
Chapter 3. Introduction to ActionScript Classes
Flash is a powerful tool for Timeline animation. Over the last several product releases, Flash has also become a powerful application development tool. ActionScript is the scripting language that has allowed Flash users to add interactivity to their Flash movies. With the introduction of ActionScript 3.0, a world of possibilities has opened up for Flash users, but as the ActionScript language has matured, the barrier to entry has jumped significantly for users who are new to coding.
This chapter is not a comprehensive guide to using ActionScript. We assume that you have some basic familiarity with ActionScript. If you’re entirely new to ActionScript, you may also want to read Adobe Flash Professional CS5 Classroom in a Book (Peachpit, 2010) or ActionScript 3.0 for Adobe Flash Professional CS5 Classroom in a Book (Peachpit, 2010). You’ll only delve into the world of programming as far as is useful for an animator. Learning about complex data structures and number crunching is not generally useful to an animator, but knowing just enough ActionScript to create a fantastic visual effect or to move your character around the Stage is fair game for an animator’s toolbox. Because an animator isn’t likely to open the Code Editor and just start typing, this chapter will focus on augmenting Timeline elements with ActionScript.
The goals for this chapter include:
• Demystify ActionScript classes
• Take advantage of tools and techniques normally reserved for programmers
• Write code that can be reused in multiple projects
• Balance best programming practices with what’s useful for an animator
• Create powerful visual effects by combining ActionScript with Timeline animation
Before diving into any ActionScript code, let’s first examine when you might want to use ActionScript.
Reasons to Use ActionScript
Flash is a tool. Much like a hammer, Flash can be used in different ways and for various purposes. If your job is to drive nails, the blunt end of the hammer may be all you require. On the other hand, if you find it necessary to remove a nail from time to time, you may want to learn how to use the other end of the hammer.
The distinction between the two ends of Flash (ActionScript and Timeline animation) is less clearly defined than the two ends of a hammer. Visual elements and code elements can live happily together inside Flash, and from the point of view of the person interacting with your Flash movie, it may not be clear which is which.
Deciding when you need ActionScript for your animation can be tricky and should be considered early in the planning stage of your project (see the next section). Here are a few reasons to use ActionScript instead of Timeline animation alone:
• The intended effect cannot be accomplished with Timeline animation.
• It takes less time to accomplish the effect with ActionScript.
• The ActionScript effect is easier to reuse.
• The ActionScript effect has already been developed.
• The ActionScript effect is more flexible in the event that there are changes.
• User interactivity is required.
ActionScript might seem complex at first. But after you endure the initial complexity at the core of ActionScript concepts, you will have extraordinary power at your fingertips. The more you learn, the more you can put to use. This chapter introduces you to one of the fundamental building blocks of ActionScript 3.0, classes. Before getting into the specifics of ActionScript classes, let’s go over factors to consider prior to starting your project.
The Importance of Planning
The mere formulation of a problem is far more often essential than its solution, which may be merely a matter of mathematical or experimental skill.
—Albert Einstein
By failing to prepare, you are preparing to fail.
—Benjamin Franklin
Good planning is an important part of a successful ActionScript project. Further, good planning is important for any successful Flash project. One measure of success is the quality of the final product. But success can also be measured by the ease of the process that led to the final product. Was the project a last-minute scramble? Could the stress of the project have been lessened? Changes happen in all projects, so it is the savvy Flash user who builds flexibility into a project.
You can’t plan for every possible scenario. So, part of the planning process is to determine which aspects of the project are likely to change. If you’re planning a character’s walk cycle, one predictable change will be the character’s position in space. Therefore, it makes sense to have all the appendages and moving parts of the character nested into one symbol so the entire character can be moved to simulate walking. If you animated your character’s moving parts on the main Timeline and then realized that you needed to move everything into a symbol, it could be a bit of a headache trying to copy everything and move it into a new symbol.
Here are some factors to consider before even opening Flash:
• What does the movie need to achieve? Will it require user interaction?
• What are the likely output formats? Web? Broadcast? Mobile? How will these affect the color palette?
• Is file size an issue?
• For larger projects, can the project be broken into smaller, more manageable pieces?
• Is this project likely to require future updates? What’s feasible to build now versus over the lifetime of the project?
• What can be reused from this project for future projects?
• What can be reused from past projects for this project?
If you spend the proper time and energy during the planning stage of a project, the beginning of your project will be the slowest part. Ideally, after this initially slow start to your project, your work will get progressively smoother as you approach the end of the project, because you have thought through likely changes and problem areas, and planned accordingly.
The planning process also helps to reveal any areas of the project that require more attention. These are areas where you may not be sure if such a task is even possible in Flash or if it is possible to implement without someone else’s assistance. Once you have identified these areas, you can build specific tests.
Consider this situation: Suppose a client has asked you to design a simple Flash application that includes an accurate stopwatch. You’ve never built a stopwatch before, but it’s a relatively small part of the application and you feel quite comfortable with everything else that the client has requested of you. Rather than building everything else first and waiting until the night before the project is due (when you may find out you need to contact a more experienced Flash developer for help), try building a prototype of the stopwatch before you start any other part of the project. If you find that you need help, you’ll have plenty of time to locate a resource. If you find that the stopwatch is no problem for you to build, you can proceed with confidence knowing that the hardest part of your project is done. Also, since you built the stopwatch independently from the rest of your project, it will likely be easier to apply to future projects, because it doesn’t rely on anything specific about the current project to function.
The more independent the working parts of your Flash project are, the more they are considered to be modular. Modularity allows the parts of your movie to be easily reused and recombined to serve different purposes. Modular design is the first step toward reusability. When deciding which pieces of your project should be modular, you will have to weigh the costs and benefits. Modular parts generally take a little longer to develop. However, when you need to make a change to a part of your project that you’ve built to be flexible, the change will be so painless that the extra initial development time will have been well worth it.
A solid building requires a solid foundation. The planning process described in this section is about designing the foundation for your Flash project, even when what will go on top of that foundation is somewhat uncertain. Consider this scenario: You’re laying the foundation for a house, and you don’t know if the room on the east side will be a study or a garage, but you have a deadline nonetheless. To move forward with your task, you wire the room so that it could become a study or a garage. In your Flash project, it will be up to you to decide which components need to be flexible. Think about how these choices will affect the project’s foundation and what can potentially be built on top of that foundation.
Now, on to the nuts and bolts! Let’s starting talking about ActionScript.
ActionScript Basics
The basic unit of ActionScript is an object. The process of creating a new object is called instantiation because it involves creating a new instance of an object. Flash objects can be visible entities like symbol instances on the Stage, or they can be abstract containers for data. Instantiating a new object in ActionScript is not unlike dragging a new instance of a symbol from the Library to the Flash Stage (Figure 3.1).
Figure 3.1 Dragging a symbol from the Library to the Stage will create a new instance of the symbol.
Classes, like symbols, provide reusable material for objects that can be made into as many instances as you need.
What Is a Class?
Every object instance in Flash has an associated class. A class is a description of methods and properties that serves as a blueprint for how instances should behave. All ActionScript instances are tied to their class the way all symbol instances on the Flash Stage are tied to their Library item. When a change is applied to a class, it affects all instances of that class.
The purpose of a class is determined by its methods and properties. The methods found in a class describe what the class does. Methods are generally associated with actions, such as go, find, hide, jump, and so on. The properties of a class describe characteristics that the class possesses. Properties are generally associated with attributes or features, such as visible, height, position, color, and so on. Some properties can have new values assigned to them, and some properties cannot be changed. Properties that cannot be changed are referred to as read-only.
The Object class is actually the most basic class in ActionScript. All classes inherit their basic methods and properties from the generic Object class. Inheritance is the mechanism that allows for the reuse of behaviors and traits (methods and properties) without writing new code.
You may remember a chart from Biology class that showed single-celled organisms (like protozoa) from billions of years ago at one end and complex multicellular organisms (like humans) of our contemporary age at the other. The progression from simple to complex occurred because nature tended to (and needed to) solve basic problems of survival and reproduction before tackling something as complex as the human eye. At the same time, complex organisms still benefit from the early mechanisms developed in protozoa. The Object class is much like the protozoa—simple, basic, and tackles the most essential problems only.

You can locate the inheritance chain for a class in the Flash Help documentation. Choose Flash > Help > Flash Help. In the Adobe Help application, select ActionScript 3.0 and Components under the Adobe Reference heading. On the next page, select ActionScript 3.0 Reference for the Adobe Flash Platform. Select a class from the bottom-left side of the window. The top of each class page lists a class’s package and inheritance.
On the other end of the complexity spectrum, the MovieClip class is responsible for much of what is seen in Flash. The MovieClip class is much more complex than the Object class because it is the result of a much longer chain of inheritance—MovieClip > Sprite > DisplayObjectContainer > InteractiveObject > DisplayObject > EventDispatcher > Object.
Observe the trend from general to specific within the MovieClip’s inheritance chain. Inheriting directly from the Object class, an EventDispatcher is an object that is capable of sending and receiving events (we’ll cover events later in the chapter), but it doesn’t do much more than that. Sending and receiving information is important to a number of other classes, so the EventDispatcher class is rightfully low in the inheritance chain. At any point in the chain, new limbs can branch out in different directions, leading to a Microphone class or a URLLoader class, but in the case of the MovieClip chain, it branches toward a limb for displaying objects onscreen.
The MovieClip class is built into the core functionality of Flash, but you can also write classes of your own that have brand-new functionality. New classes that you write are stored externally as ActionScript (.as) files. Your classes can inherit from built-in classes like MovieClip, they can inherit from other classes that you’ve written, or they can be written entirely from scratch (and by default, they will then inherit from the Object class). The process of inheriting from another class is also referred to as extending a class, because you are extending the functionality of an existing class. The extending class is considered a subclass of the class that it extends.
Understanding the trend from general functionality to very specific functionality is the basis for designing useful ActionScript classes. Writing a reusable class begins with considering how the desired functionality can be made more general or abstract. Later in the chapter you’ll learn how to write a class that controls an animated character’s walk cycle. To make your character walk, you could start by writing very specific code for the task, or you could take a moment and consider how this behavior could be made more abstract. You can start by asking the following questions: What’s more primitive than walking? How about just moving? Moving also applies to fish, birds, and snakes as well as to walking characters. By writing a Mover class first, you’ll be able to use your code for any type of moving object, be it a Pac-Man-style character, a side-scrolling Super Mario-style character for an adventure game, or a paddle for a simple Pong-style game. Once written, your Mover class never has to be rewritten. When you need new functionality, you can simply extend the Mover class.
Reusability is only one of many organizational benefits to writing code in classes with clearly defined behaviors. Consider this situation: You’ve been given a project that was designed by someone else. You’ve been tasked with updating some of the graphics and functionality. Which of the following would you rather see when you open the files: A) One 600-line ActionScript file with a list of directions for vaguely named instances on the stage, or B) four short ActionScript files named Paddle, Ball, Background, and Controller? In B, you have a pretty good idea of what the project entails just by looking at the names of the files. Every object has its own behaviors, and since the objects are clearly named, it’s easy to intuit what those behaviors might entail. This kind of organization also pays off when you need to work on your own files that you haven’t opened in a long while.
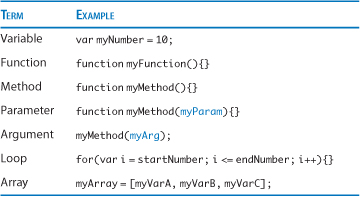
In addition to understanding how classes work, there are also some basic programming terms that you need to know to write ActionScript code. We’ll define new terms as they appear in the examples, but you can refer to Table 3.1 and Table 3.2 as guides for the basic definitions and syntax of common programming terms.
Table 3.1 Definitions for basic programming terms
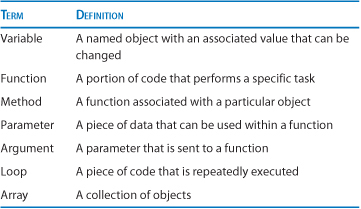
Table 3.2 Syntax examples for basic programming terms
The best way to learn the terms in the preceding tables is to start using them. Before you put them into action, let’s go over some words and symbols that ActionScript has reserved for special use.
Keywords and Statements
One difficulty that arises for nearly everyone when they begin coding is discerning which words in a piece of code have special meanings and which words are simply created by the person writing the code. The words that have special meaning fall into a couple of categories; the largest two categories are keywords and statements. The words contained in these categories are reserved by Flash for specific purposes.
Keywords are used either to define entities like variables, functions, and classes, or to alter the meaning of certain definitions. Keywords include class, extends, function, var, get, set, and so forth.
Statements are language elements that perform or specify an action at runtime (when your movie is playing). For example, the if statement evaluates a condition to determine the next action that should be taken. Statements include if, break, case, while, for, return, and so forth.
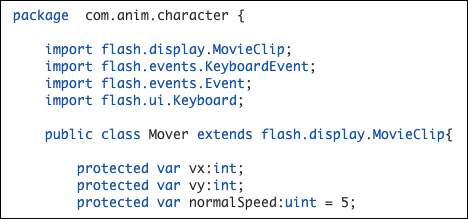
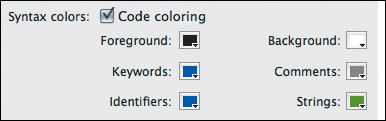
You will naturally integrate keywords and statements into your vocabulary over time. As you go through the examples in this chapter, notice which words are used most often and how (or if) the Flash Code Editor highlights them. Generally, words that are reserved by ActionScript appear in dark blue by default in the Code Editor (Figure 3.2).
Figure 3.2 The Flash Code Editor indicates reserved words using different colors.

Changing Code Coloring
You can change the colors used in the Code Editor. To customize ActionScript highlight colors, choose Edit > Preferences (or Flash > Preferences on a Mac) and select the ActionScript category at the left. In addition to changing the highlight color for keywords, identifiers, strings, and comments, you can change the foreground and background colors of the Code Editor (Figure 3.3). If you find black text on a white screen hard on your eyes, you can try a light gray foreground on dark gray background.
Figure 3.3 ActionScript Code Editor coloring in the ActionScript settings inside the Flash preferences.
For a complete list of keywords and statements see http://help.adobe.com/en_US/FlashPlatform/reference/actionscript/3/statements.html.
Operators
Operators, just like keywords and statements, are a built-in part of ActionScript. Operators are characters that have symbolic value. Operators allow you to combine, compare, or modify values inside ActionScript. Many of the operators function the same way you would expect them to on a calculator. Common operators include addition (+), subtraction (-), division (/), multiplication (*), increment (++), equality (==), less than (<), and so on.
Also, logical operators help you evaluate the truth value of statements. Common logical operators include and (&&), or (||), and not (!). It’s not important to memorize all the operators before continuing with the chapter, just be aware of their usage in the examples that follow.
There are also operators that help you organize your code. Four such operators that you will find in every example within this chapter are curly braces ({}), square brackets ([]), parentheses (()), and the semicolon (;). Let’s examine each of these in detail.
Curly braces
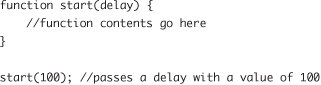
Curly braces are used to designate the start and the end of a code block. A code block can be defined as any discrete piece of code, be it a function, a package, a class, or a loop. A keyword or a statement always precedes curly braces and determines the nature of the code block. In the following example, the keyword function is used to define a function that is enclosed by curly braces.
![]()

You can add comments to clarify aspects of your code. A single line can be converted to a comment by adding two slashes (//) to the beginning of the line. You can also write multiline comments by preceding them with a slash-asterisk (/*) and closing them with an asterisk-slash (*/). Code within a comment will not be executed when your Flash movie is run.
Square brackets
Square brackets are most often used to assign or access values within arrays. In the following example, the first line assigns values to a new array using brackets, and the second line uses brackets as array access notation to retrieve a value from the new array:
![]()
The first item in an array is always at position 0. Therefore, the last item in the array will always be at a position one less than the length of the array.
Parentheses
Parentheses serve a couple of different purposes in ActionScript. They are essential to both the definition and execution of functions (aka methods). The parentheses enclose the parameters within a function definition, and they enclose the arguments that are sent when the function is executed. For example, the first set of parentheses in the following code serves as part of the function definition, and the set of parentheses after the closing curly brace serves to execute, or call, the function and pass on any necessary arguments:
Parentheses are required to both define and call a function, even when the function has no parameters:
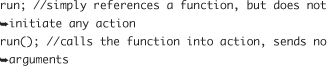
Parentheses are also used with conditional statements to enclose any conditions:
![]()
Additionally, parentheses can be used in the way that you are probably most familiar with, as a means of grouping to determine the order of operations:
var newWidth = (storedWidth + 10) / 2;
The parentheses in the preceding example ensure that the addition will be executed before the division, even though division would otherwise take place before addition.
Semicolon
The semicolon is a simple but important piece of syntax. The semicolon tells the compiler, the mechanism that converts your human-readable ActionScript into byte code that the Flash Player can read, where to end a line. The semicolon in ActionScript operates much the way a period does in written English. The Flash compiler is pretty forgiving if you forget to add a semicolon; it will assume any line break is the end of a statement and will add a semicolon while compiling.
As a matter of best practice, all your discrete statements (lines of code) should end with a semicolon:
var myNumber = 10;
var myString = "hello"; myString = "goodbye";
The second line in the preceding example would be treated as two lines by the compiler because of the semicolon.
For a full list of ActionScript operators, see http://help.adobe.com/en_US/FlashPlatform/reference/actionscript/3/operators.html.
Enough talk about syntax. Let’s write an ActionScript class already!
The Document Class
There are two basic ways to add ActionScript to your Flash file: directly on a frame or attached as a class. As noted earlier in the chapter, organizing your ActionScript into classes makes the purpose of your code clearer. Additionally, classes are easier to locate than actions attached to frames, because each class is stored in its own ActionScript file. Once you have your class in its own ActionScript file, there are three ways to instantiate a class in Flash:
• Attached as a document class
• Attached to a Library symbol
• Using the new keyword within ActionScript
In this section, you’ll attach your code as a document class. When your Flash movie is loaded, a single instance of your document class will be generated. Your entire Flash movie will then be an instance of your document class.
Creating a Document Class
Before writing any code, you need a Flash document to which you can attach your code.
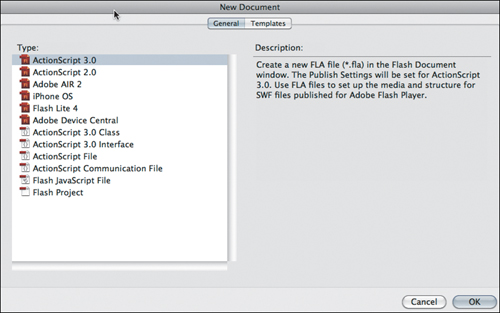
1. Create a new ActionScript 3.0 document by choosing File > New and selecting ActionScript 3.0 (Figure 3.4).
Figure 3.4 The New Document dialog box allows you to choose what type of document to create.
Finished versions of all the classes and examples in this chapter are available in the Chapter 3 folder on the CD included with this book.
2. For your document to locate your class, you’ll want to make sure that both your Flash file and your ActionScript file are saved. Choose File > Save As to save your document, create and navigate to a new folder called examples, name the document DocumentExample.fla, and click OK.
3. Now you’ll create the class file. Choose File > New and select ActionScript 3.0 Class. This generates a prompt asking you to name your class. Name the class DocumentExample (Figure 3.5). Click OK.
Figure 3.5 The prompt to name your new class. Once you provide a name, Flash sets up the basic structure of the class for you.

This opens the ActionScript in the Flash Code Editor.
As a matter of convention, class names should begin with a capital letter.
4. Choose File > Save As and save the file as DocumentExample.as in the examples directory that you created in step 2.
Be sure to save your class before you start adding any code. Many of the bells and whistles added to the Code Editor in CS5 depend on your file being saved first.
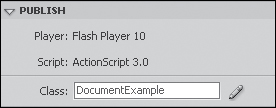
5. Return to DocumentExample.fla, and attach the class to the document by typing the class name DocumentExample into the Class field in the Properties panel (Figure 3.6).
Figure 3.6 The Class field in the Properties panel allows you to assign a document class.
Basic Class Structure
After you’ve provided a name for your class, Flash sets up the necessary structure of the class file for you (Figure 3.7). This structure includes the package block (starting with the keyword package), the class block (starting with public class), and the constructor method (starting with public function and a function name that matches your class name).
Figure 3.7 The basic class structure created automatically by Flash.
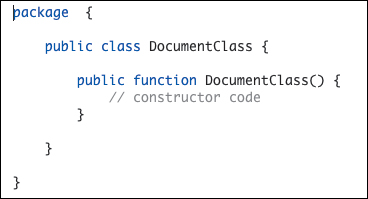
Every class must be in a package. The package gives the class context (you’ll do more with packages later in this chapter). The class block defines the start and end of the class code. The constructor method is called when an instance of the class is created. Any code within the constructor will run when the method is called. The name of the constructor method must match the class name exactly.
6. Make sure that Control > Test Movie > in Flash Professional (rather than in Device Central) is chosen and press Command+Return/Ctrl+Enter to test the movie. You’ll receive the following error in the Compiler Errors panel:
![]()
This error occurs because the Flash document relies on the methods and properties found in the MovieClip class. Although you can write all kinds of new methods and properties for your document class, you need to start by extending the MovieClip class using the extends keyword.
7. Add the following highlighted code to the class statement:
![]()
As you type, the Code Editor will display a list of packages or classes available. You can navigate the list of choices with your keyboard or mouse. Press the Return/Enter key when the correct item is selected in the list to save yourself some typing. The Code Editor will automatically add an import statement above the line you just added (you’ll learn about import statements in a moment).
8. Save your class and test your movie again (press Command+Return/Ctrl+Enter). You can test your movie from the Code Editor if you like. You should now have 0 errors listed in your Compiler panel. Although you don’t have any errors, you also don’t yet have much confirmation that your class has been instantiated (your movie is empty).
Be sure to save frequently. Always save your document and/or ActionScript files before testing your movie.
9. Replace the comment inside the constructor method block (// constructor code) with this trace statement:
trace("hello");
10. Save your class and test your movie again. You should now see the word “hello” in the Output panel (Figure 3.8), proving that your class has successfully been instantiated.
Figure 3.8 The Output panel shows any messages passed using the trace method.
![]()
The methods and properties for document classes vary depending on the nature of each specific project. In general, the document class is not one that will be reused from project to project. You’ll find that a document class is not necessary for every animation project.
To determine whether you require a document class, think about what information each object requires in your project. Place all your objects on a need-to-know basis (as if they were government spies under your supervision). If the objects within your project can act independently without your document acting as supervisor, by all means omit the document class. Conversely, if you find that there is information that must be present at the document level, use a document class (for example, the web project in Chapter 5 utilizes a document class). Sometimes a document class will be the simplest way to implement the desired functionality. Most of the examples later in this chapter focus on a different kind of class, but keep the document class in mind when planning your Flash projects.
To reference any other classes within your ActionScript file, as you did when DocumentExample extended the MovieClip class, you need a way to point to other classes. Enter classpaths.
Classpaths
A classpath is a filepath separated by dots (.) that tells the compiler where to locate the corresponding ActionScript class file. The path serves as both a file location and an organizational system. For instance, in flash.display.MovieClip, the MovieClip.as class file is located in a folder named display, which is located within a folder named flash.
Folders (and folder paths) within classpaths are referred to as packages. The package root, flash, is pretty generic, as you might expect the outermost folder to be, but the subfolder, display, tells you a bit about how the MovieClip class behaves. The MovieClip class is a display class, meaning that MovieClip instances are meant to be shown onscreen. In contrast, even though a class such as flash.geom.Rectangle appears to refer to something visual, the class instead refers to the geometric concept of a rectangle (four points, four sides), so the Rectangle class is in the geom package.
Classpaths also allow you to differentiate between two classes with the same name. Within one ActionScript file you could refer to two classes named MathUtil by referencing each one using its entire (and unique) classpath. For example:
![]()
Classpaths are often used to denote the author of the classes (most frequently, in the form of an inverted web address). For example, the web address http://ajarproductions.com becomes the com.ajarproductions package. Using a web address keeps your classpath unique. Within the com directory of your Flash project, you may have several subfolders, all referring to packages created by developers with .com websites. Named packages are generally used with classes that are designed for reuse. For project-specific classes, like the DocumentExample class, there is no need to create a named package. Project-specific classes can simply reside in the project folder with your Flash document.
To create your own classpath, you can invert your web address as described. If you do not have a web address, you can make up a unique package name of your choosing. Many developers use the com convention followed by their full name, for example, com.johnsmith. Within the base package, subfolders can be created to reflect the different purposes of classes housed inside, for example, core, ui, display, fx, animation, and so on.
Package paths should be all lowercase. Only the class name should contain capital letters. When you place your class into a package, the package statement at the top of your ActionScript class file must match the file’s folder structure. For example, the package statement and class statement within the class file at com/johnsmith/fx/WarpEffect.as must read:
![]()
The Flash CS5 Code Editor now supports code hinting for custom classes. When you reference one of your classes and start typing a method within that class, Flash shows auto-completion options for your classes, just as it does with Flash’s built-in classes. The Code Editor is even smart enough to help complete your package name if you’ve already saved your class in the proper folder.
If your package statement does not match the class’s folder structure, the Compiler panel produces an error (if not several).
For the examples later in this chapter, you will use a base package named com.anim.
ActionScript Settings
By default, Flash looks for any custom classes at compile time in your document directory. If you want Flash to search for classes in other locations, you’ll need to tell Flash where to look. To add a directory, choose File > ActionScript Settings (Figure 3.9).
Figure 3.9 The ActionScript Settings dialog box allows you to direct Flash to other locations that contain class packages.
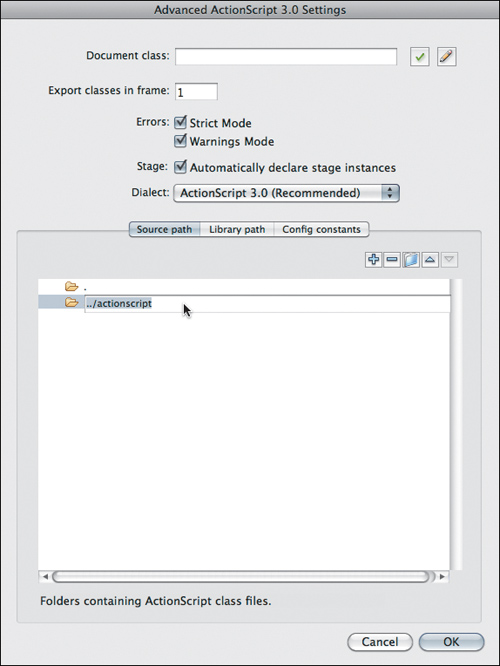
You can use absolute paths (paths that refer to an exact location on your machine) or relative paths (paths based on the location of your document). If you want to point your file to a standard class archive that you keep on your machine, use an absolute path by clicking the browse to path button (the folder icon) to browse to a folder on your machine.
More commonly, you may just want to organize all your ActionScript files for a single project into one folder. In that case, use a relative path. For relative paths, a dot (.) refers to the document folder, and two dots (..) refer to one level above the document folder. So to point to a folder named actionscript that is one folder up from your document, you’d click the button with the plus (+) sign, type ../actionscript into the new path, and click OK to save the settings.
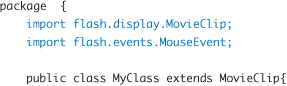
Importing Classes
When you insert ActionScript on a frame along the Timeline, Flash assumes you will be using some common classes like MovieClip and MouseEvent. When coding a class file, you must explicitly state all the classes you plan to reference using import statements. Inside the new Flash CS5 Code Editor, in most cases, when you reference a class that you’ve not yet imported, Flash automatically adds the necessary code for you. In the case of the MovieClip class, the import statement containing the classpath appears as follows:
import flash.display.MovieClip;
The import statement is necessary if you want to reference your class by name only (e.g., MovieClip). If you don’t use an import statement, you must reference your class using the entire classpath (e.g., flash.display.MovieClip). It’s always preferable to import your classes rather than referencing the entire classpath. Import statements go at the top of the ActionScript file, just within the package block and outside the class block:
By placing all the import statements at the top of a class, you further organize your class and keep the purpose of the class clear at a glance. Bear this in mind as your classes become more complex.
Interacting with Objects on the Stage
Thus far, you’ve successfully attached a document class and confirmed that the class has been instantiated. Now you’ll take it one step further and update the class to manipulate an object on Stage.
1. Return to DocumentExample.fla. Draw a square on Stage by selecting the Rectangle tool and holding down the Shift key to constrain the proportions while you draw. Make your square large enough to click on but significantly smaller than the Stage (Figure 3.10).
Figure 3.10 Make your symbol big enough to click, but leave plenty of room for it to expand.

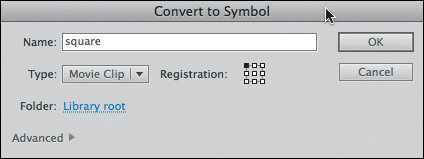
2. Select the square (Command+A/Ctrl+A to select all) and press F8 to convert the square to a symbol. When the Convert to Symbol dialog box appears, name the symbol square, make sure that MovieClip is selected in the Type menu, and click OK (Figure 3.11).
Figure 3.11 The Convert to Symbol dialog box allows you to make your artwork available to ActionScript.
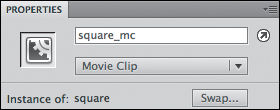
3. With the symbol still selected, name the instance square_mc using the Properties panel (Figure 3.12).
Figure 3.12 The Properties panel allows you to add a name to your symbol instance to access it with ActionScript.
4. Return to the ActionScript file and replace the trace statement with the following line:
square_mc.width *= 2;
It is considered best practice to use clearly named functions to ensure that your code is easy to read. Ideally, each function will serve a single purpose. For example, a function named doubleWidth should double an object’s width and do little else.
5. Save your document (Command+S/Ctrl+S) and then test your movie (Command+Return/Ctrl+Enter).
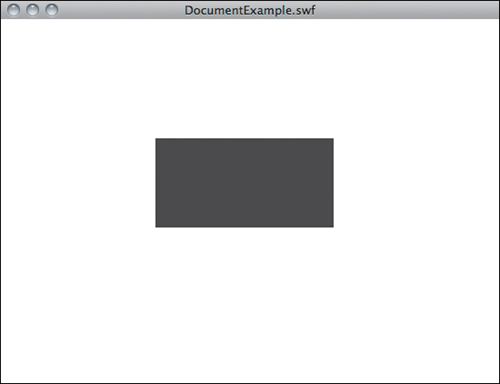
Note that step 4 uses the multiplication assignment operator (*=). This operator is shorthand for square_mc.width = square_mc.width * 2. The result is a doubling of the square’s width every time it’s clicked with the mouse (Figure 3.13).
Figure 3.13 When the movie is tested, the instance should appear twice as wide as the (square) instance on Stage.
Case Sensitivity
ActionScript is case sensitive. If you create a variable named myVar and attempt to reference it using myvar, ActionScript will fail to find the variable.
It is considered best practice in ActionScript to use camel case, meaning that the first letter of your variable or function name is lowercase and any subsequent words within the name start with capital letters rather than spaces, for example, camelCase.
For more examples using a document class, see Chapter 5. For the rest of this chapter you’ll be writing a different type of class.
Object-oriented Programming
Writing code in classes is generally referred to as object-oriented programming (OOP), because the objects that inhabit the code govern its behavior. Prior to OOP, most programming was procedural in nature, meaning it followed a sequence (e.g., execute step A, then execute step B, then step C, etc.). One benefit of writing object-oriented code is that it allows several different processes to run simultaneously because all the objects operate independently of each other. Each object is in charge of its own behavior.
Object-oriented Design Patterns
Advanced programmers also use design patterns as part of their OOP projects. Design patterns are solutions to commonly occurring problems. These patterns have names like Builder, Factory, and Singleton. As an animator, you’re not likely to be developing projects that require the use of design patterns, so they won’t be covered in depth in this book, but it’s good to be aware that they exist.
Objects in your object-oriented Flash project have the potential to move around like ants in ant farms. You can pluck an ant from one farm and drop it into another and the ant will still function. The ant doesn’t need directions from a leader or a central command to operate. The ant just does what it’s supposed to do. The logic that powers the ant is considered decentralized.
As the designer of the ant farm, this takes a huge burden off your shoulders. It’s not necessary to conceive of a farmer smart enough to direct all the workings of the ant farm. You can simply design a reasonably “dumb” ant that knows how to complete a few tasks and possibly how to interact with other ants, and then instantiate as many copies of the ant as you need.
The remaining examples in this chapter will all be decentralized in the manner just described. Instead of attaching your classes to a document, you will attach new classes to Library items. Once the class has been written, you will never have to look at it again (if you don’t want to). Your symbols won’t require any directions from your document; they will simply go about their business. After you’ve attached a class to a Library item, you can instantiate the class by dragging your Library item onto the Stage. Although you will be treading into the domain of a programmer, you will maintain the graphical workflow of an animator—the best of both worlds!
Attaching Classes to Library Items
You’ll start by reconceiving the functionality from the DocumentExample files as a class that could be attached to a Library item.
1. Open DocumentExample.fla and choose File > Save As. Then save the document as LibraryClassExample.fla in the examples folder created previously.
2. Under the Publish options in the Properties panel, highlight and delete the previously added document class, DocumentExample.
3. Create a new class (choose File > New and select ActionScript 3.0 Class). When prompted, name the class ClickSquare.
4. Save the ActionScript file as ClickSquare.as in the examples folder.
5. This class should also extend the MovieClip class since you’ll be attaching it to a MovieClip in the Library. Add the following highlighted code:
![]()
6. Replace the comment inside the constructor method (// constructor code) with the following code:
this.addEventListener(MouseEvent.CLICK, onClick);
7. Add the following code after the closing curly brace of the constructor method:
![]()
8. Be sure to add the following import statement below the existing import statement (import flash.display.MovieClip;) if the Code Editor doesn’t automatically add it:
import flash.events.MouseEvent;
9. Save your class (Command+S/Ctrl+S).
Your ClickSquare.as file should now read:
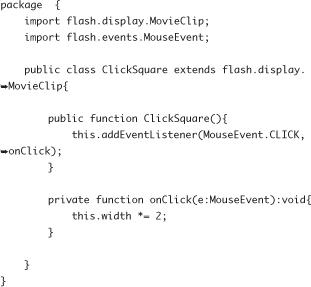
Don’t worry if you have extra empty lines between your curly braces. ActionScript is not picky about empty space.
Let’s review the code so far. Your ClickSquare class resides in an unnamed package (because it’s in the same folder as the document that will instantiate it). ClickSquare imports two native (built into Flash) classes: MovieClip and MouseEvent. ClickSquare extends the functionality of the MovieClip class. When the ClickSquare class is instantiated, the constructor adds an event listener that listens for a mouse click. When a mouse click occurs, the listener executes the onClick method of the ClickSquare class and passes a MouseEvent object to the method. When the onClick method is executed, the ClickSquare instance will be referenced using the keyword this, and the current width (an inherited property) of the ClickSquare will be doubled.
Use the Tab key to indent lines of code.
The MouseEvent object contains information about the click, including the x and y positions of the click location.
After the parentheses containing the parameter in the onClick method definition, there is a colon followed by the keyword void. Colons in ActionScript are most often used for typing, also known as strong typing, strict typing, or strict data typing. Strict typing informs the ActionScript compiler as to which type of object you expect to be used. In the case of the onClick function, the strict typing void (all lowercase in ActionScript 3.0) informs the compiler that the onClick method will not be returning a value. If the onClick method attempts to return a value using the return keyword, the compiler generates an error.
Reasons to Use Strict Typing
Here are three very good reasons to use strict typing in your code:
• Clarifies the intention of your code
• Helps the compiler catch potential errors
• Enables additional code hinting in the Flash Code Editor (Figure 3.14)
Figure 3.14 The Code Editor shows the methods and properties available for a variable that has been strictly typed.

Now you’ll associate your ClickSquare class with the square Library item.
1. Ctrl-click/right-click on the square symbol in the Library panel and select Properties to bring up the Symbol Properties dialog box.
2. Click Advanced (if necessary) to show the Linkage properties.
3. Select the Export for ActionScript check box. This allows you to add a class name.
4. Type the class name ClickSquare into the Class field. You can click the button with the check mark icon to the right of the field to verify that Flash can locate your class file (Figure 3.15).
Figure 3.15 The Linkage properties within the Symbol Properties dialog box allow you to add a class to a Library item.
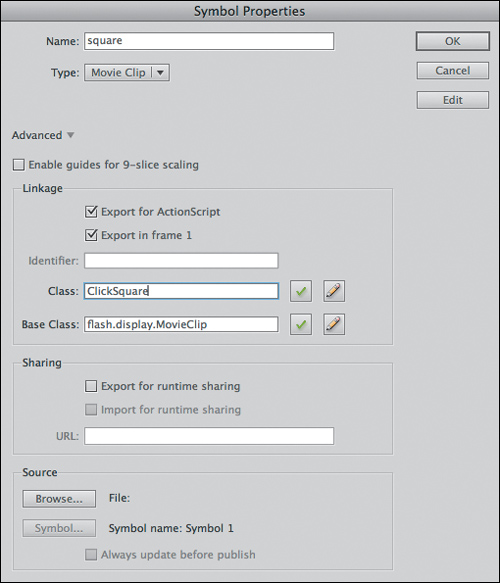
You can also type your custom class name into the Base Class field within the Symbol Properties dialog box. This will leave the Class field open if you want to provide a unique class name for the symbol. You can then instantiate your Library item from ActionScript using the unique name from the Class field. Your instantiated symbol will still inherit the methods and properties of the custom class that you typed into the Base Class field.
5. Save your document (Command+S/Ctrl+S) and test your movie (Command+Return/Ctrl+Enter).
If the text in the Class field of the Symbol Properties dialog box does not reflect an existing (and available) class, Flash will create an empty class for you when compiling, and you will be alerted when you click OK in the Symbol Properties dialog box if this is the case.
6. Click your square in the test window to ensure that the width doubles each time you click.
7. Close the test window and return to your document. Drag two more copies of the square symbol onto the Stage and test your movie again (Figure 3.16).
Figure 3.16 Each square already has ClickSquare functionality, which eliminates the need to write new code.
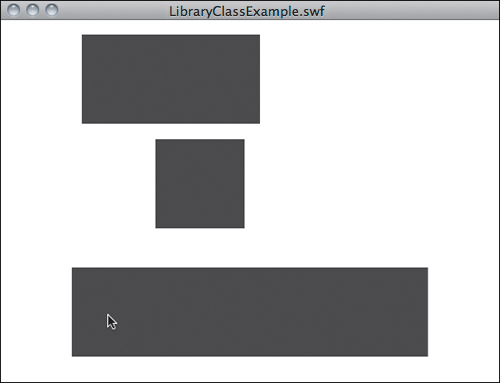
When you click on any one of the squares, that particular square should double its width. All the square instances employ the functionality from the ClickSquare class. It’s that easy to reuse the class!
Events
The examples thus far have employed a click MouseEvent as a means of interaction. Since your object-oriented code allows objects to operate independently, sending and receiving events is a great way to allow your objects to communicate with the world around them. ActionScript 3.0 is loaded with built-in events. Using the techniques covered in this chapter, you can also create your own event classes.
All event classes should extend the Event class located in the flash.events package.
An object that is notified when a particular event occurs is said to listen for that event. Conversely, an object that sends an event is said to broadcast that event, because the object is not sending the message anywhere in particular. Events are communicated in a manner similar to the broadcast of an FM radio station. The radio station is not sending its programs to anyone in particular. Instead, the station’s signal is broadcast into the air for anyone to receive. If you have a stereo that can tune into the station’s broadcast frequency, you can receive its programs. Additionally, the fact that you are tuned into that frequency does not prevent anyone else from listening to that station. The same is true for ActionScript 3.0 events. An object can broadcast an event for any interested party to receive. For these reasons, using events to communicate helps to keep your code modular.
The moment of triggering an event for broadcast is known as dispatching an event. When an event is dispatched, the event also carries information about the occurrence of the event. The information carried by the event varies depending on the type of event that was dispatched. For instance, a KeyboardEvent carries information about the key that was pressed.
You’ll put events to good use in the examples that follow.
Creating Reusable Classes For Animation
So far, you’ve written a class that takes advantage of the extends keyword to reuse the methods and properties found in the MovieClip class and applied that class to a Library symbol. There are also several other ways that classes can be reused. When extending a class, the class being extended is referred to as the base class or superclass. Any class that extends another class is referred to as a subclass of its superclass. After extending a class, you can rewrite certain methods from the superclass to fit the needs of the subclass. The ability to use a single method name for a method that behaves differently in different subclasses is known as polymorphism (poly for many, morph for shape).
Let’s return to the animal kingdom to better understand polymorphism. Suppose you need to write a Cat class and a Dog class in your project. Following good object-oriented etiquette, you begin by writing a more abstract superclass called Animal. Because vocalization is a behavior common to most animals, you endow your Animal class with a speak method. Depending on your needs, you may decide to include a Mammal class to extend your Animal class, or you may write your Cat and Dog classes as direct subclasses to the Animal class. At this point, the behavior in your classes begins to diverge. In the Dog class, you redefine the speak method to act as a bark. In the Cat class, the speak method elicits a meow. Any object that can interact with the Dog class can use the same methods to interact with the Cat class, although when asked to speak, the Cat will meow instead of bark.
In addition to altering methods to suit the needs of your subclasses, you can override methods from a superclass entirely. Even though altering the functionality inherited from your superclass can seem like rewriting, this is generally still preferable to rewriting a base class that has been tested and may have other classes depending on it. Now that you’re aware of polymorphism, you can plan your base classes accordingly. The examples that follow use polymorphism to generate various visual effects.
Class Examples: Visual Effects
Before you start on effects, let’s lay the groundwork for testing your effects. Let’s first establish a classpath for the rest of the classes you will write in this chapter and then create some artwork to show off your effects classes.
1. Create a new folder called com inside your examples folder.
2. Create a subfolder within com named anim (short for Animation with Scripting for Adobe Flash CS5 Professional Studio Techniques).
3. Create a subfolder within anim named fx. The fx folder will store your effects classes.
4. Create a new ActionScript 3.0 document named EffectsBase.fla and save it in your examples folder.
5. In the EffectsBase.fla document, create a symbol to be the target of the visual effects you create. The more complex your artwork, the more it will demonstrate the performance of the effects you are about to create.
The figures in this section use a depiction of a rocket, but you can use any piece of artwork that you’d like (Figure 3.17).
Figure 3.17 The rocket symbol made with simple shapes and gradients that will appear for the effects in this section.

6. To see the full power of your effect, create a background as well. Make sure your background is on a separate layer. The examples in this section use a night sky as a background (Figure 3.18).
Figure 3.18 The rocket against the night sky background rendered using a simple gradient and some blurred white circles.

7. Move your symbol instance to the bottom-left corner of the Stage.
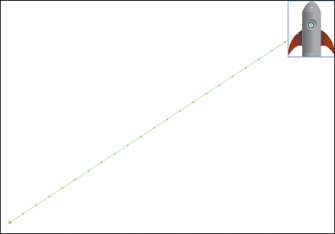
8. Ctrl-click/right-click on your symbol and choose Create Motion Tween. When your tween is created, the playhead automatically moves to the last frame. Move your symbol to the top-right corner of the Stage. You should now see the tween object depicting the path of your tweened symbol (Figure 3.19).
Figure 3.19 The tween object depicted as a path.
9. Hover over the middle of the tween path with the Selection tool. You should see a curved line appear next to your cursor. Click and drag the middle of the path toward the upper-left corner of the Stage to make a curved tween path (Figure 3.20).
Figure 3.20 Curving the tween path using the Selection tool.
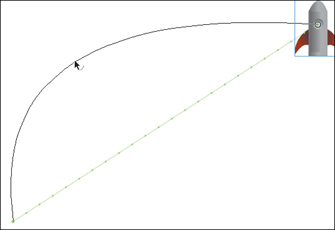
Now that your path is a curve, click on the path to select it. You can (optionally) select “Orient to path” under the Rotation heading in the Properties panel. This causes your instance to rotate as the path curves.
The symbol you create for this section can also contain nested animation. Try using the Deco tool to add a particle, smoke, or fire effect within your symbol.
10. Add a frame (F5) to the end of your background layer so it’s visible for the entire length of the tween.
11. Save your document.
Now it’s time to create your first effect.
The MotionBrush class
You’ll start your effects classes by tackling a common animation task: hand-written text. Crafting the illusion of text being hand-written in real time onscreen can be time-consuming. You’ll create an easier-to-apply, reusable class that accomplishes a write-on effect. Not only that, but any graphic content can be employed as the “brush,” and the application of the class will not be limited to write-on effects. Your MotionBrush class will also serve as a base class for effects that you will create later in this section.
To render your MotionBrush class, you’ll need to employ the powerful Bitmap class. Nearly all visual effects in Flash exploit the Bitmap class. For instance, when you add a blur filter to a symbol instance on Stage using the Properties panel, Flash renders the instance as a bitmap to generate the blur effect. Most artwork generated using the Flash drawing tools is composed of vectors. Vectors are made up of lines and curves. Bitmaps are generally less complex to render for effects because they are simply composed of pixels rather than complicated vector data. Since you’re rendering the bitmaps using artwork from the Flash file, your effect will not increase the file size.
The MotionBrush class will use a Bitmap object as a canvas and draw copies of a symbol instance onto the canvas. For programming simplicity and rendering performance, these symbol copies will simply be superficial pixel-based snapshots. Every so often, you’ll take a snapshot of the “brush” symbol at its current position and display state. For other complex effects, you may even want to use your canvas as a mask, so let’s be sure to build that into your MotionBrush class.
Start by making an inventory of what the MotionBrush class should accomplish:
• Start rendering the effect when the symbol is added to the Stage.
• Rerender the effect regularly.
• Stop rendering the effect when the symbol is removed from the Stage.
• Allow the retrieval of the bitmap used to render the effects so that it can be manipulated by code outside of the MotionBrush class.
This inventory will become the basis for the methods of the MotionBrush class. Additionally, you need to think about which parts of your class will be open to the outside world (i.e., other ActionScript classes or code). As a matter of practice, you should make no more than necessary available outside of the class. The practice of restricting the internal workings of a class is known as encapsulation. You will encapsulate parts of your class, both to protect parts of the class and to make it simpler for the outside world to interact with the class.
Since you will extend your class, and other classes will depend on this class working properly, you’ll want to make sure that your class is relatively tamper-proof. Also, your class should do its job with as little outside instruction as possible. Imagine sitting down at a restaurant to order French fries. You don’t have to tell the cook how to wash and cut the potatoes, what temperature to heat the oil to, how to store the salt, and so on because it is the cook’s job to perform these duties. In fact, the cook’s kitchen is so encapsulated that you probably will never even see the cook. You will be interacting with members of the wait staff, because that is part of their duties. If the instruction necessary for ordering French fries was too complicated, you’d be much more likely to stay home and cook for yourself. The instructions that you give to the MotionBrush class should be as simple as (or simpler than) ordering French fries.
Instead of starting by writing a heavily abstracted Effect class (as you will with the Mover class later in this chapter), you’ll create a helper class to manage the interactions with the Bitmap object. This helper class will operate in a manner similar to a cook’s kitchen: The code that interacts with MotionBrush will not have access to this helper class. The technique of utilizing a class within another class, instead of subclassing, is known as composition.
To protect access to your class, you will use access keywords. There are four keywords that determine the availability of a method or property within a class: public, private, internal, and protected. See Table 3.3 for more details on each access keyword.
Table 3.3 Access control attributes
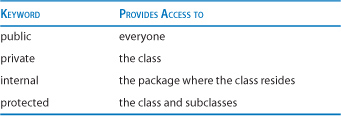
You will draw heavily on the protected keyword for your MotionBrush class. The protected keyword allows classes that extend the MotionBrush class to rewrite methods (and properties) but shields the methods from other ActionScript classes, even within your com.anim.fx package.
To reshape the MotionBrush class in subclasses, you’ll use the override keyword to rewrite functions inherited from the MotionBrush class.
1. Save a copy of EffectsBase.fla (File > Save As) as MotionBrushExample.fla into your examples folder.
2. Create a new class named MotionBrush.
3. Save the file as MotionBrush.as in the examples/com/anim/fx directory. This will place the class into the com.anim.fx package.
4. Update the first line in the script to reflect the proper package:
![]()
5. You will attach MotionBrush to the Library symbol you created earlier. Update the class declaration so that your class extends MovieClip:
![]()
6. Add the following method blocks after the MotionBrush constructor method block but before the last two closing curly braces (that close the class block and the package block, respectively):
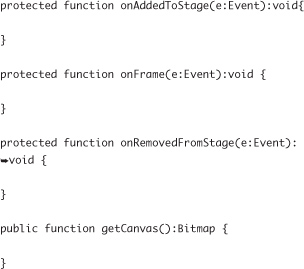
These four functions parallel the inventory items established for the MotionBrush class.
The onAddedToStage method starts your effect in motion once the symbol using the class is added to the Stage. If the symbol is added to the Stage by dragging it from the Library rather than instantiating it with ActionScript, the onAddedToStage will fire as soon as the frame with the symbol is played. Since an event listener calls your onAddedToStage method, it must accept a single parameter of type Event, which will be stored as a variable named e.
The onFrame method will be called regularly to rerender your symbol. You’ll use an ENTER_FRAME event to call the onFrame method on every frame, so onFrame must also accept a single parameter of type Event.
The onRemovedFromStage method will handle any cleanup necessary. This method will also be called from an event listener and therefore must accept a single parameter of type Event.
These first three methods utilize the protected access keyword because you’ll want to permit any classes that extend MotionBrush to rewrite these methods to allow for new behaviors. None of these three methods return any values (hence the void keyword following each method). These methods are present to launch other actions into motion. The fourth method, however, is present precisely to return an object (the bitmap canvas).
Once executed, getCanvas will return the bitmap canvas that the MotionBrush has drawn on. This functionality allows even more visual effects to be created with the MotionBrush class (and subclasses), such as using the canvas as a mask for other artwork.
7. Make sure all the import statements are listed above the class declaration:
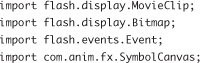
You’ll need to add com.anim.fx.SymbolCanvas by hand, but the code editor will likely have added the other import statements for you, since the classes have already been referenced in the code you’ve written.
8. Add the following property declarations above the constructor method (i.e., before the line that starts with public function MotionBrush):

The first property, symbolCanvas, stores the reference for a class that will render the bitmap. You’ll create that class in a moment. The next two properties, hideSymbol and clearCanvasOnUpdate, allow you to adjust how the symbolCanvas renders in future subclasses of MotionBrush. Both properties will be simple toggle settings so they are typed to Boolean (true or false). All three properties are assigned as protected so they can be referenced and/or rewritten by future subclasses. The reason for this will become apparent when you write the first subclass for MotionBrush.
9. Add the following initialization method (after the constructor method) to be called when the class is constructed:
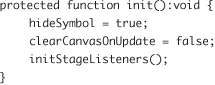
Having an initialization method instead of putting code into your constructor method is always good practice. An initialization method allows you to reset properties within your class without needing to generate a new instance of the class.
The init method assigns true/false values to your Boolean properties. The first setting notifies the symbolCanvas that it won’t need to display your original symbol, just the bitmap representation. The second setting notifies the symbolCanvas not to clear the canvas before rendering. This setting is central to achieving the write-on effect described at the beginning of this section. The init method also calls another method to initialize the listeners that will call the onAddedToStage and onRemovedFromStage methods. The initStageListeners method is primarily for organizational purposes. As a general rule, each method should perform one distinct task. Separating the listener initialization into a single method also makes the init method simpler to overwrite (and the code simpler to read).
Note that the init method is assigned protected access as well. Normally, an initialization method should be private, but in this case you want to allow for different assignments to the hideSymbol and clearCanvasOnUpdate properties in future subclasses, as well as allow for the possibility of starting and stopping the bitmap rendering at points other than when the symbol is added to or removed from the Stage.
10. Add the initStageListeners method below the init block:

Note that this method is also protected so that only a subclass can make changes.
11. After completing all the initialization code, you need to make sure that the constructor calls the init method. Add the highlighted code as shown:
![]()
12. Flesh out the original four methods by adding the following highlighted code:
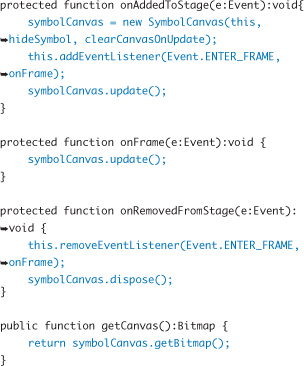
Most of the heavy lifting done in the preceding four methods is being passed along to the SymbolCanvas class. In the onAddedToStage method, you generate the SymbolCanvas instance using the new keyword and pass a reference to your symbol, and then the two properties that you assigned in the init method. You then add a listener for the ENTER_FRAME event and call the update method to immediately render the canvas.
The onFrame method calls the update method each time the ENTER_FRAME event fires. The frame rate of your document will determine how many times per second the ENTER_FRAME event is dispatched. The onRemovedFromStage and getCanvas methods also now contain the code to operate as previously described.
As a result of completing these methods, you now have an inventory for the first three methods to include in the SymbolCanvas class:
• update. To render the bitmap
• dispose. To get rid of the bitmap data that’s being stored (and free up memory)
• getBitmap. To provide the bitmap canvas for outside use
The completed code for the MotionBrush class should read as follows:
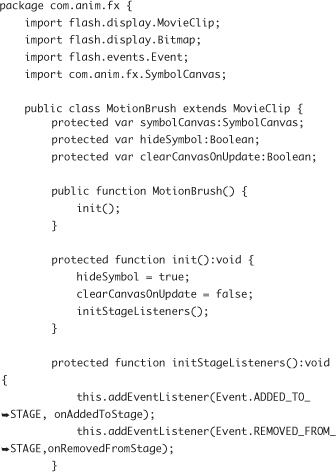
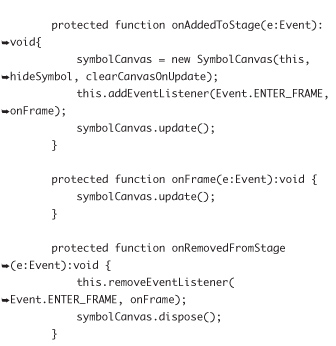
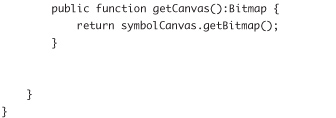
Now you can update the Library item in your Flash document to use the MotionBrush class.
1. Return to your MotionBrushExample.fla document and open the symbol properties for the symbol you created in this section.
2. Open the Library item properties, select the Export for ActionScript check box, assign com.anim.fx.MotionBrush as the symbol’s Class, and click OK.
3. Save your document.
Wait to test your movie, because you need to put the SymbolCanvas class into place first.
The SymbolCanvas class
The SymbolCanvas class primarily utilizes the private access keyword rather than protected, since SymbolCanvas is less likely to be extended. Because other classes utilize SymbolCanvas via composition rather than subclassing, it will therefore be safer to add new methods to SymbolCanvas as you progress, as long as the old methods continue to function as expected. When you want to make a method or property available to another class, you will use the public keyword.
1. Create a new class named SymbolCanvas. Save the file as SymbolCanvas.as in the examples/com/anim/fx folder.
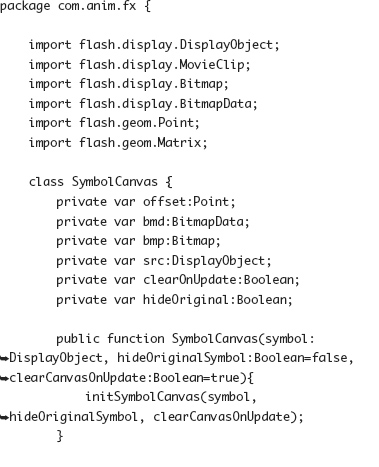
2. Update the first line in the script to reflect the proper package:
![]()
3. Let’s first add the three methods that were established from writing the MotionBrush class. Add the following code just below the constructor block:

4. Add the following properties above the constructor method:
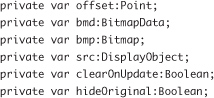
The first property, offset, will ensure that your effect always renders in the proper place on Stage (no matter how many symbols are nested above your symbol). The next two properties store the BitmapData and Bitmap objects that you’ll use to render any and all effects. The last three properties store the information that you passed from the new SymbolCanvas instantiation in the MotionBrush class.
5. Update the constructor method to match the highlighted code that follows:
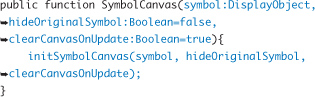
This code informs the constructor function of how many and what types of arguments to accept. These parameters must match the arguments used in the MotionBrush class. The symbol parameter is typed to DisplayObject for forward compatibility. The DisplayObject class is a distant superclass of the MovieClip class. As a refresher, here is the inheritance chain for MovieClip: MovieClip > Sprite > DisplayObjectContainer > InteractiveObject > DisplayObject > EventDispatcher > Object.
Your MotionBrush class is of type MotionBrush, but it extends MovieClip, and by extension, all the classes listed in the inheritance chain. By typing the symbol parameter to DisplayObject, your SymbolCanvas class will also allow arguments for the symbol parameters that are Sprites, InteractiveObjects, and so on. This will be of use if you ever decide to pass the SymbolCanvas class a source object that’s been instantiated using code rather than from the Library. As a general rule, typing a parameter to the lowest class in the chain makes your code more flexible for future features.
The line inside the constructor, the initSymbolCanvas method call, passes the arguments to an initialization function. You may have noticed that in addition to being strictly typed, the second two parameters defined for the SymbolCanvas constructor method also have values assigned. In addition to setting default values for these parameters, these assignments cause the hideOriginalSymbol and clearCanvasOnUpdate parameters to be optional. If these parameters are not passed when a new SymbolCanvas instance is created, the compiler will not generate an error and the parameters will be set to false and true, respectively, by default.
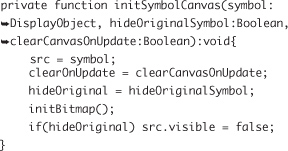
6. Let’s append the following initialization method just below the constructor block:
Conditional Logic
Conditional statements are used to determine if or when particular blocks of code should be executed.
The if statement is one of the most basic pieces of programming logic. The if statement only executes the code inside its code block if the conditions inside its parentheses are found to be true. No curly braces are necessary to enclose an if statement if the code block is only a single line (see the SymbolCanvas class for an example of a single-line if statement).
The counterpart to the if statement is the else statement. An else statement must immediately follow an if statement. The code contained in an else block will execute if the conditions for the if statement are found to be false. Similarly, there is also an else-if statement that you can use to test for additional conditions (see the BoundedMover class later in this chapter for an example of the else-if statement).
Note that the parameters are exactly the same as those of the constructor. You’ll then use the arguments from the three parameters to assign values to your src, clearOnUpdate, and hideOriginal properties. Your code will then call another initialization method to generate your bitmap. If it happens that hideOriginal resolves to a value of true, your code will render the source object invisible.
7. Now for some slightly more complex code (one reason you’re encapsulating it in the SymbolCanvas class). Add the following method below the primary initSymbolCanvas method that you just added:
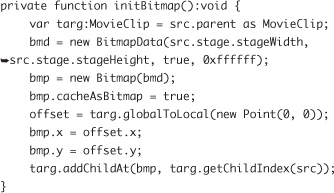
Let’s walk through the initBitmap method line by line. You first create a local variable named targ to store the parent of your source object. The parent is the object inside which your source object is nested (this will likely be the root of the Flash document). Your code then uses the as keyword to tell the compiler to type this existing object as a MovieClip. This is necessary to access methods within the MovieClip class without generating errors. At the moment, targ is a local variable, meaning it is assigned using the var keyword within the initBitmap method and will cease to exist once the method has completed execution. Use local variables when possible to increase the speed at which your code executes.
Next, your code assigns the bmd property to a new BitmapData object. Every object onscreen has a reference to the Stage stored in the stage property. You then use that reference to set your new BitmapData object’s width and height properties to match those of the Stage within the first two arguments passed to the BitmapData constructor. With the third argument, you’re assigning the transparent property of the BitmapData to true, which is essential for your effect to render properly. With the last argument you set the fill color to a hex value representing white (since the BitmapData instances use transparency, you will not see the white).
In the next line, you then assign your bmp property to a new Bitmap object and pass your BitmapData object to the Bitmap object’s constructor. The line following that turns on the cacheAsBitmap property for the Bitmap object. It may sound redundant to cache a bitmap as a bitmap, but it will be necessary if the bitmap canvas will be used for any advanced masking in the future.
The next three lines ensure that the bitmap starts at the top-left corner of the Stage, even if your source symbol’s parent does not. A Point is a very basic object: just an x coordinate and a y coordinate. The new Point starts out with both x and y at 0 (the top-left corner of the Stage), and uses the globalToLocal method of the targ object to offset the coordinates based on the targ object’s position on Stage. After the coordinate space of the Point object has been adjusted, the x and y values are assigned to the Bitmap object (Figure 3.21).
Figure 3.21 The small purple square is nested inside the larger blue square’s symbol. The local position of the purple square is x:50, y:50. The local position of the blue square is also x:50, y:50. The position of the purple square relative to the Stage is therefore x:100, y:100.

The last line within the initBitmap method adds your bitmap to the targ object’s display list so that it will be visible onscreen. Your code uses the addChildAt method to ensure that bitmap is rendered just underneath your source symbol. By using the getChildIndex method to then assign your bitmap to the stacking position held by the source object, the source object is pushed up a level in the display list (right on top of the bitmap).
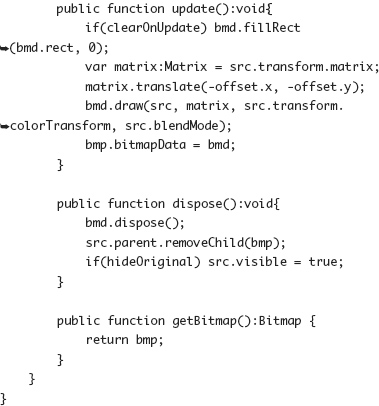
8. Let’s fill in the update, dispose, and getBitmap methods with the following highlighted text:
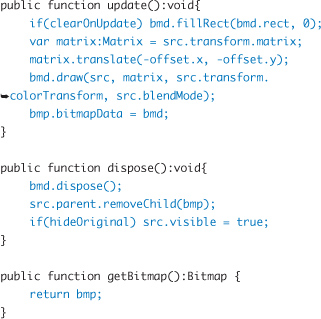
The first line of the update method checks to see if clearOnUpdate is assigned a value of true, and if so, it clears the canvas using a simple fill. The second line stores the current matrix from the src object (which includes its position, scale, and rotation). The third line uses the translate method of the Matrix class, along with the offset point stored earlier, to determine where the src object should be rendered on the canvas (no matter how deep the source symbol is nested). Both the x and y coordinates have a minus sign (-) to compensate for the translation of the canvas in the initBitmap method. The fourth line renders an image of your source symbol onto the bitmap data using the transformation matrix that you translated, the color transform from the source symbol, and the blending mode from the source symbol, so it will appear as it does on Stage. The final line in the update method assigns the updated bitmap data to the bitmap object so it will render onscreen.
The dispose method is your housecleaning function. The first line removes the data stored within the BitmapData object (using the dispose method built into the BitmapData class) to free up memory. The second line removes the bitmap from the parent object’s display list so it will no longer be rendered onscreen. The last line of the dispose method checks to see if the hideOriginal property was assigned a value of true, and if so, restores the visibility of the source object.
9. Confirm that the following import statements are all included at the top of your script. Add any that are missing:
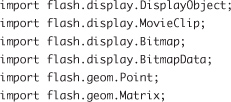
The SymbolCanvas class so far should read as follows:

You can now test the movie within your Flash document. Your symbol should now be drawing a path as it tweens (Figure 3.22).
Figure 3.22 The MotionBrush class applied to the rocket symbol.
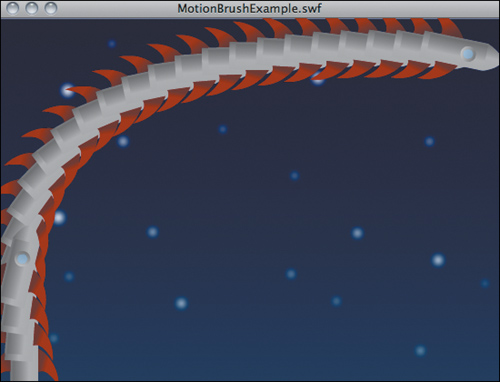
The MotionBrush effect will also capture any animation inside your symbol.
To create a write-on effect, try drawing a shape or writing your name with the Pencil tool. You can select the path created with the Selection tool, cut it (Command+X/Ctrl+X), select your tweened symbol, and paste the path to the tween (Command+V/Ctrl+V). Test your movie again to see the effect (Figure 3.23).
Figure 3.23 The MotionBrush class used as a write-on effect with a symbol containing a fire animation created using the Deco tool.

To explore the write-on effect further, check out the free MotionSketch extension (in the Extensions folder on the included CD or at http://ajarproductions.com/blog/2009/02/10/flash-extension-motionsketch/). MotionSketch can record your drawing in real time and translate it into a motion tween.
Using a MotionBrush Object as a Mask
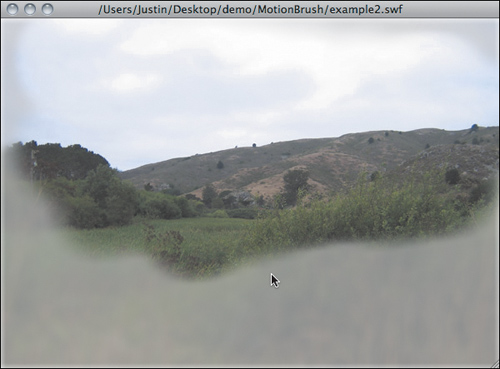
To use your symbol as a mask, you must first give instance names to your “brush” symbol instance and the symbol instance that you will be masking. Then you can use the following code (applied as a class or on a frame) (Figure 3.24):
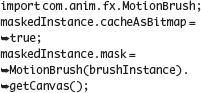
Figure 3.24 This animation creates the effect of wiping fog off a window using the MotionBrush applied as a mask.
The MotionTrail class
Now you’ll generate the first variation on the MotionBrush theme. For starters, let’s make the content painted onto the canvas fade as the source symbol moves farther away. This will render a trail, giving the impression that your brush symbol is moving a little too rapidly for the eyes. This effect is frequently used to create a trail for mouse cursors.
1. Save a new version of your MotionBrush document as MotionTrailExample.fla.
2. Create a new class called MotionTrail.
3. Save the class file as MotionTrail.as in the examples/com/anim/fx directory.
4. Update the first line in the script to reflect the proper package:
![]()
5. You will be attaching MotionTrail to the Library symbol you created just as you did with the MotionBrush class. Update the class declaration so that your class extends MotionBrush:
![]()
6. The completed code for the MotionTrail class is considerably shorter than that of the MotionBrush class, because much of the behavior is inherited from the MotionBrush class. Complete the MotionTrail class by adding the highlighted code as follows:
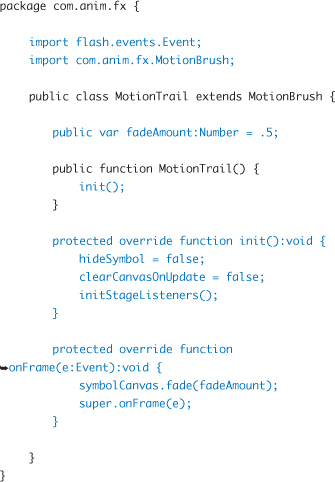
Note that the hideSymbol and clearCanvasOnUpdate properties are assigned a value of false. Given that the MotionTrail will be manipulating the canvas, you’ll keep the original symbol visible. Otherwise, the init function is identical to the init function in the MotionBrush class. Also, note the use of the override keyword to rewrite the init function.
The onFrame method is also overwritten in the MotionTrail subclass. The first line within the onFrame method calls a fade method on the SymbolCanvas instance that you will write in a moment. You’ll pass the fadeAmount property value to the fade method. This will determine how much of the canvas’s alpha value is faded on each new frame. Note that the fadeAmount property is public, meaning that this value can be assigned from any other part of your movie.
The second line in the onFrame method uses the super keyword to reference the onFrame method in the MotionBrush superclass and passes the event received by the overwriting onFrame method. In effect, you are augmenting the original onFrame method by adding a piece of functionality to the method and then running it as it normally would run inside of a MotionBrush instance.
7. Save your MotionTrail class and return to the SymbolCanvas class in the Code Editor. Add the following method toward the bottom of the SymbolCanvas class:
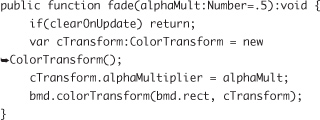
This is the fade method that was referenced from the MotionTrail class. The fade method accepts one argument representing a value for how much transparency to apply on each frame. The closer the number is to 0, the more quickly the trail will fade out. The default value for this parameter is .5.
The first line inside the method checks to be sure that clearOnUpdate is not set to true; if it is, the code uses the return keyword to abort the function. Since clearOnUpdate will wipe the canvas clean each time the update method is executed, there would be no reason to adjust the transparency on a clean canvas, so there’s no need to waste the processing power.
The second line within the fade method generates and stores a new ColorTransform object. In the third line, you apply the received argument to the alphaMultiplier property of the ColorTransform object. The last line then applies the ColorTransform to your BitmapData object, thus fading the entire image. The longer a particular representation of your symbol is onscreen, the more fades it will go through. Each fade will have an additive effect, rendering the older representations lighter than the new ones. The higher the alphaMultiplier property is set, the quicker the trail will fade.
8. Make sure that the following import statement has been added to the SymbolCanvas class:
import flash.geom.ColorTransform;
9. Save your SymbolCanvas class and return to the MotionTrailExample.fla document.
10. Open the Symbol Properties for your symbol and update the Class field to read com.anim.fx.MotionTrail.
11. Test your movie (Figure 3.25).
Figure 3.25 The MotionTrail class applied to the rocket symbol.
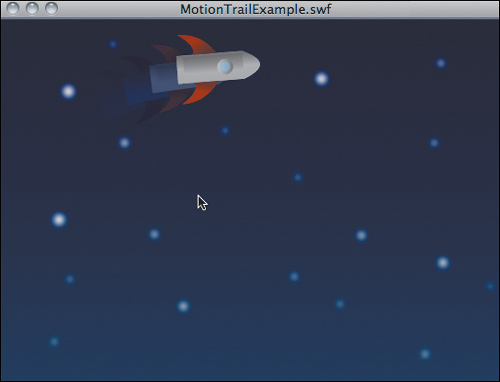
Try adjusting the fadeAmount property in the MotionTrail class and observe how the trail is altered (try values between 0 and 1). Note that the MotionTrail class is just as (if not more) complex an effect as the MotionBrush. But since the MotionBrush class was already written, it took significantly less effort to get the MotionTrail class off and running.
The MotionBlurClip class
Now, rather than extending MotionTrail, you’ll take the effect in a different direction by extending MotionBrush again. A motion blur effect will add a dose of realism to any animation. Motion blurring originates from motion pictures. The blur occurs when an object moves too fast for the camera to keep it in focus. This effect is a little more complex than MotionTrail, so it will require more new code, but several steps will look familiar at this point.
1. Save a new version of your existing document as MotionBlurExample.fla.
2. Create a new class called MotionBlurClip.
3. Save the file as MotionBlurClip.as in the examples/com/anim/fx directory.
4. Update the first line in the script to reflect the proper package:
![]()
5. Update the class declaration so that your class extends MotionBrush:
![]()
6. Add the following properties inside the package declaration (i.e., on a new line after public class MotionBlurClip extends MotionBrush {):
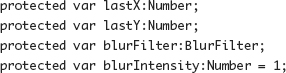
These properties will store the information necessary to render the appropriate blur effect. The lastX and lastY properties will store the location of the symbol on the previous frame. Coupled with the blurIntensity properties, the lastX and lastY will be used to determine how much blur should be applied (because they reflect the current velocity of the symbol). The blurFilter property will store the actual BlurFilter object.
7. Add a new init method below the constructor method:
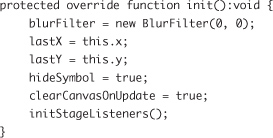
The init method is similar to the previous init methods that you’ve written except that it also assigns values to the properties added to the MotionBlurClip class.
8. Make sure the constructor calls the init method by adding the following highlighted code:
9. Add a new onFrame method (that will overwrite the onFrame method in the superclass):
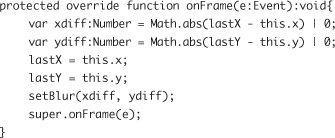
Similar to the onFrame method in the MotionTrail class, this onFrame method applies some code and then executes the onFrame method in the superclass (MotionBrush). The xdiff and ydiff variables store the difference between the previous location of the instance and the current location. Each line uses the absolute value method found in the Math class to ensure that the assigned values are positive. The bitwise OR operator (|) followed by the 0 ensures that if the preceding value is not a number, the xdiff and ydiff variables default to a value of 0. This is necessary for occasions when the lastX and lastY values have not been set (such as on the first frame).
10. Add the new setBlur method to implement the blur effect:
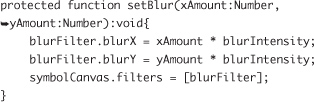
The setBlur method assigns the blurX and blurY values of the blurFilter using the position changes multiplied by the blurIntensity setting. The blurFilter is then passed to the symbolCanvas instance within an array. This is set up to mimic the filters property used on display objects, which is always an array.
11. Ensure that the following import statements are included (you may have to add the line for MotionBrush):
![]()
The completed MotionBlurClip code should now read:
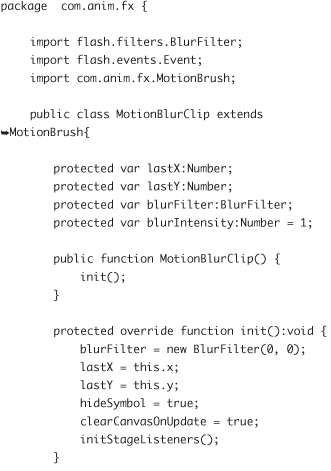
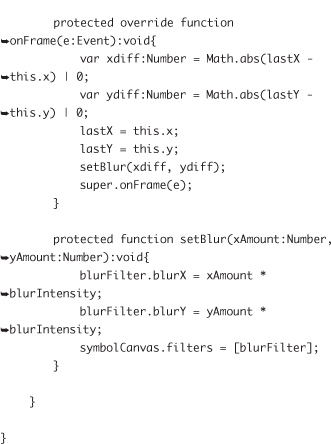
12. Save your MotionBlurClip class and return to the SymbolCanvas class. Add the following methods below the getBitmap method in the SymbolCanvas class:
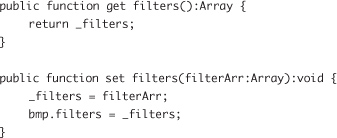
The preceding code uses two special types of methods known as a getter and a setter. From the outside of the class, these methods are applied as if they are a single property. This allows you to keep your actual property private, as well as allowing you to execute other code after the value has been set. The get method is called when no assignment operator (equal sign) is used; thus, it returns the value as if it were a property. When an assignment operator is used (e.g., symbolCanvas.filters = myFilterArray), the set method accepts the parameter to be set (which is whatever follows the assignment operator).
13. Add a private variable for the filters at the top of the SymbolCanvas code and below the package statement (after the existing properties):
private var _filters:Array;
It is common convention to use an underscore (_) at the beginning of a private property.
14. Add this line inside the top of the initSymbolCanvas method to initialize the _filters property value:
_filters = new Array();
The (now totally) completed SymbolCanvas class should read:
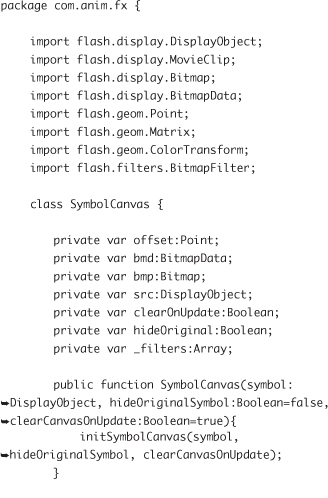
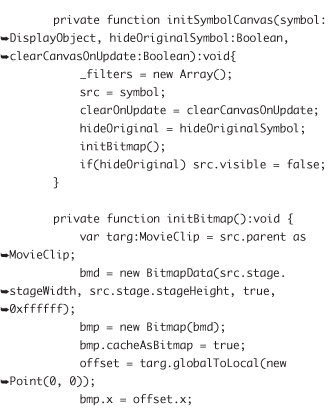
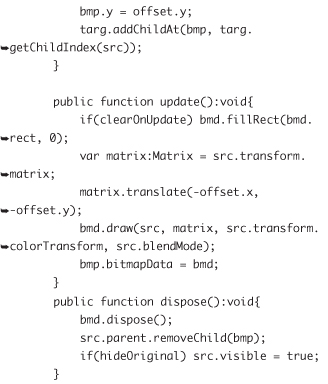
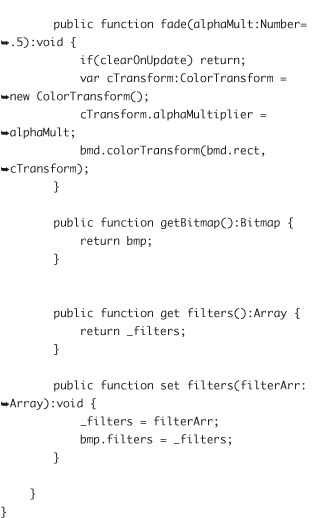
15. Save your class and return to the MotionBlurExample.fla document.
16. Open the Symbol Properties for your symbol and update the Class field to read com.anim.fx.MotionBlurClip.
17. Test your MotionBlurExample movie and observe the new effect (Figure 3.26).
Figure 3.26 The MotionBlurClip class applied to the rocket symbol.
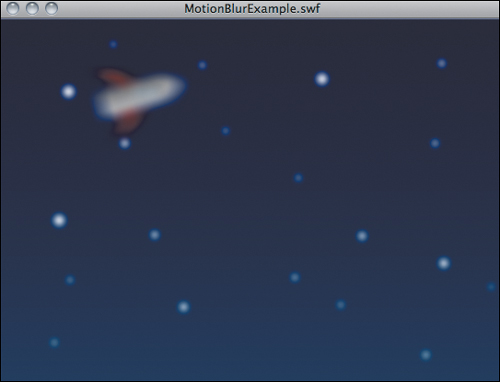
The MotionBlurTrail class
Now let’s combine the MotionTrail effect with the motion blur. You’ll start by extending the MotionBlurClip class and utilizing the code already written for the MotionTrail class.
1. Save a new version of your existing document as MotionBlurTrailExample.fla.
2. Create a new class called MotionBlurTrail.
3. Save the file as MotionBlurTrail.as in the examples/com/anim/fx directory.
4. Update the first line in the script to reflect the proper package:
![]()
5. Update the class declaration so that your class extends MotionBlurClip:
![]()
6. Update your class to match the following highlighted code to complete the MotionBlurTrail class:

The MotionBlurTrail class utilizes a fadeAmount property just like the MotionTrail class. The MotionBlurTrail init method starts by calling the init method in the superclass (MotionBlurClip) and then updates the hideSymbol property (to ensure the instance remains visible) and the clearCanvasOnUpdate property (to ensure the canvas is not cleared on each new frame). It is possible to set these properties after calling the superclass’s init method because the SymbolCanvas is not instantiated until the onAddedToStage method is executed (after the init method is executed). The onFrame in this class then utilizes the same code found in the MotionTrail class.
7. Save your class and return to the MotionBlurTrailExample.fla document.
8. Open the Symbol Properties for your symbol and update the Class field to read com.anim.fx.MotionBlurTrail.
9. Test your movie to demo the new effect (Figure 3.27).
Figure 3.27 The MotionBlurTrail class applied to the rocket symbol.

As you can see from the MotionBrush class and its subclasses, it’s possible to construct fantastic visual effects with ActionScript classes. The more you can leverage object-oriented principles, the more effects you can create with progressively less new code.
The remaining examples in this chapter illustrate a different reusable behavior: character control.
Class Examples: Character Control
As described at the beginning of the chapter, you’ll start the character control classes by writing a simple Mover class. From the Mover class, you’ll create subclasses to control different types of animated characters. These classes will allow for various types of user interaction.
For these classes, you’ll need to add a new folder to your class package. Create a new folder called character inside the examples/com/anim/ directory.
The Mover class
The Mover class will simply move an object based on keyboard input. It is recommended that you close any files that you have open from the previous examples before proceeding.
1. Create a new Flash ActionScript 3.0 document and save the file as MoverExample.fla in the examples folder.
2. Draw a circle on Stage using the Oval Primitive tool (found within the Shape tools on the Toolbar). Hold down the Shift key to constrain the proportions as you draw.
3. Select the circle and convert it to a MovieClip symbol (F8) named character. Make sure that the registration point (the dark square in the 9-square grid within the Convert to Symbol dialog box) is in the center before clicking OK.
4. Create a new ActionScript class named Mover.
5. Save the ActionScript file as Mover.as in the examples/com/anim/character folder.
6. Add the following highlighted code to have Mover subclass MovieClip:
![]()
7. Update the package statement with the following highlighted code to match the saved location of the Mover.as file:
![]()
8. Add the following variable declarations immediately following the class declaration (i.e., just before the public function Mover constructor line):
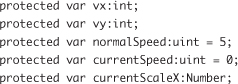
Let’s review what you have so far. Steps 6 and 7 should be pretty familiar to you following the visual effects class examples. In step 8, you’ve set up several properties that will be accessed later in the code. All properties use the protected keyword to guarantee that their values can be altered by subclasses (and only by subclasses). The vx and vy variables will store the x (left and right) and y (up and down) velocities, respectively. Both variables are strictly typed to the integer data type (int). When strict typing a property, it is best to be as specific as possible. It’s unlikely in the case of vx and vy that you’ll need your object to move at less than 1 pixel per frame (that’s quite slow), so integers will offer sufficient precision. The integer data type also allows negative values, which you’ll need for your object to move up or left.
The Flash Coordinate System
The Flash coordinate system starts at the top-left corner of the Stage. Moving to the right increases the value of the x coordinate. Moving down increases the value of the y coordinate.
The next variable, normalSpeed, stores the default speed. This variable is typed to the unsigned integer data type (uint). Unsigned integer values do not include negative numbers, so this works great for speed, which will always be a positive number (since it’s the absolute value of the velocity). You will use the speed, in combination with the direction, to determine the velocities.
9. Add the following highlighted code to call the init method from the constructor:
![]()
10. Add the init method definition as follows below the constructor method:
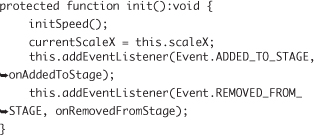
Much of this init method will look familiar from the effects classes. So, let’s just go through what’s new. An initSpeed method is called. This is separated into its own method to make this aspect of the Mover class simpler to override. The next line initializes the currentScaleX value based on the current x scale of the symbol used. The currentScaleX property will be useful in subclasses when you want to alter the horizontal direction/orientation of the character. The two addEventListener method calls are identical to those in the classes you’ve already written in this chapter.
11. Add the following method after the init method to initialize the currentSpeed property:
![]()
12. Add the following code after the initSpeed method:
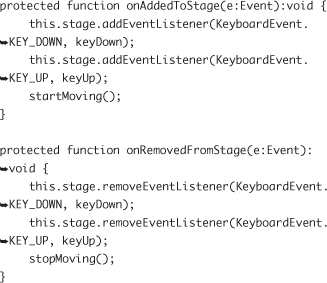
These methods have the same names as those used in the effects classes, but their content is different. The onAddedToStage method adds two event listeners to the symbol’s stage property. These events fire when a key is pressed and when a key is released on the keyboard. The third line calls a (yet unwritten) method to start the Mover moving.
The onRemovedFromStage does the complete inverse of the onAddedToStage, removing the event listeners and calling a method to stop the Mover from moving.
13. Add the following three methods after the methods you’ve already written:
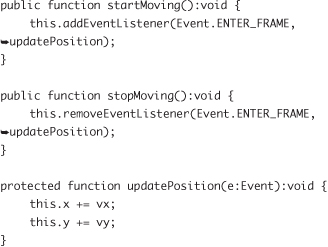
The startMoving and stopMoving methods tend to the adding and removing of the ENTER_FRAME event. When the ENTER_FRAME event fires, it triggers the updatePosition method.
The updatePosition method adds the x and y velocities to the current x and y coordinates to move the symbol on each frame.
14. Then add the following code for the two methods that will handle the keyboard events:
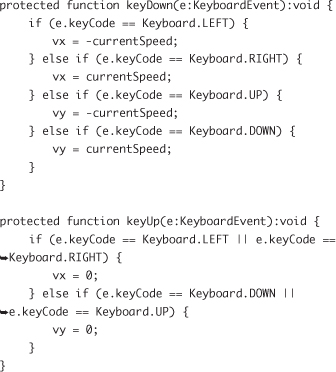
The keyDown and keyUp methods utilize conditional logic to respond differently based on which key was pressed. The keyCode property of the e parameter stores the key that was pressed when the keyboard event was fired. The keyCode value can then be compared against values stored in the Keyboard class. In this case, you’re looking for the arrow keys: left, right, up, and down. This section of code utilizes else-if statements because the conditions are all mutually exclusive, since each event will reflect exactly one key press. The x or y velocity will then be set, depending on which key was pressed. The keyDown method uses the currentSpeed property as the basis for the velocities, and the keyUp method sets the values to 0.
15. Ensure that the following import statements are included just inside the package declaration:
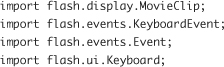
The completed Mover class should now read as follows:
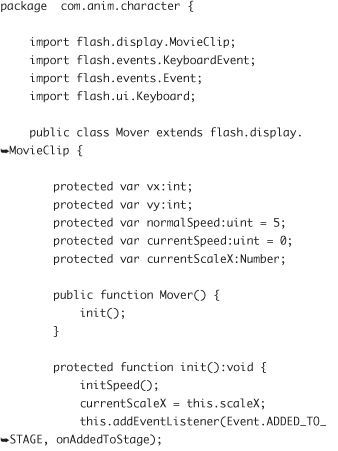
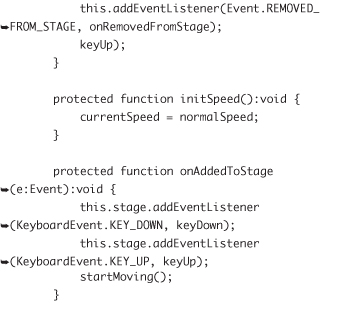

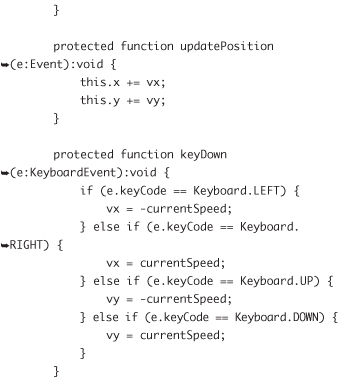
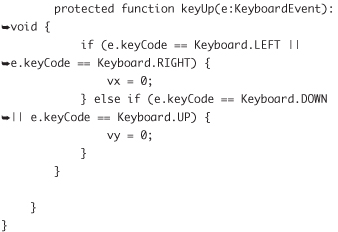
16. Save your script, return to the MoverExample.fla document, and update the character symbol properties to use the com.anim.character.Mover class.
17. Save your document and test the movie (Figure 3.28).
Figure 3.28 The Mover class allows the arrow keys to move the character instance.
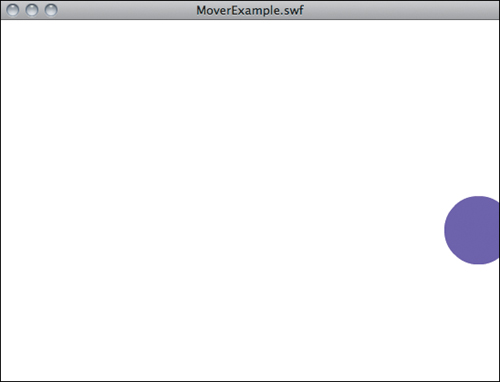
In the test window, press and hold the arrow keys to move the character around the Stage. Notice that you can navigate your character right off the edge of the screen. The first subclass to the Mover class will prevent your character from leaving the screen.
The BoundedMover class
Depending on the type of experience you are designing, you’ll need to decide what will happen when your character reaches the edge of the screen. For the examples in this chapter, you’ll create a class that will prevent the Mover from leaving the screen.
1. Save a copy of your current document as BoundedMoverExample.fla in the examples folder.
You could create a class with a different edge behavior, like one that will wrap your character to the opposite edge of the screen, or you could create a class with an edge behavior that can be altered on the fly.
2. Create a new class named BoundedMover.
3. Save the ActionScript file as BoundedMover.as in the examples/com/anim/character folder.
4. Add the following highlighted code to have BoundedMover subclass Mover:
![]()
5. Update the package statement with the following highlighted code to match the saved location of the BoundedMover.as file:
![]()
6. Add the following variable declaration immediately following the class declaration:
protected var boundaries:Rectangle;
The boundaries property will store the rectangle that defines the edges of the area within which your character is allowed to travel.
7. Add the familiar onAddedToStage method below the constructor method:
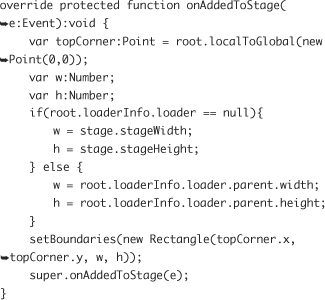
The onAddedToStage method is a little complicated, because you’re writing it in a manner that will also work in your web portfolio (for Chapter 5) without needing any updates. So, your boundaries will be different if your SWF file is being loaded into another file (as it will in the web portfolio).
You first create a local variable, topCorner, to locate the top-left corner of the SWF that houses your BoundedMover instance. The root keyword will ensure that your topCorner point reflects the SWF containing the BoundedMover instance, not an outside movie that has loaded the SWF containing your BoundedMover (this will make more sense in Chapter 5). You then create two variables (w and h) to store the width and height of the container movie. To determine if your SWF has been loaded into another movie, you check the loader property of the loaderInfo object. If this property is null (not set), then your SWF has not been loaded into another movie, and you can use stage.stageWidth and stage.stageHeight for your default boundaries. If the loader property has been set, then the else block determines the w and h values based on the parent object of the loader.
The code then invokes a new method, setBoundaries, and passes a Rectangle object based on the corner point, width, and height determined above. Finally, the last line calls the onAddToStage of the superclass (Mover).
The boundaries can be updated at any time by calling the setBoundaries method.
8. Add the following method after the method in the previous step.
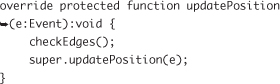
The new updatePosition method will check to see if your character is at or beyond the edges of the boundaries before calling the updatePosition from the superclass. You’ll write the checkEdges method in a moment.
9. Add the setBoundaries method after the updatePosition method:
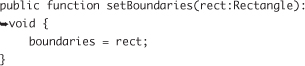
The setBoundaries method simply updates the boundaries property value. This value will be utilized in the checkEdges method that you are about to write.
10. Add the checkEdges method after the setBoundaries method:
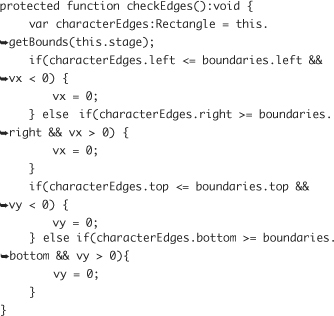
The first line inside the checkEdges method creates a new variable to store the rectangle containing the bounds around the character symbol. The conditional statements that follow check the left, right, top, and bottom edges, respectively.
Since your character can’t be at the left edge and the right edge at the same time (as long as your Stage is wider than your character), it’s best to use if-else blocks (rather than two if blocks). If the character is at or past the left edge, there’s no reason to check the right edge. The same logic applies to the top and bottom. The code in the checkEdges method uses the less than or equal to (<=) and greater than or equal to (>=) operators to compare the edge of the character to the edge of the boundary rectangle.
In addition to checking the character’s location, you should also confirm that the character is attempting to move beyond the boundary. If the character is headed away from the boundary, there’s no reason to stop the character from moving. You can check the character’s direction by determining if its x and y coordinates are positive or negative (if the velocity is 0, no action is needed).
For simplicity, the checkEdges method in this chapter does not reset the character’s position (just inside the boundary crossed) because it is not necessary for the examples shown. You may want to add this functionality to the class later, especially if you plan to call the setBounds method again (in case your character is then outside of the boundaries just set).
If the x velocity is greater than 0, the character is moving to the right. If the x velocity is less than 0, the character is moving to the left. To check two conditions (the character’s position relative to the boundary and the character’s direction) in a single if statement, you need to use the conditional and operator (&&). To stop the character from moving, the relevant velocity is then set to 0.
11. Ensure that the following import statements are included just inside the package declaration:
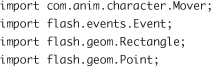
The completed BoundedMover class should read:
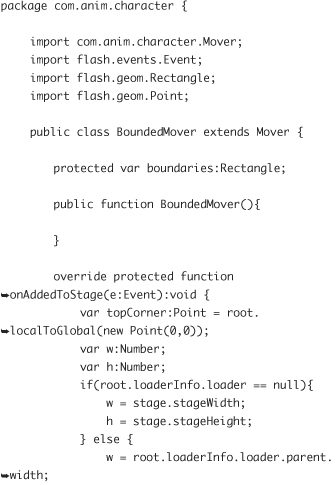
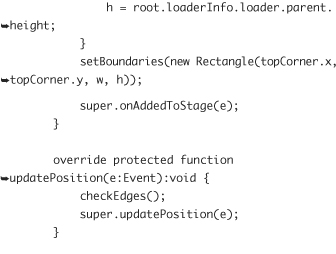
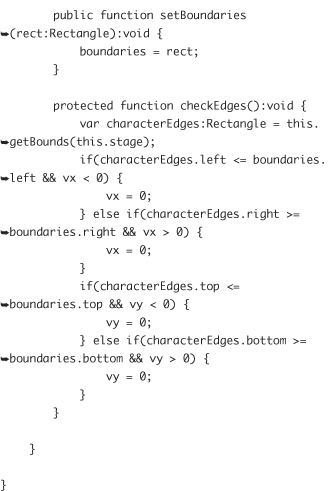
12. Save your class, return to your BoundedMoverExample.fla document, and update the character symbol properties to have a Class value of com.anim.character.BoundedMover.
13. Save your document and test the movie. Move your character around and note that it will not leave the screen (Figure 3.29).
Figure 3.29 The BoundedMover class prevents the character from traveling beyond the edges of the Stage.
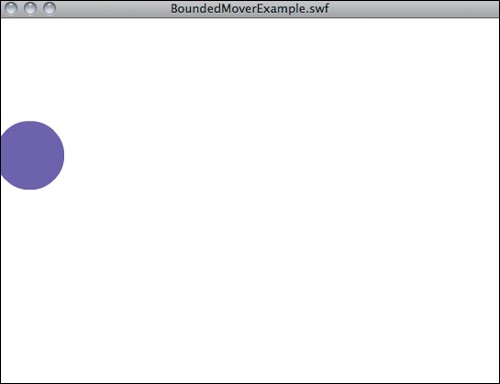
Now that you have a handle on controlling a character, let’s start adding a bit more complexity to the character.
Building the Wanderer symbol
In this section you’ll build some character animation similar to that of an arcade classic. The Wanderer class will control a character that wanders around the screen (in search of food or possibly to evade tiny ghosts). You’ll start by building a simple character with a hyperactive jaw.
1. Save a copy of your current (Mover.fla) document as WandererExample.fla in the examples folder.
2. Double-click on the character instance on the Stage to edit the symbol’s Timeline.
3. Select the oval primitive shape that is already on Stage.
4. Set the Start angle and End angle settings in the Properties panel to 10 and 350, respectively (Figure 3.30).
Figure 3.30 Setting the Start and End angle of the oval primitive shape will create the opening for the character’s mouth.
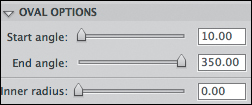
Setting the Start and End angles will create a 20-degree opening for the character’s mouth (Figure 3.31).
Figure 3.31 The oval primitive shape on frame 1 with a 20-degree opening.
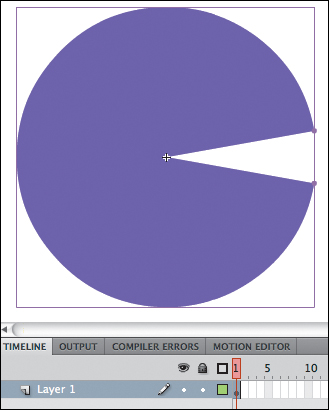
5. Select frame 10 in the Timeline and add a new keyframe (F6).
6. Select the oval on frame 10.
7. Update the Start angle and End angle settings in the Properties panel to 40 and 320, respectively. This will create a wider (80-degree) opening for when the character’s mouth is completely open (Figure 3.32).
Figure 3.32 The oval primitive shape on frame 10 with an 80-degree opening.
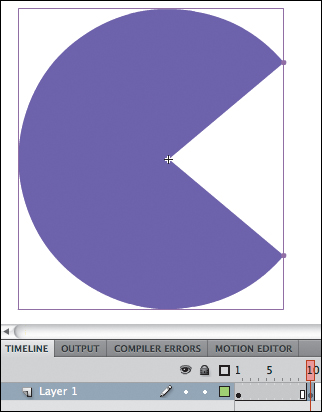
8. Select frame 1 and create a Shape Tween (Insert > Shape Tween). If you scrub the Timeline at this point, you’ll notice that the tween doesn’t look like a mouth opening and closing (Figure 3.33).
Figure 3.33 The shape tween needs a little work.
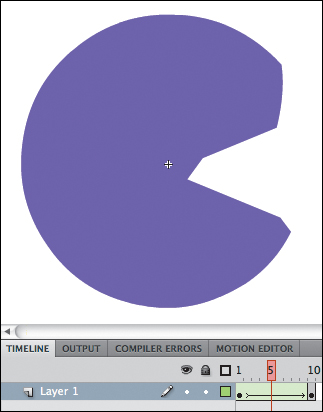
9. Select frame 1 again. Break the shape primitive into a raw vector shape (Command+B/Ctrl+B). This will allow you to add shape hints to help Flash interpolate the tweened frames.
10. Add three shape hints by choosing Modify > Shape > Add Shape Hint three times. The three hints will all have letters (a, b, and c) and will overlap when they are added.
11. Move the shape hints to the three points that compose the mouth. The points will be red for the moment (Figure 3.34).
Figure 3.34 The shape hints in position on frame 1.
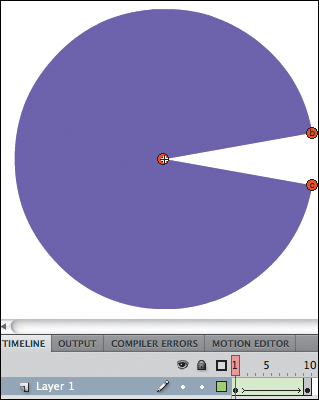
12. Select frame 10 on the Timeline and break that shape apart (Command+B/Ctrl+B).
13. Move the three shape hints to match the three points on frame 1. The points should turn green when they are in place (Figure 3.35).
Figure 3.35 The shape hints in position on frame 10.
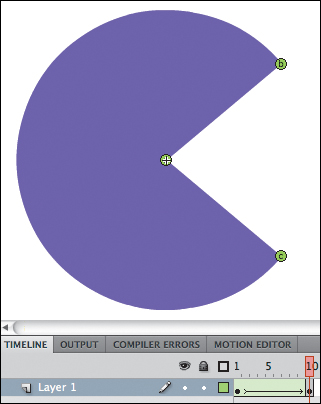
When the shape hints on frame 10 are in place, the hints on frame 1 should turn yellow. You may have to move the first point away (release it) and move it back into position (on both frames 1 and 10) to have it turn yellow on frame 1 and green on frame 10.
14. Scrub the Timeline again. The mouth should now appear to open as you move from frame 1 to frame 10 (Figure 3.36).
Figure 3.36 The shape now tweens properly.
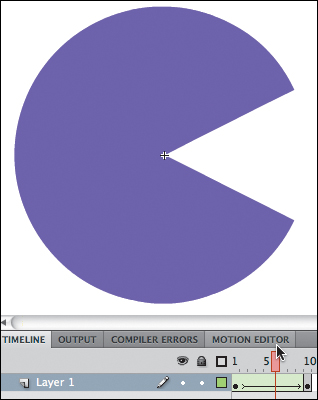
15. Ctrl-click/right-click on the first frame and choose Copy Frames.
16. Select frame 20, Ctrl-click/right-click and choose Paste Frames.
17. Ctrl-click/right-click on frame 10 and choose Create Shape Tween.
18. Add three new shape hints to frame 10 and move them to match the positions of the three shape hints already in place on frame 10 (Figure 3.37).
Figure 3.37 The second set of shape hints added to frame 10.
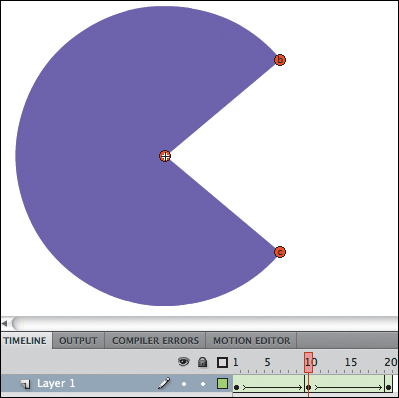
19. Select frame 20 and move the three shape hints into position (Figure 3.38).
Figure 3.38 The second set of shape hints in position on frame 20.
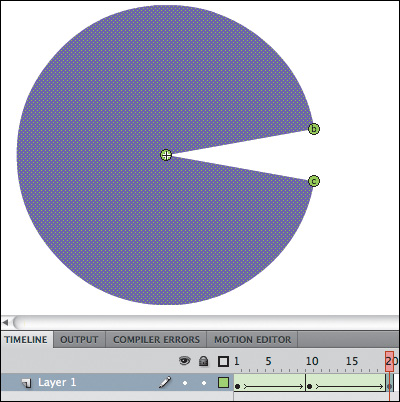
You should now have a mouth that opens and closes. One last adjustment is needed: You’ll want this mouth to loop (at the moment, frame 1 and frame 20 are identical and you only need one of them).
21. Select frame 19 and add a keyframe (F6). Note that two of the shape hints are now slightly out of place on frame 19.
22. Reposition the shape hints to match the points of the mouth (Figure 3.39).
Figure 3.39 The second set of shape hints repositioned on frame 19.
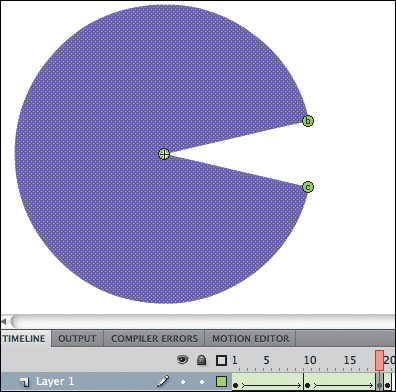
23. Ctrl-click/right-click on frame 20 and choose Remove Frames.
24. Add a new layer and create an eye for your character using the Oval tool. Make sure the eye doesn’t overlap with the mouth on frame 10 (Figure 3.40).
Figure 3.40 The completed character with the eye in place.
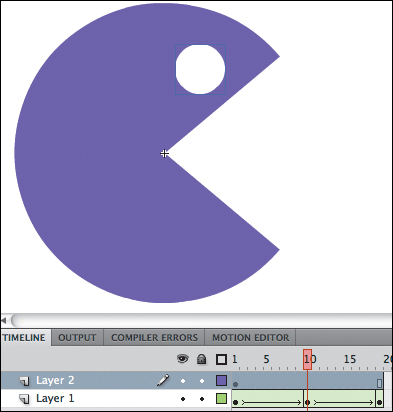
25. Test your movie. You should now have a looping animation of your character.
The Wanderer class
The Wanderer class will match the character’s intention with the user’s key presses. When the character changes directions, it will now orient toward that new direction. Additionally, the character’s internal timeline will only animate when the character is in motion.
1. Create a new class named Wanderer.
2. Save the ActionScript file as Wanderer.as in the examples/com/anim/character folder.
3. Add the following highlighted code to have Wanderer subclass BoundedMover:
![]()
4. Update the package statement with the following highlighted code to match the saved location of the Wanderer.as file:
![]()
5. Add the following updatePosition method below the constructor method to override the method (of the same name) in the superclass:
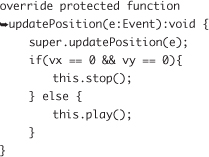
The only update that this new method implements to the superclass’s functionality is to either stop the animation on the symbol’s Timeline if the object has no velocity (in any direction) or play the symbol’s animation (mouth chomping in this example).
6. Add the following keyDown method below the updatePosition method:
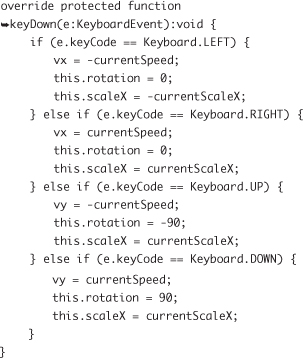
The logic in this method is exactly the same as the Mover class. The only updates are to assign values to the rotation and scaleX properties. These assignments are to orient the character to its direction. For example, since your character is facing right by default, you have to flip the character’s horizontal scaling to have the character face to the left. To face the character up or down, you need to use rotation. Both scaleX and rotation are necessary, since only using rotation would cause the character to be upside down when traveling to the left (Figure 3.41).
Figure 3.41 The character as shown if only rotation were used rather than setting the scaleX property.

7. Ensure that the following import statements are included just inside the package declaration:
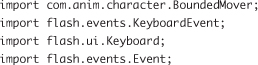
The completed Wanderer class should read:
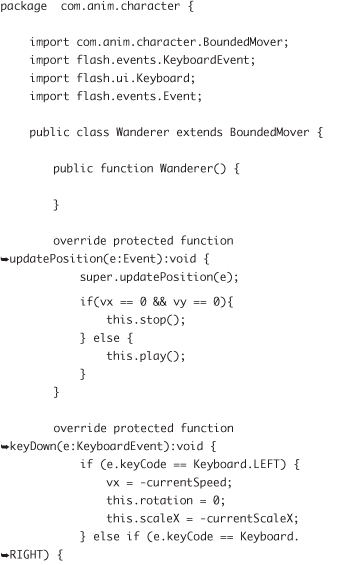
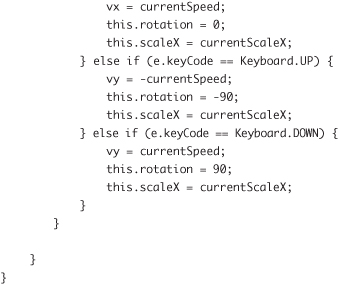
8. Save your class, return to your WandererExample.fla document, and update the character symbol properties to have a Class value of com.anim.character.Wanderer.
9. Save your document and test the movie. Move your character around and note how the character changes direction when pressing a new arrow key and how the character stops animating when no keys are pressed (Figure 3.42).
Figure 3.42 The Wanderer in action, chomping away and facing in the intended direction.
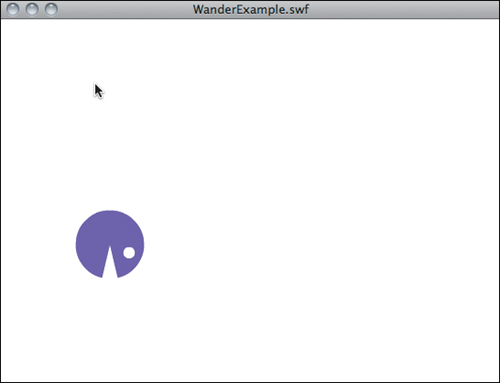
Now you’ll jump from the Wanderer to a much more advanced character. You can close any open Flash documents or scripts.
The Runner class
Normally, you might want to develop an object that walks before it runs, but since you have your base classes built, you can always go back and add a Walker class. Like the Wanderer class, the Runner class will extend the BoundedMover class created earlier.
1. Create a new ActionScript 3.0 document and save it as RunnerExample.fla in the examples folder.
2. Open the walk cycle that you created in Chapter 2. Copy the symbol from the Library that contains your character and paste it into the RunnerExample document Library. Ctrl-click/right-click and ensure that the new symbol in your RunnerExample document is set to have a Type value of “Movie Clip” in the Symbol Properties.
3. Drag an instance of your character onto the Stage and position the instance near the bottom-left corner of the Stage (Figure 3.43).
Figure 3.43 The symbol containing the walk cycle positioned near the bottom-left corner of the Stage.
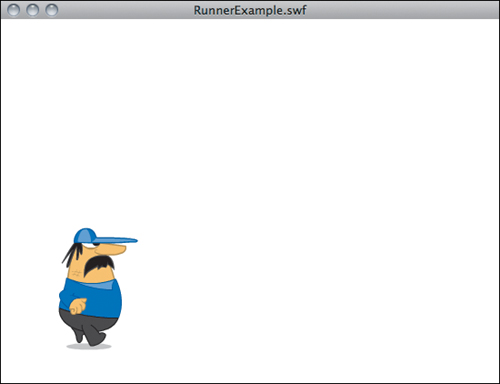
4. Create a new ActionScript class named Runner.
5. Save the ActionScript file as Runner.as in the examples/com/anim/character folder.
6. Add the following highlighted code to make Runner a subclass of BoundedMover:
![]()
7. Update the package statement with the following highlighted code to match the saved location of the Runner.as file:
![]()
8. Add the following properties just after the package declaration:
![]()
The first property, runSpeedRatio, determines how fast the character moves compared to the character’s normal walk speed. The second property, frameSkipRatio, determines how fast the character’s walk cycle will animate. To simulate running, you will skip frames in the character’s walk cycle. This will provide the illusion that the character’s legs are moving faster. The last property, shiftIsDown, stores the status of the Shift key. If the Shift key is down (pressed), it causes your character to run rather than walk.
9. Add the updatePosition method just below the constructor method:
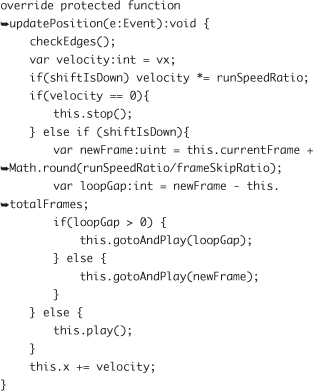
This is the most complicated updatePosition method that you’ve written thus far, so let’s go through each line. There’s first a call to the checkEdges method to make sure the character is within the boundaries. Since you haven’t overwritten the checkEdges method in this class, there’s no need to use the super keyword.
The checkEdges method is an inherited part of the Runner class, even though you haven’t rewritten it.
Next, you create a local variable to store the x velocity. This variable can be manipulated without changing the value of the original vx property.
In the third line, if shiftIsDown is true, the velocity will be increased by the runSpeedRatio. So, if the user is pressing the Shift key, the character will run.
The next block, all the way down to before the last line (this.x += velocity;), is just a slightly more complex version of the if-else statement that appeared in the Wanderer class. In the if block, you’re checking to see if the velocity is 0; if so, then you stop the walk-cycle animation. Now, examine the else block: Here you play the character’s walk cycle (in the case that the velocity is not 0). Now look at the larger else-if block. This block runs only if the first if statement is false and if the shiftIsDown property is set to true. So, the conditionals in these blocks serve the following purposes: The if statement corresponds to when the character is not moving, the else-if for when the character is running, and the else for when the character is walking.
Let’s look at the else-if block in detail. The first line defines a local variable named newFrame. The newFrame variable determines the next frame of the walk cycle that should be shown. Using the current property settings, runSpeedRatio divided by frameSkipRatio reduces to 2/2, or 1. You must round this number in case these values are changed later, because they could reduce to a number with a decimal and a frame must be a whole number. The 1 (from above) is then added to the current frame number (a property inherited from the MovieClip class).
The next variable, loopGap, stores the difference between the newFrame and the totalFrames available inside your walk cycle. This variable will be used to determine if you have gone beyond the last frame and must go back to the beginning of the cycle.
Lastly, inside the else-if block is a nested if-else statement. If the loopGap value is greater than 0, the newFrame value is beyond the total number of frames and you have to start playing your cycle from the beginning. Since the loopGap variable stores the number beyond the total number of frames, the loopGap becomes the starting frame. If you have not gone beyond the total number of frames, the else block will start playing at the newFrame value.
10. Add the keyboard listener methods below the updatePosition method:
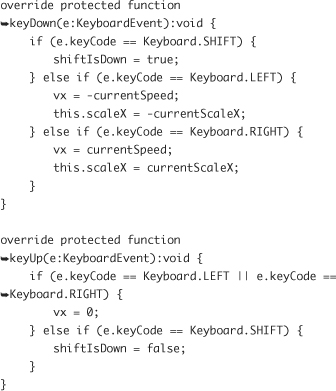
The UP and DOWN conditionals (used in the superclasses) have been removed, since your character is in profile and will only move left and right. Additionally, there’s no need for the rotation used in the Wanderer class. Only the vx and the scaleX properties must be set. A condition has been added for SHIFT that simply toggles on (true) in the keyDown method and toggles off (false) in the KeyUp method for the shiftIsDown property.
You may want to extend the Runner class in the future and reinstate the UP and DOWN conditions to apply behaviors like jumping and crouching.
11. Ensure that the following import statements are included just inside the package declaration:
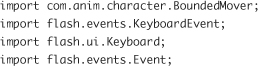
The completed Runner class should now read:

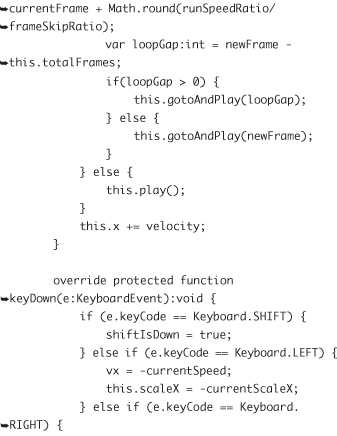

13. Return to the RunnerExample.fla document and open the symbol properties for your character. Select Export for ActionScript and input com.anim.character.Runner as the Class name.
14. Save your document and test the movie. Move your character around using the left and right arrow keys. Hold down the Shift key when you want your character to burn some rubber (Figure 3.44).
Figure 3.44 The Runner class in action.

If you want to add functionality so your character can collect gold coins and run into enemies, do a web search for as3 collision detection.
ActionScript Resources
There are countless ActionScript resources on the web. Here are a few good sites to start with:
• http://flashthusiast.com (a blog managed by the Flash motion team)
• http://pixelfumes.blogspot.com (really cool effects classes)
• http://keyframer.com/forum (a community of animators)
Now you have the tools to create some really amazing ActionScript animation on your own. Go forth and animate (with ActionScript if need be)!
Using Classes from Other Sources
As you may already know, several animators and developers have provided their ActionScript 3.0 (AS3) classes for others to use. If you find that a certain task is beyond your current skill set, try a web search. There are tons of free classes on the web. The author will usually provide documentation on how to use the class. (You’ll use a class from the web called TweenLite in Chapter 5.)