
Chapter 1. Getting Started
If you’ve picked up this book, you probably already know a thing or two about Flash. Most likely, you also know that Flash is a multifaceted application, and there isn’t a single, linear way in which everyone learns to use Flash. What you learn and what you retain depends greatly on how you use Flash. This book is largely aimed at aspiring animators who want to expand their skill set and learn how to add interactivity. Even within the world of Flash animation, there are numerous techniques and styles that you can employ. This first chapter will serve as a primer and a refresher to ensure that everyone is on the same page (so to speak) before moving forward in the book.
In this chapter, we’ll cover some basic animation concepts, production techniques for Flash animation, and how to begin planning an animated project. The techniques covered are applicable to animated stories, animated games, interactive applications, and in some cases, live-action movies.
The goals for this chapter include:
• Learn file setup basics
• Learn production techniques to keep your files organized
• Understand different types of narratives and how they can be created in Flash
• Learn to simulate camera movements in Flash
• Study the basics of storyboards and animatics
• Walk through an existing storyboard for an animated game
The remaining chapters in this book will apply the techniques found in this chapter to create dynamic characters for animated and interactive projects. Before bounding forward, let’s look at some best practices for your Flash files.
File Setup Tips
When audience members are immersed in a fantastic piece of art, a well-executed magic trick, or a mind-bending special effect, they are generally too distracted to think about how that particular experience was created. As an animator, it is of the utmost importance that you understand how to create a particularly engrossing experience—the successful execution of which depends heavily on what occurs behind the scenes. In Flash, there are several choices to be made (regarding Library symbols, document settings, ActionScript, and so on) that your audience will never see, but these choices will nevertheless affect your final product.
This section introduces (or reviews depending on your experience-level) some settings, techniques, and templates that are designed to save you time and energy.
Title Safe and Action Safe Guides
Safe areas are used in television to ensure that important information is not lost or distorted at the edge of a viewer’s screen. As such, safe areas can be considered as margins for visual content that is intended for broadcast. There are two types of safe areas: action safe and title safe. The action safe area indicates the outer edges at which important graphics can reside and actions can take place. The title safe area exists within the action safe area and indicates the outer edges at which text (i.e., titles and credits) should be displayed.
Even though most of the technology in people’s homes has changed significantly since the inception of television (i.e., many television and computer screens are now flat), and most modern televisions do a great job displaying content at the edges of the screen, it’s still a best practice to use safe areas. In most cases, it will also be desirable for the visual composition of your movies to keep your content away from the outer edges of the screen. Of course, action and title safe areas are generally not a concern for web content because in most cases, the width and height of the movie will be maintained and viewable in most cases across all browsers.
Most video editing software includes the ability to add action and title safe areas. Flash also offers several templates that contain ready-made guides for action and title safe areas. To create a new file with action and title safe guides:
1. Choose File > New.
2. In the New Document dialog box, choose the Templates heading at the top, and then choose the Media Playback category at the left.
3. Select from any of the template files that include Title Safe Area in their name, and click OK to create a new document from that template (Figure 1.1).
Figure 1.1 Selecting a template with action and title safe guides from the New from Template dialog box.

A new document will be generated from the selected template (Figure 1.2). This document’s Timeline will contain two layers: a “title / action safe” Guide layer and a “content” layer (Figure 1.3).
Figure 1.2 The Flash Stage showing title and action safe guidelines.

Figure 1.3 The Timeline contains the “title / action safe” Guide layer.
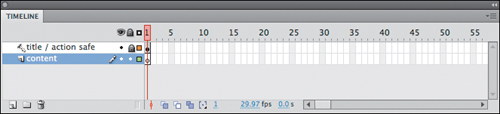
A Guide layer in Flash allows you retain content in your FLA document that will not be published in your final SWF (or video). Guide layers are useful when you want to keep certain objects on the Timeline or Stage while working, but you don’t want them included in the final exported file. This is very handy when you have reference material in your movie that you need for production but don’t want to delete the materials entirely from the Timeline when you’re done. The content on Guide layers can be used as guidelines to easily align objects or as a rough sketch to trace over (as you will do for the character created in Chapter 2). A Guide layer can also be used as a motion guide to direct a classic tween (also known as a motion tween pre-CS4) along a specific path.
To convert a layer to a Guide layer, Ctrl-click/right-click on the layer name and select Guide (Figure 1.4). In the case of the template file, the title/action safe layer is already a Guide layer, so you don’t have to worry about changing it.
Figure 1.4 The context menu allows you to convert an existing layer to a Guide.

Guided content can be used as reminders to yourself or as notes to other animators that may be working in the same file. The sections that follow will touch upon several other methods available in Flash to organize your content and communicate with colleagues.
Frame Labels
A frame label in Flash is a unique identifier given to a keyframe. Frame labels are great for adding notes to specific points on your Timeline. Additionally, frame labels can be utilized to easily target a specific frame using ActionScript.
To add labels to the Timeline:
1. Create a new layer to house your labels that will remain separate from your artwork.

As a general rule, it’s a good idea to keep layers containing labels at the top of your layer hierarchy so that the labels are easy to see.
2. Name the new layer labels (or “notes” as the case may be) and lock the layer so that artwork cannot be added to this layer.
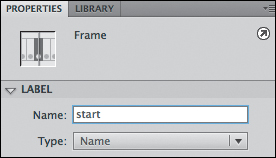
3. Select frame 1 of the labels layer. In the Name field within the Properties panel, type in a word or a short description of what takes place at that point in your movie, such as start (Figure 1.5).
Figure 1.5 Type in a frame label using the Properties panel.
To add a frame label that is specifically a note and is not to be used with ActionScript, you can add a double-slash (//) to the beginning of the label text (or select Comment from the Type menu). Frame notes will not be published with your movie.
You may need to add frames (F5) to be able to read your frame label on the Timeline.
4. Each time you need an additional label, select the desired frame on the labels layer, add a blank keyframe (F7), and type a new label, description, or note into the Name field in the Properties panel (Figure 1.6).
Figure 1.6 The Timeline with frame labels added.

With the addition of frame labels, you can keep your Timeline organized and make it easier to jump to different sections, especially if you are sharing the file with others. The next two sections describe additional techniques to organize your Timeline.

Navigating to a Frame Label Using ActionScript
You may already be aware that the gotoAndStop and gotoAndPlay methods allow you to navigate to a specific frame number. For example, the following code will move your playhead to frame 15 and begin playing from there:
gotoAndPlay(15);
However, you can also navigate to a frame label by passing the label name rather than a frame number. The following code will move your playhead to the “start” label and begin playing from that keyframe:
gotoAndPlay("start");
Timeline Customization
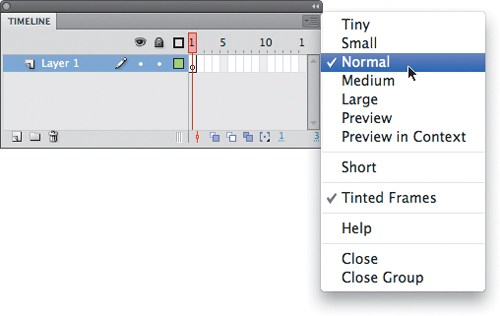
A number of lesser-known ways to customize the look of the Flash Timeline panel are available. For instance, click the menu button in the Timeline panel’s upper-right corner. In the menu, you can choose the size of the frames by selecting Tiny, Small, Normal (default), Medium, Large, Preview, and Preview in Context (Figure 1.7).
Figure 1.7 Customize the look of the Timeline using the menu.
One option within the Timeline menu that can make a big difference is Short (located in the middle of the menu). This setting compresses the height of each layer, which is perfect for Timelines containing several layers. You can also use Small or Tiny to compress the width of the frames displayed in the Timeline (Figure 1.8). This can be effective when your document has a large number of frames and you find yourself scrolling horizontally in large jumps on the Timeline.
Figure 1.8 Setting your frames to Tiny (with Short also selected in this case) allows you to see more frames and layers in your Timeline panel.
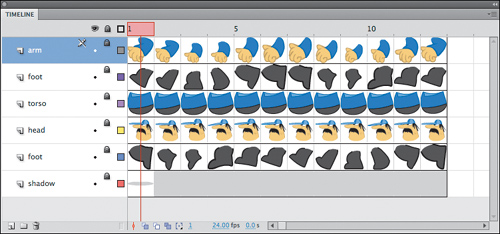
Choosing the Preview option provides you with a thumbnail of the contents of each frame within the Timeline (Figure 1.9).
Figure 1.9 Preview allows you to see thumbnails of any artwork on your frames within the Timeline.

Frame labels will not be visible in Preview or Preview in Context modes.
Preview in Context is the same as Preview, but the thumbnails are shown as they appear on the Stage (rather than scaled to fit the thumbnail size).
Layer properties
In addition to altering the Timeline display using the Timeline’s menu, you can alter the display of an individual layer by changing that layer’s display properties. Most notably, you can change the height of a given layer within the Timeline.
This may sound like a given, but be sure to give descriptive names to your layers! A name such as “Layer 5” doesn’t tell you anything about the purpose of the layer.
To alter the height of a layer:
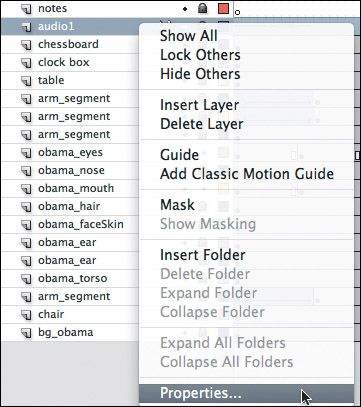
1. Ctrl-click/right-click on a layer name and choose Properties at the bottom of the context menu (Figure 1.10).
Figure 1.10 Access the Layer Properties from the context menu.
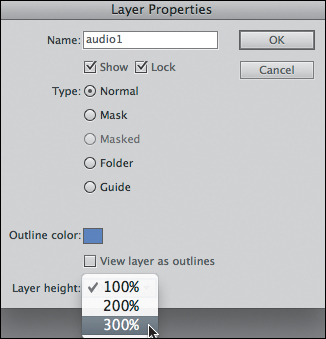
2. In the Layer Properties dialog box, change the Layer Height to 300% (Figure 1.11) and click OK.
Figure 1.11 The Layer Properties dialog box allows you to adjust the Layer height.
The Layer Properties dialog box also allows you to change the outline color of your layer. Displaying a layer as an outline is useful when you don’t want to hide your layer’s artwork entirely, but you also want to see artwork that is beneath the current layer.
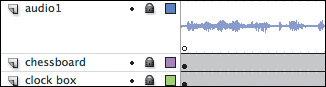
Taller layers are especially useful when you want to see a waveform (the visual representation of the audio) more clearly on a layer that contains audio (Figure 1.12). See the “Incorporating Audio” section later in this chapter, as well as the “Lip Syncing” section in Chapter 2, for more information about working with audio on the Timeline.
Figure 1.12 An audio layer with 300% height allows you to see changes in the audio waveform.
Layer folders
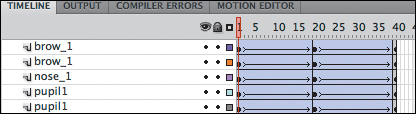
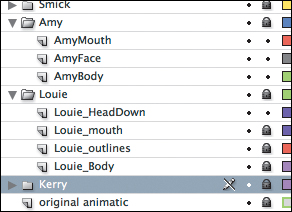
Another great way to keep your Timeline tidy is to organize your layers into folders. You can expand and collapse the folders as needed to hide layers that you are not currently working on (Figure 1.13).
Figure 1.13 Layer folders are used in this file to group elements for different characters.
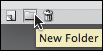
To add a new layer folder, click the New Folder button. The New Folder button is right next to the New Layer button in the Timeline (Figure 1.14).
Figure 1.14 The New Folder button allows you to add folders to your Timeline.
In addition to organizing a single Timeline in Flash, you can split your file into several timelines, each with its own content. These timelines are known as scenes.
Scenes
Scenes are great to use for each different setting in your story. Scenes help segment your overall Timeline into smaller pieces, so that you don’t have a single Timeline with thousands of frames that you have to scroll through. You can add as many scenes as you like to your Timeline. One important detail to remember about scenes, especially when exporting for the web, is that upon export, your movie will become one long Timeline. References to scenes are not included in the final output. For example, imagine you have two scenes that are 100 frames each. Upon export, frame 1 in scene 2 will become frame 101. This is important if you are using buttons and ActionScript to target different areas of the Timeline across several scenes. If you target a frame number in a different scene, the script may fail. It is always best practice to create a frame label and have your script point to that instead. We highly recommend using scenes just for Timeline organization and planning your story during the storyboard or animatic phase (storyboards and animatics will be covered later in this chapter). The main benefit of using scenes is to keep the number of layers and frames to a minimum, because each scene has its own Timeline when inside the Flash authoring environment.
To add or remove a scene, use the Scene panel; choose Window > Other Panels > Scene (Figure 1.15).
Figure 1.15 Adding scenes using the Scene panel.
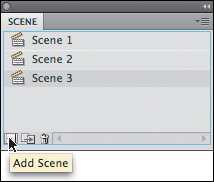
In the Scene panel, you can click the Add Scene button to add new scenes to your movie. You can rename a scene by double-clicking on the scene name and typing in a new name. You can use the Duplicate Scene button (next to the Add Scene button) to generate an exact copy of an existing scene. If you want to rearrange scenes, simply drag them vertically to change their order. Flash will play them sequentially starting from the top to the bottom.
Navigating to a Scene Using ActionScript
You can also use the gotoAndStop and gotoAndPlay methods to navigate to a scene by passing a second argument. For example, the following code will move your playhead to frame 1 of a scene named “opening” and begin playing from that point:
gotoAndPlay(1, "opening");
Now that you have your Timeline organized, let’s look at organizing the assets in the Library.
Library Organization
The Library serves as the repository for the artwork inside your Flash file. In addition to housing your graphic symbols, the Library stores all imported audio, imported bitmaps (JPEGs, GIFs, PNGs, PSDs), components used, component assets, font symbols, buttons, Movie Clips, and any Library folders (created by you or Flash). The Library can quickly become a very crowded place, which can be frustrating when you’re looking for a specific item.
Every Flash document Library should apply these two basic principles:
• A naming convention
• A folder organization system
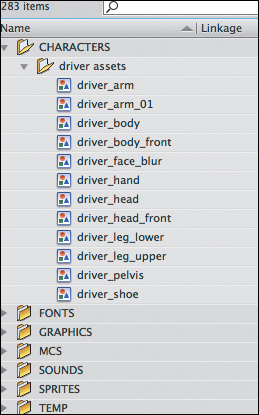
There are many different approaches to these two principles. No single approach is the “correct” approach. The important rule is to be consistent within each file so that your Library is both readable and navigable for you and anyone else who may need to use the file. When you share a file that has an organized Library, you exhibit your experience and professionalism to colleagues, and you’ll likely make their job easier. It’s a simple and subtle way to market yourself as “easy to work with.” Additionally, even if you only ever work solo, you will at some point be reopening your own files, and then you’ll be the one who is relieved to have an organized Library (Figure 1.16).
Figure 1.16 A well-organized Library can make life a little easier.
Your folder system should be one in which each Library item has only one place to go. Items can then be located quickly. For example, if you separate your folders by item type (i.e., Movie Clips, Graphics, Sound, Bitmaps, and so on), each item will only be able to go into one folder. When you create a graphic symbol, it will go in the Graphics folder. Alternatively, you could organize your items by their purpose in the file. For instance, you could put all the assets that belong to a particular character in a single folder regardless of each item’s type. You could also use subfolders to combine these two methods, item type subfolders within a character folder, or character folders within each type folder—as long as you can find what you want when you need it.
Expand and collapse folders (using the twirl arrow to the left of the folder icon) in the Library as needed. If you collapse folders that you’re not currently using, it will make other Library items easier to locate.
Consistency is the main goal when naming your Library items. Add relevant prefixes (e.g., “driver_”) to your Library item names to ensure that they’re listed together within the Library. You can also add suffixes to indicate other information such as symbol type (e.g., “_btn” for a Button symbol).
In previous versions of Flash, saving your file would simply append changes to your document, but would not, for instance, remove the residual data from any Library items that had been deleted. To deal with this issue, previous versions of Flash had a Save and Compact option in the File menu. In CS5, the FLA format is no longer binary, so it is no longer necessary to Save and Compact your documents.
Now that you have your document, Timeline, layers, and Library in top shape, let’s take a brief moment to discuss ActionScript.
ActionScript
ActionScript is the language that allows you to add interactivity to Flash. All ActionScript code in this book is ActionScript 3.0 (AS3). ActionScript techniques that utilize separate ActionScript files are covered in detail in Chapter 3. In this section, we want to mention a few best practices when adding ActionScript to your document.
ActionScript can be added to frames on the Timeline. Before adding any ActionScript to your Timeline, you should create a new layer, name the layer actions (or similar), and lock the layer so that artwork cannot be added. This will keep your ActionScript separate and easy to find.
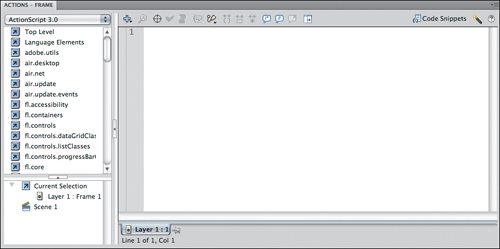
To begin adding actions to a frame, select the frame in the Timeline, and open the Actions panel (Window > Actions) (Figure 1.17).
Figure 1.17 The Actions panel allows you to add ActionScript to your frames.
Flash CS5 also has a brand-new Code Snippets panel. This panel contains common predefined actions (Figure 1.18). To implement one of the code snippets, double-click on it in the Code Snippets panel. Flash will add commented code to your actions layer and open the Actions panel (if it isn’t open already). If you have not yet created an actions layer, Flash will create one for you when you apply the first snippet.
Figure 1.18 The Code Snippets panel facilitates adding commonly used code to your document.

Certain snippets will require that you have a Movie Clip instance selected, and some may require that the instance have a name. In these cases, you may get a warning instructing you that Flash will automatically convert your artwork to a symbol and provide it with an instance name.
You can also create and save your own snippets. To learn more about the Code Snippets panel, visit www.adobe.com/devnet/flash/articles/code_snippets_panel.html.
Now every corner of your Flash document should be organized, right? Don’t worry; nobody’s coming to your house to check. Just keep in mind the techniques we’ve covered thus far. They can reduce unnecessary hassle and save you from undue stress.
Now let’s dive into some animation-specific topics!
Camera Techniques
We know what you’re thinking: What camera? Flash doesn’t have a camera per se; however, in Flash the Stage serves as the window through which viewers look into your story. You can create the illusion of a roving viewpoint by moving your scenery on Stage. Different shots, angles, and “camera” movements within a scene can provide unique visual effects.
For projects that will be exported to a format that allows the inclusion of ActionScript, there are components that have been created to behave like cameras in Flash. You can move them, scale them, rotate them, and even change their color properties. When the movie is published, your camera manipulations are seen onscreen. Visit the following web page for a great ActionScript camera (with demos): http://bryanheisey.com/blog/?page_id=18.
Two of the most common camera effects are known as panning and zooming. To set up a scene for panning or zooming, you need to place the entire scene in a single symbol. Once this has been done, panning and zooming is achieved by applying a motion tween to the instance of the symbol containing the actual scene.
Panning
Panning is the technique of moving or rotating the camera horizontally to follow an object in motion or to reveal other objects within the scene. Panning in Flash generally refers to 2D movement.
A perfect example of (3D) panning occurs in the opening scene of the original Star Wars movie. The scene is deep space, and the audience sees the mother ship flying past in all its glory. The ship moving through space is very convincing to the eye. If you were to look behind the scenes, however, you’d find that the ship never actually moves. On the set where this scene was filmed, the ship was a stationary model. To create the illusion of the ship flying, the camera was moved in reverse, past the immobile ship. When the footage is played back, the ship appears to move forward through space past the camera.
You use the same basic principle to create a panning effect in Flash. To pan across a scene, you need to follow two guidelines. Make sure that
• The scene is wider than the stage, so when you shift the “camera,” there is still something to see.
• The entire scene is inside the symbol that will be Motion Tweened.
Panning your scene is as simple as dragging an instance of your scene onto the Stage and tweening horizontally from one side to the other (Figure 1.19).
Figure 1.19 Preparing the scene for a camera panning effect.
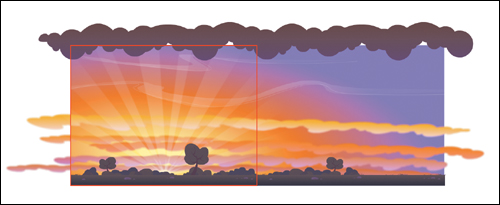
In Figure 1.19 a red outline has been added to indicate the viewable Stage area. The background was intentionally drawn much wider for the purpose of creating a panning effect and converted to a symbol. The steps that follow describe how to create a pan effect on a background that has been encapsulated in a symbol.
1. Insert frames (F5) in the Timeline and position the frame indicator (aka playhead) at the last frame (Figure 1.20).
Figure 1.20 The Timeline panel with frames inserted and ready for the Motion Tween to be applied.

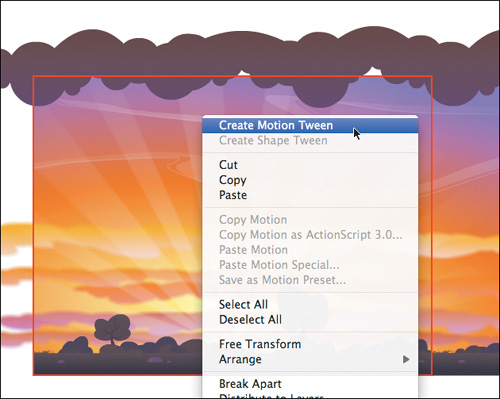
2. Ctrl-click/right-click over the symbol and select Create Motion Tween (Figure 1.21).
Figure 1.21 Applying the Motion Tween to the symbol instance.
3. Position the symbol containing the background to the opposite side of the Stage. The Motion Tween will automatically interpolate the symbol across the Stage between frame 1 and the last frame in the motion span.
There may be occasions when you realize that you want to add a pan to artwork that has already been drawn and animated on the main Timeline. The following steps describe how to convert an existing scene to a symbol.
1. Select all frames and layers by clicking and dragging across the Timeline (highlighting them in black).
2. Ctrl-click/right-click over the highlighted frames and select Copy Frames.
3. Create a new symbol in the Library, Ctrl-click/right-click over frame 1 of the new symbol’s Timeline, and select Paste Frames.
4. Return to the main Timeline to delete the original animation.
5. Create a new layer, drag your scene onto the Stage from the Library, and reposition it accordingly.
You can also convert a scene to a symbol using the Convert timeline to graphic or Convert timeline to symbol extensions found in the Extensions folder on the accompanying CD.
Now you can move the symbol containing your scene around the Stage by using a Motion Tween (Figure 1.22).
Figure 1.22 The panning effect completed with the symbol repositioned to the opposite side of the Stage.
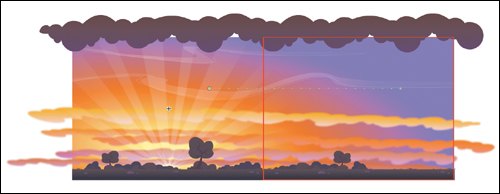
Upon playback, the illusion to the viewer is the camera being moved; when in actuality, it is the scene that is moving.
Parallax scrolling
As a general rule, objects that are closer to you appear to move faster than objects in the distance (e.g., clouds or a mountain on the horizon). To add depth to your animations, you can simulate this natural phenomenon using a technique known as parallax scrolling to move your foreground objects greater distances than your background objects over an equal amount of time (i.e., number of frames).
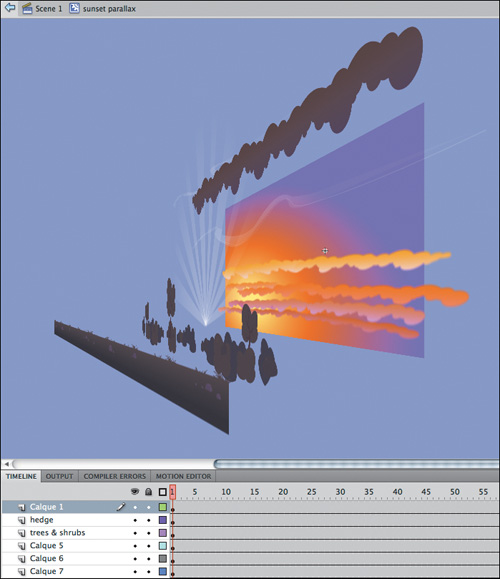
Parallax scrolling grew out of the multiplane camera invented at Disney in the 1940s. The multiplane camera involved layering different pieces of artwork in front of the camera. As the camera moved, the layers of artwork moved differently based on their relative distance from the camera (Figure 1.23).
Figure 1.23 Scene elements rendered in 3D to show how the elements will be affected by their varied depths.
To simulate parallax scrolling within an existing (multi-layered) scene in Flash:
1. Make sure each piece of artwork in your scene has been converted to a symbol and each symbol has its own layer.
2. Add a Motion Tween to each layer by Ctrl-clicking/right-clicking on each symbol instance that will move, and choose Create Motion Tween.
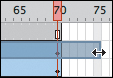
3. Adjust each tween to the desired duration by dragging the right edge of the final keyframe in the tween (Figure 1.24).
Figure 1.24 You can adjust the duration of a Motion Tween by clicking and dragging.
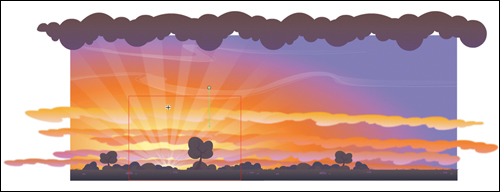
4. On the last keyframe of each tween, move each object according to the desired camera movement. Adjust the foreground objects more than the background objects. Suppose, for example, you have three layers (e.g., background, character, and a foreground in front of the character) and you’d like to create a parallax pan effect. Sample last-frame adjustments might include moving the lowest layer horizontally by 100 pixels, the middle layer by 200 pixels, and the top layer by 400 pixels (Figure 1.25).
Figure 1.25 An example of horizontal parallax scrolling. Note how the tree has moved with respect to the relatively immobile sky in the background.

You can also blur the more rapidly moving objects to add extra realism to your parallax effect (see Chapter 3 for a motion blur effect using ActionScript). These same parallax techniques can be applied to zoom effects as well.
You can easily create a motion blur on the Timeline using the MotionBlur extension found in the Extensions folder on the CD.
Zooming
Zooming is a method of decreasing the apparent view angle of an image so that the image appears closer to the viewer. Zooming effects in Flash are accomplished in a similar manner to panning except that the symbol is scaled instead of repositioned (or rotated).
1. To zoom into a scene, start with a symbol (containing your scene) at its default size so that the scenery fills the entire Stage area.
2. Insert any number of frames in the Timeline, Ctrl-click/right-click over the symbol, and select Create Motion Tween.
3. With the playhead at the last frame, use the Free Transform tool or the Transform panel (Window > Transform) to make the symbol larger.
4. Play back your animation to see the illusion of the “camera” zooming into the scene (Figure 1.26).
Figure 1.26 The zooming effect is achieved in the same manner as panning except that the symbol is scaled as opposed to repositioned.
Camera effects go a long way toward pulling your audience into your animation. You can also engage your audience by including music, sound effects, and/or dialogue. In the next section you’ll read about how to make your movie a “talkie.”
Incorporating Audio
Flash enables you to add sound to your movies with ease. Flash can import WAV, AIFF, and MP3 files. Generally, WAV files are preferred, because they are usually of higher quality and allow you to control the amount of compression (for online animations) for each audio file.
Flash doesn’t allow you to alter many of the properties of an audio clip once it’s been imported (only the endpoints and the volume). To make significant changes to your audio (effects, cuts, pitch, and so on), you’ll need to use a digital audio-editing application such as Audacity, Audition, GarageBand, Pro Tools, or Soundbooth.
An audio track requires as much planning as any other aspect in animation. You should consider your production needs when processing your audio. For instance, if you have dialogue that spans multiple scenes, you’ll want to cut your audio accordingly before importing it into Flash. Generally, smaller audio clips are more flexible because they can be played back to back on the Timeline, whereas one long clip cannot be easily separated across multiple Timelines in Flash.
To apply an audio clip to your Timeline:
1. Choose File > Import > Import to Library. Select the desired audio file. Once imported, your audio file becomes a Library item.
2. Create a new dedicated layer for your audio. Give the layer a clear name, such as audio (or be more specific when possible, e.g., “dialogue” or “music”). As a matter of best practice, audio should always be on a separate layer.
3. Lock your audio layer to avoid accidentally adding artwork to this layer.
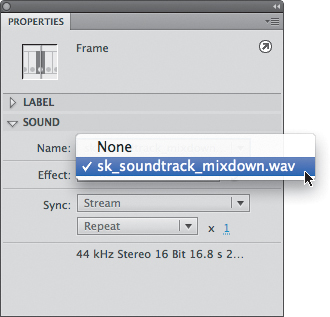
4. Select the first keyframe in your audio layer, and then in the Properties panel, under Sound, select your imported sound from the Name menu (Figure 1.27).
Figure 1.27 Select the imported sound using the Sound menu in the Properties panel.
5. Insert new frames (F5) to extend your Timeline so that it is long enough to accommodate your audio (use the waveform displayed on the Timeline as your guide).
6. Add new keyframes to your audio layer as necessary, and repeat the previous step to start an audio clip at a different location (Figure 1.28).
Figure 1.28 Audio clips spanning multiple keyframes.

If you move the playhead back and forth, you won’t hear anything at this point. This is because the default behavior is Event. The next section shows you how to adjust the sound properties.
Sound Properties
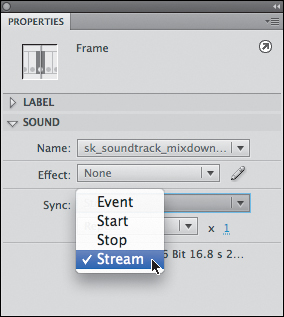
In the Properties panel, when your sound is selected in the Timeline, you can choose the Sync menu to select from four behavior options: Event, Start, Stop, and Stream.
• Event. Synchronizes the sound to the occurrence of an event, such as when a user clicks a button. An event sound plays when its starting keyframe first appears (and plays in its entirety, independently of the Timeline, even if the SWF file stops playing). If an event sound is playing and the sound is instantiated again (for example, by the user clicking the button again), the first instance of the sound continues to play and another instance begins to play simultaneously.
• Start. The same as Event except that if the sound is already playing, no new instance of the sound plays.
• Stop. Silences the specified sound.
• Stream. Synchronizes the sound with the Timeline. Flash forces animation to keep pace with stream sounds. If Flash can’t draw animation frames quickly enough, it skips frames. Unlike event sounds, stream sounds stop if the SWF file stops playing. Also, a stream sound can never play longer than the length of the frames it occupies.
As an animator, you’ll want to use the Stream behavior almost exclusively so that you can time your music, effects, and dialogue with your visual elements. The other three behaviors are useful in games and when you need to play audio using ActionScript. To update your existing audio on the Timeline so that it will sync with your artwork:
1. Select the first keyframe (or whichever keyframe has an associated sound item) in your audio layer.
2. Switch the Sync behavior to Stream in the Properties panel (Figure 1.29).
Figure 1.29 Set the sound behavior to Stream using the Sync menu in the Properties panel.
3. Move the playhead around again. You should now hear the sound, assuming your speakers are on and Mute Sounds (Control > Mute Sounds) is deselected.
You can now see (and hear) how the Stream behavior enables you to sync your audio with your animation. You’ll put the Stream behavior to good use in Chapter 2 when you sync a character’s mouth to an audio clip.
Although Flash doesn’t allow you to manipulate audio to any great extent, you can make some adjustments to how the sound plays by editing the sound envelope.
Editing the Sound Envelope
A sound envelope effectively clips the volume of an audio file based on the shape of the envelope and the shape of the audio waveform. A waveform is a visual representation of the amplitude (basically volume) of an audio clip over time. Flash has a number of presets to quickly adjust the envelope of an audio clip, such as Fade in or Fade out, Fade to left or Fade to right, and so on. When you have a keyframe with audio selected, you can apply one of these presets via the Effect menu under the Sound heading within the Properties panel (Figure 1.30).
Figure 1.30 You can apply an Effect preset from the Properties panel.

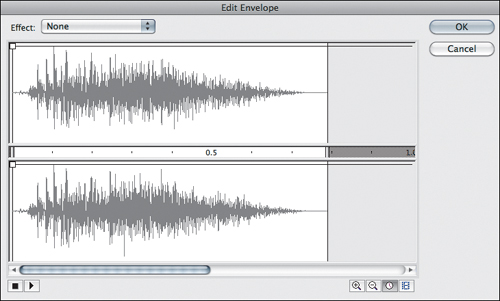
To edit the audio envelope more precisely, click the Edit sound envelope button (the pencil icon) next to the Effect menu (Figure 1.31). With the Edit Envelope window open, you can edit the envelope by hand (Figure 1.32). The two waveforms represent the left and right channels (for stereo audio).
Figure 1.31 Click the Edit Sound icon to open the Edit Envelope dialog box.
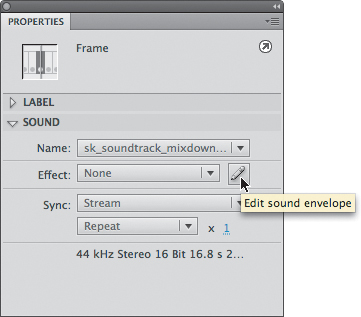
Figure 1.32 The Edit Envelope dialog box lets you make custom edits to the audio’s envelope.
To alter the sound envelope, drag the envelope handles to change levels at different points in the sound (Figure 1.33). To create additional envelope handles (up to eight total), click the envelope lines. To remove an envelope handle, drag it out of the window. Note how adding or removing a handle applies to both channels.
Figure 1.33 Drag the handles to customize the envelope.
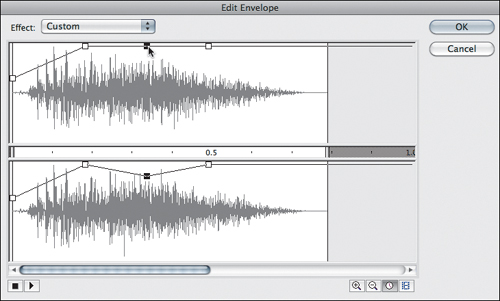
Effects such as fading from one channel to the other channel (essentially, one speaker to the other) can add realism to an action that takes place on one side of the Stage and ends on the opposite side. For example, a character running from offstage onto the Stage, across the Stage, and eventually off the Stage on the opposite side would be greatly enhanced by editing the sound effect files of his footsteps from one channel to the other.
Now that you can import and customize your sounds, let’s briefly touch on how to apply sounds to animated projects that contain multiple scenes.
Using Sounds Across Multiple Scenes
Using the same sound across more than one scene can be tricky. Why? Because within Flash you must manually add the sound into each scene you create. This is not a problem if your sound is composed of several small files that can be moved around on the Timeline. But this is a huge problem if your audio is one continuous soundtrack, like music (as we have discussed). You can’t split an audio file in Flash between two scenes and expect an audibly seamless result. If the audio is a continuous sound and you add it to the Timeline in Scene 1 and then again in Scene 2, there will most likely be a noticeable glitch in the audio during playback. Within the Flash environment, there’s really no way around this issue. Thus, if you have an audio track similar to a piece of music and there are no obvious breaks or moments of complete silence, we recommend keeping your movie as a single scene.
Conversely, you’ll want to set up your Flash file so that it’s easy to edit. Try to avoid having a 30,000-frame Timeline during the planning of your project, before even opening Flash. In some projects, a long Timeline will be unavoidable. Use the techniques from the “File Setup Tips” section earlier in this chapter to keep your Timeline as manageable as possible.
If you have several audio files containing effects and spoken lines from actors, it’s much easier to implement the separate files across multiple scenes. Remember that scenes are only a function of the Flash authoring tool. Once you export your movie, your animation becomes one long Timeline.
One last topic, sound settings, needs to be addressed before we wrap up this section on incorporating audio into your animation.
Sound Settings
When you’ve finished working on your animation and if you’re exporting a SWF, you should ensure that you use appropriate compression settings for the type of audio in your movie. Dialogue and music will likely require a higher-quality compression setting than will sound effects. Because sound has a considerable effect on file size, you will have to balance quality against bandwidth on your animated web projects.
1. Choose File > Publish Settings and select the Flash heading (Figure 1.34).
Figure 1.34 The Publish Settings dialog box allows you to access the sound export settings.
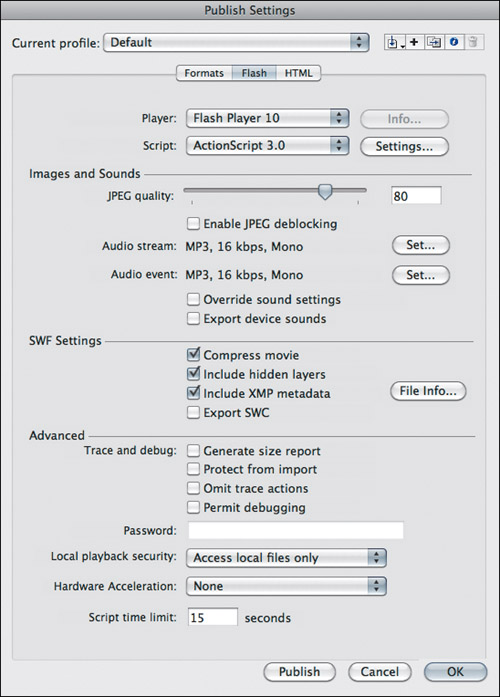
In addition to adjusting global Publish Settings, you can individually adjust the quality of each sound item in the Library. Note that the Override sound settings check box in the Flash Publish Settings allows you to supersede those Library item settings if you so desire.
2. Click the Set button to the right of the Audio Stream label to open the Sound Settings for all audio with the Stream behavior (Figure 1.35).
Figure 1.35 The Sound Settings allow you to change the quality of the audio in your exported SWF.
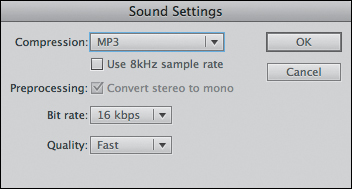
In the Sound Settings dialog box, you can change the Compression, Bit rate, and Quality. Bit rate is generally the most effective setting to change. For publishing to the web, MP3 generally has the best compression-to-quality ratio.
3. Once you’ve adjusted the Sound Settings to your liking, click OK in the Sound Settings dialog box, and then click OK to save your Publish Settings.
4. Test your movie (Command+Return/Ctrl+Enter) and listen for the difference. Return to the Sound Settings as necessary to adjust the audio quality to your satisfaction. The new SWF History heading in the Properties panel keeps a log of your published SWF file size and will give you an indication of how your Sound Settings are affecting the file size of your output.
Now that we’ve covered the technical aspects of animating in Flash, let’s consider the creative phases of animation.
Narrative
The sequences of events that constitute your story are considered its narrative. The word “narrative” is often synonymous with story, but is more specifically used when referring to the structure of a story. Narrative defines how your story is told.
Before delving into the specifics of a project, you should have a rough idea of the story’s narrative. This will help you develop a broad understanding of where your animation is going before you begin investing your time in implementation. Here are some questions to consider when assembling a narrative:
• Is the story driven by a character or a situation?
• What characters are present in the story?
• How do the characters’ actions affect one another?
• From whose point of view is the story told?
• In what sequence are the story elements presented?
• What is the setting (time and place) of the story?
• What conflicts occur in the story?
• How are the conflicts resolved?
Answering the preceding questions will help flesh out your story. Take Star Wars as an example again, and answer these questions regarding its narrative. The answers tell you in broad strokes what makes Star Wars a compelling story. Answering these questions will also make it easier for you to explain your story to others, which is especially helpful if you are seeking funding or need additional help producing your animation. In addition, answering these questions can help you decide what type of narrative to employ.
Types of Narrative
There are a few basic types of narratives. You can use a single narrative type, or you can exploit multiple narrative types in a single story. There are three broad types of narrative to consider: linear, nonlinear, and branching. These narrative types can be used on their own or combined with each other in various ways.
Linear
A linear narrative occurs in a straight, cause-and-effect, chronological sequence. A sample linear narrative might proceed as follows:
• We, the audience, meet Boy (what a nice, troubled young man)
• We meet Girl (hey, she should meet this Boy we know)
• Boy meets Girl (and we realize they’d be perfect together)
• Conflict ensues and it appears that Boy and Girl cannot be together (and the suspense is unbearable...)
• Conflict is resolved, and Boy and Girl end up together in the end (phew!)
This may be a plain-vanilla narrative, but the truth is that many good stories utilize such a linear narrative. As with any other art form, execution is key. Plenty of fantastic events occur in the original Wizard of Oz movie, but it’s essentially a linear travel narrative until the very end (when we learn that most of the story may have all just been a dream).
Nonlinear
Nonlinear structure rejects the cause-and-effect, chronological sequence. Displaying a character’s memory onscreen as a flashback is an example of a nonlinear narrative device. Many nonlinear narratives are meant to mimic human memory. Some of these narratives can be reconstructed (chronologically) in your head once you’ve seen the whole story (e.g., Memento), whereas others cannot. Some film theorists argue that these movies, which can be reconstructed into chronological order after the fact, are better described as out of sequence. Other narratives are designed precisely so that a chronological sequence cannot be reconstructed (e.g., David Lynch’s Lost Highway). As you can imagine, there are several variations within the general category of nonlinear narrative.
Branching
Interactive storytelling is especially well suited for a particular subtype of nonlinear narrative: branching. A branching narrative allows the path of the story to change as the story is being told (or shown), as in the context of a game. Shifts in the narrative can be based on user interaction, they can be based on environmental factors (e.g., time of day or location), or they can be entirely random.
With Flash’s capabilities, all narrative options are on the table. It’s up to you to determine what kind of structure best serves your story. Depending on the specific project and how you work, you may develop your narrative first and then begin sketching your characters, or you may sketch a character that sparks an idea for a narrative.
Character Design
Your character’s motives and mannerisms contribute greatly to your story. For this reason, it’s important to have a good understanding of your character before you begin animating. Character design is the process of defining your character’s physical and behavioral traits.
Character design is especially important in animation because you are creating your character from scratch; that is, there’s no actor who already has a nose, eyes, shoulders, hair, and a certain way of speaking and moving. It’s up to you to invent all of these characteristics. You should write up any relevant ideas while constructing your narrative. If you want to take your character description a bit further, you can write a story bible. Story bibles are reference documents written for comics and television shows that include detailed information on character, setting, and other story elements. Story bibles are especially helpful for maintaining consistency on projects that have multiple authors or writers.
In addition to creating a written description of your character, you’ll want to design a model sheet.
Model Sheets
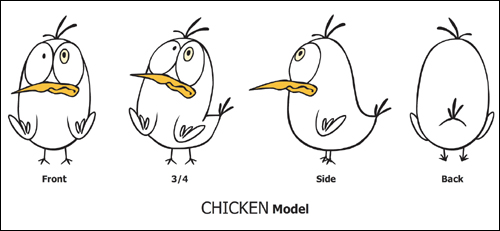
A model sheet depicts a character in several different poses, often from different angles. These poses help to determine how a character will be rendered from various vantage points. Additionally, these poses help to establish the character’s onscreen personality.
For sample model sheets from famous animated television shows, visit http://animationmeat.com/modelsheets/modelsheets.html and http://www.animationarchive.org/2008/09/design-mice-and-duck-model-sheets.html.
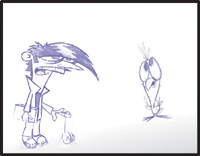
Model sheets serve two distinct purposes: exploration and communication. If it’s early in a project and you’re trying to “figure out” your character, your mode is one of exploration. If you’re ready to begin production and you’re working with a team of animators that need to render a character consistently in every scene, the model sheet serves as a means of communication between animators. A model sheet can be rendered as rough sketches (Figure 1.36) or as polished, full-color drawings (Figure 1.37), depending on the specific project (and its current stage).
Figure 1.36 A rough-sketch model sheet.

Figure 1.37 A polished model sheet.
Once you’ve designed your characters, you can start rendering them into scenes within your narrative. Usually, rough sketches are drawn to determine shot composition and timing. The process of drawing a rough version of your story is known as storyboarding.
In Chapter 2 you’ll see how the rubber meets the road by translating a rough sketch into a polished, animated character.
Storyboarding
A storyboard is a sequence of drawings, as in a comic book or a graphic novel, that serves as a blueprint for your story. The act of “storyboarding” is the process of drawing (and/or laying out) each scene of your movie based on a script or a soundtrack. Think of the storyboard as a visual plan for your project or as a script with sketches instead of words.
Like many other techniques in animation, storyboards were first created at Disney in the 1930s. Since then, the elements of storyboarding have remained essentially unchanged.
Many live-action movies are also storyboarded to help plan shots.
When developing a game, storyboards are useful for mapping out the overall game play, action sequences, and scene breaks. If you’re creating a game or other interactive experience, you may be employing a branching narrative (see the “Types of Narrative” section earlier). If this is the case, your storyboard may require a more complex layout that includes arrows to describe branching outcomes (similar to the look of a flowchart).
A successful animated project is the result of good preparation. Whether your project is a motion picture film, video, animated cartoon, or interactive game, a storyboard is often a necessary part of the production process. If you’re working on your own, you might be able to keep everything in your head, but if you’re working in a team, you’ll want to use a storyboard to communicate your ideas. A storyboard ensures that all animators are on the same page. The storyboard also gives you a feel for how your movie will look and enables you to decide on changes before doing the full-fledged animation.
To learn more about storyboarding, see this interview with a storyboard artist at Pixar (www.pixar.com/artistscorner/joe/interview.html).
Now that you know what a storyboard entails, you might be curious to see what one looks like.
Storyboard Format
Storyboards, like characters, come in all shapes and sizes. All storyboards contain an indication of framing. The frame (in film, not in Flash) denotes the edges of the screen that will display the image. All actions take place within the frame. Each frame of the storyboard translates to a frame in the finished animation. Usually, only frames with important actions are included in the storyboard (i.e., keyframes).
Storyboards can be rough hand-drawn images because their purpose is to save time, but the drawings should be clear enough to make the action evident to someone else. Each frame in the storyboard should include just enough detail to convey the setting, characters, and camera shots (collectively known as blocking).
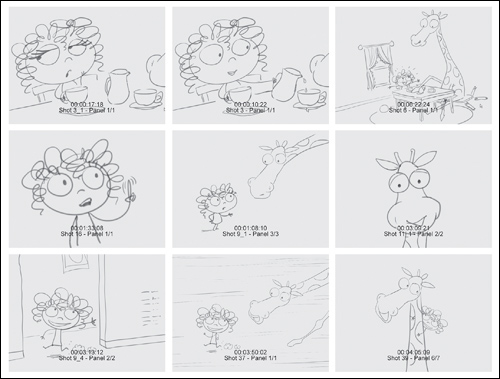
Don’t worry if your drawing skills are lacking, you do not have to be an artist to draw a storyboard. We’ve seen plenty of storyboards from nonillustrators that convey the story or gameplay just fine. Some of the best storyboards have even been drawn on restaurant napkins. It doesn’t really matter how imperfect your storyboard is, as long as it communicates the story visually (Figure 1.38).
Figure 1.38 Drafting a rough storyboard before the actual animation is started can prevent time-consuming revisions later.
Your storyboard page can contain 1, 2, 3, 4, 6, or 8 frames (or panels) of action. If you try to fit more than eight on a page, you’ll end up with some pretty tiny drawings. You can download preformatted storyboard templates or create your own by drawing panels (on paper or in Flash). If you use Flash to create your storyboard and include one action per keyframe, the Stage will serve as your frame border.
If you build your storyboard in Flash, don’t forget that you can use frame labels to include notes.
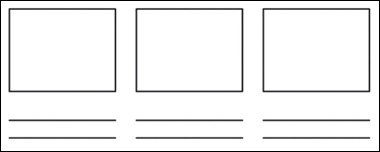
Beyond including a frame border on your storyboard pages, you can also choose to include space for information about the production and/or company, a scene number, dialogue boxes for each frame, descriptions of the actions on each frame, and any other information that you deem relevant to the storyboard (Figure 1.39).
Figure 1.39 This simple storyboard format contains three panels and a space for action, notes, and/or dialogue.
The tools that you use to create your storyboard may affect the particular format that you choose for your storyboard.
You can download preformatted storyboard templates for television and feature animation at http://animationmeat.com/templates/templates.html. You can print this template for a hard copy or import the PDF to Flash and work with it digitally.
Digital tools
Traditionally, storyboards are drawn with pencil on paper, and then each image is scanned and saved as a file. You may prefer to use this method, or you may prefer to remain completely paperless by drawing entirely on the computer. Drawing directly into Flash is certainly a fast and easy way to start your Flash animation project.
There are several digital alternatives to drawing in Flash: Adobe Photoshop, Adobe Illustrator, and Autodesk SketchBook Pro are our favorites, but you can use whatever you are most comfortable with. There is also a program from Toon Boom (http://toonboom.com) called Storyboard Pro that is designed specifically for the creation of storyboards and visual storytelling (Figure 1.40).
Figure 1.40 Toon Boom’s Storyboard Pro software.
Storyboarding on Tablet Devices
With new technology comes new ways of creating content. The iPad from Apple (http://www.apple.com/ipad) can be turned into a portable drawing tablet if you install the Brushes application (http://brushesapp.com), or you can use Autodesk’s SketchBook Pro for mobile devices (http://autodesk.com/sketchbookmobile). These applications are designed so that your finger is the actual drawing tool. But for more precision, you can purchase a Pogo stylus from Ten One Design (http://tenonedesign.com).
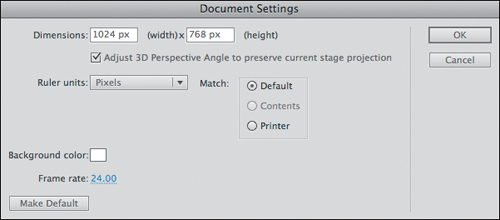
If you will be drawing your storyboard in Flash or any other graphics program, we recommend setting the width and height of the Stage to the same dimensions as your final Flash file. You can locate the dimensions of your Flash file in the Document Settings dialog box (Modify > Document) (Figure 1.41).
Figure 1.41 The Document Settings dialog box; here you can retrieve (as well as set) the width, height, and frame rate of your project.
Consider your output format when deciding on your Flash dimensions. See Chapter 5 for more information.
Now that you’re familiar with potential storyboard formats, let’s address the less tangible elements that constitute a good storyboard.
Storyboard Composition
One of the most important functions of the storyboard is to establish your framing (i.e., shot composition). This is essentially how the camera (and thus, the audience) will see your characters and the scenes they inhabit. Several elements combine to form successfully drawn storyboard images. The following subsections detail the primary elements that should be considered when drawing your storyboard frames.
Setting
Setting determines where the action takes place: inside a building or outside, in a city, a jungle, or perhaps a desert. The setting may be very minimal, such as a simple background texture or color that doesn’t play a large role in the story other than to help provide a specific look and feel to the project. On the other hand, the setting may play an integral part of your project, provided certain areas of the background interact with the character.
Plot
Plot describes what happens to the character(s) in the story or the game. In a game, a plot can be as simple as getting the character from point A to point B, or something more complicated such as accumulating points by collecting various types of hidden objects on different levels. A character may have to traverse a particular terrain and overcome various obstacles before reaching the finish line. Obstacles can be physical obstructions, difficult path choices, trivia questions, or just other people who stand in the character’s way. Conflicts develop as the protagonist attempts to battle the obstacles in a particular path. The conflict might consist of a sequence of events linked by cause and effect (in a linear narrative). The decisive event is the climax—a final conflict that determines whether or not the protagonist will reach the goal. In the event you are planning an interactive game, the climax could be as simple as time running out, or the user reaching the final and most difficult level.
Action
Action determines how the story or game will play out from beginning to end. Actions are the events that drive the plot. When it comes to interactive narratives, the user contributes to those actions (which are generally controlled with ActionScript).
Camera shots
Storyboards are quite useful for deciding on camera shots, as well as on any pans and zooms. Typically, Flash animated shorts and games do not have as many different camera shots as a traditionally animated cartoon, but a new camera angle here and there can be refreshing and can help convey emotions within a scene. There are several traditional camera shots that describe the camera’s distance from the character. In a storyboard, these roughly translate to how much space a character consumes in a particular frame.
• Wide shot (or long shot). This is a shot that shows your entire scene or stage. It can also be called an establishing shot. You will usually see this as the very first shot of a film because it does a good job of setting the scene for your movie. When used in other parts of a story, the wide shot can be used to emphasize a character’s isolation (Figure 1.42).

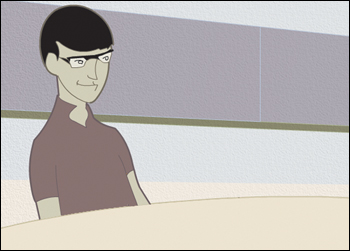
• Medium shot. This type of shot is “closer” to the subject than a wide shot. If the subject is a character, the medium shot would be from about the waist up. The medium shot can also serve as a transition from a wide shot to a close-up. If you don’t transition using a medium shot, going from wide to close-up may be disorienting for the viewer (Figure 1.43).

• Close-up shot. This shot is very close to the subject and tends to show your character from the shoulders up. The Stage could potentially be filled with your character’s head. It’s a very useful shot for showing details of expression and emotion (Figure 1.44).
• Extreme close-up shot. Use the extreme close-up sparingly, especially in any animation. Since animation contains less detail than live-action photography, an animated character’s face may be slightly less engaging than that of a real person (Figure 1.45).
Figure 1.45 An extreme close-up shot.

• Two-shot. This is a shot in which the frame encompasses a view of two people (Figure 1.46).
• Over-the-shoulder shot. This is a great shot to use when two or more characters are interacting with each other. It gives the viewer a solid visual understanding of who is where in the scene. The over-the-shoulder shot is an effective way to transition from one shot to the next (Figure 1.47).
Figure 1.47 An over-the-shoulder shot.

In addition to considering the camera’s relative distance from your characters, you should also consider the camera’s angle when viewing your characters.
Perspective angle
The camera’s perspective (or point of view) determines the angles at which objects are displayed within the frame and creates spatial depths for the scene. The simplest way to imply a camera angle is to add angle lines in the background. Angled lines can add depth to an otherwise flat scene (think railroad tracks trailing off into the distance). Angled lines also serve to draw a viewer’s eye to specific points in your composition.
Different angles can alter the interpretation of a given shot or serve to reinforce a mood that is being conveyed with other elements (e.g., music, dialogue, and actions). The angle you choose can convey a certain relationship between two characters or between the character and the audience. One angle can make your character look powerful; yet another can make your character appear meek and helpless (Figure 1.48).
Figure 1.48 Note how the four different angles depicted invoke four different emotions.

It can be difficult to render characters at an angle if you’re used to drawing them straight on. Rendering characters from various angles can also generate more work for the final animation because it entails creating more new drawings instead of reusing symbols. Even when rendering a character essentially flat, consider angling your background to add depth to your scene (Figure 1.49).
Figure 1.49 Note how the background texture and angled lines lend depth in this frame.
For more tips on perspective and storyboarding in general, visit http://animationmeat.com/notes/televisionanimation/televisionanimation.html. This page contains notes from Brad Bird (director of Iron Giant, The Incredibles, and Ratatouille) on composition, notes on “Storyboarding The Simpsons Way” by Christian Roman (story artist on The Simpsons and Toy Story 3), as well as layout notes from Hanna-Barbera (producers of Scooby-Doo, The Flintstones, and several others) and Spumco (producers of Ren & Stimpy).
Now that we’ve covered the aesthetics of a storyboard, let’s look at an example!
Sausage Kong Storyboard Example
Sausage Kong is a game developed by Thibault Imbert (Adobe Systems Flash Player Product Manager) and Chris. This game started as a simple way to showcase the peer-to-peer capabilities of Flash Player 10.1 by controlling a single character running across the screen on Android mobile devices. What started off as a very simple example quickly grew into a fully interactive Flash game that includes various characters, animation, and a scoring system. Sausage Kong is the result of several fun ideas tossed back and forth by Thibault and Chris via email. At the time, Thibault was living in Paris, France, and Chris lives in Boston, Massachusetts, so it was helpful to construct a storyboard to ensure that both parties were on the same page when it came to determining how the game would work and what assets were necessary to create and program the game. This is a situation in which a rough storyboard came in handy.
The Concept
Within Sausage Kong, the user presses the arrow keys on the keyboard to control the direction of a character (left and right). To start the game, the user presses the spacebar, and a boy jumps in the air. Pigs with parachutes begin floating down from the sky, and the boy has to run back and forth to “catch” them. Once caught, the boy must run toward a grinder machine, and the user presses the spacebar to make the boy throw the pig into the grinder. The grinder cranks out sausages made from the pig. The more sausages made within a predetermined amount of time, the more points earned.
Working from this concept, Chris began creating storyboards.
Storyboard Panels
The first frame of the storyboard shows what the preloader screen will look like. Since the pigs are parachuting from a high elevation, the background environment is an exterior shot with grass, trees, and sky. The preloader includes a percentage load bar as well as a fun animation of sausages dancing in a circle (Figure 1.50).
Figure 1.50 Panel 1 of the Sausage Kong storyboard shows the preloader screen.
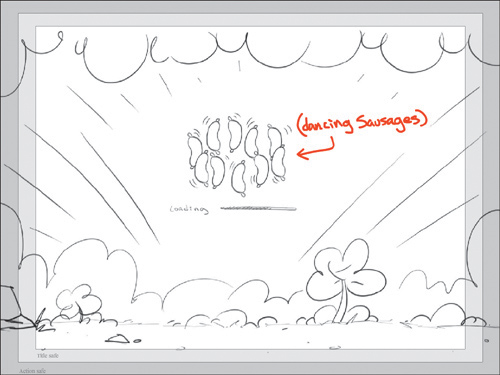
A preloader serves as a visual indication of progress while file assets are loading.
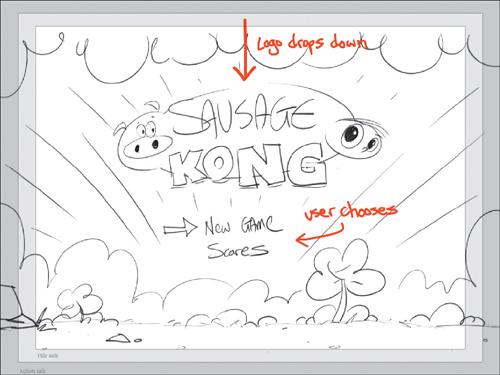
The second frame of the storyboard roughly shows how the introductory splash page will look. The preloader disappears, and the game logo drops down from outside the viewable area, as indicated by the red arrow. When creating a storyboard in Flash, it can be useful to dedicate an additional layer just for drawing arrows and notes to specify how various elements will move (Figure 1.51).
Figure 1.51 Panel 2 of the Sausage Kong storyboard shows the splash screen.
If the user selects New Game (with the arrow keys), the logo will disappear and the game begins. The third drawing in the storyboard shows the character entering from a hole that appears in the ground. The boy jumps up from the hole, the hole disappears, and the boy lands safely on the ground (Figure 1.52).
Figure 1.52 Panel 3 of the Sausage Kong storyboard shows the boy entering.

Immediately, the game starts as the pigs begin falling, and the timer (in the upper-left corner) appears and starts counting from 0 to 60 seconds (Figure 1.53).
Figure 1.53 Panel 4 of the Sausage Kong storyboard shows the game play.
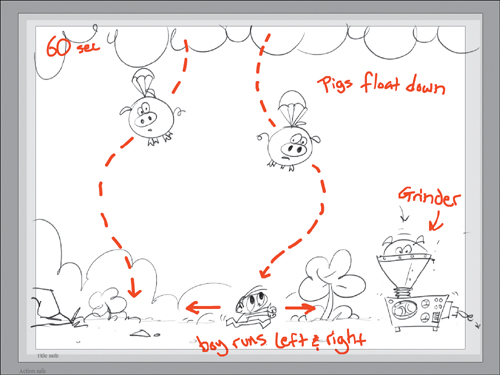
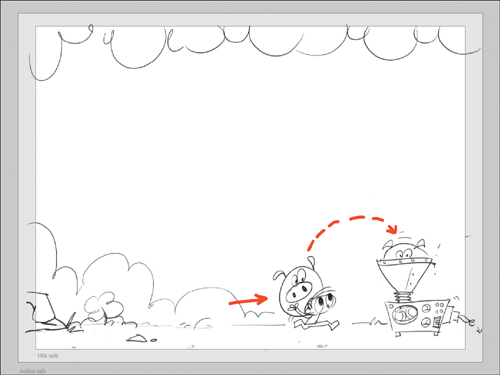
The fifth frame simply shows how the boy will run toward the grinder and throw the pig into it; the resulting sausages made from the pig are also shown (Figure 1.54).
Figure 1.54 Panel 5 of the Sausage Kong storyboard shows the boy throwing a pig into the grinder.
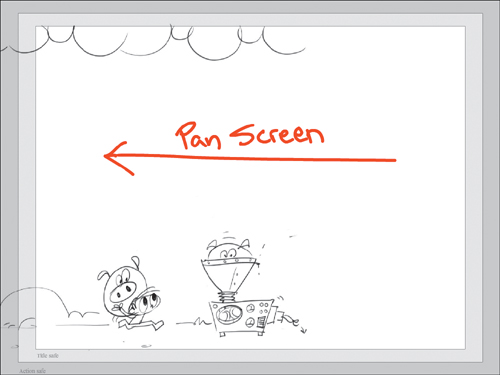
When time has elapsed, the game will end and the entire screen will pan to the left (Figure 1.55).
Figure 1.55 Panel 6 of the Sausage Kong storyboard shows the screen panning to the left.
In this screen, a meat truck will drive in from the right in reverse (Figure 1.56).
Figure 1.56 Panel 7 of the Sausage Kong storyboard shows the meat truck entering from right to left.
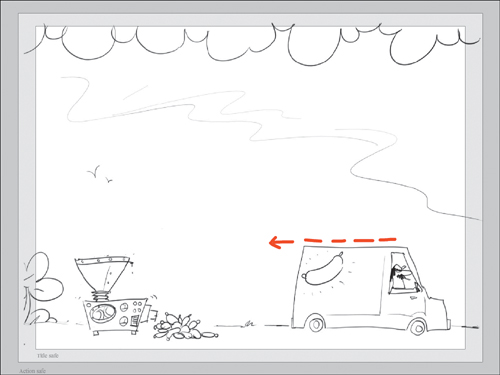
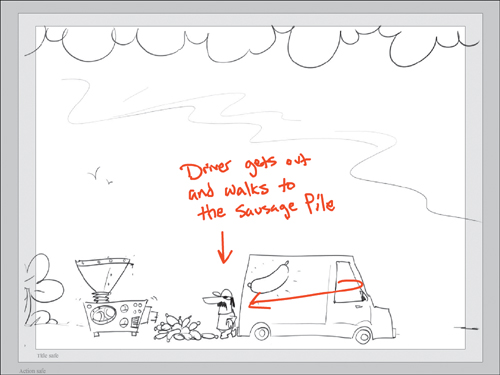
Next, the driver exits the truck and walks to the sausage pile (Figure 1.57).
Figure 1.57 Panel 8 of the Sausage Kong storyboard shows the driver exiting the truck and walking toward the sausages.
The high score and the player’s score will appear while the driver throws the sausages into the back of his truck (Figure 1.58).
Figure 1.58 Panel 9 of the Sausage Kong storyboard shows the driver loading the truck with sausages.

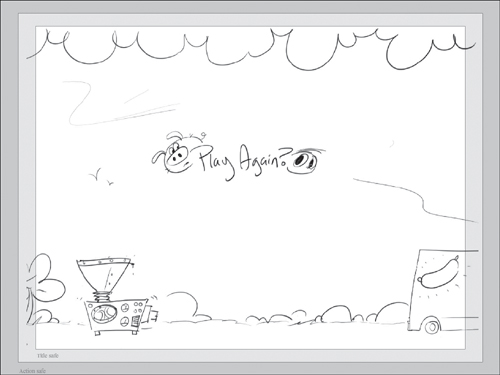
The last frame shows a button to play the game again while the driver drives off the screen to the right (Figure 1.59).
Figure 1.59 Panel 10 of the Sausage Kong storyboard shows the “play again” screen.
In storyboard format, the visual plan could be shared between everyone involved in the project. A concise storyboard makes for a great starting point for projects of all scopes and sizes.
If you’re interested in learning more about storyboarding, be sure to check out Prepare to Board! Creating Story and Characters for Animated Features and Shorts by Nancy Beiman (Focal Press, 2007).
For more storyboard examples, visit:
• http://animationarchive.org/2006/03/media-john-ks-storyboard-for-stimpys.html
• http://johnkstuff.blogspot.com/2009/10/storyboard-slug-stimpys-invention.html
• http://characterdesign.blogspot.com/2009/05/pixars-up-storyboards.html
When you’ve completed your storyboard, you can jump right into production, or you can first create an animatic.
Animatics
An animatic is an animated (or timed) version of your storyboard. The purpose of an animatic is to work out the timing of each shot, as well as the timing of specific animated sequences and key poses of the characters. An animatic often includes rough dialogue, music, or narration, so that the shots can be timed with the soundtrack. An animatic can give you a good idea of how your shots will play as a sequence and provide a better feel for the overall pacing of the animation. Think of the animatic as the rough draft for your animation.
Building an animatic in Flash is a rather straightforward process, since Flash is time-based and allows you to incorporate audio. When building an animatic in Flash, it’s recommended that your file dimensions match your final project dimensions (which means planning ahead), and you only include one panel (shot) per keyframe. Having your animatic shots fill the Stage will make your animatic file useful as a template when you begin building your final animation.
The rhythm of your animation is critical. Every story has a certain tempo, much like a musical composition. You are the songwriter, and you decide how fast or how slow your song will be. Unfortunately, this is often not as easy as it sounds. The animatic phase allows you to make last-minute adjustments to the storyboard and soundtrack before starting production. This process can save money and ensure that larger projects have fewer scenes that later hit the cutting room floor. It is much more difficult to make timing changes after the animation is complete.
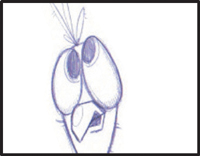
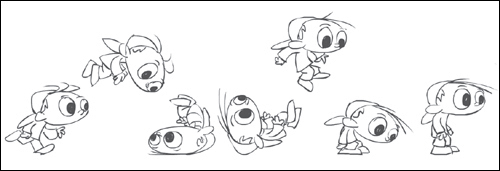
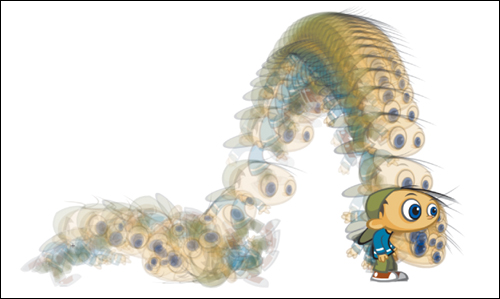
Chris often creates a character animatic using a sequence of key poses. This helps him adjust the overall timing of the action he wants his character to perform. To make his MudBubble character perform a forward body roll and then leap high in the air and land standing up, he drew a series of key poses (Figure 1.60).
Figure 1.60 Chris’s character’s key poses roughly drawn in Flash using the Brush tool.
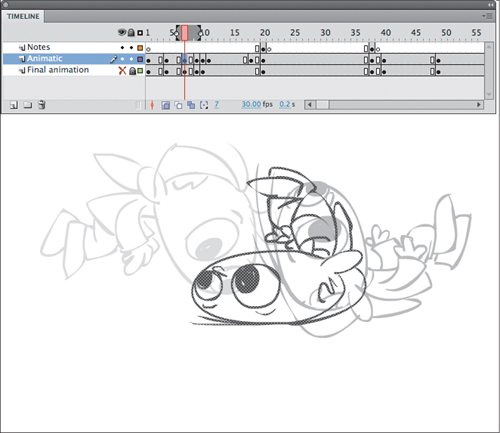
Chris then placed each key pose in its own keyframe and inserted frames between each keyframe to work out the timing of the overall action sequence. Quick actions include fewer frames (such as the roll); in contrast, the jumping is slower and therefore more frames are included between the key poses (Figure 1.61).
Figure 1.61 An animatic sequence created by inserting frames between key poses.
When you’ve completed your storyboard or animatic in Flash, you can go back to frame 1 and play back your Timeline (Return/Enter). You can then get a feel for the timing of your animation sequence. It is very important to make sure the timing is perfect before proceeding to the final animation stage. Some sequences may feel too long or short as you watch them. Insert and/or remove frames to adjust the timing. You may even decide additional sequences are needed, or in some cases, that some existing sequences should be eliminated. Ultimately, knowing how long or short a specific sequence should be is often based on your intuition as an animator (Figure 1.62).
Figure 1.62 The final animated sequence.
To find more examples of animatics, check the DVD special features of your favorite animated television show or feature film. Many of them include scenes from the animatic.
Now you’re ready to start creating the actual animation and writing some code. Chapter 2 will focus on building an animated character. Chapter 3 will show you how to make your characters interactive.