Chapter 4. Workflow Automation
Animation is an intensely creative art. It requires an understanding not only of shape and color, but also of weight, movement, and timing. Animators often work in teams because creating the illusion of life on a two-dimensional screen is a laborious undertaking. Any minuscule loss of form, even for a fraction of a second, chips away at the illusion. To maintain this illusion for the audience, animators need to exercise a great deal of control over the medium. Every measure of control translates into a choice, which can quickly become overwhelming, especially when several steps are needed to enact each choice.
In this chapter, you’ll learn how to make Flash do the heavy lifting for you by taking the complicated sets of choices and automating them into single steps. By simplifying the steps involved in creating your animation, you can focus on the choices that really matter—those involving shape, color, weight, movement, and timing.
The goals for this chapter include:
• Learn some Flash extensibility language basics
• Write scripts to automate common Flash animation tasks
• Integrate user interaction into the scripts
• Build a Flash panel from scratch
You’ll also learn the basics of sharing what you’ve created in this chapter with others as well as where to look for additional resources. By the time you’ve finished this chapter you’ll be an animator and an automator.
Why Automate?
Suppose you’re creating a three-minute animation in Flash that includes a character speaking onscreen for approximately half the duration of the piece. At 24 frames per second (fps), that’s 2,160 potential mouth shapes needed to create the illusion of speech. Although altering every frame may not be necessary to create the illusion of speech, even the modification of every other frame would require 1,080 new mouth shapes.
Now suppose that for each of those 1,080 shapes you must do the following:
1. Scrub the Timeline over the current frame once or twice to hear the audio.
2. Select the symbol on Stage by clicking on it.
3. Highlight the first frame field in the Properties panel by clicking and dragging.
4. Remember the number of the frame inside the mouth symbol containing the mouth shape (which corresponds to the audio you heard on the frame).
5. Type the frame number into the keypad.
6. Press the Enter key.
7. Scrub the playhead to the next frame.
All told, this entire process translates to approximately one click, three to four click and drags, and two to three key presses on the keyboard. In addition, the mouse must be moved from the Timeline to the Stage to the Properties panel; all the while, your gaze needs to be darting back and forth between parts of the screen and the keyboard for each new mouth frame for 1,080 frames.
Clearly, the time spent on these actions adds up. If you assume that each frame requires at least 30 seconds to sync, you’ve just spent nine hours lip syncing (and you probably now have some repetitive strain injuries to boot). What if you could reduce the entire process to only four to five clicks—without dragging, keyboarding, and recalling frame numbers—and what if your mouse only needed to traverse an area of 200 by 350 pixels? This latter scenario might only require about ten seconds of your time per frame, which translates into only three hours of lip syncing! Now you’ve reduced your animating time by two-thirds with absolutely no loss of creative control. In fact, a greater proportion of your brain is likely to still be intact after only three hours of this process! Also, if you’re getting paid a fixed amount of money for the project, you’ve just tripled your hourly income for that section of the job.

See the section on lip syncing in Chapter 2 to learn more about FrameSync. You can download the extension from the Extensions folder on the CD included with this book or from http://ajarproductions.com/blog/flash-extensions.
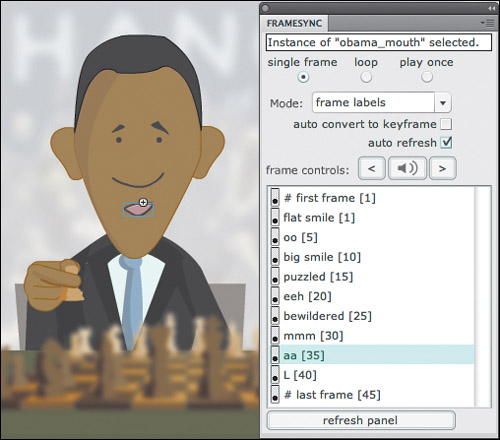
This more direct approach can be accomplished with a coding language called JavaScript Flash (JSFL). Actually, the rapid lip-syncing process just described can be achieved using a free extension called FrameSync that can be added to Flash (Figure 4.1). All the functionality in FrameSync was built with ActionScript and JSFL. The examples you’ll work with throughout this chapter will be simpler than FrameSync in terms of coding, but like FrameSync, they’ll be time-savers and are geared specifically toward animation tasks. As a general rule, anytime you find that you’re doing the same thing more than two or three times in Flash, there’s probably something JSFL can do to help you.
Figure 4.1 The FrameSync panel using JSFL to speed up the lip-syncing process.
What Is JSFL?
The term JSFL was introduced in Flash MX 2004. Normal user interactions that occur on the Stage, in the toolbar, on the Timeline, and elsewhere within Flash occur within the authoring environment. Specifically written to interact with the Flash Professional authoring environment, JSFL is a variant of JavaScript that functions much like a user, and as such, can do nearly everything that a user can do within Flash, such as create layers, create objects, select frames, manipulate Library items, open files, and save files. In addition, JSFL allows you to script a few tasks that users cannot normally perform (at least not easily or quickly). Anything made with JSFL can be referred to as an extension, because it extends the capabilities of Flash. You can effectively house extensions within the following regions of the authoring environment: in the Commands menu, in a SWF panel containing buttons and graphics, and as a tool in the toolbox. This chapter focuses primarily on commands.
![]()
Extensions in other systems are sometimes referred to as plug-ins, macros, or add-ons. These terms all describe similar concepts that add functionality to an application.
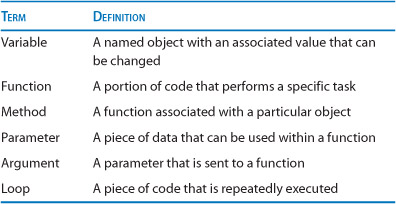
Although this chapter is geared toward animators, JSFL is a scripting language. Don’t worry if you don’t understand every aspect of the language. Focus on completing the examples. It may take time for new concepts to sink in. The words scripting, programming, and coding will be used interchangeably to mean writing code. Refer to Table 4.1 for any scripting terms that may be unfamiliar to you while reading the chapter.
Table 4.1 Scripting terms used in this chapter
You create a new JSFL script by choosing File > New and selecting Flash JavaScript File in the New Document dialog box. The file extension for a JSFL script is always .jsfl. It should be noted that JSFL is distinct from ActionScript. The latter is compiled into a SWF, and that SWF can play in the ubiquitous Flash Player. On the other hand, JSFL code is executed on the spot and is used to control the Flash Professional authoring environment. Both JSFL and ActionScript are based on a script standard known as ECMAScript. Whereas the “vocabulary” of JSFL is much smaller than that of ActionScript 3.0, much of the know-how gained in one language will be applicable in the other.
If you’re familiar with other scripting languages, such as ExtendScript or AppleScript, you may be pleasantly surprised with how rapidly JSFL executes. The language is an integral part of the Flash application and is used by the Adobe Flash team to test features for quality assurance. The speed of execution makes JSFL excellent for batch processing and complex actions. In short, JSFL enables the animator to shed hundreds of redundant mouse clicks while saving heaps of time. To date, each Flash Professional update has included a few new commands for the JSFL Application Programming Interface (API), but most of the API has remained consistent since Flash MX 2004.
Your Buddy, DOM
Everything that you can manipulate with code in JSFL is considered an object. The Document Object Model (DOM) is basically the hierarchy or structure (model) of objects within a particular document. If you’ve written JavaScript for a web browser, you’re probably somewhat familiar with this idea. In the case of the browser, you’re traversing the structure of an HTML document to gain access (and make changes) to tags and content.
The good news is that even though you may never have thought about it before, you’re already familiar with the Flash DOM. There’s an order to everything you do within a Flash document, and since you are reading this book, we can assume that you implicitly understand this order. Let’s first consider some objects in Flash and how they relate to each other, starting with frames and layers. Which of the following options makes more immediate sense to you?
• A frame on a layer
• A layer on a frame
If the latter makes you scrunch up your nose and wonder how that might even be possible, you do possess an implicit awareness of the DOM. Without this organization of objects, it wouldn’t be possible to make much sense of anything in Flash.
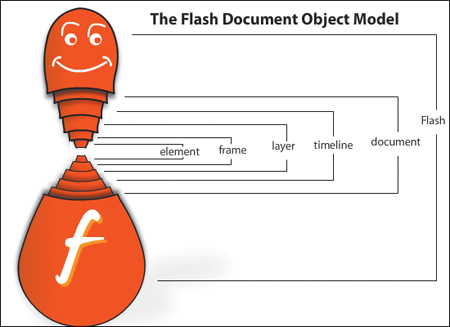
The most basic Stage object in Flash is called an element. All Stage objects—for example, bitmaps, groups, graphic symbols, and movieclip symbols—inherit the properties and methods of a basic element. Here’s a representation of the hierarchy for an element that resides on the Flash Stage:
Flash > Document > Timeline > Layer > Frame > Element
In reverse order and translated into plain Flenglish (English for Flash users): An element is on a frame that is on a layer, and that layer is on a Timeline within a document that is open in Flash.
In JSFL, that same hierarchy is written as follows:
![]()
Properties within objects, which can also be complex objects, are referenced using dot (.) syntax, just as they are in ActionScript. The object references in the code sample are actually arrays (collections of objects) containing several items. The square brackets are used to reference objects within an array. The zero, in array notation, denotes the first item in an array. So, in Flenglish, the preceding code references the first element, on the first frame, on the first layer, within the first Timeline (scene) of the first document that is open in Flash. Flash will not recognize any attempt to reference the first element on the first layer because a layer contains frames, not elements (not directly, at least). Each object in the DOM operates like a Russian doll that experiences a parent doll and a child doll (with the exception of the outermost and innermost objects). No object in the DOM has contact with what’s inside its child object or outside of its parent object (Figure 4.2).
Figure 4.2 The Flash DOM hierarchy.
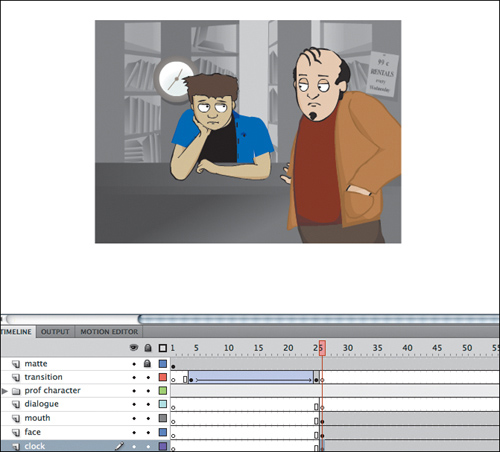
Consider this situation: Suppose an art director has a Flash file with an animated scene, and said art director wants you to hang a clock on the wall within that scene. You are told the layer on which to place the illustration, so that the clock doesn’t end up obscuring the main character’s face. However, nobody informed you that there’s a transition at the beginning of the scene. Being a savvy animator, you scrub through the Timeline after inserting the clock to verify that everything looks OK, but you notice a problem. The clock is hanging in empty space on the first frame (Figure 4.3). As a fix, you move the starting keyframe for the clock to align it with the starting keyframes for the other layers with artwork (Figure 4.4). Everything looks good now, thanks to the fact that you were able to extend beyond the literal directions given to you.
Figure 4.3 The clock hanging in empty space.
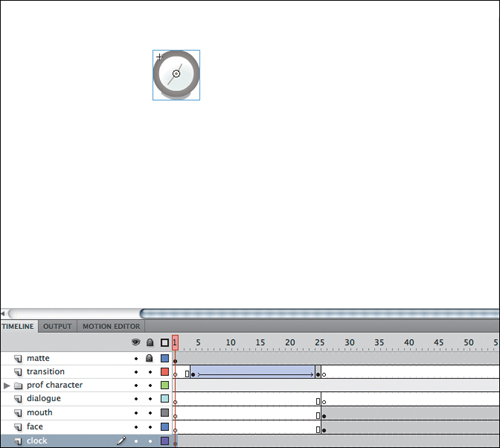
Figure 4.4 The clock hanging where it should be.
Keep in mind that the JSFL interpreter is not as smart as you are, so it will need you to spell out everything very clearly. If you instruct it to do something to an element on a layer, rather than to an element on a frame on a layer, it won’t understand: Your script will stop executing and alert you with an error. The upside of JSFL’s literal-mindedness is that it is quite reliable. Again, your skills on the Flash Stage already give you a leg up in understanding how to interact with the Flash DOM. You also have an eager friend who is ready to bridge the gap between the authoring environment and the scripting API: the History panel.
Writing Scripts to Control Flash
The History panel is your conduit from animating on the Flash Stage to writing code in the Script Editor. The History panel stores all the actions you take within a Flash document: creating a new layer, editing a Library item, adding a new scene, drawing a shape, and so on. As such, the History panel is a great way to revert your document to an earlier state, but it’s also a great way to peer inside Flash and see what steps can be automated.
Getting Started with the History Panel
Let’s take a look at the basic workings of the History panel and how you can use it to associate JSFL code with actions that are occurring on Stage.
1. Create a new Flash document by choosing File > New and then selecting ActionScript 3.0 in the New Document dialog box.
2. Open the History panel by choosing Window > Other Panels > History.
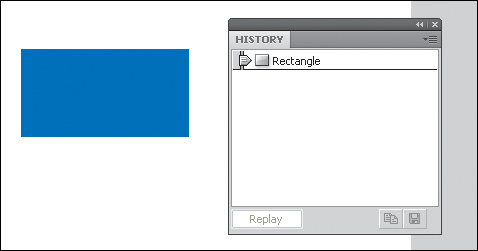
3. Select the Rectangle tool, make sure there is a fill color but no stroke color, and draw a rectangle on the Stage. Notice that this action is recorded in the History panel (Figure 4.5).
Figure 4.5 The new rectangle is recorded in the History panel.
4. Click the menu on the top right of the History panel to change the display format and tooltip display (Figure 4.6).
Figure 4.6 Change the History panel display using the menu at the top right.
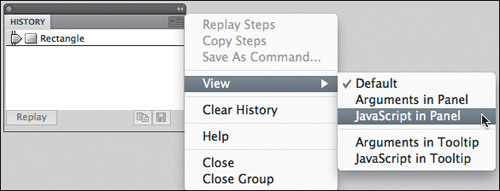
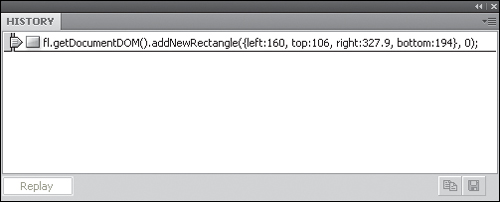
5. Change the display to show JavaScript in Panel if it’s not selected already (Figure 4.7).
Figure 4.7 JSFL code is displayed in the History panel.
![]()
Not all actions in the History panel can be replicated with JSFL. If an action cannot be replicated with JSFL, it will appear with a red X in the History panel, and there will be a keyword or description in parentheses rather than a line of JavaScript.
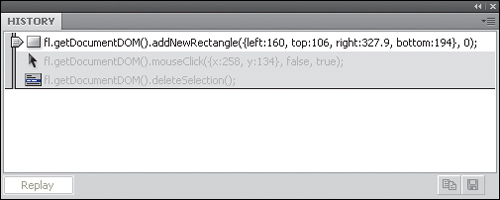
6. Switch to the Selection tool. Select the rectangle on the Stage by clicking on it. Then delete the rectangle by pressing the Delete key on your keyboard.
7. On the left side of the History panel, drag the slider up so that it’s parallel to the original rectangle command. Note that sliding the arrow undid the deletion of the rectangle. This slider acts as an undo and redo mechanism (Figure 4.8).
Figure 4.8 Here the History slider is used as an undo.
8. Drag the slider down to the deleteSelection command (Figure 4.9). Select the original addNewRectangle command and click the Replay button. This will create a rectangle with the same dimensions as those of the original rectangle (Figure 4.10).
Figure 4.9 Here the slider is used as a redo (before clicking Replay).

Figure 4.10 After clicking the Replay button.


You can select multiple steps in the History panel using the Command (Mac) or Ctrl (Windows) key. You can also select continuous steps by clicking on the first item, holding Shift, and then clicking on the last item.
If this is as far down the rabbit hole as you’d like to venture, you can just save your script as a command. To save the command from the History panel, select the desired steps within the History panel and click the button showing the disk icon in the lower-right corner (Figure 4.11). As a result, you will be prompted to name your command, which will then be available via the Commands menu. Be sure to at least skim ahead in this chapter to the section on adding a keyboard shortcut to your command.
Figure 4.11 Save your script as a command from the History panel.
Moving from the History Panel to a Script
The History panel is a great place to start automating, but it only allows you to repeat actions that you’ve already taken. Let’s move the JSFL into the Script Editor so you can start generating new actions.
1. With only the addNewRectangle command still selected, click the Copy Steps button in the bottom right of the History panel (Figure 4.12).
Figure 4.12 The Copy Steps button allows you to copy selected steps to your clipboard.
2. Drag the undo/redo slider to the very top of the History panel to revert the document to its opened state.
3. Choose File > New. When the New Document dialog box appears, select Flash JavaScript File and click OK.
4. Paste the stored command into the newly created script file by choosing Edit > Paste.
5. Click the Run Script button (Figure 4.13) at the top of the Script Editor and return to the Flash document.
Figure 4.13 The Run Script button inside the Flash Script Editor executes the current script.

Note that a rectangle has been drawn on the Stage in the same place and with the same dimensions as those of the initial rectangle drawn using the Rectangle tool (Figure 4.14).
Figure 4.14 The script successfully draws the rectangle.

Now you’re able to control the Flash Professional authoring environment, aka the Flash Integrated Development Environment (IDE), using a script, which is pretty cool in its own right. At this point, though, your rectangle has somewhat random and meaningless dimensions. In the next section, you’ll leverage some information from the Flash DOM to make a rectangle using dimensions that will be more useful.

To launch the help documents, choose Help > Flash Help. In the Adobe Community Help window, select Extending Flash Professional CS5. You’ll see a list of contents on the left (mainly JSFL objects).
The help documents are a programmer’s best friend. Get to know the Extending Flash help documents. It is highly recommended that you download a PDF to your local drive using the link provided on the help pages. The PDF is faster to navigate than any other format. There’s no reason to memorize all the commands and properties within the JSFL API; just keep your PDF handy.
Composing a Smarter Script
You’ll now tweak the current script so that the new rectangle matches the current size of the Stage. Your rectangle will then be useful as a Stage background or a background for new symbols. By referring to the Extending Flash CS5 Professional help documents, you can see that a Flash document contains simple height and width properties, just like those of a Movieclip object in ActionScript. You’ll utilize those properties when creating your rectangle.
1. Create a new variable to store the current document object by adding this code to the top of your script:
var dom = fl.getDocumentDOM();
2. Replace fl.getDocumentDOM() in the original code with dom.
3. Set the top and left position for the rectangle to 0, and the right and bottom to dom.width and dom.height, respectively. The script should now read:
![]()

A new variable is created using the var keyword.
Now you have a rectangle you can use! Steps 1 and 2 just did a bit of housekeeping to organize your script and make it more readable, so it really only took you one step to make the History panel step more useful. By collecting data from the current document (like Stage height and width), you can make highly responsive scripts that will save you time. The next section shows you where to save your script so you can run it without opening the Script Editor.
Parameters in Square Brackets
One way of getting the most out of the Flash help documents is knowing how to read the method usage descriptions. These descriptions will help you understand what arguments to send to each method:
• When a parameter is located within square brackets in a method definition of a help document page, it denotes that the parameter(s) is optional.
• In the following method usage description from the help documents, the parameter boundingRectangle is obligatory, but the parameter for suppressing the fill of the new rectangle as well as the parameter for suppressing the stroke are both optional:
![]()
• To suppress the stroke, an argument must initially be passed for the bSuppressFill parameter. Here’s an example that suppresses the stroke, but not the fill:
![]()
Saving a Script as a Command
To run your script conveniently from Flash, it helps to be able to access your script from within the Flash authoring environment. The simplest way to access a script inside of Flash is via the Commands menu. To add your script to the Commands menu, place the script file inside the Commands directory. The Commands directory is located within the Flash Configuration directory. The Extending Flash CS5 help document lists the following locations for the three common operating systems:
• Windows Vista. boot driveUsersusernameLocal SettingsApplication DataAdobeFlash CS5languageConfiguration
• Windows XP. boot driveDocuments and SettingsusernameLocal SettingsApplication DataAdobeFlash CS5languageConfiguration
• Mac OS X. Macintosh HD/Users/username/Library/Application Support/Adobe/Flash CS5/language/Configuration/
If you still have trouble locating your Configuration directory, you can create and execute a simple new JSFL script with the following code:
fl.trace(fl.configDirectory);
This script displays the path to your Configuration directory in the Output panel. When you’ve found your configuration directory, save your existing script as Create Stage Size Rectangle.jsfl in the Configuration/Commands directory.
![]()
Copies of the finished scripts can be found in the Chapter 4 folder on the CD that accompanies this book.
Running a Saved Command
With your script saved as a command, you can now access the command!
1. Create a new Flash document by choosing File > New and selecting ActionScript 3.0.
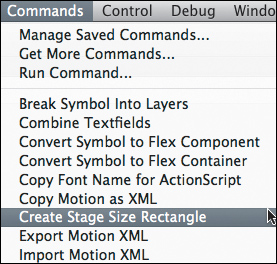
2. Run the command by choosing Commands > Create Stage Size Rectangle (Figure 4.15).
Figure 4.15 The command appears in the Commands menu.

Be careful when opening a JSFL script from your operating system’s file browser. Rather than opening the script in Flash’s Script Editor, Flash will actually execute the script. If you want to open the script for editing, choose File > Open inside Flash.
Voila! You have a rectangle with dimensions that match the Stage. Once written, commands are quite easy to run. The power of a command as an automation tool lies in the fact that a command only has to be written once. The command can then be run instantly, whenever you need it.
![]()
The rectangle was created using the currently selected fill and stroke colors from the toolbar. If you had object drawing mode selected when last using a drawing tool, your rectangle will be a shape object; otherwise, the rectangle will exist as raw vector data.
Creating a Matte
Animators and designers often find it necessary to use a matte or a mask to hide artwork at the edge of the Stage. A matte covers up areas that are not to be displayed. A mask operates by only showing content within the bounds of the mask’s shape. Both mattes and masks must sit on a layer above all others to function properly. Both devices are used to hide objects—typically those that are entering into or exiting from view—at the edge of the Stage. One reason to use a matte or a mask is to prevent these hidden objects from being seen when a SWF is scaled. The experience of seeing what is supposed to be hidden undermines the illusion that the artist is trying to create. This trespass across the imaginary wall separating an audience from the performance on a Stage is sometimes referred to as “breaking the fourth wall.”
In Flash, it can be frustrating to work with masks because the mask and all the “masked” layers need to be locked for the mask to appear correctly on the Stage. A matte, on the other hand, appears on the Stage just as it will in the published SWF. So, a matte can also serve as Stage guidelines for the animator. For these reasons, some Flash users prefer to use mattes instead of masks.
Just as there are numerous approaches to accomplishing a task using the tools in the Flash authoring environment, there are a number of ways to accomplish the same end using JSFL. The approach to a problem in JSFL often parallels what a user would be doing onscreen in the authoring environment. So, let’s consider this issue when creating a matte script.
![]()
Identifying Raw Vector Data
Raw vector graphics are part of Flash’s default Merge Drawing Model, which automatically merges shapes that overlap. A raw vector, when selected, appears as though it’s covered with a dot pattern. In contrast, shape objects will appear with a “marquee” border when selected, just as a symbol or group would appear (Figure 4.16). Shape objects are part of the Object Drawing Model, which does merge shapes that overlap.
Figure 4.16 Display differences with shape objects and raw vector data.

Start by making a mental map of the steps that the script might follow. One way to create a matte involves drawing two rectangles and using the inside rectangle to cut a hole in the outer rectangle. You can refer to this strategy as the “two-rectangles” method. Once you have the two rectangles, you can approach the next step in two different ways. If the rectangles you drew are not shape objects and they have different color fills, simply deselecting the rectangles and deleting the inner rectangle will leave you with the matte appearance that you’re seeking. Alternatively, you could draw two rectangles, make sure both rectangles are shape objects, and use document.punch() (Modify > Combine Objects > Punch) to generate your matte shape. You can verify that this works by replicating these steps on the Stage. If you copy the steps from the History panel, you’ll be most of the way toward having a completed matte script.
One problem with both of the two-rectangles approaches is that they require you to change the object drawing mode (and/or fill color) setting in the user interface. So you should first check to see whether object drawing mode is off or on (depending on the method), and then restore the setting when you’re finished, so you don’t interrupt your workflow (or the workflow of other users you might share the script with).

If you check the help page for fl.objectDrawingMode, which can toggle object drawing mode on or off, you’ll notice that Flash 8 is listed under Availability. This means that the fl.objectDrawingMode property was not available in Flash MX 2004 (the version before Flash 8). Pay special attention to the availability of the properties and methods that you use if you intend to distribute your extension to others.
Let’s go back to the proverbial drawing board and come up with a strategy that will create a matte without requiring you to fiddle with the user settings. This time let’s consider something that would be difficult for a user to accomplish on Stage. Instead of worrying about object drawing mode, draw a rectangle, select it, and then break it apart into raw vector data (Modify > Break Apart). You could then draw a selection rectangle inside your rectangle on the Stage, and then delete that selection, leaving a hollow frame that surrounds the Stage area. A quick check in the documentation reveals that there is a document.setSelectionRect() method. Accomplishing this type of selection would be difficult (if not impossible) for a user, because the selection would start with a mouse click. As soon as the user clicks, the entire fill is selected. This is a case where JSFL can take an action that a user cannot. Let’s now put this “single-rectangle” strategy to the test.
1. You’ll build on the existing Create Stage Size Rectangle script (choose File > Open to open the script if you’ve closed it) to create your matte script. Choose File > Save As and save the script (also in the Commands directory) as Create Stage Matte.jsfl. This sequence will not overwrite your previous script as long as you choose Save As.

You can also work with the Create Stage Size Rectangle script and ActionScript to create an effect similar to your Stage matte script using masking. Do this by converting the rectangle into a movieclip symbol and using that symbol as an ActionScript mask for the Stage. Note that the masking set in ActionScript only shows when the file is compiled. The masking will not be apparent within the Flash authoring environment.
2. Copy the original addNewRectangle line and paste it below the first one:

3. Modify the second line so that it calls the setSelectionRect instead. Change the second parameter to true to force the selection to replace any existing selections:

4. Add a variable at the top of the script set to however many pixels you like to control matte thickness. Then update your original rectangle to account for the extra area created by the matte thickness, which will extend beyond the bounds of the Stage on all sides:

5. Add a couple of optional arguments to keep the fill but suppress the stroke, since the stroke won’t be needed for a matte:

6. Check to see if object drawing mode is indeed turned on, and then break apart your rectangle before making a selection. To use the breakApart() command, you need to be certain that you’ve first made a selection. Add the following two lines of code between the addNewRectangle and setSelectionRect lines:
dom.selectAll();
if(fl.objectDrawingMode) dom.breakApart();
7. Using selectAll is imprecise because there might be something else on the layer you don’t want to select, but you’ll improve on that step in a moment. Delete your selection to form the cut-out part of the matte by adding this line to the end of the script:
dom.deleteSelection();
If you run the current script on a blank document, it works as intended. Unfortunately, if you run it in almost any other scenario, it will likely wreak havoc on your existing artwork. One thing you can do to improve your single-rectangle script is to situate the matte on its own named layer. Then you’ll be sure to select the contents of that layer rather than selecting all. Ideally, this will prevent your selection rectangle (that you then delete) from also selecting artwork on other layers as well.
Jumping ahead a few steps, the astute reader may see a speed bump on the horizon. The selection rectangle selects content on all available layers, so when you delete your selection, you’ll still be deleting content from other layers as well. You’ll rectify that in the steps that follow.
Improving the matte script
You can use several approaches to resolve the problem introduced by the selection rectangle:
• Loop through and remove items from the selection that are not contained on your new layer prior to deleting the selection.
• Use a mouse click to select only your rectangle (yes, JSFL can do that, too).
• Convert your rectangle into a shape object or a group, enter edit mode, and safely make your deletion there.
• Start over and try an entirely different approach.
Let’s try the third option listed, the edit mode approach. Even if you make your object into a group, you still have to determine if your rectangle is a shape object once you’re in edit mode. If you convert the rectangle into a shape object, you know you’ll be dealing with a raw-vector rectangle inside edit mode. However, if your rectangle is a shape object from the beginning, the rectangle will be unaffected by being made into a shape object again, so you’ll attempt to convert the rectangle to a shape object regardless. Test this out: Make an element into a drawing object by selecting the element on Stage and choosing Modify > Combine Object > Union. Then enter edit (in place) mode by double-clicking on the shape object. The shape within the shape object will be raw vector data regardless of whether the shape was a shape object to begin with.
1. Create a variable that will reference the current Timeline. Insert the following text just below the declaration of the dom variable near the top of the script:
var tl = dom.getTimeline();
2. Create a new layer below the matteThickness variable. The addNewLayer method will return the index of the new layer. The index refers to the position of the layer within its parent Timeline. You’ll store the index so that you can use it later:
var newLayerNum = tl.addNewLayer("matte");
3. Make your selection more precise by assigning the elements contained on the first frame of your new layer (which will just be your rectangle) as the document’s current selection. You’re using the elements object because it’s already in array format, and dom.selection only accepts an array. Replace the selectAll line with the following code:
![]()
4. Remove the breakApart line entirely. You’ve rendered the break apart step obsolete.
5. Convert the selection into a shape object, and enter edit mode by adding these two lines right after the line in step 3:
dom.union();
dom.enterEditMode('inPlace'),
6. To clean up, exit out of edit mode and lock your matte layer by adding these two lines to the end of the script:
dom.exitEditMode();
tl.setLayerProperty("locked", true);
If you want to make sure your matte layer is on top of the pile, you can add this line to the end of your script:
tl.reorderLayer(newLayerNum, 0);
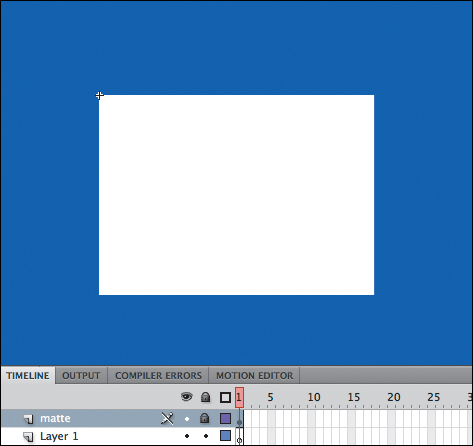
7. Open a new ActionScript 3.0 document and run your script by choosing Commands > Create Stage Matte (Figure 4.17).
Figure 4.17 The Stage matte in action after the Create Stage Matte command has been run.
The full script should now read as follows:
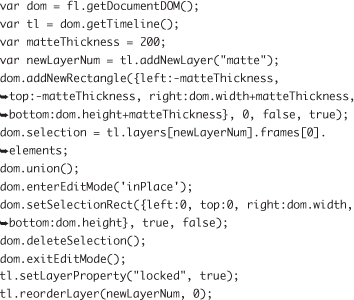
If you were curious as to what your script would have looked like if you had initially followed the two-rectangles approach using object drawing mode, here it is with the drawing mode stored and then restored after all the other code has executed:
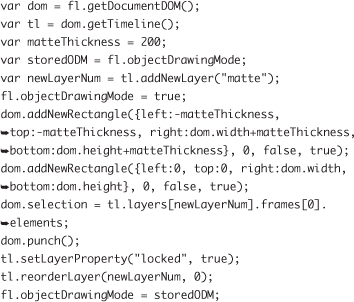
The two-rectangles method has the same number of lines as the single-rectangle/edit-mode method. Both scripts are fairly robust (i.e., tough to “break” and will work in many scenarios). Both scripts require at least Flash 8, because they use aspects of the object drawing mode that were introduced with Flash 8.
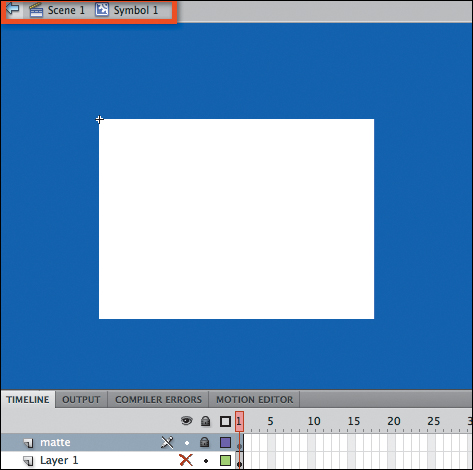
There’s at least one scenario in which the two-rectangles method could be a more robust script: Suppose you wanted to add a matte to a symbol’s Timeline rather than to the main Timeline. If you’re operating on a symbol’s Timeline, then that places you in edit mode to start with, and exiting edit mode could potentially transport you to the main Timeline of the current scene instead of back to the symbol’s Timeline (which you had been editing before you ran the script). The circumstances in which you might want to render a matte within a symbol may seem rare, but this type of scenario should be considered when developing scripts, especially when you plan to distribute your script to other users. Fortunately, if you test this scenario by running the current matte command while in symbol editing mode, the matte is drawn as expected (Figure 4.18).
Figure 4.18 Stage matte shown working properly within the edit mode of a symbol.
You will run into cases where a method functions differently in various scenarios or doesn’t function exactly as anticipated in any scenario. In these cases, there are often still workarounds to accomplish your desired end. When seeking a new solution, it can be helpful to consider how you might accomplish the same task within the Flash interface. For instance, if exitEditMode did not produce the desired result, you could trigger a mouse double-click action on an empty part of the Stage to exit the current edit mode.
![]()
Developing for Others
As in all other development projects, it’s good to think through how someone might cause your script to execute in a way that you did not intend. Try to “break” your script by testing it in as many different scenarios as you can imagine. Potential users who unintentionally run the script in a scenario that you had not imagined are likely to think of your script as breaking their workflow, not the other way around.
The process of creating a “smart” script is as much a process of creative thinking as anything else that can be done in Flash. As with any creative project, you may occasionally find that you need to scrap an idea entirely and start from scratch. With your matte script, a bit of persistence paid off and allowed you to move forward, but scenarios may arise during scripting in which there aren’t ready alternatives. If you feel stuck, remember to comb the documentation further or post your questions on the help forums listed in the “More Resources” section at the end of this chapter.

If you’re not worried about the backward compatibility of your script for any version prior to CS4, you can write a shorter version of the two-rectangles matte script using the addNewPrimitiveRectangle command. Rectangular Primitives will be shape objects by default.
Adding a Keyboard Shortcut to a Command
The ability to add a shortcut to your commands allows for huge gains in workflow efficiency. Follow the steps here to add a new shortcut to one of the commands that you’ve written.
1. To open the Keyboard Shortcuts dialog box, choose Edit > Keyboard Shortcuts in Windows or Flash > Keyboard Shortcuts in Mac OS X (Figure 4.19).
Figure 4.19 The Keyboard Shortcuts dialog box allows you to add shortcuts to several items within the Flash authoring environment, including commands that you’ve written.
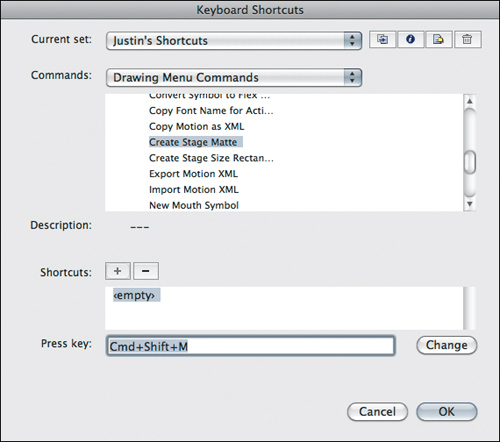
2. If you have not done so already, start by duplicating the default set of shortcuts and giving that set a unique name. The Duplicate button is the first on the left after the menu for the current set.
3. Choose Drawing Menu Commands from the Commands menu, and then twirl open the Commands item by clicking the adjacent arrow to reveal the list from your Commands menu.
4. Select the command to which you’d like to add a shortcut, and click the plus (+) button where it says Shortcuts. The word <empty> will appear in the “Press key” field and the Shortcut box.
5. Using the keyboard, perform the shortcut that you’d like to add. The shortcut keys will appear in the “Press key” field. If the shortcut is invalid or conflicts with another one of your shortcuts, a warning message will appear at the bottom of the dialog box.
6. When you are happy with a particular (valid) key combination, click the Change button to apply this shortcut to the <empty> item in the shortcut list. Note that you can click the plus (+) to add additional shortcuts to the same command.
7. Click the OK button to close the dialog box and save your settings when you’ve finished.
Creating a Script with User Interaction
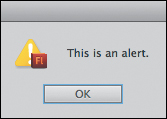
Three different types of basic user interactions are listed as global methods within the JSFL documentation: alert, confirm, and prompt. The alert method is the simplest. It accepts a single string parameter that is then displayed to the user (Figure 4.20). At this point, OK is the only user option, so alert is useful for cases in which you want to provide feedback such as error messages and script completion notifications to the user.
Figure 4.20 The alert message box.
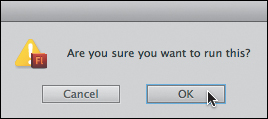
The confirm method adds a Cancel button to the alert. This is useful when you need the user to make a choice, such as whether or not to allow the script to continue to run, even though some precondition has not been met (Figure 4.21). The confirm method returns a value to notify you about which option the user selected.
Figure 4.21 The confirmation message box.
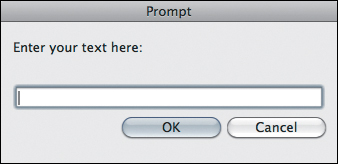
The prompt method is the most sophisticated of the three. It allows the user to enter text and accepts two parameters when called (Figure 4.22). The first parameter is a prompt message. The second is optional and includes any text that you want to prepopulate into the user’s text entry field. The prompt will then either return what was entered into the field or return a value of null if the user clicked Cancel. Although the prompt function has a number of applications, the most common is to allow the user to name something (e.g., a new symbol, a prefix for Library items, etc.).
Figure 4.22 The Prompt message box.
![]()
Debugging Your Scripts
Debugging is the process of finding and reducing the number of bugs, or defects, in your script. You can use the following methods to generate feedback when parts of your script are not working:
• The alert method (described in this section) can be useful for providing you, the developer, with feedback when something is not working.
• The fl.trace method can also be used. It is similar to the trace method in ActionScript and prints the feedback into the Output panel instead of an alert message box. The fl.trace method will not clear the Output panel when you retest your script like the ActionScript trace method does when you retest a SWF. To clear the Output panel, use fl.outputPanel.clear() at the top of your script.
Bitmap Smoothing
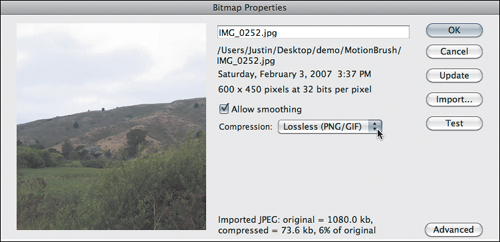
Bitmaps can sometimes become pixelated, blurry, or otherwise “crunchy” when they are animated or scaled. Flash’s default settings don’t tend to display bitmaps well at any scale other than 100%. To fix this, you can open the bitmap Library item by Ctrl-clicking/right-clicking on the Library item and choosing Properties. In the Bitmap Properties dialog box, select the Allow Smoothing check box. If you’re producing a project for broadcast or physical media (e.g., CD or USB drive) or if you are more concerned about quality than about file size, set the Compression to Lossless (PNG/GIF) instead of Photo (JPEG) (Figure 4.23). Setting these properties on every bitmap can be a headache if you have a lot of bitmaps in your Library, so let’s script it!
Figure 4.23 The Bitmap Properties dialog box allows you to control settings on individual bitmaps within the Library.
1. Create a new JSFL file (File > New > Flash JavaScript File) and save it in the Commands directory as Smooth and Lossless Bitmaps.jsfl.
2. Define variables for the Library and the items currently selected in the Library:
var lib = fl.getDocumentDOM().library;
var items = lib.getSelectedItems();
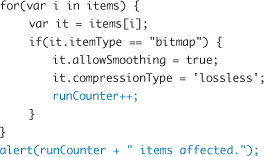
3. Loop through the contents of your items variable using a for in loop and store the current Library item as you go:
![]()
4. You need to set the allowSmoothing and compressionType properties of each variable. Before doing so, check to make sure the current item is a bitmap, since only a bitmap will possess these properties (attempting to apply these properties to any other types of Library items will generate an error). Add the following lines after the declaration line for the it variable inside the for in loop:

The script will run fine at this point, but the user remains uninformed about what’s going on behind the curtain. Even when you’re scripting just for you, it’s nice to have confirmation that the script ran as intended. While you’re at it, check to see if any Library items are selected in the first place. If there are no items selected, give the user the option to apply this command to all the bitmaps in the Library.
5. To see if the user wants to apply the command to all Library items, use a confirm box if no Library items are selected. If the user clicks OK, you’ll reassign your items variable to the entire list of Library items. Add the following lines just after the line containing the declaration of the items variable:

6. Add a variable at the top of your script that will keep track of the number of bitmap items you’ve altered:
var runCounter = 0;
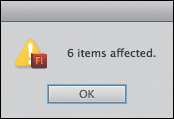
7. You’ll now increment this variable by 1 for each time a bitmap is encountered in your list of items. When your loop is complete, you’ll display the resulting number to the user in the form of an alert message. Add the highlighted code as shown:
If nothing is selected in the Library, the user will see the message that you added in step 5 (Figure 4.24). Now the user has more control and receives some feedback from your script (Figure 4.25).
Figure 4.24 The confirmation message appears and informs the user that no Library items are selected.

Figure 4.25 The alert message tells the user how many bitmaps were affected by the script.
Generating a Ready-made Mouth Symbol
For setting up and organizing files, JSFL is a great tool. Perhaps you have a common set of layers or Library folders that you always use for your files. Any repeated activities used to set up a file or assets within a file will lend themselves well to scripting. Standards make files simpler to work with. Aside from the organization benefits, standards take away the burden of memorization. For instance, if you have a standard set of mouth shapes for your character, you won’t have to memorize a new set when working with each new character. In this example, you’ll set up a mouth symbol with ready-made frame labels for lip syncing an animated character (Figure 4.26).
Figure 4.26 Frame labels as they will appear when the script is complete.

1. Create a new JSFL file and save it in the Commands directory as New Mouth Symbol.jsfl.
2. Define variables for the current document’s DOM and Library:
var dom = fl.getDocumentDOM();
var lib = dom.library;
3. You’ll define two settings for your script. The first variable will store all your standard mouth shapes (which tend to represent phonemes, basic units of sound) as a string with the values separated by commas. You can add to or subtract from this list to fit your needs. The second variable will tell the script how many frames you want between each label, which will enable you to easily read each label. Add the following two variable declarations to your script:
var labelString = "default,ee,oh,ah,mm,L,s";
var framesPerLabel = 10;
4. Prompt the user to name the new symbol and to store that name by adding this code immediately after the code in the previous step:
var namePath = prompt("Symbol name: " );
5. You’ll add a graphic symbol to the Library using the name given by the user. The new Library item will automatically be selected. You’ll edit the symbol from there. Add these two lines after the code in the previous step:
lib.addNewItem('graphic', namePath);
lib.editItem(namePath);
6. Since you’ve called editItem(), you’re now inside the symbol, and by requesting the current Timeline, you’ll receive the symbol’s Timeline. Add the following line after the lines in the previous step:
var tl = dom.getTimeline();
7. You’ll create a new variable and convert your labelString into an array so that you can loop through each label. Then you’ll use the length of that array and the framesPerLabel variable to determine the number of frames that the symbol should have on its Timeline. Add the following lines to your script:
var labels = labelString.split(','),
tl.insertFrames(labels.length * framesPerLabel);
8. Add the following lines to create a new layer to store your labels, as well as create a variable to store your new layer for easy referencing:
var newLayerNum = tl.addNewLayer("labels");
var newLayerObj = tl.layers[newLayerNum];
9. Loop through all your labels and assign a frame number to each label based on your framesPerLabel setting and the number of times that your loop has run by adding this block of code:
![]()
10. For each iteration of the loop, you also want to add a keyframe (except on the first frame, because there’s already a keyframe there by default). You also want to set the name of the current frame in your loop to the current label in the loop. Setting the name of the frame is equivalent to assigning the label name via the Properties panel. Add these next two lines within the for loop after the first line, but before the closing curly brace:
if(frameNum != 0) tl.insertKeyframe(frameNum);
newLayerObj.frames[frameNum].name = labels[i];
Improving the mouth symbol script
Your script will work just fine as it is right now, but you should probably do a little housekeeping:
1. Lock the new layer to make sure no content is accidentally placed on the “labels” layer by adding the following line to the end of the script:
newLayerObj.locked = true;
2. You’ll use the next bit of code to move the playhead back to the first frame and target “Layer 1” so the user can immediately begin adding artwork after running the script. This can be accomplished in a single step by setting the selected frame.
There are two different ways to pass a selection to the setSelectedFrames() method. Method A accepts arguments for a startFrameIndex, an endFrameIndex, and a toggle about whether to replace the current selection (the toggle is optional and true by default). Method B accepts a selection array as its first argument and the same toggle from method A as the second argument. Because you want to specify the layer that you’re selecting, you’ll use method B with a three-item array that includes the layer that you want to select, the first frame, and the last frame. Layer index numbering starts with zero at the top of the stack. To access the layer below your “labels” layer, you need to add 1 to the layer index that you stored. Add this next line to the bottom of the script:
tl.setSelectedFrames([newLayerNum + 1, 0, 1]);
3. If the user clicks Cancel when asked for the symbol name, you need to be sure to abort the rest of the script. You’ll do this by wrapping most of your code in a function. You can then exit that function at any point in time. Add the following function definition before the declaration of the namePath variable:
function createNewSymbol(){
4. You still need to make sure that you close your function and that the script actually calls the function that you just defined. Do so by adding the following to the end of the script:
}
createNewSymbol();
5. You’re now able to exit the function if and when the user clicks Cancel. Clicking Cancel causes the prompt() to return a value of null. To exit the function if the user cancels, add the following line immediately after the namePath prompt:
if(namePath == null) return;
6. Save your script (Command+S/Ctrl+S) and test it by opening a new document and choosing Commands > New Mouth Symbol.
Rather than wrapping your code in a function (as you just did), you could have wrapped your code in an if statement block, which would have checked to see if namePath was not set to null. The advantage of wrapping everything in a function is that it’s easy to then exit the function for any number of reasons. For example, you could add another prompt before the symbol name to determine if the user wants to add (or remove) any labels to your set. This is an easy feature to add because you originally defined your label set as a string, not an array. The prompt will also return a string. You thus have the option to abort the script if the user clicks Cancel within the Prompt box. If you had used a second if statement instead of a function, you’d in turn have to wrap everything in another set of brackets, rendering everything more difficult to read.
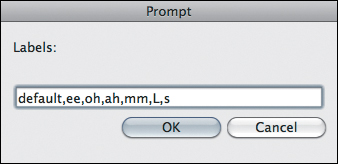
7. Return to your script. By adding the following snippet inside the beginning of the createNewSymbol function block, the command will present the user with your set of labels and allow the user to add or remove labels:

8. Save your script, return to the open document, and run the command again. Your script will now include a prompt that allows the user to add or remove frame labels (Figure 4.27).
Figure 4.27 The prepopulated prompt that allows users to add or remove labels.
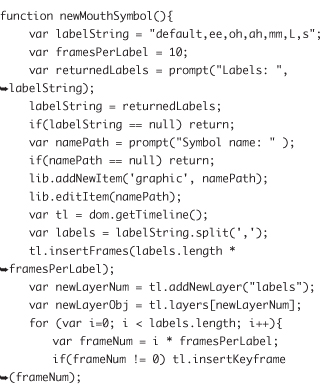
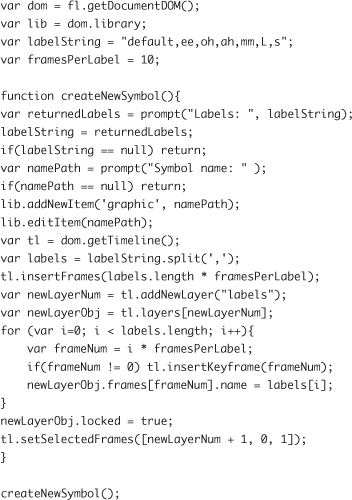
Your completed New Mouth Symbol script should look like this:
Extending Flash Even Further
Several topics capable of improving your workflow have been covered to this point, but there are even more powerful techniques yet to be discovered. This section gives you a taste of additional techniques that you can use to extend Flash beyond the topics covered thus far in this chapter.
Advanced Dialog Boxes
So far, we’ve touched upon some very simple user interactions, but you can create more complex interactions using the XMLUI object (Figure 4.28). The XMLUI object allows you to create complex dialog boxes using a simple XML configuration file. An XML file is a simple text file that uses tags to describe data. Similar to HTML, XML tags begin with a less than sign (<) and end with a greater than sign (>), and a slash (/) is used to close a tag. Here’s the XML that describes the structure of a dialog box for a command that combines textfields in Flash:
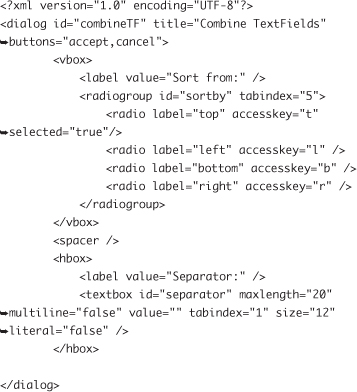
Figure 4.28 The dialog box produced by an XMLUI file that appears for the Combine TextFields command.
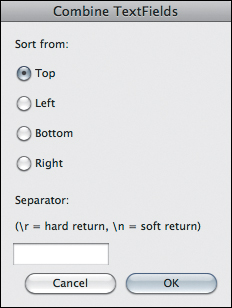
Once the XML file is saved, the file location can be passed as an argument using the document.xmlPanel() method, which launches the dialog box. You can access the user selections made within the dialog box after the dialog box has been closed just as you can with the confirm and prompt methods.
Adobe has almost no official documentation of how these XML files work. The only complete documentation can be found in Extending Macromedia Flash MX 2004: Complete Guide and Reference to JavaScript Flash by Todd Yard and Keith Peters (friends of ED, 2004). You can also find a great article by Guy Watson at www.devx.com/webdev/Article/20825.
Panels
The JSFL knowledge covered in this chapter carries over to Flash panels as well. A Flash panel is simply a published SWF that can be loaded into the Flash Professional interface and accessed by choosing Window > Other Panels. You can design custom panels to look like the panels that come installed with Flash, or you can make them entirely unique. To have your SWF show up as a panel, you’ll need to place it in the Configuration/WindowSWF folder. If you have Flash open when you paste (or save) the SWF into the folder for the first time, you must restart Flash to make the panel available.
From a SWF, there is one primary way for ActionScript to talk with JSFL, which is to use the MMExecute() function. This function passes a string to be interpreted as JSFL. When you pass this code as a string, you’ll have to be careful to escape any characters such as quotation marks (using a backslash, e.g., /") that will disrupt the string in ActionScript. If you use double-quotes for JSFL, you can use single quotes to wrap your string, and vice versa:
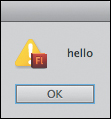
MMExecute("alert('hello'),");
When you publish your SWF by choosing Control > Test Movie, you won’t see any indication that the JSFL code has executed. If you place the SWF inside the WindowSWF folder, restart Flash, and locate the panel by choosing Window > Other Panels (the panel name will be the filename minus the .swf extension), you will then see an alert box that displays “hello” (Figure 4.29).
Figure 4.29 An alert box generated by a SWF panel using MMExecute.
Complex ActionScript-to-JSFL Interactions
For more complex interactions, it is recommended that you place all your JSFL functions in a script file and call individual functions within the script using the fl.runscript() method (from MMExecute) rather than including all your JSFL inside your ActionScript and sending large strings with MMExecute.
• The method usage for fl.runscript() is documented as follows:
fl.runScript(fileURI [, funcName [, arg1, arg2, ...]])
• To execute an entire script, pass the file location of the script as the only argument.
• To call a function within a script, also pass the name of the function as the second argument.
• All arguments after the second one are for arguments that you are passing to the function that you are calling.
• By keeping your JSFL in a separate script, you avoid the need to republish your SWF (and copy it to the WindowSWF folder) with every update.
Building the Animation Tasks panel
There are several reasons to design a SWF panel. ActionScript has several capabilities to analyze and display content that JSFL does not. Sometimes, however, house-cleaning for your Commands menu is reason enough. As more commands are collected, the Commands menu list can be so extensive that it becomes difficult to locate the desired command. Since the name of the game is efficiency, there’s good reason to keep the Commands list manageable (Figure 4.30). Let’s take some of the commands that you developed in this chapter and design a simple SWF panel.
1. Create a new JSFL script and save it as Animation Tasks.jsfl in a folder of your choosing.
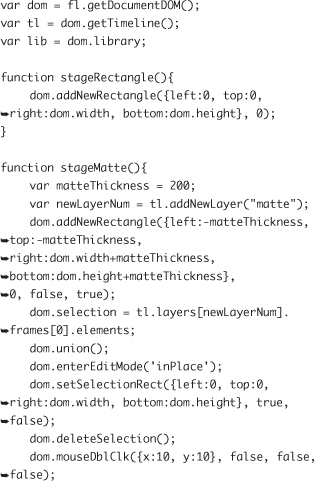
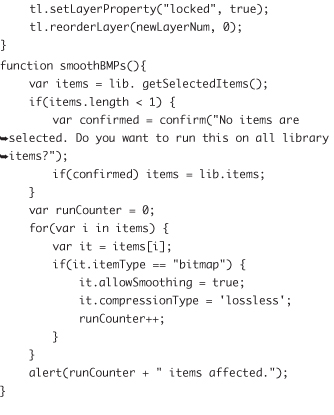
2. Copy the content from Create Stage Size Rectangle.jsfl, Create Stage Matte.jsfl, Smooth and Lossless Bitmaps.jsfl, and New Mouth Symbol.jsfl scripts that you saved previously, and paste each into the Animation Tasks script.
3. Wrap each block of code from the scripts you copied within the following function names respectively: stageRectangle, stageMatte, smoothBMPs, and newMouthSymbol.
4. Consolidate any variable declarations for the document, Library, and Timeline (except the one in the middle of the newMouthSymbol function) at the top of the script.
Your Animation Tasks script should now read as follows:
5. Create a new ActionScript 3.0 document and save it as Animation Tasks.fla (in the same folder with the corresponding JSFL script).
6. In the Properties panel under the Properties heading, click the Edit button next to Size, change the size of the document to 200 × 150, and click OK.
7. Use the color selector within the Properties panel to change the background color of the Stage to a light gray color, like #CCCCCC.
8. Open the Components panel (Window > Components), twirl open the User Interface folder, and drag four instances of the Button component onto the Stage.
9. Select all four buttons (Command+A/Ctrl+A), set their width properties to 200 in the Properties panel, and arrange the buttons evenly on the Stage (Figure 4.31).
10. Give the buttons the following instance names using the Properties panel (from top to bottom): rect_btn, matte_btn, bmp_btn, and mouth_btn.
11. Give the buttons the following labels using the Component Parameters area of the Properties panel: Create Stage Rectangle, Create Stage Matte, Smooth Bitmaps, and New Mouth Symbol (Figure 4.32).
12. Create a new layer and name it actions. Lock the layer and select the first frame.
13. Open the Actions panel (Window > Actions) and type the following ActionScript into the Actions panel:
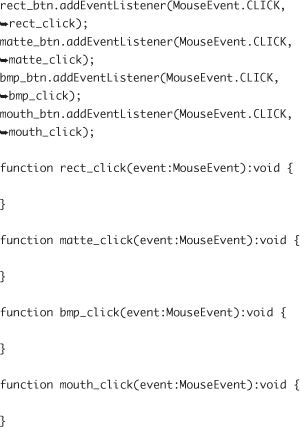
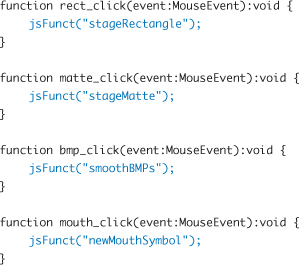
This code uses the instance names you added to the buttons to create mouse click listeners. When the SWF is rendered and a user clicks one of the four buttons, your panel will summon the corresponding function. Each one of these functions will trigger a function inside of your Animation Tasks JSFL script.
14. To save some typing, funnel all the JSFL communication through a single ActionScript function. Add the following highlighted code to the click functions:
Now you’ll write the function that will communicate with your JSFL script. This function will accept a JSFL function name from your script as an argument, and then your ActionScript function will call the function within the JSFL script.
15. Add the following code at the end of the ActionScript within the Actions panel:

Notice how complex the jsfl string is with all the single and double quotations. You need JSFL to recognize parts of your message as a string, hence the use of the single quotes within the double quotes that define your string. You’ll be sending a message for JSFL to run a function from within a script.
16. Add this line of ActionScript to the top of your code to define the location of the JSFL script:
![]()
This line retrieves the name of your SWF and replaces the .swf extension with a .jsfl extension to locate the path for your JSFL script (which is in the same folder).
For the moment, you’re using the trace method instead of MMExecute, so that you can preview your JSFL strings in the Output panel.
17. Ensure that Control > Test Movie > in Flash Professional is selected and press Command+Return/Ctrl+Enter to test the movie.
18. Click all four buttons. Your Output window should trace text resembling the following:
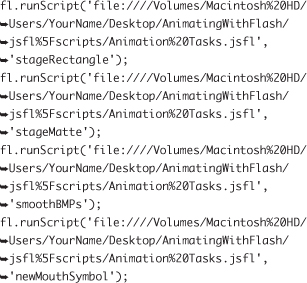
Verify that the two arguments being sent to fl.runScript are in single quotes and that there are no other quotation marks.
19. Close the test window and update your code to replace the trace method with MMExecute:
![]()
20. Test your movie again, click each button, and ensure that there are no errors in the Compiler Error or Output panels.
21. Locate the folder containing Animation Tasks.fla. There will be a corresponding Animation Tasks.swf file that was generated as a result of testing your movie in Flash. Copy the Animation Tasks.swf and Animation Tasks.jsfl files into your Configuration/WindowSWF directory. Restart Flash.
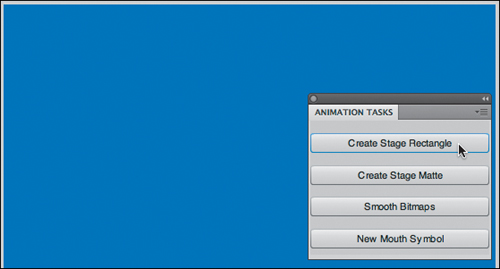
22. Open a new ActionScript 3.0 document. You can now open your SWF panel by choosing Window > Other Panels > Animation Tasks (Figure 4.33). Verify that each button completes its task (Figure 4.34).
Figure 4.30 The Queasy Tools panel started out as a way to clean up the Commands menu and has evolved into a powerful SWF panel.
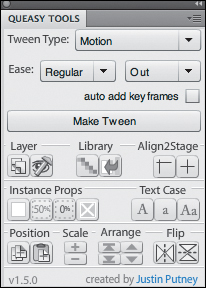
Figure 4.31 Button instances evenly spaced on the Stage.
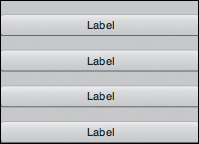
Figure 4.32 Setting the button label in the Properties panel.
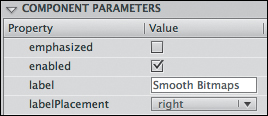
Figure 4.33 Locating the newly created Flash panel by choosing Window > Other Panels.
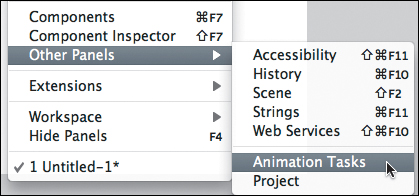
Figure 4.34 The Flash panel in action.
Because you’ve successfully grouped these four commands in a panel, you can now delete the original commands from your Configuration/Commands directory to free some space in the Commands menu.

You can also delete (or rename) commands by choosing Commands > Manage Saved Commands.
Tools
You can also create custom tools for the Flash toolbar using JSFL. Tool files reside in the Configuration/Tools directory. Tool files have special functions not generally used in other JSFL scripts, like mouse event handlers and Properties panel settings. The PolyStar tool that comes with Flash (found with the shape tools in the toolbar) is actually an example of an extensible tool. You won’t be developing any tools in this book, but you can view the code that powers the PolyStar tool by opening Configuration/Tools/PolyStar.jsfl.
Packaging Extensions for Distribution
![]()
The file extension for an MXI file is .mxi.
The first step toward making your extension available (and easily installable) to others is creating an MXI descriptor file. An MXI file is a special XML file that contains information about the extension (title, author, version, copyright, license agreement, which files it includes, where to install the files, etc.). Here’s sample text from an MXI file:
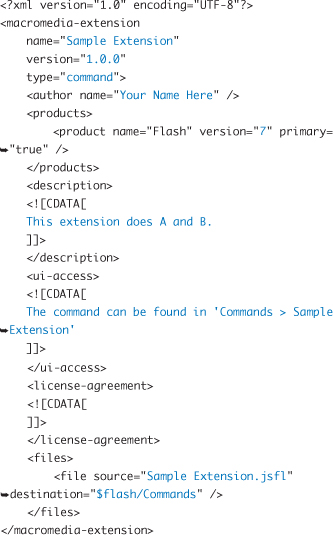
The highlighted text needs to be customized for each extension using a text editor like TextEdit in Mac OS X or Notepad in Microsoft Windows.
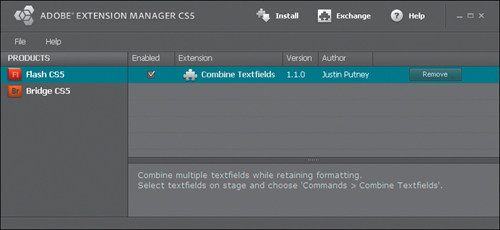
After you’ve edited your MXI file in a text editor, open it in the Adobe Extension Manager (Figure 4.35). The Extension Manager comes free with any of the Adobe Creative Suite applications. The Extension Manager will ask where you want to save your packaged file. Once you’ve given your file a name and location, the Extension Manager will package all the files referenced in the <files> tag of the MXI file and include them in a single MXP (or ZXP for CS5-specific extensions) file. That new file can then be distributed to other users and installed using the Extension Manager.
Figure 4.35 The Adobe Extension Manager allows you to package extensions for others as well as save and manage extensions on your own system.
More Resources
This chapter covered the basics of writing commands and creating a handy SWF panel for accelerating your Flash animation workflow, but we’ve still only scratched the surface of Flash extensibility. This last section provides you with additional resources to continue extending your Flash animation workflow.
Other People’s Extensions
There’s a wealth of cool stuff that’s already available and free to use. If you’re on a tight deadline and you don’t have time to write your own script, don’t be shy about checking to see if anyone has gotten there before you. Conversely, if you just want to write the script as a challenge or to make something work exactly the way you want, then go for it. You can always learn from comparing your solution to others on the web.
Books
There’s only one book to-date that is completely dedicated to JSFL. It hasn’t been updated since the release of JSFL in 2004. Luckily, very little of the language has changed since 2004. Coupled with the (up-to-date) help documentation, Extending Macromedia Flash MX 2004: Complete Guide and Reference to JavaScript Flash by Todd Yard & Keith Peters (friends of ED, 2004) is an invaluable reference.
Forums
Forums are a great way to start a conversation. Sometimes a web search is all that is needed to find a solution, but other times you really need a back-and-forth interaction with someone who understands your problem. Many of the Flash forums are packed with knowledgeable people willing to give free advice. If you’re looking for existing extensions or help with JSFL, here are a few good sites to start with:
• http://www.keyframer.com/forum/
• http://bbs.coldhardflash.com/
• http://www.actionscript.org/forums/
Sites with Flash Extensions
Looking for sites with Flash extensions? Check out these sites:
• http://www.adobe.com/exchange/
• http://ajarproductions.com/blog/
• http://www.animonger.com/flashtools.html
• http://www.dave-logan.com/extensions
• http://www.toonmonkey.com/extensions.html
• http://www.5etdemi.com/blog/archives/2005/01/toolsextensions-for-flash-mx-2004/
Sites with JSFL Help
Here are a few other sites to visit for JSFL techniques:
• http://summitprojectsflashblog.wordpress.com/
• http://www.bit-101.com/blog/
• http://www.adobe.com/devnet/flash/articles/invisible_button.html
• http://www.adobe.com/go/em_file_format (MXI documentation in PDF format)

