
Chapter 5. Sharing Your Animation
If you’re creating animated movies or games in Flash, chances are you’d like someone to see what you’ve produced. Whether your goal is to tell a story, express yourself creatively, or sell a product, you’ll need a way to share your handiwork with an audience. Fortunately, sharing is a fundamental part of the Flash platform.
This chapter gives you the industrial-strength tools necessary to share your Flash creations with the world. You’ll construct a Flash portfolio to display the character animation and visual effects you created in the preceding chapters of this book. To craft your portfolio, you’ll utilize ActionScript techniques from Chapter 3 and even use a bit of JavaScript Flash (JSFL) to render some of your artwork.
The goals for this chapter include:
• Create a website to showcase your animated projects
• Learn how to load content into your Flash movie dynamically using XML
• Learn how to dynamically style text using CSS
• Add animation to your site using ActionScript
• Learn about other ways to share your animation (broadcast, mobile, and desktop)
Showcasing Your Animation on the Web
If you’re looking for a job or hoping someone will notice your work, there are few tools as effective as an online portfolio. It’s a simple, inexpensive way to show potential clients or employers what you can offer. For a few dollars a month, you can have your own website with a unique URL to host your content. An online portfolio has become an expected part of any digital artist’s professional presentation. This section shows you how to build an easy-to-update portfolio to serve as a platform for your work on the web.

To find a good web host, start by doing a little research based on your needs. Try search terms such as web host review and look for review sites that might be more impartial than others (e.g., CNET at http://reviews.cnet.com/web-hosting-buying-guide/).
Planning Your Portfolio
A digital portfolio can be laborious and time-consuming to build and maintain (especially when you’re busy with client work and/or a full-time job). Proper planning can make the difference between a portfolio that requires a complete rebuild in six months and a portfolio that will be viable for years (with minor updates).

Most video sharing sites also allow you to upload video for free and can serve as a good venue to showcase your animation (see the “Publishing for Broadcast” section later in this chapter).
While planning your portfolio, it’s important to first determine which parts of your site will change frequently and which parts will remain fairly constant. For instance, you will probably want to update your work samples often, but your name will likely remain unchanged. To facilitate easy upkeep, you’ll want to separate frequently updated portions of your site from portions that will not change (at least in terms of how the file and the ActionScript are set up). This type of modularity (having independent parts) also has additional benefits. Site visitors will benefit from only needing to load those pieces of your site that they actually see.
As you begin to plan your site, consider the following questions about potential visitors to your portfolio:
• Who is your intended audience? Art directors? Business people?
• Is your audience technically savvy?
• What do you want your visitors to take away from your site?
The answers to these questions will inform the requirements for your site. Once you’ve addressed the preceding questions, you’ll want to generate a list of the attributes required for your portfolio.
Here are the site requirements for the portfolio you will build in this chapter:
• Easy to edit and update (keeps work recent)
• Concise (limited window of time to catch the viewer’s eye)
• Reasonably low-bandwidth (load indication for large content)
• A space reserved for text (to describe the work and your role in the project, as well as credit for anyone else involved)
• Must show some design and animation skills but not draw attention away from the work itself
• A reasonably large area for displaying work samples
• Readable text
After you’ve listed the site requirements, make a list of methods for meeting those requirements.
Solutions (site specifications) include:
• Arranging buttons vertically to accommodate varying numbers of work samples
• Using a two-color design, which is less likely to clash with the colors in the work samples
• Using vector artwork for the site, which is low bandwidth, but including a preloader for work samples that may be larger
• Adding an area for descriptive text with the capability of including links
• Loading content from an XML file that can be edited without opening Flash
• Using a sans-serif typeface (Myriad Pro) that is easy to read onscreen
• Controlling the site animation with ActionScript, which is also easy to update
Additionally, you want to consider the monitor size and the likely Flash Player version that your visitors will have installed.

Flash Player Version
Deciding which Flash Player version to publish to is usually a decision between the latest/greatest features and maximum compatibility. As a general rule, you’ll want to publish to the lowest version that includes all the features (and ActionScript methods) used in your project. If your intended audience is a Flash-based design or animation studio, backward compatibility will be less of a concern.
For statistics on the acceptance of a specific Player version, see the following site: www.adobe.com/products/player_census/flashplayer/version_penetration.html.
After you’ve established some of your technical specifications, you can start thinking about how your site will look. As you start to envision your site, you’ll want to consider the organization of the visual elements onscreen. Which areas will deserve more attention than others? Certain areas of the screen will command more of the viewer’s attention. You’ll want to make these areas correspond with the content that you most want the viewer to see.
It’s easy enough to write an explicit list of items that you want the viewer to see: clear title, easy to locate links/options, prominently displayed work samples, and so on. Then sketch the elements of your site (on paper or onscreen) and see if you can make the elements work together as a cohesive whole (Figure 5.1). It may take a couple of attempts to render a visually pleasing layout that meets the site requirements that you’ve listed (Figure 5.2).
Figure 5.1 A rough pencil mockup and notes for the portfolio site.
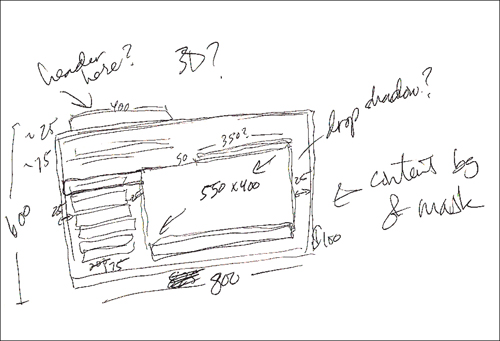
Figure 5.2 A more polished digital mockup created in Flash.

Setting Up the Flash Document and Creating Artwork
You’ll begin by creating those aspects of your site that will remain more or less unchanged. In general, even these elements will be organized in a manner that will allow for reasonably easy updates.
Start by setting up your site directory and Flash file.
1. Create a new folder named website to house all the files you create in this section.
2. Create a new ActionScript 3 document and save it as site.fla in your website folder.
3. In the Properties panel under the Properties heading, click the Edit button next to Size, change the size of the document to 800 × 600 pixels, and click OK.
Dimensions of 800 × 600 pixels will allow for plenty of space for your work samples, buttons, and text description while still fitting on nearly every (nonmobile) screen quite nicely.
Now that your document has been established, you can start creating artwork within the document.
1. Rename Layer 1 to background.
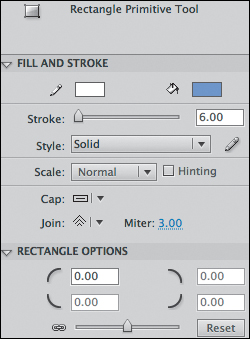
2. Select the Rectangle Primitive tool. In the Properties panel, set the fill color to #6699FF and the stroke to white (#FFFFFF), set the Stroke value to 6, set the Cap to Square, and set Join to Miter (Figure 5.3).
Figure 5.3 The Rectangle Primitive settings for the background shape.
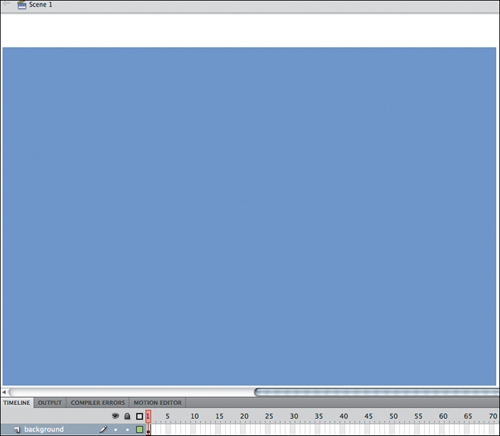
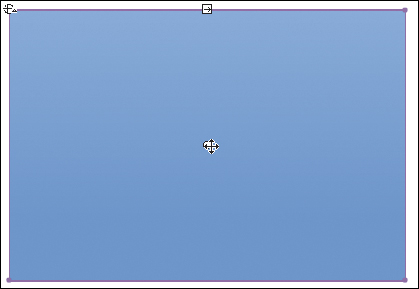
3. Draw a rectangle on Stage and use the Properties panel to adjust the rectangle to have a position of X: 0, Y: 50 and have a size of W: 800, H: 550 (Figure 5.4).
Figure 5.4 The rectangle will serve as the background for the portfolio artwork.
You can use the Tab key to jump between the X, Y, Width, and Height values in the Properties panel, and you can use Shift+Tab to jump backwards.
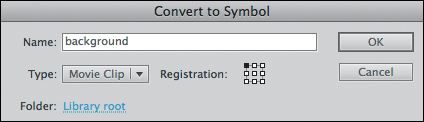
4. Convert your rectangle into a Movie Clip symbol (F8). Name the symbol background and make sure the Registration is set to the top left (Figure 5.5).
Figure 5.5 The Convert to Symbol dialog box settings for the background symbol.
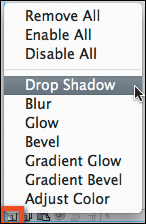
5. Expand the Filters group in the Properties panel (if necessary) and add a new Drop Shadow filter (Figure 5.6) to the background instance. Update the following properties on the Drop Shadow: Blur X: 10, Blur Y: 10, Strength: 30%, Quality: Medium.
Figure 5.6 Use the New Filter button to add a Drop Shadow filter to the background instance.
Don’t worry about the background stroke and drop shadow extending beyond the edge of the Stage. You’ll account for this when you publish your HTML file.
Now you’ll create the shape that will house the externally loaded work samples. Later, using ActionScript, you’ll make your dynamically loaded content visible by nesting it inside the symbol instance you are about to create.
1. Lock the background layer. Create a new layer named content.
Locking layers as you progress will prevent you from editing artwork unintentionally.
2. Use the Rectangle Primitive tool to draw another rectangle.
3. In the Properties panel, update the new rectangle so it has no stroke and a fill color of #3366FF, X: 225, Y: 100, W: 550, and H: 400.
4. Convert the current rectangle to a Movie Clip symbol (F8) named content with a top-left Registration.
Observe that the content rectangle matches the default size of a Flash document (and the size of the documents you created in previous chapters). This allows you to load that content without needing to scale it.
5. Ctrl-click (right-click) on the first frame in the content layer and choose Copy Frames.
6. Create a new layer named content_mask.
7. Ctrl-click (right-click) on the first frame in the content_mask layer and choose Paste Frames.
8. Ctrl-click (right-click) on the content_mask layer and choose Mask.
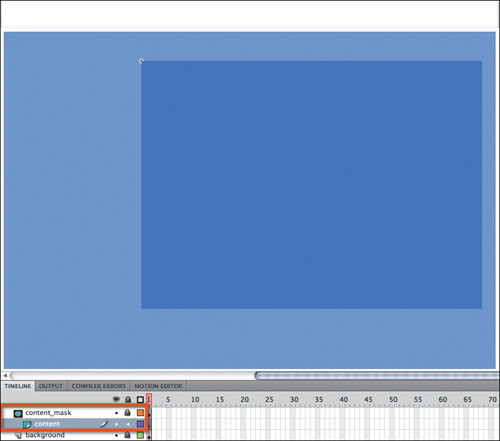
This mask ensures that any offstage artwork from the dynamically loaded content is hidden (Figure 5.7).
Figure 5.7 The content layer is indented under the content_mask layer to indicate that it is masked by the content_mask layer.
9. Unlock the content layer and use the Selection tool to select the symbol instance. In the Properties panel, give the rectangle an instance name of content_mc.
One convention to distinguish instance names from symbol names is to add a suffix (e.g., “_mc” for Movie Clips).
10. Re-lock the content layer.
Recall that you’ll need an area to display a text description for each work sample. You’ll now create the artwork that will display the description just below the content region.
1. Create a new layer named description and move it above the content_mask layer.
2. Use the Rectangle Primitive tool and the Properties panel to add a rectangle at X: 225, Y: 510 with the dimensions W: 550 and H: 75.
3. Convert the new rectangle to a Movie Clip symbol named description.
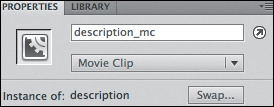
4. Add an instance name of description_mc using the Properties panel, and lock the description layer (Figure 5.8).
Figure 5.8 The instance name of description_mc has been added using the Properties panel.
In addition to the description area, you’ll create a symbol that will house the title of the work sample that is currently being displayed.
1. Create a new layer named title.
2. Use the Rectangle Primitive tool and the Properties panel to add a rectangle at X: 475, Y: 70 with dimensions of W: 300 and H: 30.
3. In the Rectangle option of the Properties panel, click the chain icon to allow each corner radius to be set to a different value. Then set the upper-left corner to a value of 20.
4. Convert the new rectangle to a Movie Clip symbol named title.
5. Name the instance title_mc and lock the title layer.
6. Drag the title layer below the content layer and toward the left so it is not masked by the content_mask layer (Figure 5.9).
Figure 5.9 Flash indicates where the layer will land so you can avoid accidentally masking the layer.
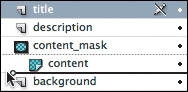
The title layer will sit below the content layer so the title can animate behind the content layer when you add ActionScript later in the chapter.
You’ve now created most of the static artwork that will appear onscreen. To create the menu button symbol that will be instantiated dynamically (based on the number of work samples you have), you will create a library symbol with no instances on Stage.
1. In the Library panel, Ctrl-click (right-click) on the title symbol and choose Duplicate. In the Duplicate Symbol dialog box, name the new symbol menuItem and select the Export for ActionScript check box (Figure 5.10).
Figure 5.10 The Export for ActionScript check box automatically populates the Class field with the symbol name.
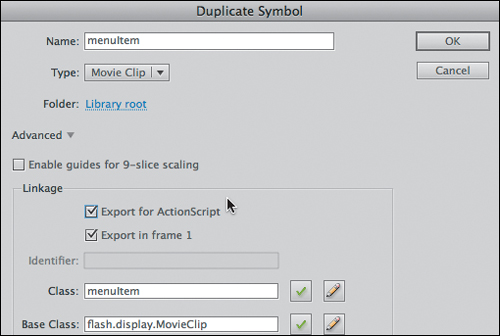
When you click OK in the Duplicate Symbol dialog box, you will be prompted with a message telling you that the menuItem class was not found and that Flash will automatically create one for you (Figure 5.11 on the next page). Click OK to allow Flash to generate a class automatically.
Figure 5.11 Flash will prompt you if the name in the Class field does not correspond with an existing file that it can locate.
2. Double-click the menuItem icon in the Library to edit the symbol.
3. Select the rectangle primitive and update the bottom-left corner in the Rectangle options within the Properties panel to a value of 20. The rectangle should now be completely curved on the left side (Figure 5.12).
Figure 5.12 The curved edge rendered using the Rectangle options.

4. Update W to a value of 180 and lock Layer 1.
5. Ctrl-click (right-click) on the first frame inside the menuItem symbol and choose Copy Frames.
6. Create a new layer named shine.
7. Ctrl-click (right-click) on the first frame of the shine layer and choose Paste Frames.
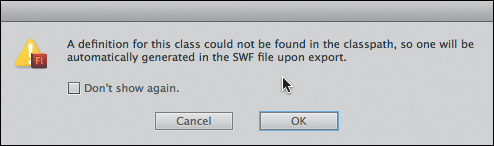
8. Select the shape on the shine layer and open the Color panel (Window > Color).
9. Change the color type to Linear Gradient. By default, this will create a black-to-white gradient with a black color pointer at the left (at the bottom of the Color panel) and a white pointer at the right. The selected color pointer will have a black tip (Figure 5.13).
Figure 5.13 The settings in the Color panel correspond to the selected pointer with the black tip.

10. Update the pointer on the left to be white with an alpha value of 0% and move the pointer about 1/5th of the way to the right. Update the pointer on the right to white with an alpha (the A under RGB) of 25% (Figure 5.14).
Figure 5.14 The updated gradient settings for the shine shape.
11. Use the Gradient Transform tool (by default it’s grouped with the Free Transform tool) to rotate the gradient counterclockwise 90 degrees (by dragging the circular handle), and collapse the gradient height (by dragging the square handle with the arrow) to match the height of the artwork (Figure 5.15).
Figure 5.15 The collapsed gradient now covers the shine shape exactly.

12. Adjust the position of the shine shape to X:2 and Y:2 with dimensions of W:176 and H:26 to indent the shine within the shape (Figure 5.16).
Figure 5.16 The indent completes the shine effect and gives the button some depth.
![]()
Now that you have the artwork laid down for the menuItem symbol, you’ll add a dynamic textfield. A dynamic textfield, unlike a static textfield, can be edited at runtime using ActionScript. Employing a dynamic textfield allows you to populate your movie with content that will be added to an external file later in the chapter. Given that the contents of your dynamic textfield are uncertain (and unfixed) when your movie is published, Flash won’t know which characters to include in your file; thus, you’ll need to embed font characters so that your text can be properly displayed.
Font Embedding
When your published movie plays on a user’s computer, there is no guarantee that the fonts you applied will be available on another user’s machine. To ensure that your text maintains the appearance that you intended (regardless of the machine on which your movie is viewed), you can embed entire fonts or specific subsets of characters from a font. Once a font is embedded, you can use that font anywhere in your published movie.
Flash CS5 has a spiffy new Font Embedding dialog box. Also, beginning with Flash CS5, Flash automatically embeds all characters used by any text objects that contain text.
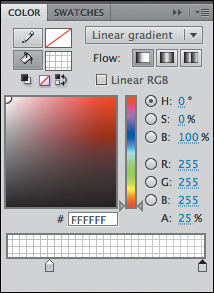
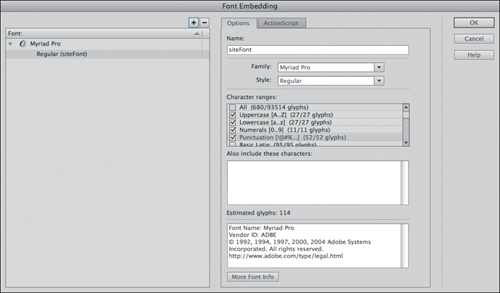
1. Choose Text > Font Embedding, type siteFont into the Name field, and type Myriad Pro into the Family field. Then select the check boxes for Uppercase, Lowercase, Numerals, and Punctuation, and click the plus sign (+) to add the font. Click OK to save (Figure 5.17).
Figure 5.17 The Font Embedding dialog box in Flash CS5.
Embedded fonts are not necessary for text objects that have the Anti-alias property set to Use Device Fonts.
You’ll now be able to access siteFont* (the asterisk indicates an embedded font) from the Font Family menu.
2. Create a new layer named text inside the menuItem symbol.
3. Draw a new textfield using the Text tool. In the Properties panel, set the Text engine to Classic Text, the Text type to Dynamic Text, and type in txt as the Instance Name.
4. Update the respective position and size of the textfield to X:15, Y:5 and W: 160, H: 20. In the Character section of the Properties panel, set the Family to siteFont* (the font you created), the Size to 14, and the Color to white. Make sure the anti-aliasing is set to “Anti-alias for readability,” and toggle the Selectable button off (Figure 5.18).
Figure 5.18 The Properties panel settings for the textfield instance inside the title symbol.

Classic Text vs. TLF Text
Flash CS5 now has native support for the Text Layout Framework (TLF) that was introduced with Flash CS4. A TLF textfield can support several new formatting features, including ligatures, multicolumn layout, linked textfields, and more.
Classic text refers to the text engine that has been available in all of the previous versions of Flash.
When you publish a movie that contains a TLF textfield, an SWZ file is added to the directory with your SWF file. The SWZ file contains code necessary for the TLF textfield to function, and it weighs in at about 160 KB. Because you won’t be using any of the TLF features in your portfolio, you’ll stick with classic text for this project. But keep TLF in mind for future projects that require large amounts of text (or special formatting).
You’re now finished editing the menuItem. Because the menuItem will be instantiated using ActionScript, no instances need to be added to the Stage.
You’ll also use the shine and the textfield that you just created (slightly adjusted) in your title and background symbols.
1. Select the frames on the text and shine layers, Ctrl-click (right-click), and choose Copy Frames.
2. In the Library, double-click the icon next to the title item to edit the symbol.
3. Lock Layer 1 and create a new layer. Ctrl-click (right-click) on the first frame in the new layer and choose Paste Frames. You should now have a shine layer and a text layer.
4. Update the textfield properties to have a width of 275 and a Paragraph format of Align Right.
5. Update the shine shape to have a width of 296 and set the bottom-left corner radius back to 0 to match the shape in Layer 1.
6. In the Library, double-click the icon next to the description item to edit the description symbol.
7. Lock Layer 1 in the description symbol’s Timeline and create a new layer. Ctrl-click (right-click) on the first frame in the new layer and choose Paste Frames. You should now have a shine layer and a text layer. Delete the shine layer.
8. Update the textfield with the following values in the Properties panel: Y: 15, W: 520, and H: 50. In the Paragraph section, update the Line Spacing to 1 pt, and choose Multiline for the Behavior.
9. Return to the main Timeline by clicking Scene 1 at the top of your Stage. Deselect all (Command+A/Ctrl+A) and use the Stage color selector within the Properties panel to change the background color of the Stage to the following hex value: #3366FF. Your Stage should now be blue.
10. In the Library, double-click the icon next to the background item to edit the symbol.
11. Again, lock Layer 1 and paste the stored frames into a new layer.
12. Use the Text tool to type ANIMATION with ADOBE FLASH into the textfield on the text layer (or use your own name if you’d like).
13. Convert the Text type to Static Text. Change the Family to Myriad Pro, the Style to Bold, and the Size to 40.
14. Adjust the X to 37 and the Y to −34 so the text sits on and blends into the white border of the background symbol. Adjust the width of the textfield as well so that the text sits on one line (Figure 5.19).
Figure 5.19 The textfield sits on a single line along the white border.
![]()
Static text does not need to be embedded; Flash will automatically convert static text to outlines when you publish your movie.
15. Select the shine shape and use the Properties panel to adjust the respective Position and Size values to the following: X: 4, Y: 4 and W: 792, H: 540. Also, click the Reset button in the Rectangle options to restore pointed corners to the rectangle shape.
16. Resize the shine gradient using the Gradient Transform tool so the gradient spans the entire shine shape. You may need to move the center point of the gradient down to do so (Figure 5.20).
Figure 5.20 The shine gradient scaled and positioned within the background symbol.
17. Save your document.
Congratulations! You’ve completed all the necessary artwork for the web portfolio. Let’s just add one piece of flair.
Building an animated preloader
A preloader is a way to provide visitors with feedback by letting them know that the content they requested is loading. This will be one place in this particular portfolio where you’ll show off some Timeline animation.
1. Create a new layer above all the existing layers and name it preloader.
2. Select the Oval Primitive tool and draw a circle on Stage (hold down the Shift key to constrain the proportions).
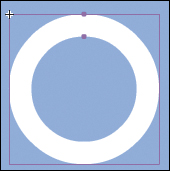
3. Your oval should have a white fill with no stroke. In the Properties panel, update the following values: X: 425, Y: 200, W: 150, and H: 150. In the Oval options, assign a value of 70 to the Inner Radius. Your circle should now have a hollow center like that of a ring (Figure 5.21).
Figure 5.21 The circle primitive with a hollow center was created by adjusting the Inner Radius in the Properties panel.

4. Convert the oval to a new Movie Clip symbol named preloader. Name the symbol instance preloader_mc.
5. Switch to the Selection tool and double-click on the preloader instance on the Stage to edit it in place.
6. Use the Transform panel (Window > Transform) to rotate the oval shape −90 degrees. This will place the two dots that appear in the oval selection at the top of the oval (Figure 5.22). This rotation will cause your animation to begin at the top of the circle.
Figure 5.22 The rotated oval primitive.
There are several ways to animate this ring so it appears to be actively drawn in a circle. Tweening is generally a good way to save time (recall the mouth within the Wanderer example in Chapter 3). Unfortunately, in this case, tweening this effect would take at least four new keyframes, several shape hints, and a mask (because the resulting tween would remain slightly deformed). Alternatively, adjusting the End angle of the shape would create the desired effect and would produce a clean animation; however, you would need an inordinate number of keyframes. In this case, 100 keyframes would be required. Each keyframe would correspond to 1 percent of loaded content. This process would also be a bit tedious, so let’s script it with JSFL.
7. Create a new Flash JavaScript file and save it as AnimateOvalPrimitive.jsfl.
8. Input the following code:
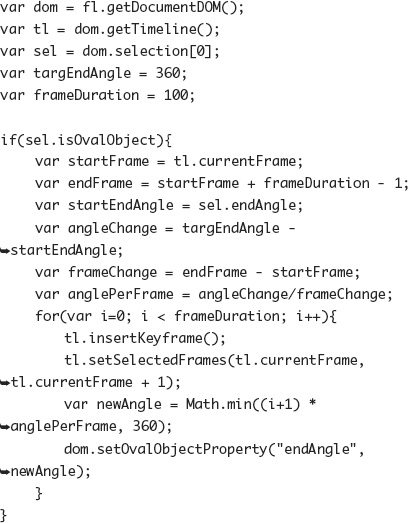
The Math.min method is used to ensure that the newAngle value does not exceed 360 degrees. The Math.min method accepts as many arguments as you care to feed it (separated by commas) and returns the lowest value. Additionally, 1 is added to i because the loop starts at 0 and the frame sequence starts at 1.
Let’s briefly consider what you accomplish with the code you’ve entered. You first create variables to store the current document and current Timeline. Then you create a variable, sel, to store the first item in the selection array. The next variable, targEndAngle, specifies the End angle that your oval will reach at the end of the frame sequence. Finally, frameDuration determines how many frames to create for the sequence.
To be on the safe side, the rest of the code has been wrapped in an if block that will only execute if the (first) selected object is an oval primitive. Inside the if block, several additional variables are created. Most of these variables are included so that this script is easy to reuse (and repurpose) in the future. For example, you will be starting on frame 1, but your script won’t assume that you’re starting on frame 1, and instead will check for the current frame. Then the script will determine the endFrame based on the current frame and the frameDuration assigned above. You must subtract one frame from this total to include the current frame in the total duration (i.e., for a frame duration of 100, starting on frame 1: 1 + 100 = 101; therefore, subtract 1). The startEndAngle for the animation is then determined using the endAngle property on the oval primitive that is selected on Stage. The total angleChange and frameChange values are then determined and are used to calculate the angle change per frame.
The for loop then iterates a certain number of times based on the frameDuration. For each iteration, a keyframe is added (which contains the content from the previous frame), the new frame is selected, the angle for that frame is determined by multiplying the anglePerFrame value with the iteration value (i.e., the number of times the loop has run), and finally the endAngle property is assigned on the oval within the current frame.
9. Save your script and return to your site document. Select the oval and enter a value of 0.50 for the End angle. This will serve as the starting frame for the animation.
10. Now return to the JSFL script you just wrote and click the Run Script button.
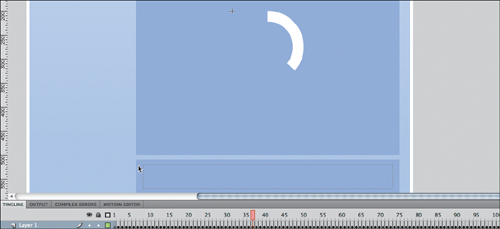
11. When your script is finished executing, return to your document. You should now have a 100-frame animation (Figure 5.23). Press Return/Enter to see a preview of the animation.
Figure 5.23 The 100-frame loader ring animation generated by the JSFL script.
12. Lock the current layer and create a new layer named character.
13. Open the document containing the run cycle that you created in Chapter 2 (the driver from Sausage Kong) or open the run_cycle.fla in the Chapter 5/assets folder on the accompanying CD.
14. Copy an instance of the character and paste it into the character layer in the site.fla document. Move the playhead to frame 100. Position and scale the character so he fits inside the ring (Figure 5.24).
Figure 5.24 The character positioned inside the loader ring.

If your character is facing to the left, you can flip the symbol horizontally (Modify > Transform > Flip Horizontal).
15. Ensure that the Instance behavior in the Properties panel is set to Movie Clip (so that the run-cycle animation loops independently of the ring animation).
16. Add a new layer named text and use the Text tool to add a static textframe that reads loading content.
17. Adjust the size (20 pt) and position (X: 4, Y: 164) of the textfield so it sits below the ring and lines up close to the edges (Figure 5.25).
Figure 5.25 The preloader content with the textfield in position.

18. Save your document.
Congratulations, you’ve completed the artwork for a sophisticated preloader! Now it’s time to set up the content that will be loaded into your site.
Preparing the Site Content
It’s time to start collecting the artwork (and animation) that you’ll display in your portfolio. You’ll start by collecting files from previous chapters, but you’ll soon see how easy it is to update the portfolio to highlight whatever pieces you’d like.
1. Create a folder inside the website directory named content. The content folder will hold all the examples that will be loaded into the portfolio.
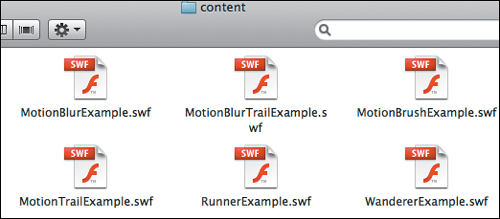
2. Copy any examples that you’d like to include in the portfolio. You can use the examples you created from previous chapters or use the following files from the Chapter 5/assets folder on the CD: MotionBlurExample.swf, MotionBlurTrailExample.swf, MotionBrushExample.swf, MotionTrailExample.swf, RunnerExample.swf, and WandererExample.swf (Figure 5.26).
Figure 5.26 The content directory will contain all the work samples for the portfolio.
You only need to copy the output files into the content directory (i.e., SWFs not FLAs).
3. Create a config folder in your website directory. The config directory will hold the configuration files for the portfolio.
Note: You’ll be employing SWFs in this chapter, but your portfolio will also be able to load JPEGs, GIFs, and PNGs with no alterations to the code.
When you add new content, you will place the files in the content directory.
Now that you have your work samples collected in a single directory, you can write the XML text that will reference these files.
Dynamic Content Using XML
As you may recall from the previous chapter, XML is short for Extensible Markup Language. An XML file is a simple text file that uses tags to describe data. Similar to HTML, XML tags begin with a less than sign (<) and end with a greater than sign (>), and a slash (/) is used to close a tag. Collectively, an opening tag, the corresponding closing tag, and everything in between is referred to as a node when the XML content is converted into an ActionScript object. An XML object must possess a root node (a node that encompasses all the data) to be properly read into ActionScript.
1. Create a new text file using a simple text editor (like TextEdit on Mac, or Notepad on Windows, or you can use Dreamweaver to create a new XML file). Save the file as config.xml in your website/config directory.
2. Enter the following text into the config.xml file:

If you use TextEdit on the Mac, you need to choose Format > Make Plain Text before saving your file. When you save your file, deselect Hide Extension and manually type in the .xml extension. After you click Save, TextEdit will ask you to confirm that you want to use the .xml extension; click “Use .xml” to save the file. You will need to follow these same steps to properly save your .css file later in the chapter as well.
The preceding code defines the structure for your XML document. The XML document will determine what is shown in your portfolio.
The first line of the XML file is called the XML declaration. The declaration indicates to any system that tries to use the file that what follows is XML content. The next line contains the opening <site> tag. Note that there is a corresponding closing tag that contains a forward slash (</site>) at the end of the file. The <site> tag will serve as the root node.
There are six opening and closing <item> tags. Inside the opening tags are two attributes. Attributes provide additional information about a tag element. The name attribute will be displayed on a menu item button and on the content title within the Flash movie. The url attribute will tell the Flash file where to look for content that will be loaded when the corresponding menu item button is clicked. The address that you add to the url attribute will be relative to the location of the Flash document.
Since each item node refers to a menu item, adding or removing work samples to your portfolio will be as simple as adding or removing an item node in this file. This approach allows you to make updates without requiring you to update and republish your Flash movie.
3. Update your attributes on each item tag to match the files in the content directory by adding the following highlighted text:
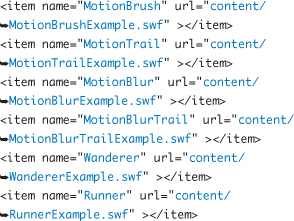
Adjust the name and url attributes to customize whatever content you want to use in your portfolio.
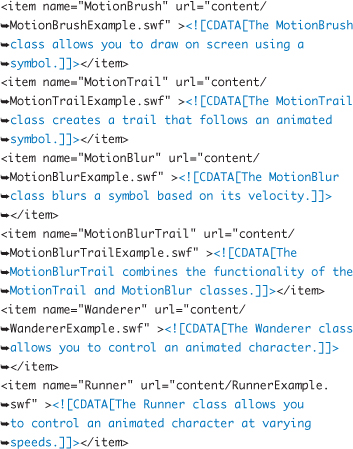
Next, you’ll add a description that will appear in the box below the content in your portfolio. To accomplish this, you will add your text between each opening and closing item tag. Your text will potentially contain characters reserved by XML (e.g., < and &); this will especially be the case when you include HTML text. Thus, you will wrap your text in a CDATA tag to prevent it from being parsed (i.e., interpreted) as XML. A CDATA section starts with <![CDATA[ and ends with ]]>.
You can add attributes containing other information that you’d like to keep track of, such as date_added, project_type, and so on. These additional attributes can then be displayed by updating your Flash file (and code), or they can remain unseen and yet retained for your personal reference.
4. Add the following highlighted descriptions to each item:
You may want to add links or formatting to your description text. Links are useful if you want to credit another artist for some portion of the work shown or if you want to link to a live website that contains your work.
5. Add the following highlighted HTML link to the first item description:
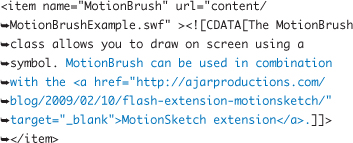
The anchor (<a...>) tag in the preceding text will create a link in the description field. The target attribute (set to _blank) will force the link to open in a new window.
If you want to add bold or italic formatting to content that will appear in a textfield with an embedded font, you will also need to embed the bold and italic variations of the font family in the Font Embedding dialog box. Alternatively, embedding will not be necessary if your textfield uses Device Fonts with a common web font (e.g., Arial or Verdana).
6. Save your XML file.
Now that your content and configuration files are ready, you can write the document class that will drive the entire site.
The Site Document Class
There are a number of ways to approach the coding of your site. If you feel that you could potentially reuse many of the behaviors on the site or that you might be developing similar sites in the future, you may want to structure your project to be heavily object-driven (broken into smaller, more reusable classes). Given that the interactions in this project are pretty simple and will all take place well within reach of the site document, this chapter will approach the coding of this site using a document class. This is a somewhat subjective decision that will be largely affected by your needs as a Flash artist.
1. Return to your site.fla document in Flash. Deselect all (Command+Shift+A/Ctrl+Shift+A).
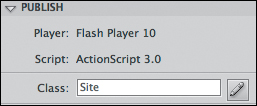
2. In the Properties panel, type in Site as the document class and click the Edit class definition button (the pencil icon) (Figure 5.27). The first time you click this button, Flash warns you that the class doesn’t exist and that it will create one automatically; click OK.
Figure 5.27 The Edit class definition button in the Properties panel.
3. Click the Edit class definition button a second time. Flash shows you the document class that it generated. Save this class as Site.as in your website folder.
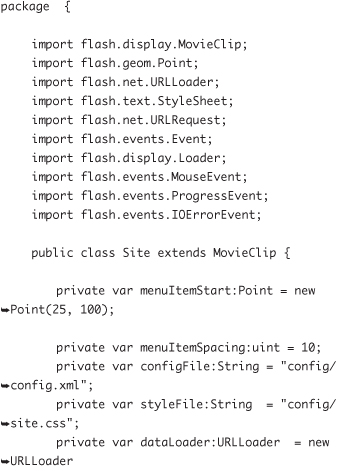
4. Add the following property declarations just inside the class block:
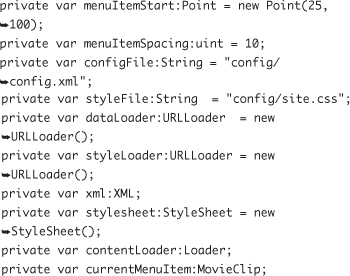
These properties will be used later in the Site class. Defining these properties at the top makes the file easy to update, and it renders the properties available to all the methods you’re going to write. Since this is a document class, all the methods and properties will be private, because no other class will need (or have reason) to access them.
The menuItemStart property will store the position of the first menu button, and that position will determine the position of all the subsequent buttons. It is more efficient to store this position as a Point object rather than having separate properties for x and y values. The menuItemSpacing property will determine how much vertical space (in pixels) is added between each button. The configFile and styleFile properties will store the relative locations of the XML file you just created and a CSS file that you will create later on. The dataLoader and styleLoader objects will take the file locations and load them into the Flash file. The xml object will store the data from the loaded XML file, and the stylesheet object will store the data from the loaded CSS file. The contentLoader will be responsible for loading and storing the content that will be loaded based on the url attributes in the XML. Finally, currentMenuItem will store the active menu item once it’s been clicked.
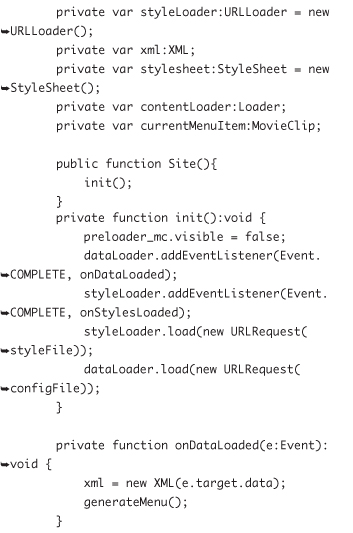
5. Define the init method and call it from the constructor, as shown in the following highlighted code:
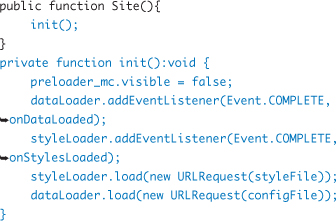
The init method starts by hiding the preloader_mc instance (since you only want it to appear when content is loading). The init method then adds two event listeners to handle the loaded XML file and CSS style sheet. Finally, the load method of each loader is called, and the links are sent as URLRequest objects.
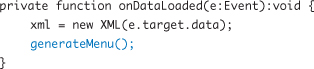
6. Add the methods (after the init method) that will be called as a result of the init method:

The onDataLoaded method uses the event data that has been passed to the method to populate the xml object. The trace method will provide confirmation that your XML data has been loaded successfully (this method will be removed in a moment). The onStylesLoaded method parses the data provided into the stylesheet object and then applies the parsed CSS to the stylesheet property of the description textfield.
7. Ensure that the following classes are imported at the top of your class package:

8. Save your script and test your movie (Command+Return/Ctrl+Enter).
When you test your movie, you’ll see a significant amount of text in the Output panel. You’ll see an Unhandled ioError pointing to your nonexistent CSS file (you may have to scroll up in the Output panel). That will be resolved later, after you’ve created the CSS file. Don’t worry about this error message for now. If Flash is able to parse your XML, you’ll also see the text from your XML file in the Output panel. If Flash cannot parse your XML, you’ll receive an XML parser failure message in the Output panel, and you’ll need to check your XML file for typos.
9. Once you have your XML loading successfully, you can replace the trace method call:
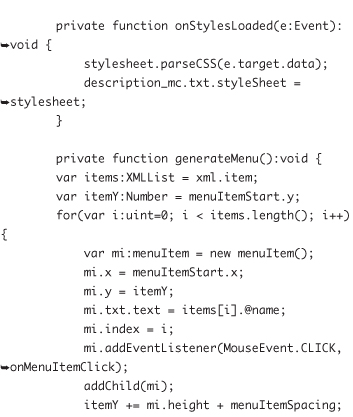
10. Now define the generateMenu method below the onStylesLoaded method:
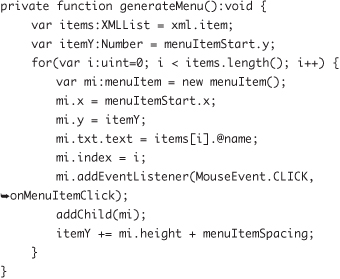
The generateMenu method creates a local variable, items, to store the item nodes in the XML object. Note the simplicity and power of the dot syntax used to reference this list of nodes (xml.item). The items variable is typed to XMLList because it has no root node (it’s just a list of the item nodes inside the XML object). Next, a local variable is used to store the y position for the item. This position will change for each menu item.
A for loop is utilized to traverse the items list. Note the parentheses on length(). These are necessary to retrieve the length of the items list because length is a method in the XMLList (and XML) class, whereas it is a property in the Array class. Within the loop, a new menuItem instance is created from the menuItem symbol in the Library. This instance is given a position based on the stored x value and the current itemY value. The text property is then assigned on the textfield within the menu item. The name attribute of the current item in the loop is then referenced using the @ operator. Then a new property is created dynamically on the menu item to store the current index in the loop. This index allows you to reference the correct item node in the XML when the button is pressed. A click listener is added to detect when the button has been clicked. The button is then added to the display list using the addChild method. Finally, the itemY value is increased, both to account for the height of the button that was just added and to add space for a new button that is still to be added.
Using the index number on each menu button to trigger new content is a smart means of achieving forward compatibility. If you decide you want back and next buttons or a different navigation system entirely, you’ll still be able to easily load content from places other than the menu item button.
You’ll now begin writing the code that will load in your external content.
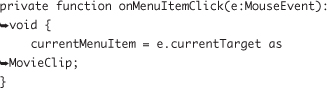
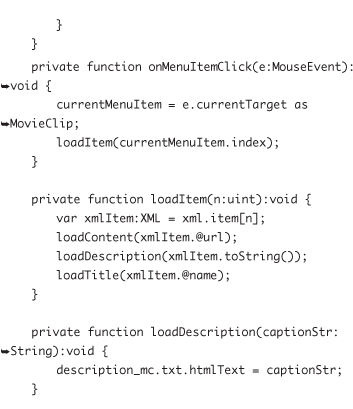
1. Within your Site.as ActionScript file, add the onMenuItemClick method below the generateMenu method:
Accessing XML Attributes
There are two ways to access attribute content on an XML node:
• node.@attributeName
• node.attribute(“attributeName”);
The first method is shorthand and is generally very readable. The second method is longer but slightly more tolerant if your attribute happens to be missing. Whichever method you use is project-specific and the choice is largely based on personal preference.
The clicked button is obtained by accessing the currentTarget property of the MouseEvent. The currentMenuItem will be stored as a Movie Clip so that you can use methods and properties of the MovieClip class without offending the compiler.
2. Ensure that flash.events.MouseEvent has been added to your import statements at the top.
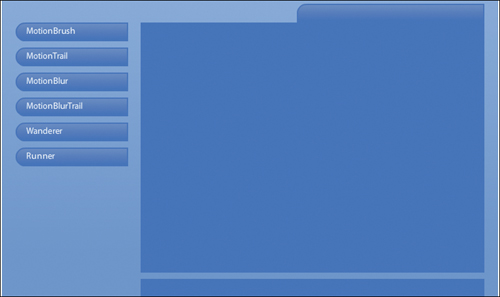
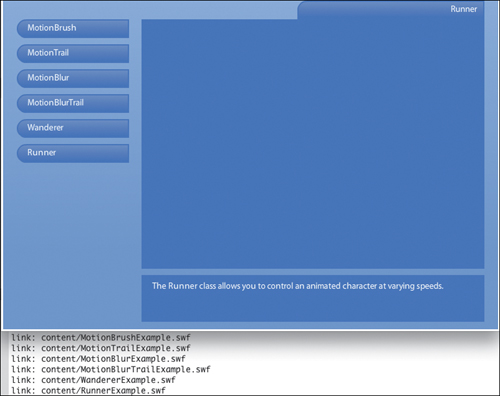
3. Save your script and test your movie. You should now see six buttons with text corresponding to the item names in your XML file (Figure 5.28).
Figure 5.28 The menu buttons are now loaded in and arranged dynamically with ActionScript.
4. Add the following highlighted code to your onMenuItemClick method:
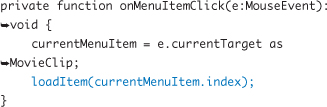
The index property that you stored in the generateMenu method will now be used to load the item content, title, and description into the corresponding symbols within your Flash document.
5. Add the loadItem method below the onMenuItemClick method:
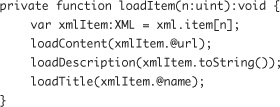
The first line on the loadItem method uses Array access notation to locate the desired item node within the stored XML object. The node is then accessed to populate the arguments for the method calls that follow. The description content is obtained by using the toString method on the item node.
6. Add the following method definitions below the loadItem method:

The htmlText property is used for the description (rather than the text property) to ensure that the content will be displayed as HTML rather than as plain text.
7. Save your script and test your movie. Click each menu button. You should see the title and description appear in their proper places as you click each menu item, and the link to the content should appear in the Output panel (Figure 5.29).
Figure 5.29 The Output panel displays the links from the menu button clicks.
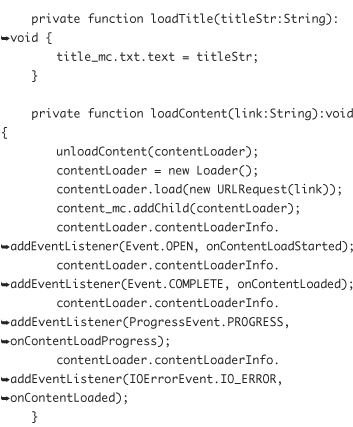
8. Now replace the trace call in the loadContent method with the following highlighted code:
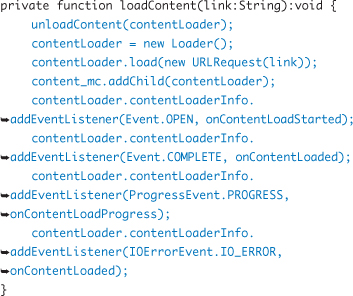
The loadContent method looks complex, but what it’s doing is actually pretty simple. An unloadContent method clears out any content that has been loaded previously. Next, a fresh Loader object is assigned to the contentLoader property, and the link is loaded as a URLRequest. The contentLoader is then added to the display list within the content_mc instance on Stage. The next four lines use the contentLoaderInfo property of the loader to add event listeners for the following scenarios: when the content starts loading, finishes loading, progresses in loading, and fails to load.
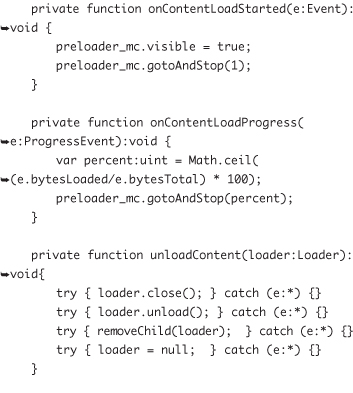
9. Add the following two methods after the loadContent method:
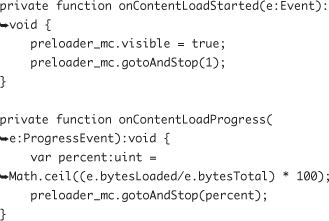
When the load is started, the onContentLoadStarted method will make the preloader visible and move the preloader to the first frame. As the load progresses, the onContentLoadProgress method will calculate the percentage loaded and will move the preloader to the corresponding frame. Moving the preloader’s frame will animate the ring you created while the content loads. The code utilizes the bytesLoaded and bytesTotal properties of the ProgressEvent to calculate the percentage, which is then translated to a frame number by multiplying the decimal by 100 and rounding that value up to a whole number using the Math.ceil method (i.e., “ceiling”; because there is no frame 0, that value should always be rounded up to the nearest integer).
10. Add the unloadContent method below the previous two methods:
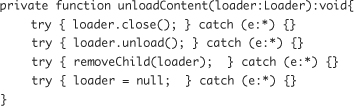
The unloadContent method utilizes try and catch statements. Try-catch statements are similar to if-else statements except that each try statement must have a corresponding catch statement. If the code inside the try block fails, the catch block will be executed. In the preceding code, each try-catch block has been condensed to a single line. The catch statement requires a single parameter, which has been typed here with an asterisk (*). The asterisk denotes that the argument passed can be of any type. In these try-catch statements, the catch block is empty. In this case, the purpose of using try-catch is simply to avoid generating errors. The try-catch statements are a quick solution for unloading content, because you won’t know exactly what state the contentLoader is in when the unloadContent method is called. The contentLoader could be loading content, done loading, or undefined. This unloadContent method is a nice one-size-fits-all solution.
This method for unloading content was found on Grant Skinner’s blog (http://gskinner.com/blog), which has heaps of great Flash and ActionScript information and tools.
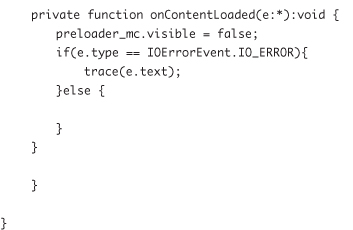
11. Finally, add the onContentLoaded method below the previous method:
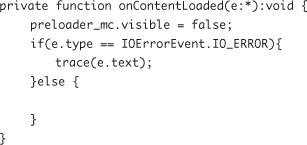
The incoming parameter is typed using an asterisk, because it could be an error event or a complete event. The preloader is hidden in any case. If the incoming event is an error, the message will be sent to the Output panel.
Thus far, your Site class should read as follows (be sure to add any missing import statements):
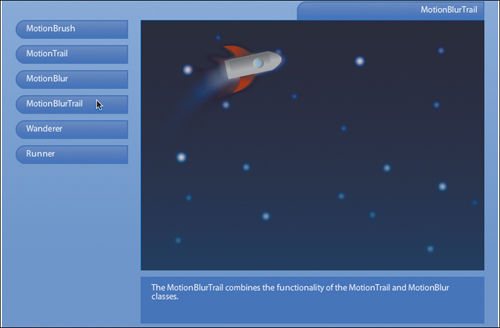
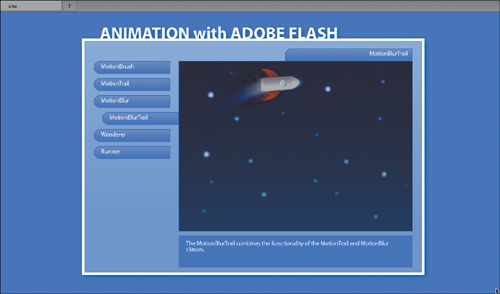
12. Save your script and test your movie. Click on each menu item. You should now see your content files loaded into your portfolio (Figure 5.30 on the next page).
Figure 5.30 The content is now successfully being loaded into the portfolio.
At this point, your content should be loading just fine, but since you’re loading files directly from your local machine, you may not have any indication that the preloader is working.
Testing Using Bandwidth Profiler and Simulate Download
The Bandwidth Profiler and Simulate Download features allow you to test different download speeds for your Flash movie. This is the best way to test the bandwidth of your content and how it will load at various speeds.
1. Test your movie.
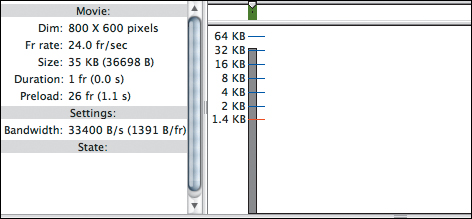
2. With the test window still open, open the Bandwidth Profiler by choosing View > Bandwidth Profiler (Figure 5.31).
Figure 5.31 The Bandwidth Profiler appears at the top of your test movie window and provides information about the movie and how many kilobytes are on each frame.
3. Adjust the download speed to test for a DSL connection rate by choosing View > Download Settings > DSL (32.6 KB/s) (Figure 5.32).
Figure 5.32 The Download Settings can be adjusted to simulate different Internet connection speeds.

4. Choose View > Simulate Download. Your test window will go white for a moment while the site.swf file loads.
5. Click on the menu items to see your preloader in action (Figure 5.33).
Figure 5.33 The preloader is visible while simulating a DSL connection speed, and beneath the Streams heading, the Bandwidth Profiler displays information about the content that is being loaded.

The Internet connection speed that you choose to simulate (and target) will depend largely on your intended audience.
6. When you’re done testing, hide the Bandwidth Profiler (View > Bandwidth Profiler) and close the test window. You won’t need the Bandwidth Profiler for the remaining steps in this chapter.
Now that you know your preloader is running smoothly, you can write the CSS file that will style your description text.
Dynamic Styling Using CSS
There are a number of ways to style a textfield in Flash. But there are two main advantages to loading an external CSS file. First, just like your XML file, a CSS file is just a simple text file, which makes it very easy to edit and requires no republishing of your Flash file. Second, you can also use the same CSS file for the HTML document that contains your Flash movie, which facilitates easy coordination of your text styling and colors (between HTML and Flash).
Flash utilizes only a subset of CSS. To see all the CSS properties available to Flash, visit http://help.adobe.com/en_US/FlashPlatform/reference/actionscript/3/flash/text/StyleSheet.html.
The reason for using CSS in this project is rather simple: to highlight any links in the description text. At the moment, the hand cursor appears when hovering over the link that you’ve added, but the user has no other visual indication that there is a link in the textfield (Figure 5.34).
Figure 5.34 The hand cursor is the only indication that there is a link in the textfield.

To better accentuate any links in your description text, you’ll create a CSS file and add styling for the anchor tag.
1. Create a new text file and save it to the website/config folder as site.css.
2. Add the following text to the site.css file:
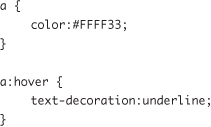
The hover state in CSS is akin to a rollover state in Flash.
3. Save the file and return to your site.fla document.
4. Test your movie. Click the MotionBrush menu item. Note that the link from your XML file is now yellow and shows an underline when you roll over it (Figure 5.35).
Figure 5.35 The link is now highlighted in yellow, and an underline appears when you roll over the link.

Your Output panel should now be empty (no error regarding the missing CSS file).
Admittedly, this approach to styling an anchor tag within this single textfield may be overkill. This method of loading an external CSS file is included partially as a proof of concept, in case you would like to use it in future projects (or expand it as your portfolio grows).
Now that everything you’ve built so far is in working order, it’s time to start adding animation to your ActionScript.
Adding Animation with ActionScript
Animating with ActionScript has two distinct advantages over Timeline animation. First, ActionScript animation can easily be altered. Timeline animation offers a great amount of precision, but that precision often comes at the cost of flexibility. Second, ActionScript animation can easily be written to be dynamic (i.e., the animation can change based on circumstance). Timeline animation works well when everything is fixed, but what happens when user interaction or dynamic content from XML is introduced? For these reasons, you’ll be employing ActionScript animation in your portfolio.
Animation classes are also known as tween classes. Flash comes with its own Tween class (in the fl.transitions package). The built-in Tween class can be useful when you don’t want to keep track of extra ActionScript files, but it has a number of limitations. Fortunately, there are several tween libraries (all written by different developers) that you can choose from. Some of the freely available libraries are Tweener, gTween, TweenLite, and Twease. Each library was designed for a slightly different purpose, and thus, each library has slightly different advantages.
For more documentation on TweenLite, visit http://greensock.com/tweenlite.
Easing
Each tween library can take advantage of a concept known as easing. Easing alters the rate at which your animation occurs. Almost nothing in nature goes from a stop to full speed for a set amount of time, and then immediately returns to a stop. Easing simulates more realistic movements by varying an object’s speed based on its distance (or time) from its final destination. An ease-in starts slowly before reaching its target speed. An ease-out drops an object from its max speed and slows it to a stop as the object approaches its destination. An ease-in-out starts slowly before reaching its max speed and then slows to a stop.
There are several different types of eases; a few common eases include Quadratic, Cubic, Back, and Elastic. Each one of these types includes ease-in, ease-out, and ease-in-out variations. For realistic animation, you’ll want to choose the easing that best fits the type of movement you’re trying to simulate. This sometimes requires you to treat inanimate objects like living things and imagine how they might move. A little ease goes a long way in adding personality to any animation.
For this project, you’ll be using TweenLite, which was written by Jack Doyle. TweenLite has a small footprint and a simple syntax (with a nice built-in ease), and it allows for sequencing and delays (which you’ll use in your portfolio).
Jack has several free ActionScript classes available, as well as several other cool classes that are available as part of a subscription on his site at http://greensock.com.
The basic syntax of TweenLite is as follows:
![]()
Let’s jump right in!
Using TweenLite
You’ll add the TweenLite classes to your project folder, just as you did with the classes that you developed in Chapter 3, but you will be accessing TweenLite through ActionScript alone.
1. Download the latest ActionScript 3.0 (AS3) version of TweenLite from www.greensock.com/tweenlite/ or copy it from the Chapter 5/assets folder on the CD included with this book.
2. Unzip the greensock-as3.zip file and copy the com folder into your website directory. This will make the TweenLite classes available to your Site class.
3. Open your Site.as file in Flash. Add the following import statements after the existing import statements:
import com.greensock.*;
import com.greensock.easing.*;
The asterisks (*) instruct the compiler to include any classes within the preceding package that are referenced in the ensuing code. This method of importing classes is slightly imprecise but is very handy when you need to reference several classes from a single package.
The asterisk only instructs the compiler to import classes within a package. Classes within subpackages will not be imported (e.g., import com.yoursite.utils.* will not import com.yoursite.utils.text.TextUtils).
4. Start by adding a simple fade-in for your content. Add the following highlighted code to the onContentLoaded method:

The highlighted code is added to the else statement to ensure that the code only executes when there is no load error. The first line sets the alpha of the contentLoader to 0, rendering the content entirely transparent. The next line animates the contentLoader over a period of .75 seconds, tweening the alpha property to 1 (100% opaque).
5. Save your script and test your movie. Click on the menu items. Note the subtle fade-in that occurs on the loaded content when you click each item.
Now let’s utilize the TweenLite class further and create a sequenced animation.
1. Update the loadTitle method with the following highlighted code:

The first line stores the y position of the title_mc instance so that the position can be returned to at the end of the animation. The second line tweens title_mc over a duration of .25 seconds, moving the title down to a position equal to its current position plus its height. An ease-in is applied rather than the default ease-out. An onComplete method is assigned to the content that previously populated the loadTitle method. The net result is that the title_mc object slides behind the content rectangle and then updates the title’s content (in private, so to speak). Finally, title_mc is tweened again, this time over a period of .75 seconds. The y position is returned to its original value. A delay is added to match the first tween of title_mc, and overwrite is given a value of false. Setting overwrite to false prevents the second tween from overwriting (and destroying) the first tween.
2. Save your script and test your movie. When you click on a menu item, the old title should now slide down behind the content rectangle and slide back into position with the new title (Figure 5.36).
Figure 5.36 The title sliding down below the content area.

3. Now create a similar effect on the description, this time using 3D rotation. Update the loadDescription method with the following highlighted code:
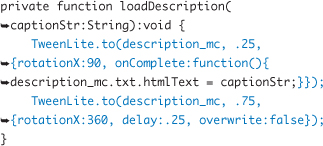
This code is similar to the code used to animate the title except it utilizes the rotationX property rather than the y property. This subtle difference results in a very different animation (Figure 5.37).
Figure 5.37 The description rotating in 3D space.

4. Save your script and test your movie. Your description should now flip around in 3D space and update the description text in the process. You may notice that your description text remains blurry after completing its animation. This blurriness is partially due to the fact that Flash converts the content into a bitmap in order to render 3D effects (Figure 5.38).
Figure 5.38 The 3D rotation causes the text to remain blurred.
![]()
5. Update the loadDescription method with the following highlighted code:
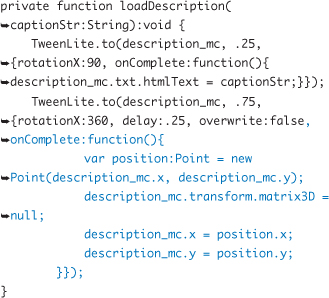
This new code runs when the tween has completed. It stores the current position, removes any 3D properties applied to the object, and then restores the object’s position. As a result of the removal of the 3D properties, the text is now clear when the animation completes (Figure 5.39).
Figure 5.39 The text no longer has a blur after being rotated.

Now that the basic animation is in place, there are just a few more items to wrap up.
Adding the Finishing Touches
You’ll now add a little bit of button behavior to your menu items and give them a nice animation as they appear onscreen.
1. In your document class, update the generateMenu method to include the following highlighted code:
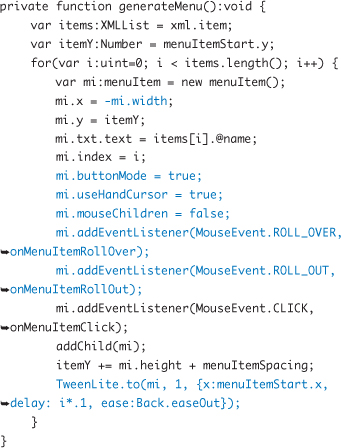
The preceding highlighted code starts by setting the x position of each menu item so that each item sits off the left edge of the Stage. To show the hand cursor when hovering over each button, the buttonMode and useHandCursor properties are both toggled to true. The mouseChildren property is toggled to false so that the textfield nested in each menu item does not affect the cursor. Event listeners are added for rolling over and rolling off each menu item. Finally, each item is tweened over a 1-second duration to its proper x position. A delay is added based on the item’s location in the loop. Items later in the loop will have a longer delay. A back ease is added to cause each item to overshoot its position before snapping back (hence the name) to its final location. Postpone testing your movie for a moment, because you still need to define the methods called by the event listeners.
2. Add the following two methods before the onMenuItemClick method:

Each method retrieves the menu item from the incoming event and types it to a MovieClip so that the filters property can be accessed. The rollover method creates a light blue inner glow and assigns the filter to the active menu item, but only in the case that the menu item’s enabled property resolves to true. The rollout method then resets the item’s filters when the item is no longer active.
3. Now update the onMenuItemClick method with the following highlighted code:

The if block at the top executes if currentMenuItem has been assigned a value. If so, the currentMenuItem is reenabled and tweened back to its original location. Then, per the original code, the currentMenuItem property is updated to the item that was just clicked. That item is then disabled (so that the filter is not shown when the current item is rolled over) and its filters (that were assigned within the rollover method) are cleared. The menu item is then tweened so that it sits against the content.
A completed version of the Site.as file can be found on the CD in the Chapter 5/finished/website/folder.
4. Save your document class and test your movie. You should now see the buttons slide in (Figure 5.40), glow when rolled over (Figure 5.41), and slide against the content region when clicked (Figure 5.42).
Figure 5.40 The buttons form a rubbery wave as they animate onto the Stage.
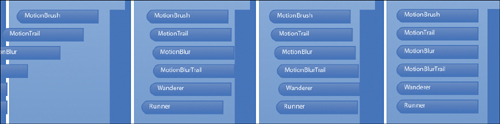
Figure 5.41 The rollover glow in action.
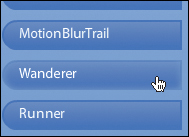
Figure 5.42 The clicked menu button slides against the content region.

Congratulations! You’ve completed the portfolio. You can now customize it and make it your own. Play around with your files and see what you can come up with. Here are some suggestions to get you started:
• Try updating the code to scale artwork that is larger or smaller than the 550 × 400 content area, and see if you can load artwork of different sizes and shapes (hint: think about constraining proportions).
• Try different types of easing on your tweens, like Elastic.easeOut on the tween within your generateMenu method.
• Try creating different types of transitions, such as blurring and unblurring the description rather than rotating it.
• Give the content_mask an instance name and animate the mask rather than the content.
Have fun and alter the portfolio until it provides a good representation of you and your work. Because your site is so flexible, you can try all kinds of variations. When you have the portfolio just the way you want it, you’re ready to upload it for the world to see.
Uploading Your Site to the Web
When your files are ready to share, you can use an application (like Transmit, FileZilla, or Dreamweaver) with File Transfer Protocol (FTP) capabilities to transfer your files to your web server. You’ll only need to transfer the output files (e.g., SWF, HTML, XML, CSS, JS) in order for your site to function. Your source files (e.g., FLA, AS, PSD) do not need to (and in most cases should not) be uploaded.
Before uploading your files, you want to make sure that you’ve published your HTML document. Testing your movie in the authoring environment only generates a SWF file.
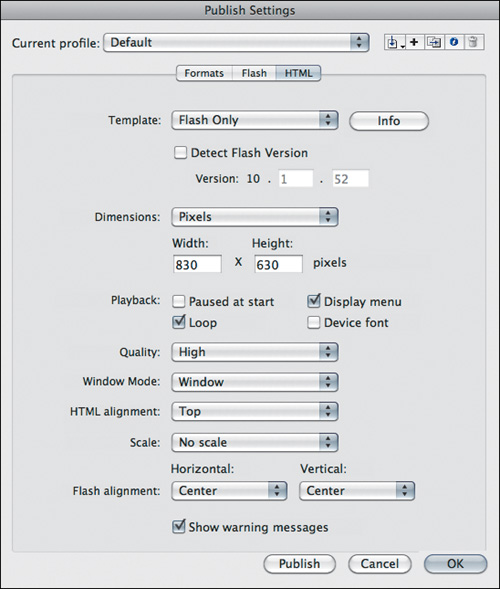
1. Choose File > Publish Settings and click on the HTML heading at the top.
2. Set the Dimensions menu to Pixels and update the Width and Height to 830 and 630 pixels, respectively. The increased dimensions will make room for a stroke and drop shadow around the background symbol.
3. Set the HTML alignment to Top, set Scale to No scale, and set both the Horizontal and Vertical Flash alignment settings to Center (Figure 5.43).
Figure 5.43 The updated HTML Publish Settings.
4. Click the Publish button to publish both the SWF and the HTML file, and then click OK to save your Publish settings.
5. Navigate to your website directory on your hard drive. You should see a site.html file. Open the site.html file in your web browser by double-clicking on the file. Note that there is plenty of room for the stroke and drop shadow (Figure 5.44).
Figure 5.44 The site.html file viewed in a web browser.

6. Open the site.html file again, this time in a plain text editor (like TextWrangler on a Mac, Notepad in Windows, or Dreamweaver code view). You should now see the raw HTML text (Figure 5.45).
Figure 5.45 The raw HTML text in TextWrangler (with customized color coding).

7. Edit line 9 in the site.html file to match the following highlighted code:
![]()
Flash wraps your movie in a <div> tag with an id attribute set to flashContent by default when you publish your HTML file. The text that you just added to the HTML is actually CSS embedded in the HTML page. By giving the flashContent element a negative left margin that is half the width of your embedded Flash movie, and padding the left side of the element by 50%, you have effectively centered your movie horizontally (even when the user changes the scale of the browser window).
While you’re editing the HTML code, also consider updating the text within the <title> tag. This text will appear at the top of your browser tab or window when the page is loaded.
You can find TextWrangler (a free code editor for the Mac OS) at www.barebones.com/products/textwrangler.
8. Save the HTML file.
9. Refresh the site.html page in your web browser (or reopen it if you closed it). The style update in the previous step will have centered your Flash content horizontally, blending the Flash more seamlessly into the matching HTML background (Figure 5.46).
Figure 5.46 The site.html page centered horizontally in the web browser.
10. Use an FTP application of your choice and upload the following files and folders: site.swf, site.html, the content folder (and the files contained within), and the config folder (and its files).
Before uploading your files, be sure to test them on as many operating systems and browsers as you have available to make sure everything is working properly.
When your files have been uploaded, you can send the link to your desired clients/employers, friends, and family, and show them the great work you’ve done.
Now that you have a solid web portfolio up and running, it’s time to look at a few other ways to get others to notice your work.
Publishing for Broadcast
Your intended output format will help dictate how you set up your Flash document and in some cases how you will create your animation. There are countless animation studios using Flash for the development of CD and broadcast television. The early years of using Flash were focused solely on Timeline animation and exporting to QuickTime Video and AVI format. Those were the days of Macromedia Flash 4, which was a much simpler version than Adobe Flash Professional CS5. Exporting to video with Flash 4 required nothing more than choosing File > Export Movie and selecting either QuickTime or AVI video (depending on your operating system).
Exporting to video from Flash is very straightforward, but there are a few rules to follow, depending on your needs. If you are producing content that requires frame accuracy in Flash (generally content that will be exported to video or image sequence format), you must make sure all your animation is in sync with the main Timeline. Thus, you must avoid Movie Clip symbols. A Movie Clip Timeline is independent of the main Timeline and will only play within the Flash Player. It is recommended that you use Graphic symbols instead, especially when nesting animations and layering timelines. Graphic symbols are always in sync with the main Timeline and will export to video or an image sequence. If the animation plays inside the Flash IDE, it will also export to video.
Document Setup
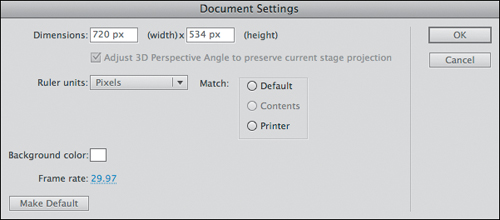
Let’s take a look at how to set up a basic Flash document for video output in Flash CS5. Create a new document and then choose Modify > Document to open the Document Settings window. Here you can edit the dimensions of your document’s Stage as well as its frame rate (Figure 5.47).
Figure 5.47 The Document Settings window allows you to edit the current document’s dimensions and frame rate.
Color is also an important issue when animating for broadcast. Some colors do not display well on television screens. You can find an NTSC color-safe palette at www.animonger.com/ntsc.html.
Even though NTSC and PAL both have a 4:3 ratio, pixels dimensions can vary based on the specific format (e.g., DV, D1DV, DVwide). Some formats use square pixels and others use rectangular pixels. For more on aspect ratios, see http://en.wikipedia.org/wiki/Pixel_aspect_ratio.
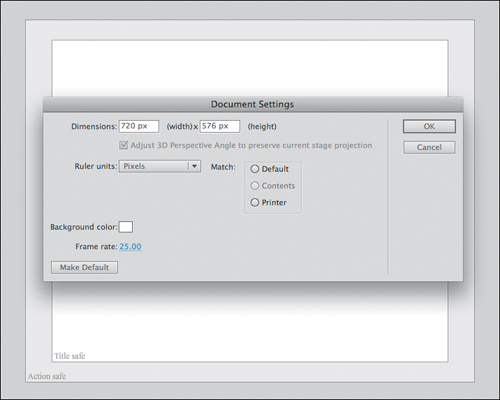
Adobe Flash CS5 provides premade templates that meet the NTSC (National Television System Committee) and PAL (Phase Alternating Line) broadcast standards. NTSC is used in North America and most of South America, whereas PAL is used outside of the Americas. NTSC uses a 4:3 aspect ratio and a frame rate of 29.97 (Figure 5.48). PAL uses a 4:3 aspect ratio and a frame rate of 25. The specific aspect ratio for PAL is 720 × 576 (Figure 5.49).
Figure 5.48 The Document Settings for an NTSC DV template.
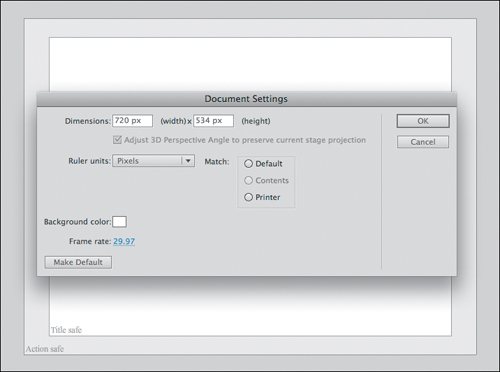
Figure 5.49 The Document Settings for a PAL D1DV template.
Most animators use a frame rate of 24 frames per second (fps) when using Flash, but that frame rate is converted during the export process based on which video standard is used. It is perfectly fine to use any frame rate when animating, because the software will calculate the conversion to the appropriate frame rate for video. Just keep in mind that animating at 24 or 30 (29.97) fps is recommended, because they are standard frame rates for animation.
Exporting to PNG Sequence
In many situations, animation exported from Flash is often imported to Adobe After Effects for additional effects to be added. To ensure frame accuracy during the exporting and importing process, the PNG sequence is preferred among many postproduction professionals. When your animation in Flash is complete and you’re ready to export it, there may be a few things you’ll want to do first: For example, make sure you’re using Graphic symbols (not Movie Clips) and turn off the visibility of your guide layers that contain graphics that you do not want exported in the final sequence. Be sure to hide any title and action safety layers, and any extraneous graphics (Figure 5.50).
Figure 5.50 Turn off the visibility of any guide layers when exporting to a PNG sequence.
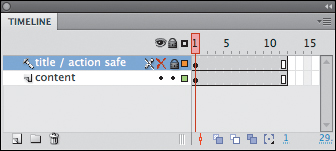
Even though guide layers are not visible within the Flash Player, they will export to a PNG sequence unless their visibility is turned off as well. You could delete these layers, but it may be advantageous to keep them for future editing if the Flash document will be reused.
Depending on the length of your animation, a PNG sequence will contain several individual image files. The number of files can range from a few to several hundred or even thousands. It is best practice to break down your animation into different Flash documents based on scenes or even camera shots. It is typical to have several short animations as individual FLA files, as opposed to one long Flash document to avoid memory issues, crashes, and corrupt files. Based on our past experience, individual FLA files should range from two seconds to, at the most, one minute in duration. Each of these files can then be edited together using video editing software such as Adobe Premiere or Adobe After Effects.
Some of the memory issues mentioned may be a thing of the past, since Flash CS5 has transitioned from a binary format to an open format based on XML, but it’s better to be safe than sorry. Additionally, it is a good idea to back up your work frequently, because there’s nothing more frustrating than losing hours of work.
To export your animation to a PNG sequence, follow these steps:
1. Choose File > Export > Export Movie (Figure 5.51).
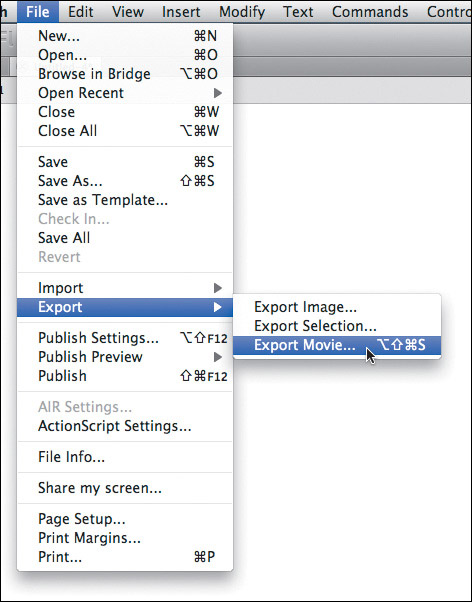
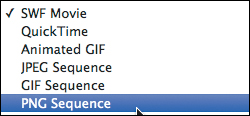
2. In the Format menu within the Export Movie dialog box, choose PNG Sequence (Figure 5.52).
Figure 5.52 The Format menu within the Export Movie dialog box.
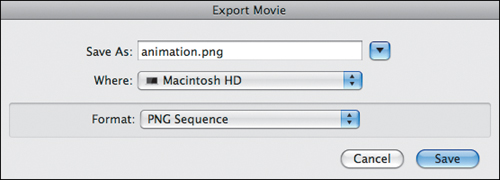
3. Create a new folder or select a folder already created for Flash to export the image to, and then click Save (Figure 5.53).
Figure 5.53 Save to an empty folder using the Export Movie dialog box.
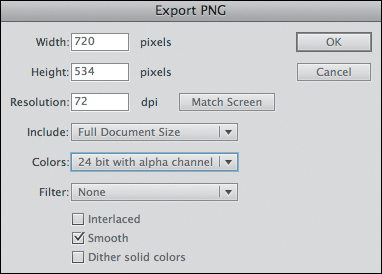
4. You will be prompted with PNG-specific encoding settings. Click OK to generate the image sequence (Figure 5.54).
Figure 5.54 The PNG-specific export settings allow you to define the image encoding settings.
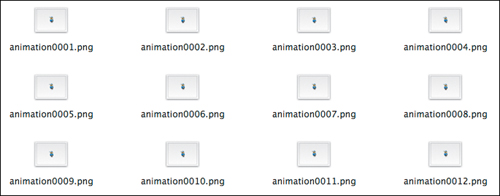
It is best practice to export each image sequence to its own folder. This helps keep each sequence organized and manageable (Figure 5.55).
Figure 5.55 The generated sequence of PNG files is stored in its own directory.
The export methods discussed so far work great for files that simply contain animation, but there may be some situations in which you’ll need to export dynamically created (i.e., code-driven) animation to video.
Exporting Dynamic Animation
Flash CS5’s QuickTime Exporter supports ActionScript-generated content. As an example, let’s create a simple animation that contains some ActionScript and export it to the QuickTime format.
1. Create a new ActionScript 3 document and save it as dynamicAnimation.fla.
2. Copy the Movie Clip instance of the driver running (the one used in the section “Building an Animated Preloader” earlier in this chapter, or copy it from run_cycle.fla in the Chapter 5/assets folder on the CD) and paste it onto the Stage in your dynamicAnimation document (Figure 5.56).
Figure 5.56 The Sausage Kong driver Movie Clip on Stage.

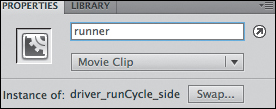
3. Give the Movie Clip an instance name of runner in the Properties panel (Figure 5.57).
Figure 5.57 The instance name applied in the Properties panel.
4. Add a new layer named actions. Lock the actions layer and select the first frame.
5. Open the Actions panel (Window > Actions) and type in the following code:
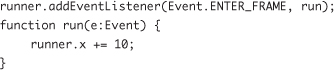
6. Save your document and test your movie to see the driver move horizontally to the right in 10-pixel increments. Now let’s export this dynamic animation to a QuickTime movie.
Before exporting to QuickTime, test your movie in the Flash Player and time it with a stopwatch. Because you are using dynamically generated content, its duration may not be as clear as that of frame-based content. You will need to enter the duration of your animation in terms of minutes and seconds during the export process.
7. Choose File > Export > Export Movie, and select QuickTime in the Format menu (Figure 5.58).
Figure 5.58 The Export Movie dialog box allows you to export a QuickTime movie.
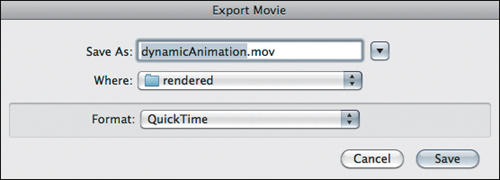
8. Enter a filename for your QuickTime movie and the desired location to save it to. Then click OK.
9. In the QuickTime Export Settings dialog box, select “After time elapsed” and enter the duration of your animation. Type in a duration of 5 seconds (or 00:00:05) (Figure 5.59).
Figure 5.59 The QuickTime Export Settings dialog box allows you to export your dynamic content based on elapsed time.

10. Click the QuickTime Settings button to open the Movie Settings dialog box. Here you can select the desired compression level for your movie’s audio and video. You can leave the default video compression (set to Animation) and click OK (Figure 5.60).
Figure 5.60 The Movie Settings dialog box allows you to adjust audio and video compression.
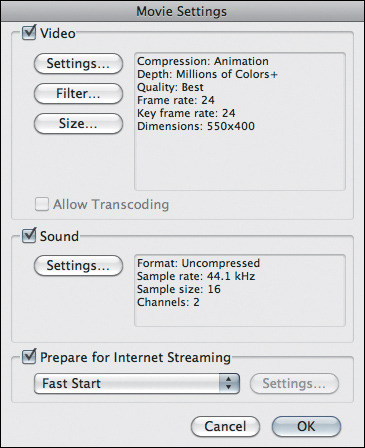
You can deselect the check box next to the Sound label to disable sound and reduce the file size on movies that contain no audio.
11. Click Export to render your dynamic content to a true fixed-frame QuickTime file (Figure 5.61).
Figure 5.61 Flash records the movie based on the time you entered and renders the compressed movie.
The quality of the output from this method of capturing dynamic animation is heavily dependent on your machine’s performance. It is recommended that you close any other open programs to free up memory.
Now that you’re familiar with the basics of exporting video, you can also apply this knowledge toward rendering videos that can be uploaded to the web.
Exporting Files for Video Sharing Sites
Video sharing sites are another great way to show off your animation. There are plenty of well-established video sites on the web (YouTube, Vimeo, DailyMotion, to name a few), and more seem to be cropping up every day. You may decide that you want to post to YouTube because it has the widest audience, or you may choose to post to Vimeo because you like the design of the player. This decision is largely subjective.
Some animators have had issues with the screen recording method of exporting video and still swear by SWF2Video from www.flashants.com.
Once you’ve decided where to share your video, you can create an account for that video-sharing website. You should then look up the recommended video settings for that particular site. Most of the sites have a guide for optimal video settings (e.g., www.vimeo.com/help/compression) that will help you avoid some frustrating trial-and-error attempts. These sites accept almost any video format, but they usually recompress the video to play on their site. You’re likely to get the best results if you base your export settings on the site’s recommendations.
To quickly locate instructions regarding optimal video settings for a particular site, try a web search with the site name and the words upload and settings.
Believe it or not, we have not yet run out of ways to share Flash content. Two more goodies are coming right up.
Publishing to Mobile and Desktop
Flash has evolved from a simple web format into a rich platform that can run in almost any computing environment. Developing content in Flash effectively allows you to be a mobile developer and a desktop developer, as well as a web developer. You can use the same familiar tools and techniques to deliver your content in a variety of settings and on a variety of devices.
For a detailed look at publishing to mobile and desktop, see the Chapter 5 subfolder on your book disc. Look for the pdf, “Chapter_5_Mobile_Desktop.”
Not only can you create beautiful and dynamic content, but you can now also distribute it anywhere. Go forth and multiply (the number of places your animation can be seen, that is)!