6. Automation and the Cordova CLI
As you may have noticed from the last two chapters, the typical Cordova developer spends a lot of time at the command prompt. In this chapter, I’m going to show you how to add a little automation to your Cordova projects.
As I worked on each of my Cordova books (this is my fourth), I found myself typing in the same commands over and over for each Cordova project I created, and I created a lot of apps. In the first half of this chapter, I’ll show you how to automate some of the repetitive tasks you perform with the CLI. In the second half of the chapter, I’ll show you how to add additional actions to the activities that Cordova performs while it’s managing your projects.
Automating the Project Setup Step
For every Cordova application project I create, I always execute the same commands in a terminal window:
cordova create project_folder appID AppName
cd project_folder
cordova platform add list_of_platforms
cordova plugin add org.apache.cordova.console
cordova plugin add org.apache.cordova.dialogs
cordova plugin add org.apache.cordova.device
After doing this so many times, I started looking for a way to automate those steps so I can type in only one command and get all of that stuff done. In this section, I’ll show you several ways to automate this process; there are probably other ways you can do this, but I’m going to show you the ones I know of.
Windows Command File
Microsoft DOS has always had the capability that enabled savvy users to automate a series of tasks using batch files. A batch file is a file with the .bat file extension (make-project.bat, for example) that contains a sequence of DOS commands that are executed in order. Microsoft Windows is “based” on DOS, so the same capability is available here, but it’s now command files (a file with a .cmd extension—make-project.cmd, for example) rather than batch files.
To create a command file, open your text editor of choice, copy in those Cordova CLI commands I showed earlier, and save the file to an appropriate location with the appropriate file name plus the .cmd extension. If you then open a terminal window and execute the command file, those steps will execute sequentially and your Cordova project will be created for you.
Unfortunately, each Cordova project is stored in a different folder, and each has a unique ID and a unique name. To accommodate this, Windows applications can accept command-line arguments, so all we need to do is update our process so it accepts the arguments we need like this:
command-file.cmd param1 param2 param3
So, assuming I’ve created a command file called cva-create.cmd, I could execute it and pass in my Cordova project arguments like this:
cva-create.cmd lunchmenu com.ac4p.lunchmenu LunchMenu
All that’s needed is to have some way to grab those arguments and use them in the execution of the command file.
Within a Windows command file, arguments passed to the program are automatically assigned to variables called %1, %2, %3, and so on. So, whenever I want to use one of the arguments in the code, all I have to do is refer to it by the variable name. With that information, we have everything we need to make a Windows command file that can be used over and over and over again to create new Cordova application projects.
Listing 6.1 shows a Windows command file I created called cva-create.cmd that operates using the command-line arguments I showed in my previous example. You can create the same file, copy it to your development system, and use it to make new projects.
REM Turn off writing commands to the console
ECHO off
REM Clear the screen so we start at the top
REM when we run
cls
echo ==================================
echo Creating the Cordova Project
echo ==================================
call cordova create %1 %2 %3
REM change to the new project folder that
REM was just created
cd %1
echo.
echo ==================================
echo Adding Platforms
echo ==================================
call cordova platform add android firefoxos wp8
echo.
echo ==================================
echo Adding Plugins
echo ==================================
call cordova plugin add org.apache.cordova.console
call cordova plugin add org.apache.cordova.device
call cordova plugin add org.apache.cordova.dialogs
REM Tell the user that we're done
echo.
echo Finished!
The echo commands simply write the content to the console. An echo with a period behind it will simply write a blank line to the console.
There’s one problem with what I’ve created here: you can’t pass in an application name that contains a space. I tested this several ways, and I wasn’t able to get it to work; for everything I tried, it would treat the space between the two words (I tried “Lunch Menu”) as a delimiter and a project would get created named Lunch. Perhaps one of you will figure this out and send me the fix.
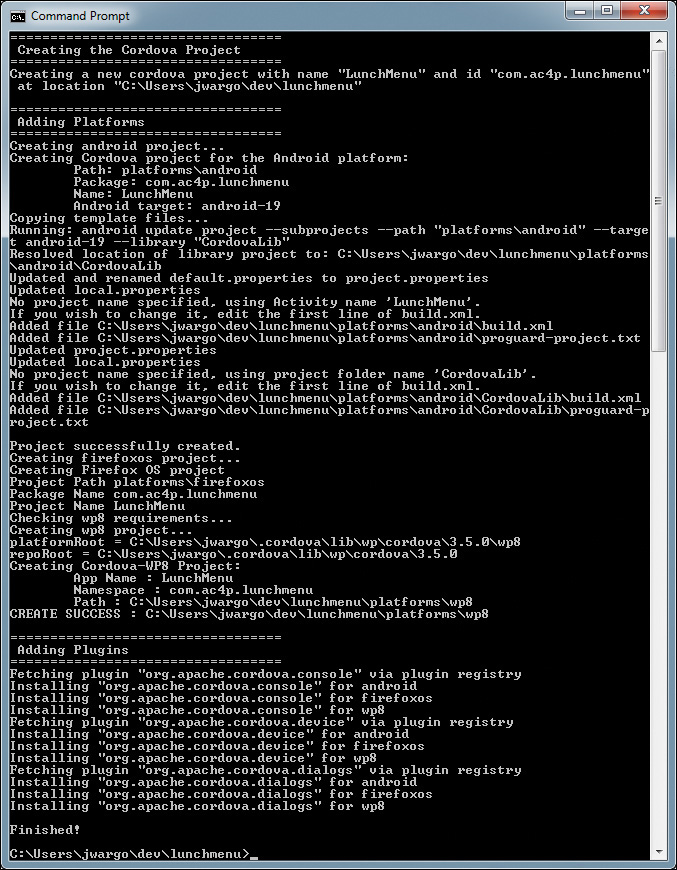
When you run the command file from a Windows terminal window, it will generate the output shown in Figure 6.1 and, of course, create a new Cordova project for you.
Bash Script
Macintosh OS X and Linux of course don’t support Windows command files; instead, you need to write a bash script. Bash scripts are just like Windows command files, but there is a slightly different command syntax to use in some cases. In Listing 6.2 I show the same cva-create process, only in a bash script.
#!/bin/sh
# Clear the screen, so we start at the top
# when we run
clear
# Create the Cordova project
echo ===============================
echo Creating the Cordova Project
echo ===============================
cordova create $1 $2 "$3"
# Change to the new project folder
cd $1
echo
echo ===============================
echo Adding Platforms
echo ===============================
cordova platform add android ios
echo
echo ===============================
echo Adding Plugins
echo ===============================
cordova plugin add org.apache.cordova.console
cordova plugin add org.apache.cordova.dialogs
cordova plugin add org.apache.cordova.device
# Tell the user we're done
echo
echo "Finished!"
The bash script starts with a #!/bin/sh that tells the operating system we’re executing a bash script; otherwise it’s pretty much the same as the example in Listing 6.1. Notice that the bash script uses $1, $2, and so on to describe the arguments passed to the script.
If you’re running the script in a terminal window from the folder where the script resides, you will execute the script using
./cva-create.sh project_folder appID AppName
Otherwise, for both examples you’ll need to put the file in a folder that is located on the system path, or you will need to type a full path pointing to the file location every time you execute the command. I simply put the script files in my system’s dev folder since I create all applications under that folder structure.
Cross-Platform Approach Using NodeJS
As interesting as the command file and bash script options are for automating the creation of a new Cordova project, the implementation requires that you have a different solution for Windows than for OS X. You could install a bash shell on Windows and use the bash script on both, but there’s a better solution.
Since the Cordova CLI runs on multiple platforms and uses Node, you could build a Node application that manages the Cordova application creation process for you. This is the solution I picked for myself when I first started looking for a solution to this particular problem. So, instead of having to write the Node application yourself, I’ve already done it for you. I’ve created a Node module called cdva-create and, rather than show all of the code here, I’ve already published the source code to my GitHub account at https://github.com/johnwargo/cdva-create and published the module to NPM (www.npmjs.com/package/cdva-create) so you can quickly install the module and put it to work.
To install the module on Windows, open a terminal window and execute the following command:
npm install –g cdva-create
Macintosh OS X and Linux users should open a terminal window and execute the following command:
sudo npm install –g cdva-create
NPM will churn for a little while, then let you know it installed the module correctly when it displays something similar to the following:
C:UsersjwargoAppDataRoaming
pmcdva-create ->
C:UsersjwargoAppDataRoaming
pm
ode_modulescdva-createcordova-create.js
[email protected] C:UsersjwargoAppDataRoaming
pm
ode_modulescdva-create
├── [email protected]
└── [email protected]
To use the module, simply open a terminal window, navigate to the folder where you want the application project created, and execute a command similar to the following:
cdva-create folder app_id app_name [platform list]
To create the Lunch Menu application we’ve been using lately, I would use the following command:
cdva-create lunchmenu com.ac4p. lunchmenu "Lunch Menu" android
Notice that I put the application name, Lunch Menu, in quotes; that’s because there’s a space in the application name and the module needs to know to treat both words as one parameter. Without a space, it would look like this:
cdva-create lunchmenu com.ac4p. lunchmenu LunchMenu android
To create the same project, but include an iOS project as well, you would use the following command:
cdva-create lunchmenu com.ac4p. lunchmenu "Lunch Menu" android ios
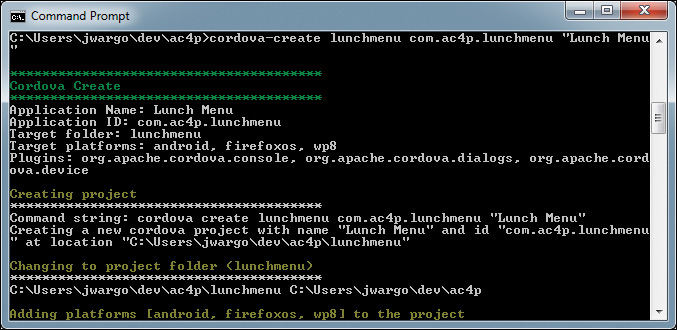
Figure 6.2 shows the output from the module in the Windows terminal.
When you run the module, you will notice that it’s preconfigured with a specific set of platforms and plugins. Don’t worry; you can easily customize the module.
When the module runs the first time, it creates a configuration file called cdva-create.json in the current user’s home folder. The home folder will usually be in C:Usersuser_name on Windows and /Users/user_name on OS X. To customize the module, simply edit the configuration file and adjust the parameters there to suit your specific requirements. The next time you execute the module, your changes will apply.
A sample cdva-create.json file is shown in Listing 6.3.
Listing 6.3 cdva-create.json File
{
"platformList": [
"android",
"firefoxos",
"wp8"
],
"pluginList": [
"org.apache.cordova.console",
"org.apache.cordova.dialogs",
"org.apache.cordova.device"
],
"enableDebug": false,
"copyFrom": ""
"linkTo": ""
}
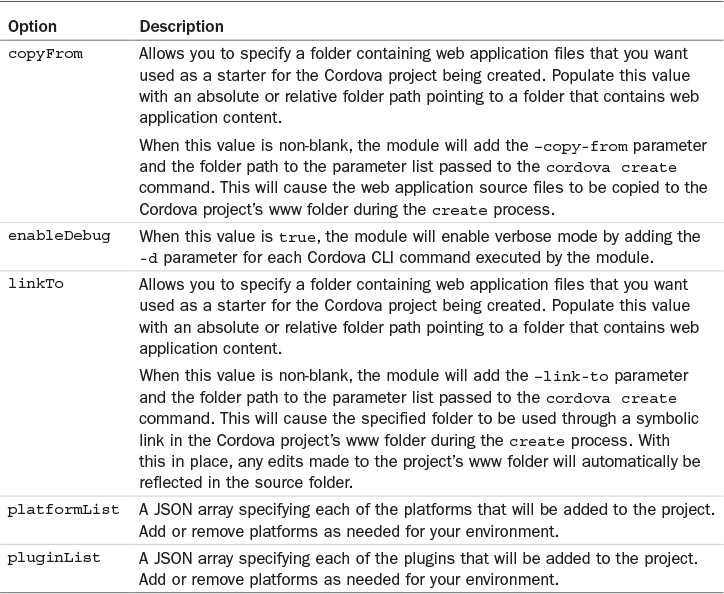
Table 6.1 describes each of the available configuration options for the cdva-create module.
Automating the Cordova Process
The Cordova CLI does a lot of work for you, managing most everything about your Cordova projects. However, as you’ve read through Chapter 4, “Using the Cordova Command-Line Interfaces,” or worked with your own Cordova projects, I bet you’ve wondered if it’s possible to add your own processes to the steps the Cordova CLI performs when it’s doing its work. Well, you can, and in this chapter I’ll show you how it works.
With the Cordova CLI, you can enhance most of the CLI commands using the hooks folder. With the hooks folder, you create a folder for each event you want to enhance and add to the folder any executable code you want executed on the event and the CLI will execute it for you automatically.
From an event standpoint, you usually have two options for each event: before and after. As an example, one of the events that you can expose through the hooks folder is prepare. Using hooks, you create before_prepare and after_prepare folders within the hooks folder and add any executable code (applications, shell scripts, Node applications, and more) to each folder and the CLI will execute each of them at the appropriate time in any supported CLI process.
The executables or applications in the before_prepare folder will be executed by the CLI before the prepare process starts, and the executables or applications in the after_prepare folder will execute after the prepare process has completed.
Warning
Remember from Chapter 5, “The Mechanics of Cordova Development,” that I mentioned the hooks folder; at the time I wrote this, the hooks folder was included with the base Cordova project folder structure, but as the Cordova dev team recently removed the merges folder, I wouldn’t be surprised if they whack the hooks folder as well someday. So, if your Cordova project doesn’t contain the hooks folder, simply create it and you’ll be ready to go.
Hooks aren’t supported for the Cordova CLI create command, because the hooks folder is created during the create process, so it simply wouldn’t work. Hooks, however, support most other Cordova CLI commands; here is the complete list of the current hooks options:
![]() after_build
after_build
![]() after_compile
after_compile
![]() after_docs
after_docs
![]() after_emulate
after_emulate
![]() after_platform_add
after_platform_add
![]() after_platform_ls
after_platform_ls
![]() after_platform_rm
after_platform_rm
![]() after_plugin_add
after_plugin_add
![]() after_plugin_ls
after_plugin_ls
![]() after_plugin_rm
after_plugin_rm
![]() after_plugin_search
after_plugin_search
![]() after_run
after_run
![]() after_serve
after_serve
![]() before_build
before_build
![]() before_compile
before_compile
![]() before_docs
before_docs
![]() before_emulate
before_emulate
![]() before_platform_add
before_platform_add
![]() before_platform_ls
before_platform_ls
![]() before_platform_rm
before_platform_rm
![]() before_plugin_add
before_plugin_add
![]() before_plugin_ls
before_plugin_ls
![]() before_plugin_rm
before_plugin_rm
![]() before_plugin_search
before_plugin_search
![]() before_prepare
before_prepare
![]() before_run
before_run
![]() before_serve
before_serve
![]() pre_package
pre_package
The pre_package option (and folder) applies only to the Windows 8 and Windows Phone target platforms. There is some talk about expanding this to allow for custom processes during the packaging and signing process.
Unfortunately, the Cordova CLI doesn’t make the hooks folders for you; you’ll have to do this yourself. To make things easier for you, I created a command file for Windows and a bash script for OS X and Linux that you can use to create the folders; you can find the files in the Chapter 6 folder of the book’s GitHub repository at https://github.com/johnwargo/ac4p. Simply open a terminal window, navigate to a Cordova project folder, and execute the appropriate make-hooks script and it will create the hooks folder (if it’s not there), then create each of the subfolders listed above.
Hooks will run in alphabetical order, so if you want your hooks applications to run in a particular order, be sure to name them alphabetically. Most developers begin the hooks files with numeric values; that’s the easiest way to list them in a particular order: 1-hook.cmd, 2-hook.cmd, and so on.
Holly Schinsky, an Adobe Evangelist, wrote a blog post that introduces hooks at http://goo.gl/Ggr64k. She includes a few example hooks you can use to better understand your options. One of the examples she gives is for a Node application that would automatically add an application’s plugins to a project during the platform add step; I’m not sure I agree with this as a good example. Essentially to use this hook, you’d have to create a Cordova project, then create the necessary hooks folder (after_platform_add) and copy in your hook code before executing the Cordova CLI platform add command. I really don’t see that this approach is less complicated than simply adding the platforms and issuing a few platform add commands manually. It’s up to you to see if this option works for your projects.
The big question you’re probably asking yourself right about now is why you would need to use hooks for your projects. I’m really not sure since I’ve not encountered a situation where a problem I had could be easily solved using a hook. I imagine that if you needed to copy in some files from another location during some part of the process or process some image files (optimizing or resizing them), hooks would be very useful.
You could easily use hooks to minify your source code or compile CoffeeScript to JavaScript during the before_prepare event, but most developers will most likely use something like Grunt or Gulp to manage these types of processes; I’ll show you how to use these tools with your Cordova projects in Chapter 18, “Using Third-Party Tools with Cordova.”
The problem for me is that there’s not currently a way to automate getting the hooks files into position through the CLI. The Cordova CLI allows me to copy web application project files into the project’s www folder through the --copy-from switch passed to the create command (described in Chapter 4). However, there’s no counterpart for hooks files. So, if you have a regular set of hooks you use for your projects, there’s no easy way to get them into place except to manually copy them after you create the project.
Note
After I submitted this chapter for editing, I created Node modules to automate the creation of the hooks and merges folders. The module for automating the creation of the hooks folders is called cdva-hooks (www.npmjs.com/package/cdva-hooks) and the module for automating the creation of the merges folders is called cdva-merges (www.npmjs.com/package/cdva-merges).
Wrap-Up
In this chapter, I’ve shown you a few ways to automate Cordova CLI commands and how you can insert your own code or applications into many of the Cordova CLI processes. With this information, you should be able to simplify many of your Cordova development processes.
In the next five chapters, I’ll show you how to use the native SDKs for several mobile device platforms to build, test, and debug Cordova applications for those platforms.