17. Using Third-Party UI Frameworks with Cordova
From time to time, people pop up on the Cordova dev list or the support forums asking about what UI capabilities Cordova provides and what HTML5 frameworks are compatible with Apache Cordova. The purpose of this chapter is to address all of those questions.
The quick answer to the first question is that Apache Cordova doesn’t provide any UI capabilities. None. This was demonstrated in Chapter 2, “Anatomy of a Cordova Application.” The Cordova framework doesn’t do anything to enhance the UI of a Cordova application. There are several good reasons for this.
First of all, the definition of Apache Cordova directly from the Apache Cordova web site (www.cordova.io) says:
Apache Cordova is a set of device APIs that allow a mobile app developer to access [a] native device function such as the camera or accelerometer from JavaScript.
There’s nothing there that says anything about UI; Apache Cordova is all about access to native APIs through a JavaScript interface, nothing more. It does one thing and it does it really well. The framework provides access to device-specific features and applications and leaves it up to developers to theme their applications however they see fit. Web developers should use the capabilities provided by HTML, CSS, and even JavaScript to enhance the UI of their Cordova applications as needed.
Second, most of the developers I know are persnickety. They have cool jobs, they write cool apps that do cool stuff, and they use cool tools to do it all. Over the years, developers build a relationship with specific tools and frameworks, and if Cordova provided a UI framework, most developers simply wouldn’t use it. Each developer has his or her own favorite, and there’s really nothing you can do to change it.
There, I answered the first question pretty clearly, right? Now on to the second one.
A long time ago, web developers learned that they could rely upon third-party frameworks to give their applications a complete and interesting UI. There’s a ton of them out there, so I’m not going to give you a list, but there are a lot of frameworks available that can simplify web development by providing a UI layer that the application’s other stuff fits cleanly into. As smartphones became more popular, web developers found themselves needing to be able to build web applications that mimic the look-and-feel of native applications on these mobile platforms. Many open-source and commercial frameworks were created to accommodate this need.
So of all of the HTML5 frameworks out there, which ones are compatible with Apache Cordova?
All of them.
Yep, that’s it—all of them. So the answer to the question “Can I use framework X for my Cordova applications?” (filling in any framework name for X) is yes. That was easy.
Remember, an Apache Cordova application is simply a web application running in a browser window embedded inside of a native mobile application. Since it’s essentially the device’s web browser that is running the web content and the web browser is compatible with HTML5, pretty much any HTML5 framework will work in a Cordova application.
There can be issues when you’re running multiple frameworks in the same app, though. Frameworks such as MooTools (http://mootools.net) and jQuery (http://jquery.com), for example, conflict with each other when running in the same app. Cordova apps will run into this problem, not because of Cordova, but simply because of how the frameworks work. Of the two examples given here, both use the $ as a shortcut to functions within the framework. When you run your application and use the $ shortcut to do something, you really won’t know whether MooTools or jQuery is responding. This is all documented pretty well (with a workaround) at http://goo.gl/R13BYx, so it is something that’s easily fixed.
With all of those questions behind us, I thought I’d use the rest of the chapter to show you how to use some of the frameworks I’ve worked with. The options I describe here aren’t necessarily the most common frameworks used, but they’re the ones I already know and a few I wanted to learn about. In this chapter, we discuss how to enhance the UI of a Cordova application using the following frameworks:
![]() Adobe Topcoat
Adobe Topcoat
![]() jQuery Mobile
jQuery Mobile
![]() Bootstrap
Bootstrap
![]() OpenUI5
OpenUI5
![]() Ionic
Ionic
![]() Onsen UI
Onsen UI
Adobe Topcoat is there because it’s from Adobe, and since Cordova and PhoneGap are both from Adobe as well, I thought I’d highlight it. jQuery Mobile and Bootstrap are there because they’re commonly used frameworks. I added OpenUI5 because that’s an open-source framework from SAP (and I work for SAP). Ionic and Onsen UI are new frameworks that are specifically crafted to work with hybrid application frameworks like Cordova. I was going to add a section on Sencha Touch, but it is the most complicated of the available options and I ran out of time and space.
In each section that follows, I introduce you to a framework and show you how to use it to make a Cordova application. Don’t forget, though, for all but the ones that are crafted specifically for Cordova development, there’s nothing special about using them with your Cordova applications. For each of the examples in this chapter, I’ve taken the Hello World #5 application from Chapter 2 and enhanced the application’s UI using the frameworks. I’m not going to go into detail for each framework. I just want to give you the high-level overview and let online help and any available books dedicated to the topic cover the frameworks in detail.
Adobe Topcoat
To make it easy for web developers to create good-looking Cordova applications, some developers at Adobe created a small, fast CSS library called Topcoat (http://topcoat.io) that you can use to apply a simple and clean UI to your Cordova applications. Topcoat is a clean wrapper around some common web application UI elements with a library of images and button styles you can use in your application. It’s not a full HTML5 framework like Sencha Touch or jQuery Mobile, but it is very useful for creating clean, simple, fast UIs for your web applications.
As it’s entirely CSS based, there are some things that it can’t do that other frameworks easily can. An example of this is the slider control. Topcoat can easily style an HTML slider control so it matches the Topcoat theme, but frameworks like jQuery Mobile provide more functionality around the control. You can see examples of this in the sample applications from my Apache Cordova API Cookbook (www.cordovacookbook.com). In that book, I used Topcoat for as many of the applications as I could, but some of the more complicated applications needed the additional capabilities provided by jQuery Mobile.
To use Topcoat, download the framework’s files from the Topcoat web site. The download is a .zip file, so extract the files to a folder on your development system, then copy the download’s css, font, and img folders to your Cordova project’s www folder.
Next, add the following line to the application’s index.html file:
<link rel="stylesheet" type="text/css" href="css/topcoat-mobile-light.min.css">
Topcoat provides both light and dark themes for applications; I’ll show you examples of both after I show you some code. This link tag loads the light, mobile version of the framework’s CSS file into the application; there is also a desktop version. With that in place, all you have to do to use the framework is add some CSS tags to your application’s HTML to make the application look beautiful.
If you take a look at Listing 17.1, you’ll see the Hello World #5 application from Chapter 2 updated so it gets its UI from Topcoat. I’ll explain the differences after you have finished looking at the code.
Listing 17.1 Hello World #5 index.html Using Adobe Topcoat
<!DOCTYPE html>
<html>
<head>
<title>Hello World #5 - Topcoat Version</title>
<meta charset="utf-8" />
<meta name="format-detection" content="telephone=no" />
<meta name="viewport" content="user-scalable=no, initial-scale=1,
maximum-scale=1, minimum-scale=1, width=device-width,
height=device-height" />
<link rel="stylesheet" type="text/css"
href="css/topcoat-mobile-light.min.css">
<script src="index.js"></script>
<script src="cordova.js"></script>
</head>
<body onload="onBodyLoad()">
<div class="topcoat-navigation-bar">
<div class="topcoat-navigation-bar_ _item center full">
<h1 class="topcoat-navigation-bar_ _title">Hello World #5 - Topcoat Version</h1>
</div>
</div>
<p>This is a Cordova application that makes calls to the Cordova Device API.</p>
<p id="deviceInfo">Waiting for Cordova Initialization to complete.</p>
</body>
</html>
In the body section of the HTML, I made a few changes to give the application a topcoat (pun intended). I added a few divisions that add a toolbar to the top of the web page:
<div class="topcoat-navigation-bar">
<div class="topcoat-navigation-bar_ _item center full">
<h1 class="topcoat-navigation-bar_ _title">Hello World #5</h1>
</div>
</div>
Topcoat doesn’t have a footer style, so the bottom of the page will be plain. The application generates the device information list after the deviceready event has fired, so all of that code is in the application’s index.js file shown in Listing 17.2.
Listing 17.2 Hello World #5 Application index.js Using Adobe Topcoat
function onBodyLoad() {
console.log("Entering onBodyLoad");
alert("Body Load");
document.addEventListener("deviceready", onDeviceReady, false);
}
function makeListItem(textStr) {
return '<li class="topcoat-list_ _item">' + textStr + '</li>';
}
function onDeviceReady() {
console.log("Entering onDeviceReady");
navigator.notification.alert("Cordova is ready!");
console.log("Cordova: " + device.cordova);
var tmpStr;
tmpStr = '<ul class="topcoat-list_ _container"><h3 class="topcoat-list_ _
header">Device API Properties</h3>';
tmpStr += makeListItem('Cordova Version: ' + device.cordova);
tmpStr += makeListItem('Operating System: ' + device.platform);
tmpStr += makeListItem('OS Version: ' + device.version);
tmpStr += makeListItem('Device Model: ' + device.model);
tmpStr += makeListItem('UUId: ' + device.uuid);
tmpStr += '</ul>';
//Get the appInfo DOM element
var element = document.getElementById('deviceInfo'),
//replace it with specific information about the device
//running the application
element.innerHTML = tmpStr;
console.log("Leaving onDeviceReady");
}
In the onDeviceReady function, the application creates some HTML and adds it to the page (replacing the contents of an existing div). The content being added begins with the definition of an unordered list that includes a simple h3 header. Special Topcoat classes are added to the tags to allow Topcoat to apply its style to the page elements.
tmpStr = '<ul class="topcoat-list_ _container"><h3 class="topcoat-list_ _header">Device API Properties</h3>';
In the makeListItem function, the code adds a list item tag to the device information that’s being written to the unordered list. As in the previous example, a Topstyle class is added to the list item definition in order for Topcoat to be able to apply its styling:
function makeListItem(textStr) {
return '<li class="topcoat-list_ _item">' + textStr + '</li>';
}
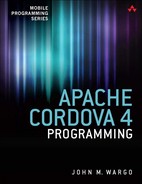
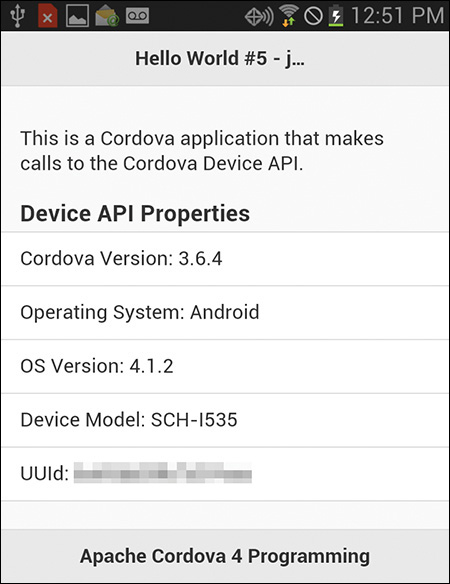
As you can see, using Topcoat to clean up the UI of your web application is really simple; all you have to do is add some class attributes to your existing page elements and you’re all done. Figure 17.1 shows the application running on an Android device.
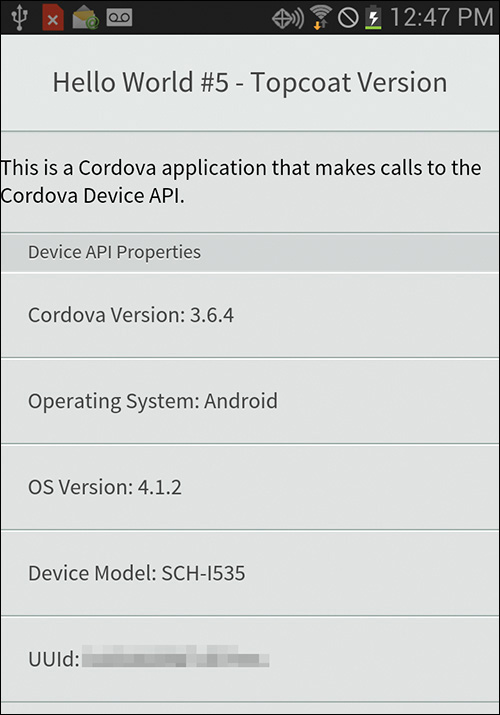
Figure 17.2 shows the same application running on an iOS device. Notice that the application looks almost exactly the same; there are some scaling differences because of display differences between the devices, but they’re essentially the same.
These HTML frameworks work very hard to make sure the application looks the same on all supported platforms, so you shouldn’t be too surprised to see that the results are pretty much the same on Android and iOS devices.
Notice, however, that the Cordova version differs between the two devices. I created these screen shots after Cordova 4.0 was released, but the native platforms are lagging behind a bit, and since they’re on different release streams, the versions will always be a bit out of alignment between platforms. This isn’t a problem; it’s simply the result of the CLI, platforms, and plugins all being on independent release schedules.
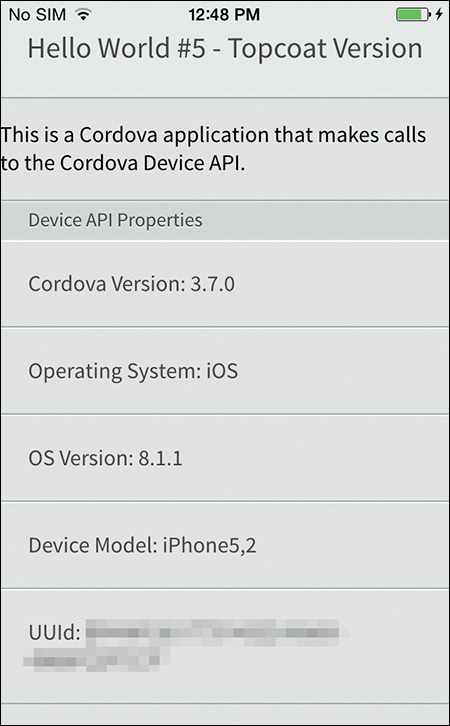
Topcoat supports light and dark themes; to switch to the dark theme, look for the following line in the beginning of the sample application:
<link rel="stylesheet" type="text/css" href="css/topcoat-mobile-light.min.css">
Replace it with the following:
<link rel="stylesheet" type="text/css" href="css/topcoat-mobile-dark.min.css">
When you run the modified application on an Android device, you’ll see something similar to what is shown in Figure 17.3.
Figure 17.3 Topcoat Version of the Hello World #5 Application Running on an Android Device Using the Dark Theme
jQuery Mobile
One of the most popular frameworks for mobile web applications is the jQuery Mobile framework (http://jquerymobile.com). Built to mimic the Apple iOS Browser type of application, jQuery Mobile (jQM) enables you to quickly build a web application with toolbars top and bottom as well as drill-down navigation and a cool, clean, themable UI. One of the useful differences between Topcoat and jQM is that jQM has similar CSS code and images to make the application look pretty, but it also has some very useful JavaScript capabilities that enable you to do so much more. It’s the jQM JavaScript libraries that enable you to make more compelling application UIs and automatically manage transitions between pages of your application. There’s so much you can do with jQM, but I’m going to show you only a little bit of it here; there are a lot of jQM books available in the market that can show you all of the ins and outs of jQM.
If you take a look at Listing 17.3, you’ll see the Hello World #5 application from Chapter 2 updated so it gets its UI from jQuery Mobile. I’ll explain the differences after you have finished looking at the code.
Listing 17.3 Hello World #5 index.html Using jQuery Mobile
<!DOCTYPE html>
<html>
<head>
<title>Hello World #5 - jQuery Mobile Version #1</title>
<meta charset="utf-8" />
<meta name="format-detection" content="telephone=no" />
<meta name="viewport" content="user-scalable=no, initial-scale=1,
maximum-scale=1, minimum-scale=1, width=device-width,
height=device-height" />
<link rel="stylesheet" href="css/jquery.mobile-1.4.3.min.css" />
<script src="js/jquery-2.1.1.min.js"></script>
<script src="js/jquery.mobile-1.4.3.min.js"></script>
</head>
<body onload="onBodyLoad()">
<div data-role="page">
<div data-role="header" data-position="fixed">
<h1>Hello World #5 - jQuery Mobile Version</h1>
</div>
<div data-role="content">
<p>This is a Cordova application that makes calls to the Cordova Device API.</p>
<h3>Device API Properties</h3>
<ul data-role="listview" id="devInfo"></ul>
</div>
<div data-role="footer" data-position="fixed">
<h1>Apache Cordova 4 Programming</h1>
</div>
</div>
<script src="index.js"></script>
<script src="cordova.js"></script>
</body>
</html>
To use jQM in your web application, you will have to download libraries from two locations. jQM makes heavy use of utility functions from jQuery (http://jquery.com), so you’ll first have to go to the jQuery web site and download the latest compatible version of jQuery. Next, you’ll need the jQM CSS and JavaScript libraries that can be downloaded from http://jquerymobile.com/download. With that done, copy the downloaded files to your Cordova application’s www folder. I typically put the CSS file in the css folder Cordova creates for me and the JavaScript files in the existing js folder. With the files in place, add the following lines to the application’s index.html file:
<link rel="stylesheet" href="css/jquery.mobile-1.4.3.min.css" />
<script type="text/javascript" src="js/jquery-2.1.1.min.js"></script>
<script type="text/javascript" src="js/jquery.mobile-1.4.3.min.js"></script>
The min versions are compressed so comments, white space, line breaks, and so on are removed from the files. This allows the files to take up less space within the packaged application, helping to reduce the file size of the application, and allows these resources to load more quickly when the user launches the application.
All you have to do next to make use of the jQM features is to add special attributes to your web application content. Instead of using CSS classes as Topcoat does, jQM uses proprietary attributes added to the HTML tags as shown in the example here:
<div data-role="page">
<div data-role="header" data-position="fixed">
<h1>Hello World #5 – jQuery Mobile Version</h1>
</div>
<div data-role="content">
<p>This is a Cordova application that makes calls to the Cordova Device API.</p>
<h3>Device API Properties</h3>
<ul data-role="listview" id="devInfo"></ul>
</div>
<div data-role="footer" data-position="fixed">
<h1>Apache Cordova 4 Programming</h1>
</div>
</div>
The most common one you’ll encounter with jQM is the data-role attribute. In the example code I’ve shown, the data-role attribute is used to define the different parts of the page; you should be able to easily see in the code how I’ve defined the page, header, footer, and content sections of the HTML body content. When the application runs, the jQuery libraries are loaded, and they quickly scan the web page and replace the tagged HTML content with the appropriate settings and associated JavaScript code to implement the needed UI and user experience (UX).
The device information list is rendered within a jQuery ListView. To implement this in the application, I created an unordered list and assigned it a data-role of listview:
<ul data-role="listview" id="devInfo"></ul>
When the application runs, the list gets the correct styling as well as code that allows the user to smoothly scroll up and down through the list and tap on items to drill down into the details if needed. I didn’t do that for this application, but in Chapter 10 of Apache Cordova API Cookbook (www.cordovacookbook.com) you’ll find several examples of this.
With the page content in place, the application’s JavaScript code does the rest; the complete listing of the application’s index.js is provided in Listing 17.4.
Listing 17.4 Hello World #5 index.js Using jQuery Mobile
function onBodyLoad() {
console.log("Entering onBodyLoad");
alert("Body Load");
document.addEventListener("deviceready", onDeviceReady, false);
}
function makeListItem(textStr) {
return '<li>' + textStr + '</li>';
}
function onDeviceReady() {
console.log("Entering onDeviceReady");
navigator.notification.alert("Cordova is ready!");
console.log("Cordova: " + device.cordova);
var tmpStr;
tmpStr = makeListItem('Cordova Version: ' + device.cordova);
tmpStr += makeListItem('Operating System: ' + device.platform);
tmpStr += makeListItem('OS Version: ' + device.version);
tmpStr += makeListItem('Device Model: ' + device.model);
tmpStr += makeListItem('UUId: ' + device.uuid);
//Write the values to the Unordered list
$('#devInfo').html(tmpStr);
$('#devInfo').listview('refresh'),
console.log("Leaving onDeviceReady");
}
In the deviceready event listener, the application builds the unordered list as shown in the other examples, then writes the content to the page. jQuery provides a quick and easy way to manipulate the web page content through the $ function. When it comes time to write the HTML to the page, the application executes the following code:
$('#devInfo').html(tmpStr);
$('#devInfo').listview('refresh'),
The first line writes the content to the page. Since there weren’t any list items on the page previously, jQM wasn’t able to update the page content with all of the style information and JavaScript code, so in order to make the listview render like a jQM listview, you have to tell jQM to refresh the listview content as shown in the second line of code.
When you run the application on an Android device, you will see something similar to what is shown in Figure 17.4. Figure 17.5 shows the same application running on an iOS device.

Notice that the application looks similar across platforms. In a more complicated application, as you navigate deeper, the jQM framework will automatically add mobile device platform features to the application such as a back button on iOS and support for the Escape key and menu on Android devices.
The application’s header, however, isn’t rendering very well; this is because I’ve put too much information into that portion of the page. Even though there’s enough space on the page for all of the content I’ve provided, jQM automatically allocates space in the header for buttons to the left and right of the header content—that’s why the header text is truncated in these examples.
When you were downloading the jQM files, you may have noticed that there were instructions for how to use CDN (content delivery network)-hosted files for your application. The instructions say to add the following lines to your application’s HTML:
<link rel="stylesheet"
href="http://code.jquery.com/mobile/1.4.3/jquery.mobile-1.4.3.min.css" />
<script src="http://code.jquery.com/jquery-1.11.1.min.js"></script>
<script src="http://code.jquery.com/mobile/1.4.3/jquery.mobile-1.4.3.min.js">
</script>
What this means is that the jQM files will be hosted on the Internet, and your application simply retrieves them as needed when the application launches. This keeps you from having to host the files on your own server or, in the Cordova case, package the files into your Cordova app. This is a good approach to take when you’re running a hosted web application from a web server, but it might not work so well for you in a Cordova application.
When you use this approach in a hosted application, users don’t really notice the difference. They type in your web site’s URL or tap on a bookmark, and your application’s files are retrieved from your web server and the jQM files are retrieved from, well, somewhere else. The desktop browser fires off multiple threads to retrieve resources simultaneously, so it’s pretty fast. As far as the user is concerned, nothing’s different; the site loads and renders as expected. There might be a slight problem if your web server is up and the CDN is down, but for the most part that’s not going to happen that often.
Within a Cordova application, however, this could be a problem. Remember, in general, the Cordova application web application assets are packaged with the Cordova application. When the Cordova application launches, it usually has everything it needs locally (except perhaps for any network-based data that’s loaded after the application has finished rendering). If you switch to using CDN-hosted resources, when the Cordova application launches, it will have the content it needs to render the application’s UI, but it must make an external network request to get the jQM files it needs to render the UI with the appropriate styling and JavaScript code. So, when you launch the application, and if there’s a delay in retrieving the files from the CDN, your web application won’t look right until the app completes downloading those extra files. An example of this is shown in Figure 17.6; in this case you’re seeing the application from Listing 17.2 before the jQM files have successfully downloaded. In this example, I’ve turned off the device radio to allow me to simulate the delay in retrieving the network-based files.
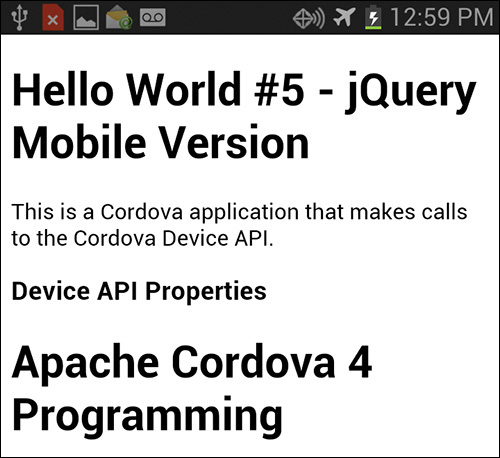
Figure 17.6 jQuery Mobile Version of the Hello World #5 Application Running on an Android Device with CDN-Hosted Files
One of the benefits of using Cordova for your applications is that if all of the web application content is packaged within the Cordova container, the application can run when the mobile device radio is turned off. If, however, you choose to use CDN-hosted content, your application will run correctly only when connected to the network. For this reason, I suggest that you ignore the CDN option for your third-party libraries unless you can guarantee that the application will be used only when network connectivity is available.
These examples only lightly cover the capabilities of jQM; there’s so much more you can do with this framework to enhance the user experience within your Cordova applications. Refer to the jQM online documentation or several of the new books on jQM for additional information about the capabilities provided by the framework, for example, Phillip Dutson, Sams Teach Yourself jQuery Mobile in 24 Hours (Indianapolis, IN: Sams Publishing, 2012).
Bootstrap
Bootstrap (http://getbootstrap.com) is a very popular front-end framework for building responsive, mobile-first web sites. Originally created by Twitter, it’s now one of the most popular open-source projects in the world (according to the Bootstrap web site). Instead of providing a mobile-friendly UI like jQuery Mobile and Topcoat, Bootstrap is mostly about responsive design and layout. It includes some styling, but the primary reason developers use it for their web applications is its capability to quickly and easily deliver a responsive web application anywhere.
To use Bootstrap for your web applications, download the latest version of Bootstrap from the project’s web site. When you extract the downloaded files, all you’ll see in the target folder are three folders: css, font, and js. Copy all of the folders to your Cordova project’s www folder and you’re all set.
The Bootstrap team publishes several starter applications developers can use as a starting point for their mobile applications. The starter pages are listed as examples on the project’s Getting Started page at http://goo.gl/59aDu7. For Listing 17.5, I grabbed the Starter template and updated it to accommodate the standard Hello World #5 application from Chapter 2.
Listing 17.5 Hello World #5 index.html Using Bootstrap
<!DOCTYPE html>
<html>
<head>
<title>Hello World #5 - Bootstrap Version</title>
<meta charset="utf-8" />
<meta name="format-detection" content="telephone=no" />
<meta name="viewport" content="width=device-width, initial-scale=1">
<!-- Bootstrap core CSS -->
<link href="css/bootstrap.min.css" rel="stylesheet">
<!-- Custom styles for this template -->
<link href="css/starter-template.css" rel="stylesheet">
</head>
<body onload="onBodyLoad()">
<div class="navbar navbar-inverse navbar-fixed-top" role="navigation">
<div class="container">
<div class="navbar-header">
<button type="button" class="navbar-toggle"
data-toggle="collapse" data-target=".navbar-collapse">
<span class="sr-only">Toggle navigation</span>
<span class="icon-bar"></span>
<span class="icon-bar"></span>
<span class="icon-bar"></span>
</button>
<a class="navbar-brand" href="#">Hello World #5 - Bootstrap Version</a>
</div>
<div class="collapse navbar-collapse">
<ul class="nav navbar-nav">
<li class="active"><a href="#">Home</a>
</li>
<li><a href="#about">About</a>
</li>
<li><a href="#contact">Contact</a>
</li>
</ul>
</div>
<!--/.nav-collapse -->
</div>
</div>
<div class="container">
<div class="starter-template">
<p class="lead">
This is a Cordova application that makes calls to the Cordova Device API.
</p>
<h3>Device API Properties</h3>
<p id="deviceInfo"></p>
</div>
<footer>
<hr />
<p>Apache Cordova 4 Programming</p>
</footer>
</div>
<!-- /.container -->
<!-- jQuery (necessary for Bootstrap's JavaScript plugins) -->
<script src="js/jquery-2.1.1.min.js"></script>
<!-- Include all compiled plugins (below), or include individual files as needed -->
<script src="js/bootstrap.min.js"></script>
<script src="index.js"></script>
<script src="cordova.js"></script>
</body>
</html>
The first thing you might notice about this application is that I’ve changed the viewport meta tag. Since I’m going to be letting Bootstrap manage the layout of the page, I deleted my standard Cordova viewport settings and simply used the one from the Bootstrap Starter template:
<meta name="viewport" content="width=device-width, initial-scale=1">
Next, the application loads some of the required Bootstrap files. The bootstrap.min.css file is part of the Bootstrap distribution, while the starter-template.css file is specific to the Starter template I’m using.
<!-- Bootstrap core CSS -->
<link href="css/bootstrap.min.css" rel="stylesheet">
<!-- Custom styles for this template -->
<link href="css/starter-template.css" rel="stylesheet">
In this example, the application defines a toolbar and a content container for the application. The toolbar code defines a collapsible toolbar and populates it with a few options. For this application I’m not including any code for the other pages exposed through the toolbar.
<div class="navbar navbar-inverse navbar-fixed-top" role="navigation">
<div class="container">
<div class="navbar-header">
<button type="button" class="navbar-toggle"
data-toggle="collapse" data-target=".navbar-collapse">
<span class="sr-only">Toggle navigation</span>
<span class="icon-bar"></span>
<span class="icon-bar"></span>
<span class="icon-bar"></span>
</button>
<a class="navbar-brand" href="#">Hello World #5</a>
</div>
<div class="collapse navbar-collapse">
<ul class="nav navbar-nav">
<li class="active"><a href="#">Home</a></li>
<li><a href="#about">About</a></li>
<li><a href="#contact">Contact</a></li>
</ul>
</div>
<!--/.nav-collapse -->
</div>
</div>
The application’s main content area is defined using the following code:
<div class="container">
<div class="starter-template">
<p class="lead">
This is a Cordova application that makes calls to the Cordova Device API.
</p>
<h3>Device API Properties</h3>
<p id="deviceInfo"></p>
</div>
<footer>
<hr />
<p>Apache Cordova 4 Programming</p>
</footer>
</div>
<!-- /.container -->
Here the application defines a content area, a container that is managed by Bootstrap as the page layout changes when the user rotates the device. The application replaces the content in the deviceInfo div with the data from the Device API.
At the bottom of the file the template loads the jQuery libraries as well as the supporting JavaScript code for Bootstrap. This is loaded at the bottom of the file so that the UI can load before extra processing of the page can begin. Since we want the application UI to appear before Cordova does its initialization, I’ve added the cordova.js file here as well:
<!-- jQuery (necessary for Bootstrap's JavaScript plugins) -->
<script src="js/jquery-2.1.1.min.js"></script>
<!-- Include all compiled plugins (below), or include individual files as needed -->
<script src="js/bootstrap.min.js"></script>
<script src="cordova.js"></script>
The rest of the differences are all in the HTML body for the application. Bootstrap doesn’t have any special list processing like Topcoat and jQuery Mobile, so for this version of the application I decided to simply write the device information to the screen as text. The complete listing for the application’s JavaScript code is shown in Listing 17.6.
Listing 17.6 Hello World #5 index.js Using Bootstrap
function onBodyLoad() {
console.log("Entering onBodyLoad");
alert("Body Load");
document.addEventListener("deviceready", onDeviceReady, false);
}
function makeListItem(label, value) {
return '<strong>' + label + '</strong>' + value + '<br />';
}
function onDeviceReady() {
console.log("Entering onDeviceReady");
navigator.notification.alert("Cordova is ready!");
console.log("Cordova: " + device.cordova);
//Now populate the content
var tmpStr;
tmpStr = makeListItem('Cordova Version: ', device.cordova);
tmpStr += makeListItem('Operating System: ', device.platform);
tmpStr += makeListItem('OS Version: ', device.version);
tmpStr += makeListItem('Device Model: ', device.model);
tmpStr += makeListItem('UUId: ', device.uuid);
//Write the values to the page
$('#deviceInfo').html(tmpStr);
console.log("Leaving onDeviceReady");
}
When you run the application on an Android tablet, you will see a screen similar to what is shown in Figure 17.7. In this case, the image shows the application layout in portrait mode. Because the application is displaying in portrait mode, there is not enough room for the toolbar content, so Bootstrap automatically collapses it and exposes it through the Menu button on the top right corner of the screen.
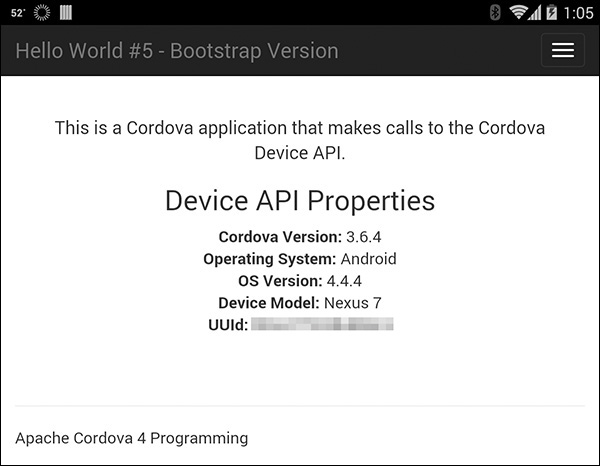
Figure 17.7 Bootstrap Version of the Hello World #5 Application Running on an Android Device in Portrait Mode
When you rotate the tablet to landscape mode, you will see a screen similar to what is shown in Figure 17.8. In this case, since there is enough room for the toolbar, the application expands the toolbar to display all of the options.

Figure 17.8 Bootstrap Version of the Hello World #5 Application Running on an Android Device in Landscape Mode
There’s a lot more you can do with Bootstrap; I could, for example, have shown you a web application with multiple content areas and used Bootstrap to automatically format that content for a smartphone’s smaller screen. As this is a Cordova book and not a Bootstrap book, I tried to get you what you need to see how Bootstrap works and how to get started.
SAP OpenUI5
SAP is a German enterprise software company producing Enterprise Resource Planning (ERP) and other business software for large and small companies around the world. I’m telling you this for two reasons: because I work for SAP and because you may not know what we do. SAP is one of the largest software companies in the world.
For years, SAP customers have complained about the user interface of our software products. The core ERP software from SAP was written 40 years ago, before robust graphical interfaces or the web browser. It’s been updated since, of course, but it has never really gotten a high-performance, polished UI upgrade. This all changed with SAP UI5 and Fiori.
SAP UI5 is an HTML framework SAP created to enable a new suite of applications called SAP Fiori. Fiori is Italian for “flower,” and for SAP and SAP customers it has become a design paradigm for focused web applications for desktop and mobile browsers. SAP UI5 is used to create applications with a clean and simple UI and is how SAP will be delivering beautiful applications to customers going forward.
In late 2013, SAP open-sourced SAP UI5 as OpenUI5 (http://sap.github.io/openui5), so now this beautiful framework is available for you to use for your web and/or Cordova applications. I’m not going to go too deeply into OpenUI5—there’s a whole lot to it. I’m only going to use it to create a simple Cordova application for this chapter; you’ll need to refer to the OpenUI5 web site for additional information on the framework’s capabilities.
With SAP UI5 and OpenUI5, web applications start with a simple HTML-based shell, but the majority of an application’s UI and UX is handled by JavaScript code included with the application. I created a simple example for this chapter; Listing 17.7 shows the example’s index.html file.
Listing 17.7 Hello World #5 index.html Using OpenUI5
<!DOCTYPE html>
<html>
<head>
<meta http-equiv='X-UA-Compatible' content='IE=edge' />
<title>Hello World #5 - OpenUI5 Version</title>
<script id='sap-ui-bootstrap' src='resources/sap-ui-core.js'
data-sap-ui-theme='sap_bluecrystal' data-sap-ui-libs='sap.m'>
</script>
<script src="cordova.js"></script>
<script src="index.js"></script>
</head>
<body id="body" class='sapUiBody' onload="onBodyLoad()"></body>
</html>
There’s really not much to it; all it does is load some scripts and define an empty body for the web application. Everything else is done in JavaScript. Notice that no CSS files are loaded and the script tag has more to it than we’ve seen in any other example in the book. This is because the script file loaded by the application manages the bootstrapping of OpenUI5 and loads the appropriate themes and more during startup. The application knows what theme to apply to the page from the following:
data-sap-ui-theme='sap_bluecrystal'
Blue Crystal is the default theme for UI5; there are others and you can create your own.
The application loads its mobile UI files through the following:
data-sap-ui-libs='sap.m'
As you can see from Listing 17.7, the web application’s body tag has an id and class assigned to it; it’s through these that OpenUI5 creates and manages the application’s UI. I added the call to onBodyLoad to enable me to do my Cordova stuff after the Cordova container has finished initializing.
Listing 17.8 shows the contents of the application’s index.js file.
Listing 17.8 Hello World #5 index.js Using OpenUI5
"use strict";
function onDeviceReady() {
function makeListItem(label, value) {
return '<li><strong>' + label + '</strong>' + value + '</li>';
}
console.log("Entering onDeviceReady");
navigator.notification.alert("Cordova is ready!");
console.log("Cordova: " + device.cordova);
//Now populate the UL content
var tmpStr;
tmpStr = makeListItem('Cordova Version: ', device.cordova);
tmpStr += makeListItem('Operating System: ', device.platform);
tmpStr += makeListItem('OS Version: ', device.version);
tmpStr += makeListItem('Device Model: ', device.model);
tmpStr += makeListItem('Universally Unique Identifier: ', device.uuid);
//Write the values to the page
$('#deviceInfo').html(tmpStr);
console.log("Leaving onDeviceReady");
}
function onBodyLoad() {
console.log("Entering onBodyLoad");
alert("Body Load");
document.addEventListener("deviceready", onDeviceReady, false);
var app = new sap.m.App("myApp");
var mainPage = new sap.m.Page("mainPage", {
title: "Hello World #5 - OpenUI5 Version",
content: new sap.ui.core.HTML({
content: "<p>This is a Cordova application that makes calls to the Cordova
Device API.</p><ul id=deviceInfo></ul>"
}),
footer: new sap.m.Bar({
contentMiddle: [new sap.m.Label('footerTitle', {
text: "Apache Cordova 4 Programming"
})]
})
});
app.addPage(mainPage);
app.setInitialPage("mainPage");
app.placeAt("body");
}
The application’s entire UI is created through the following code:
var app = new sap.m.App("myApp");
var mainPage = new sap.m.Page("mainPage", {
title: "Hello World #5 - OpenUI5 Version",
content: new sap.ui.core.HTML({
content: "<p>This is a Cordova application that makes calls to the Cordova
Device API.</p><ul id=deviceInfo></ul>"
}),
footer: new sap.m.Bar({
contentMiddle: [new sap.m.Label('footerTitle', {
text: "Apache Cordova 4 Programming"
})]
})
});
app.addPage(mainPage);
app.setInitialPage("mainPage");
app.placeAt("body");
It essentially creates the same header, footer, and content area for the application that you’ve seen in other examples throughout this chapter. Once that’s in place, after the Cordova container has finished initializing, the application’s onDeviceReady function is executed to update the page with the device information.
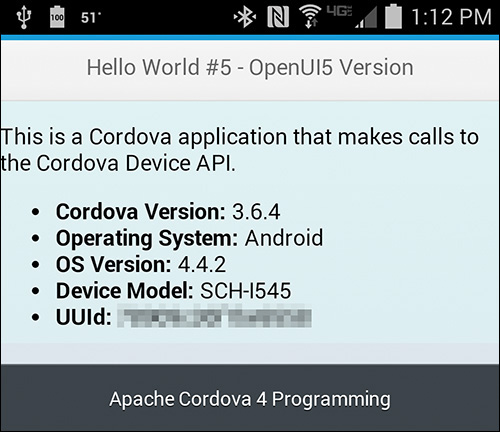
For this example, I didn’t use a listview to render the device information; I simply rendered the device information as an unordered list as shown in Figure 17.9. OpenUI5 supports listviews like Topcoat and jQuery Mobile, but since SAP is an enterprise company and enterprise apps are all about data, the OpenUI5 listview is focused on rendering data from a local or back-end data source to the screen.
In order for me to be able to use a listview for this application, I would have to define a data model, create and populate a local store with the device information, and let a listview render the store on the page. That was way more complicated than I wanted for this simple sample application, so I didn’t take that route. For applications that need to render data, though, this is a very powerful feature. In case you’re interested, Sencha Touch works the same way.
Ionic Framework
Ionic (http://ionicframework.com/) is an HTML framework designed specifically for hybrid applications. Created by Drifty (http://drifty.com/), Ionic is designed to be simple and very fast. Along with the UI framework, the Drifty team has given Ionic its own CLI wrapper around the Cordova CLI, so you have an easy way to start new Ionic projects using tools you are already familiar with. I saw a member of the Ionic team speak at PhoneGap Day 2014, and they seem pretty committed to Apache Cordova and apparently have plans to create the “world’s first full-stack hybrid mobile platform.”
To use Ionic for your Cordova applications, there’s nothing to download; everything is done through the CLI. To install the Ionic CLI on Windows, open a terminal window and issue the following command:
npm install -g ionic
For Macintosh OS X, use the following:
sudo npm install -g ionic
When that process completes, you will have the ionic command at your disposal.
The Ionic team has created a suite of starter templates you can use for your Cordova applications. You can find the list of them on the Ionic Getting Started page at http://ionicframework.com/getting-started/. To create a new Ionic project, open a terminal window, navigate to the folder where you want the project created, and issue the following command:
ionic start appFolder appTemplate
So, for this chapter’s example, I’ll call it Example 17.6, I selected the blank template as a starting point for the application and created my sample using the following command:
ionic start ex176 blank
The Ionic CLI will use the Cordova CLI to create a new project and copy over some additional components Ionic uses for its builds and other stuff. You can see the folder structure it created for this project in Figure 17.10. As you can see from the figure, the project includes configuration files for Bower, Gulp (described in Chapter 18, “Using Third-Party Tools with Cordova”), NPM, and more. It also includes support for Sass (http://sass-lang.com/). There’s a lot going on here, more than we’ve seen for any other framework.
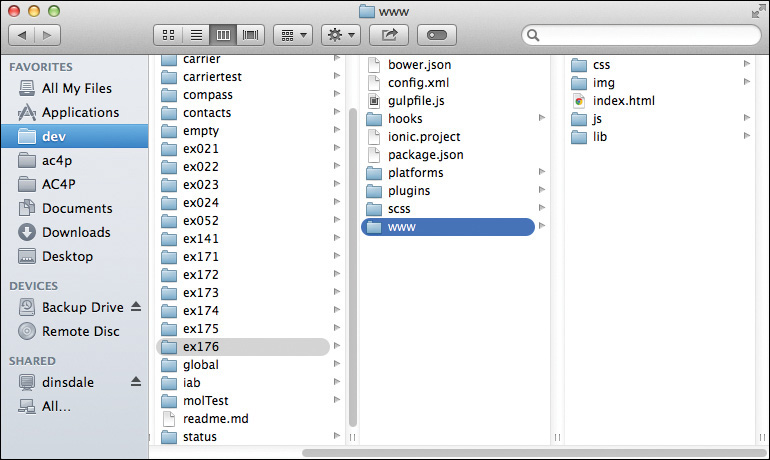
When the Ionic CLI has completed creating the project, it will display some additional information in the terminal window to help you understand what you can do next:
Your Ionic project is ready to go! Some quick tips:
* cd into your project: $ cd ex176
* Setup this project to use Sass: ionic setup sass
* Develop in the browser with live reload: ionic serve
* Add a platform (ios or Android): ionic platform add ios [android]
Note: iOS development requires OS X currently
See the Android Platform Guide for full Android installation instructions:
https://cordova.apache.org/docs/en/edge/guide_platforms_android_index.md.html
* Build your app: ionic build <PLATFORM>
* Simulate your app: ionic emulate <PLATFORM>
* Run your app on a device: ionic run <PLATFORM>
* Package an app using Ionic package service: ionic package <MODE> <PLATFORM>
For more help use ionic --help or visit the Ionic docs: http://ionicframework.com/docs
So, to add target platforms to the project, use
ionic platform add ios android
The Ionic CLI creates a simple index.html file for the project, one that automatically loads the libraries and frameworks needed by the application template. You can see a complete listing of the file, updated with some stuff I added, in Listing 17.9.
Listing 17.9 Hello World #5 index.html Using the Ionic Framework
<!DOCTYPE html>
<html>
<head>
<meta charset="utf-8">
<meta name="viewport" content="initial-scale=1, maximum-scale=1,
user-scalable=no, width=device-width">
<title>Hello World #5 - Ionic Version</title>
<link href="lib/ionic/css/ionic.css" rel="stylesheet">
<link href="css/style.css" rel="stylesheet">
<!-- IF using Sass (run gulp sass first), then uncomment below and
remove the CSS includes above
<link href="css/ionic.app.css" rel="stylesheet">
-->
<!-- ionic/angularjs js -->
<script src="lib/ionic/js/ionic.bundle.js"></script>
<!-- cordova script (this will be a 404 during development) -->
<script src="cordova.js"></script>
<!-- your app's js -->
<script src="js/app.js"></script>
</head>
<body ng-app="starter">
<ion-pane>
<ion-header-bar class="bar-stable">
<h1 class="title">Hello World #5 - Ionic Version</h1>
</ion-header-bar>
<ion-content>
<p id="deviceInfo">Waiting for Ionic Initialization to complete.</p>
</ion-content>
</ion-pane>
<div class="bar bar-footer bar-stable">
<div class="title">
<a href="www.cordova4programming.com">www.cordova4programming.com</a>
</div>
</div>
</body>
</html>
Everything I added is within the file’s body tag; Ionic uses ion-pane, ion-header, and ion-content to define the different parts of an application page. I changed the header for the page, then added the deviceInfo div to the ion-content section of the page.
With the page all set, I next updated the application’s app.js file with my code to update the page content with the Cordova device information; you can see a complete listing of the file in Listing 17.10.
Listing 17.10 Hello World #5 app.js Using the Ionic Framework
// Ionic Starter App
//angular.module is a global place for creating, registering and
//retrieving Angular modules
//'starter' is the name of this angular module example (also set in
//a <body> attribute in index.html)
// the 2nd parameter is an array of 'requires'
angular.module('starter', ['ionic'])
.run(function ($ionicPlatform) {
$ionicPlatform.ready(function () {
function makeListItem(textStr) {
return '<li class="item">' + textStr + '</li>';
}
// Hide the accessory bar by default (remove this to show the
//accessory bar above the keyboard for form inputs)
if (window.cordova && window.cordova.plugins.Keyboard) {
cordova.plugins.Keyboard.hideKeyboardAccessoryBar(true);
}
if (window.StatusBar) {
StatusBar.styleDefault();
}
console.log("Cordova: " + device.cordova);
var tmpStr;
tmpStr = '<ul class="list">';
tmpStr += makeListItem('Cordova Version: ' + device.cordova);
tmpStr += makeListItem('Operating System: ' + device.platform);
tmpStr += makeListItem('OS Version: ' + device.version);
tmpStr += makeListItem('Device Model: ' + device.model);
tmpStr += makeListItem('UUId: ' + device.uuid);
tmpStr += '</ul>';
//Get the appInfo DOM element
var element = document.getElementById('deviceInfo'),
//replace it with specific information about the device
//running the application
element.innerHTML = tmpStr;
});
});
Instead of using the default Cordova deviceready event, Ionic exposes an ionicPlatform.ready event that is fired once Cordova and the Ionic framework have initialized. It’s here that I’ve added my code to update the page with the Cordova device information. Ionic uses the list class to style the unordered list and the item class to style list items, so those are the only changes I had to make to the code compared to other versions of this app.
The Ionic CLI provides commands for running the application; I didn’t check, but I’m assuming it uses Gulp and some of those other components to process the application’s code during the prepare/build/run steps. To run the application on an Android device, open a terminal window, navigate to the Ionic application project folder, and issue the following command:
ionic run android
To run the application on a device simulator, use the emulate command:
ionic emulate ios
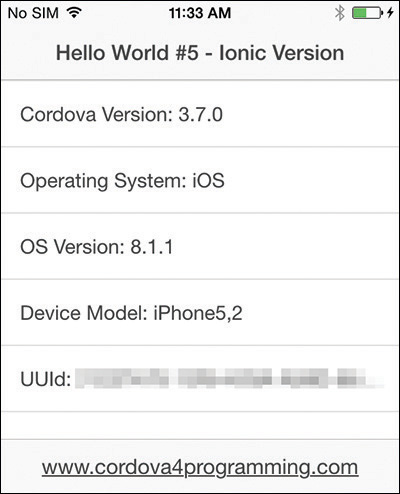
You can see an example of the application running on an iOS device in Figure 17.11.
Onsen UI
Another third-party framework specifically designed for Cordova applications is Onsen UI (http://onsenui.io). Onsen UI takes a slightly different approach when it comes to creating new projects; instead of providing a CLI like Ionic, Onsen UI simply provides downloadable Cordova projects to use as a starting point. The framework was created by Asial Corporation and works hand-in-hand with the company’s Monaca cloud-based development environment.
Monaca seems to be a pretty robust hybrid application editor with remote debugging capabilities. I didn’t get a chance to dig too deeply into this product, so I won’t include any details on it for this edition of the book.
To get started with Onsen UI, download one of the starter project templates from http://goo.gl/OigfgY and extract the downloaded files to a folder on your development system. To work with the project, open a terminal window and navigate to the new project folder. You can use the Gulp-based capabilities included with the project by installing the required Node modules using
npm install
Since the project folder contains a complete Cordova project folder structure (including a project config.xml), you can immediately start using Cordova CLI commands against the project. Before you can run the application, you’ll need to add platforms and plugins to the project using the cordova platform add and cordova plugin add commands, for example.
For the sample project for this chapter, I grabbed one of the starter projects—I think it was the Sliding menu project—and deleted all of the junk I didn’t need from the project’s index.html file. Next, I added the content I needed for the Hello World #5 application; you can see the complete source code in Listing 17.11.
Listing 17.11 Hello World #5 index.html Using the Onsen UI Framework
<!doctype html>
<html lang="en" ng-app="app">
<head>
<title>Hello World #5 - Onsen UI Version</title>
<meta charset="utf-8">
<meta name="apple-mobile-web-app-capable" content="yes">
<meta name="mobile-web-app-capable" content="yes">
<link rel="stylesheet" href="lib/onsen/css/onsenui.css">
<link rel="stylesheet" href="styles/onsen-css-components-blue-basic-theme.css">
<link rel="stylesheet" href="styles/app.css" />
<script src="lib/onsen/js/angular/angular.js"></script>
<script src="lib/onsen/js/onsenui.js"></script>
<script src="index.js"></script>
<script src="cordova.js"></script>
<script>
var module = angular.module('app', ['onsen']);
</script>
</head>
<body onload="onBodyLoad()">
<ons-page>
<ons-toolbar>
<div class="center">Hello World #5 - Onsen UI Version</div>
</ons-toolbar>
<p>This is a Cordova application that makes calls to the Cordova Device API.</p>
<ons-list id="deviceInfo">
</ons-list>
</ons-page>
</body>
</html>
The file loads all of the libraries required by Onsen UI; all I really did was add the content to the file’s body element. It should look pretty similar to what you’ve seen in other examples in this chapter; the only real difference is in the device information list. Instead of using HTML unordered list (ul) elements like some of the other frameworks, Onsen UI uses proprietary ons-list elements to define the list and ons-list-items to define the list items. In the index.html file, I’ve defined an empty ons-list with an id of deviceInfo; in the application’s JavaScript code, I’ll populate that list with the appropriate content for the application.
Listing 17.12 shows the contents of the application’s index.js file; it should look a lot like the other examples shown in this chapter. I’ll explain the differences after you have had a chance to look at the code.
Listing 17.12 Hello World #5 index.js Using the Onsen UI Framework
function onBodyLoad() {
console.log("Entering onBodyLoad");
alert("Body Load");
document.addEventListener("deviceready", onDeviceReady, false);
}
function makeListItem(textStr) {
return '<ons-list-item>' + textStr + '</ons-list-item>';
}
function onDeviceReady() {
console.log("Entering onDeviceReady");
navigator.notification.alert("Cordova is ready!");
console.log("Cordova: " + device.cordova);
var tmpStr;
tmpStr = '<ons-list-header>Device API Properties</ons-list-header>';
tmpStr += makeListItem('Cordova Version: ' + device.cordova);
tmpStr += makeListItem('Operating System: ' + device.platform);
tmpStr += makeListItem('OS Version: ' + device.version);
tmpStr += makeListItem('Device Model: ' + device.model);
tmpStr += makeListItem('UUId: ' + device.uuid);
//Get the appInfo DOM element
var element = document.getElementById('deviceInfo'),
//replace it with specific information about the device
//running the application
element.innerHTML = tmpStr;
ons.compile(element);
console.log("Leaving onDeviceReady");
}
In the application’s deviceready event listener function, the code populates the page’s ons-list element with ons-list-items. The individual device information components are wrapped in the proprietary tags using
function makeListItem(textStr) {
return '<ons-list-item>' + textStr + '</ons-list-item>';
}
The only other difference from the other examples shown in this chapter is the following line:
ons.compile(element);
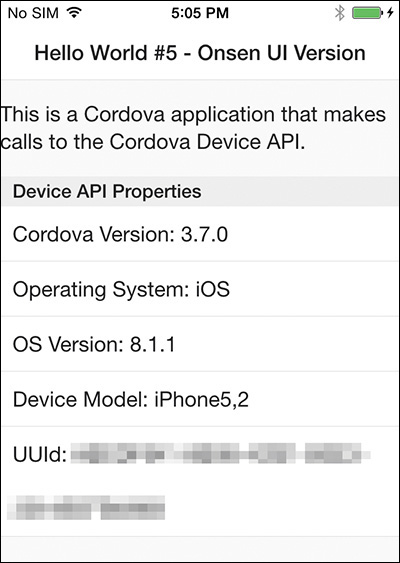
What this does is refresh the contents of the ons-list on the page; if I didn’t do this, the text would appear on the page, but it would not render into the list shown in Figure 17.12. In the figure, the application is running on an iOS device.
Onsen UI provides a clean and simple framework for delivering visually pleasing hybrid UIs. When coupled with the code-editing and debugging capabilities of Monaca, it’s a pretty slick solution for beginning or experienced Cordova developers.
Wrap-Up
In this chapter, I answered a couple of very important questions about the compatibility of third-party frameworks with Apache Cordova and showed you how to leverage several popular, a couple of not-so-popular, and two Cordova-specific HTML5 frameworks in your Cordova applications. Using the information provided herein, you’ll be able to enhance the visual appeal of any Cordova application.
In the next chapter, I wrap up the book by covering third-party tools you can use to enhance your Cordova development experience.