
To test whether your installation was completed successfully, you need to run Solr. Type these commands in the terminal to run it:
$ cd /usr/local/Cellar/solr/4.4.0/libexec/example/
$ java -jar start.jar
After you run the preceding commands, you will see lots of dumping messages/logs on the terminal. Don't worry! It's normal. Just try to fix any error if it is there. Once the messages are stopped and there is no error message, simply go to any web browser and type http://localhost:8983/solr/#/.
Tip
Downloading the example code
You can download the example code files from your account at http://www.packtpub.com for all the Packt Publishing books you have purchased. If you purchased this book elsewhere, you can visit http://www.packtpub.com/support and register to have the files e-mailed directly to you.
You will see following screen on your browser:
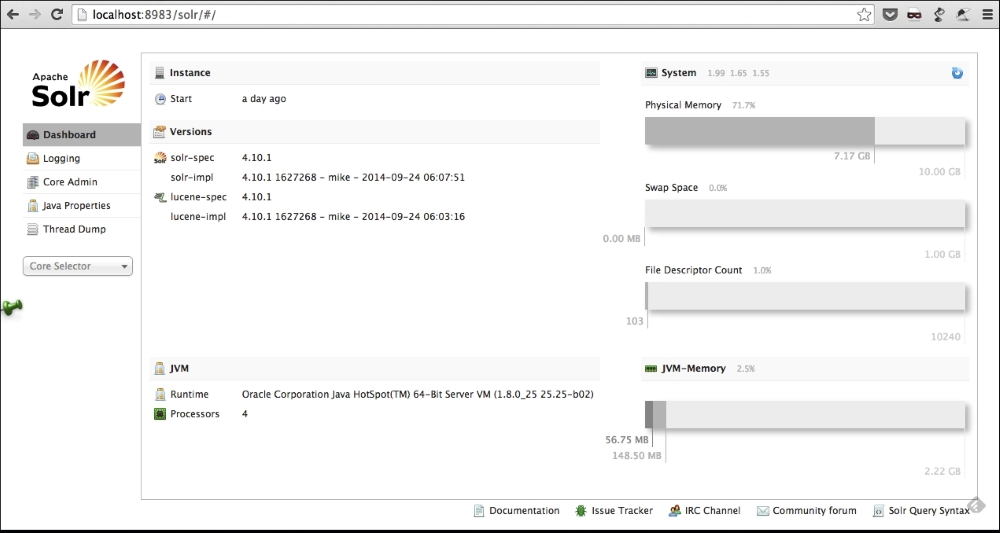
Fresh Solr do not contain any data. In Solr terminology, data is termed as a document. You will learn how to index data in Solr in upcoming chapters.
There are multiple ways of installing Solr on a Windows machine. Here, I have explained the way to set up Solr with Jetty running as a service via NSSM:
- Install the latest Java JDK from http://www.oracle.com/technetwork/java/javase/downloads/index.html.
- Download the latest Solr release (ZIP version) from http://www.apache.org/dyn/closer.cgi/lucene/solr/. At the time of writing this book, the latest Solr release was 4.10.1.
- Unzip the Solr download. You should have files as shown in the following screenshot. Open the
examplefolder.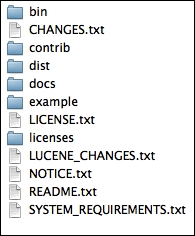
- Copy the
etc,lib,logs,solr, andwebappsfolders andstart.jartoC:solr(you will need to create the folder atC:solr), as shown in the following screenshot: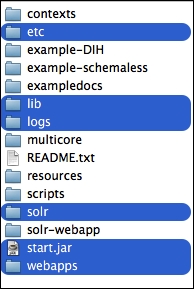
- Now open the
C:solrsolrfolder and copy the contents back to the rootC:solrfolder. When you are done, you can delete theC:solrsolrfolder. See the following image, the selected folder you can delete now: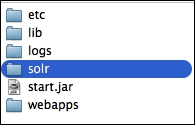
At this point, your
C:solrdirectory should look like what is shown in the following screenshot: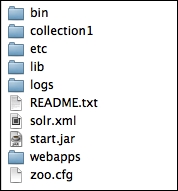
- Solr can be run at this point if you start it from the command line. Change your directory to
C:solrand then runjava -Dsolr.solr.home=C:/solr/ -jar start.jar. - If you go to
http://localhost:8983/solr/, you should see the Solr dashboard. - Now Solr is up and running, so we can work on getting Jetty to run as a Windows service. Since Jetty comes bundled with Solr, all that we need to do is run it as a service. There are several options to do this, but the one I prefer is through Non-Sucking Service Manager (NSSM)program in windows which is the, the most compatible service manager across Windows environment. NSSM can be downloaded from http://nssm.cc/download.
- Once you have downloaded NSSM, open the
win32orwin64folder as appropriate and copynssm.exeto yourC:solrfolder. - Open Command Prompt, change the directory to
C:solr, and then runnssm install Solr. - A dialog will open. Select
java.exeas the application located atC:WindowsSystem32. - In the options input box, enter:
Dsolr.solr.home=C:/solr/ -Djetty.home=C:/solr/ -Djetty.logs=C:/solr/logs/ -cp C:/solr/lib/*.jar;C:/solr/start.jar -jar C:/solr/start.jar. - Click on Install service. You should get a service successfully installed message.
- Finally run
net start Solr. - Jetty should now be running as a service. Check this by going to
http://localhost:/8983/solr/.
To install Solr on Linux/Unix, you will need Java Runtime Environment (JRE) version 1.7 or higher. Then follow these steps:
- Download the latest Solr release (
.tgz) from http://www.apache.org/dyn/closer.cgi/lucene/solr/. At the time of writing this book, the latest release was 4.10.1. - Unpack the file to your desired location.
- Solr runs inside a Java servlet container, such as Tomcat, Jetty, and so on. Solr distribution includes a working demo server in the
exampledirectory, which runs in Jetty. You can use Jetty servlet container, or use your preferred servlet container. If you are using a servlet container other than Jetty and it's already running, then stop that server. - Copy the s
olr-4.10.1.warfile from the Solr distribution under thedistdirectory to thewebappsdirectory of your servlet container. Change the name of this file; it must be namedsolr.war. - Copy the Solr home directory,
solr-4.x.0/example/solr/, from the distribution to your desired Solr home location. - Start your servlet container, passing to it the location of your Solr home in one of these ways:
- Set the
solr.solr.homeJava system property to yourSolr home(for example, using this example jetty setup:java -Dsolr.solr.home=/some/dir -jar start.jar). - Configure the
servletcontainer so that a JNDI lookup ofjava:comp/env/solr/homeby the Solr web app will point to yourSolr Home. - Start the
servletcontainer in the directory containing./solr. The defaultSolr Homeissolrunder the JVM's current working directory ($CWD/solr).
- Set the
- To confirm the installation, just go to
http://localhost:/8983/solr/and you will see the Solr dashboard. Now your Solr is up and running.
Thus, by the end of the installation, your Solr is up and running. But since we have not fed any data into Solr, it will not index any data. Let's try to insert some example data into our server.
The Solr download comes with example data bundled in it. We can use the same data for indexing as an example. Go to the exampledocs directory under the example directory. Here, you will see a lot of files. Now go to the command line (terminal) and type the following commands:
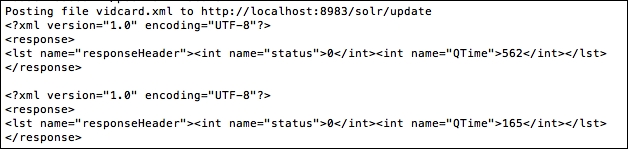
$ cd $SOLR_HOME/example/exampledocs/
$ ./post.sh vidcard.xml
Within the post.sh file, the script will call http://localhost:8983/solr/update using curl to post xml data from the vidcard.xml file. When the import completes (without any error), you will see a message that looks something like this:
Now let's try to check out our imported data from web browser. Try http://localhost:8983/solr/select?q=*:*&wt=json to fetch all of the data in your Solr instance, like this:

When you see the preceding data, it means that your Solr server is running properly and is ready to index your desired feed. You will be reading indexing in depth in upcoming chapters.