In the previous chapter, we covered advanced topics in Solr, such as multilanguage support, deduplication, content streaming, and so on. In this chapter, we'll see how we can set up a cluster of Solr servers that will provide a fault-tolerant and high-availability scenario. We'll cover the following topics:
- Setting up SolrCloud
- Using the collections API
- Distributed indexing and searching
In this section, we will see how we can set up multiple nodes of Solr servers on a single physical machine. We'll clone the example folder that comes with the default Solr installation to create multiple shards.
Let's go ahead and set up a two-node Solr instance. We'll navigate to our Solr instance and execute the following command:
$ cd $SOLR_HOME
$ cp -r example shard1
$ cp –r example shard2
After running the preceding commands, we'll see that there are two folders (shard1 and shard2) that are now ready.
Let's go ahead and start the two solr nodes that we just created. To do this, we'll navigate to $SOLR_HOME/bin folder:
shard1:$ ./solr start -cloud -d ../shard1 -p 8983shard2:$ ./solr start -cloud -d ../shard2 -p 8987 -z localhost:9983
After running the two nodes, we can navigate to http://localhost:8983/solr and can see a Cloud tab activated. This example was performed on a fresh installation of Solr, so the results will be different if we don't use a fresh installation. The following screenshot shows us the Graph view of the SolrCloud:
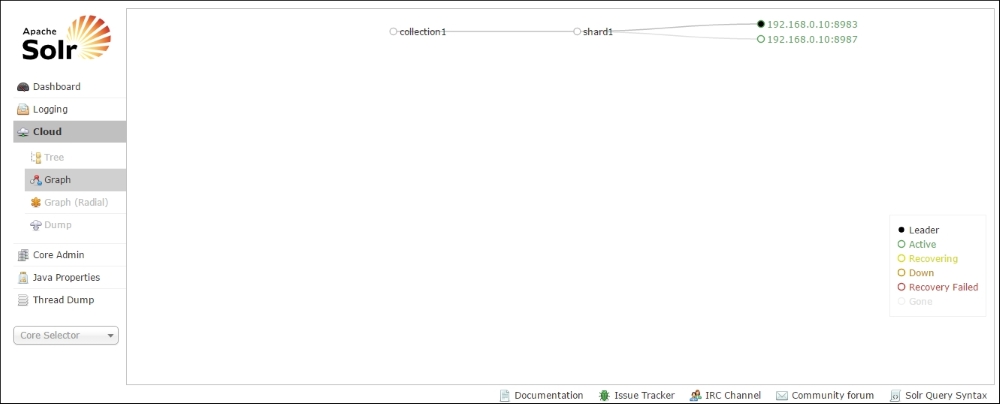
As we can see from the Solr Cloud tab, the default configuration contains two nodes, which contain a shard, one of them being the shard leader and the other being a replica.
Let's create a new collection using the collections API and assign to it two shards and two replicas that we can use.
But before we do this, we'll create a default configuration for the collection and upload it to ZooKeeper. The configuration stored in ZooKeeper is shared between the nodes that are running in SolrCloud. Any changes made in the configuration can then be made available on all the instances within the SolrCloud that are using that configuration:
$ $SOLR_HOME/example/scripts/cloud-scripts/zkcli.sh -zkhost localhost:9983 -cmd upconfig -confdir $SOLR_HOME/example/solr/collection1/conf -confname default
Note that Windows users can use the zkcli.bat version of the script or the following Java command:
$ java -classpath "examplesolr-webappwebappWEB-INFlib*;examplelibext*" org.apache.solr.cloud.ZkCLI -cmd upconfig -zkhost localhost:9983 -confdir $SOLR_HOME/example/solr/collection1/conf -confname default
After uploading the collection configuration to ZooKeeper, we'll create a collection named musicCatalogue-solrcloud:
curl "http://localhost:8983/solr/admin/collections?action=CREATE&name=musicCatalogue-solrcloud&replicationFactor=2&numShards=2&collection.configName=default&maxShardsPerNode=2&wt=json&indent=2"
We'll get the following response from the Solr instance:
{
"responseHeader":{
"status":0,
"QTime":8549},
"success":{
"":{
"responseHeader":{
"status":0,
"QTime":7582},
"core":"musicCatalogue-solrcloud_shard1_replica2"},
"":{
"responseHeader":{
"status":0,
"QTime":7641},
"core":"musicCatalogue-solrcloud_shard2_replica2"},
"":{
"responseHeader":{
"status":0,
"QTime":7912},
"core":"musicCatalogue-solrcloud_shard2_replica1"},
"":{
"responseHeader":{
"status":0,
"QTime":7982},
"core":"musicCatalogue-solrcloud_shard1_replica
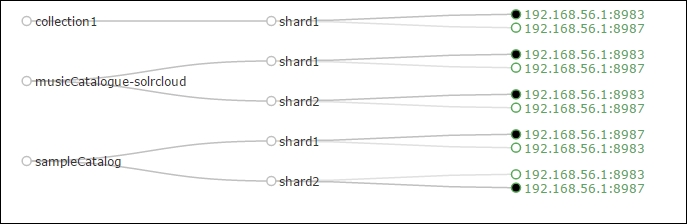
}After we have done this, we can navigate to the Solr Cloud tab. The following screenshot shows us the two different shards which were created:

Now let's just test our new collection by indexing some data in it. We'll use the following command to index the data in Solr:
$ curl 'http://localhost:8983/solr/musicCatalogue-solrcloud/json?commit=true' -H 'Content-type:application/json' -d '
[
 {"id" : "1", "title" : "Apache Solr Indexing Data"},
 {"id" : "2", "title" : "Apache Solr Cookbook"}
]'
After running the command, we should get the following response from Solr, telling us that the documents were indexed successfully:
{"responseHeader":{"status":0,"QTime":237}}The collections API supports the following operations, which can be used to create, remove, or reload collections:
There are more operations available, and they can be found on the Solr Wiki. In this chapter, we'll just see how we can use the collections API to manage a Solr configuration.
Let's go ahead and create a new collection with the number of shards as 2. To do this, we'll execute the following command:
curl "http://localhost:8983/solr/admin/collections?action=CREATE&name=sampleCatalog&replicationFactor=2&numShards=2&collection.configName=default&maxShardsPerNode=2&wt=json&indent=2"
We'll get the output as follows after running this command:
{
  "responseHeader":{
    "status":0,
    "QTime":10346},
  "success":{
    "":{
      "responseHeader":{
        "status":0,
        "QTime":9381},
      "core":"sampleCatalog_shard1_replica1"},
    "":{
      "responseHeader":{
        "status":0,
        "QTime":9565},
      "core":"sampleCatalog_shard1_replica2"},
    "":{
      "responseHeader":{
        "status":0,
        "QTime":9689},
      "core":"sampleCatalog_shard2_replica1"},
    "":{
      "responseHeader":{
        "status":0,
        "QTime":9774},
      "core":"sampleCatalog_shard2_replica2"}}}
After creating the new catalog, we can navigate to the Cloud tab in Solr Admin UI. We can see that our new core has been created.
Now, let's use the collections API to delete the newly created collection. We'll use the following command to delete it:
curl "http://localhost:8983/solr/admin/collections?action=DELETE&name=sampleCatalog&wt=json&indent=2"
We'll get this response after running the preceding command:
{
  "responseHeader": {
    "status": 0,
    "QTime": 1272
  },
  "success": {
    "192.168.56.1:8983_solr": {
      "responseHeader": {
        "status": 0,
        "QTime": 182
      }
    },
    "192.168.56.1:8983_solr": {
      "responseHeader": {
        "status": 0,
        "QTime": 209
      }
    },
    "192.168.56.1:8987_solr": {
      "responseHeader": {
        "status": 0,
        "QTime": 200
      }
    },
    "192.168.56.1:8987_solr": {
      "responseHeader": {
        "status": 0,
        "QTime": 216
      }
    }
  }
}
After we have run the
delete query, we can run the list command to get the current list of collections.
To do this, we use the following command:
curl "http://localhost:8983/solr/admin/collections?action=LIST&wt=json&indent=2"
We'll get this response:
{
  "responseHeader": {
    "status": 0,
    "QTime": 283
  },
  "collections": [
    "collection1",
    "musicCatalogue-solrcloud"
  ]
}
We've seen how we can create and delete collections. Now let's see one more feature of the collections API. We can create an alias using this API.
Let's create an alias for our collection using this command:
curl "http://localhost:8983/solr/admin/collections?action=CREATEALIAS&name=musicCatalogue-alias&collections=musicCatalogue-solrcloud&wt=json&indent=2"
After running it, we should get the following response:
{
  "responseHeader": {
    "status": 0,
    "QTime": 282
  }
}
Now, let's use the alias we've just created and run a query against it:
curl "http://localhost:8983/solr/musicCatalogue-alias/select?q=*%3A*&wt=json&indent=true"
We'll get this response:
{
  "responseHeader": {
    "status": 0,
    "QTime": 32,
    "params": {
      "q": "*:*",
      "indent": "true",
      "wt": "json"
    }
  },
  "response": {
    "numFound": 3,
    "start": 0,
    "maxScore": 1.0,
    "docs": [
      {
        "id": "1",
        "title": [
          "Apache Solr Indexing Data"
        ],
        "_version_": 1516224129180631040
      },
      {
        "id": "2",
        "title": [
          "Apache Solr Cookbook"
        ],
        "_version_": 1516224138192093184
      }
    ]
  }
}
This shows us how we can create an alias for a collection using the Collections API. One of the main benefits of using an alias is that it hides the main collection from the search client application. For example, we can have an alias named onlineArticles; when queried, it can return documents from magazines and blogs collections.
An alias can also be deleted using the following command:
curl "http://localhost:8983/solr/admin/collections?action=DELETEALIAS&name=musicCatalogue-alias&wt=json&indent=2"
Note
More information about the Collections API can be found at https://cwiki.apache.org/confluence/display/solr/Collections+API.
There is always a need to update configuration files in Solr. In Solr, while using SolrCloud, we can always maintain the configuration files in SVN, Git, or any other version control tool. Any changes in the configuration file can be pushed to the ZooKeeper instance that will keep all the Solr instances in sync with the latest version of the configuration.
Let's now see how we can update an instance of a file in ZooKeeper. To do this, we'll create a new file in the conf directory, which we'll then push to Zookeeper using the zkcli script.
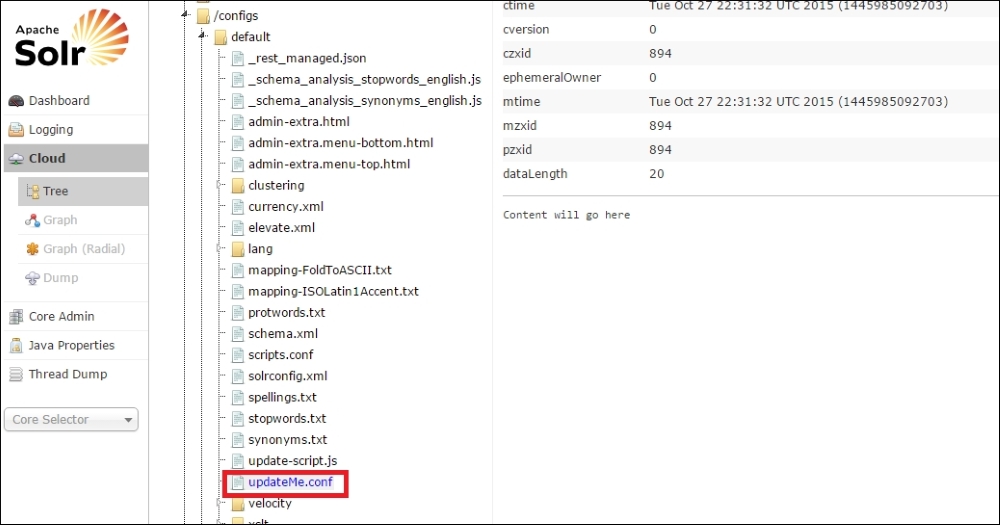
We create a new file called updateMe.conf in %SOLR_HOME%/example/solr/collection1/conf. After this we run the following command, which will push the file:
$ $SOLR_HOME/example/scripts/cloud-scripts/zkcli.sh -zkhost localhost:9983 -cmd upconfig -confdir %SOLR_HOME%/example/solr/collection1/conf -confname default
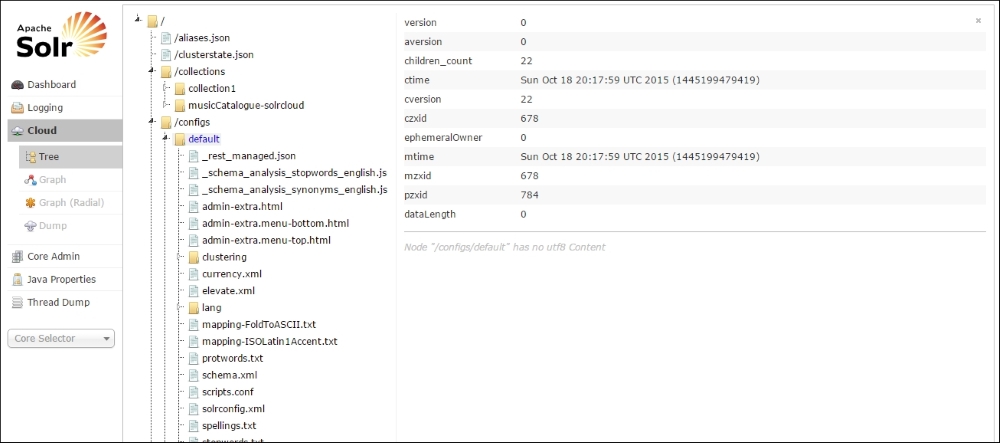
After running this command, we can navigate to the Cloud tab and then click on the Tree button, which will show us the files that are available in the Zookeeper instance. We can see in the following screenshot that our newly created file is present in the /configs/default location:
After updating the collection, we should always reload it, which will load up any changes made in the configuration files. We can reload a collection using the Collections API, like this:
curl "http://localhost:8983/solr/admin/collections?action=RELOAD&name=musicCatalogue-solrcloud&wt=json&indent=2"
We've discussed new terms in this chapter such as sharding and replication. Let's see what these terms mean in SolrCloud:
- Sharding: In Solr, sharding allows us to break down a large index into multiple smaller indexes that can fit on one server and can help us parallelize complex query execution and index operations.
- Replication: In Solr, replicas can help us create additional copies of a Solr index across multiple servers to add redundancy/failover scenarios. Replication also helps us increase the number of queries that an index can execute concurrently.
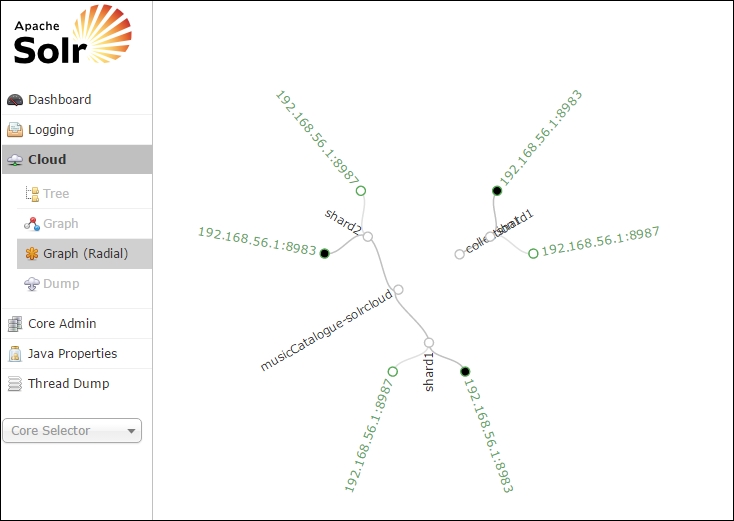
The Solr Cloud view also shows the configuration that was sent to ZooKeeper. The following screenshot shows the Solr Cloud view:
The Cloud tab contains the graph (radial) view, which can be used to see the shards and replicas currently being used in a graphical way. This screenshot shows our collection in a radial view: