Three basic rules of compression
Encoding tips and techniques
Compressor is to encoding what Final Cut Pro is to editing, meaning that the underlying skills are learned separately from the software used to perform them. While Compressor makes encoding accessible to all, behind its interface lies intense codec engineering and mathematics that generally fall into a “dark arts” category where few tread and even fewer seek any level of mastery. Although you can produce excellent results by mastering Compressor as an application, a deeper understanding of compression technology and technique is essential to becoming an encoding expert.
Although encoding can be a very exacting craft, it’s also an art form governed by aesthetics. Compression exists for the purpose of delivering digital media in a cost-effective manner, but it also has to look and sound good, and that is the marriage of the science and the art.
When videotape was the primary delivery format for completed content, the online media was often a lateral digital copy of the tape. For example, 10-bit uncompressed video was ingested from DigiBeta tapes, and then the final edit was laid back to DigiBeta with very little quality loss.
Today’s reality is that the final delivery format is very often a compressed version of the online master. HDCAM SR and D-5 tapes still provide very high-quality HD masters with minimal degradation from the source. But if your final content is intended for an optical medium such as Blu-ray Disc or DVD, or broadcast distribution via transport and program streams, or mobile devices and the Web, then the final version of your content will be a highly compressed version of the original. The goal is to produce a compressed version of your content that’s visually lossless when compared to the original.
The mathematics governing compression may be quite complex and complicated, but the basic rules governing their use are quite simple and easy to follow.
The highest quality media can usually be defined as the media that is closest to the production media or the online masters. For example, if you have an Apple ProRes 422 (HQ) file and a DVD of your movie and want to encode a version for the web, choosing the ProRes file will produce significantly higher-quality encodes because of its greater resolution and video fidelity. Remember, just because the DVD was the “final” version of the project doesn’t mean that it’s the best encoding source.
When following the test clip workflows in Lesson 5, it’s tempting to compare the various test encodes in hopes of finding a “winner.” Your goal, though, is finding the output settings that produce the most visually lossless media within the particular delivery constraints. Therefore, comparing the encoded media to the source is the only way to accurately judge the results of compression.
The well-worn project triangle of “fast, cheap, and good” says that you can realize two qualities from the list, but that you never can achieve all three. The underlying message of compromise translates perfectly to encoding, and in many ways it’s just an either/or choice. For example, you can have either high quality or small file size, fast encoding or multi-pass encoding, increased file compatibility or increased file functionality. Your goal always should be to clearly define your compromises so that you can best inform your encoding decisions.
Compressor’s batch templates (Lesson 2) remove many of the technical barriers of digital distribution because after you tell it what you want Compressor performs all the heavy lifting. Moving from the batch templates to Compressor’s intermediate and advanced workflows requires some basic understanding of compression technology.
It’s tempting to seek out a one-size-fits-all approach to encoding. Granted, Droplets and templates appear to provide that solution, but in reality they are one-size-fits-most applications. The first step in becoming a compressionist is realizing that every project and every source media clip has unique properties and idiosyncrasies.
Identifying the following items in your source media will inform your evaluation of the project by focusing your attention on those elements that are the greatest encoding challenges:
Rapid camera movements (swishes, pans, crash zooms, and so on)
Fast movement within the shot or many objects moving simultaneously within the shot
Night scenes or scenes shot with low available light
Scenes with wide dynamic range: the brightest whites to the darkest blacks
Tip
Find any of these sections in your source media and then use the test clip workflows described in Lesson 5 to encode just those portions. If you can achieve good results with those most challenging sections, the same settings will produce good results with the balance of the source media.
Just as in professional sports, in which a single player can have a disproportionate effect on the outcome of the game, a single compression setting can have a disproportionate effect on the quality of the encoded output. A perfect example of a Compressor “impact player” is bit rate, or data rate.
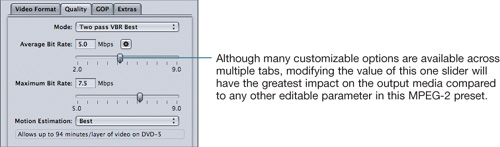
MPEG-2 setting in the Encoder pane of the Inspector window
When working with bit rates or data rates, you will have to choose a compromise between file size and media quality. The more bits, or data, that you apply to the encode, the greater the visual (and/or audio) quality, but at the expense of increased file size.
Tip
The megabit and the megabyte (10 Mbps versus 10 MBps, for example) are two units of measurement that are often confused, especially when referring to data throughput. Megabits (Mbps) measure data transfer; megabytes (MBps) measure data storage (file size). The confusion arises because both are also used to describe bandwidth and throughput in the same way that inches and centimeters describe distance. The conversion between the two is 1 Mbps = 0.125 MBps, or more precisely 8 bits = 1 byte.
When applying intraframe compression, every frame of video exists individually, and any data reduction (encoding) that is achieved resides within the boundaries of each frame. It is often referred to as all I-frame video.
In contrast, interframe compression removes large groups of whole frames and replaces them with algorithmic data sequences that a playback device (iPod, DVD, QuickTime Player) decodes and interprets as video. From a production, post-production, and digital distribution standpoint, the difference between these two methods is enormous. Understanding when to use each one is an essential skill.
Because intraframe compression includes a frame of video for every frame captured, it’s often used in camera acquisition and post-production editorial in these common formats: DV NTSC, DVCPro HD, Apple ProRes (all versions), and 10-bit uncompressed. The actual compression that occurs within each frame can vary greatly among the formats, but every frame will exist at the given frame rate. The cost of all this data is large file sizes when compared to content encoded with interframe compression. The overall picture fidelity and editorial ease in applications such as Final Cut Pro make intraframe compression a good choice for streamlined post-production.
Interframe compression employs temporal encoding that places code and algorithms between full video frames in the data stream. The interstitial math determines the differences between those full frames, and during playback it resolves how to represent that interpretation as video. Removing the vast majority of full frames results in a significant reduction in overall file size, but at the expense of quality when compared to content encoded with intraframe compression. Delivery formats such as DVD (MPEG-2) and Blu-ray Disc (AVC) use interframe encoding exclusively to produce widely distributable media in the most cost-effective manner. Therefore, apply interframe compression (H.264 and MPEG-2, for example) when delivering your content to final distribution formats such as YouTube, MobileMe, iPhones and iPods, DVDs, and Blu-ray Discs.
Tip
Some consumer and prosumer camera platforms such as HDV and AVC-Intra employ interframe compression to allow high definition acquisition to tape and solid-state media such as compact flash cards, but you may find that transcoding that material into an intraframe format produces a better post-production workflow. Refer to the “Working with Apple ProRes” section in Lesson 9 for more information on transcoding into a production codec.
To evaluate your understanding of the concepts covered in this lesson and to prepare for the Apple Pro Certification Exam, download the online quiz at www.peachpit.com/apts.compressor.