Learn the basic functions of Compressor’s five main windows
Digital media distribution has become both varied and multifaceted. Long gone are the days when laying your final edit out to tape was the only option. Now you may find yourself producing video screeners for iPods and iPhones, compressing movies for Apple TV playback, encoding high-quality trailers for YouTube, and creating both DVDs and Blu-ray Discs. Modern post-production workflows involve cross-compatibility between video and audio files in many different formats, and between the hardware platforms used to create and manipulate them. Compressor shines as the digital distribution hub for work inside Final Cut Studio, and for the other platforms in your post-production pipeline.
Fortunately, you can use Compressor as either a beginner or advanced user. For the beginner, the batch template workflows described in Lesson 2 produce high-quality, distributable media and require very little encoding knowledge. The advanced user can dig deeply into Compressor’s encoding settings, harness its batch management and monitoring capabilities, and increase its speed and efficiency using distributed encoding.
Compressor uses five main windows to guide you through the different steps of the encoding process: the Batch window (with Batch Template Chooser), the Preview window, the History window, the Inspector window, and the Settings window.
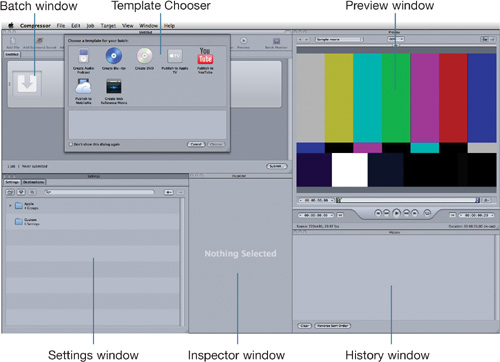
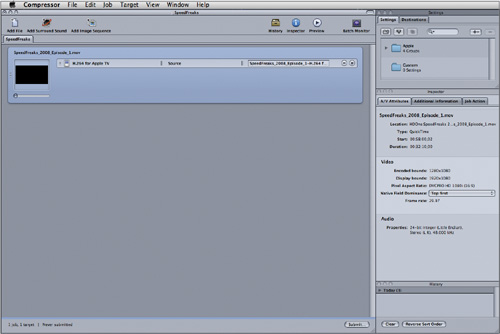
Compressor’s Standard window layout
Standard Window | Function |
|---|---|
Batch window | The vast majority of work done in Compressor starts and finishes inside the Batch window. Templates are accessed, media is imported, targets are applied, destinations are selected, output filenames are customized, and jobs are submitted to the encoder for compression. |
Preview window | The Preview window compares the source media and the proposed target settings. This window also lets you define the section of the source media that the encoder will process, and it lets you place chapter, podcast, and compression markers to support interactivity and encoding. |
This window provides easy access to current and completed encoding jobs. Past jobs can be imported back into Compressor for reference or resubmission. | |
Inspector window | The Inspector window serves as a portal to information and settings. The window’s display changes depending on what is selected in the Settings and Batch windows. If a media file is selected, information regarding that file is displayed in the Inspector. If a target or destination is selected, the preset attributes are displayed. |
Settings window | This window allows the creation, organization, duplication, and deletion of both settings and destinations. This window can also automatically detect the metadata of QuickTime media and create custom settings based on those parameters. |
The Batch window lets you manage your encoding tasks. With a combination of main menus, shortcut menus, and buttons, the Batch window provides access to all the essential components of Compressor.
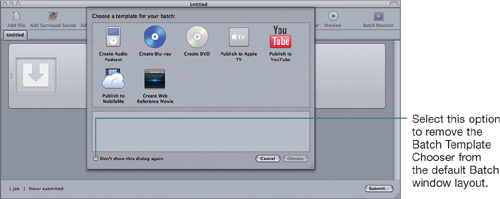
Compressor displays this window configuration when you open Compressor, or choose File > New Batch From Template.
Tip
You can also set the default display of the Batch window by choosing Compressor > Preferences and setting the For New Batches parameter to the desired choice: Show Template Chooser or Use Blank Template.
When you start with a blank template (empty job with no targets), the Batch window is divided into two sections: an upper section containing the toolbar, and a lower section that contains the individual batches in tabs with any jobs they contain.
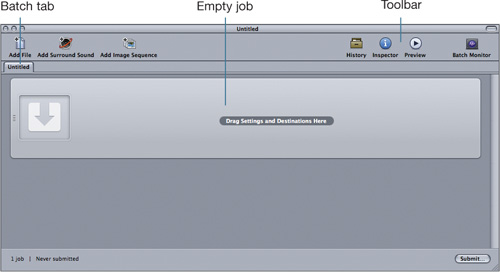
The Batch window toolbar gives you one-click access to the other Compressor windows. If a window is currently visible, click its button to activate it. If the window is not visible, click its button to both open and activate that window.
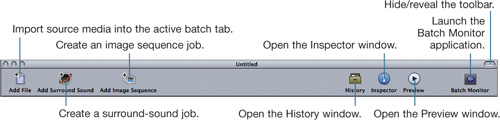
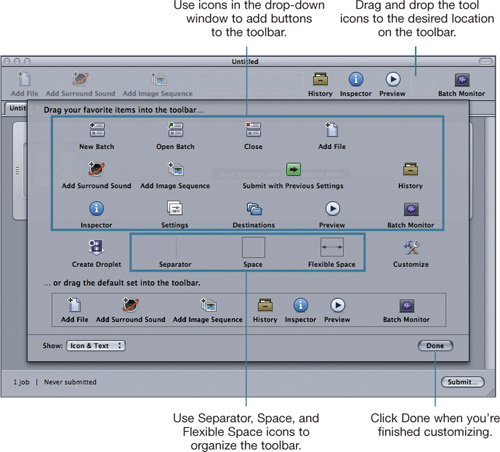
You can customize the toolbar by selecting the Batch window and choosing View > Customize Toolbar.
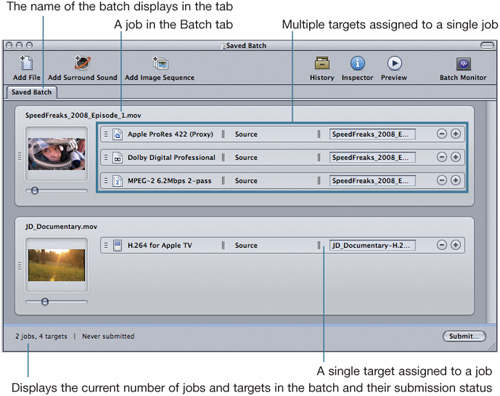
Batch windows let you import source media (called jobs) and assign encoding tasks (called targets) to each job. Targets are comprised of both a setting and a destination. You can create multiple jobs, each with multiple targets, which together comprise a batch that you can submit to encode as one session.
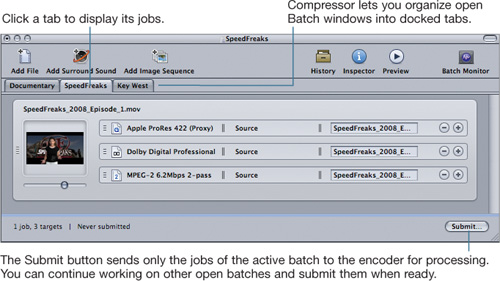
Both the toolbar and tabs of the Batch window provide context-specific menus depending on where you Control-click (or right-click).

The Preview window is divided into three areas: Display controls, Preview screen, and Timeline controls. It offers real-time playback of source material and an output preview of the Filters and Geometry target attributes. Refer to the strategies discussed in Lesson 5, “Test Clip Workflows” for previewing Encoder and Frame Controls settings.
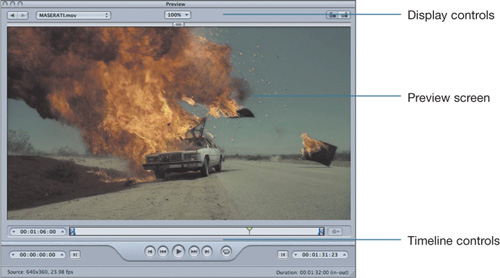
The Display Control buttons and pop-up menus let you manage how the Preview window presents the native source media and the source media with the currently selected setting (target) applied. The Preview screen plays back the currently selected source media or applied target as a real-time preview.
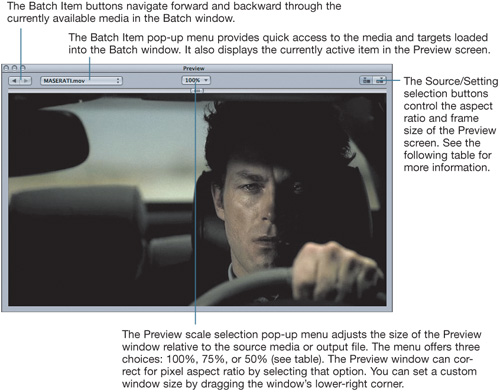
The Source/Setting selection buttons can be somewhat confusing when used in tandem with the Preview screen. The following table clarifies how to use these buttons.
Click This Button: | |
|---|---|
Watch playback of source media |
|
Crop the source media manually |
|
Watch a preview relative to the output media—that is, view a particular target in its output dimensions rather than the source’s native dimensions |
|
View any manual crop settings or crop values that were applied in the Geometry pane of the Inspector |
|
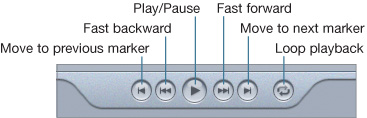
During media playback, the Preview window uses standard transport controls much like those in QuickTime Player or in Final Cut Pro’s Viewer and Canvas windows.
In addition to using the transport controls, you can also scrub the Timeline by dragging the playhead. For more precise control, use the timecode field to the left of the Timeline.

Enter the exact frame in the timecode field or click the up and down triangles on either side to move the playhead forward or backward one frame at a time.
You can set In and Out points in the Timeline to define a section of source media bound for encoding.
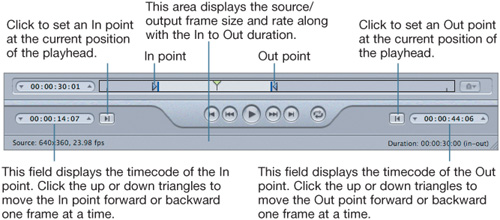
In tandem with the playhead position, press I or O on the keyboard to set the In and Out points, respectively.
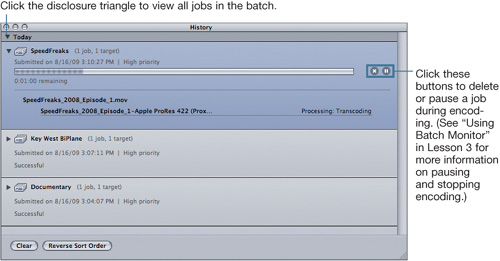
The History window provides convenient access to recent encoding jobs and targets, allowing you to quickly re-enter them into your Compressor workflow. The History window lists the batches by date.
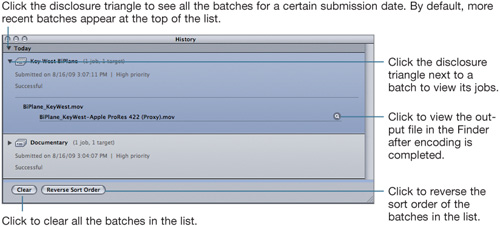
You can re-import an entire batch by dragging the entry from the History window into the Batch window.
Note
When importing previous batches from the History window, Compressor will create a new “Untitled” batch based on the original source and target settings. You can change or modify the batch as you choose, and then resubmit it. If any source clips have been moved or deleted from their original locations, you will have to manually relink the jobs in the Batch window to the original source media or alternatively import new source media for the job.
The History window also displays the status of currently encoding batches.
The Inspector window is your portal to Compressor’s brain, providing access to all the inner workings and parameters that define settings, actions, and destinations. It also displays the most useful information about the imported source media.
For the Inspector to display anything, though, you have to select a job or target in the Batch window or a setting in the Settings window. If nothing is selected, the Inspector window remains empty except for a “Nothing Selected” message.
If source media is selected in the Batch window, the Inspector details the specs of the imported file.
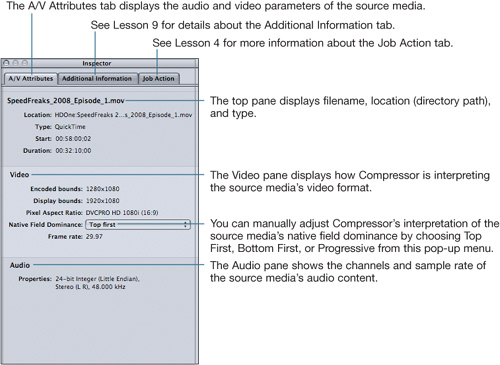
In addition to displaying source media information, the Inspector provides detailed access to all the settings and destinations. Depending on which setting you’ve selected from the Settings window, or which target you’ve selected from the Batch window, the Inspector will display different interfaces that let you interact with the applicable parameters. The vast majority of custom work you perform in Compressor will employ the Inspector window, and your desired output media type will dictate largely how you modify an item’s settings.
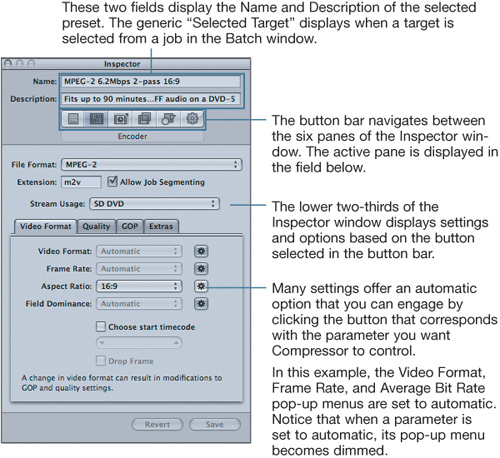
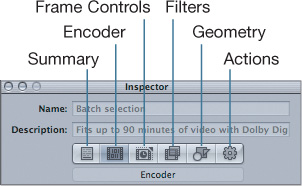
A closer look at the Inspector’s button bar
Note
See Lesson 4 for more specific information regarding using the Inspector window to modify settings, destinations, and actions..
Compressor encodes for media platforms ranging from Blu-ray Discs and DVDs to Apple TVs and iPhones, from lossless transcodes to audio and video podcasts. Each of those compression targets is governed by a setting and is output to a destination. The Settings window lets you manage the library of stock Apple settings and destinations that install with Compressor, and also the library of custom settings and destinations that you create yourself.
You access the two sections of the Settings window by selecting the Settings or Destinations tab in the upper-left corner of the window.
The Settings tab displays two folders containing presets you can apply as targets to jobs in the Batch window. When you install Compressor, all of the stock Apple settings are placed in the Apple folder; presets that you create are saved to the Custom folder.
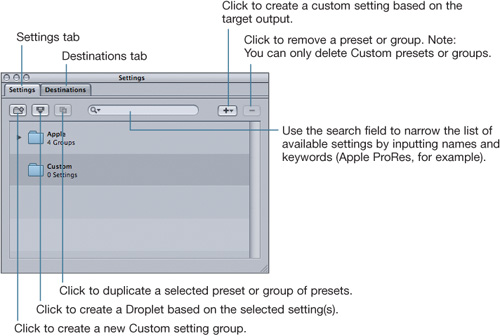
To view the contents of a folder, click the disclosure triangle to the left of the folder.
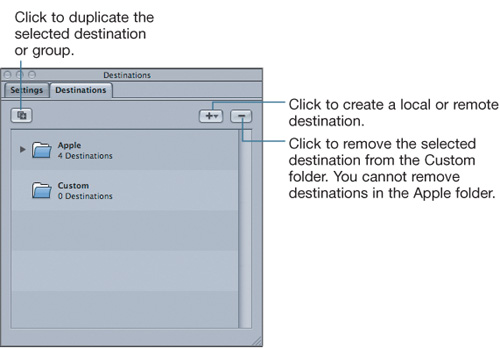
Each target assigned to a job in the Batch window must have a local or remote destination for the output file. The Destinations tab includes both the default Apple destinations and any custom destinations you define.
Compressor’s default window layout is called Standard and it appears in two screen resolutions: 1440 × 900 and 1280 × 800. As a frame of reference, if you are working on a 15-inch MacBook Pro and choose the Standard 1440 × 900 layout, the Compressor windows will fill your screen real estate to the edges.
Compressor also installs with a Batch layout that displays in three screen resolutions: 1440 × 900, 1280 × 800, and 1024 × 768.
To use a predefined window layout, choose Window > Layouts and select the desired orientation and resolution.
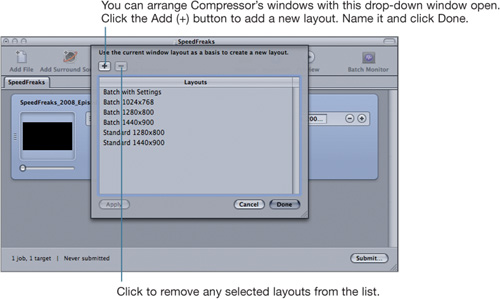
In addition to the layouts that install with Compressor, you can create custom layouts and save them for future use. For example, you may find that a layout including Batch, Preview, and Settings windows works best with batches that require no setting customization.
Tip
You can adjust multiple windows simultaneously by placing your cursor between two or more windows and dragging the group.
Once you have designed a window arrangement that suits your needs, choose Window > Save Layout. Name the layout and click Save.
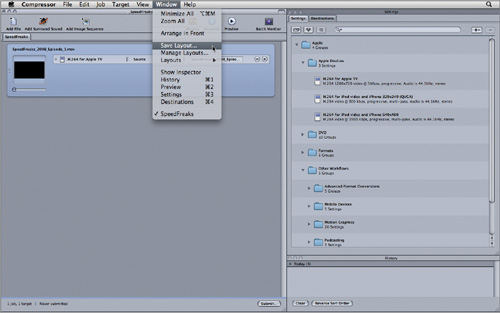
Choose Window > Manage Layouts to add or delete custom window arrangements.
To evaluate your understanding of the concepts covered in this lesson and to prepare for the Apple Pro Certification Exam, download the online quiz at www.peachpit.com/apts.compressor.