Understand batch templates
Publish to Blu-ray Disc
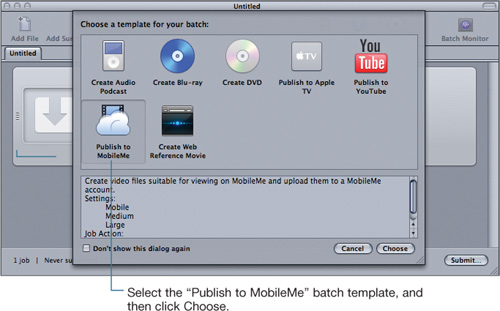
Publish to MobileMe
Integrate batch templates with manual workflows
Batch templates create a simplified, streamlined pathway through Compressor that allows you to choose the direction of the encoding process based on the final published media and not on the encoded files. When you’re first learning how to use Compressor, batch templates provide a launchpad for content encoding that teaches you about digital delivery while simultaneously producing final media.
Batch templates include all of the necessary encoding settings for the most common forms of digital distribution used during post-production: DVDs, Blu-ray Discs, media for Apple devices (iPhones, iPods, and Apple TVs), and movies published to the Web via YouTube and MobileMe.
As a result, you don’t need an extensive knowledge of codecs and formats to produce high-quality media using Compressor. In a few easy steps, Compressor can create the final product, and you can focus on creating and distributing your content.
Batch templates are self-contained workflows through Compressor and don’t require any other application. For example, if you choose the DVD template, Compressor will not only create the files needed to make the DVD, but it will author and burn the final disc, based on its analysis of the source movie and the template’s parameters.
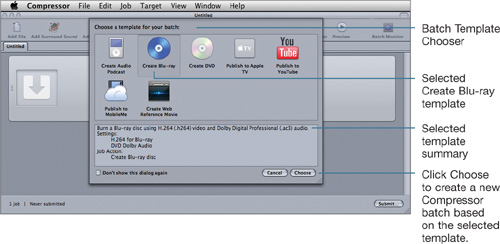
Working with batch templates comprises four basic steps:
Choose a batch template.
Import a source media file.
Customize the job action.
Submit the batch for processing.
Each batch template employs the same basic methodology when producing the encoded media for final output. The templates differ, though, in the implementation of their post-encoding tasks, called job actions. The Compressor Help documents describe each of the standard Apple batch templates and their general use. This lesson will demonstrate two practical applications of batch templates.
In addition to the batch templates that install with Compressor, you can create custom templates that will appear with the default ones (see Lesson 4, “Working with Actions”).
Tip
The Easy Export option found in both Final Cut Pro and Motion utilizes Compressor’s core batch templates. This interface lets you choose the same encoding targets and job actions described in this lesson. Refer to the Final Cut Pro and Motion Help documents for more information on Easy Export via the File > Share menu option.
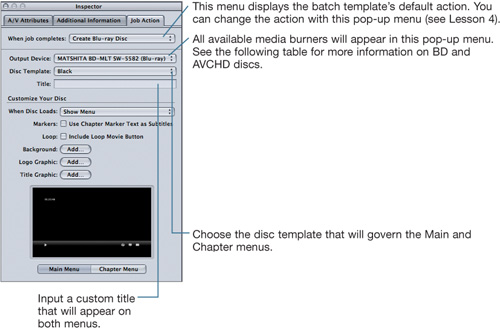
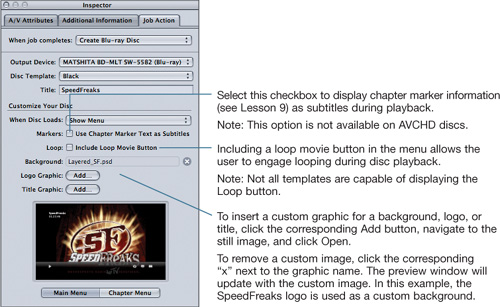
The Create Blu-ray batch template enables the production of Blu-ray-compatible audio and video files and the burning of a Blu-ray-compatible disc.
Note
Blu-ray Disc burning (BD and AVCHD) using the batch templates is only supported on computers when Final Cut Studio is installed.
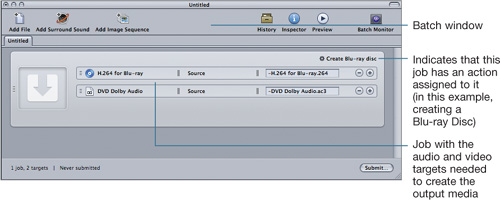
After selecting the template, define the source media by dragging a QuickTime-compatible file from the Finder onto the job in the Batch window. In this example, an episode of the high-definition television series SpeedFreaks (www.speedfreaks.tv) will be used to create the Blu-ray Disc.

Refer to Lesson 3 for more information on importing source media into Compressor.
Note
Each batch template has only a single job and can therefore process only a single piece of source media. If you drag multiple files onto a batch template, Compressor will use only one as the source media.
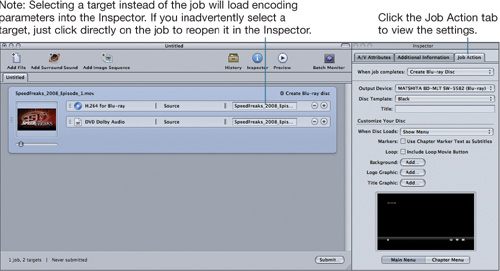
Select the job in the Batch window to open it in the Inspector window.
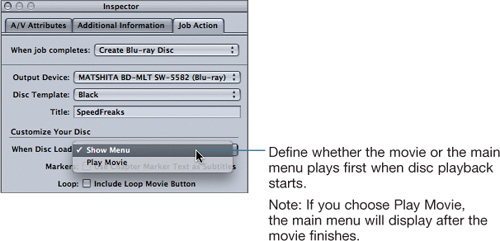
Some batch templates, such as the Blu-ray Disc template, do not need to be customized, but making them unique to your particular project adds a higher level of production value to your published disc. For example, placing a background image on the menus adds a distinctive touch to a stock template.
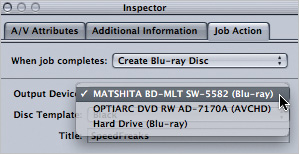
In this example, both an external, third-party Blu-ray burner and an internal SuperDrive (DVD) are available.
Note: Choose the Hard Drive option to create a Blu-ray Disc image that you can use to later burn optical media using Disk Utility or Roxio’s Toast (www.roxio.com).
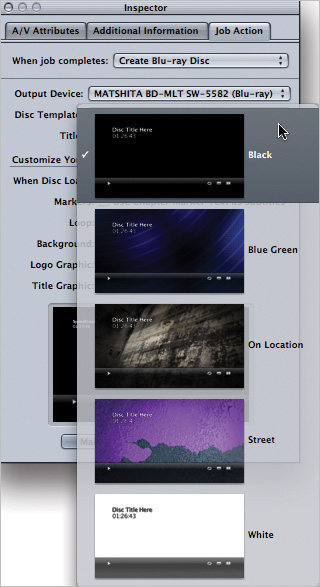
Some menus include motion elements; others are static. Choose the theme that best suits your source media.
The following table illustrates the differences between the two types of burned media that the Create Blu-ray Disc Job Action can produce.
Format | BD | AVCHD |
|---|---|---|
Media Type | Blu-ray Disc | DVD-5 and DVD-9 |
Capacity | 25 GB (50 GB for dual layer discs) | 4.7 GB and 8.5 GB |
Laser Type | Blue | Red |
Max Bit Rate | 35 Mbps | 17 Mbps |
Subtitles | Supported | Not supported |
Menu Features | Full template support | Basic template support |
Support for burned BD or AVCHD media varies from player to player. Refer to your hardware manufacturer’s documentation or website for compatibility specifications.
Note
You cannot natively play discs that contain either form of Blu-ray Disc content (BD or AVCHD) on a Mac computer.
After customizing the job action, the batch is ready for processing. In the Batch window, click Submit to send the batch to the encoder.
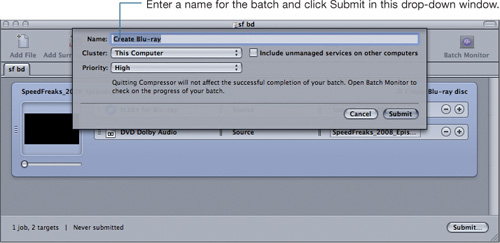
You can oversee the encoding process in the History window (see Lesson 1) or Batch Monitor (see Lesson 4).
After the assets for the Create Blu-ray batch template are finished encoding, the Create Disc application will open and request the insertion of blank optical media.
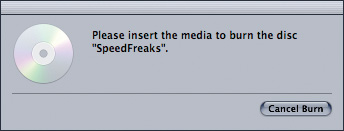
Based on your choice in the Output Device pop-up menu, insert a blank Blu-ray Disc or DVD into your optical drive.
Note
Canceling the batch at this point will stop the burn process, but the encoded media will remain in the output location as defined by the batch template.
You can continue to monitor progress in the History window or Batch Monitor. When the batch is completed, the optical drive will eject the finished media and Create Disc will display this dialog:
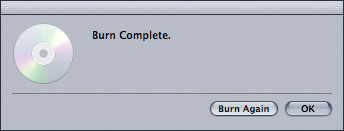
Clicking Burn Again creates another disc without re-encoding the source media. Click OK when you are finished burning discs.
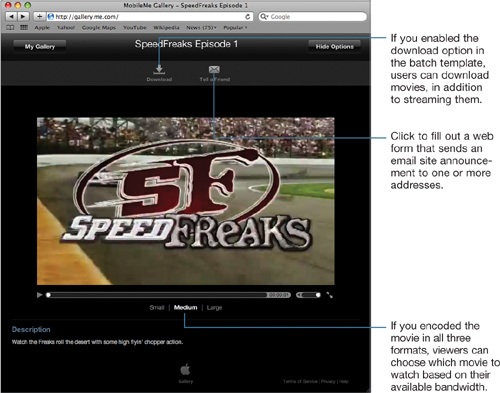
MobileMe galleries provide a convenient way to globally distribute your content via the Internet. The “Publish to MobileMe” batch template not only outputs the proper media, but it also uploads the movies to the online service and creates a Web Gallery where your audience can view and download the content.
Using this batch template requires a MobileMe account and Internet access for uploading, managing, and viewing the online galleries.
Tip
Since the batch template workflow is a simplified path through Compressor, many of the steps outlined in this section are similar to those previously described in the “Publishing to Blu-ray Disc” section. Learn the differences in each of the templates’ encoding settings (targets) and job actions to understand which file formats serve each delivery platform. For example, output media appropriate for a DVD is different from media that is suitable for an iPhone. The batch templates are not only an easy way to publish content within Final Cut Studio, they can also instruct you in core compression concepts.
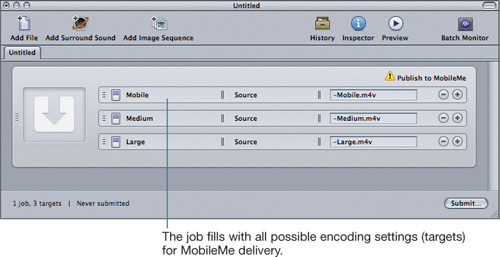
By default, the “Publish to MobileMe” template creates three output-encoding settings for the job. Each one will produce a media file that targets a specific audience: Mobile targets iPhone, Medium targets iPod, and Large targets Apple TV. You use the batch template to either create all three file formats and let your audience choose a desired format, or you could reduce the number of output files (and available viewing options) by selecting one or two targets to remove and pressing Delete. However, at least one of the delivery targets must remain for a valid “Publish to MobileMe” batch template.
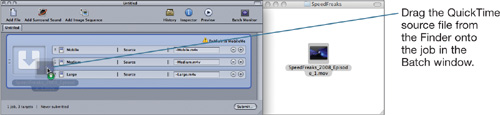
Refer to Lesson 3 for more information on importing source media.
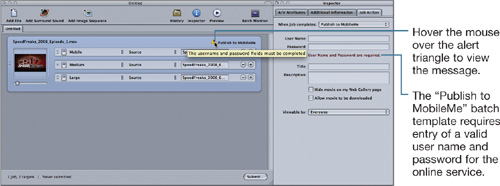
Although many batch templates do not require user customization, other templates, such as “Publish to MobileMe,” require user input before they can process.
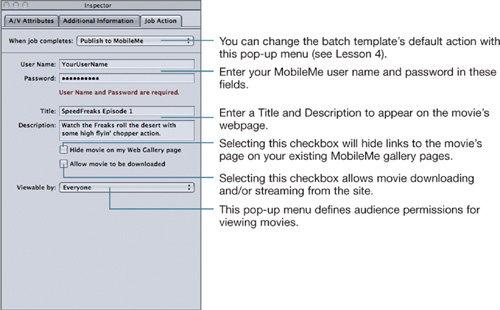
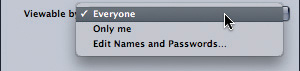
Choose Everyone to allow open access to the movies via the Internet.
Choose “Only me” to restrict access to the movie to anyone with your MobileMe user name and password.
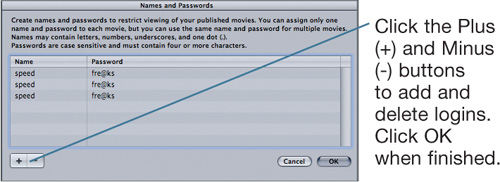
Choose “Edit Names and Passwords” to open the following dialog:
You can only define a single login for each MobileMe batch template. If you have multiple jobs in the batch, use the same login for each entry.
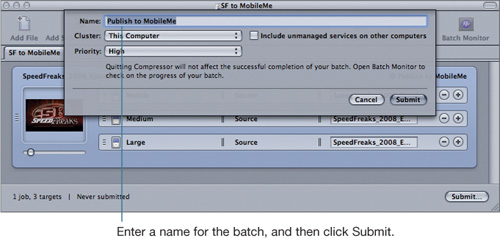
After customizing the job action, the batch is ready for processing. In the Batch window, click Submit to send the batch to the encoder.
You can oversee the encoding process in the History window (see Lesson 1) or Batch Monitor (see Lesson 4). After the MobileMe movies are encoded, Compressor will upload them to the online service and create a Web Gallery. When the batch successfully completes, log in to your MobileMe account with Safari and click the Gallery button.

In addition to the streamlined batch templates, Compressor offers an alternative path through the application. This hands-on workflow allows the selection and customization of the encoding parameters, thereby defining exactly the type of output media your delivery specification requires. Lessons 3 and 4 cover this core Compressor workflow in detail.
Batch templates provide simple solutions for some common delivery platforms, but even after you’ve “graduated” from using batch templates exclusively and transitioned to Compressor’s manual workflows, batch templates still provide a fast and efficient method of producing content in Final Cut Studio.
As your skills with both Compressor and compression increase, you’ll undoubtedly find you employ a mixture of templates, Droplets (see Lesson 4), and manual workflows depending on the project at hand. Batch templates are not only quick and easy, they are often the best path for the job.
To evaluate your understanding of the concepts covered in this lesson and to prepare for the Apple Pro Certification Exam, download the online quiz at www.peachpit.com/apts.compressor.