Apply additive filters
Apply corrective filters
Apply color filters
Filters allow you to add audiovisual elements to your output media, such as watermarks and timecode burns, audio fade-ins and fade-outs, color adjustments, and many other general modifications. Filters are applied during encoding as separate tasks, apart from the target’s codec, and you can apply a single filter or multiple filters to each target.
Compressor includes a series of video, audio, and color filters you can combine with Apple and custom settings to modify the look of encoded media. You can preview the filter results in real time in the Preview window (see Lesson 5).
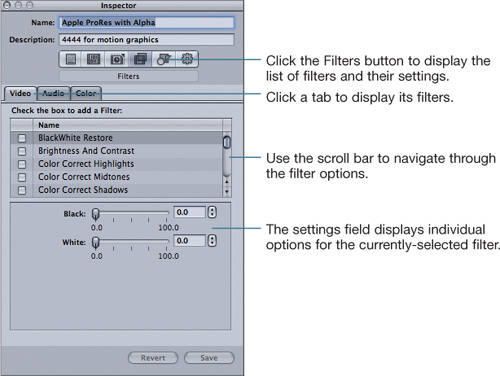
Audio and Video filters are applied in the same manner, but the Color filter is applied to the entire job as a single setting. Compressor’s Help documentation describes each filter in detail, but here is an introduction to some commonly used filters:
Several filter options add image elements to the data stream during encoding. For example, reference timecode is often added to video during post-production. You can easily add a timecode display during encoding using the Timecode Generator filter.
Opening the Preview window during filter adjustment makes the process easier because you can see changes update in real time.
Other additive filters are applied in a similar fashion. For example, you could use the Watermark or Text Overlay filter to add a company logo or copyright notice to the video. In most cases, you’ll need to define what is added, where to add it, and its appearance.
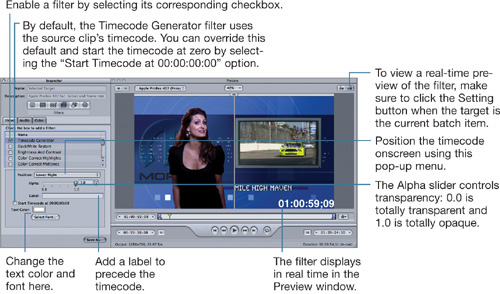
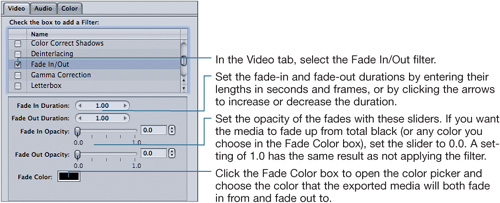
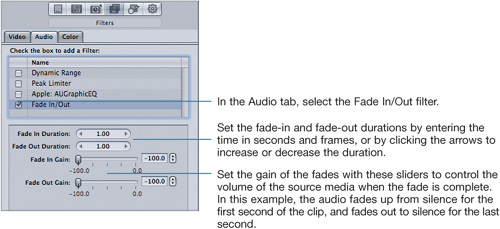
The Fade In/Out filters in both the Video and Audio tabs are additive filters that create stand-alone clips by adjusting the opacity of the picture and gain of the sound.
Tip
You can set In and Out points in the Preview window (see Lesson 1) and then use the Fade In/Out filters to make a subclip from your source media that fades the audio and video at the beginning and end of the output movie.
Like content filters, corrective filters can adjust specific visual aspects of the output media. When encoding a low-bandwidth job for the web, for example, you may find that the resulting image appears too soft. A Sharpen Edge filter can counteract an apparent loss of detail caused by the encoding process.
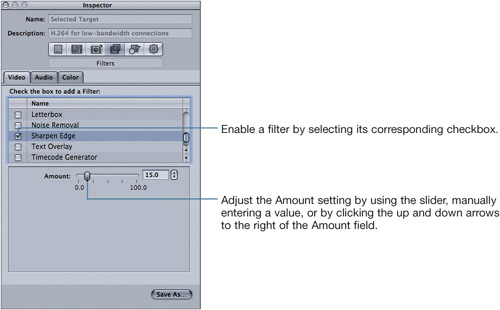
When using the Sharpen Edge filter or any of the corrective filters, ease into the adjustment. For the most part, a little of each filter goes a long way. For example, setting the Sharpen Edge filter to a value greater than 25 can create fairly severe looking video (although that may be the creative look you are trying to achieve). Corrective filters can be used both artistically and aesthetically to manipulate the output image; similar to the way color correction, for instance, can play both an objective role (achieving optimal color values) and an artistic role (establishing a unique appearance for a scene).
Tip
You’ll notice some redundancy between a few of the filters and the Frame Controls options. For example, in addition to a Deinterlace filter, you have access to Deinterlace options in the Frame Controls pane of the Inspector; you have a Letterbox filter, as well as the Padding setting in Frame Controls. As a general rule, Frame Controls will produce better quality but at the cost of longer encode times. Filters can provide you with more control over the effect; for example, you can change the color of the Letterbox filter, but you cannot change the color using the Padding controls. Try experimenting with the different looks you can achieve by using the techniques discussed in Lesson 5.
Compressor supports multiple output color spaces: YUV, 2YUV, RGBA, ARGB, and YUV (210). For each target output, Compressor chooses the optimal color space based on quality and encoding performance. Certain codecs and codec/filter combinations may change Compressor’s default choice for a given job. In the Color tab, you can choose from the Output Color Space pop-up menu to override Compressor’s default assignment for the output media.
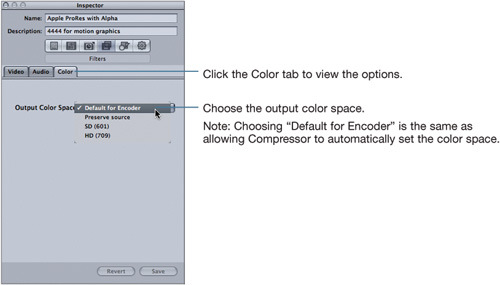
If you are not satisfied with the output color space of a given encode, try setting the output color space to Preserve Source. With that setting chosen, Compressor will attempt to maintain the source media color space through the encoding process. If the output media is bound for broadcast television or optical disc delivery, selecting the SD or HD options may provide better output color fidelity for those distribution platforms.
Filters are always rendered in top-down list order. Although Compressor initially lists filters alphabetically, you can change the rendering order by dragging and rearranging filters in the list. This is useful when you want to change the render order of multiple activated filters. For example, if you place a Timecode Generator followed by a Letterbox filter, you may obscure your timecode with the letterbox. By swapping the order of the filters in the list to render the Letterbox filter first, you can help ensure that your timecode will be seen.
To evaluate your understanding of the concepts covered in this lesson and to prepare for the Apple Pro Certification Exam, download the online quiz at www.peachpit.com/apts.compressor.