Choose encoding settings and create your own
Choose and create destinations for encoded media
Create Droplets to save time on repetitive tasks
Work with Job Actions
The previous lesson discussed importing source media and managing the flow of jobs within the batches. This lesson will detail targets, which consist of settings and destinations, and it will also cover actions that Compressor can apply after processing completes.
Compressor installs with a series of predefined parameter files called settings that control the encoder and the output file destination. You can also create your own settings and destinations presets by modifying the Apple settings or by creating entirely new settings.
By default, the Settings window is a container for both the Settings and Destinations tabs. This default configuration keeps both of these preset groups in one convenient place.

The title bar of the Settings window displays the currently active tab. In this example, the Settings tab is selected and therefore its name is displayed in the title bar.
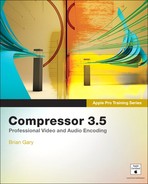
Compressor encodes source media according to a collection of parameters and options known as a setting. Compressor installs a library of Apple settings for the most common digital media distribution platforms. These settings are divided into four groups: Apple Devices, DVD, Formats, and Other Workflows.
Note
Some overlap does exist between groups. For example, Apple ProRes (HQ) can be found in both the Formats and Other Workflows groups.
Within each group, a hierarchy of folders is increasingly platform specific as you navigate through the path to an individual setting.

Settings remain dormant until you either add them to a job in the Batch window—a target—or interact with them in the Inspector window (refer to Lesson 1 for information on the Inspector).
Select a setting or group from the list to open it in the Inspector window
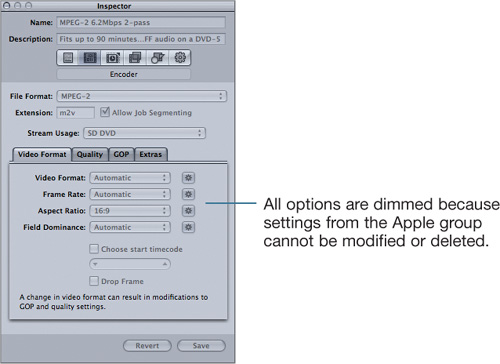
In this example, the summary tab of the Inspector window displays the information of the currently selected group.
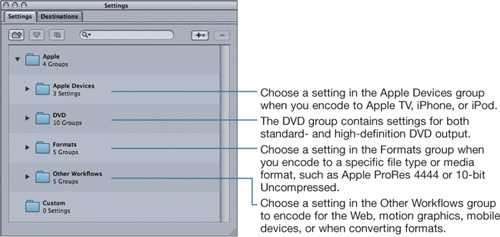
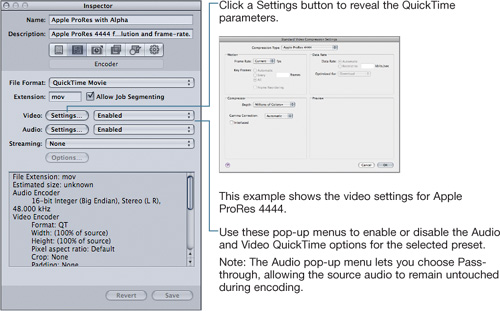
The Encoder pane of the Inspector window displays the core parameters of each setting, and depending on the exact setting you select, the Encoder pane will display one of three templates:
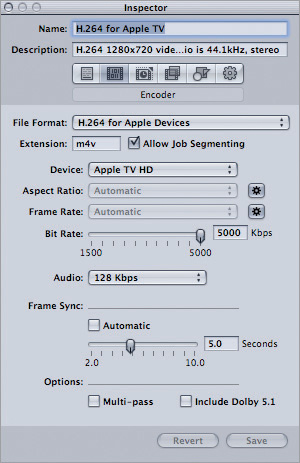
This display, with a combination of buttons, sliders, and pop-up menus, shows all available parameters within the same pane.
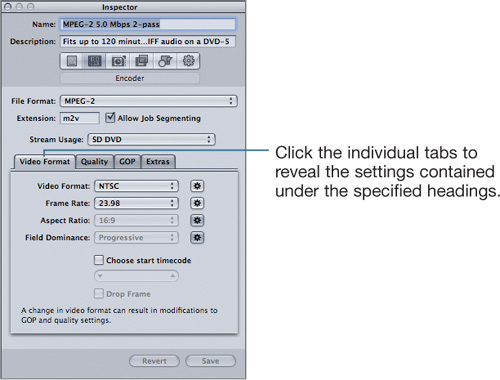
This display divides the available parameters among multiple tabs.
The Apple settings in the Settings window have a logical organization by encoded file type or output media. For example, you’ll obviously find settings for creating the requisite files for DVD authoring in the Apple > DVD group. However, some settings are buried a bit deeper in the folder structure. For example, to locate Apple ProRes 422 (Proxy) you’d navigate to Apple > Formats > QuickTime.
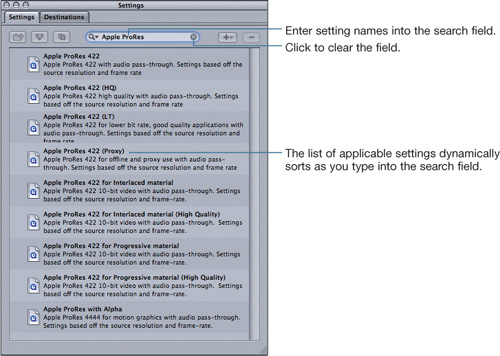
You don’t have to know exactly where a setting is located or its exact name to find it. The Settings window has a dynamic search field that lets you enter words and phrases to narrow down the list of settings.
For example, typing Apple ProRes in the field returns the following list:
Compressor searches both the names and the descriptions of settings when performing searches. For example, typing dvcam returns these results:
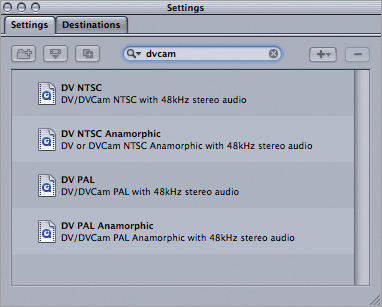
Tip
If you don’t know the file type or setting you’re looking for, but you know the type of media you ultimately want to produce, try using the batch template workflow described in Lesson 2.
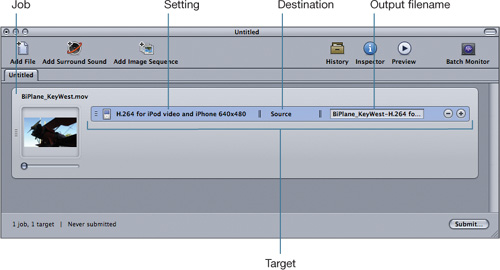
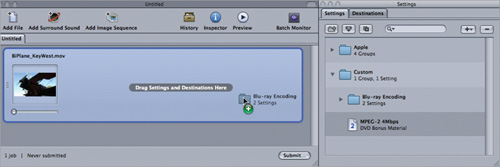
When settings are applied to jobs in the Batch window, they create targets that comprise a setting, a destination, and an output filename. Jobs in the Batch window can have a single target or multiple targets applied to them.
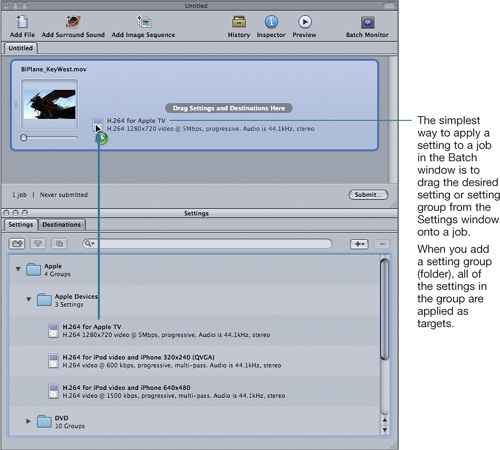
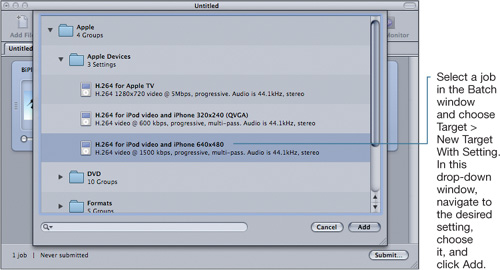
In the Batch windows, you can apply settings to jobs using one of the following three methods:
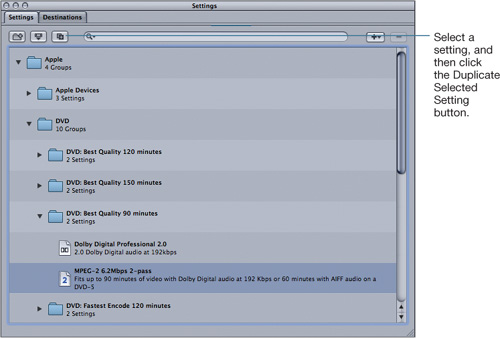
The most convenient way to create a custom setting is to duplicate an Apple setting and then save the modifications as a unique preset.
If, for example, your movie is intended to become bonus material on an SD DVD, you could duplicate an Apple SD DVD setting, which will create an MPEG-2 setting in the Custom folder with the suffix “Copy” appended. Then you can adjust that setting as needed and save it.
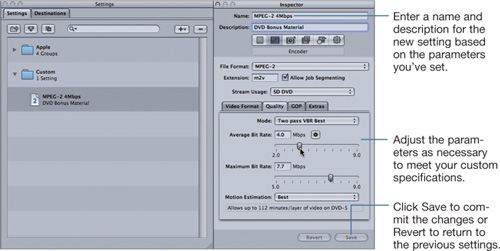
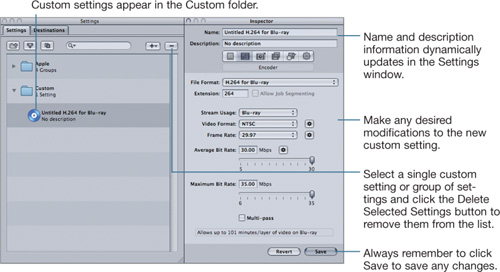
A new custom setting is created in the Custom folder of the Settings window. Select the new custom setting to load it into the Inspector.
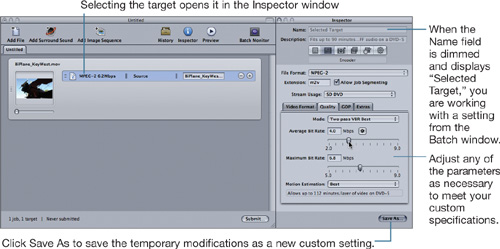
In addition to duplicating a setting in the Settings window, you can apply a setting to a job, modify the target, and then save those modifications as a new custom setting.
Note
When you add a setting to a job in the Batch window and create a target, Compressor uses a copy of the setting, not the setting itself. Therefore, any changes you make to settings applied to jobs in the Batch window will not alter the original settings in the Settings window.
If you make any modifications that would work well for future encoding sessions, be sure to save them because after a batch is submitted for encoding, the setting reverts to its original parameters in the Settings window and any modifications are discarded.
Tip
In the event that you forgot to save a modified target, you can reload the batch from the History window (see Lesson 1) into the Batch window and save the customized target.
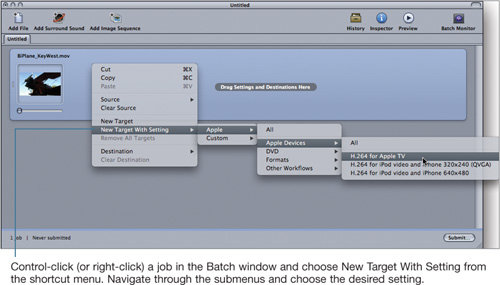
In addition to displaying in the Settings window, custom settings will appear in the Custom folder of the target drop-down window, and in the Batch window in the New Target With Setting submenu of the shortcut menu.
Creating custom settings presets requires just a few additional steps and a little planning.
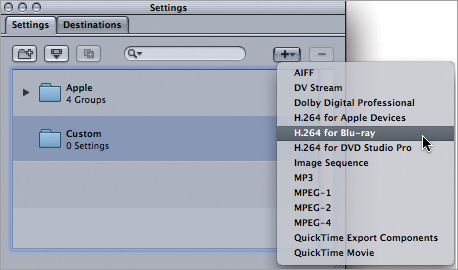
First, decide what type of encoding process the preset should address. Compressor offers the following options for custom settings:
Export Option | Primary Use |
|---|---|
AIFF | Uncompressed PCM audio for DVD or audio CD |
DV Stream | Encoding for use in iMovie |
Dolby Digital Professional | Compressed audio for DVDs. Compressor can produce both 2.0- and 5.1-format files. |
High-quality video for iPods, iPhones, and Apple TV | |
H.264 for DVD Studio Pro | High-definition video assets for high-definition disc delivery |
H.264 for Blu-ray | High-definition video elementary stream for Blu-ray Disc authoring |
Image Sequence | Creates a sequence of still images from the source media; used primarily for CGI work |
MP3 | Compressed audio for Internet delivery and podcasting |
MPEG-1 | Lower-quality/lower-bandwidth codec often used for VCD and cross-platform web delivery |
MPEG-2 | Standard video encoder for SD DVD and HD discs |
MPEG-4 | Produces high-quality web media at relatively fast encoding times; requires QuickTime 6 or later for playback (Mac or PC) |
QuickTime Export Components | Suitable for cell-phone (3G) delivery or any third-party plug-in that is Compressor compatible |
QuickTime Movie | Creates QuickTime container files with any of the available audio or video codecs |
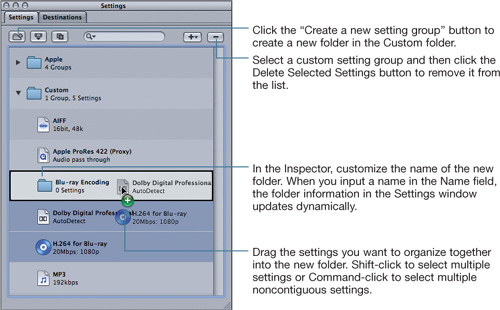
You create custom settings directly in the Settings window.
Custom settings can be organized into specialized folders and applied to a job as a group, just like Apple settings.
Tip
You can also delete custom settings or groups of settings by selecting them in the Settings window and pressing the Delete key.
The settings you’ve organized together can all be applied to a job by dragging the group folder from the Settings window onto the job in the Batch window.
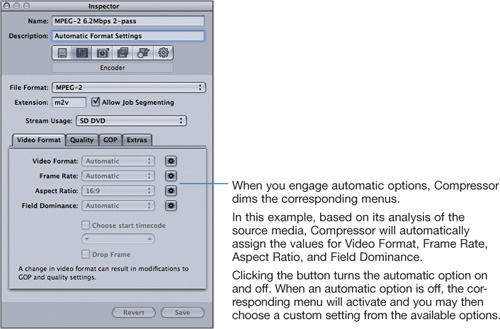
Some settings have automatic aspects to their encoder parameters. For example, you can allow Compressor to define a series of settings in the encoder pane of MPEG-2 presets based on its analysis of the source media.
Tip
It’s good practice to open source media in the Inspector window (see Lesson 1) to ensure that Compressor has analyzed the clip properly. If Compressor’s analysis is incorrect or the source media contains nonstandard metadata, turn off the automatic options and manually enter the values for any applied targets.
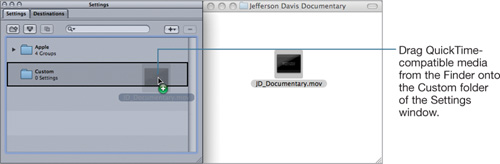
You can drop a QuickTime movie onto the Custom folder of the Settings window and Compressor will define a brand new custom setting based on the metadata it finds in the encoded file.
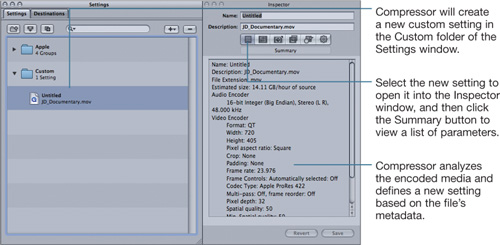
Use the Auto Detect Settings feature as a starting point for creating your own custom settings; but be aware that the results—especially for media not encoded by Compressor—may vary or not produce a viable preset for subsequent encoding.
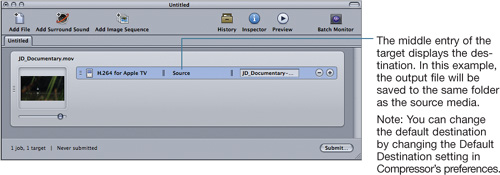
Destinations are a second, very important part of a target because they tell Compressor where to output the encoded media.
Source (the same folder where the input media originated) is the default destination that Compressor automatically applies to new targets.
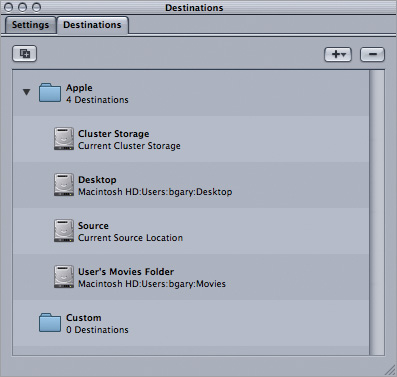
Compressor installs with four destination presets.
Note
The root of the startup disk is the Source destination for targets applied to jobs with Final Cut Pro sequences as the source media.
Compressor offers three ways to change a target’s output location from the default destination:
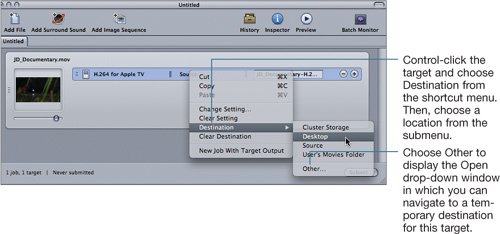
You can also modify the destination by selecting a target, choosing Target > Destination, and then selecting the output location from the options in the list. Choose Other to define a custom destination for the selected target.

With the target selected, choose Target > Destination and choose a location from the submenu.
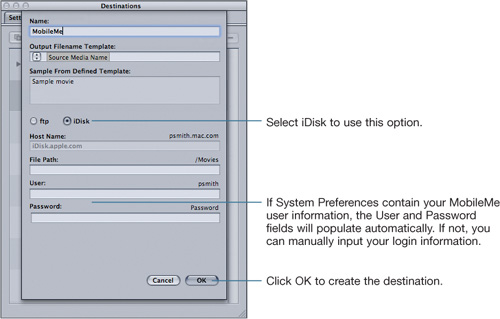
You can create permanent custom destinations in the Destinations tab of the Settings window by modifying existing destinations or creating new destinations based on a local or remote output location. Local destinations are storage devices connected to your computer, whereas remote locations are devices that you connect to via a network (file server) or the Internet (such as an FTP site or MobileMe account).
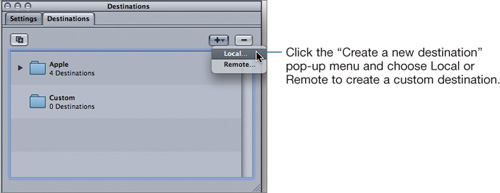
As with settings, custom destinations that you create will appear in the Custom folder. You can apply custom destinations to jobs just as you apply Apple destinations.
When you choose Local, an Open drop-down window appears in which you can choose the output location on a drive or device directly connected to your computer. Navigate to the desired location and click Open.
The new custom destination will appear in the Custom folder. In the Inspector window, name the destination and modify its properties.
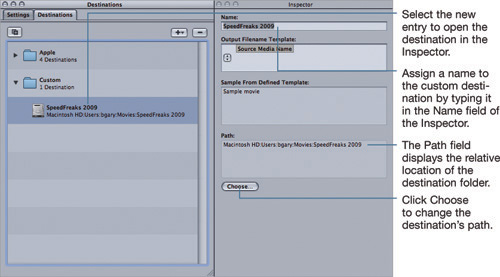
You can use the Output Filename Template field and pop-up menu to modify which suffixes Compressor appends to the output filename. The default export option only uses the source media’s name and the target file extension. For example, if your source media is a DV NTSC clip with a filename of My Movie.mov, and you apply an Apple TV target, the output filename would be My Movie.m4v.
You may find that placing more information in the filename is useful when outputting to custom destinations. For example, you can append the current date to the filename to aid the organization of multiple encoding jobs.
Tip
When creating files for use in DVD Studio Pro, avoid using any identifier other than the source media name. DVD Studio Pro will combine similarly named audio and video elementary streams as a single unit inside the application. For example, the files MyAwesomeMovie.m2v and MyAwesomeMovie.ac3 would be paired by DVD Studio Pro even though they were separate assets. Creating a custom destination just for this purpose is a handy, timesaving trick because it avoids manually assigning paired assets during authoring.
When you choose Remote, a drop-down window appears in which you can input all of your server connection information.
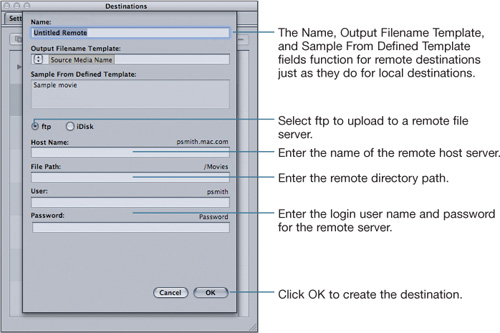
Consult your network or site administrator for login information.
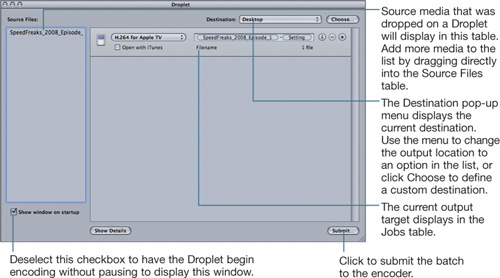
When settings grow up and graduate, they become Droplets. Compressor uses Droplets to pack settings into an application suitcase so they can stand alone in the Finder and run entirely outside Compressor.
You can create Droplets from any Apple or custom setting in the Settings window and then drag QuickTime-compatible media onto them to start encoding. Droplets can be quite handy, especially for repetitive encoding tasks in which settings do not change from job to job.
Note
Compressor and Qmaster must be installed on any system to which you intend to use Droplets. It’s also good practice to verify that the same version of Compressor is installed on each computer you intend to run the Droplets to ensure compatibility.
You can create Droplets in Compressor in one of two ways. The method you choose mainly depends on where you’re working and what you’re currently doing.
If you’re currently working with a setting in the Settings window that would make a good Droplet, select it and then click the “Save Selection as Droplet” button.
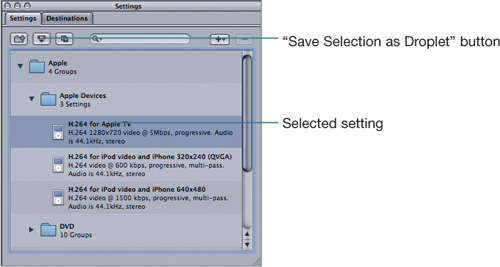
The settings in the Apple Devices group are good candidates for promotion to Droplets because in most cases they’re applied to jobs with no customization; that is, the parameters are already tuned for Apple devices, and the automatic options allow for variances from source to source.

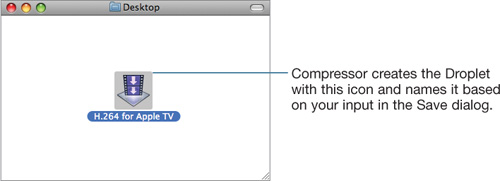
Drag QuickTime-compatible media onto the Droplet to begin the encoding process; you can drop a single file or multiple files concurrently.
Note
When dropping several hundred files (or a few very large files) onto a Droplet at once, you may experience a long delay before the application opens. To avoid this delay, parse your source media into smaller groups and drag them onto the Droplet separately.
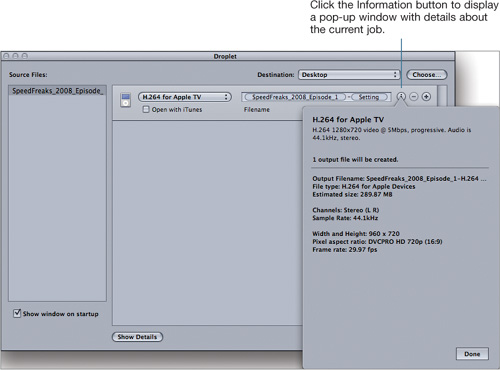
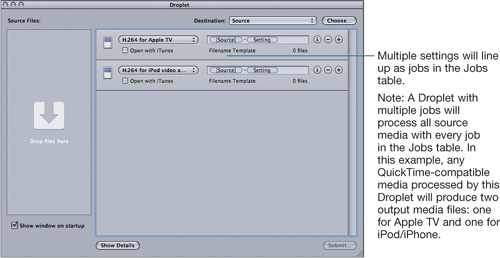
The Droplet connects to the Compressor transcoder (background service) and opens the Droplet window, which displays all the options and parameters.
An alternative way to produce a Droplet is to choose File > Create Droplet and define the application parameters in the Save dialog that opens.
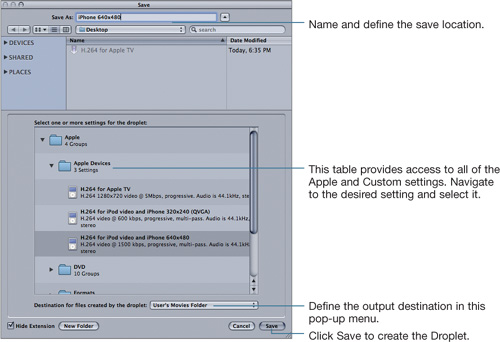
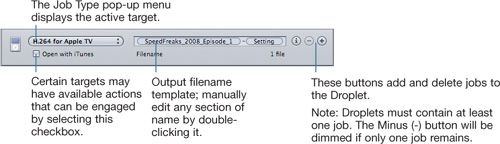
When creating a Droplet, you can include single or multiple settings. Alternatively, you can add settings and templates to a completed Droplet in its main window.

In the Save dialog that opens, define the Name, Save Location, and Output Media Destination and then click Save to create the Droplet.
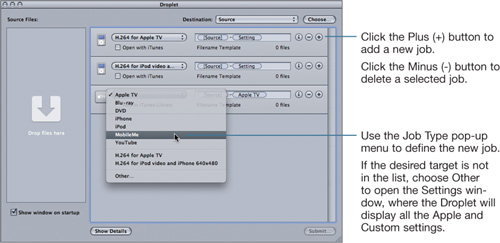
You can also add jobs directly to an open Droplet by clicking an existing job’s Plus (+) button in the Jobs table.
Droplets dynamically save any modifications you make to them while their windows are open. The Undo and Redo commands in the Edit menu are not available when working with Droplets, so be cautious when changing the Jobs table or the Destination settings. You can duplicate a Droplet at the Finder level and make any changes to the copy to ensure that the original version remains unchanged.
To close an open Droplet, choose Droplet > Quit Droplet.
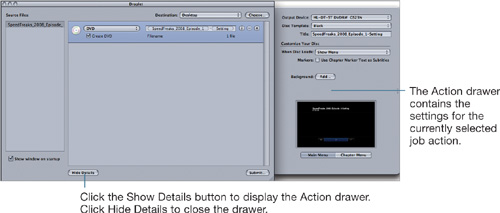
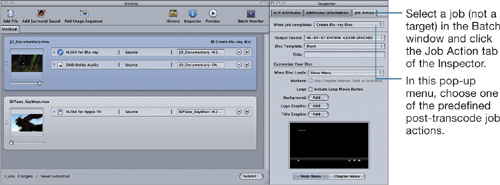
Actions occur after Compressor processes the media. They perform tasks such as burning DVDs and Blu-ray Discs, uploading movies to MobileMe and YouTube, and running AppleScripts or Automator actions. Compressor contains two types of actions: job and setting.
Lesson 2 covers job actions and batch templates in detail, but here are some general considerations when working with these types of post-transcoding tasks.
The Run Automator Workflow job action, though seemingly simple, is quite powerful.

Automator-created scripts can significantly increase your productivity and efficiency in a wide variety of tasks and functions. For more information on Automator and scripting applications and Mac OS X, go to www.macosxautomation.com/automator/.
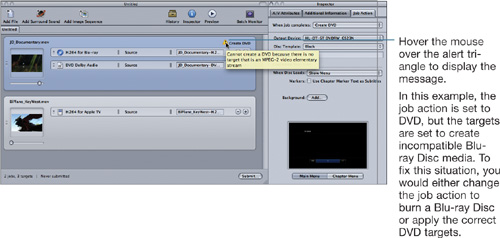
Compressor will display alerts and warnings if you attempt to configure a specific job action with incompatible targets.
Settings actions let you send a post-transcode email to a single recipient or to run a single AppleScript after encoding is completed. Both actions are linked directly to a specific setting, and you control these tasks in the Actions pane of the Inspector.
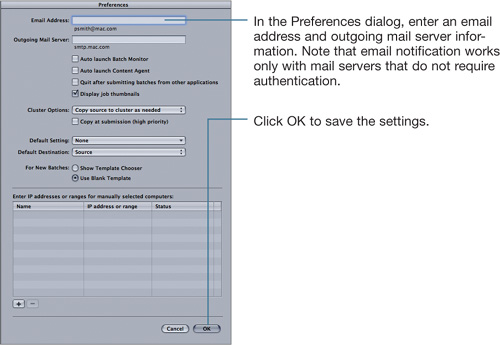
Before enabling email notification, you must configure Compressor’s preferences by choosing Compressor > Preferences.
Tip
You can set email notification or script execution for each job in a batch by configuring the Actions pane for each individual setting. As Compressor completes each job in the list, it will send an email or run a script.

To evaluate your understanding of the concepts covered in this lesson and to prepare for the Apple Pro Certification Exam, download the online quiz at www.peachpit.com/apts.compressor.