
Export a QuickTime movie from Final Cut Pro
Import QuickTime media to Compressor
Export files from Soundtrack Pro
Submit a batch (source media) for encoding
Check status and manage the encoding process with Batch Monitor
Compressor not only delivers media from Final Cut Studio to the rest of the world, it’s also the post-production workhorse for transcoding media files from one format to another. While it can, for example, transform a Final Cut Pro sequence into H.264 and Dolby Digital Professional assets that are appropriate for a Blu-ray Disc, it can also use the Apple ProRes production codecs to transcode HD camera footage into formats suited to workflows inside Final Cut Studio.
The true power of Compressor is unleashed when you manage the flow of audio and video sources through its Batch window. Although importing source media and applying targets to jobs in the Batch window are among the core functions of the Compressor workflow, the ability to queue up disparate encoding jobs, called a batch, and monitor their progress during processing is what makes Compressor the centerpiece of your entire digital distribution pipeline.
In the context of using batch templates, the previous lesson described a basic Compressor workflow: Choose where you want to deliver content, customize any of the actions, and finally submit the batch for encoding.
The core Compressor workflow, more suitable for intermediate and advanced use, entails three basic steps:
Import source media into a job in the Batch window.
Assign a target to the job (includes encoder, destination, and output filename).
Repeat steps 1 and 2 for as many source and output media files that your particular project requires.
Submit the batch for processing.
The primary difference between the batch template workflow and the core Compressor workflow is production focus. Meaning, in the batch template workflow you only need to know what you want to produce, such as a Blu-ray Disc or a YouTube-ready movie. In the core Compressor workflow, you need to know the type of media files you want to produce. This manual path through Compressor allows the advanced user with extensive compression experience to manipulate and tweak the encoding settings for specific results.
The next two lessons outline the core Compressor workflow. This lesson details the importing and managing of media, or jobs, within Compressor. Lesson 4 will examine settings, targets, and actions.
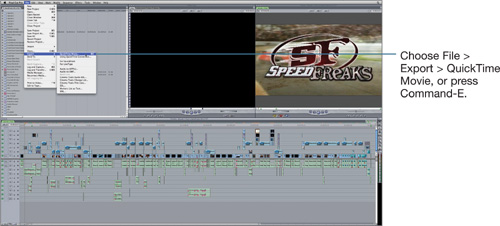
You can export Final Cut Pro sequences to Compressor in one of three ways: by exporting a QuickTime movie, by using the Share command, or by using the Send To command.
This method renders a final movie of the sequence as either a self-contained or reference QuickTime movie that can be imported directly into Compressor.
With a sequence loaded in the Timeline, make the Timeline the active window.
Note
To export the entire sequence, remove any In or Out points from the Timeline; otherwise Final Cut Pro will export only the portion of the sequence between the user-defined In and Out points.
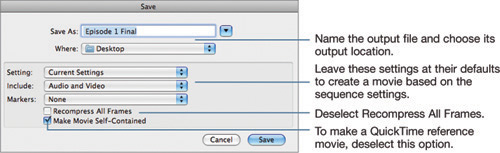
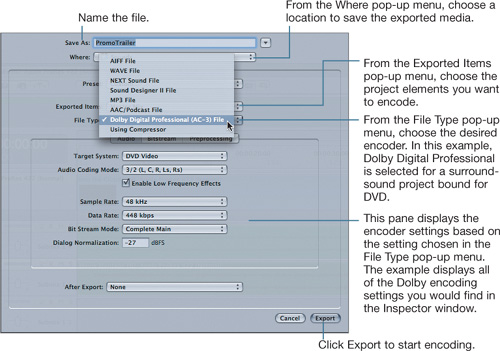
Define the output file in the Save dialog that opens.
Note
QuickTime reference movies, although significantly smaller in file size than self-contained movies, will play properly only on the systems on which they were created because the movie is actually referencing local media and render files. Create self-contained movies when you need to move the exported file to another system.
Refer to the section “Importing QuickTime Media” in this lesson for methods on using exported Final Cut Pro files within Compressor.
Final Cut Pro’s Share command provides output options similar to Compressor’s batch templates.
With a sequence loaded in the Timeline, select the Timeline window to make it the active window, and choose File > Share.
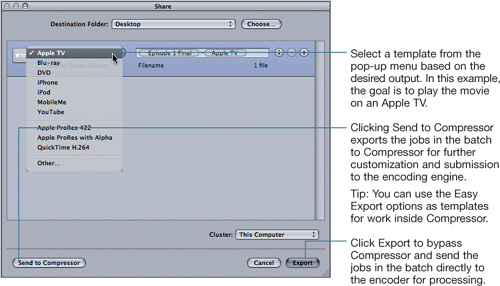
If you choose to send the batch, Compressor will open, populate an empty batch with the sequence, and apply any targets and actions you defined in Final Cut Pro’s Share window.
Final Cut Pro’s Send To Compressor command will export a sequence directly to Compressor without the need to render or output any sequence media before encoding. The rendering (including effects, composites, transitions, and so on) will occur during the encoding process.
Note
Rendered elements (if any) will appear only in the final output media from Compressor. This process will not create sequence render files that you can use when editing in Final Cut Pro.
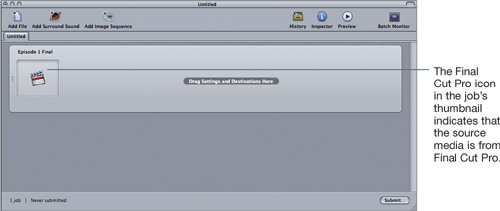
With a sequence opened in the Timeline, make the Timeline window active, and choose File > Send To > Compressor.
If it’s not already open, Compressor will open and populate an empty batch with the sequence. If Compressor is currently running and you already have an active batch, a new Batch window will be created and docked as a tab. A new Batch window is also created if you send additional sequences from Final Cut Pro during the same Compressor session.
See Lesson 4 to learn techniques for assigning targets, destinations, and actions to sequences imported from Final Cut Pro.
When sending sequences from Final Cut Pro to Compressor using the Send To command, you will want to consider some benefits and compromises to the workflow.
When sending directly from Final Cut Pro to Compressor, the native frames from the sequence are sent; that is, they are not first rendered into the sequence settings. This not only saves drive space, but it also passes the highest quality media to Compressor for encoding.
Additionally, you can send sequences to Compressor and continue working inside Final Cut Pro. You can even continue editing the sequence you just sent, with a few limitations:
Because Final Cut Pro is performing all sequence-based renders for Compressor in the background, Final Cut Pro performance may degrade when sending sequences with extensive compositing, effects, or mixed media. The more powerful your Mac, the better the overall performance will be.
If a Final Cut Pro sequence is currently encoding in Compressor, you can send additional sequences to Compressor, but you will not be able to access them in the Preview window or begin processing them until the previous job is completed. This alert message will appear in the Preview window:

If you reopen a batch for resubmission from the History window and it contains a job that originated as a Final Cut Pro sequence, Compressor will need to open Final Cut Pro to access the source media. Therefore, the Final Cut Pro project and its associated assets will need to reside on the same system as the Compressor batch you are attempting to resubmit.
If you are submitting batches with Final Cut Pro sequences to a cluster (see Lesson 12), Final Cut Pro will have to be installed on all the nodes and those nodes will need read access to all the source media referenced in the sequence.
Compressor can import any media file for which QuickTime has an appropriate playback codec. If QuickTime Player can open a file, Compressor can import it.
Note
Compressor cannot import any media containing Digital Rights Management (DRM) or copy-protection, such as content purchased from the iTunes Store.
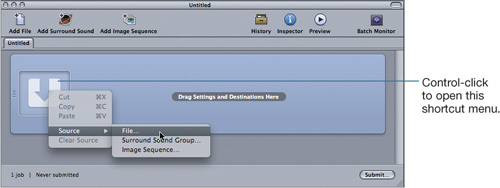
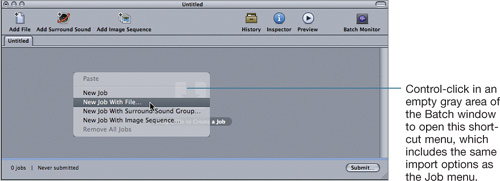
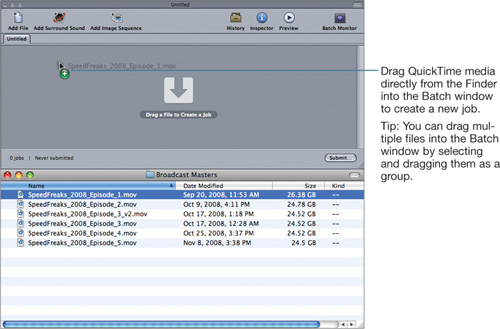
You can import source media into Compressor using one of the three following methods:
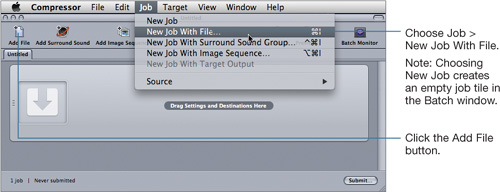
Any of these methods will display an Open dialog in which you can navigate to your source media, select it, and then click Open.
If you have multiple Batch windows docked as tabs when using any of these methods, make sure you select the desired Batch tab before importing source media. You can also create a new Batch window for the imported QuickTime media by choosing File > New Batch.
All of the Compressor encoding options available to Soundtrack Pro are contained within Soundtrack Pro’s export function.
Starting with a completed multi-track project in Soundtrack Pro, choose File > Export.
Neither Compressor nor Batch Monitor will launch upon export; the processing occurs within Soundtrack Pro.

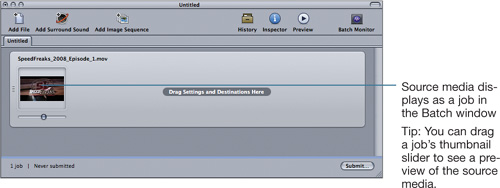
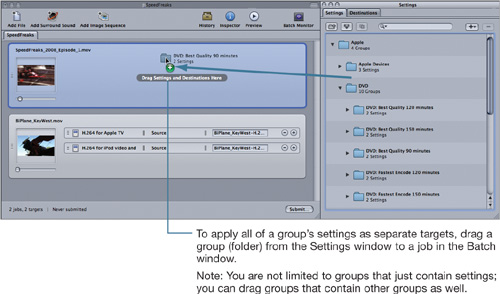
A batch comprises individual pieces of source media (a job). Any given batch can contain as many jobs as you require. Targets control the encoding process and comprise a setting, a destination, and an output filename. Each job can include multiple targets.
The Batch window
Compressor offers almost unlimited ways to create batches to address your encoding needs. Compressor’s versatility is especially useful when the overall estimated encoding time for a series of jobs spans several hours (or days). Instead of submitting and monitoring each job individually, you can batch-organize the sessions and let Compressor perform the laborious task of monitoring each job in the series. Furthermore, a series of jobs and targets in a batch is, in essence, a template for your encoding work. That is, you can save a batch and reuse it by replacing only the source media.
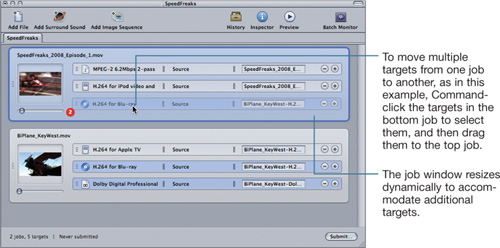
Jobs and targets are the building blocks of batches. You can combine and manipulate them in the Batch window to create more efficient encoding workflows.

Compressor lets you work on jobs and targets individually or as groups. For example, if you have 50 jobs to encode as Apple ProRes 422 (Proxy), make the Batch window active, choose Edit > Select All, and then choose Target > New Target With Setting. From the drop-down window, choose the desired setting and then click Add. The same target will be applied to every job in the batch—a real timesaver.
In Compressor, you can manage and recycle your work using convenient cut-and-paste methods. Encoding can encompass many repetitive tasks, so copying a target from one job to another within the Batch window is a great timesaving technique.
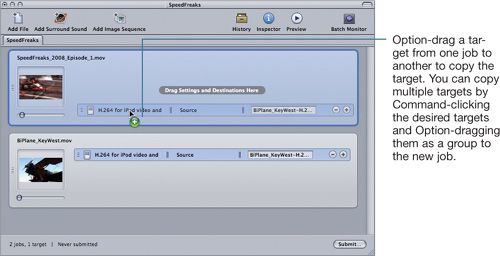
The standard cut, copy, and paste commands in the Edit menu (and their keyboard shortcuts) work with both jobs and targets, so you can cut or copy a target from one job and paste it onto another.

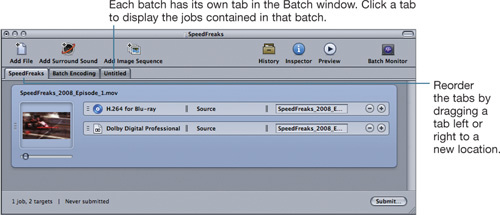
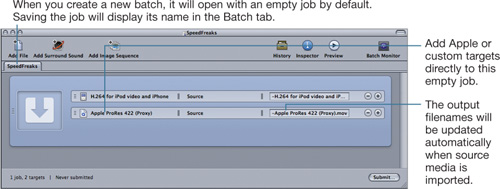
Although Compressor opens with either a template or a single empty batch in the Batch window, you can create as many batches as you need by opening new batches as tabs in the current Batch window. To create a new batch, choose File > New Batch.
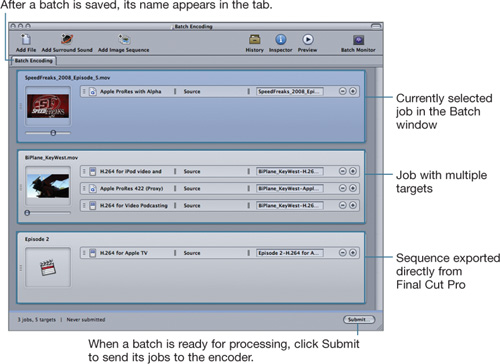
Compressor also lets you save batches for use with later encoding jobs, or to more efficiently organize current jobs. To save a batch, make sure the Batch window is active, then choose File > Save. In the drop-down window, name the batch, navigate to the desired save location, and click Save. The batch name will appear in the current tab in the Batch window.

Tip
In Compressor, you can copy, cut, and paste both jobs and targets between all open batches. So, you can cut a job and its targets from one batch, click the tab of another batch, and paste the job and all its targets into that batch. This is useful, for example, when three of the four jobs in a batch are ready for encoding. You can cut and paste the job that is not yet ready into another batch and then submit the batch with the three jobs that are ready for processing.
When at least one target is applied to all jobs in a batch, you can submit the batch for processing by clicking Submit. If no targets have been applied, Compressor displays an alert when you click Submit:
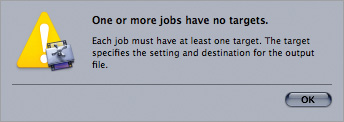
To correct the error, add at least one target to every job in the batch and click Submit.
Batches rely on relative paths to the source media and to the Final Cut Pro sequences or Motion projects they contain. Therefore, if any source media is moved from the location it occupied when the batch was created, Compressor will no longer be able to locate the file and will display an alert.

A red alert will appear above the source media poster frame if there is a problem locating source media. Place your pointer over the alert to view the alert details.
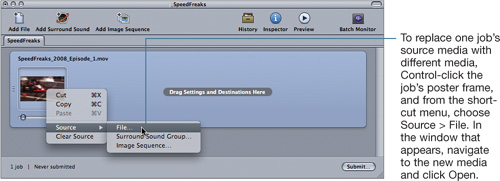
To correct a missing media error, Control-click the job’s poster frame and choose Source > File from the shortcut menu. In the Open window, navigate to the media’s new location and click Open. You can also drag the media directly from the Finder onto the job’s poster frame, and Compressor will automatically update the location.
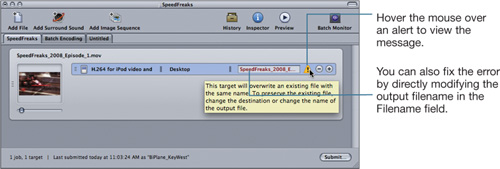
Compressor will also alert you when it encounters a job with the same output filename as a file currently in the target destination.
Note
It’s important to understand that this alert will not stop Compressor from encoding the job. If you click Submit without changing the output filename or destination, Compressor will output the file and overwrite the existing file to eliminate the conflict.
Compressor will also display an alert message if two targets within the batch could export files with identical filenames.
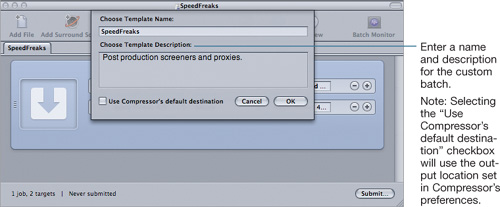
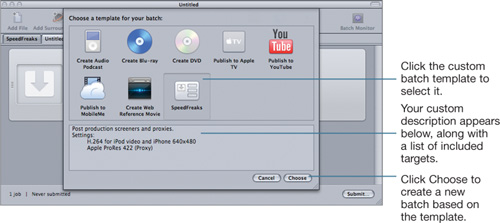
You can streamline routine encoding sessions by creating a batch template from common encoding scenarios. For example, if you consistently encode the same types of media during the early phases of post-production—such as when creating iPod/iPhone screeners and proxy movies—you can, instead, create a batch template and save the time you would spend configuring those jobs manually for every single use.
You can define as many targets as you need to fulfill your encoding workflow.
Save the custom batch template by choosing File > Save as Template.
To use any of the custom or default batch templates, choose File > New Batch from Template.
Refer to Lesson 2 for more information on using batch templates as a complete Compressor workflow.
Tip
To remove custom batch templates, delete them at the Finder level: ~/Library/Application Support/Compressor/Templates/. Delete any unwanted templates from that folder and they will no longer appear in the Batch Template Chooser.
Additionally, any batch you’ve saved can be used as a template for encoding work inside Compressor.

Finder icon of a saved Compressor batch.
To reuse a saved batch, double-click it in the Finder, or choose File > Open in Compressor and navigate to the saved file. Next, replace the source media with new media. You can submit the batch “as is” or make any adjustments to the targets, and then submit the batch for encoding.
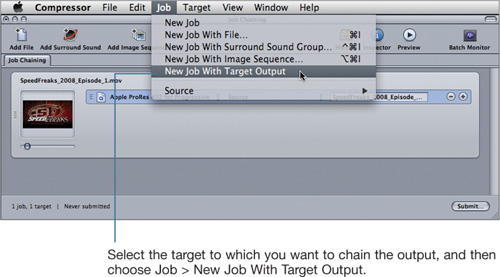
Compressor lets you control and refine the encoding process by setting up a series of two or more jobs that use output from a preceding job as their source media. This is known as job chaining.
For example, an H.264 encoding job with multi-pass engaged could require three or four passes over the media. If any Frame Controls (see Lesson 6) are enabled, they will process with each pass. Depending on the settings, this situation can lengthen the encoding time considerably. So, instead of encoding the Frame Controls during each pass, you can use a job chain to process them just once and then pass the output of that job to the H.264 job.
Tip
The Apple ProRes 422 (HQ) settings are very good for encoding the intermediate movies that pass between jobs in the chain because they retain picture fidelity and are flexible in terms of frame size and frame rate. Apple ProRes 422 (HQ) employs a high-quality, 10-bit encoder in a 4:2:2 colorspace. If your processing requires a full 4:4:4 colorspace, you can use Apple ProRes 4444.
To create a job chain, import source media, apply a target, and make any necessary changes to the settings. In the following example, an HD clip is being downconverted to a 640 × 360 resolution using Frame Controls. An Apple ProRes 422 (HQ) setting was used as the intermediate codec. You’ll find both progressive and interlaced output versions in the Settings window by following this path: Apple > Other Workflows > Advanced Format Conversions > Apple Codecs.
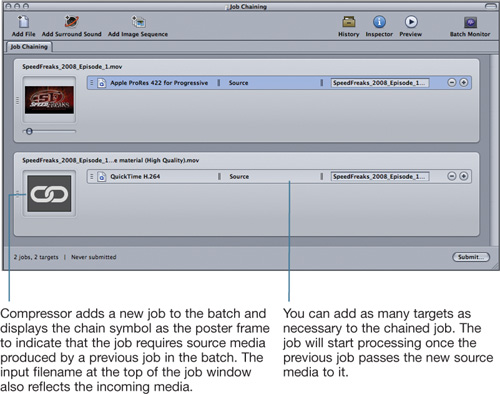
In this example, the 640 × 360 Apple ProRes 422 (HQ) movie output from the first job passes to the next job in the chain where an H.264 encoder is applied. Since the previous job already converted the output frame size using Frame Controls, the Geometry parameters (see Lesson 8) can be set to 100 percent of the source. This process retains all of the image quality but realizes a benefit in efficiency because the time-consuming Frame Controls are encoded only once.
Think of job chaining as a form of assembly-line encoding that lets you control the stacking order of encoding tasks based on necessity or personal preference. For example, you may want to encode all frame rate conversions or reverse telecine transcodes before processing any frame size transformations. Using job chaining, you can parse and establish the task order by controlling the encoding within each of the steps. In essence, each job in the chain becomes a part of the larger job of outputting the final movie.
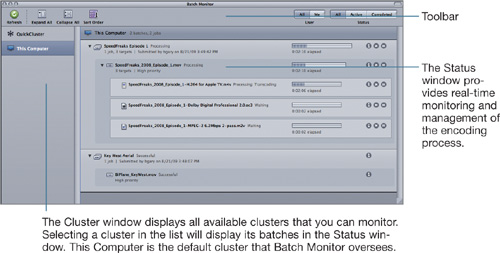
Batch Monitor is a separate application that you can open when Compressor submits a batch for encoding. It provides real-time feedback on the status of the currently encoding jobs and lists any jobs pending in the batch.
By default, Compressor does not automatically open Batch Monitor because the History window provides a basic view of the currently encoding batches and any batches that have been processed (see Lesson 1). Batch Monitor will open automatically if you choose Compressor > Preferences and select the “Auto launch Batch Monitor” checkbox.
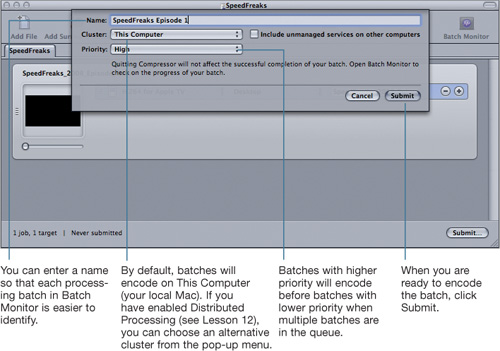
When you first submit a job from the Batch window, a drop-down window opens to permit some last-minute adjustments before the job goes to processing.
Batch Monitor is divided into three sections: the toolbar, the Status window, and the Cluster window. Each of these sections provides two functions: monitoring and management.
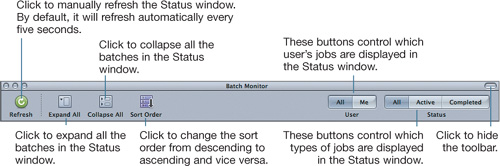
The toolbar controls how batches display in the Status window. You can modify which icons appear in the toolbar by choosing View > Customize Toolbar, or you can Control-click the toolbar and choose Customize Toolbar from the shortcut menu. From the drop-down window, drag desired items to the toolbar.
Tip
To change the automatic refresh duration, choose Batch Monitor > Preferences and enter a new value in the “Update every” field.
In addition to displaying information on currently encoding batches and jobs, the Status window lets you manage the encoding process. The three buttons to the right of each batch and each job provide information as well as the ability to pause and cancel processes.
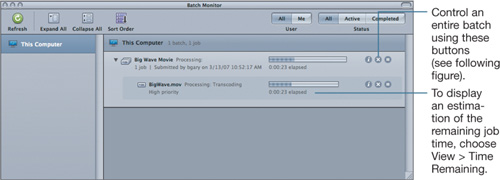
Each individual job has its own set of buttons to control the encoding process.

Some restrictions apply to starting and stopping encoding jobs and batches in the Batch Monitor. Some codecs, such as MPEG-2, allow you to pause and then resume processing from the point at which the encoding stopped. Other codecs, such as H.264, only let you stop processing and then force the encoder to restart the job from the beginning when encoding resumes.
If the job or batch you are attempting to stop will be affected by a total loss of currently encoded material, then after clicking the Pause button you will receive this alert from the Batch Monitor:

When you click the Information button, it opens an Information window for that job or batch.

To evaluate your understanding of the concepts covered in this lesson and to prepare for the Apple Pro Certification Exam, download the online quiz at www.peachpit.com/apts.compressor.