
Logic 9 Files > Lessons > 07 Sunday Morning | |
Media | Logic 9 Files > Media > Additional Media |
Time | This lesson takes approximately 60 minutes to complete. |
Goals | Match a project tempo to an audio file’s tempo |
Use the Loop Browser | |
Create Apple Loops | |
Make an audio region follow the project tempo | |
Insert tempo changes and tempo curves | |
Time-stretch an audio region to match the project tempo | |
Use Varispeed effects | |
Apply Tape or Turntable speed-up and slowdown effects | |
Use the Flex tool to stretch single notes on the waveform |
Modern music genres have seen the use of loops and samples increase exponentially over the last few years. New technologies encourage experimentation, and it is more and more common to find, say, a sample of a Middle Eastern instrument in a modern rock song, a sample of classical music in a pop song, or a sample of a pop song in a hip-hop track.
Mixing prerecorded material into a project can lead to exciting results, but the material must be carefully selected to ensure that it seamlessly blends into the project. The first challenge is to match the tempo of the prerecorded musical material with the tempo of a project.
But even when you record your own performances, the ability to stretch audio waveforms like a rubber band gives you new creative power as a producer. Furthermore, special effects such as Varispeed and tape speedup or slowdown can trigger new inspiration.
In this lesson, you will import an audio file into a new project, changing the project tempo to match the audio file’s tempo. You’ll use existing Apple Loops and create your own Apple Loops. You will also create a tempo map for your project; use flex editing to make audio files follow the project tempo, or to stretch individual notes in an audio region; and apply the new Varispeed and Speed Fade features.
Sometimes you start a new project with prerecorded material and want to use the tempo of that material for the new project. For example, you find a drum loop that you like because of the way it grooves at its original tempo. You need to adjust the project tempo to match that loop. When the project tempo matches the loop, you can use the grid to edit regions, program and quantize MIDI regions, or add Apple Loops while keeping everything synchronized with the prerecorded drum loop.
In this exercise, you will import a drum groove recording into a new project, then have Logic detect the recording’s tempo and set it as the new project tempo so that the drums are aligned to the project’s grid.
Choose File > New (or press Command-N).
In the Templates dialog, click the Empty Project template.
Create a stereo audio track, and select Open Library.
In the Media area, click the Browser tab.
At the top of the Browser, click the Home button.

All the folders contained in your home folder are displayed in the Browser.
Click the Column button.

Navigate to Logic 9 Files > Media > Additional Media and locate the Drums Recording.aif file.
When you double-click an audio file in the Browser, an audio region is created on the selected track at the playhead position. Make sure that the playhead is placed at the beginning of the project.
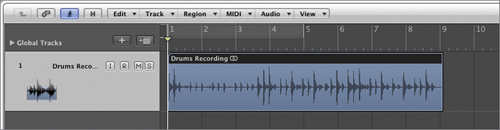
Double-click Drums Recording.aif.
The audio file is imported into the project, and an audio region representing the entire audio file is inserted on the selected track, at the playhead position (bar 1).
In the Arrange area, zoom in vertically to clearly see the waveform.
You can use the metronome to check the project tempo (which in this case is the default 120 bpm for an empty project) and compare it with the audio file’s tempo.
In the Transport bar, click the Metronome button to turn on the metronome.

Play the project.
The drums play more slowly than the metronome and rapidly drift out of sync.
Make sure that the Drums Recording region is selected, and choose Options > Tempo > “Adjust Tempo using Beat Detection.”
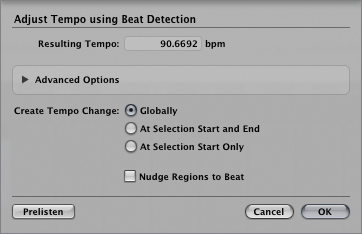
Logic analyzes the file and then displays a dialog, which indicates a tempo of 90.6692 bpm, and allows you to create a tempo change. Because you want to use this loop throughout your song, you’ll leave Globally selected.
Click OK.
In the Transport bar, the tempo is set to 90.6692 bpm, matching the tempo of the imported Drums Recording audio file.
Listen to your project. The metronome now plays in time with the drums.
Turn off the metronome.
You have matched the project’s tempo to the audio file’s tempo, and now you can start building the project using the grid. Before you go any further, you need to cut a loop out of the Drums Recording region to use as a drum loop throughout the song.
You will now cut the best two bars out of the Drums Recording region and use the section as a drum loop, discarding the rest. To select the desired two bars, you will use the Marquee tool, your Command-click tool.
Command-drag in the Drums Recording region to select a section from bar 3 to bar 5.
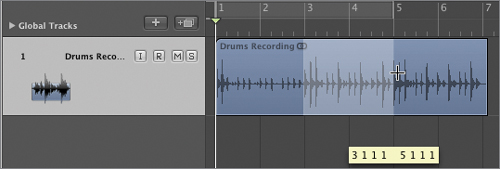
You will now crop the marquee selection using the “Crop Regions outside Locators or Marquee Selection” key command (Control-C).
Press Control-C.
The marquee selection remains, and the unselected parts are discarded. You can now use your two-bar region as a drum loop.
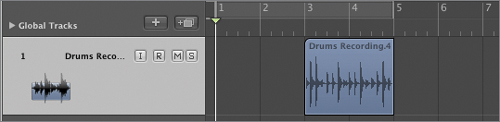
Drag the region to bar 1.
In the Inspector, select the Loop checkbox (or press L).
The drums are now looped throughout the song.
Once you have set the project’s tempo to match the drum loop you’re using, you can use the Arrange area’s grid to cut the region and loop it. You can then continue building your song using all the editing techniques you’ve learned in previous lessons. You can also add Apple Loops, which will automatically match the tempo of your drums.
Apple Loops are AIFF- or CAF-format audio files containing additional information that allows them to automatically match the tempo and key of a Logic project. They also contain descriptive information—such as instrument, genre, mood, and scale—that helps you search large libraries of Apple Loops using the Loop Browser.
More Info
Apple Loops are also supported by the GarageBand and Soundtrack Pro applications. When Apple Loops are imported into an application that does not support them, they behave like regular audio files.
You were introduced to the Loop Browser in Lesson 1, when you previewed and chose loops to create a project. Now you’ll take a closer look at the Loop Browser.
In the Media area, click the Loops tab.
The Loop Browser opens. You are going to search for a major-scale acoustic guitar loop in the pop genre.
At the top of the Loop Browser, three menus—View, Signature, and Scale—allow you to filter searches of Apple Loops by collection (Jam Pack, GarageBand, or other), time signature, and type of scale (minor or major).
From the Scale menu, choose Major.
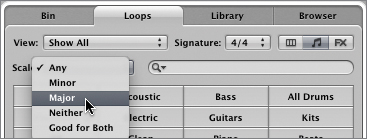
This will filter your next search to display only loops that work with a major scale. The Loop Browser needs a little more information and doesn’t display any results yet.
At the upper right of the Loop Browser, you can choose one of three views: Column, Music, or Sound Effects. Each view enables a different way to filter the loops as they are organized in the Search Results list.

Click the Column button.
While the Music and Sound Effects views display only a selection of category buttons, the Column view lets you access all the existing descriptors: By Genres, By Instruments, and By Moods.
Choose By Instruments > Acoustic Guitar > Acousti...ar (365). Note that the last category name, Acoustic Guitar (365), is abbreviated.
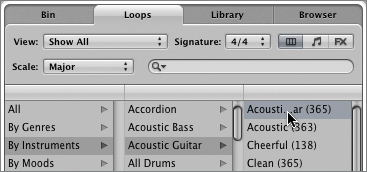
The number in parentheses (365) represents the number of results that match your search and may be different depending on the number of loops installed on your computer. The 365 major-scale acoustic guitar loops are displayed in the Search Results list at the bottom of the Loop Browser.
At the top of the Loop Browser, you can enter text in the search field and further filter the search results to display only the loops containing the search text in their names.
In the search field, type pop, and press Return.
The Search Results list now shows the 17 major-scale acoustic guitar loops that have pop in their name.
Click Alt Pop Acoustic 01.
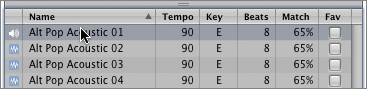
The loop starts playing. It sounds like a detuned acoustic guitar, and you may hear some weird artifacts. In fact, in the Key column, you can see the loop’s original key. This loop was performed in E major. When you preview a loop, it is transposed to match the key of the project (the default key signature for a project is C major—you will change the project’s key signature in the next exercise). The further the playback key and tempo are from the loop’s original key and tempo, the more artifacts are introduced.
At the bottom of the Loop Browser, the preview settings let you adjust the volume and key at which you preview the loops.
From the “Play in” pop-up menu, choose C#.
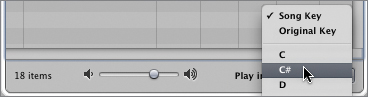
The loop plays in C#, one semitone higher than the project’s default key.
From the “Play in” pop-up menu, choose Original Key.
The loop plays in its original key, E major. It now sounds like an acoustic guitar playing in a regular tuning, and the artifacts disappear.
Drag Alt Pop Acoustic 01 to bar 1, below the existing track in the Arrange area.
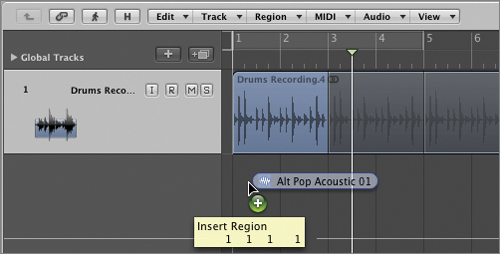
A new audio track is created, and the Alt Pop Acoustic 01 loop is inserted at bar 1.
In the Inspector, select the Loop checkbox (or press L) to loop the acoustic guitar.
The acoustic guitar plays in time with your drums! However, the loop plays in the project’s key, C major. In the next exercise, you will change the project’s key to make that loop sound better.
In the previous exercise, you noticed that a loop sounds more natural when it is played in its original key. Its sound is closer to that of a regularly tuned instrument, and since there is no transposition to process, you hear fewer artifacts. It is usually preferable to choose Apple Loops with original keys and tempos that are closest to the project’s key signature and tempo, in order to reduce the amount of processing necessary to match the loops to the project, thereby reducing audible artifacts.
Let’s change the key of the project to E major, the original key of the acoustic guitar. To change the project’s key signature, you need to access the global Signature track.
At the top left of the Arrange area, click the words Global Tracks (or press G).
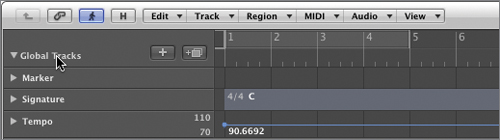
The global Marker, Signature, and Tempo tracks are displayed. In the global Signature track you can see the time signature (4/4) and the key signature (C).
Double-click the key signature (C).
The Key Signature window opens.
From the Key pop-up menu, choose E. Keep Major selected.

On the global Signature track, the new key signature is E.
Listen to the project.
The loop plays in the new key signature, E major. It now sounds much more natural and matches the drums quite well.
You used the global Signature track to set your project’s key, making sure that all Apple Loops in the project will now play at the new project key. If you want to go further and create an arrangement using Apple Loops, you can also insert key signature changes on the Signature track to build a chord progression, and all Apple Loops will change key according to the Signature track.
When you want to vary the tempo throughout a project, you can usAae the global Tempo track to insert tempo changes and tempo curves. All MIDI regions, Apple Loops, and audio regions that are set to follow tempo will automatically follow the project tempo, even when tempo variations occur in the middle of regions.
In the Global Tracks headers, click the global Tempo track disclosure triangle.

The Tempo track expands vertically. You can see the tempo value displayed (90.6692 bpm).
In the Tempo track header, you can choose between nine Alternative tempo maps. Let’s leave Alternative 1 set to 90.6692 bpm, and choose Alternative 2. This will allow you to experiment with tempo changes in Alternative 2 but leave Alternative 1 available at the original tempo if you are not happy with the new results.
In the Tempo track header, click the Alternative menu and choose 2.

Tempo Alternative 2 is displayed, and the entire project is set to the default 120 bpm tempo.
Listen to the project.
The acoustic guitar Apple Loops automatically match the new tempo, and its region length is still exactly two bars. However, the drums audio region does not change its tempo and now plays too slowly. To make sure the drums follow the project tempo, you can use one of the flex modes.
In the Tempo track header, click the Alternative menu and choose 1.
The tempo goes back to 90.6692 bpm, and the drums are in time with the project again.
Select the Drums Recording track.
In the Inspector, click the Track parameters disclosure triangle.
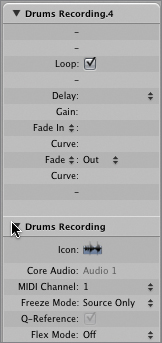
This Flex mode slices the audio where it detects a transient, and moves the slices without time-stretching them, which typically works great for drums.
In the Tempo track header, click the Alternative menu, and choose 2.
The tempo is set to 120 bpm again, but this time the Drums Recording region follows the new tempo and stays exactly two bars long.
Listen to the project.
Now both the guitar and the drums play in sync at the project tempo. From now on, you can insert tempo changes throughout the project, and both files will follow them.
The Tempo track displays tempo changes as nodes. At present, only one node is placed at the beginning of the project, and one horizontal line follows that node, indicating a constant tempo throughout the entire project. Let’s first slow down the song.
In the Tempo track, position your pointer over the tempo line.
The pointer turns into the Hand tool to indicate that you can move the line.

Drag the line down to 100 bpm.
Although the line has to be dragged below the bottom of the Tempo track and seems to disappear, keep dragging down and watch the help tag to set the tempo to 100.

When you release the mouse button, the scale in the Tempo track header readjusts, and the line is visible again with the new value (100 bpm) visible next to the node.
Let’s insert a tempo change at bar 5.
At bar 5, position the pointer far enough above the tempo line that it no longer looks like a hand, and double-click to insert a new tempo node.

The value of the new tempo is displayed next to the node. You can adjust the value of a tempo change up or down by dragging the node or the horizontal line that follows it.
To the right of bar 5, drag the new line up vertically to a value of 120.

You can move a tempo change left or right by dragging the node or the line that follows it.
To the right of the 120 bpm tempo node, drag the horizontal line to the left to move the tempo change to 3 1 1 1.

You will now create an accelerando during the first two bars. The goal is to gradually increase the tempo from 100 bpm to 120 bpm. To create a tempo curve, you need to position the pointer over the node placed above or below a tempo change. When the pointer changes into a pointing index finger icon, drag to the left.
At bar 3, drag the node below the 120 bpm tempo change, and drag it to the left and up.
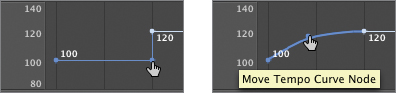
You can precisely adjust the tempo curve by dragging the node farther to the left, up, or both.
Play back from the beginning of the song.
The whole project follows the new tempo map. Your results may vary, depending upon the Apple Loops you are using or the type of audio recordings that follow the tempo. Drastic tempo variations may create artifacts, so let your ear be the judge. Note that percussive material usually reacts better to tempo variations than melodic and harmonic material.
Let’s revert to the first tempo alternative.
In the Tempo track header, click the Alternative menu and choose 1.
Close the global tracks (or press G).
You can now create complex tempo maps to add excitement to your arrangements. Sometimes, a chorus that’s a bit faster than the rest of the song is all the song needs to really take off. Or you can use tempo curves to create the classic ritardando at the end of the song. All of your Apple Loops and MIDI regions will automatically follow the project tempo. To make audio files follow the tempo, you only have to choose a flex mode.
While flex modes make audio files follow tempo, Apple Loops follow both tempo and key signatures, and can be catalogued in the Loop Browser for easy access from any of your projects. When using audio regions to create Apple Loops, blue Apple Loops are produced.
Blue Apple Loops can be used only as audio regions on audio tracks. When you use MIDI regions, green Apple Loops are produced. Green Apple Loops can be used as audio regions on audio tracks or as MIDI regions on software instrument tracks, giving them the additional flexibility of being able to edit the sound of the instrument and the MIDI sequence.
Drag the Drums Recording region to the Loop Browser.

The “Add Region to Apple Loops Library” dialog appears. All the information you enter in this window will be used by the Loop Browser to index the loop. It is the same information you will use to search for that loop in the Loop Browser.
Enter or choose the following information:
Name: Rock Groove
Type: Loop
Scale: Neither
Genre: Rock/Blues
Instrument Descriptors: All Drums > Beats
Click the tags Single, Clean, Acoustic, Relaxed, Cheerful, Dry, Grooving, and Part.

More Info
When dragging a region to the Loop browser, you can create blue Apple Loops only when the number of beats in a selected region is a whole integer. This function uses the project tempo to tag the transient positions and works best for audio files that match the project tempo. If the selected region’s number of beats is not an integer, the Type parameter will be set to One-shot and dimmed.
To create blue Apple Loops with material that does not match the current project tempo, and to see a more refined transient analysis of your audio file, choose Audio > Open in Apple Loops Utility and use the Apple Loops Utility, as explained in Apple Pro Training Series: Logic Pro 9 Advanced Music Production by David Dvorin with Robert Brock. (Peachpit Press).
Click Create.
Logic temporarily solos the Drums Recording track, bounces the audio region as a new audio file, and then adds the loop to the Loop Browser. This process can take some time, depending upon the number of loops present on your system.
When the operation is completed, an Apple Loops file has been created and indexed, and is available in the Loop Browser. You can now access it from any project as you can any other Apple Loops file.
In the Loop Browser’s search field, type Rock Groove, and press Return.
Your new drum loop is displayed in the search results. You can click it to preview it, and add it to any of your projects.
Now that you know how to create Apple Loops, try creating a green Apple loop. Create a new Software Instrument track, choose a channel strip setting in the Library, and use some of the techniques you’ve learned in the previous three chapters to create a MIDI region (recording, step input recording, programming, or even Pitch Bend automation in Hyper Draw, if you’re feeling adventurous!). Then drag your MIDI region over the Loop Browser to create a green Apple Loop.
Remember the distinction between blue and green Apple Loops when you preview loops in the Loop Browser. When you like the sound of a green loop, you can add it to your project just to use the software instrument channel strip setting. Then, delete the MIDI region and record or program your own MIDI region. (Previewing green Apple Loops gives you a chance to audition their software instrument channel strip settings without loading the channel strip settings.) In contrast, if you like the melodic or rhythmic pattern played by a green loop, you can add it to the Arrange area and keep only the MIDI region, using another software instrument channel strip setting.
In the days of analog tape recording, engineers performed all sorts of tricks by changing the tape speed. Many major albums were sped up ever so slightly during the mixing process to add excitement to tracks by raising their tempos. This simultaneously raised the pitch, giving the impression of the vocalist reaching higher notes in the most emotional passages of the song. On the other hand, engineers would sometimes slow the tape during recording, so that a musician could play a challenging passage at a more comfortable tempo. When played back at its regular speed during mixdown, the recording gave the illusion of the musician playing faster than he really was. DJs are probably the biggest users of Varispeed techniques, which gives them control over the tempo and pitch of a track, allowing for seamless transitions from one track to the next.
Logic takes this concept a step further, offering both the classic Varispeed—which, like a tape or record player, changes both the pitch and the speed simultaneously—and a mode called Speed Only, which allows you to change the speed without changing the pitch.
Close the current project, and don’t save it.
Navigate to Logic 9 Files > Lessons, and open 07 Sunday Morning.
Listen to the song to get familiar with it.
To use the Varispeed feature, you need to add the Varispeed display to the Transport bar.
Control-click the Transport bar, and choose Customize Transport Bar.

A dialog appears, in which you can select the buttons and displays you’d like to see in the Transport bar.
In the Customize Transport Bar dialog, select Varispeed and click OK.
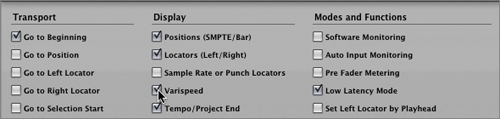
A new Varispeed display appears in the Transport bar.

In the Varispeed display, drag the 0.00% value down to –10.00%.

The Varispeed display is shaded in orange. The tempo value turns orange, too, indicating that the song is no longer playing at its normal tempo due to the Varispeed feature. To the right of the Transport bar, the Varispeed button turns orange to indicate that the feature is turned on.
Listen to the project.
The entire project plays back 10 percent slower than its normal speed, but at the same pitch. This would be perfect for practicing a part with your instrument. You could even record your part at this speed, and then turn off Varispeed to play the whole song (including your new part) at the normal speed.
Double-click the Varispeed value, enter 10, and press Return.
The Varispeed value is set to +10.00%.
Listen to the project.
The entire project plays 10 percent faster than its normal speed. This is a great way to audition your project at a different tempo. Now let’s try the classic Varispeed mode that affects both the pitch and the speed of the project.
In the Varispeed display, click Speed Only.
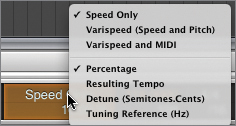
A menu appears, in which you can choose one of the three Varispeed modes. At the bottom of the menu, you can choose one of four ways to display the speed variation.
Choose “Varispeed (Speed and Pitch).”
The pitch of the entire project is raised.
In the Varispeed display, click Varispeed to open the menu, and choose Resulting Tempo.
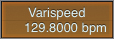
The speed variation is displayed as a tempo value rather than as a percentage. Now you know that your project is playing at 129.8 bpm.
In the Transport bar, click the Varispeed button to turn off Varispeed.

The Varispeed button, the display, and the tempo value are dimmed, and you can hear the project play at its normal speed and pitch. The Varispeed button allows you to toggle Varispeed on and off without changing the Varispeed value.
You were introduced to flex time editing in Lesson 3 when you used it to quantize a drums region and move a single hi-hat note within that region. In the next exercises, you will use flex time editing to stretch the waveform as you would a rubber band, and to match the tempo of an imported audio file to the project tempo.
In this exercise, you will use the Flex tool to stretch the lead vocals, making a sustained note even longer than it was performed. You will then take a quick peek at Flex view, which shows you what is happening under the hood when you use the Flex tool.
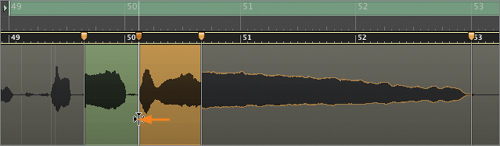
On the Vox track (track 8), zoom in on the end of the Vox 2 region, making sure that you can still see the M3X Sansamp track above (track 7).

Drag a five-bar cycle from bar 49 to 54, and listen to that section.
You are listening to the end of a section. The singer sings, “Nothing, really,” and then all the instruments stop at bar 52, where a drum fill announces the new section starting at bar 53. The goal is to stretch the singer’s very last note to sustain it throughout the break.
Press Esc (Escape) to open the Tool menu.
At the bottom of the Tool menu, choose the Flex tool.
With the Flex tool, click anywhere on the Vox 2 region.
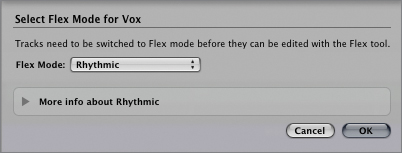
A dialog appears, to remind you that you must choose a flex mode before you can use the Flex tool. The advantage of using that dialog over selecting the Flex Mode parameter in the Inspector is that the dialog displays a bit more information about each of the flex modes.
In the Flex Mode dialog, click the disclosure triangle to view a description of the Rhythmic flex mode.
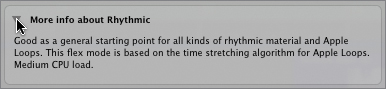
From the Flex Mode menu, choose Monophonic.

The description of the Monophonic mode says, “Good for solo vocals” so this should work great!
Click OK.
On the Vox 2 region, place the Flex tool pointer at the very end of the waveform, and drag to the end of the break (the downbeat of bar 53).
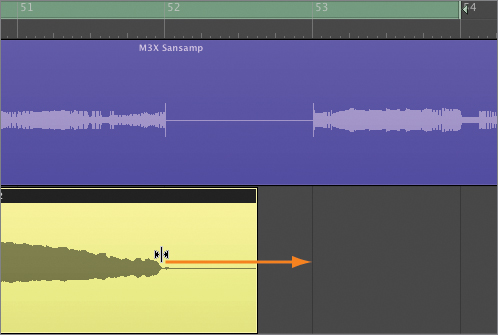
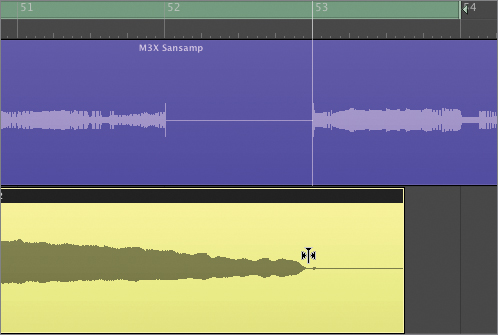
The region is lengthened and the waveform is stretched. Listen to the result. The vocal note sustains until the next section. Now let’s look at what happened “under the hood.”
In the Toolbar, click the Flex button to turn on Flex view.

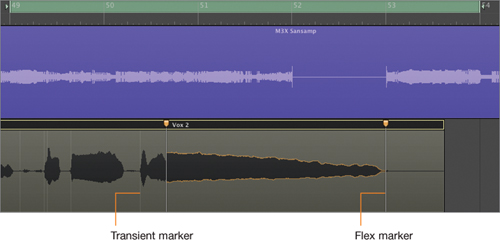
In Flex view, light gray vertical lines represents the transients that Logic detected in the file—generally the notes’ attacks. The bright vertical lines with an orange handle at the top are the flex markers, and they help you determine which parts of the waveform are stretched. Also, time-expanded sections of the waveform get an orange halo, while time-compressed ones get a green halo.
While in Flex view, press Command-Z (Undo), and then press Command-Shift-Z (Redo) to see what happened when you stretched the last note with the Flex tool.
Two flex markers were added around the last vocal note, which was time expanded (and therefore gets an orange halo).
To prepare for the next step, play the current section a few times to get really familiar with the waveform and which words it represents. You will now stretch the attack of the word Really to the left so that it starts a bit earlier.
In the lower half of the waveform, position the Flex tool over the attack of the word Really.

Pay close attention to the Flex tool. When positioned over a transient marker and in the lower half of the waveform, it should look like three little flex markers, as in the previous figure.
This symbol means that you’re going to stretch the waveform using three flex markers:
On the transient marker you’re about to drag
On the transient marker before (which will not move)
On the transient marker after (which will not move)
Start dragging the Flex tool to the left.
You see the transient that you’re dragging, the transients before, and the transients after all turn into flex markers. The time-compressed part of the waveform is highlighted in green, and the time-expanded part is highlighted in orange. A mini-ruler appears at the top of the region to help you align transients to the grid.
Listen to your results.
You’ve shortened the thing part of the word Nothing and lengthened the word Really. Now the vocals seem to float in midair throughout the break. Cool!
Press Esc twice to return the Left-click tool to the Pointer tool.
In the Toolbar, click the Flex button to turn off Flex view.
While the Flex tool is the ideal tool to correct the placement of a note that may be a little too late or a little too early, it is equally powerful at stretching notes—lengthening some and shortening others—to rethink the groove of a musical phrase. Remember to use the Flex tool with moderation, as it can be quite addictive!
At the beginning of this lesson, you imported a drum recording and used Logic to detect its tempo so that you could start a new song and match the project tempo to the drum recording tempo. You will now do the opposite: You will import a percussion recording and use a flex mode to make that recording match the tempo of your project.
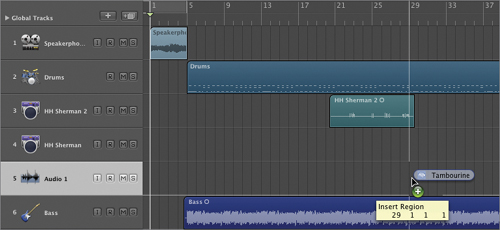
Select the HH Sherman track (track 4).
At the top of the track list, click the New Tracks button, and create a new stereo audio track.
The new track (track 5) is added below the HH Sherman track.
In the Toolbar, click the Media button to open the Media area, and in the Media area, click the Browser tab (or press F).
Navigate to Logic 9 Files > Media > Additional Media, and drag Tambourine.aif to track 5 at bar 29.
Click “Play from Selection” (or press Shift-Enter).
The tambourine is playing more slowly than the rest of the song. You can use a flex mode to make it automatically match the project tempo.
Make sure that the Tambourine track is selected, and in the Inspector, set Flex Mode to Rhythmic.

Logic analyzes the Tambourine.aif audio file to detect transients and automatically time-stretches the file to match its tempo to your song tempo.
Click “Play from Selection” (or press Shift-Enter).
The tambourine plays perfectly in sync with the other tracks.
You can now copy the tambourine to the other choruses. First, use the Marquee tool and the “Crop Regions outside Locators or Marquee Selection” key command (Control-C) to crop a perfect eight-bar Tambourine region. Then drag one copy to bar 53 and another copy to bar 81. Dragging the upper right corner of each region, you can use the Loop tool to fill out each chorus. Finally, in the Inspector, turn down the level of the Tambourine to about –5 dB and pan it slightly to the right to give it a place in the mix.

When you stop a turntable with the stylus on the record or stop a tape machine with the tape head in contact with the magnetic tape, the result is a signal that simultaneously slows down and drops in pitch. Although tape machines and turntables are slowly disappearing, this highly recognizable sound effect has regained popularity—along with its alternative, the tape or turntable that turns on and increases in speed while rising in pitch.
To re-create those effects in Logic, you apply a fade over an audio region, and then change that fade into a speed fade: speed up for a fade-in, slow down for a fade-out.
On the OutroTapeDelays track (track 11), zoom in on the last four or five bars.
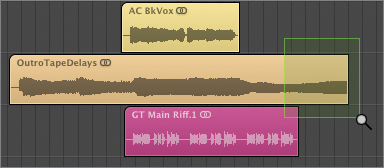
Listen to the ending of the song from bar 100.
You are going to create a turntable slowdown effect from bar 101 to the end of the OutroTapeDelays region. First you need to create a fade-out. Remember, you can apply fades with the Pointer tool by holding down Shift-Control.
Shift-Control-drag the OutroTapeDelays region from bar 101 and over the right border of the region to apply a fade-out.

In the Inspector, click the Fade parameter and choose Slow Down.

Tip
For a turntable start effect, add a fade-in to an audio region, and in the Inspector, click the Fade In parameter and choose Speed Up.
In the Arrange area, the OutroTapeDelays fade turns orange, indicating that it is a speed fade. Listen to your fade. It sounds just like a turntable stopping! You can adjust the length and curve of the speed fade just as you would a regular fade.
Shift-Control-drag the fade slightly to the left to curve it.
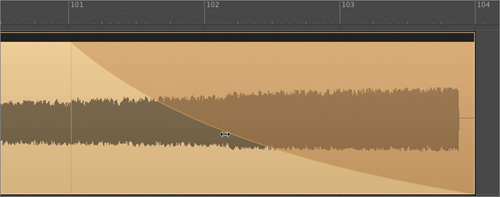
The speed drops a bit faster at the beginning of the slowdown effect and a bit slower toward the end, and the result sounds more realistic.
While you just used a speed fade to create a realistic tape slowdown effect, you can also use speed fades for all kinds of effects. Try using short speed fades on rapid successions of short regions to create DJ scratching effects.
You now have a large repertoire of techniques you can use to ensure that any audio file recorded or imported in a project will play back at the project tempo. Mastering these techniques will give you the freedom to use almost any prerecorded material in your projects, so keep your ears tuned to interesting material that you could sample and loop for your future songs. Using Varispeed, turntable speed-up and slowdown effects, and time-stretching techniques, you have a new palette of special effects that can add ear candy to your productions.