
Lesson Files | Logic 9 Files > Lessons > 11 New Day |
Logic 9 Files > Lessons > 11 Testing MIDI | |
Time | This lesson takes approximately 60 minutes to complete. |
Goals | Learn good backup practices |
Understand the principles of troubleshooting | |
Learn basic troubleshooting steps |
As an Apple Certified Pro, you will find yourself in situations where you are responsible for the proper functioning of several Logic systems. Whether maintaining your home studio or a professional studio, teaching in a classroom with student computer stations, or working as a technical consultant, you will often need to safely and quickly solve problems.
Problems can generally be attributed to one of three causes.
Human errors: The user forgot to press a button, didn’t connect devices properly, didn’t install the proper driver, or made another mistake.
Hardware limitations: The user reached the limitations of the computer, was trying to use too many plug-ins, or asked the system to play back more tracks than it could handle.
Software- and hardware-related problems: Incompatible devices, corrupted preferences or project files, and other defects can result in unexpected behaviors.
In this lesson, you will explore the most common issues you may run into and will develop a sense for general troubleshooting techniques that you can apply to many situations.
Before starting to troubleshoot, you should make sure that you have current backups of all your critical projects. Now is a good time to learn responsible backup practices.
The importance of backing up cannot be overstressed. Backing up data is a precautionary measure that guarantees you will always have a properly working copy of your Logic projects, no matter what system problems you might encounter.
While some Logic problems can be fixed using the troubleshooting techniques described in this lesson, many problems—such as human error, data corruption, power failure, and hard drive failure—can result in data loss. The most reliable way to recover lost or corrupted data is to revert to a backup copy. Obviously, that means you must follow a strict backup routine.
In Lesson 1, you learned the importance of saving your project at regular intervals. Now is a good time to further understand Logic’s behavior when saving a project, and the way automatic backups are created.
When you open a Logic project, the project file is transferred from the hard disk to the computer’s random-access memory, or RAM. RAM has a much faster access speed than hard disk storage and allows most operations to occur instantaneously. However, RAM is also volatile. In the event of a power failure, a computer crash, or unexpected program termination, your project is erased from RAM without giving you a chance to save it to the hard disk.
When you save your project, you are copying it from RAM to the hard disk. If an incident causes the project to disappear from RAM, you can always open it again from the hard disk in the same state that it was in the last time you saved it. Therefore it is important to save it frequently, or at least after any important operation has been performed. Each time you save a project, the previously saved version of the project is backed up automatically, as in the next exercise.
When switching between Logic and the Finder, remember that you can use Command-H to hide the application with key focus, and Command-Tab to switch between applications. You will first save the project to your desktop to have easy access to the project folder and clearly see its contents.
Go to Logic 9 Files > Lessons, and open 11 New Day.
Choose File > Save As.
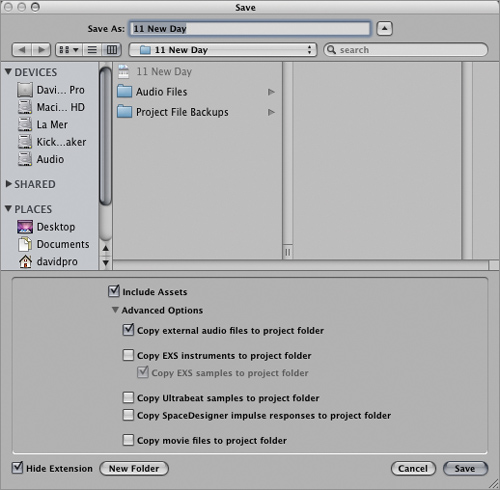
A Save dialog appears.
If a file browser is not open, click the disclosure triangle next to the Save As field.
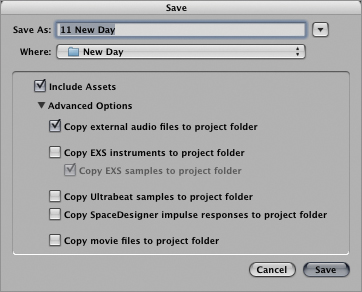
A file browser opens.
Click the desktop icon in the sidebar (or press Command-D), make sure that Include Assets is selected, and click Save.

The whole project is saved on the desktop, and a few progress indicators show the audio files being copied to the new project.
In the Finder, double-click the 11 New Day project folder to look at its contents.
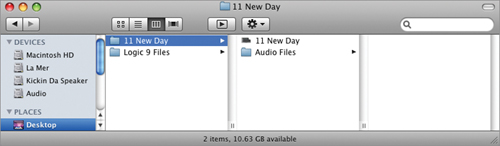
The project folder contains the 11 New Day project file and an Audio Files folder.
Click the Audio Files folder to view its contents.
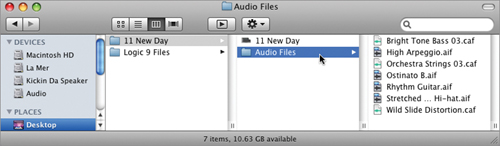
All the audio files used in the project have been copied to the Audio Files folder inside your new Project folder.
Leave the Finder window open, switch back to Logic, and look at the Arrange window’s title bar.

In the title bar, notice the plain Logic project icon in front of the project name. That plain icon indicates that the open project is identical to the one on the hard disk.
In the Arrange area, drag a region to move it by a few bars.
Now notice the Logic project icon. It is dimmed, indicating that the current project exists only in RAM and is different from the version on the hard disk.

Choose File > Save (or press Command-S).
Your project is saved to the hard disk, and the icon returns to its previous state to indicate that the versions onscreen and on the hard disk are identical.
Switch to the Finder.
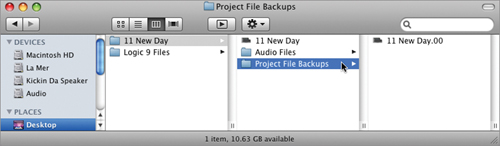
The project folder now includes a Project File Backups folder, which contains a backup of the project file. That backup corresponds to the previously saved version of the project file, which was made before you last saved. In this case, the 11 New Day.00 file in the Project File Backups is the file you first saved in step 4, before moving the region, while 11 New Day (at the root of the project folder) is the new project file you saved in step 8, after moving the region.
Each time you save a project, the previously saved version is moved to the Project File Backups folder and assigned a sequential number. By default, the Project File Backups folder contains up to ten saved versions of your project, numbered 00 through 09. The file numbered 00 is the most recent and 09 is the oldest. If you ever save your project by mistake, you can close the project and open an earlier backup.
Like any other computer file, a Logic project file can become corrupted. This usually results in unexpected behaviors when you work with a project, behaviors not present when you work with other project files.
When a project file is corrupt, the only solution is to rebuild the project (see next exercise). Of course, a proper backup regimen may avoid the need for a rebuild.
You should save copies of your project file at regular intervals, or after you’ve made any significant changes. For example, if you save a copy every 20 minutes, and your project is corrupted, the worst that can happen is that you have to return to the previous version and will lose the past 20 minutes of work.
Choose File > Save As (or press Command-Shift-S).
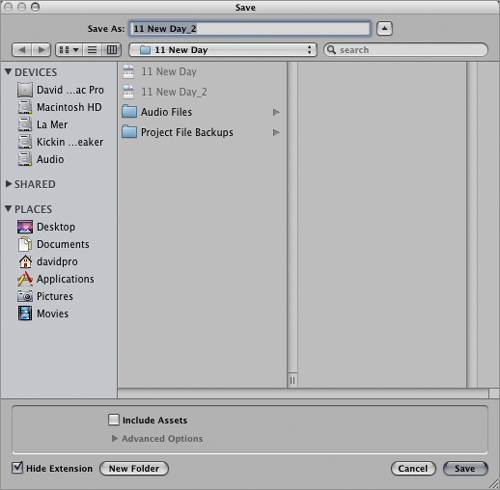
The Save As dialog opens, and you can see the contents of the project folder. You don’t have to change the location of the file you are about to save—it will be saved in the project folder. However, you don’t need to copy all the audio files again. The new project file will use the same audio files as the current file.
Deselect Include Assets.
Name the new project file 11 New Day_2, and press Enter.
A copy of the project file is saved on the hard disk as 11 New Day_2, and that is the version you are now working with. You can verify the name in the title bar of the Arrange window.
You will now save one more backup version of the project file.
Choose File > Save As (or press Command-Shift-S).
You can see the contents of the project folder, which now contains two project files: 11 New Day and 11 New Day_2.
Name the copy 11 New Day_3 and save it.
Close the project.
This saving technique ensures that you have an earlier backup to go to in case of project file corruption. It also offers an easy means to revert to a previous version of your project, should you decide that you are no longer happy with the artistic direction you have taken in the last saved version(s).
When your project seems to be corrupted and you don’t have access to a recent backup, you can create a new empty project and import all the data from the corrupted project.
Choose File > New and create an Empty Project.
The Empty Project’s Arrange window opens, and the New Track dialog appears.
Create one audio track.
You will now locate the old project file to import its data.
Make sure the Media area is open.
At the top of the Media area, click the Browser button (or press F).
Click the Home button.
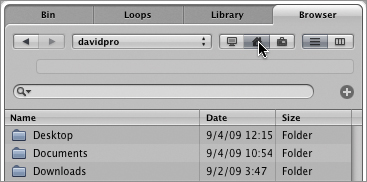
Navigate to Desktop > 11 New Day > 11 New Day, and select the Project file.

At the bottom of the File browser, click the Import button.

The File browser now displays a list of all the tracks in the old project. To completely rebuild the project, you will also import all the Global tracks. This will ensure that the new project has the same tempo track, marker track, and so on.
At the top of the File browser, click the Global button.

The File browser now also shows the global Marker, Signature, and Tempo tracks.
Choose Edit > Select All (or press Command-A).
All the tracks in the File browser are selected.
In this instance, you want to import the content of all the tracks, the plug-ins of their corresponding channel strips, and their input/output settings. Because you selected all the tracks, you need to select only one checkbox in each of those columns.
Select one checkbox in the Content column, one in the Plug-ins column, and one in the I/O column.
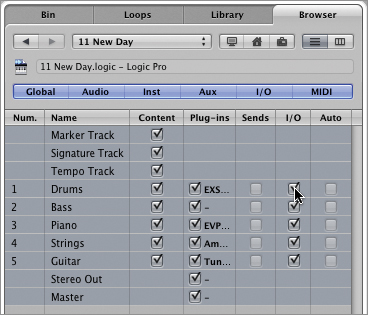
All checkboxes in those three columns are selected.
At the bottom of the File browser, click the Add button.

Tip
If you have customized settings in the old projects, you can import them to the new project by clicking the Import Project Settings at the bottom of the File Browser.
All the tracks from the old project are added to the Arrange area. You can now delete the empty track you created at the beginning of this exercise to start this project.
In the Arrange area, click the first track’s track header, and choose Track > Delete.
This new project now contains the same tracks with the same regions as the old project. You’ve also successfully imported the tempo, plug-ins, and I/O settings of the old project.
Save and close your project.
Until now, you saved your project file to the hard disk and made backup copies inside the project folder. But one day your hard disk will die, and you can’t know when that day will be. It could be the very first day you use the hard disk, or it could be years from now.
To protect yourself against human error or hard disk failure, you have to back up the entire project folder to another hard disk. An easy solution is to purchase an external hard disk dedicated to backing up your project folders. You can also back up to another computer’s hard disk over a network, or even to online storage (such as a MobileMe account). Having a backup in a remote location adds protection in case of burglary or fire.
When your project folder contains only one project file, you can choose File > Save As, make sure that Include Assets is selected, and choose a location on your external hard disk. However, if you use the technique described in the earlier exercise, “Backing Up Project Files,” your project folder will have several project files, and a Save As won’t work. In that case, use the Finder to copy the whole project folder to the new location.

A music production system built around Logic can quickly grow into a complex network of interconnected devices. When a problem occurs, finding its cause can become a high-tech scavenger hunt.
Troubleshooting requires one part logical reasoning and one part experimentation. When troubleshooting a signal chain comprising several devices, you can systematically bypass each device in turn, or substitute one device for another, to find the culprit. By carefully examining which device combinations work and which don’t, you can often isolate the offending device.
Whether the problem is due to human error (such as an improper setup) or to component failure (such as a bad connection), the techniques to identify the point of failure are the same.
The greatest frustration of working with music equipment occurs when the equipment does not produce any sound. When troubleshooting the solution, you can easily rule out your audio interface and monitoring system by making sure that Logic can play Apple Loops from the Loop Browser.
Open an empty project and create an audio track.
In the Media area, click the Loops tab (or press O).
Click any category.
Select the first loop in the search results list.
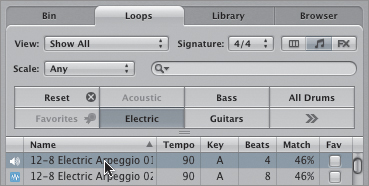
The loop icon turns into a speaker, and its signal is displayed in the Inspector on the Stereo Out channel strip’s level meter.

If the loop icon doesn’t change when you click it and no signal is displayed on the Stereo Out channel strip, check your audio driver settings.
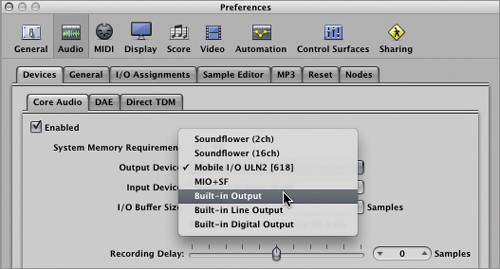
In the Toolbar, click the Preferences button, and choose Audio from the pop-up menu.
Make sure that the Enabled checkbox is selected and the correct audio interfaces are chosen in the Output Device and Input Device menus. If those settings are correct, you can try to restart the Core Audio driver.
If the settings that you checked in step 5 appear to be correct, deselect Enabled.

The audio driver is disabled.
Select Enabled again, and click Apply Changes.

After a moment, a progress indicator appears, showing the initialization progress of the Core Audio engine.
If the loop icon still doesn’t change when you click it, try bypassing your audio interface as described in the next section.
When a signal appears on the Stereo Out channel strip, you know that Logic is producing sound. If you still can’t hear the sound, you should suspect the monitoring chain (drivers, audio interface, cables, monitors, and headphones).
Any level meter on your interface, mixer, or even speakers can help you figure out where the signal is being lost. Plugging headphones into your audio interface can help determine if the problem occurs between the computer and the audio interface (no sound in the headphones), or between the audio interface and the monitors (sound in the headphones but not in the monitors).
A few things to check:
If you are using your Mac’s built-in audio interface, click the speaker icon on the right side of the main menu bar and make sure that the volume slider is up.
Make sure that you have installed the latest audio interface drivers.
If the audio interface has additional software installed, open that software and make sure that the signal routing is correct and no volume fader handle is down or mute button is on.
Check the audio interface’s manual for a reset procedure.
Check the fuse or temporary protection on the monitors.
Check all cables between the computer, the audio interface, and the monitors.
Many audio problems and data errors (such as sample rate errors, or audio and MIDI synchronization errors) can be traced to the audio interface and its drivers. The easiest way to determine if the audio interface is at fault is to bypass it and use the Mac’s built-in interface and speakers.
From the main menu, choose Logic Pro > Preferences > Audio; or, in the Toolbar, click the Preferences button and choose Audio from the pop-up menu.
From the Output Devices menu, choose Built-in Audio (or Built-in Output).
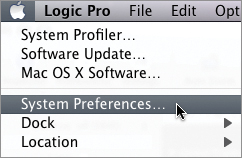
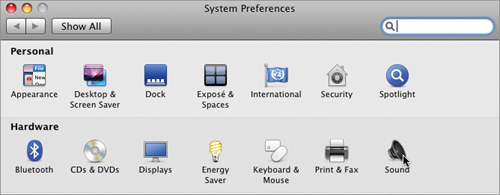
From the Apple menu, choose System Preferences.
In the Hardware area, click the Sound button.
Click the Output button.
Select Internal Speakers, or Headphones.
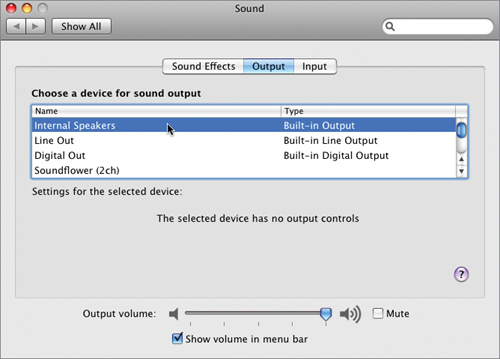
Make sure that the Output volume slider is positioned toward the right and Mute is deselected.
If the problem goes away when you’re using the Mac’s built-in interface, then you can suspect your external audio interface or your speakers. After you’ve made sure that the speakers work, check the audio interface’s manufacturer’s website to be sure that you’re using the most current drivers for your system. Check the audio interface manual for a way to implement a reset procedure. If all else fails, contact the manufacturer to get help troubleshooting the audio interface and its accompanying software.
If no sound is produced when you’re recording or monitoring an audio source in Logic, you should first verify that you are getting sound out, as described in the previous exercises. In other words, before troubleshooting your microphones, make sure that your speakers work!
If your interface has input meters, check that the meters display a level when the artists perform. If they don’t, the problem lies ahead of Logic’s inputs. Try replacing the instrument or microphone, switch to another cable, or use the built-in audio interface.
If your interface does display an input level and you still can’t hear incoming sound in Logic, chances are you are dealing with human error. Check that your audio interface settings are correct and your incoming audio signal is properly routed.
First look at the channel strip. Does the level meter display a signal? If it doesn’t, you might be attempting to monitor the wrong device or the wrong input on the correct device.
In the Arrange area, record-enable the audio track.
A Save As dialog opens.
Name your project Audio Test and save it to the desktop.
In the Toolbar, click the Preferences button and choose Audio from the pop-up menu.
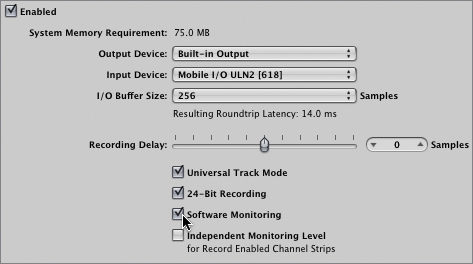
Make sure that the correct device is chosen.
Verify that Software Monitoring is selected, and close the Preferences window.
Note
Some audio interfaces offer near-zero latency monitoring, usually accessible through the software accompanying the interface. Other configurations use a hardware mixer to route live instruments directly to the headphones or monitors. In those situations, Software Monitoring should be deselected so that Logic no longer routes incoming audio to its outputs.
On the audio channel strip, see that the correct input from the Input menu is chosen.
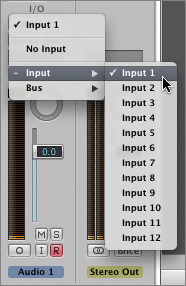
Sometimes audio interfaces don’t label inputs in the same way as Logic, and what appears to be Input 1 on the audio interface could be labeled Input 3 in Logic. In that case, you can use the driver labels.
Open the Mixer, and choose Options > I/O Labels.
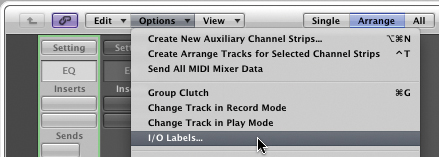
The I/O Labels window opens.
For all input channels, select the options in the “Provided by Driver” column.
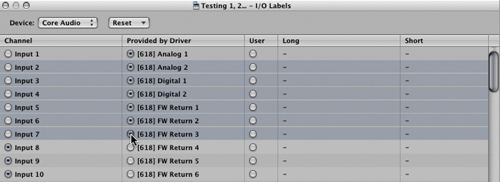
On the audio channel strip, check the Input menu again, this time looking at the driver labels.

Make sure the Record Enable button is turned on in the channel strip.
If the record-enabled channel strip displays a signal and the Stereo Out channel strip still doesn’t display a signal, you need to check for proper routing of the signal.
Make sure the output of the channel strip is set to Stereo Out.
Make sure the Level fader is up.
Make sure the Mute button is not on.
Make sure the Mute button is not blinking.

A blinking Mute button indicates that the channel strip is temporarily muted, even though its Mute button is not on. This situation happens when another channel strip is soloed.
Tip
When you realize that one or more tracks are soloed, it can be cumbersome to open the Mixer and unsolo them all, especially in larger sessions featuring many tracks. Instead, click to turn on the Solo button of the current channel strip, and then Option-click that same Solo button again. This will take all tracks out of Solo mode.
Close the project, and don’t save it.
Once the Stereo Out channel strip meters display a signal, you should hear that signal through your monitors. If you don’t, take another look at “Restoring Your Audio Output,” earlier in this lesson.
When trying to play MIDI regions on external MIDI instrument tracks, first make sure that the track is assigned to the correct MIDI instrument, as explained in the appendix “Using External MIDI Devices.”
When troubleshooting MIDI Out routing, it is important to isolate the MIDI Out signal routing from the audio routing of your MIDI device. If the MIDI device has a MIDI input activity monitor, you can check it to verify that the MIDI device is receiving the MIDI data sent by Logic. You can also plug a headphone directly into the MIDI device to verify that the device properly responds to the MIDI events it receives. If it does, then use the techniques described in the previous exercises to check the audio input routing (from the MIDI device into Logic) and the audio output routing (from Logic to your speakers).
The MIDI Activity (In/Out) display in the Transport bar is a great tool for troubleshooting MIDI problems. It displays incoming (upper line) and outgoing (lower line) MIDI events in real time.
If you do not see any outgoing MIDI activity in the display, check for muting at the track, region, and note levels.
Open 11 Testing MIDI.
Start playback.
Watch the MIDI Out display: It doesn’t show any activity.
On track 1, click the Mute button to unmute the track.

You still can’t see any activity in the Transport bar’s MIDI Out display.
With the Mute tool chosen, click the MIDI region (or select it and press M), and start playback.

The MIDI Out display still doesn’t show any outgoing MIDI activity.
MIDI notes are displayed in the Piano Roll Editor, but they are dimmed, indicating that they are muted.
Select all the notes, click them with the Mute tool (or press M), and start playback.
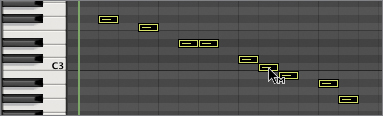
The notes are unmuted, and the MIDI Out display shows activity.
If Logic’s MIDI Out display shows note events and you still can’t hear anything, then the problem lies somewhere else. Check your MIDI routing, as explained in Appendix A. To temporarily bypass all audio routing, plug your headphones directly into the receiving MIDI device’s headphone output. Make sure that you have installed the latest drivers for your MIDI interface or MIDI device.
More Info
To monitor all incoming and outgoing MIDI events at the computer level, you can use a free third-party utility, MIDI Monitor, available from Snoize (http://www.snoize.com/MIDIMonitor/).
In Logic, all incoming MIDI events are routed by default to the record-enabled MIDI or software instrument track. Incoming MIDI events are also shown in the Transport bar in the MIDI In display.
If no MIDI activity is displayed when you play a MIDI controller, check all the MIDI devices in the chain before Logic.
Check your MIDI controller’s MIDI output activity display, if present.
Check your MIDI interface’s MIDI input activity display, if present.
Power-cycle the MIDI controller. Turn it off, and then turn it on.
Power-cycle the MIDI interface.
Disconnect and reconnect the cable connecting the MIDI device or MIDI interface to your computer.
If you are using a USB MIDI device, try using another USB port on your computer.
Try unplugging other USB devices from your computer, aside from the keyboard and mouse.
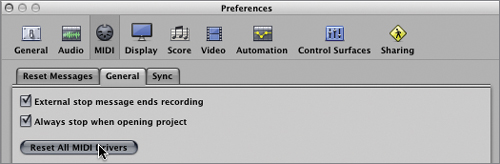
In the Toolbar, click the Preferences button, then choose MIDI from the pop-up menu.
In the General tab, click “Reset All MIDI Drivers.”
After these steps, if Logic still does not show any incoming MIDI activity when you play your MIDI controller, close the current project and open a factory template. If the template shows activity on the Transport bar’s MIDI In display, then the problem lies with your project file. Reopen your project.
In Logic, the Environment contains all the objects you can assign to a track in the Arrange area, such as audio and instrument channel strips and external MIDI devices. It also contains several MIDI objects that control MIDI input and output.
When a MIDI input issue has been isolated to a specific project file, you need to check the default MIDI input cabling of objects in the Environment.
In this project file, the default cabling was broken. Now, you will fix it.
Create a new software instrument track, and choose a channel strip setting from the Library.

Play a few notes on your MIDI controller.
In the Transport bar, the MIDI In display does not show any activity, and you can’t hear the piano.
Choose Window > Environment (or press Command-8).

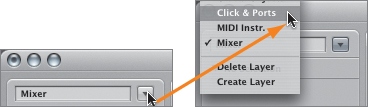
The Environment window opens. The Layer menu at the upper left allows you to view different layers or sections of the Environment. The Click & Ports layer is where incoming MIDI is connected to Logic’s sequencer input.
Next to the Layer menu, click the arrow button and choose Click & Ports.
The Click & Ports layer appears. A default Click & Ports layer should show a Physical Input object. The SUM output of the Physical Input is cabled into a keyboard named Input Notes. The keyboard is cabled to a monitor named Input View. That monitor is cabled into the Sequencer Input. Make sure that those objects are properly connected. If a cable is missing, cable the objects according to the picture.
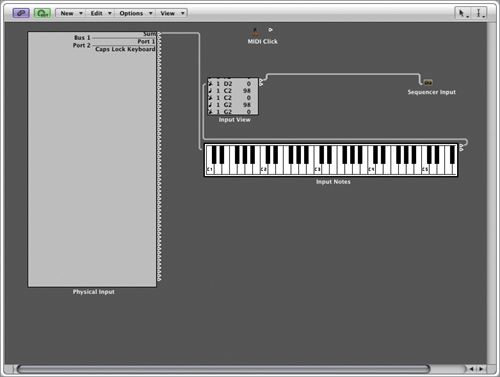
In this project file, you can see that a cable is missing between the Input View object and the Sequencer Input object. Now, you will reconnect the two objects. To cable objects, click the output triangle at the top right of the source object, and drag the connector to the destination object.
Hold down the Input View output triangle and drag the cable onto the Sequencer Input object.

When the proper default cabling is restored, incoming MIDI events should be displayed in the Transport bar on the MIDI Activity display, and you can hear sound when playing notes on your MIDI controller.

Close the project but don’t save it.
To get the most performance out of your system, you need to understand how Logic uses and balances hardware resources.
The computer consists of three main components:
Random access memory, or RAM
The hard disk
The CPU
The hard disk stores the applications and files. When the computer starts, Mac OS X is loaded from the hard disk into RAM. When an application is opened, it is also loaded into RAM. Then the CPU can process the files as requested by an application.
When a Logic project is opened, the project file is loaded into RAM along with all the samples (including impulse responses used by Space Designer), Apple Loops, audio files set to follow tempo, and plug-ins used in the project. The amount of RAM influences the number of Apple Loops, samples, and audio files set to follow tempo that can be used in a project.
When playback starts, the audio files and samples used by the project are streamed from the hard disk. The hard disk influences how fast the computer starts, how fast applications are opened, and how many simultaneous audio tracks and samples can be played or recorded.
Note
By default, the EXS24 mkII sampler loads only the attack section of longer samples. When those samples are played, the rest of the sample is then streamed from the hard disk, and each sample also uses hard disk bandwidth.
The CPU influences the amount of processing power that Logic can use in real time while playing back a project. All plug-in and summing calculations require real-time processing. Certain plug-ins (like Amp Designer or Space Designer) require a lot of processing, while others (like Channel EQ) require very little.
When any of the three main components overload, Logic will stop, or display an alert message, or both. Logic doesn’t always know precisely why the problem arises but usually tries to point you toward the source.
Other times, Logic will alert you to a problem without giving you any hint as to the source. For example, a loss of synchronization between audio and MIDI can be triggered by many events, including too much stress being placed on the hard drive or the CPU.

When you have a problem or feel Logic’s performance is sluggish, monitor the CPU and HD (hard drive) meters in the Transport bar. Once you know which component is responsible, you can take the necessary measures to fix or work around the issue.
When the CPU meter goes into the red, it indicates that you are reaching the limits of the computer’s processing power. Effects and software instrument plug-ins all use processing power, some more than others. With a little experience, you will get a sense of which plug-ins need the most processing power. Try to locate the more demanding channel strips on the Mixer, and freeze their corresponding tracks. Freezing a track bounces it to an audio file, thereby eliminating all the real-time CPU calculations needed by the software instrument and effects plug-ins on that track.
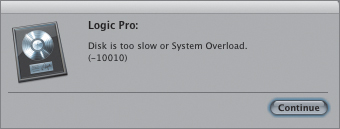
When all the calculations required by a project cannot be processed in real time, the CPU overloads and you usually get the following message:

When you get this alert or another indication that you might be reaching the limits of the CPU, look at the CPU load meter.
If the meter goes into the red, it’s time to freeze some tracks.
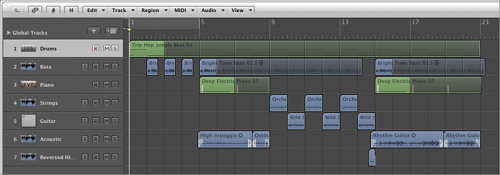
Open 11 New Day.
Control-click a track header and choose Freeze from the pop-up menu.
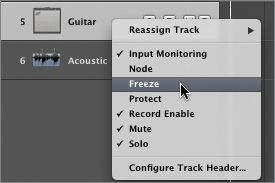
The track headers display the Freeze button.
Click the Freeze buttons for the tracks you want to bounce to an audio file.

The buttons turn green, indicating that those tracks will be frozen.
When deciding which tracks to freeze, find the tracks that include the most CPU-intensive plug-ins and that you don’t intend to tweak any further, at least for now. Plug-in settings cannot be modified on a frozen track.
Adjust the project end marker’s position to bar 23.
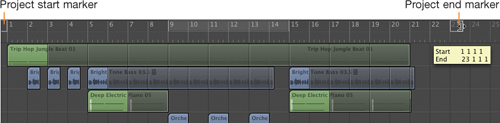
The project end marker is in the Bar ruler. When freezing, Logic bounces individual tracks between the project start and end markers. If your project end marker is located beyond the actual end of the project, you are wasting precious time bouncing silence!
Press the Spacebar.
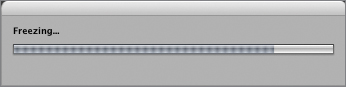
Logic starts the freezing process and displays a progress indicator. Wait until the process ends.
Start playback.

The CPU load meter should now be at a lower level. Note that the HD load meter will reach a little higher, since Logic has to stream the freeze files from the hard disk. When a track is frozen, you can’t edit the regions on that track, and you can’t change the plug-in settings on its channel strip. If you need to access a track’s plug-ins or regions, click its freeze button to unfreeze it.
While issues related to signal routing and hardware limitations can be easy to identify, sometimes you may experience unexpected behaviors for no apparent reason. It can be hard to trace the exact cause of those problems; however, you can try a few safe and fast methods that will solve most of them.
When facing unexpected behaviors, the first step you should take is to return the system to its normal condition or initial state.
Restart Logic, or
Restart the computer
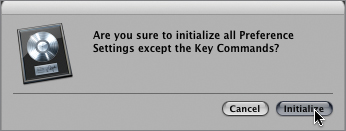
A common cause of application error is corrupt preferences files. When an application opens, its preferences file is loaded into RAM. When you quit the application, the preferences file is saved to the hard disk. If the application quits unexpectedly or the computer crashes, an application may not properly write the preferences file to the hard disk, which results in a corrupted preferences file. This often is responsible for unexpected application behaviors.
Keep in mind that after initializing your preferences, you will have to reset them manually.
Note
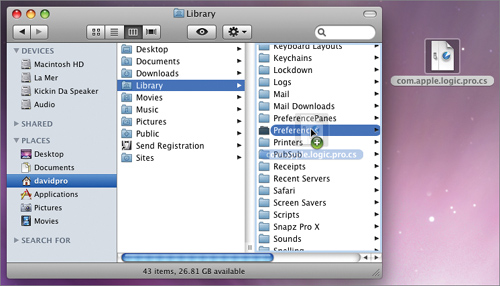
You can also delete the preferences files manually from the Finder. Your main preferences file is ~/Library/Preferences/com.apple.logic.pro.plist, and your control surface preferences file is ~/Library/Preferences/com.apple.logic.pro.cs. (Logic Express preferences are named com.apple.logic.express.plist and com.apple.logic.express.cs.)
To avoid manually resetting your preferences every time you troubleshoot, you should make a backup of your preferences file. Locate the file ~/Library/Preferences/com.apple.logic.pro.plist, and copy it to another drive or storage device.
If you have a backup preferences file, and you suspect the current one might be corrupt, you can replace your current file with the backup.
When a project file is corrupted, you may experience unexpected behaviors, and some functions may stop working altogether.
When experiencing unexpected behaviors even after restarting and initializing the preferences, open a brand-new template and try to reproduce the problem. If after experimenting for a while you notice that a particular problem or behavior occurs only in a specific project file, chances are the file is corrupt.
Although you won’t be able to repair the file, identifying project corruption can help you decide on what direction to take: revert to an earlier backup, rebuild the project by importing the audio and MIDI regions in a new template, or attempt to finish the project with the limited functionality.
Input/output buffers were explained in Lesson 2, “Recording Audio.” The smaller their size, the more pressure on the CPU. This generally results in clicks and pops in the monitoring, or in extreme cases a complete loss of monitoring. If you experience monitoring problems, increase the I/O buffer size.
When Logic freezes at startup, the problem usually lies with the Core Audio engine. Often an incompatible or corrupted third-party plug-in contained in a template or song that opens at startup is the cause of freezing. You can disable the audio drivers at startup by holding down Control immediately after clicking Logic in your Dock. A dialog will open, allowing you to open Logic without launching the Core Audio engine. You can then look at the template or song, uninstantiate any suspicious third-party plug-ins, and re-enable the Core Audio devices in your Audio Preferences window.
When a problem occurs, it can be difficult to decide where to start. In this lesson, you learned typical troubleshooting steps you can take depending on the issue at hand. As you gain more experience and a better understanding of how your system works, you will get faster at diagnosing issues you may have when you work in Logic, and finding a solution to fix them.