
Logic 9 Files > Lessons > 09 Mitral Valve Prolapse | |
Media | Logic 9 Files > Media > Mitral Valve Prolapse |
Logic 9 Files > Lessons | |
Time | This lesson takes approximately 90 minutes to complete. |
Goals | Navigate the Mixer and use effect plug-ins |
Adjust volume levels and use groups | |
Adjust pan positions | |
Filter frequencies with the Channel EQ plug-in | |
Process with aux sends and aux channel strips | |
Add depth with delay and reverberation plug-ins |
Mixing is the art of blending all the instruments and sounds in a stereo sound field. A good mix can make the difference between an amateur demo and a professional production. Mixing should carefully balance two goals: blending all the elements into a cohesive whole and, at the same time, keeping them sufficiently defined so that listeners can distinguish between them. In other words, make the musicians sound as if they are playing in the same room, while ensuring that they don’t mask each other and muddy the mix. A good mix is like a completed puzzle, in which all the pieces (all the instruments) fill their proper places in the sound field without overlapping each other.
With those goals in mind, you can adjust four parameters of an instrument to define its space in the stereo sound field. You can adjust the instrument’s volume, its position in the stereo field (from left to right), its distance and depth, and its frequency spectrum. Those parameters are interrelated, and changing one often means that you will need to readjust the others.
In mixing, it is also fundamental to be consistent with the genre of the song. In the previous lesson, you worked with a mix that was really dry because the song genre didn’t call for many effects, and the simple instrumentation didn’t require much processing to get the desired results. In this lesson, you will work with a modern pop rock song that will benefit from a variety of processing effects. A more complex arrangement with more layered instruments also means that more attention must be paid to each instrument’s place in the mix.
Before you open the project and start mixing the song, watch a QuickTime clip of the music video to get familiar with the song and its final mix.
Go to Logic 9 Files > Lessons and open 09 MVP Video.mp4.
The music video opens in QuickTime.
At the bottom of the QuickTime Player window, click the Play button (or press the Spacebar).
Watch the whole music video and listen to the mix, trying to identify the effects it uses and the position of each instrument in the stereo sound field.
In the following exercises, you will open a project file that has been partially mixed, but it requires that some of the instruments receive additional polish. You will use techniques that will help you achieve a mix like the one you just heard.
You can use effects-processing plug-ins to sculpt the sound of the instruments and help them find their places in the mix. These plug-ins will also give those instruments a different timbre and, later, influence the way you adjust their levels or EQs (equalization).
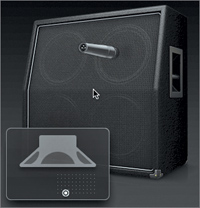
The Amp Designer is a plug-in that emulates the sound of a guitar amp, its speaker cabinet, and the microphone used to pick up that sound. It offers several amp models that resemble famous vintage to modern guitar amps that produce sounds ranging from clean to devastating high gain distortion, and every nuance in between.
In this song, the electric guitar on track 22 was recorded direct, without using a guitar amp. To start your mix, you’ll apply Logic’s Amp Designer plug-in to give the guitar a vintage low gain distortion tone. Throughout this exercise, take the time to experiment with various models, and tweak the amp knobs to get a feel for the different sounds that the Amp Designer can produce.
Open Logic 9 Files > Lessons >09 Mitral Valve Prolapse.
Listen to the beginning of the song.
When you reach the middle of verse 2, you can hear that the electric guitar plays a few harmonics, and then plays rhythm starting in the pre-chorus on bar 25. You will focus on that pre-chorus as you adjust the sound of the guitar, so let’s create a cycle area.
In the ruler, Command-drag the PRE CHORUS marker to the upper half of the ruler.

A cycle area corresponding to the pre-chorus is created. Now, pressing the Spacebar will always start playback at the beginning of the pre-chorus.
Click the E Guitar’s solo button.
You can hear the dry sound of the electric guitar recorded “direct.”
Select track 22.

The electric guitar’s empty channel strip is displayed in the Inspector.
In the Inspector, on the left channel strip, click the first insert, and choose Amps and Pedals > Amp Designer.
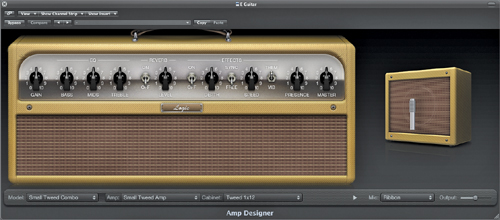
The Amp Designer plug-in opens. In the graphic interface you can see the amp and its parameters (Gain, EQ, Reverb, and so on), and to the right, the cabinet and the microphone. At the bottom, menus allow you to choose a model, and to customize the model by selecting the desired amp, cabinet, and microphone.
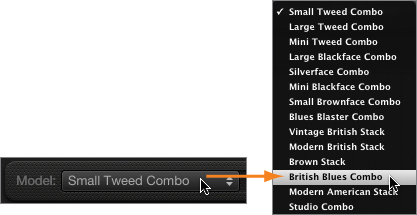
From the Model menu, choose British Blues Combo.
The character of the sound and the picture of the amp change to reflect the sound characteristic of an early British combo amp. First, you’ll dial in the desired distortion level. A great way to get a warm and thick distortion from early British amps is to use the power amp’s distortion by raising the master volume. On real amps, this creates the challenge of dealing with huge levels of sound. But on a modeled amp, you simply bring down the output!
At the bottom right of the Amp Designer, turn the Output down to –9.0 dB.
On the amp, turn the Master volume all the way up!

You can now dial in more distortion with the Gain knob from the preamp.
On the amp, turn the Gain to about 9.

Inserting an Amp Designer plug-in on your dry guitar track and choosing the desired amp model gives you a sound that is very close to the sound of a mic’ed guitar amp cabinet. The modeled amp gives you the sound you want without the hassle of dealing with high acoustic sound levels, and with great flexibility. However, don’t restrict this plug-in to dry guitar tracks! It can work wonders to add sizzle to a drum track or give an edge to a vocal track.
A great way to personalize the sound of a guitar amp is to pair it with a specific speaker cabinet and microphone. As you customize and fine-tune your guitar amp, don’t forget to unsolo the guitar occasionally to see how your changes affect the guitar within the mix of the entire song.
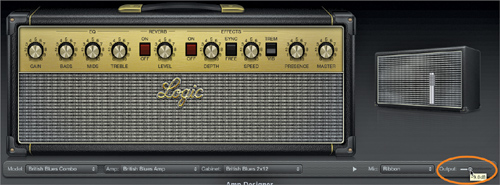
From the Cabinet menu, choose Modern British 4x12.
You’ll now see a bigger cabinet sporting four 12-inch speakers, and the guitar sounds bigger. In fact, it’s a bit too bassy. Choosing a different microphone will help you get a more focused tone.
From the Mic menu, choose Dynamic.
Before you start using the EQ to sculpt your sound further, you can customize the type of EQ you’ll be using. In this exercise, you will use an amp with the EQ section of another amp!
On the amp, click the EQ label and choose British Bright.
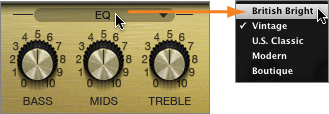
The sound is fuller and the EQ label now reads “CUSTOM EQ.” Notice how changing the EQ model drastically alters the character of the amp.
To get electric guitar that cuts nicely through this busy pop mix, you will use the EQ to make some space for the bass guitar, and give the electric guitar a brighter sound.
Turn down the Bass a bit, and slightly turn up the Treble.

For even more sparkling brightness, you can use the Presence knob.
Turn up the Presence.

The guitar’s sound is now nice and bright. You will explore one final way to sculpt the sound of the guitar by carefully positioning the microphone in front of one of the cabinet’s speakers.
Place the pointer over the speaker cabinet.
A graphic appears that displays the position of the microphone in front of the speaker (represented as a white dot).
Drag the white dot over the graphic while listening to the effect on the guitar sound.
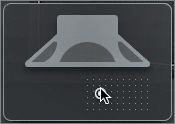
The mic position strongly influences which frequencies generated by the cabinet will be picked up by the mic. When the mic is aligned with the center axis of the speaker, you’ll hear the maximum level of high frequencies, and the guitar will sound brighter and more present. Moving the mic off-axis tends to scoop the frequency spectrum, lowering the mids while emphasizing the lows. Moving the mic closer to the speaker also tends to accentuate the speaker’s bass response.
Try to place your mic slightly off the speaker’s axis and not too close to the speaker, as seen in the preceding figure.
Tip
When you have chosen a speaker cabinet and a mic, and positioned the microphone, you can click the disclosure triangle in front of the Mic menu to work with a smaller Amp Designer window.

You will now add subtle amp designer effects to give dimension to your guitar sound.
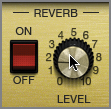
Click the Reverb’s On/Off switch to turn it on.
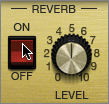
As with the EQ section, you can click the Reverb label to choose another reverb model.
Click the Reverb label and try different reverb models.
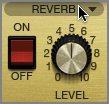
When choosing a reverb, consider how you intend to place the guitar in the mix. In this case, you only want to add a bit of dimension to the sound, while keeping the guitar up front. Pay close attention to how each reverb affects the low-frequency content of your sound. Your mix can get muddy quickly when too much bass content fights for attention.
Choose the Mellow Spring reverb model.
The best way to judge how a reverb affects the guitar sound is to toggle the reverb’s on/off switch and compare the two sounds. This particular type of reverb creates too much low-tone rumbling, which can be challenging when you later try to mix the guitar with the bass and the kick drum.
Choose the Boutique Spring reverb model. This model is nicely bright and sparkling; however, you’re going for a subtler effect.
Turn down the Reverb Level so that its effect is barely noticeable.
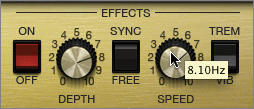
You will now add more dimension with a slight vibrato effect.
Turn on the Effects section.
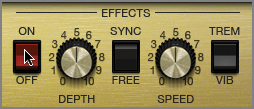
The default effect is a tremolo (rapid variations in volume), which is a more obvious effect than the vibrato. This will allow you to clearly hear and adjust the speed of the effect.
Raise the Depth so that you can clearly hear the effect, and adjust the Speed to suit yourself.
Click Vib to set the effect to Vibrato.

The vibrato effect is less pronounced than the tremolo, and you may have to toggle the Effect section’s On/Off switch to hear what the vibrato is adding to the sound.
Close the Amp Designer plug-in window.
Turn off the Cycle mode and listen to the guitar from bar 21.
You can clearly hear the vibrato effect when the guitar is playing single note harmonics in the second half of Verse 2.
Your guitar now has a sparkling, crunchy sound that faithfully emulates the famous tone of early low-gain British amps. It has just enough distortion to thicken the tone without muddying the harmony of the chords.
When customizing and adjusting the settings of an amp, remember that all settings interact, and the quest for the ultimate guitar tone is rarely a sequential process. Trying a different mic probably means you’ll have to correct its position. Experiment with a new speaker cabinet to find the perfect cabinet/microphone pairing, and then readjust the Gain and EQ.
Electric guitarists love to collect and manipulate effect pedals that personalize their sound by creating unique effect combinations. After all, who would recognize The Edge (U2’s guitarist) without his signature delay pedals? How interesting would Nirvana’s “Come As You Are” guitar riff be if Kurt Cobain wasn’t using his favorite chorus pedal?
Electric guitars usually present a challenge, as they produce sounds in the same frequency range as the lead vocals, which you normally want to keep intelligible so that listeners don’t have to strain to decipher the lyrics. Adding a modulating effect to a guitar can help make it noticeable even when you turn down its volume, leaving more space for the vocals to sit comfortably in the mix. In this exercise, you will add a rotor cabinet effect to the guitar, then set it to a reasonable level in the mix.
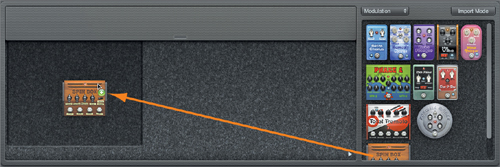
In the Inspector, click the insert below the Amp Designer, and choose Amps and Pedals > Pedalboard.
The Pedalboard plug-in window opens. The large dark area on the left is the pedal area, which is currently an empty canvas where you can drag the desired pedals from the pedal browser on the right.
While in the real world you would typically process your guitar signal with effect pedals before it reached the guitar amp, in the virtual world you are free to insert the Pedalboard and Amp Designer plug-ins in the order you want. Different orders will produce quite different results, and in this case placing the modulation effect after the amp’s distortion gives a better result.
At the top left of the Pedal Browser, click the Show All menu and choose Modulation.

Only the modulation effect pedals are displayed in the Pedal Browser.
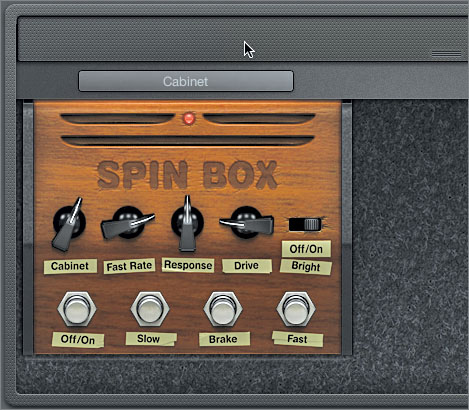
Drag the Spinbox pedal to the Pedal area.
In the Bar ruler, click the cycle area above the PRE CHORUS marker to turn on Cycle mode.
Listen to the guitar with the Spinbox effect turned on.
Once again, take a minute to try other pedals and tweak their knobs to explore the sound palette that the Pedalboard has to offer. After you’ve experimented for a while, return to a single Spinbox pedal with the default settings to continue this exercise. (To remove pedals from the pedal area, drag them out of the plug-in window.)
On the Spinbox pedal, set the Cabinet knob to Single.
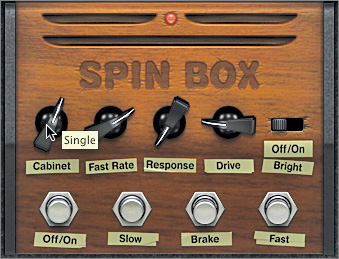
Click the Bright switch to turn it on.

The effect is now a rotating speaker; however, it almost hides the guitar tone that you worked on in the previous exercise. Wouldn’t it be nice if you could use the Spinbox modulation effect without mangling your crunchy guitar tone? Well, there’s an easy solution. You can use the Pedalboard’s signal routing capabilities to mix dry signal and effect, dialing in just the amount of effect you need.
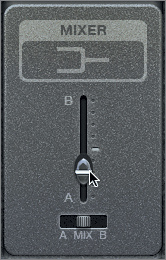
Move your pointer over the routing area at the top of the Pedal area.
The routing area’s lid opens, and you can see a rectangle representing your effect (called Cabinet, as the Spinbox emulates the sound of a rotating speaker cabinet).
In the Routing area, click the Cabinet label.

The guitar signal is now divided into two busses, and the cabinet effect jumps to the upper bus. A Mixer pedal is automatically inserted after the cabinet so that you can mix the signal from both busses:
Bus A (lower bus) is your dry crunchy guitar tone
Bus B (upper bus) is the wet tone modulated by the Spinbox
On the Mixer pedal, drag the mix fader down toward A, about halfway between A and the middle position.
The crunchy guitar tone you worked on in the previous exercise is now coming through clearly, mixed with just a dash of the rotating speaker effect. Let’s compare the results with the sound you had previously.
At the bottom of the Mixer pedal, set the Mix switch to B.

You can hear Bus B, the 100 percent wet tone. It’s heavily modulated, and the nice crunch from the Amp Designer is muffled.
Set the Mix switch to A.
You can hear Bus A, the 100 percent dry tone without the modulation.
Set the Mix switch to Mix. Close the Pedalboard plug-in window.
You have the best of both worlds! You can clearly hear the Amp Designer’s crunchy distortion mixed with the Spinbox’s modulation effect. Now you can lower the level of the guitar to make it sit in the mix.
In the Inspector, make sure the E Guitar is no longer soloed, and drag its volume fader down to –11.8 dB.

Note
When the volume fader is set to values equal or lower than –10.0 dB, the minus sign is no longer displayed in the fader’s handle.
When you spend a lot of time adjusting the sound of an instrument, it can be difficult to detach yourself from that specific instrument and shift your focus to the song as a whole. To find the right level for the guitar, it may help to turn it all the way down, listen to the whole mix (without the electric guitar) for a while, then slowly raise the level of the electric guitar. (Closing your eyes makes sure that you use your ears, and not any preconceived notion of what value the fader should be.) When you feel that the electric guitar adds texture to the song without taking away from the other instruments (especially the lead vocals), you’ve found the right level.
The flexibility of the Pedalboard gives you an extended palette of sound to play with. Spend some time experimenting with more pedals and more complex routings. When using multiple pedals, you can reorder them by dragging them left or right in the Pedal area. In the Routing area, you can make them jump from one bus to the other by clicking their labels. At the top left of the Pedal browser, when you choose the Utility category, you’ll see a Splitter pedal that you can use to send the high frequencies, or your guitar signal, to one bus and send the lows to another. This allows you to use different effects for the different frequency ranges of your guitar!
Adjusting the level of each instrument may seem like the most obvious part of the mixing process. You will usually start setting levels while you build the song. However, the perception of an instrument’s loudness will change during the mixing process, and you will often have to readjust the level of an instrument after you change its pan position or EQ settings, or as you mix other instruments that influence the perception of the first instrument.
Another consideration when adjusting levels is to avoid distortion. If an instrument is too loud, it will start clipping the signal (the clip detector indicates this by turning red), and you may hear distortion. Although clipping a channel does not always result in audible distortion, it is usually best to follow good mixing practice and ensure that all track level meters stay below 0 dBFS and the clip detectors don’t turn red.
In this exercise, you will solo all the drum tracks and adjust their levels to get a good balance among all the drums in the drum kit.
At the bottom of the Arrange area, click the Mixer button (or press X).
The Mixer opens, and you can see the channel strips for all the tracks you have in the Arrange area.
Note
If you have a small screen resolution, the Mixer area may not show the entire height of the channel strips and may be hiding the Arrange area. To perform the exercises in this lesson, you may need to resize the Mixer area to see a few tracks in the Arrange area, and you may need to scroll the Mixer area vertically to see the channel strip names at the bottom, or Setting button and EQ display at the top.
The first nine channel strips from Kick to Room are the drum channel strips. (You may have to scroll to the left to see them.) You should solo all the drum channel strips to focus on them while adjusting their levels. In the Mixer, selecting multiple channel strips will temporarily link their settings, allowing you to solo all nine channel strips at once.
Starting with the Kick channel strip, drag across the bottom of the first nine channel strip labels.

All nine channel strips are highlighted, indicating that they are selected.
On one of the selected channel strips, click the Solo button.
All selected channel strips are soloed.
A good way to find the right level for each drum is to use the kick as a reference, setting it at 0 dB, turning the other drums all the way down, and then slowly raising each drum individually, stopping when you find the level you prefer.
On one of the selected channel strips, drag the volume fader all the way down.
All the faders in the drum channel strips are turned all the way down.
Now you need to deselect the channel strips to unlink their parameters, so that you can adjust their volume levels independently.
At the bottom of the Kick channel strip, click the Kick label.
The Kick channel strip remains selected, and all other channel strips are deselected. Although you could click anywhere in the background of a channel strip to select it, clicking its label is the best way to ensure that you’re not going to change one of its settings accidentally.
Option-click the Kick volume fader to set it to 0 dB.
You can keep looping the pre-chorus section as you mix the drums.
In the Arrange area, make sure that the cycle area above the PRE CHORUS marker is still on.

Start playback.
You are now ready to adjust the level of the drum channel strips in relation to the Kick.
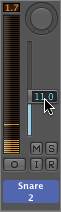
Slowly drag the Snare volume fader until you find the appropriate level. Set the Snare fader to –11.0 dB.
Before you can adjust the levels of the other drums, you should find the right level for the overhead microphones (the stereo pair of microphones placed above the kick to pick up the sound of the cymbals) and the room microphones (a pair of microphones placed farther away from the kick to pick up the sound of the whole drum kit in the room).
Slowly raise the Overhead fader to –11.0 dB.
Slowly raise the Room fader to –27.0 dB.
You can experiment with the Room fader by raising it a little higher if you want your drums to have a roomier sound.
Continue adjusting the drum track levels as follows:
Set Snare B (the microphone placed at the bottom of the snare) to –13.0 dB.
Set Hats to –13.0 dB.
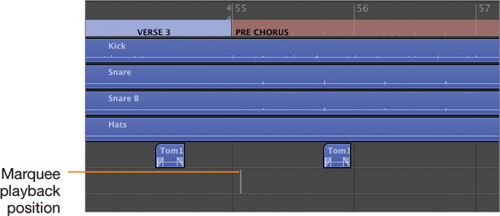
You now need to find a section of the song in which the drummer hits the toms. Since the drummer plays the toms only a few times in the song, you need to loop one of those sections as you adjust the toms’ volume levels.
One way to adjust the cycle area is to use the Marquee tool to select a section and set the cycle area to match the marquee selection.
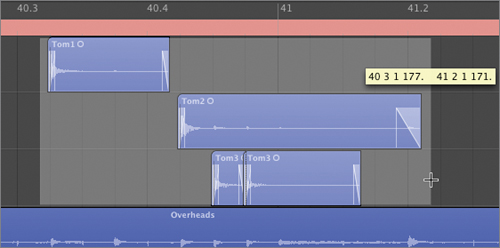
Zoom in on the three tom hits in the second chorus, around bar 41.
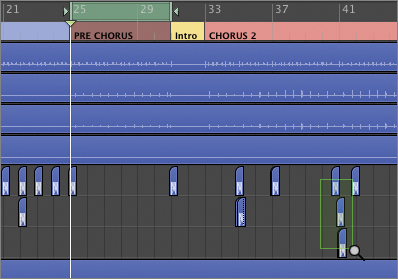
Drag the Marquee tool (your current Command-click tool) over the three tom hits to select them.
In the Toolbar, click the Set Locators button.
The cycle area matches your marquee selection, encompassing the three tom hits.
Start playback.
Adjust the three toms’ track levels as follows:
Set the Tom1 fader to –7.8 dB.
Set the Tom2 fader to –7.2 dB.
Set the Tom3 fader to –7.2 dB.
You now have a good balance between all the drum tracks. In the next exercise, you will make sure the whole drum kit is at the right level when you listen to it in the context of the song.
Turn off Cycle mode, and click in the background of the Arrange area to undo your marquee selection.
Some channel strips are closely related to each other, such as all the drum channel strips that make up the drum kit. When you’re mixing, it is useful to group those tracks and link some of their parameters, so that you can adjust parameters for the whole group at once.
You’ll try this by grouping all the drum tracks, then adjusting the volume level of the entire drum kit while listening to the rest of the instruments in the song, all the time preserving the relative level of each individual drum track.
Starting with the Kick channel strip on the left, drag across the labels of the first nine channel strips.
All nine channel strips are selected and temporarily grouped.
On the Kick channel strip, click the Group slot, and choose Group 1 from the pop-up menu.
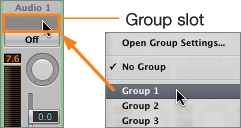
The number “1” appears in the Group slot of the selected channel strips, indicating that they are assigned to Group 1.
In one of the grouped channel strips, click the Group slot, and choose Open Group Settings.
The Group Settings window opens.
All the parameters selected in the Group Settings window are linked for the whole group. The Volume parameter is selected by default, so you don’t need to change any settings. You can, however, name the group to easily identify it.
Double-click in the Name column for the first group, type Drums and press Return.
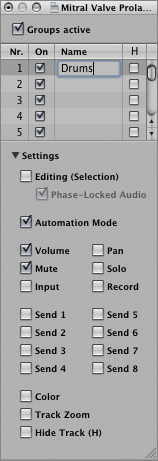
The name “1: Drums” appears in the Group slots on all the drum track channel strips.
You will also need to quickly toggle the solo status of the Drums group.
In the Group Settings window, make sure your Drums group is selected, and select the Solo parameter.

Click the Kick Channel Strip label to deselect the other channel strips.
In the Mixer or in the Arrange area, click the Solo button of one of the drum tracks.
All the tracks in the Drums group are unsoloed.
Close the Group Settings window.
Start playback at the beginning of verse 2.
The drums are now too low, so you will raise their level.
Drag the Kick fader up to about +4.5 dB.
All the drum channel strip volume faders are raised by the same amount, raising the level of the whole drum kit while preserving each drum’s relative level.
Positioning instruments to the left or to the right of the stereo mix is a good way to separate them and make it easier for the listener to distinguish between the instruments. Panning instruments and positioning them at different places in the stereo field can also result in a wider stereo mix.
Continuing with your drum kit, you will use the Pan control knobs to reproduce the real positions of the individual drums, from the drummer’s perspective. Then you will spread the guitar tracks throughout the stereo field.
First, imagine that you are the drummer, and visualize the pieces of the drum kit in front of you. The hi-hat is slightly to your left, and the toms are spread out left to right. You will re-create those positions using the Pan control knobs on the drum channel strips.
In the Mixer, click the solo button of one of the drum channel strips.
The entire drum kit is soloed.
Start playback at the beginning of the second pre-chorus (around bar 55).
Tip
When mixing, you often need to repeatedly start playback from the same position. You can use the Marquee tool to indicate a playback position. First zoom in on a section, and click the Marquee tool (your current Command-click tool) in the Arrange area to create a thin vertical white line. Then use the Spacebar to toggle playback from that position. To clear the Marquee playback position, click the background of the Arrange area with the Pointer tool.
On the Hats channel strip, set the Pan control to –24.

To pan the toms, you need to find a playback position in the Arrange area where the drummer plays a tom fill—for example, toward the beginning of the last chorus. You will exaggerate the toms’ panning to make the drum kit sound wider than it really is.
On the tom channel strips, set the Pan controls to the following values:
Tom1: –57
Tom2: +24
Tom3: +49
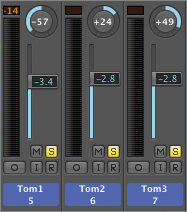
Listen again to a section where the drummer hits the toms. They sound spread out in the stereo field, widening the sound of the tom fills.
Click one of the soloed channel strips’ Solo button to unsolo them all.
To spread the guitars in the stereo field, you will pan them left and right. First, solo all the guitar channel strips.
In the Mixer, scroll toward the right, and drag across the six acoustic guitar channel strip labels, from channel strip 16 to channel strip 21.

All six channel strips are selected, and their settings are temporarily linked.
On one of the selected channel strips, click the Solo button.
All six channel strips are soloed. You need to deselect the channel strips to unlink their parameters.
Select a currently deselected channel strip to deselect the six guitar channel strips.
Notice that the six acoustic guitars were recorded in pairs: two guitars during the verses (V Acous 1 and V Acous 2), two guitars during the choruses (Acoustic 1 and Acoustic 2), and two 12-string guitars. Focusing on one pair of guitar channel strips at a time, you will pan the first guitar to the left and the second to the right. However, on each side of the stereo field, you don’t want to end up with four guitars overlapping each other in the same position. So, you will vary the amount of panning for each pair of guitars.
You may want to scroll down in the Arrange area to see all the guitar regions, so that you can easily navigate to a section where the guitars you are adjusting are playing.
Play a verse, and pan V Acous 1 to –24 and V Acous 2 to +23.
Play a chorus, and pan Acoustic 1 to –53 and Acoustic 2 to +50.
More Info
While mono channel strips include a Pan control (which determines the position of the mono signal in the stereo field), stereo channel strips include a Balance control (which determines the relative levels of the left and right signals). In other words, a stereo channel strip always sends the left signal to the left speaker and the right signal to the right speaker, but turning the Balance control to one side turns down the level of the signal sent to the speaker on the other side.
For true stereo panning, you can use the Direction Mixer plug-in (in the Imaging category).
Pan 12 String 1 to –64 and 12 String 2 to +46.
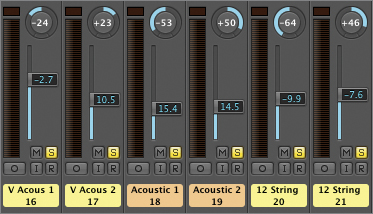
Now the guitars are spread out and you have achieved better stereo separation, making it easier for the listener to distinguish each individual guitar.
On one of the guitar channel strips, Option-click the Solo button.
The mix sounds much wider with an ensemble of six acoustic guitar players placed at different positions in a room, rather than a single guitar player who layered six acoustic guitar tracks.
The sound of an instrument is composed of several frequencies mixed together in various amounts. By using an EQ plug-in to attenuate or boost certain ranges of frequency, you can alter the timbre of the sound, much as you would change the sound of your stereo by tweaking the bass or treble knobs.
EQ plug-ins can shape the sound of your instruments, focusing the sound in a specific frequency range and helping that instrument cut through the mix without boosting the overall level of its channel strip. Equalizing (EQing) an instrument can also decrease unwanted frequencies in its recording and keep it from masking another instrument in the same frequency range.
To shape the frequency spectrum of your snare, you will use the Channel EQ plug-in to attenuate some of its low rumbling while boosting the high frequencies to make it sound snappier.
In the Bar ruler, click the cycle area above the PRE CHORUS marker to turn it on, and click the background of the Arrange area to clear any marquee selection you may still have.
To equalize the snare, you need to solo its channel strip. However, the snare belongs to the Drums group. To solo only one channel strip from a group, Option-click its solo button.
In the Mixer, scroll to the left and Option-click the solo button of the Snare channel strip (channel strip 2).
On the Snare channel strip, double-click the EQ area.

A Channel EQ plug-in is inserted in the first available Insert slot below the compressor, and the Channel EQ window opens.

The Channel EQ plug-in allows you to adjust eight bands of EQ. You can toggle a band on and off by clicking the button at the top of the band. By default, the first and last bands are turned off, and all of the other bands are turned on. Each band’s settings are shown below the graphic display in the parameter section.
Clicking the Analyzer button turns on the frequency analyzer, which displays the frequency spectrum curve of the sound on the graphic display when the track is playing.
Tip
By default, the frequency analyzer displays the frequency spectrum of the sound at the output of the Channel EQ plug-in. You can click the Pre/Post EQ button below the Analyzer button to switch the frequency analyzer to pre EQ. It will then display the frequency spectrum of the sound at the input of the Channel EQ, before being adjusted by the Channel EQ.
Click the Analyzer button.
Start playback.
A curve appears in the graphic display, showing the sound’s frequency spectrum curve in real time. Every time the kick hits, notice the pulsating movement in the very low range of frequencies (to the left).
You will filter out those very low frequencies to attenuate the low frequencies of the kick drum in the snare audio signal.
On the left, click the first Band On/Off button to turn that EQ band on.
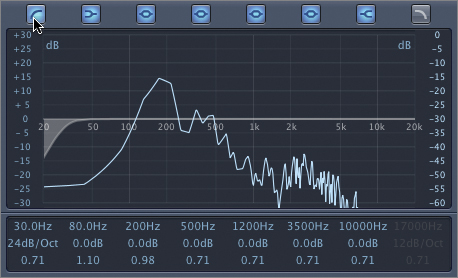
The first EQ band’s shape appears on the graphic display, and you can see that the low frequencies are attenuated below 30 Hz.
In the parameter section below the graphic display, drag the Frequency parameter of the first band up to 70 Hz.
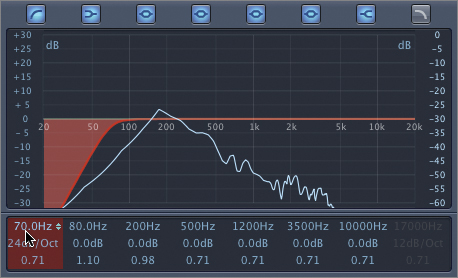
The EQ band shape updates in the graphic display. In the frequency curve displayed by the Analyzer, you can watch the low-frequency content disappear from the snare signal. Not all speakers reproduce very low frequencies, and you may not hear the result, but it will make an audible difference in a system that accurately reproduces very low frequencies.
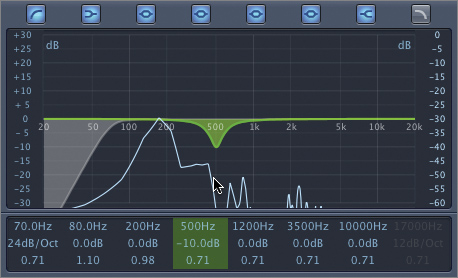
Now you will attenuate the low-mid frequencies to get the mud out of the snare sound. Instead of adjusting the numerical settings in the parameter section, you can drag the pointer in the graphic display to adjust the shape of individual bands.
Position the pointer over the graphic display, and move the pointer from left to right.

As you move the pointer horizontally, you can see the settings for the EQ band highlighted in the parameter section.
You can shape the selected EQ band by dragging in the graphic display.
To adjust the gain, drag vertically in the area of the EQ band.
To adjust the frequency, drag horizontally in the area of the EQ band.
To adjust the Q (or width, or resonance), drag the pivot point (which appears at that band’s frequency) vertically.
You first need to adjust the gain of the band to see its shape on the graphic display.
Position the pointer to select the fourth band, which is currently set to a frequency of 500 Hz.
Drag down so that the Gain parameter below reads –10.0dB.
The shape of the selected EQ band appears on the graphic display, and the settings below are adjusted according to your mouse movements.
Now, while listening to the snare, you will adjust both the Q and the frequency of the EQ band you are attenuating.
Drag the pivot point all the way down to get a wide band of EQ.
Drag the band to the left to set the frequency to 455 Hz.
Drag down in the area of the band to set the gain to –11 dB.

The snare sounds less muddy already. Remember to click the Bypass button to compare the snare sound before and after the EQ.
Now you can boost a high-frequency EQ band to make the snare sound snappier and have it more easily cut through the mix.
Adjust the sixth EQ band’s parameters:
Set the frequency to 5700 Hz.
Set the gain to +7.5 dB.
Set the Q to 0.12.

Close the Channel EQ window (or press Command-W).
Unsolo the Snare channel strip.
Keep playing the song, and Option-click the Channel EQ plug-in to toggle it on and off, comparing the sound with and without the Channel EQ.
With the Channel EQ turned on, the snare volume is lower, so you need to raise its volume fader to bring it back up in the mix. First you need to temporarily disable the drums group so that you can adjust the snare volume level without adjusting the whole drum kit.
From the Mixer’s local menu bar, choose Options > Group Clutch (or press Command-G).
In the drum channel strips’ Group slot, the Drums group is dimmed.
Drag the Snare fader up to –3.1 dB.
Press Command-G again to turn the drums group back on.
In the Bar ruler, click the Cycle area to turn off Cycle mode.
By applying an EQ plug-in to the snare, you shaped its frequency spectrum to make it sound clearer and snappier, giving the snare its appropriate place in the frequency spectrum of the mix.
In a natural environment, an instrument’s sound is reflected by the floor, walls, and ceiling of a room. The sounds of those reflections, combined with the direct sound of the instrument, allow listeners to determine the distance from the instrument to their ears and understand the nature of the acoustic space.
When recording instruments, you can choose to record in an absorbent studio to primarily record the direct sound of each instrument. You then use delay and reverberation plug-ins to create artificial reflections, giving you total control over the apparent placement and depth of the instruments.
By adding delay and reverberation to vocals, you’ll give them more depth. Since you are now working with a single channel strip, you can close the Mixer to get a better view of your arrangement.
Close the Mixer.
Select the Lead Vocal track (track 24).
Start playback at the beginning of the first verse.
Notice how dry the vocals sound. They were recorded in an absorbent studio, and you can’t hear much reverberation.
First, you will add a delay plug-in to add dimension to the vocals.
On the left Arrange Channel Strip, click the first available Insert slot (below the DeEsser), and choose Delay > Tape Delay.

The Tape Delay plug-in is inserted and its window opens. You can hear the reflections on the vocals as an echo. By default, the tape delay is automatically synchronized to the project tempo so that the reflections are produced every quarter note. That sounds fine for this song.
In the Tape Delay window, you can use the two Output sliders to the right to adjust the level balance between Dry (the sound not affected by the plug-in) and Wet (the reflections generated by the plug-in). You will bring the Dry signal all the way up to its maximum level, so that you have the same level of direct sound as you had before inserting the plug-in.
Drag the Dry slider up to 100%.
At the lower left of the Tape Delay window, you can adjust the Low Cut and High Cut sliders to filter the sound of the reflections. Narrowing the frequency range of the reflections gives them a more rounded sound, so they are not as sharp as the dry sound. This allows you to make the echo effect less perceptible and more natural sounding.
Drag the Low Cut slider toward the right to 160 Hz.
Drag the High Cut slider toward the left to 10,000 Hz.
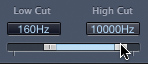
The reflections are now softer and don’t steal attention from the dry vocal sound.
You could insert a reverb plug-in directly in the channel strip the same way you inserted a delay plug-in in the previous exercise. However, when you use reverb to place the instruments in an artificial room, using an individual reverb plug-in for each instrument would require a lot of processing power. You would also have to readjust the parameters of every reverb plug-in each time you wanted to change the sound of your artificial room.
Instead, you can use aux sends to route some of the signal from a channel strip to a new channel strip, called an aux (auxiliary channel). Once you have set up an aux channel strip with the desired reverb plug-in, you can add reverberation to any instrument by sending some of its signal to that aux for processing.
In this exercise, you will use an aux send to send the lead vocal to an aux, and insert the reverberation plug-in on the aux channel strip.
Make sure the Lead Vocal track (track 24) is still selected, and solo it.
On the left Arrange channel strip, click the first Send slot and choose Bus > Bus 2.
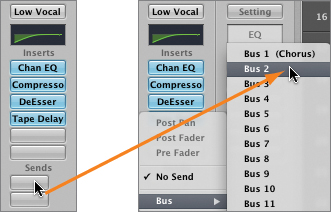
When you click a Send slot and choose an available bus, a new aux channel strip is automatically created and added to the Mixer. In the Inspector, the right channel strip automatically shows the Aux 2 channel strip, so you can see the signal path from the lead vocal channel strip to the aux channel strip. In the I/O section of the Aux 2 channel strip, the input is set to Bus 2.
A bus is a virtual audio cable that allows you to route the audio signal from one channel strip to another—in this case, from the lead vocal channel strip to a new aux channel strip. By default, an aux send is positioned in the signal flow of the channel strip after the volume fader but before the pan. For routing vocals to a reverb, that position is perfect, as the balance between dry and wet will be preserved if you adjust the level of the vocal.
On the left channel strip, Option-click the Send level knob next to Bus 2.

The Bus 2 send level is set to 0.0 dB, and the Aux 2 channel strip meter displays the same signal level as the left channel strip.
By default, choosing a new bus in the Send slot of a mono channel strip creates a mono Aux channel strip. In this case, you want to make that Aux stereo have a wider stereo reverb effect, where different reflections have different positions in the stereo field. You can toggle the mono/stereo status of a channel strip by clicking its Format button below the meter.
Below the Aux 1 channel strip’s meter, click the Format button.
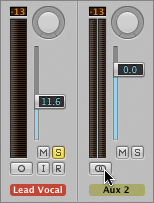
The Format button now displays two interleaved circles, indicating that the channel strip is stereo. Notice that the channel strip now has a stereo meter.
More Info
You can also hold down the Format button to choose other channel strip formats such as Left, Right, or Surround (Logic Pro only).
Now you will insert a reverb plug-in.
On the aux channel strip, click the first Insert slot and choose Reverb > Space Designer.
You will now choose a preset for the Space Designer plug-in.
In the Space Designer plug-in header, click the Settings menu and choose 01 Large Spaces > 01 Rooms > 02.1s_Big Drums.
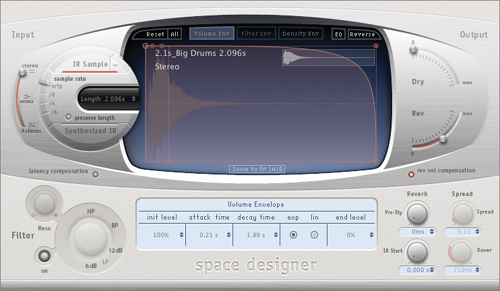
You can hear the reverb’s effect on the vocals. When you solo a channel strip, any channel strip included in its signal flow is not muted. In this case, Output 1-2 and Aux 2 are not muted, so you can hear the vocals and their reverb.
At the upper right of the Space Designer plug-in window, notice the two Output sliders, Dry and Rev. When a plug-in is inserted on an aux channel strip, the Dry slider is automatically set to 0, so the aux channel strip processes 100 percent of the signal that is sent to that aux. You can adjust the balance between dry and wet signals on the left channel strip. The volume fader adjusts the dry signal, and the Bus 2 Send level knob adjusts the amount of reverb.
Drag the Bus 2 Send level knob down to –7.2 dB.
You can now send any channel strip to Bus 2 to route it to that aux channel strip and add the same reverb effect to its sound. Let’s add some reverb to one of the guitar tracks.
Unsolo the vocals.
Select the V Acous 1 track (track 16).
Solo the V Acous 1 channel strip.
Make sure that you start playback in a verse to hear the sound of the V Acous 1 guitar.
On the V Acous 1 channel strip, click the first aux Send slot and choose Bus > Bus 2 (Aux 2).
Slowly raise the Bus 1 Send level knob to adjust the amount of reverb in the acoustic guitar.
Unsolo the guitar.
Close the Space Designer and Tape Delay plug-in windows.
The dynamic range of a recording is the difference between the softest and loudest parts of the recording. Sometimes too much dynamic range in a recording can be a problem, as the loudest parts become too loud, and the softest parts are barely audible. You can use dynamic processing plug-ins such as a compressor or a limiter to control the dynamic range of an audio signal, usually to make the audio signal level more consistent over time.
Dynamic processing can be applied to a single channel strip or to the entire mix.
When recording an instrument, the musician rarely plays all the notes at the same volume. This can become a challenge when mixing, as some of the notes stick out and others are buried in the mix.
A compressor attenuates a signal when its level reaches a specific threshold. You can use it to attenuate notes that are too loud and then raise the overall level of the instrument to bring up the softer notes.
You will use a compressor plug-in to make the dynamic range of the acoustic guitar in your intro more consistent, making sure that you can hear all the notes at the same level.
Drag a cycle area from bar 4 to bar 9.
Start playback.
Listen to the acoustic guitar. The first few notes are nice and loud, but the two notes around bar 7 are too soft and get buried behind the bass and the vocals.
On the V Acous 1 channel strip, click the first Insert slot below the Channel EQ, and choose Dynamics > Compressor.
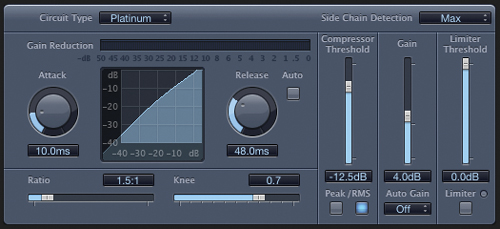
While the song is playing, look at the Gain Reduction meter. It becomes active when the compressor is triggered. Some of the guitar notes barely trigger the compressor (you can see the meter react).
Below the Compressor Threshold slider, two buttons let you choose between peak and RMS methods to analyze the incoming audio signal and determine how it should trigger the compressor. The acoustic guitar notes have strong attacks, and you want the attacks to be attenuated by the compressor, so you’ll choose Peak.
Below the Compressor Threshold slider, click the Peak button.

On the Gain Reduction meter, you can see the attack of the notes being attenuated a little more than when RMS was selected.
You will now adjust the threshold so that all the notes trigger the compressor.
Drag the Compressor Threshold slider down to –19.5 dB.
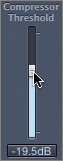
On the Gain Reduction meter, you can see the compressor being triggered by all the notes. The gain reduction slowly decreases as the notes sustain, and you can hear the notes sustain longer.
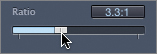
You can adjust the amount of compression with the Ratio slider, which adjusts the ratio by which the signal is reduced when it exceeds the threshold.
Drag the Ratio slider to 3.3:1.
Tip
If you want to make the compression really obvious, you can experiment with more extreme settings by turning the threshold down further and raising the ratio.
Notice that the Gain slider is set to 4.0 dB, raising the overall level of the guitar signal. The compressor attenuates the parts of the signal that go above the threshold, then raises the overall level to compensate for that attenuation.
The guitar sound is now more consistent. The attacks are softened, and the notes sustain longer. All the notes are closer to being the same level, and you don’t hear the guitar drop in volume around bar 7 as much as you did before compressing it. Don’t hesitate to solo the guitar track and toggle the compressor’s bypass button to compare the sound with and without compression.
Close the Compressor window.
In the Bar ruler, click the cycle area to turn off Cycle mode.
On a professional project, you would usually send your final mix to a mastering engineer, who would put a final polish on the stereo audio file using subtle amounts of EQ, compression, reverb, or other processing.
When you don’t have the budget to hire a mastering engineer, you can master your own mix, inserting plug-ins on the Stereo Out channel strip, as in this exercise. You will start by using a compressor to make the mix level consistent throughout the song, and then apply a limiter to make sure you’re not clipping the Stereo Out channel strip audio.
Start playback at the beginning of the song.
When you choose a bus in the Send slot of the left Arrange channel strip, the right Arrange channel strip automatically updates to display the Aux corresponding to that bus. You can choose to display any channel strip in the signal flow of the left Arrange channel strip by clicking the desired send or output slot.
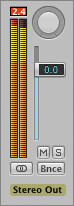
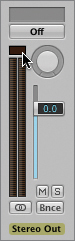
On the left Arrange channel strip, click the Output slot.

The right Arrange channel strip now displays the Stereo Out channel strip.
On the Stereo Out channel strip, click the first Insert slot and choose Dynamics > Compressor.
The compressor is inserted and its window opens. This time you will use a setting designed to emulate the soft, warm compression of analog tape recorders.
Click the Setting menu and choose 05 Compressor Tools > Platinum Analog Tape.
Try playing different sections of the song. In the intro, the bass barely triggers the compressor. In the first verse, the compressor attenuates the mix by 1 or 2 dB. In the loudest parts of the song, like the choruses, the compressor attenuates the mix by 3 to 5 dB. Since the Gain parameter raises the overall gain at the output of the compressor, you end up with a louder mix with more consistent levels from section to section.
You can see the clip detector on the Stereo Out channel strip going into the red.
You will now insert a limiter after the compressor to ensure that you don’t clip the output. A limiter works in a manner similar to a compressor; but when the signal reaches a certain threshold, the limiter attenuates the signal so that the output signal never exceeds a specific ceiling.
Click the Insert slot below the compressor and choose Dynamics > Adaptive Limiter.
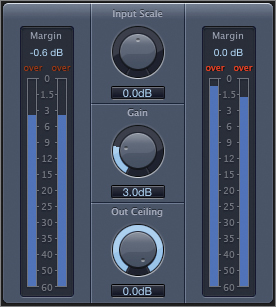
At the bottom of the Adaptive Limiter plug-in window, the Out Ceiling is set to 0.0 dB, ensuring that the audio signal will never go over 0 dBFS on the Stereo Out channel strip. The meters on the left display the signal level at the input of the plug-in; the meters on the right display the signal level at the output of the plug-in.
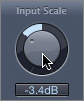
When adjusting the Adaptive Limiter, you should adjust the Input Scale knob to avoid having red overs warnings on the input meters. However, sometimes a few red overs can be OK. When in doubt, trust your ears!
Drag the Input Scale down to –3.4 dB.
At the top of the input meters, click both red “over” warnings to reset them.
The overs are dimmed. Keep playing the song, and make sure that the overs don’t turn red all the time.
You can now adjust the Gain knob in the middle of the plug-in window to raise the perceived level of the mix. This is when you need to pay close attention to what you are hearing. Although it is tempting to raise the Gain to produce a louder mix, high gain settings will introduce distortion.
Drag the Gain knob up to 10.0 dB.

You can clearly hear the distortion introduced by the Adaptive Limiter, even though the signal is not clipping on the Stereo Out channel strip meters.
Note
During playback and after you stop playback, the clip detector keeps displaying the last maximum peak value. When you start playback again, the clip detector is automatically reset. If you have not stopped playback since you inserted the Adaptive Limiter plug-in, remember to click the clip detector on the Stereo Out channel strip to reset it.
Tip
When you are not sure how a specific plug-in parameter affects the sound, don’t hesitate to turn it all the way up and all the way down. The results are most probably not going to be good, but you will hear how that setting affects the sound, and you will know what to focus on in the sound as you adjust the parameter to a more reasonable setting.
Drag the Gain down to 5.9 dB.
Even though the Adaptive Limiter’s output meters still display “over” warnings, the audible distortion disappears, and the Adaptive Limiter still gives you a nice gain boost on the whole mix.
Close the plug-in windows, and on the Stereo Out channel strip, Option-click the plug-in inserts to turn both plug-ins on and off, comparing the mix with and without the compressor and limiter.
The compressor and limiter plug-ins make your mix sound more consistent.
You have finished your mix using effect plug-ins and adjusting the four main parameters of the instrument sounds (volume levels, pan position, frequency, and depth) to give each sound its own place in the stereo sound field.
To study and listen to one possible version of this final mix, go to Logic 9 Files > Media > Mitral Valve Prolapse and, depending on your version of Logic 9, open one of these Logic projects:
Mitral Valve Prolapse Logic Express 9
Mitral Valve Prolapse Logic Pro 9
The final mix is more complete, with additional tracks and more processing plug-ins applied. It also includes a lot of track automation, which will be the topic of the next lesson.
Like any other art, mixing requires a combination of skill, experience, and talent. It takes practice to learn how to apply mixing techniques efficiently, and even more practice to learn to listen. Here are a few tips and tricks that will help you perfect your craft and become better at mixing your projects.
After you mix for while and listen to the same song for the hundredth time, you can lose your objectivity and experience ear fatigue. Take frequent breaks while mixing, and return to the mix with rested ears. You will then be able to better judge your results.
When you feel your mix is pretty advanced and you are happy with the way it sounds in your studio, burn it on a CD and listen to it in a boombox in another room or, even better, in your car while driving. You will probably hear things you didn’t notice in your studio, and miss things you could hear clearly in your studio. You can take notes and go back to your studio to rework the mix. Obviously, the mix will never sound the same in the studio and in the car, but it’s the mixing engineer’s job to make sure that all the instruments can be heard in most situations.
Compare your mix with the commercial mixes you like. Build a small library of good-sounding mixes in the same genre of music as the songs you are mixing. You can open a new Logic project, and place your mix on one track and a professional mix on another track so that you can solo them and compare them one after the other.