Time | This lesson takes approximately 120 minutes to complete. |
Goals | Browse, preview, and use loops |
Edit regions and create an arrangement | |
Navigate and zoom in the Arrange area | |
Use effect and software instrument plug-ins | |
Mix down and export to MP3 |
Let’s get into the heart of the matter and start producing music immediately. In this lesson, you will go straight to the fun part of creating music with Logic 9—producing a grooving trip-hop song using loops—while gaining a global understanding of how you interact with the application and its library of loops, instruments, and effect plug-ins.
You will take an entire Logic project from start to finish. You will open an empty Logic template and build the song from scratch, using the Loop Browser to preview and add loops. Then you’ll edit regions to build an arrangement, add effect plug-ins, mix, and export your song.
You can open Logic by double-clicking the Logic icon in the application folder, doubleclicking a Logic project file, or clicking the Logic icon in your Dock. To get started, you will add Logic to the Dock, making it easy to access. You will then open it and open an existing song file.
In the Finder, choose Go > Applications (or press Shift-Command-A).

The Applications folder opens in a Finder window.
Drag the Logic application icon to your Dock.
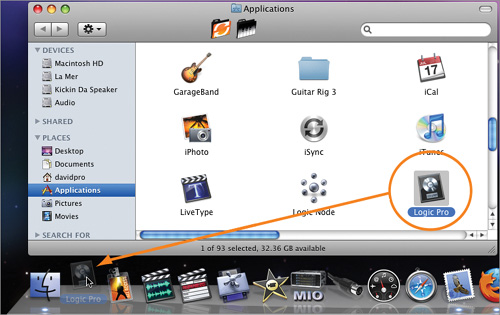
In your Dock, click the Logic icon.
Logic starts, you may see a Registration dialog, and after a moment the Templates dialog opens.
Note
If you’ve already used Logic, the last project you worked on automatically opens when you open Logic. In the main menu bar, choose File > Close Project to close that project, and then choose File > New to open the Templates dialog.
The left column displays several folders containing collections of templates. The first three collections—Explore, Compose, and Produce—contain factory templates installed with Logic.
The Empty Project template is available in all the collections, and it is the one you are going to use for this exercise.
Click Empty Project.

An empty template opens, and the New Tracks dialog comes down from the Arrange window’s title bar. A Logic project always needs to have at least one track. For this exercise, the first track you will need is a software instrument track.
Keep Number set to 1, select Software Instrument, and make sure Open Library is selected.

Click Create.
A software instrument track is created, and the Media area opens on the right of the Arrange window, displaying the software instrument Library.

Until you manually save the project to a hard disk, it lives only in the computer’s RAM, making it vulnerable to a power failure, a computer freeze or crash, or even a loss of notebook battery power. It is extremely important to regularly save your project as you progress.
Choose File > Save (or press Command-S).
Since this is the first time you’re saving your project, a Save dialog opens. Anytime you save a file on a computer, you have to provide the following:
A filename
A location on the hard disk where you want to save the file
In the Save As field, type your project name, My New Day. From the Where pop-up menu, choose Desktop (or press Command-D).
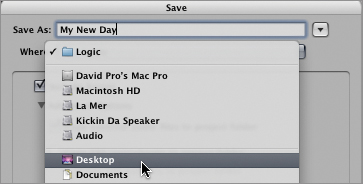
Click Save (or press Return).
Note
If your keyboard has a numeric keypad, you can choose to press Enter instead of Return to confirm a dialog or after entering a value in a parameter field.
Note that the new project name is now on the Arrange window’s title bar.
By opening an empty template, creating a software instrument track, and saving the project, you’re already on your way with your Logic project.
When you open an empty template, Logic opens the Arrange window, which will be your main work area. In the next section, you will examine the Arrange window and its working areas.
As you work in Logic, you will spend most of your time in the Arrange window. The Arrange window has six areas. Aside from the main Arrange area, each area can be opened and closed, giving you quick access to most of the features you need.
Let’s now open the Editing area.
Click the Mixer button at the bottom of the Arrange window.

The Mixer is displayed in the Editing area, below the Arrange area.
Note
To resize the Editing Area, position the pointer between the Arrange area and the Editing area, and drag the Resize pointer up or down.

Examine the areas of the Logic interface.
The areas of the Arrange window are as follows:
Arrange area
Editing area
Toolbar
Transport bar
Inspector
Media, Lists, or Notes area
Notice that one of the areas has a white frame around it. The white focus frame identifies the area that has key focus. When the same key command can be used in different areas, the area that has key focus responds. You can click the title bar or background of an area to give it key focus.
Tip
You can also press Tab and Shift-Tab to cycle the key focus forward and backward through the Arrange window areas.
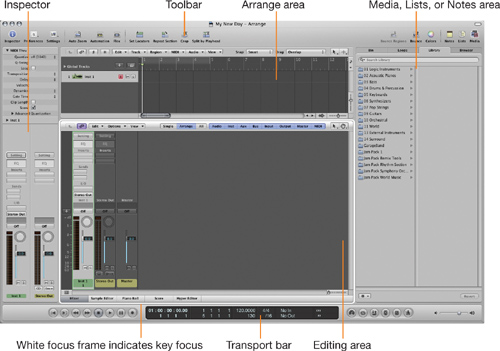
Arrange Area The Arrange area is where you build a song by arranging audio and MIDI regions on the tracks located below the Bar ruler.
Editing Area The editing area can display the Mixer or various editors that let you edit the contents of MIDI or audio regions.
Toolbar The customizable Toolbar provides quick one-button access to the features and settings you use the most.
Transport Bar The customizable Transport bar displays transport buttons (Play, Record, Forward, Rewind, and others), information displays (indicating the playhead position, tempo, time signature, and so on), and mode buttons (such as Cycle Mode and Metronome).
Inspector The Inspector includes a contextual set of parameters. Its contents automatically update depending on the area in key focus, the selected region, and the selected track.
Media, Lists, or Notes Area The Media, Lists, or Notes area displays media files (such as audio files and plug-in settings), lists of events (such as MIDI events and tempo changes), Project notes, or Track notes.
Click the Mixer button to close the Mixer.
In a moment, you’ll learn more about navigating a project in the Logic interface, but you first need to fill out your project a bit. Using loops can be a great way to start. For the songwriter, loops can quickly provide inspiring rhythmic support, allowing you to focus on the chords and the melody. For the producer, they are a large resource of musical bits that can be layered with your tracks to add texture and interest.
The Apple Loops provided with Logic include professional recordings of top-shelf musicians along with software instrument settings designed by major sound designers. Since they are royalty free, you can use them for professional projects at no charge. In fact, as you become more familiar with Logic’s collection of Apple Loops, don’t be surprised if you start recognizing some of them in major movies or in platinum-selling hit songs!
Logic Express
If you haven’t installed the Apple Loops from this book’s DVD, be sure to install them before going further by following the steps in “Getting Started.”
To start building a song, you need to preview loops and decide which ones to use. The Loop Browser is the perfect tool for the job. It allows you to browse loops by instrument, genre, mood, and other attributes.
At the top of the Media area, click the Loops tab.
The Loop Browser opens.
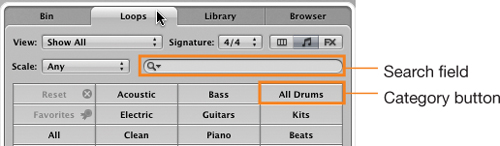
In the search field, enter Trip Hop, and press Return.
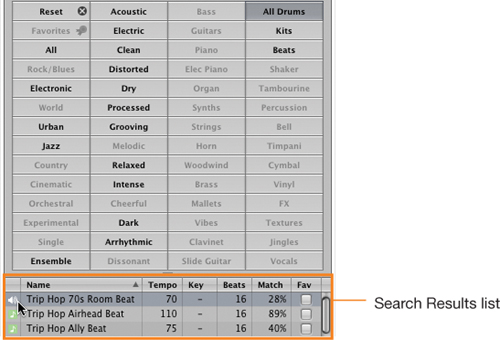
The bottom part of the Loop Browser displays the Search Results list: all the drum loops that contain the text Trip Hop in their names. The first loop at the top of the Search Results list should be named Trip Hop 70s Room Beat.
In the Search Results list, click the first loop.
The loop’s note icon turns into a speaker, and you can hear the loop. The loop automatically plays at your project’s tempo. Logic’s default tempo for a new project is 120 bpm (beats per minute), which is way too fast for trip-hop! That explains why that loop’s groove doesn’t sound quite right. Now is a good time to adjust your song’s tempo.
You can adjust any setting in the Transport bar display fields by dragging numbers up and down, or by double-clicking a value and entering a new one.
While the loop is playing, look at the Tempo display in the Transport bar. The default tempo is 120 bpm. Drag down the tempo and listen as your loop gets slower.
Drag the tempo digits to set your tempo to 70.0000 (bpm). Now it sounds like trip-hop!

Tip
The tempo adjusts by whole increments of the digit you drag. Drag one of the digits on the right of the decimal point when you need more precision.
Now you can try directly entering a new tempo.
Double-click the Tempo display.
A text field appears.
In the text field, enter 73, and press Return.

The tempo is set to 73 bpm.
In the Loop Browser, click the next loop (or press the Down Arrow).
The Loop Browser starts playing the next loop. You can press the Up Arrow and Down Arrow keys to listen to more loops until you find something you like.
Click the currently playing loop.
The loop stops playing. Since you’re about to drag loops into the Arrange area to build a song, you can close the Mixer to increase your workspace.
At the bottom of the Mixer, click the Mixer button.
The Mixer closes.
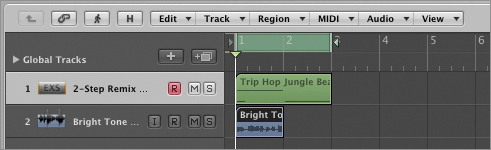
In the Loop Browser, use the scroll bar to scroll down through the alphabetical list of loops and click Trip Hop Jungle Beat 01.
That’s a nice one! Let’s use it for the song.
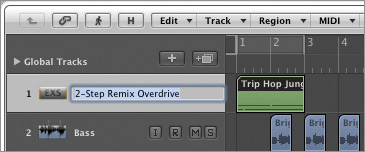
Drag the loop onto the Inst 1 track in the Arrange area, between the bar 1 and bar 2 grid lines.
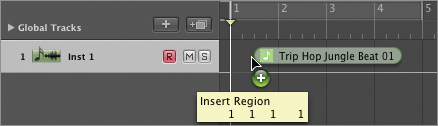
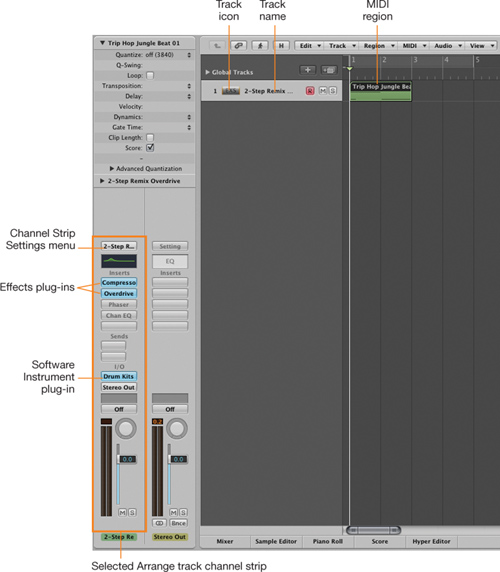
The Inspector (the left area of the Arrange window) displays two channel strips: the selected Arrange track channel strip on the left and the output channel strip on the right. Logic automatically loads the necessary channel strip setting (the entire configuration of software instrument and effect plug-ins and their settings) to the selected Arrange track channel strip and places the MIDI region containing the drum pattern on the track. The region snaps to the beginning of bar 1.
An abbreviation of the channel strip setting name (2-Step Remix Overdrive) is displayed in the Channel Strip Settings menu. The track header displays the track icon and track name.
More Info
In the Loop Browser, some loops have a blue waveform icon, while others have a green note icon. Blue loops are audio loops only: They can be used only as audio regions on audio tracks. Green loops are audio loops that also contain the MIDI region and the channel strip settings used to produce them. They can be used as audio regions on audio tracks (like blue loops) or as MIDI regions on software instrument tracks. For more information, see Lesson 7, “Manipulating Tempo and Time Stretching.”
Now you have a drum groove that will be the foundation of your song. Later, you will select more loops that match the feel and style of those drums, so you can keep building the arrangement. Now, let’s learn how to find your way around your project.
One of the big advantages to producing music with a computer is that the whole song is laid out right before your eyes. This makes it extremely easy to jump to a certain part of the song, start playback, go back to the beginning, or continuously repeat a section.
Logic offers many ways to navigate a song. In the next two exercises, you will learn the Transport buttons and their keyboard commands; and you will learn how to continuously repeat a section of the project, which will allow you to keep the drum loop playing as you preview more loops.
When producing music, time is of the essence. Many tasks are repetitive, and you will find yourself playing, stopping, and positioning the playhead every few seconds. Minimizing the time it takes you to perform those basic operations will greatly improve your workflow and save valuable time.
While it may seem easier at first to click buttons with the mouse, using key command shortcuts can really speed up your workflow. Try to memorize at least the basic set of key commands corresponding to the transport buttons in the Transport bar.
Note
The key commands used throughout this book are from the U.S. preset. Before you proceed any further, make sure you are using the U.S. preset. Choose Logic Pro > Preferences > Key commands, and in the Key Command window, choose Options > Preset > U.S.
Let’s tour the Transport buttons on the left of the Transport bar and learn the basic navigation key commands.
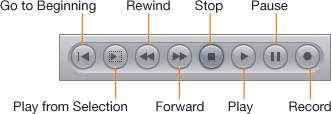
Play or Stop | Spacebar |
Rewind | < |
Forward | > |
Fast Rewind | Shift-< |
Fast Forward | Shift-> |
Go to Beginning or Stop | Return |
Play from Selection | Shift-Enter |
Record | R |
Note
If your keyboard does not have an Enter key, you can press the function key (fn) and the Return key at the same time. So, to use the “Play from Selection” key command, press Shift-fn-Return
Click the Play button.

The project starts playing, and you can hear the drum loop.
Click the Stop button.

The project stops. Before using Key Commands in the Arrange area, you have to make sure the Arrange area has key focus.
Click the background of the Arrange area to give it key focus.
The playhead returns to the beginning of the project.
Press the Spacebar.
The project starts playing.
Press the Spacebar again.
The project stops playing.
Click the background of the Arrange area.
The Trip Hop Jungle Beat region is deselected. Clicking in the background of the Arrange area deselects all regions.

Click the Trip Hop Jungle Beat region.

The name of the region is highlighted, displayed in white letters over a black background, indicating that the region is selected. Notice the difference between the way Logic displays the region name when it is deselected and when it is selected.
Click the “Play from Selection” button (or press Shift-Enter).
The playhead jumps to the beginning of the selection (the Trip Hop Jungle Beat 01 region) and playback starts.
Click the Forward button a few times (or press >, the right angle bracket).
As the project continues to play, the playhead jumps to the next bar each time you click the Forward button or each time you press >.
Press the Spacebar.
The project stops playing.
Click the Rewind button a few times (or press <, the left angle bracket).
The playhead jumps to the previous bar each time you click the Rewind button or each time you press <.
You may often need to focus on a section of the arrangement and work on the section while it repeats over and over. In this exercise, you will turn on Cycle mode while adjusting the cycle area to match the drums region, and continuously repeat that section as you preview and add more loops.
In the Bar ruler at the top of the Arrange area, you can see a rectangle in a lighter shade of gray, spanning bars 1 through 4. That rectangle indicates the positions of the left and right locators, which are the boundaries of the cycle area when the Cycle mode is on. The cycle area allows you to select a part of the song you want to continuously repeat.
Select the Trip Hop Jungle Beat 01 region if it is not already selected.
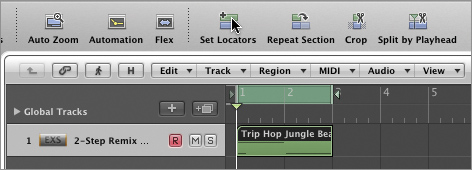
In the Toolbar, click the Set Locators button.
The cycle area turns green, indicating that Cycle mode is on, and it matches the position and length of the selected region.
Press the Spacebar to start playback.
Logic starts cycling over the first two bars, allowing you to hear your drums loop as you preview other loops.
While Logic is cycling through the drumbeat, at the upper left of the Loop Browser, click the Reset button.
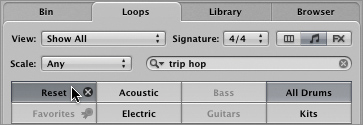
The music-category buttons and search field are reset, and the Search Results list at the bottom is emptied.
Click the Bass button, enter Bright Tone Bass in the search field, and press Return.
Click the first loop in the Search Results list.
You can hear the bass loop while the drums loop is playing. The bass loop plays in time with the drums, at the project’s tempo. You can press the Down Arrow to hear the other loops.
If necessary, adjust the volume of the loop you are previewing by dragging the volume slider at the bottom of the Loop Browser.

Drag Bright Tone Bass 03 below the drums track, in bar 1.
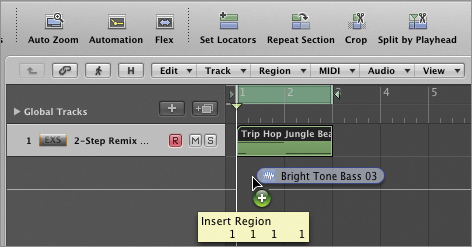
Logic automatically creates a new audio track, and the blue loop appears as an audio region.
Press Command-S to save your project.
To continue the song, use the Loop Browser buttons and search field to find the following loops, and drag each one below the last track in the Arrange area, in bar 1. Remember to click the Reset button before each new search.
Deep Electric Piano 05 (click the Elec Piano button).
Orchestra Strings 03 (click both the Orchestral and Strings buttons).
Wild Slide Distortion (enter Wild in the search field).
Click the background of the Arrange area to give it key focus.
Press Return to stop playback, and press Return again to go to the beginning.
In the Bar ruler, click the Cycle area to turn off Cycle mode.
Your Arrange area now has five tracks: drums, bass, piano, strings, and guitar.
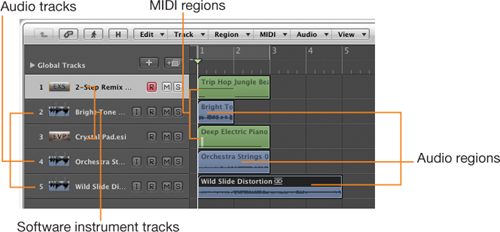
The green regions (drums and piano) are MIDI regions on software instrument tracks, and the blue regions (bass, strings, and guitar) are audio regions on audio tracks.
Now that you have chosen the Apple Loops you will use, you are ready to start building the song.
In Logic, you build projects by arranging regions on tracks, positioned below the Bar ruler. You need to determine where a region starts, how many times it is looped, and where it stops. When editing regions in the Arrange area, the same techniques apply to both MIDI and audio regions.
Before you start building the arrangement, let’s make sure you understand two fundamental concepts: saving the project at regular intervals, and being able to undo the most recent actions.
Accidents do happen. While some of these will turn out to be happy events and improve your composition, at other times they turn out to be outright mistakes. It is therefore a good idea to save your song after every couple of steps. Remember that the key command to save your file is Command-S. Press it often!
On the other hand, don’t be afraid to experiment and to make mistakes. It is easy to undo your last action by choosing Edit > Undo Action (or pressing Command-Z). You can press that key command several times to retrace the steps you most recently performed. By default, Logic can undo the previous 30 steps.
Command-S (Save) and Command-Z (Undo) will quickly become your two new best friends, so commit them to memory now!
The first step in building your arrangement is to decide where each instrument should enter. By introducing instruments one after the other, you constantly give something new to the listeners, which keeps them excited and eager to discover what’s next.
From the Arrange area local menu bar, choose Edit > Select All (or press Command-A).
All five regions are selected and their names appear in white over black.
In the Inspector’s Region Parameter box, click to select the Loop checkbox (or press L).
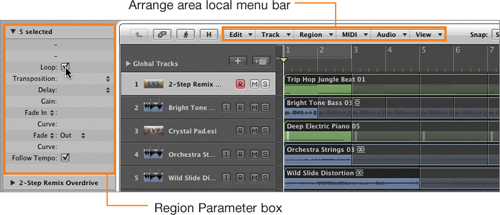
All selected regions are looped until the end of the song. The dimmed sections to the right of each region represent the region looping over and over.
Click in the background of the Arrange area (or press Command-Shift-A).
All regions are deselected.
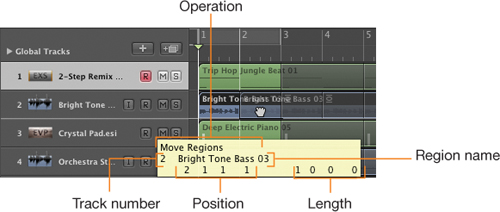
Drag the Bright Tone Bass 03 loop toward the right and drop it on bar 2.
As you perform an operation on a region, a yellow help tag displays the following information:
The operation you are about to perform (in the current step, it is Move Regions)
The number of the track where you are (2 in the current step)
The name of the region you are clicking (Bright Tone Bass 03)
The position of the operation (1 1 1 1 before you drag, 2 1 1 1 after you drag)
The length of the region (1 0 0 0)
The help tag displays positions and lengths in bars (or measures), beats, divisions, and ticks. You will often refer to a position or a length with those four numbers.
The beat is the denominator in the time signature (1/4 note here).
The division is set in the Transport bar, below the time signature (1/16 note here).
A clock tick is 1/960 of a beat. A 1/16 note contains 240 ticks.
So in this case, moving the Bright Tone Bass 03 region to 2 1 1 1 means moving it to bar 2, beat 1, division 1, tick 1: exactly on bar 2.

At the left of the Transport bar, the current playhead position is displayed in SMPTE units on the top line, and bars, beats, divisions, and ticks on the bottom line.
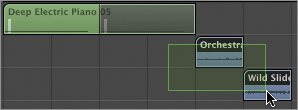
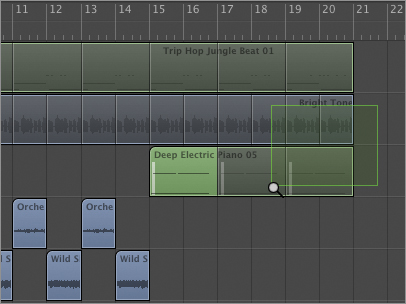
Drag the piano loop (Deep Electric Piano 05) to bar 5.
Drag the strings loop (Orchestra Strings 03) to bar 9.
Drag the guitar loop (Wild Slide Distortion) to bar 10.
You already have the foundation of a simple arrangement, starting with drum and bass patterns that groove together, and you’ve built on it by layering other elements such as piano and strings as the song progresses.

Your next step is to decide where to eliminate some of the instruments and allow the arrangement to breathe a little.
Let’s edit the bass track to make the intro lighter in texture, letting the full bass loop kick in at bar 5 with the electric piano.
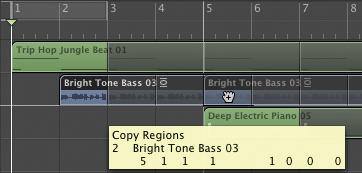
Option-drag the Bright Tone Bass region to bar 5.
Dragging a region moves it, but Option-dragging makes a copy and lets you place the copy. Now you can manipulate the bass region in the intro; but starting on bar 5, the full loop will play repeatedly. Notice that while you Option-drag a region, the help tag now reads Copy Regions.
Tip
In Logic, when you use modifier keys such as Shift, Control, Command, or Option while dragging, it is most important which key is depressed at the time you release the mouse button. In fact, you can switch modifier keys while dragging, and the help tag will reflect the change, displaying the appropriate operation. To successfully copy a region by Option-dragging it, make sure you release the mouse button before you release the Option key.
In bar 2, select the Bright Tone Bass region.
In the Inspector’s Region Parameter box, click to deselect the Loop checkbox (or press L).
The region’s Loop parameter is turned off, and the region does not loop anymore.
You are about to shorten the bass region, but first you will zoom in on it so that you can see individual bass notes in the waveform.
Press Z (the “Toggle Zoom to fit Selection or All Content” command).
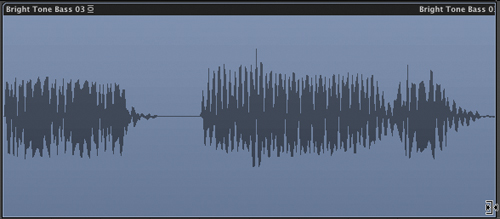
The selected region fills the Arrange area, and you can clearly identify individual notes in the waveform.

Click the “Play from Selection” button in the Transport bar (or press Shift-Enter).
Listen to your bass pattern while looking at the waveform. You are going to shorten the bass region to remove the last three notes.
Press the Spacebar to stop playback.
Position your pointer over the lower-right corner of the region.
The pointer turns into a Resize tool.

You can use the Resize tool to adjust the start or end of a region.
While looking at the waveform, drag the corner of the region to the left, shortening the region to hide the last three notes.
Don’t use the help tag for this operation. Look at the waveform and make sure you hide the last three notes. You will now zoom out. When no regions are selected, the “Toggle Zoom to fit Selection or All Content” key command zooms to fit all the regions in the Arrange area.
Click the background of the Arrange area to deselect all regions, and press Z.
You can see all your regions in the Arrange area.
You now have a nice short bass pattern in measure 2 that is perfect for the introduction.
Choose File > Save (or press Command-S).
The project is saved.
You need to repeat the same bass pattern twice in bars 3 and 4, before the full bass loop kicks in at bar 5.
Click the Bright Tone Bass region in bar 2 to select it.
In the Arrange area’s local menu bar, choose Region > Repeat Regions (or press Command-R).

The Repeat Regions/Events dialog opens, allowing you to create copies of the region and snap them to the desired grid unit.
In the Number of Copies text field, enter 2. From the Adjustment menu, choose Bar, and click OK.

The shortened bass region is copied twice on the downbeats of bars 3 and 4.

Press Command-S.
Go the beginning of the song and listen to your new introduction.
You now have a nice little introduction. The song starts with the drums groove; then a shortened version of the bass riff is introduced and played three times. On bar 5, the whole bass line starts just as the electric piano joins in.
Before you move on to arrange the strings and slide guitar parts, you will adjust the number of repetitions of the electric piano so that it stops on bar 9, leaving some space in the mix for the next section.
Position your pointer over the upper part of the piano loops (the dimmed parts to the right of the region).
The pointer switches to a loop tool. You can use the tool to precisely adjust the point where a region stops looping.
Hold down the Loop tool at bar 9.

The help tag reads Loop 9 1 1 1 (2), meaning that the region is looped until the first downbeat of bar 9, and the loop plays twice.
Tip
Once you become more proficient with Logic, you can use the Loop tool by clicking where you want to cut off the loop without holding down the mouse button. For now, holding down the mouse button displays the help tag, which allows you to make sure the loop will stop exactly where you want. If the help tag doesn’t read 9 1 1 1 (2), you can drag the mouse left or right until it does, then release the mouse button to perform the cut.
The song file is saved.
The song is starting to take shape! It has a nice sparse intro, then a fuller grooving section with the electric piano. Let’s work on the strings and slide guitar section.
One modern production trick is to re-create a music phrase composed of pieces of phrases from different instruments. It is the modern equivalent of the classic call-and-response dialogue that blues singers and guitarists perform when jamming: The singer sings a short phrase, and then the guitarist answers it with a short lick.
In this song, you are going to perform that trick using the strings for the call and the slide guitar for the response.
Select the Orchestra Strings region.
Press L.
That region’s Loop parameter is turned off, and the region does not loop anymore.
Position the pointer on the lower-right corner of the strings region until the Resize tool appears. Drag to the left to halve the size of the region.

The help tag indicates that the resized region is one bar long.
Select the Wild Slide Distortion region.
That region’s Loop parameter is turned off, and the region does not loop anymore.
Drag the region’s lower-right corner to bar 11.
The resized region is one bar long.

You have re-created a two-bar phrase composed of one bar of strings followed by one bar of slide guitar. The strings play a simple quarter-note motif. The slide guitar repeats and sustains the last note played by the strings, and then slides back into the first note of the strings motif. If you repeat that new phrase a few times, the slide guitar will take you right back into the strings motif.
You can use the same Repeat Regions command you used earlier to repeat a group of regions.
Click in the background and drag the pointer, making sure that the rectangular green highlight touches both the strings and the slide regions.
Both regions are selected.
Tip
When selecting regions, make sure you always start dragging in the background. If the pointer is over a region when you start dragging, you will move the region.
In the Arrange area’s local menu bar, choose Region > Repeat Regions (or press Command-R). Leave Number of Copies set to 2, set Adjustment to None, and click OK.
This time the whole selection, which contains two regions, is repeated twice.

Select the first Orchestra Strings region on bar 9.
Click the “Play from Selection” button (or press Shift-Enter).
Playback starts at the beginning of the selection, on bar 9, and you can listen to your new dialogue between the strings and the guitar.
Press the Spacebar to stop playback.
Now would be a good time to wrap up the song. You will bring back the electric piano, let it groove for a while, and create an ending for the song on bar 21. First, you will need to zoom out of the Arrange area to make space for the ending.
At the lower right of the Arrange area, drag the horizontal zoom slider to the left (or press Option-Control–Left Arrow).

The whole arrangement zooms out horizontally. Look at the Bar ruler, and try to display at least 23 bars in the Arrange area. Depending on your screen size, you might also want to zoom in vertically.
Drag the vertical zoom slider down (or press Option-Control–Down Arrow).
The whole arrangement zooms in vertically.
The zoom sliders are an easy means of zooming the whole arrangement. Once again, commit the Option-Control arrow key combinations to memory, and save your right arm a trip to the sliders every time you need to zoom. The commands are listed at the end of this lesson.
Option-drag the Deep Electric Piano region to bar 15, right after the end of the last Wild Slide Guitar region.
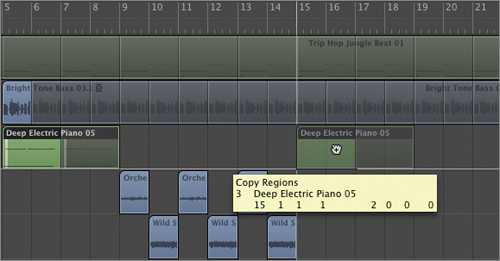
The region is copied along with its single loop. To create an ending for the song, you will stop all the still-looping regions at the same place. The last piano loop is still selected, so you will add the drum loop and bass loop to the selection by Shift-clicking them.
Shift-click the drum loop and the bass loop above the selected piano loop.
Shift-clicking allows you to select several regions at once when there is no easy way to drag a rectangle across them as you did earlier for the strings and guitar regions.
Position the pointer over the top part of one of the looping sections.
The pointer switches to the Loop tool.
Option-drag the Loop tool to bar 21.
All three regions stop looping on bar 21. When using the Loop tool on multiple regions, holding down Option makes all the looping sections stop at the same place.

In the lower half of the Bar ruler, double-click about a bar before the end.
The playback starts where you double-clicked. The song ending sounds a little abrupt: Usually musicians end a song by playing the last note on the downbeat of the last bar. Since the loops are cut off right on the downbeat, that last note is missing.
You can adjust the end of the bass and the piano loops so that they play one more note on the next downbeat.
Press the Spacebar to stop playback.
Click in the background of the Arrange area.
All the regions are deselected.
This time, you need to zoom in on the ending of the bass and the electric piano tracks to precisely adjust where both instruments will end.
Option-Control-drag around the last bar (bar 20) on both the bass and piano tracks.
The pointer switches to the Zoom tool, and the highlighted area is zoomed in.
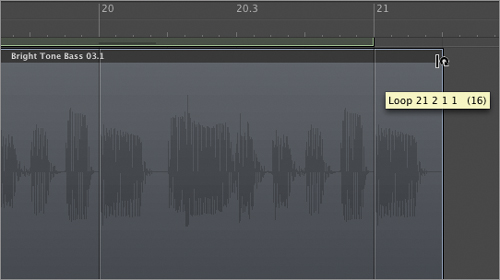
On the bass track, drag the Loop tool to the right to uncover one more note, until the help tag reads 21 2 1 1 (16).
You can see the final note in the waveform.
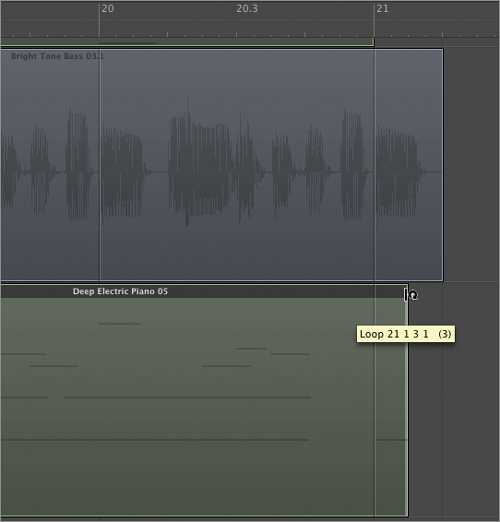
On the piano track, drag the Loop tool to the right to uncover the beginning of the first note in bar 21.
On MIDI regions, notes are displayed as horizontal lines. Here, the low note is in the lower part of the looped region. As long as the attack of a note is visible, Logic will sustain the note for its whole length.
Now you can zoom out to see your entire arrangement.
Option-Control-click anywhere in the Arrange area.
The arrange area returns to the previous zoom level, showing you your complete arrangement.
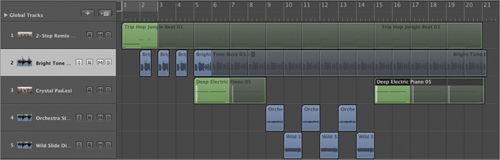
Listen to your arrangement.
You should now have a basic understanding of how to manipulate regions to create an arrangement in Logic. Your basic editing techniques are as follows:
Drag a region to move it.
Option-drag a region to copy it.
Place the pointer at one of the lower corners of a region to resize it.
Place the pointer at the upper-right corner of a region to loop it.
You also learned basic zooming techniques:
Option-Control-drag on an area to zoom in on that area, and Option-Control-click anywhere to return to the previous zoom level.
Press Option-Control–Right Arrow to zoom in horizontally, Option-Control–Left Arrow to zoom out horizontally.
Press Option-Control–Down Arrow to zoom in vertically, Option-Control–Up Arrow to zoom out vertically.
Press Z to zoom in on the selection, and press Z again to return to the previous zoom level, or deselect all regions and press Z to see your entire arrangement.
Feel free to experiment on your own, and be creative! Try adding sections, or creating breaks in some parts. Use short breaks in the drums or bass tracks to trigger attention. They remove the foundation that listeners take for granted. You wake them up, then bring them back into the full groove.
As an additional exercise, try to stop the bass from looping just before the last section (on 14 2 1 1), and have it return for the end (on 15 1 1 1).
Once you have arranged the song, the next step is to mix the song before you can export it as a stereo file. Mixing is the art of blending the instruments, carefully balancing their volume and frequency spectrum, and giving them a place in the stereo sound field.
As you finish the project, you use the Mixer to adjust the level of each track and its stereo position, and add processing plug-ins to sculpt the sounds. In the following exercises, you will mix the middle section: the exchanges between the strings and guitar.
When mixing, you can use Cycle mode to repeat a section of the song, so you don’t have to worry about navigating the song while you focus on making that section sound better as you work in the Mixer.
In this exercise, you will open the Mixer, rename the channel strips, and adjust the cycle area to match the middle section of the song.
At the bottom of the Arrange window, click the Mixer button (or press X).
The Mixer opens.
Note
Depending on your screen size, you may need to resize the Mixer area so that you can still see your tracks in the Arrange area. You may also have to scroll the Mixer area vertically to see the entire channel strips.

The Mixer shows you the channel strips that correspond to the tracks in the Arrange area. All those channel strips are mixed onto the Stereo Out channel strip. The Arrange area stacks tracks vertically, while the Mixer stacks channel strips horizontally, so the channel strips are displayed left to right in the same order in which they are displayed top to bottom in the Arrange area.
The names of the channel strips are not really descriptive. You can rename a channel strip by double-clicking the name at the bottom of the channel strip, or in the corresponding track’s header.
In track 1, double-click the drums track’s name.
A text field appears.
Type Drums, and press Tab.
The first channel strip in the mixer displays the new name, Drums, and the text field moves to the next track.
Set the remaining track names:
Track 2 to Bass
Track 3 to Piano
Track 4 to Strings
Track 5 to Guitar
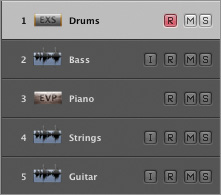
In the Mixer, all the channel strips display the new names.

Now let’s adjust the cycle area to the middle section of the song.
Select all six Orchestra Strings and Wild Slide Distortion regions.
In the Toolbar, click Set Locators.
The Cycle mode is turned on, and the cycle area adjusts to fit the selection.

From now on, when you use the Spacebar to toggle between play and stop, playback will always start at the beginning of the first strings region at bar 9.
Each channel strip has a level meter, a peak detector on top of the meter, a volume fader to adjust the level, and a Pan/Balance control to adjust the stereo position. Below the volume fader, a Mute button allows you to silence that channel strip, and a Solo button allows you to listen to that channel strip by itself.

Tip
In Logic, selecting something in one area or window usually results in the same element being selected in other Logic areas or windows. For example, selecting a track in the Arrange area results in the selection of that track’s channel strip in the Mixer, and vice versa.
Play the song.

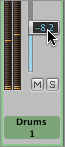
The peak detector at the top of the Stereo Out channel strip is hitting the red. That’s not good! Notice that it reads 3.0. That means Logic’s output is overloading by 3 dB. You will turn down some of the instruments to avoid overloading the mix.
In the Drums channel strip, drag the level fader down –8.2 (dB).
On the Stereo Out channel strip, click the peak detector.
The peak detector is reset and starts tracking the new peak level. It no longer hits the red. Good.
On both the Drums and the Bass channel strips, click the Solo buttons.

The Solo buttons turn yellow, and you can hear only the Drums and the Bass tracks. This makes it easy to balance the level of the bass against the drums without the distraction of other instruments that are not yet mixed. Now that you’ve turned down the drums, you can hear that the bass needs a little taming.
In the Bass channel strip, lower the level fader to –2.7 (dB).
Option-click one of the yellow (engaged) Solo buttons.
Both Solo buttons turn off simultaneously.
In trip-hop, you want to keep the drums and bass “in your face.” The only way to achieve that balance without overloading the mix is to turn down all the other instruments. If you feel your mix starts to sound weak, don’t be fooled: Simply turn up the volume on your audio interface or monitoring system.
In the Strings channel strip, lower the level fader to –9.2 (dB).
In the Guitar channel strip, lower the level fader to –20.0 (dB).
Press the Spacebar to stop playback.
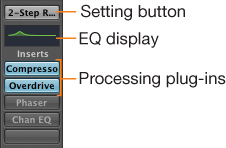
At the top of each channel strip, a Setting button gives you access to thousands of factory channel strip settings for both software instrument and audio tracks. Again, a channel strip setting is a collection of all the plug-ins on a channel strip, along with their individual settings.
Below the Setting button are the EQ display and the Insert slots for processing plug-ins.
Another technique to keep the drums and bass sounding big is to make the other instruments sound thinner. First you will try a few channel strip settings to change the sound of the guitar.
At the top of the Guitar channel strip, click the Setting button to open the Channel Strip Settings menu, and choose 02 Electric Guitar > 01 Guitar Tone Sampler > Surf.
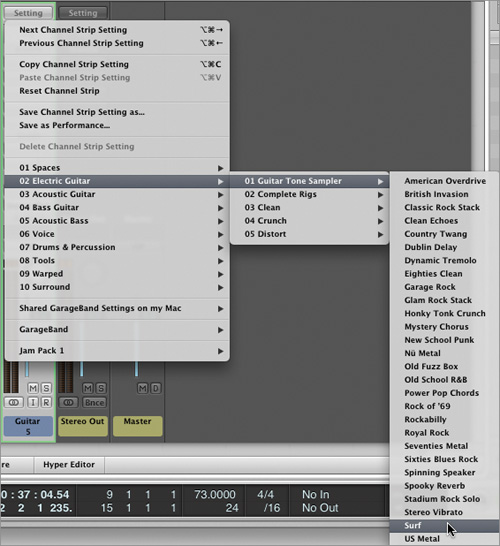
The channel strip setting loads, inserting an Amp Designer, Channel EQ and Compressor plug-in, and their settings to give that particular surf sound. The Setting button now displays this channel strip setting’s name, Surf.
Press the Spacebar.
Playback starts at the beginning of the cycle area, and you can hear the effect of the chosen channel strip setting on the guitar.
Click the Setting button for a moment to open the Channel Strip Settings menu again, and choose Next Channel Strip Setting.
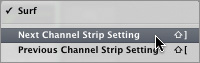
The next channel strip setting loads, and the Setting button displays its abbreviated name, US Metal. That setting doesn’t seem to work as well for that song, but feel free to experiment with other settings until you find one you like. For this exercise, we’ll go back to the Surf setting.
Click the Setting button again and choose Previous Channel Strip Setting.
The Surf setting is reloaded.
Press the Spacebar to stop playback.
Remember that your initial goal is to get the strings and the guitar to have a conversation. You will realize this concept by panning them to either side of the stereo field while making them sound a little more alike, placing them in the same range of frequencies. In the Surf channel strip setting, the Amp Designer plug-in is mainly responsible for the resulting sound, so you will copy that plug-in and its settings on the Strings channel strip.
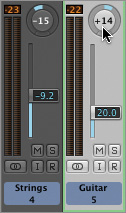
In the Strings channel strip, drag the Balance control down to –15.
Even though the Balance control is a rotary knob, you adjust it like any other setting in Logic: drag the Balance control vertically, starting dragging in the middle of the control knob.

The strings move to the left.
Drag the Guitar channel strip’s Balance control up to +14.
The guitar moves to the right.
Now let’s copy the Amp Designer plug-in from the Guitar channel strip to the Strings channel strip.
Command-Option-drag the Amp Designer plug-in to a Strings channel strip Insert slot on the left.

A copy of the plug-in, with identical settings, is inserted on the Strings channel strip.
The Strings are now slightly too loud.
In the Strings channel strip, lower the fader to –19 (dB).
Now let’s listen to a section with the electric piano to adjust its level.
In the Arrange area, select the Deep Electric Piano region at bar 5 and click the “Play from Selection” button (or press Shift-Enter).
Logic starts playing the song from the selection, even though you have Cycle mode turned on.
In the Piano channel strip, lower the fader to –5.3 (dB).
Click the Mixer button again to close the Mixer, click the Cycle area to turn off Cycle mode, and listen to your song.
The song is finished! You started from nothing and used the Loop Browser to select five loops; created an arrangement by moving, looping, and editing regions; and mixed the five instruments. You can now export the mix and share it with your friends and family.
When you are finally happy with the way your song sounds, it’s time to export it. In this exercise, you will export an MP3 file. The process of rendering the mix into a single stereo file that you can burn onto a CD or use in other applications is called bouncing.
First, you must adjust the project length to define the bounce range. At the top of the Arrange area, look at the Bar ruler. The last region in your song is the bass, and it stops a little after bar 21. If you listen to the song’s end, you’ll notice that the last piano note sustains for a while, so you will end the song on bar 24 to avoid cutting off the last note.
In the Transport bar, below the Tempo display, drag the Project End display down to set the project length to 24 bars.

Let’s make sure the song plays until the end.
Double-click the lower half of the Bar ruler around bar 20 to play the end of the song.
The last electric piano note is not cut off.
The bounce range can also be defined by the cycle area, or by selecting regions. To bounce the entire song, make sure that Cycle mode is turned off and no regions are selected.
Click the background of the Arrange area.
All the regions are deselected.
Choose File > Bounce (or press Command-B).
You are going to bounce the project as an audio file, so the Bounce window looks like a Save As dialog with name, location, and bounce options at the bottom.
Make sure the Start and End positions correspond to your entire song. Start should read 1 1 1 1 and End should read 24 1 1 1. If they don’t, you can adjust them now by dragging the digits vertically.

Name the bounce file New Day; and from the Where pop-up menu, choose Desktop (or press Command-D).
You can choose from four different destinations for your bounce file:
PCM: uncompressed audio file (AIFF, WAVE, CAF, and Sound Designer II)
MP3: compressed audio file
M4A: compressed audio file format used by iTunes and iPod
Burn: a file burned directly from Logic onto a CD or DVD-A
Click Bounce.
A progress indicator appears, tracking Logic as it bounces the mix. A second progress bar tracks Logic as it converts the mix to an MP3 file.
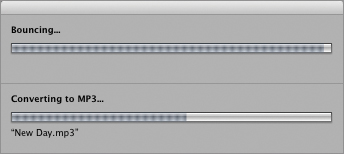
Once the Progress windows disappear, the file is ready.
On your desktop, double-click the file New Day.mp3.
Tip
You can use Mac OS X key commands to help complete this last step. Press Command-Tab to switch to the Finder, and then press Command-Option-H to hide other applications so that you can see your desktop. Type the first few letters of your song or use arrow keys to select it, and press Command–Down Arrow to open it.
The file opens in iTunes (or in your default MP3 player), and you can listen to your very first Logic mix. Your MP3 file is ready to be shared in an e-mail or uploaded to a website!