
Lesson Files | Logic 9 Files > Lessons > 02 New Day |
Logic 9 Files > Lessons > 02 We Shared Everything | |
Logic 9 Files > Lessons > 02 We Shared Everything_end | |
Time | This lesson takes approximately 60 minutes to complete. |
Goals | Choose digital audio settings |
Record single and multitrack audio | |
Record additional takes | |
Record in Cycle mode | |
Punch record both on the fly and automatically | |
Adjust count-in, metronome, and other settings |
To build a song, you need to come up with the raw material you will later arrange and mix. You might start with an idea you have in your head, a part you rehearsed on an instrument, or a prerecorded sample or loop, or you can start experimenting until inspiration strikes. To sustain and develop that initial inspiration, you need to master the various techniques that Logic offers to record, create, or edit the audio and MIDI regions that constitute the building blocks for your project.
In addition to providing resources such as software instruments and Apple Loops, Logic Pro is a powerful digital audio workstation, offering you a complete set of tools to assist you in the most demanding recording sessions.
In this lesson, you will set up Logic for audio recording and study some situations that you will typically encounter when recording live musicians: recording a single instrument, recording additional takes of the same instrument, cycle recording, multitrack recording, punching on the fly, and automatic punching.
When recording audio, Logic saves the digital data stream from the audio interface to an audio file on your hard disk. Assuming you have the correct settings, Logic does not exert any influence over the quality of your recordings. By choosing the right recording environment and using high-quality components in your signal chain, you ensure that the quality of your audio recordings will be the same as the quality produced by a professional studio.
In the following exercises, you will set up Logic to prepare for a music recording intended for use on an audio CD.
Note
Most audio interfaces include converters, and many include microphone preamps. Also, most modern Macintosh computers ship with a built-in audio interface. Many Mac notebooks and iMacs even have internal microphones. While they are not intended for professional-quality recording, internal microphones will allow you to perform the exercises in this lesson in the absence of an external microphone.
The sample rate of a project should be set before starting your first recording. All the audio files used in a project should be recorded and played at the same sample rate. Playing an audio file at the wrong sample rate will result in the wrong pitch and tempo, much like playing back an audiotape or vinyl record at the wrong speed.
Note
Make sure you read the section “Installing the Logic Lesson Files” in “Getting Started” before you continue.
Go to Logic 9 Files > Lessons, and open 02 New Day, or continue working in the project file you created in Lesson 1.
In the Toolbar, click the Settings button and choose Audio.
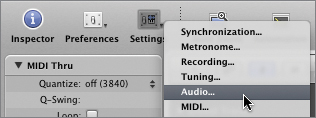
The Project Settings window opens.

By default, the sample rate is set to 44.100 kHz.
Data for an audio CD is encoded at a sample rate of 44.1 kHz (44,100 samples per second), and audio data for a standard video DVD is encoded at 48 kHz. While you can choose to work at other sample rates, using 44.1 kHz for music projects and 48 kHz for video projects avoids the need to convert the sample rate.
Since you are working with a music file for a CD, you’ll work at 44.100 kHz, the current setting.
Close the Project Settings window (or press Command-W).
While it is problematic to mix audio sample rates, Logic handles audio files of various bit depths in the same project without causing problems at playback.
Let’s set the bit depth and choose an audio interface.
In the Toolbar, click the Preferences button and choose Audio.

From the Output Device and Input Device menus, choose the desired audio interfaces.
The Output Device is the device connected to your monitors or headphones. The Input Device is the device into which you plug your microphones or instruments. You will often use the same device for both audio output and input.
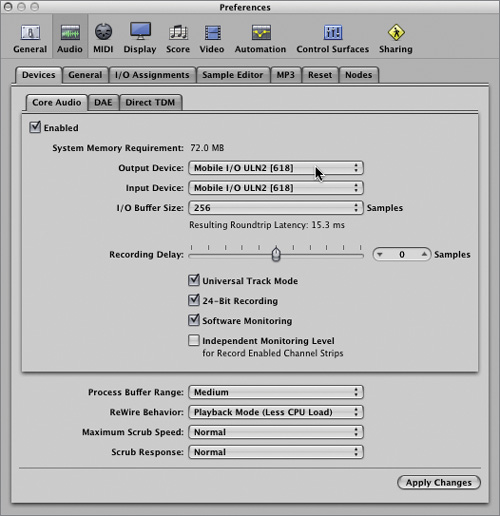
If you do not have an audio interface connected to your Mac, choose from the Built-in Output and Input devices.
When 24 Bit Recording is not selected, Logic records at 16-bit resolution. A 24-bit recording has a significantly greater dynamic range than a 16-bit recording. The extended dynamic range lets you record at lower levels without having to worry about digital noise, thereby decreasing the chances of clipping your recording.
Make sure 24-Bit Recording is selected.
Close the Preferences window (or press Command-W).
If you choose a new output or input device, Logic automatically reinitializes the Core Audio engine when you close the window.
In this example, you will record a single instrument. While the exercise describes recording an acoustic guitar, feel free to record any instrument you have, or your own voice if you do not have an instrument.
To record audio, you first have to create a new audio track, select the correct input (the input connected to your microphone), and enable that new track for recording.
Tip
To avoid feedback, turn off your speakers and monitor your recording using headphones. If you are working with a notebook computer’s microphone, plug in the headphones or turn off the speakers before you enable a track for recording.
When adding tracks, the new tracks are inserted below the selected track. To create a new track at the bottom of the Arrange area, you first need to select the bottom track.
At the bottom of the Arrange area, make sure the Guitar track is selected.
At the top of the track list, click the New Tracks button (+) at the top of the track list (or press Command-Option-N).
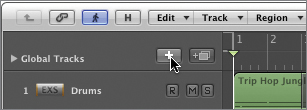
The New Tracks dialog appears.
Make sure Number is set to 1, Type is set to Audio, and Format is set to Mono.
From the Input menu, choose the desired input of your audio interface. If you are using your Macintosh’s built-in audio interface or your notebook’s microphone, leave the option at Input 1.
Select Record Enable.
Select Open Library.

This selection will open the Library tab in the Media area so that you can select a channel strip setting for your new audio track.
Click Create (or press Return).
A new record-enabled mono audio track is created, and in the Media area, the Library opens showing all available audio channel strip settings. Logic automatically assigns the new track to the next available channel. Since three audio tracks were created when you dragged blue Apple Loops in Lesson 1 (remember that the green Apple Loops are on software instrument tracks), the new track is assigned to the Audio 4 channel and is automatically named Audio 4. Let’s rename it.
You will record in an existing Logic project, and the audio files will automatically be placed in the audio folder inside that project folder.
Note
If the Logic project was not already saved, a Save As dialog appears when you record-enable an audio track or create a new record-enabled audio track. Always save the project before you record audio, and make sure that Include Assets is selected at the bottom of the Save As dialog. This ensures that all audio files used in that project will be placed in the audio folder inside the Logic project folder.

In the Audio 4 track header, double-click the name.
A text field appears with the current name selected.
Enter Acoustic, and press Return or click outside the text field.

Tip
Since Logic automatically assigns the name of a track to the audio files recorded on that track, it is a good idea to always name a track before recording on it. You will avoid populating your hard disk with files with nondescript names such as Audio 04#06, and more descriptive names will help you identify files later.
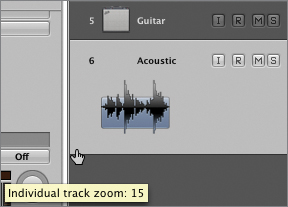
Before you start recording, you will expand the new track vertically to better see the waveform.
Position the Pointer tool near the lower-left corner of the track header.
The Pointer tool turns into the Finger tool.
Using the Finger tool, drag down to resize the new track.
Because your new audio track is record-enabled (the R button on the track header is red), the next recording will create an audio region on that track. You can monitor the audio routed to record-enabled tracks while Logic is stopped, playing, or recording.
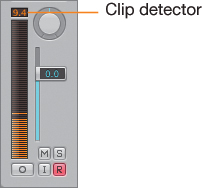
Before recording, make sure you can monitor the sound through Logic, and adjust the source audio level to avoid overloading the converters. On the channel strip, look at the clip detector, and make sure it never hits 0 dBFS (decibels full scale), which would indicate that you are clipping the input of your converter. Keep in mind that you need to adjust the audio level before the converter input, so use your microphone preamp gain knob. Allow for some headroom, especially if you know that the artist might play or sing louder during the actual recording. It’s better to work with a low-level recording than clipping the input.
More Info
If you are using the Macintosh built-in line input or microphone, you can adjust the input level in the Sound pane’s Input tab in System Preferences.
Let’s adjust the recording and monitoring levels, tune the guitar, and find a cool acoustic guitar sound.
Ask the musician to play the loudest part of the performance you are about to record, and adjust the level on the microphone preamp as you watch the clip detector on the channel strip. If the clip detector turns red, lower the gain on the preamp and click the clip detector to reset it. Make sure the maximum peak sits comfortably below 0 dBFS: The wider the dynamic range of the source, the more headroom it needs to limit the risk of clipping.
Note
You may hear a small delay between when you play a note and when you hear it. This delay is called latency. You will learn how to reduce latency at the end of this lesson, in the section “Setting the I/O Buffer Size.”
Press the Spacebar to start playback, and play along with the song. If the acoustic guitar is now too loud or too soft in comparison to the other tracks, adjust the monitoring level using the channel strip’s fader.
During recording, the channel strip’s volume fader adjusts the monitoring level, but it does not alter the recording level. After the recording, the fader stays at the same position to play back the track at the same level.
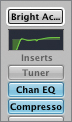
In the Library tab, choose 03 Acoustic Guitar > Bright Acoustic.

The Bright Acoustic channel strip setting opens. The channel strip displays the name of the setting, and Channel EQ and Compressor plug-ins are inserted. The guitar sounds a little brighter, fitting better into the mix. The settings even include a Tuner plug-in, so you can verify that your instrument is in tune before you start recording.
Press the Spacebar to stop playback.
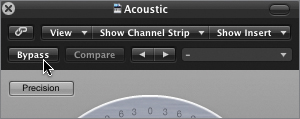
Double-click the Tuner plug-in in the first insert slot.
The Tuner plug-in opens. The Bypass button is orange, indicating that the plug-in is bypassed.
Click the Bypass button to turn off the bypass function.
The Bypass button turns black, indicating that the Tuner is now on.
Play the guitar’s individual strings one after another, making sure that the Tuner displays the correct note and the meter stays as close as possible to the center position (blue bar).

Bypass the Tuner.
Close the Tuner window.
You have set the desired sample rate and bit depth, adjusted the recording and monitoring levels, found a good-sounding channel strip setting, and tuned the instrument. You are now ready to start recording.
Let’s record a guitar part from bar 5 to bar 9.
In the Transport bar, click the Forward or Rewind button as needed—or press > (right angle bracket) or < (left angle bracket)—to position the playhead on bar 5.
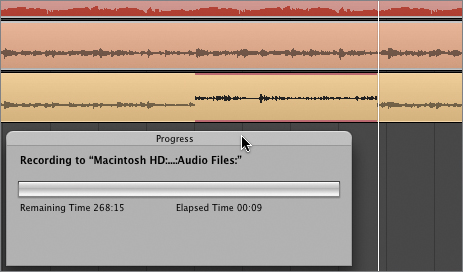
Click the Record button (or press R).
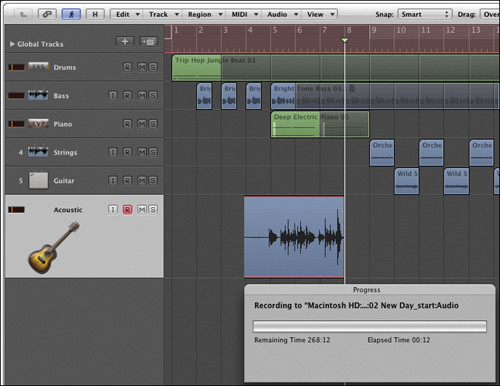
The playhead jumps one bar earlier and gives you a four-beat count-in with an audible metronome click before the recording starts. The Bar ruler turns red to indicate that Logic is recording. A progress window appears that shows the remaining recording time and the elapsed time. A new region with a red halo is created behind the play-head on the record-enabled track, and you can see the recording’s waveform drawn in as you play or sing.
After you’ve recorded a few bars, in the Transport bar, click the Stop button (or press the Spacebar).
Your new recording appears as an audio region on the Acoustic track. Note that this new region is selected, making it easy to play, or to delete if you’re not happy with it.
In the Transport bar, click the Play from Selection button (or press Shift-Enter).
The playhead jumps to the beginning of the recording and starts playing.

Stop playback.
Make sure the Arrange area has key focus, and press Delete on the main keyboard.
A Delete dialog appears. You can still click Cancel if you change your mind; but if you select Delete and click OK, the audio file will be permanently deleted from your hard disk. If you select Keep and click OK, the region is removed from the Arrange area, but the file remains on your hard disk.
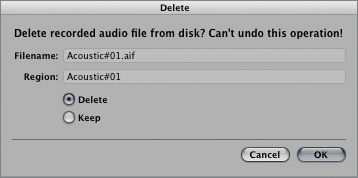
Click Cancel (or press Esc).
The new recording remains on the track.
When recording or importing audio files into a project, Logic uses the Audio Bin, located in the Media area, to track all the audio files and audio regions imported or recorded in the project. You can open the Audio Bin to make sure that files are recorded at the correct sample rates and bit depth settings and are properly named.
At the top of the Media area, click the Bin tab.
The Audio Bin opens, showing you the new Acoustic#01.aif file, as well as the three blue Apple Loops that you dragged into the Arrange area in Lesson 1.
For each audio file, the Info column displays the following:
Sample rate
Bit depth
Status icon
File size
You can click the disclosure triangle to the left of an audio file to display the regions associated with that audio file.
Click the disclosure triangle next to Bright Tone Bass 03.aif.

The regions associated with that audio file are displayed, including the one you shortened in Lesson 1 for the intro of the song. The blue segment indicates which portion of the audio file the region contains.
Notice that the new Acoustic#01 audio region you just recorded is selected, in both the Audio bin and the Arrange area. The path of the selected region’s parent audio file is displayed at the top of the Audio Bin (or the beginning of the path if the path is too long to fit).
This is a quick way to ensure that the audio file was recorded in the correct location: in the audio folder inside the project folder.
In this case, the path is too long to be displayed in its entirety.
In the Bin, Control-click the Acoustic#01.aif audio file and choose Show File(s) in Finder.
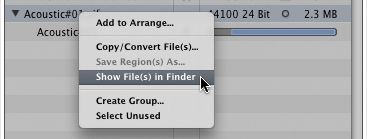
A Finder window opens, showing the selected audio file.
Click the Arrange window (or press Command-Tab) to go back to Logic.
Click the first Bright Tone Bass 03 region in the Audio Bin.

Bright Tone Bass 03 is selected in both the Audio Bin and the Arrange area. In the Arrange area you can see that it’s the first shortened region used in the intro. Experiment by clicking regions in the Audio Bin or the Arrange area, and observe the same region being selected in the other location.
Click the disclosure triangle for the Bright Tone Bass audio file.
The regions associated with Bright Tone Bass are hidden.
Keep the Audio Bin open for the rest of this lesson to look at the new audio files created when recording.
When recording a live performance, musicians can make mistakes. Rather than deleting the previous recording and repeatedly recording until you get a flawless performance, you can record several takes (performances of the same musical part) and later choose the best take, or even the best parts of each take, to create a comp track (composite track).
To record new takes in Logic, you can record the new performance over the previous one. All of the takes (including the original recording) will be placed into a take folder.
Make sure the track used to record your first performance (the Acoustic track) is still selected and record-enabled, and the Arrange area has key focus.
Position the playhead on bar 5.
In the Transport bar, click the Record button (or press R).
Record a second take of about the same length as the first take.
The new recording seems to be recorded over the previous audio region.

Stop the recording.
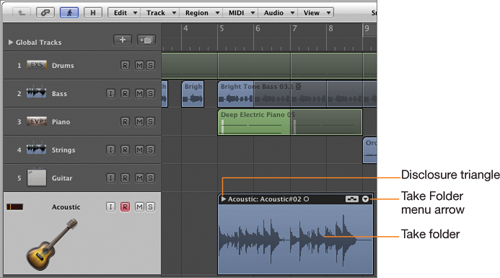
Both the original take and the new take have been packed into a take folder. You can tell that the region is a take folder by the presence of a disclosure triangle in front of the region name, and by the Take Folder menu arrow at the upper right of the region. Clicking the disclosure triangle displays all takes on individual sub-tracks. Clicking the Take Folder menu arrow allows you to access take-editing features.
Record a third take.
In the Acoustic track header, click the Record Enable (R) button.

The Record Enable button is disabled: The track is disarmed, and you can no longer hear the incoming sound.
If you listen to the song now, only the last recorded take will play back. The previous takes are muted. If the last take is shorter than another take you recorded previously, then playback automatically switches to that previous take at the end of the last take.
Click the disclosure triangle next to the take folder’s name.
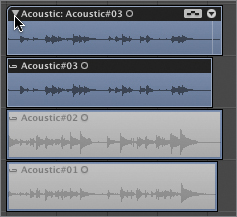
The take folder opens, showing you all the takes on lanes.
When the take folder is open, you can select the take you want to listen to.
More Info
The take turns blue and the others are dimmed (muted). Take folders and comping (creating a comp track) will be discussed in Lesson 3.
Click the disclosure triangle on the take folder.
The take folder closes.
If you are both the engineer and the musician, it’s not always practical to switch from playing your instrument to operating Logic between each take (and it can really destroy the vibe). Recording in Cycle mode allows you to repeatedly record a single section, creating a new take for each pass of the cycle. When you stop the recording, all the takes are packed inside a take folder.
Click the Go to Beginning button (or press Return).
Drag the horizontal zoom slider to the right (or press Option-Control–Right Arrow a few times) to zoom in on the intro, so that you can see at least the first five bars.
Drag a cycle from left to right between bars 3 and 5.
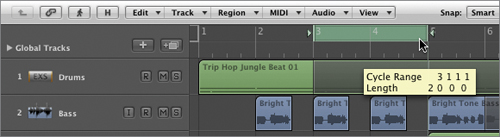
Start recording.
The playhead jumps a bar ahead of the cycle for a one-bar count-in and starts recording the first take. When it reaches bar 5, the end of the cycle area, it jumps back to bar 3 and starts recording a new take.
Tip
You don’t have to position the playhead when recording in Cycle mode: Recording automatically starts at the beginning of the cycle, after the count-in.
Logic keeps looping the cycle area, recording new takes until you stop recording. Record five or six takes.
Click Stop (or press the Spacebar).
All the takes recorded in Cycle mode are placed in a take folder.
Look at the new audio file in the Audio Bin.
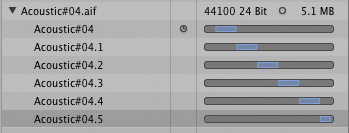
All the takes recorded in Cycle mode are displayed as successive regions of a single audio file.
Let’s turn off the Cycle mode and return the Acoustic track to its original size.
Click the cycle area in the Bar ruler (or press C).
Cycle mode is turned off.
Position your Pointer tool over the lower-left corner of the Acoustic track header.
The Pointer tool turns into the Finger tool, ready to resize.
With the Finger tool, Shift-click the track header.
The track zooms out and returns to the same height as the other tracks.
You can use the same single-track techniques to record multiple tracks simultaneously. This allows you to record several instruments at once, placing each instrument on a separate track.
You first create as many tracks as needed, making sure each track is set to a different input and is record-enabled. (You can’t record-enable channel strips that are set to the same input on your audio interface because they would all record the same input.)
In the following exercise, you will record two mono tracks at the same time, which you can do using the built-in Macintosh audio interface. To record more than two tracks simultaneously, you need an audio interface with more than two inputs.
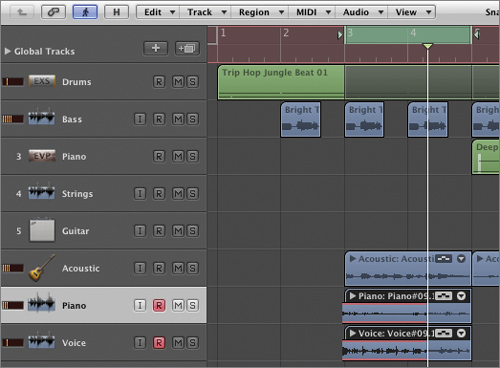
At the bottom of the Arrange area, click the last track header.
This ensures that the tracks you create now will be added below the last track.
At the top of the track list in the Arrange area, click the New Tracks button (+) (or press Command-Option-N).
The New Tracks dialog appears.
Use the following settings:
Number: 2
Type: Audio
Format: Mono
Input: Input 1
To the right of the Input pop-up menu, select Ascending.

When creating multiple tracks, selecting the Ascending checkbox automatically sets the inputs (or outputs) to ascending settings. In this case, it will create two tracks and assign the first to Input 1 and the second to Input 2.
Deselect Open Library.
The Library won’t open. The Audio Bin will stay open, and you can see the audio files created as you record.
Click Create (or press Return).
Two audio tracks are created, automatically assigned to the next available audio channels (Audio 5 and Audio 6). Their inputs are set to Input 1 and Input 2, and both are record-enabled.
Tip
If you need to reassign a track’s input, hold down the Input slot in the I/O section on the track’s channel strip. A menu opens, allowing you to choose any input on your audio interface.

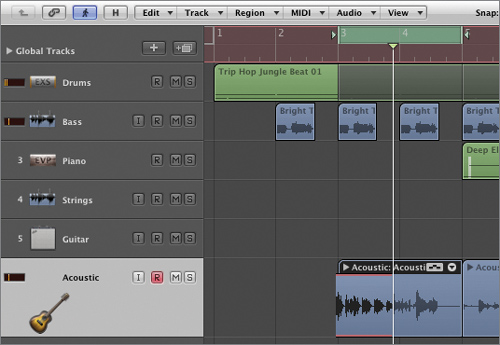
Rename the tracks Piano and Voice, or whatever you wish.
In the Transport bar, click the Go to Beginning button, or press Return.
Start recording.
The multitrack recording starts, and after a one-bar count-in, you see the playhead appear on the left of the Arrange area, creating two regions, one on each record-enabled track.
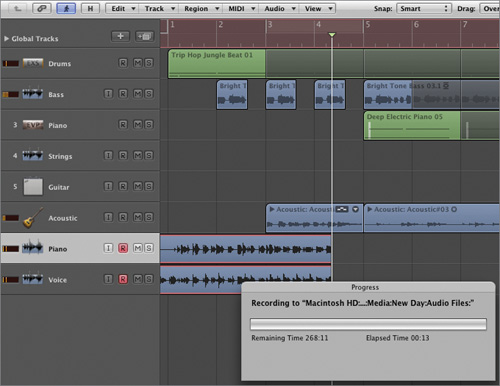
After a few bars, stop the recording.
You have a new audio region on each track.
You can use the same procedure to simultaneously record as many tracks as needed. If the tracks already exist in the Arrange area, make sure you assign them the correct inputs, record-enable them, and start recording.
You can record additional takes on multiple tracks as you would record a single track: by recording over the existing multitrack recording.
Return the playhead to the beginning of the song.
Make sure both the Piano and Voice tracks are still record-enabled.

A new take is recorded on each record-enabled track.
Stop recording.
You have a new take folder for each track.
You can also use cycle recording to record multiple takes on multiple tracks.
First, let’s clean up the project by deleting all the Piano and Voice recordings.
Make sure both the Piano and Voice take folders are selected.
Choose Edit > Delete (or press Delete).
A Delete dialog appears.
If you select Keep and click OK, the operation is nondestructive. The selected regions or take folders disappear from the Arrange area but remain in the Audio Bin, and the audio files remain on the hard disk.
If you choose Delete and click OK, the operation is destructive. The audio files are deleted from the hard disk. In that case, you cannot undo the operation and the audio files are removed permanently.
Tip
Be very careful when deleting audio files. When in doubt, click Cancel to abort. Then you can open the Audio Bin to preview all of the selected audio files before deciding what to do with them.
If you do not wish to keep the piano and voice recordings, delete them.
Make sure Delete is selected.
Select “For all.”
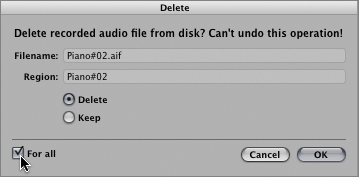
When “For all” is selected, the choice of deleting or keeping the first audio file will be applied to all selected audio files.
Click OK (or press Return).
The take folders disappear, and the corresponding audio files are removed from the Audio Bin and permanently deleted from the hard disk.
In the upper half of the Bar ruler, click the gray cycle area to turn on Cycle mode.
Make sure both the Piano and Voice tracks are still record-enabled.
Start recording.
Logic counts in four beats, and then records one take on each track for every pass through the cycle area.
Stop recording.
You have two take folders containing each track’s multiple takes.
Choose File > Close Project. Save the project only if you want to keep your work in this lesson.
When you want to correct a specific section of a recording—usually to fix a performance mistake—you can start playback before the mistake, punch in to engage recording just before the section you wish to fix, and punch out to stop recording immediately after the section. A take folder is created, automatically edited to play only the new recording between the places where you punched in and out. Punching is nondestructive. At any time, you can open the take folder and select the original recording.
There are two punching methods: on the fly and automatic. Punching on the fly allows you to use a key command to punch in and out while Logic plays, whereas automatic punching requires you to set the Autopunch area in the Bar ruler before recording. Punching on the fly is fast but usually requires an engineer to perform the punch in and punch out while the musician is performing. Automatic punching is ideal for the musician-producer who is working alone.
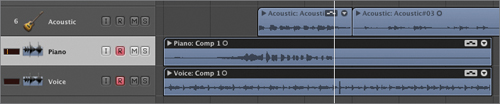
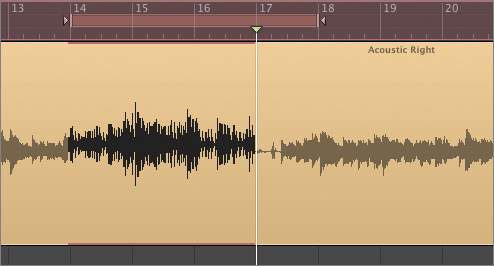
In the next exercise, you will get familiar with the song, turn on the “Punch on the Fly” mode, and then use the Record Toggle key command (Shift-R) to punch on the last acoustic guitar track, Acoustic Right.
Go to Logic 9 Files > Lessons, and open 02 We Shared Everything.
Play the song.
The last track, Acoustic Right, is missing an entire section. The guitar player made a mistake and stopped playing between bars 14 and 18. To make it easier to focus on that track, you can mute all the tracks except for the drum tracks.
Starting on the High Cello tracks, hold down the Mute button and drag down to the Acoustic Left track.
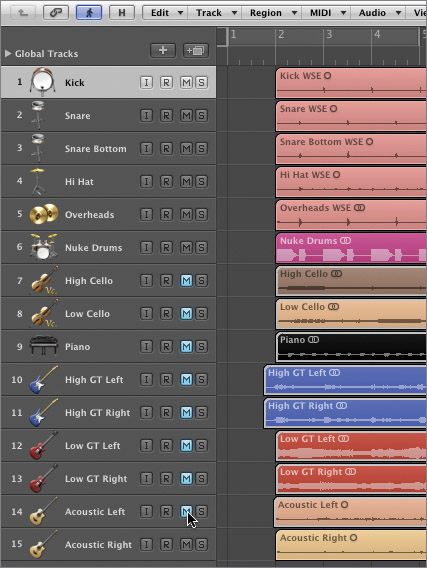
Tracks 7 through 14 (High Cello to Acoustic Left) are muted. Holding down a button in a track header and dragging down or up emulates the way engineers quickly mute or solo a whole section of the arrangement by sliding a finger across the buttons on a real mixing board.
Choose Options > Audio > Punch on the Fly; or in the Transport bar, hold down the Record button and choose Punch on the Fly from the pop-up menu.

If you look at the menu again, a checkmark appears next to Punch on the Fly, indicating that the mode is active.
Click the lower half of the Bar ruler at bar 12 to position the playhead.
At the bottom of the Arrange area, record-enable track 15 Acoustic Right.
Check your recording and monitoring levels.
Now that the project is ready to record, save it. You will revert to this record-ready state in the next exercise.
Choose File > Save (or press Command-S).
Start playback.
When the playhead reaches bar 14, press Shift-R (the Record Toggle key command), and play your instrument.
You just punched in. Logic starts recording over the current Acoustic Right audio region.
When the playhead reaches bar 18, click the Play button, or press Shift-R again.
This time you punched out. Logic stops recording and reverts to playing back the current Acoustic Right audio region on the track.
Stop playback.
The Acoustic Right track now displays a take folder.
Open the take folder.
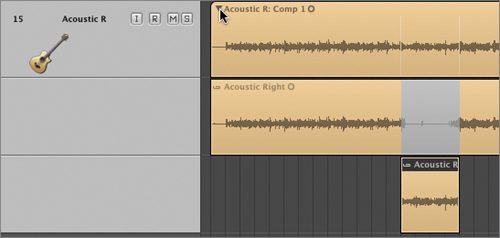
You can see that the comp take contains the original recording and the new recording between bars 14 and 18 where you punched in and out.
To prepare for automatic punching, you turn on the Autopunch mode and adjust the Autopunch area. You will also temporarily hide all tracks except for the one you record on, to clearly see what occurs.
Choose File > Revert to Saved.
An alert message appears, indicating that you are about to discard the changes you’ve made since the last time the song was saved.

The current project is closed without being saved, and the last saved version of 02 We Shared Everything opens. It should be ready for recording, as you saved it before punching on the fly in the previous exercise.
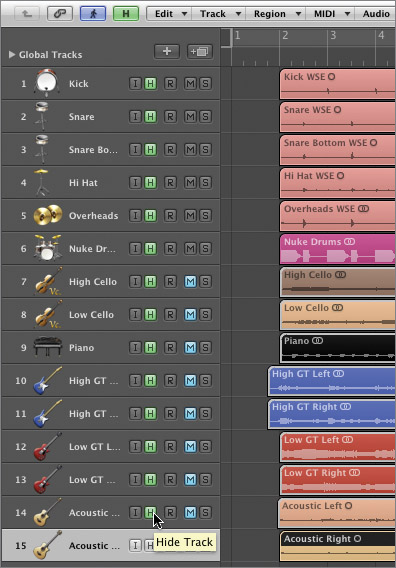
Let’s hide all the tracks but the one you’re going to record on.
At the top of the Arrange area, click the Hide View button (or press H).

The Hide View button turns green, and a Hide button (with the letter H) appears in each track header.
Hold down the first track’s Hide button, and drag down to the Acoustic Left track to engage the Hide Track function for those tracks.
Click the Hide View button again (or press H).
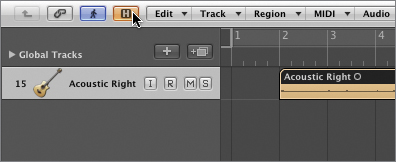
The Hide View button turns orange, and all the tracks with Hide buttons engaged are now hidden.
Press Option-Control–Down Arrow a few times to zoom in vertically.
In the Transport bar, click the Autopunch button.

In the Bar ruler, a red autopunch strip appears from bar 2 to bar 4. The Autopunch area defines the section to be rerecorded.
Adjust the Autopunch area so that it extends from bar 14 to bar 18.

You can drag the edges of the Autopunch area to resize it or drag the entire area to move it. The red vertical guidelines will help you to align the punch in and out points with the waveform.
Position the playhead before the Autopunch area.
Record-enable the Acoustic Right track.
Click the Record button (or press R).
Playback starts. When the playhead reaches the beginning of the Autopunch area, Logic starts recording over the current Acoustic Right audio region. When the play-head reaches the end of the Autopunch area, Logic stops recording and reverts to playing the current Acoustic Right audio region.
Click Stop (or press Return).
The Acoustic Right track now displays a take folder.
Open the take folder.
You can see that the comp take contains the original recording and the new recording between bars 14 and 18 (corresponding to the Autopunch area).
You can hear the results of a successful punch recording in 02 We Shared Everything_end, where the guitar player used Autopunch mode to replace bars 14 through 18 with a new take.
Close, but don’t save, the current project and open 02 We Shared Everything_end.
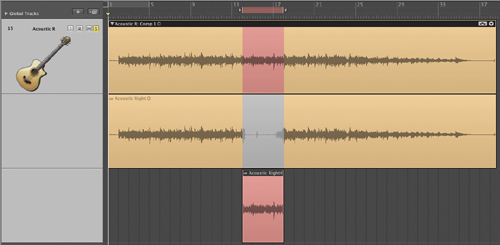
The Acoustic R track is soloed and its take folder is expanded. The second take, Acoustic Right#2, is colored light red, so you can clearly see it in the comp at the top, under the Autopunch area.
Position the playhead just before the Autopunch area and start playback.
Listen to the transitions between the takes. Not bad!
In the Acoustic R track header, click the Solo button to unsolo the track.
Click the Hide View button at the top of the Arrange area (or press H).
All tracks are now visible.
Listen to the Autopunch area again.
Notice the nice chorus effect produced by the two acoustic guitars panned left and right.
Tip
You can speed up the Autopunch recording process by using the Marquee tool described in Lesson 3. When a marquee selection is present, starting a recording automatically turns on the Autopunch mode, and the Autopunch area matches the marquee selection.
In the Bar ruler, Option-click the Autopunch area to turn Autopunch mode off.
Some settings do not affect the quality of the audio recording but can change the behavior of your project when recording or the audio file format used for recordings. Although you can record audio using the default settings, sometimes you’ll want to change them. The next few exercises will show you how those settings affect the audio recording process, and how to adjust them.
When communicating with the audio interface, Logic does not receive or transmit just one sample at a time. It places a number of samples in a buffer. When the buffer is full, Logic processes or transmits the entire buffer. The larger the buffer, the less work is required from the CPU. The advantage of using a larger buffer is that the CPU has more time to calculate other processes and you can use more plug-ins. The drawback to a larger buffer is that you have to wait a bit longer for the buffer to fill before you can monitor your signal. That means a longer delay between the original sound and the one you hear through Logic. That delay is called latency.
Usually, you want to have the smallest possible latency when recording and the most CPU processing power possible when mixing, so that you can use more plug-ins. You can adjust the I/O buffer size depending on the situation.
In the Toolbar, click the Preferences button and choose Audio.

Click the I/O Buffer Size pop-up menu.
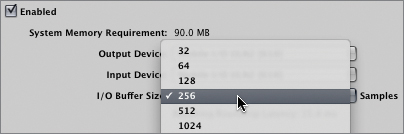
The menu allows you to set the buffer size anywhere between 32 and 1024 samples.
Choose 32, and click Apply Changes.
Wait for the Core Audio engine to reinitialize. Note the very small resulting latency displayed below the I/O Buffer Size menu.

Play the song.
Look at the CPU meter in the Transport Bar. Depending on your computer’s CPU, you might see pretty big spikes. You might even hear pops and cracks while the song plays back, or get a Core Audio overload alert.

Set the I/O Buffer Size to 1024, and click Apply Changes. Note the difference in the resulting latency displayed below the menu.
Play the song.
The CPU meter should hit much lower. It doesn’t have to work as hard with the larger buffer size. However, if you try to record audio with that setting, you will hear a delay between the notes you play and the notes you hear. That’s latency. If you intend to do more audio recordings, find the lowest I/O buffer size setting that allows a clean monitoring.

Logic can record in three digital audio file formats: AIFF (the most commonly used audio file format on Macintosh computers), Broadcast Wave File (BWF, or WAVE), and Core Audio Format (CAF). The Audio Engineering Society recommends using BWF for most applications. CAF is practically unlimited in file size and can contain more than two channels, so it can be used for large audio files and multichannel surround audio files.

The count-in is the time you have to prepare yourself and get in the groove before the actual recording begins.
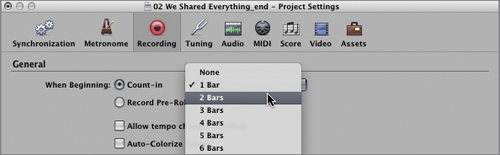
In the Toolbar, click the Settings button and choose Recording; or in the Transport bar, hold down the Record button and choose Recording Settings.

The Recording Project Settings window opens.
From the “When Beginning” options, select Count-in, and set it to 2 Bars.
Record-enable any track.
Go back to the beginning of the song.
Start recording.
This time you can hear eight beats (two bars in 4/4) before the playhead appears and starts recording on the first downbeat of bar 1.
Stop the recording.
Choose Edit > Undo Recording (or press Command-Z).
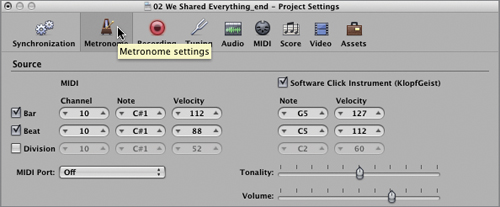
You can adjust the sound of the metronome in the Metronome project settings.
At the top of the Project Settings window, click the Metronome button.
Tip
You can also access the Metronome project settings by holding down the Metronome button in the Transport bar and choosing Metronome Settings.
The Metronome Project Settings window opens. The Software Click Instrument settings are on the right of the window.
More Info
Preferences (such as the I/O buffer size and the Recording File Type set in previous exercises) are global settings that affect Logic’s behavior in any project you work on. Project settings (such as count-in or metronome settings) are local settings that affect only the current project and are saved with the project.
Start playing the song.
Click the Metronome button in the Transport bar.
In the Metronome Project Settings window, drag the Volume slider to the right.

The metronome click increases in volume.
Drag the Tonality slider to the right.
The metronome sound changes and you can distinctly hear a pitch. Adjusting the tonality of the metronome is important: A pitched sound (slider to the right) will cut better through a busy mix but will also bleed through the musician’s headphones into the microphone. A more muted sound (slider to the left) is more suitable for quiet mixes when you can’t tolerate any metronome bleed.
Adjust the metronome so that it is loud and clear.
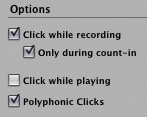
When a project already contains a drum track, you may need the metronome only during the count-in to get into the groove before the song starts.
Under Options, select “Only during count-in,” and deselect “Click while playing.”
Position the playhead on bar 2, the beginning of the song.
Start recording.
You hear the metronome for two bars; then it stops playing as the song starts on bar 2.
Stop and undo the recording.
Note
If you want your metronome to play a specific sound on an external hardware MIDI synthesizer or sampler, use the MIDI Metronome. From the MIDI Port menu, choose a port, and connect a MIDI cable from that MIDI Out port on the MIDI Interface to the MIDI In port on your hardware sampler/synthesizer.