
Lesson Files | Logic 9 Files > Lessons > 10 LVL-Home |
Time | This lesson takes approximately 40 minutes to complete. |
Goals | Edit automation offline |
Record live automation | |
Record live automation using a control surface | |
Export the final mix |
When multitrack recorders first appeared in recording studios, they forever changed the way artists produced music. Having separate recordings of individual instruments opened the door for experimentation, and soon artists and producers alike placed their hands on the mixing board during the final mixdown, panning an instrument from left to right or riding a volume fader to change the level of a track throughout a song. Soon enough, two or three pairs of hands weren’t enough to perform all the changes needed throughout a mix, and a solution was needed.
Eventually, mixing consoles were designed so that moving a fader also generated a data stream. By recording those data streams onto a separate track of the multitrack tape, the console could automatically re-create the fader movements during playback. This started the era of automated consoles. Today, professional computerized mixing boards and digital audio workstations are fully automated.
In Logic, you can automate almost all the controls on a channel strip, including volume, pan, and all plug-in parameters. In this lesson, you will draw and edit offline automation to play a snare at different volume levels in verses and choruses, create a decrescendo on a pair of grouped guitars, and pan a sound effect from left to right. You will then record live automation using the mouse, bypassing a plug-in and tweaking its parameters remotely using the knobs on a control surface.
In Logic, the techniques used to create and edit track-based automation closely resemble Hyper Draw, the graphic editing of MIDI continuous controller events that you explored in Lesson 5, “Programming and Editing MIDI.” While Hyper Draw allows you to automate MIDI CC parameters in a region, track automation lets you automate almost any channel strip controls (including all plug-in sliders, knobs, and bypasses) and to do so independently of the regions on the track.
Drawing automation graphically is also known as offline automation, because it is independent of the playhead position and can be performed while Logic is stopped.
When you need accurate control over the volume of an instrument in specific sections of the song, drawing offline automation over the waveform gives you surgical precision without the pressure of performing fader movements in real time.
You will now create offline volume automation on the snare track so that it plays softer during the verses.
Go to Logic 9 Files > Lessons and open 10 LVL-Home.
Play the song.
Throughout this lesson, you may want to use the Track Solo buttons or Solo mode to listen to a track before automating it.
Listen to the snare. It is really sharp and sounds great in busier sections such as the choruses, but it is a little too loud and distracting during the verses. You will automate the snare volume to remedy this.
In the Toolbar, click the Automation button.

In the Arrange area, tracks need to be tall enough to display their automation data, so the Arrange area is automatically zoomed in vertically. In the Automation Parameter menu on the track header, you can choose the parameter to be displayed in the automation track, a transparent gray area overlaid on the track.
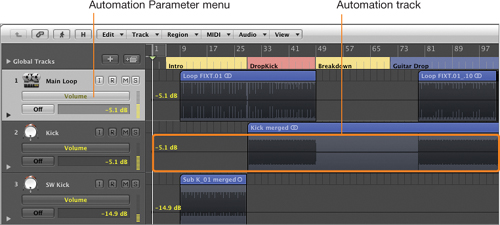
While it can be useful in some cases to view the automation tracks for all the tracks, in this case you need to automate only the snare track. You can use Auto Track Zoom to automatically expand the height of the selected track, thereby displaying the automation data only on the selected track.
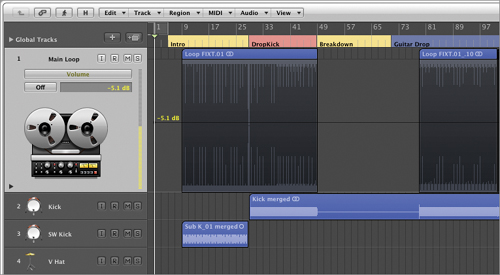
In the Toolbar, click the Automation button to hide the automation tracks.
The Arrange area returns to its previous vertical zoom level.
In the Toolbar, click the Auto Zoom button (or press Control-Z).
The selected track (Main Loop, track 1) expands vertically, and all other tracks retain their original vertical zoom levels.
In the Toolbar, click the Automation button (or press A).
The automation track is displayed for the selected track only.
Click the Snare track header (track 6).
The Snare track is selected and zoomed in vertically, and the previously selected track returns to its original zoom level. You can see the snare’s volume automation track and its Automation Parameter menu in the Snare track header. In the automation track, a horizontal black line indicates the current volume level of the track (–11.2 dB).
Option-Control-drag to zoom in on the Snare track around the Verse 1 section.
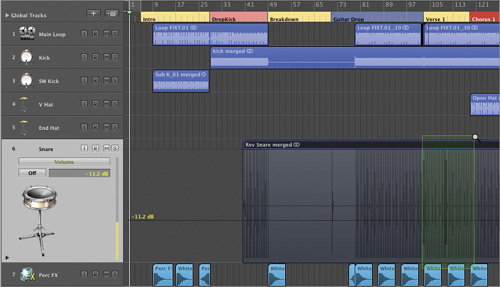
Zoom in on the first few snare hits at the beginning of the verse.
Using your waveform-reading skills, you’ll notice that the last snare before the verse is a reversed snare. You will drop the snare volume level after that reversed snare plays. You can edit track-based automation using the same drawing techniques you learned when creating Hyper Draw automation of MIDI CC events in Lesson 5.
Just after the reversed snare that leads into the verse, click the black line to create a node at the current volume level (–11.2 dB).

The node is created and the yellow volume automation line appears.
When you create the first automation node on a track, the automation mode automatically switches from Off to Read, so that the next time you play the project, the volume automation you create will be read by the level fader. You can see the automation mode of the selected track on its channel strip and track header.
Hold down the mouse button slightly below the yellow automation line and to the right of the node you just created—but before the first snare in the verse—and then drag the new node to –16.4 dB.
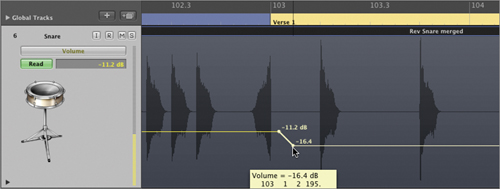
You have reduced the volume just before the verse. Now you need to create two more nodes at the end of the verse to return the volume to its original level for the following chorus.
Option-Control-click in the background to return to the previous zoom level.
You should now be able to see the entire Verse 1 section. Depending on your screen resolution, you may need to zoom in to perform the following steps, but if you can clearly see the individual snare hits on the waveform, try to create the automation without zooming in.
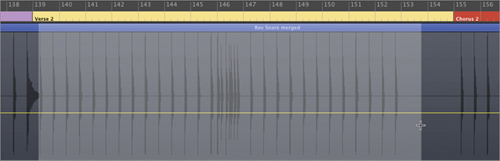
After the last snare in the verse (at bar 119), click the yellow automation line to create a node at –16.4 dB.
Place your pointer slightly above and to the right of the node you just created, and drag up to position the new node at a value of –11.2 dB.
When trying to create a node close to an existing node, you may accidentally click the existing node and delete it. If this happens, hold down the mouse button a little farther to the right of the existing node, and then drag the new node to the desired position.

You have changed the level of the snare so that it drops to –16.4 dB during Verse 1 and then returns to –11.2 dB at the beginning of Chorus 1. You will now create the same automation in Verse 2.
Scroll to the right until you can see the entire Verse 2.
This time, you will use a new technique with the Marquee tool to quickly set a different volume for a section of the song. Remember to press Command to use the Marquee tool.
In Verse 2, drag the Marquee tool from just before the first snare to after the last snare.
You can now adjust the volume of the section by vertically dragging the horizontal line within the Marquee selection.
Drag down the horizontal line within the Marquee selection to –16.4 dB.

As you drag the line down, you can see two nodes created on each end of the Marquee selection, so dragging the automation line adjusts the volume only for the selected section.
Start playback just before the first verse.
On the left Arrange channel strip, watch the level fader “read” the automation you just created, and notice the softer snare in the verses.
In this exercise, you will create a slow decrescendo on the Heavy Guitars track to evolve the timbre of the Guitar Drop section. It will start with an assault of aggressively distorted guitars; then the guitars will slowly fade out throughout the section, leaving some space in the mix for the synths that start playing a melody and, later, a chord progression.
Select the Heavy Guitars track (track 10).
The Heavy Guitars track expands vertically, and you can see its volume automation track.
Listen to the Guitar Drop section (starting around bar 69).
When the guitars come in at the beginning of the Guitar Drop section, they are supported by two more guitar tracks playing an octave lower (in tracks 11 and 12), which creates a strong impact. The mix is very sparse at that point, so the guitars fill the entire sound field. Then the drumbeat and the synths return at bar 79. At bar 87, the synth starts playing a melodic riff and is joined by a dreamy high-pitched synth. You can hear an evolution from the very aggressive guitars at the beginning of the section to the more musical synths at the end. However, the guitars play the same rhythm at the same volume throughout the section, fighting with the melodic synths at the end of the section.
You will now create a decrescendo on the Heavy Guitars to slowly make space for the dreamier synth melodies at the end of the section.
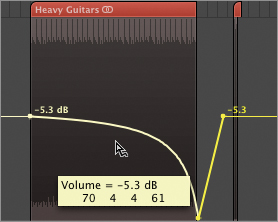
Click the black horizontal line at the beginning of the first Heavy Guitars region to create a node at the current volume (–5.3 dB).
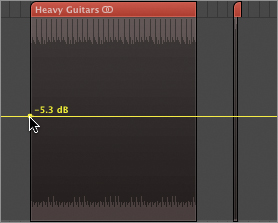
The node is created, and the Heavy Guitars automation mode is set to Read.
Before you create the decrescendo, you will create another node at the current volume level before the next Heavy Guitars region on the track. This will ensure that the next regions on that track play at –5.3 dB.
Click the yellow volume automation line after the end of the first Heavy Guitars region, but before the next region on the track.
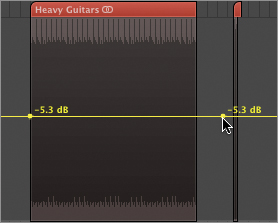
You can now draw the decrescendo over the first Heavy Guitars region without worrying about changing the volume automation of the remaining regions to the right.
Create a node at the end of the first Heavy Guitars region, before the last node you created, and drag it all the way down.
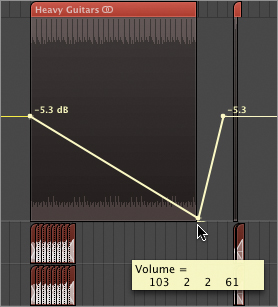
You can now add a curve to the decrescendo to make it a little slower at the beginning and faster toward the end of the Guitar Drop section.
Shift-Control-drag the sloped automation line in the Guitar Drop section upward to create a convex curve.
Listen to the Guitar Drop section.
Listen to the way the section evolves as you see the level fader slowly move down on the left Arrange channel strip. It starts with the guitars playing loudly; then they slowly fade out as the synths start playing. Later in the section, the guitars slowly disappear as the synths play melodic lines. The Guitar Drop section evolves from an aggressive rhythm guitar pattern to a melodic synth part that leads into the first verse.
Pan automation can be a fun way to create movement in your mix, moving a sound from one side of the stereo field to the other. It is a powerful effect that calls attention to the automated sound but, when used in moderation, can add life to a sound effect.
You will now draw offline pan automation on the first sound effect after the intro, making it move from the left speaker to a position slightly right of center.
Select the Perc FX track (track 7).
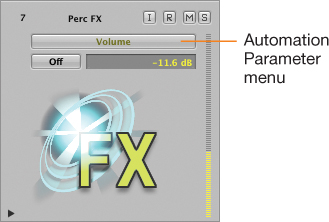
You can use the Automation Parameter menu in the track header to choose the parameter you want to automate.
In the Perc FX track header, click the Automation Parameter menu and choose Pan.
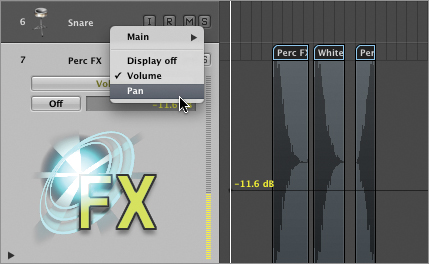
The Perc FX track now displays the pan automation track.
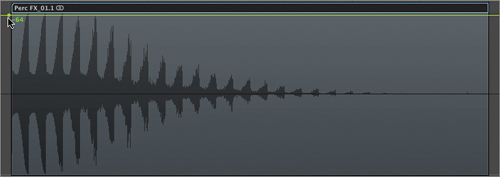
Zoom in on the first Perc FX region.
The black horizontal line at the top of the pan automation track indicates the current pan position (– 64) which is all the way left.
Create a node on the black horizontal line (–64) at the beginning of the region.
The node is created, and the green pan automation line appears. The Perc FX automation mode is automatically set to Read.
Create a node around the middle of the region, and drag it down to +20.

Your new pan automation will move the sound effect from the left speaker to its new pan position, slightly to the right (+20).
Start playback before the first Perc FX region to listen to your pan automation.
The pan automation is a little slow, but you can make it happen quickly so that the effect will be more obvious.
Drag the second node (+20) to the left.

Listen while you adjust the position of the second node, or create a curve shape until you get the desired pan automation. For a more pronounced effect, try dragging the second node all the way down to +63.
Zoom out.
While offline automation is a good option when you know in advance what automation movements you want to achieve, you sometimes want to hear the song playing as you adjust the controls of a channel strip (or in a plug-in window) in real time.
To record live automation, you need to choose a live automation mode for the track(s) you want to automate, start playback, and tweak the desired controls on the channel strip.
In Touch mode, any existing automation on the track will be read as in Read mode. As soon as you hold down the mouse button on a knob or slider, its automation is recorded. When you release the mouse button, Touch mode behaves like Read mode again, and the automation parameter returns to its original value or reproduces any existing automation on the track.
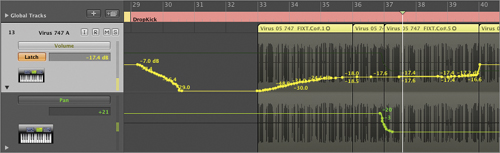
In this exercise, you will slowly fade in a synth in the DropKick section, returning it to its original value when the snare enters.
Select the Virus 747 A track (track 13).
Listen to the beginning of the DropKick section (starting at bar 29).
The Virus synth comes in suddenly at bar 33. You will create a slow crescendo so that the synth fades in slowly, reaching full volume as the snare starts on bar 41.
In the Virus 747 A track header, set the automation mode to Touch.
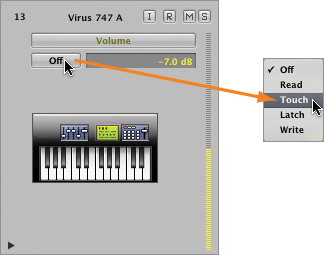
You are ready to record live automation. You don’t need to put Logic in record mode to record live automation. You only need to put the track in one of the live automation modes (Touch, Latch, or Write) and start playback.
When you record automation in Touch mode, hold down the mouse button until you want the parameter to return to its original level (in this case, after you hear the first reversed snare).
Zoom in on the group of Virus regions in the DropKick section (bar 33 to bar 49).
Since you will now record live automation as the song is playing back, you may want to first read steps 5 through 9 before starting.
On the left Arrange channel strip, drag the volume fader all the way down, but don’t release the mouse button.
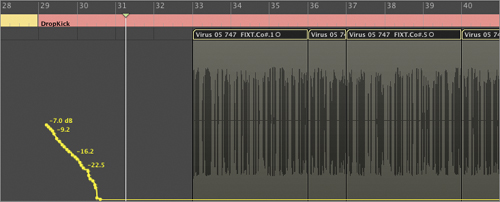
You can see volume fader movements being recorded in the Virus 747 volume automation track.
When the playhead reaches the beginning of the first Virus region, slowly drag the volume fader up to create the crescendo.

Try to time your crescendo so that the level is almost back to the original level (–7.0 dB) at the beginning of the snare region.
When you hear the first reversed snare in bar 40, release the mouse button.
The automation line jumps back to its original level (–7.0 dB).
Stop playback.

At the end of the crescendo, where you released the mouse button, you can see the volume automation jump back to the original level on the track (–7.0 dB).
If you are not entirely happy with the crescendo or with a particular section of the crescendo, you can stay in Touch mode and correct your automation. Let’s correct it now to start the crescendo a little later in the section.
Start playback before the first automation node on the track.
As long as you don’t touch it, the level fader reproduces the volume automation on the track.
When the level fader is all the way down (–∞), position the pointer over it and hold down the mouse button.
As soon as you start holding down the mouse button, a node is created, and the position of the fader (–∞) overwrites the existing volume automation.
A little later in the section, slowly start raising the level fader.
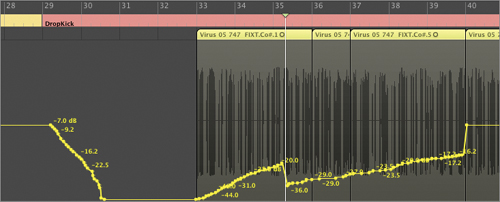
The new fader movements continue to overwrite the existing automation.
Continue raising the fader a little faster, trying to catch up with the level of the existing automation in the middle of the crescendo, and then release the mouse button.

When you release the mouse button, the fader reproduces the movements of the existing volume automation on the track.
When you are done automating the track, make sure that you return its automation mode to Read, or you could accidentally record automation if you adjust any channel strip or plug-in setting while the project is playing.
Set the automation mode to Read.
Start playback at the beginning of the DropKick section to listen to the automation you created.
The Virus synth should come in slowly and jump to its original level right after the reversed snare.
Latch mode works the same way as Touch mode, except that when you release the mouse button, the automation continues to be recorded and the parameter stays at the same value. If automation is already present for that parameter on that track, the automation is overwritten until you stop playback.
You will now use the Latch mode to record pan automation on the Virus 747 A synth without the need to hold down the mouse button.
Start playback at the beginning of the DropKick section.
Listen to the Virus 747 A track. It repeats the same four-bar melody four times (although the new crescendo makes the first four-bar melody barely audible). You will try to time your Pan control movements to place each successive four-bar melody on opposite sides of the stereo sound field.
Even though you don’t need to display automation tracks to record live automation, you will now display the Virus 747 A track’s pan automation track to look at the pan automation as you record it.
Rather than choose Pan from the Automation Parameter menu, you can open a second automation track for the same track. That way, you can still watch your volume automation as you record the pan automation.
In the lower-left corner of the Virus 747 A track header, click the disclosure triangle.
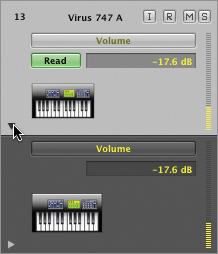
A separate automation sub-track opens below the track.
From the sub-track header’s Automation Parameter menu, choose Pan.
In the Virus 747 A track header, choose Latch from the Automation Mode menu.
On the left Arrange channel strip, set the Balance control to –20 in order to pan the synth to the left.
Note
The Pan automation parameter allows you to automate the Pan control of a mono channel strip or the Balance control of a stereo channel strip.
In the automation track, notice that the black horizontal line indicating the current pan position moves up to –20.
Start playback at the beginning of the DropKick section.
When you hear the synth start to fade in, wait for the end of a four-bar melody, and quickly drag up the Pan control to about +20; then release the mouse button.
The pan automation is recorded, and the pan remains at the position it was in when you release the mouse button.
Wait for the end of that new four-bar melody, and drag the Pan control down to about –20; then release the mouse button.
Continue panning each four-bar melody to the opposite side of the stereo field.
When you have entered the last pan automation, stop playback.

Listen to your result.
The synth slowly fades in during the DropKick section, reaching its full volume when the snare comes in, and the four-bar melodies alternate their pan positions from left to right.
In the lower-left corner of the Virus 747 A track header, click the disclosure triangle to close the pan automation sub-track.
Set the automation mode back to Read.
Zoom out.
Like a guitar player engaging a distortion pedal to play a solo, you’ll sometimes want to use an effect plug-in for only specific sections of a song. Automating the plug-in bypass allows you to turn the effect on and off at particular positions in the song.
You will now automate the bypass of a distortion plug-in on a synth track, turning off the plug-in when the vocals enter to give them some space in the mix.
Select the V 2 String track (track 18).
Zoom in on the group of regions at the end of Verse 2.
Start playback before the group of regions, around bar 145.
The first small region at the end of bar 146 sounds good as it punctuates the drum and guitar fills. Then, after bar 147, that synth starts fighting for attention with the vocals. You will bypass the Bitcrusher plug-in on the channel strip right after the first region at the end of bar 146, to bypass the distortion when the vocals enter.
On the left Arrange channel strip, set the automation mode to Latch.
Note
Remember that it is not necessary to choose a parameter from the track header’s automation menu to record live automation.

Get ready to Option-click the Bitcrusher plug-in as soon as you’ve heard the distorted synth punctuating the drum fill at the end of bar 146.
Start playback around bar 145.
When you hear the end of the drum fill, Option-click the Bitcrusher plug-in to bypass it.
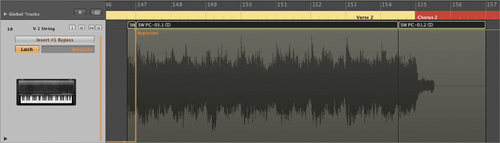
On the V 2 String track, the Insert#1 bypass automation is automatically displayed (Bitcrusher is the first insert on the channel strip).
The bypass automation should occur on the first downbeat of bar 147, but it’s OK if it’s a little later, as long as you don’t hear the distortion on the synth when the vocals come in.
On the left Arrange channel strip, set the automation mode back to Read.
Zoom out and listen to the result.
You still have the punctuating effect of the first synth hit at the end of the drum and guitar fill, but now the synth is not distorted during the verse, letting the vocals shine through.
Recording live automation by dragging onscreen sliders and knobs with the mouse can be a powerful means of expression, but nothing beats the feel of a real fader or knob under your fingers. Adding a control surface to your Logic setup allows you to map different knobs to the desired channel strip or plug-in parameters, and to remote-control those parameters while you record live automation.
Many supported control surfaces (such as the Mackie Control Universal) can be detected automatically by Logic, which also will automatically assign their faders and knobs.
When the controls are not automatically mapped—for example, when control knobs are used on a MIDI keyboard that isn’t a supported device—you can manually assign the physical knobs to the parameters you want to automate.
Note
If your only control surface is a MIDI keyboard that does not have a controller knob of any kind, you can use the pitch bend and modulation wheels as controller sliders to perform the following exercises. Any device sending MIDI CC events can be assigned to any channel strip or plug-in parameter.
Automation Quick Access allows you to assign a single controller knob to the automation parameter that is currently displayed on the selected track. You need to assign the controller knob only once, and you can then use it to control any parameter on any track. You just select a track and choose the desired parameter from the Automation Parameter menu.
Note
If you're not getting the expected behavior during this exercise, your control surface preferences may be corrupt. Close Logic, then in the Finder, navigate to Home Folder > Library > Preferences. Locate the file named com.apple.logic.pro.cs and drag it to the trash. Open Logic again and start over.
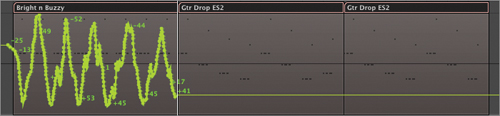
Select the ES 2 track (track 20).
Start playback at the beginning of the first ES 2 region (bar 79).
You may want to solo the ES 2 track to clearly hear the results of your automation.
You will use a controller knob to create wide pan automation on the ES 2 track, creating drastic movements of the synth in the stereo field to add frenzy to this aggressive part of the song.
First, you need to set up a controller knob using Automation Quick Access.
From the Arrange area local menu, choose Track > Track Automation > Automation Quick Access (or press Command-Option-Control-A).
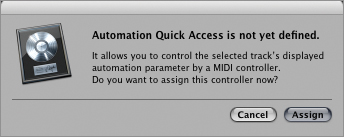
An alert message appears asking you to assign a controller to Automation Quick Access.
Note
If a controller has already been assigned to Automation Quick Access, this alert does not appear, and choosing Track > Track Automation > Automation Quick Access will toggle Automation Quick Access on and off. To reassign Automation Quick Access to a new controller knob, choose Logic Pro > Preferences > Automation, make sure that Automation Quick Access is turned on, click Learn Message and continue with step 5 of this exercise.
Click Assign.
The Automation Preferences window opens, Automation Quick Access is turned on, and you can assign the controller knob that you want to use.
Move a knob or slider on your control surface.
A help tag appears to indicate that the controller has been assigned.
In the Automation Preferences window, click Done.

Close the Automation Preferences window (or press Command-W).
Move the controller knob, giving it a wide swing to cover its entire range from the minimum to the maximum positions.
In the Inspector, the volume fader of the ES 2 should follow the movements of the knob. On the ES 2 automation track, the black line representing the current volume value moves in the same way.
Since Automation Quick Access controls the displayed automation parameter, you need to display the pan parameter. First, make sure that the ES 2 returns to its original volume.
Set the ES 2 volume back to –12 dB.
In the ES 2 track header, choose Pan from the Automation Parameter menu.
Move the controller knob until you see the pan control move on the left Arrange channel strip.
The controller knob now remotely controls the panning of the selected track, and you can use it to record live pan automation.
From the Automation Mode menu, choose Touch.
Start playback before the Guitar Drop section.
When the ES 2 starts, move the knob left and right to generate wide pan automation.
The pan automation is recorded on the track.
Feel free to go crazy with the pan automation in the first few bars, and then gradually narrow the range of your controller movement to decrease the width of the pan automation, finally settling back to a center position around the middle of the Guitar Drop section. Remember, that section evolves from frantic to melodic, and you want to respect that mood progression in the panning of the ES 2 synth.
Set the automation mode back to Read, and listen to your results.
Now that you have assigned a controller to Automation Quick Access, you can use that same controller for any parameter on any track. Try selecting another track, choosing a parameter from the Automation Parameter menu, and automating that parameter using the same controller.
From the Arrange area local menu, choose Track > Track Automation > Automation Quick Access to turn it off.
Using knobs on a control surface to tweak plug-in parameters in real time can be a lot of fun as you discover new ways to “play” the plug-ins as musical instruments. Make sure that you keep this technique in mind when you feel an instrument or a section of a song is a little static or repetitive and could benefit from automation.
When you finish mixing and automating a project, you need to export it—to a CD or an MP3 file, for example—so that you can share it with other listeners.
You can use the cycle area to select the section of the project you are going to bounce. In this exercise, you will export the mix to an uncompressed audio file. First, you will zoom out so that you can see the entire song in the Arrange area.
In the Arrange area, click the background (or press Command-Shift-A).
All regions are deselected.
Press Z, the keyboard shortcut for “Toggle Zoom to fit Selection or All Contents.”
You can see the entire song.
In the Arrange area, click the background to deselect all regions and marquee selections.
Make sure Cycle mode is turned off.
In the Toolbar, click the Bounce button.

The Bounce window opens.
Name the bounce file LVL-Home and save it to the desktop.
In the Destination area, make sure that PCM is selected, so your mix is saved as an uncompressed digital audio file. At the lower right of the Bounce window, you can change the PCM file parameters.
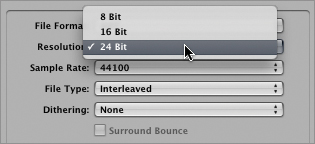
The sample rate is set by default to the sample rate of the project, 44,100 Hz in this case, so don’t change it unless you need to convert the bounced audio file to a new sample rate.
However, this project was recorded mainly with 24-bit audio files. If you intend to send the bounced file to a mastering engineer so that he can put the final touches on the master before it is sent to the CD production plant, you will want to export your mix with the full dynamic range offered by 24-bit audio files.
In the Resolution menu, make sure that 24 Bit is selected.
Click Bounce. A progress indicator shows that your project is bouncing. This process may take a few minutes.
Press Command-Tab to open the Finder, and press Command-Option-H to hide all other applications.
On the desktop, Control-click LVL-Home.aif and choose Open With > iTunes (or QuickTime Player) to preview your final mix.
Using automation, you have taken your song to a new level, fading instruments in and out to evolve the instrumentation and mood of a section in time. You have used offline automation to draw automation on the track, and you have recorded live automation using both the mouse and a control surface. Let your imagination run wild, and try to think of other applications to automate your own projects.
To hear a more complete version of the finished automated mix, go to Logic 9 Files > Media > LVL-Home and, depending on your version of Logic, open one of the following files:
LVL-Home Logic Pro 9
LVL-Home Logic Express 9