We have seen how complex shapes can be built up from vertices, triangle faces, Sprite3D objects, and segments. In practice, it would be a tedious and error-prone task to have to create each of these shapes manually from their base elements every time we wanted to use them. Fortunately, Away3D includes a number of classes that can be used to create a wide range of primitive shapes with ease.
To demonstrate the primitive shapes included in Away3D, we will create an application that will display a selection of them on the screen. This will be implemented by a class called PrimitivesDemo, which will extend the Away3DTemplate class that was introduced in Chapter 1, Building Your First Away3D Application.
The PrimitivesDemo class is quite large, but its function is quite simple. Let's break down the code to see how it works.
package
{
The Object3D class has been imported. Object3D is the base class for all 3D objects that can be added to the scene.
import away3d.core.base.Object3D;
A number of classes have been imported from the away3d.primitives package. Each of these classes represents a primitive shape that is included with the Away3D library.
  import away3d.primitives.Cone;
  import away3d.primitives.Cube;
  import away3d.primitives.Cylinder;
  import away3d.primitives.GeodesicSphere;
  import away3d.primitives.GridPlane;
  import away3d.primitives.LineSegment;
  import away3d.primitives.Plane;
  import away3d.primitives.RegularPolygon;
  import away3d.primitives.RoundedCube;
  import away3d.primitives.SeaTurtle;
  import away3d.primitives.Skybox;
  import away3d.primitives.Skybox6;
  import away3d.primitives.Sphere;
  import away3d.primitives.Torus;
  import away3d.primitives.Triangle;
  import away3d.primitives.Trident;
The application will respond to two Flash events. The first event will be triggered once per frame, which, as we saw from Chapter 1, Building Your First Away3D Application, is used to redraw and animate the scene. The second will be triggered when a keyboard key has been released, and will be used to change the primitive that is displayed on the screen. Responding to these events requires that we import the Event and KeyboardEvent classes from the flash.events package.
  import flash.events.Event;
  import flash.events.KeyboardEvent;
Some of the primitives have unique ways of applying materials. To demonstrate this, we will use the BitmapFileMaterial class. Materials are covered in more detail in Chapter 5, Materials.
import away3d.materials.BitmapFileMaterial;
Just like the SphereDemo class from Chapter 1, Building Your First Away3D Application, the PrimitivesDemo class extends the Away3DTemplate class, allowing it to easily initialize the Away3D engine.
public class PrimitivesDemo extends Away3DTemplate
The PrimitivesDemo class has one property called currentPrimitive, which will reference an Object3D object. Since all the primitive classes extend the Object3D class, either directly or indirectly, we can use this property to reference any of the primitive 3D objects that will be created.
protected var currentPrimitive:Object3D;
The constructor does nothing more than call the Away3DTemplate constructor, which in turn will call the initUI(), initEngine(), initScene(), and initListeners() functions.
  public function PrimitivesDemo():void
  {
    super();
  }
The initEngine() function has been overridden to set the initial position of the camera to be 500 units down towards the negative end of the Z-axis. This will give the camera a good view of the primitive 3D objects, which will be positioned at the origin.
  protected override function initEngine():void
  {
    super.initEngine();
    camera.z = -500;
  }
The initScene() function has been overridden to call the initSphere() function, which will cause the sphere primitive to be displayed on the screen first.
  protected override function initScene():void
  {
    super.initScene();
    initSphere();
  }
The initListeners() function is overridden to register the onKeyUp() function to be called when the KeyboardEvent.KEY_UP event is dispatched by the stage, in response to a key on the keyboard being released.
  protected override function initListeners():void
  {
    super.initListeners();
    stage.addEventListener(KeyboardEvent.KEY_UP, onKeyUp);
  }
The onEnterFrame() function is called once per frame, and it is where we animate the scene.
  protected override function onEnterFrame(event:Event):void
  {
    super.onEnterFrame(event);
In order to see the primitive shapes from a good range of angles, we will rotate them slowly within the scene. This is done by modifying the rotationX, rotationY, and rotationZ properties from the Object3D class. Animating 3D objects in this way is covered in more detail in Chapter 3, Moving Objects.
The speed at which the 3D object will rotate in this example is dependent on the frame rate of the application. The more frames that are rendered per second, the faster the rotation properties will increase, and therefore the faster the 3D object will rotate.
Note
Chapter 3, Moving Objects, shows you how to use the TweenLite library to implement movement and rotation in a frame rate independent manner, while Chapter 13, Performance Tips, shows you how to modify the maximum frame rate.
    currentPrimitive.rotationX += 1;
    currentPrimitive.rotationY += 1;
    currentPrimitive.rotationZ += 1;
  }
The onKeyUp() function is called when the KeyboardEvent.KEY_UP event has been dispatched by the stage, in response to a key on the keyboard being released.
  protected function onKeyUp(event:KeyboardEvent):void
  {
Before a new primitive is created and displayed, the primitive that is currently being displayed has to be removed from the scene. This is done by calling the removeCurrentPrimitive() function.
removeCurrentPrimitive();
We now respond to the particular key that was just released. Each key on the keyboard is identified by a numeric code. These codes can be found at: http://www.adobe.com/livedocs/flash/9.0/main/wwhelp/wwhimpl/common/html/wwhelp.htm?context=LiveDocs_Parts&file=00001136.html. The comments against the case statements note the key that the code relates to.
Inside each case statement, a function is called that will create a new primitive 3D object.
  switch (event.keyCode)
  {
    case 49:  // 1
      initCone();
      break;
    case 50: // 2
      initCube();
      break;
    case 51: // 3
      initCylinder();
      break;
    case 52: // 4
      initGeodesicSphere();
      break;
    case 53: // 5
      initGridPlane();
      break;
    case 54: // 6
      initLineSegment();
      break;
    case 55: // 7
      initPlane();
      break;
    case 56: // 8
      initRegularPolygon();
      break;
    case 57: // 9
      initRoundedCube();
      break;
    case 48: // 0
      initTorus();
      break;
    case 81: // Q
      initTriangle();
      break;
    case 87: // W
      initSeaTurtle();
      break;
    case 69: // E
      initSphere();
      break;
    case 82: // R
      initTrident();
      break;
    case 84: // T
      initSkybox();
      break;
    case 89: // Y
      initSkybox6();
      break;
    default:
      initSphere();
      break;
  }
}
Just as a 3D object has to be added to the scene using the addChild() function from the scene object for it to be visible, to remove it from the scene we call the removeChild() function.
The removeCurrentPrimitive() function, which is called by the onKeyUp() function before a new primitive 3D object is created, will remove the currently displayed 3D object.
protected function removeCurrentPrimitive():void
{
  scene.removeChild(currentPrimitive);
  currentPrimitive = null;
}
The remainder of the PrimitivesDemo class is made up of the functions that create and display the various primitive 3D objects demonstrated by the application. These functions are shown in detail in the coming sections. In addition, a list of the parameters that can be supplied to the primitive class constructors is provided.
As we saw in Chapter 1, Building Your First Away3D Application, it is common for classes included in the Away3D library to accept an init object as a constructor parameter. This init object is usually created using object literal notation. While this practice is common, it is not universal, as you will see with the Trident, Skybox, and SkyBox6 classes.
Unless otherwise noted, the parameters listed in the following tables relate to the properties of the init object.
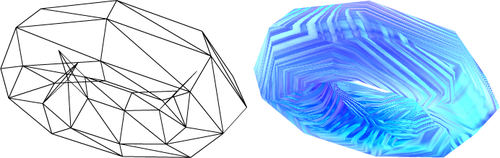
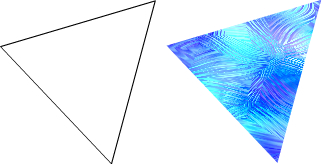
Where appropriate, an accompanying image is also provided showing the primitive as a wireframe model, and with a bitmap material applied to it. Note that these images are for illustrative purposes only, as they do not reflect the output of the example code, which produces primitive 3D objects that use the default WireColorMaterial class as their material.
All of the primitive shapes demonstrated below, with the exception of the trident, extend the Mesh class. Shapes like the triangle, sea turtle, line segment, and skybox extend the Mesh class directly, while the rest extend the AbstractPrimitive class, which in turn extends the Mesh class.
The init object supplied to the constructors of the primitive classes is passed along to the Mesh constructor. This means that there are a number of init object parameters that are common to all the primitive shapes (excluding the trident because it does not extend the Mesh class, and skyboxes, because they do not pass the init object down to the underlying Mesh class).
The majority of these parameters deal with how materials are applied. Materials are covered in more detail in Chapter 5, Materials.
Most of the init object parameters shown in these tables are also properties that can be set or accessed on the object once it has been instantiated. So
var plane = new Plane({bothsides: true});
could also be written as:
var plane = new Plane();plane.bothsides = true;
|
Parameter |
Data Type |
Default Value |
Description |
|---|---|---|---|
|
|
|
Defines a segment material to be used for outlining the 3D object. | |
|
|
|
Defines the material displayed by the base elements that make up the mesh. | |
|
|
|
Defines a material to be used for the back face of the base elements that make up the mesh. | |
|
|
|
Indicates whether both the front and back sides of a face should be rendered. Setting this to true disables back face culling. |
Creating a new instance of a primitive class is very straightforward. Once the appropriate class has been imported from the away3d.primitives package, a new instance of the class can be created and added to the scene directly. This is unlike the triangle face, Sprite3D, and segment objects, which first had to be added to a mesh.
In truth, the process we followed to create a triangle face manually is much the same as the process used by the primitive classes. The big difference is that the primitive classes, which all extend the Mesh class (except for the Trident, Skybox, add SkyBox6 classes), add the triangle faces to themselves instead of adding them to a separate instance of the Mesh class.

The initCone() function is used to create and display an instance of the Cone class.
protected function initCone():void
{
  currentPrimitive = new Cone(
  {
      height: 150
  }
  );
  scene.addChild(currentPrimitive);
}
The following table lists the init object parameters accepted by the Cone class:
|
Parameter |
Data Type |
Default Value |
Description |
|---|---|---|---|
|
|
|
Defines the radius of the cone base. | |
|
|
|
Defines the height of the cone. | |
|
|
|
Defines the number of horizontal segments that make up the cone. | |
|
|
|
Defines the number of vertical segments that make up the cone. | |
|
|
|
Defines whether the end of the cone is left open or is closed. | |
|
|
|
Determines if the cone should be oriented to point up along the Y axis. |
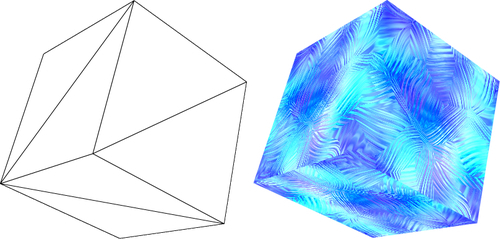
The Cube class creates a standard six-sided cube. By default, the sides are oriented so that they are visible from outside. If you want to place the camera inside the cube and see the sides, you can set the flip init object parameter to true, which will reverse the orientation of the triangle faces that make up the sides of the cube.
The initCube() function is used to create and display an instance of the Cube class.
protected function initCube():void
{
  currentPrimitive = new Cube();
  scene.addChild(currentPrimitive);
}
The following table lists the init object parameters accepted by the Cube class:
|
Parameter |
Data Type |
Default Value |
Description |
|---|---|---|---|
|
|
|
Defines the width of the cube. | |
|
|
|
Defines the height of the cube. | |
|
|
|
Defines the depth of the cube. | |
|
|
|
Flips the orientation of the sides of the cube. This is used to make a cube that is visible from the inside. | |
|
|
|
Defines the number of segments that make up the cube along its width. | |
|
|
|
Defines the number of segments that make up the cube along its height. | |
|
|
|
Defines the number of segments that make up the cube along its depth. | |
|
|
|
Defines how the UV coordinates are applied to the cube. Valid values are | |
|
|
|
A data structure that holds six materials, one for each face of the cube. | |
|
|
|
The same as the faces property. If the faces property has been set, the |
Most of the primitive classes are designed to have a single material applied to them. The Cube class is a little different. Using the cubeMaterials or faces parameters, which both accept a CubeMaterialsData object, you can specify six individual materials to be applied to each side of the cube separately. The CubeMaterialsData class resides in the away3d.primitives.data package.
The CubeMaterialsData constructor takes a number of init object parameters itself: front, back, left, right, top, and bottom. Each of these parameters accepts a material, which will be applied to the appropriate side of the cube.
new Cube(
{
cubeMaterials: new CubeMaterialsData(
{
left: new BitmapFileMaterial("one.jpg"),
front: new BitmapFileMaterial("two.jpg"),
right: new BitmapFileMaterial("three.jpg"),
back: new BitmapFileMaterial("four.jpg"),
top: new BitmapFileMaterial("five.jpg"),
bottom: new BitmapFileMaterial("six.jpg")
}
)
}
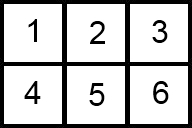
);In addition, by setting the mappingType init object parameter to map6 or CubeMappingType.MAP6, it is possible to display a texture that has been split up into two rows and three columns, with each of the six divisions being applied to one of the sides of the cube.
An example of such a texture is shown in the following figure:

This texture can then be applied to the cube like so.
  new Cube(
  {
    mappingType: CubeMappingType.MAP6,
    material: new BitmapFileMaterial("map6.jpg")
  }
  );
The following image shows the results of both the examples:

The Cylinder class creates either a solid or open-ended cylindrical 3D object.
The initCylinder() function is used to create and display an instance of the Cylinder.
class protected function initCylinder():void
{
  currentPrimitive = new Cylinder(
    {
      height: 150
    }
  );
  scene.addChild(currentPrimitive);
}
The following table lists the init object parameters accepted by the Cylinder class:
|
Parameter |
Data Type |
Default Value |
Description |
|---|---|---|---|
|
|
|
Defines the radius of the cylinder. | |
|
|
|
Defines the height of the cylinder. | |
|
|
|
Defines the number of horizontal segments that make up the cylinder. Increasing this number produces a more rounded cylinder. | |
|
|
|
Defines the number of vertical segments that make up the cylinder. | |
|
|
|
Defines whether the ends of the cylinder are left open or closed. | |
|
|
|
Determines if the cylinder should be oriented to point up along the Y-axis. |
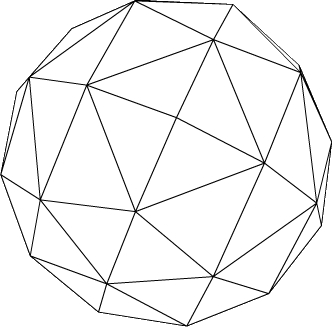
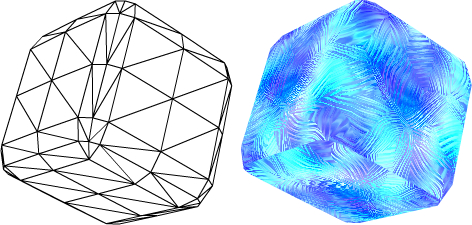
Away3D has two sphere primitives. The geodesic sphere, being constructed with triangle faces of roughly equal size, is the more uniform of the two. This is unlike the regular sphere primitive, where the triangle faces that make up the sphere are smaller towards the top and bottom.
The following image is of a geodesic sphere primitive:
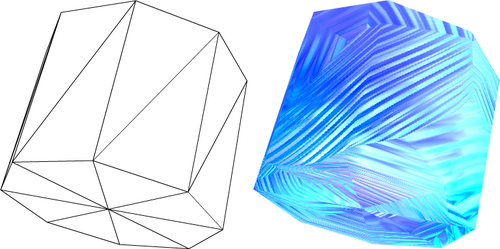
Compare the geodesic sphere with the following image, which is of a regular sphere primitive. Notice how the triangles that make up the regular sphere are much smaller towards the bottom than they are around the middle.
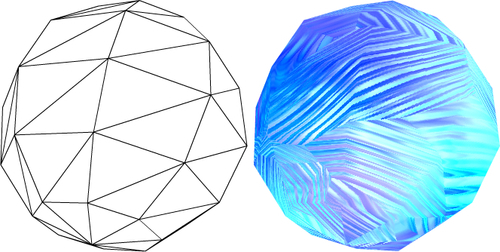
The geodesic sphere will produce a more rounded shape compared with the standard sphere using the same number of triangle faces.
The initGeodesicSphere() function is used to create and display an instance of the GeodesicSphere class.
protected function initGeodesicSphere():void
{
  currentPrimitive = new GeodesicSphere();
  scene.addChild(currentPrimitive);
}
The following table lists the init object parameters accepted by the GeodesicSphere class:
The grid plane is a grid of rectangles, and it is a handy primitive for judging the position of other 3D objects in the scene. Combined with the trident primitive (which is covered in the following section) to show the scene axes, it is very easy to replicate the look of a simple 3D modeling application. As you can see in the following screenshot, grid planes allow you to instantly see a 3D object's position relative to the origin (or any other point in space), which can be invaluable when debugging.

The grid plane is constructed using segments rather than triangle faces. This allows it to display rectangles rather than triangles, which is how the plane primitive (which is constructed using triangle faces) is shown when it has a wire frame material applied to it.
The initGridPlane() function is used to create and display an instance of the GridPlane class.
protected function initGridPlane():void
{
  currentPrimitive = new GridPlane(
    {
      segments: 4
    }
  );
  scene.addChild(currentPrimitive);
}
The following table lists the init object parameters accepted by the GridPlane class:
|
Parameter |
Data Type |
Default Value |
Description |
|---|---|---|---|
|
|
|
Defines the width of the grid. | |
|
|
|
Defines the height of the grid. | |
|
|
|
Sets the number of grid divisions per side, so a value of 2 would create 4 rectangles in the grid. | |
|
|
|
Defines the number of horizontal segments that make up the grid. This property defaults to the value assigned the segments property. | |
|
|
|
Defines the number of vertical segments that make up the grid. This property defaults to the value assigned the segments property. | |
|
|
|
Determines if the grid plane should be oriented to point up along the Y axis. |
The LineSegment class is another example of a primitive that is built using segments rather than triangle faces. It can be used to display a line between two points in space. For convenience, you would probably use the LineSegment class rather than build a mesh and then manually add a segment to it as we did in the section The basic elements of a 3D object.
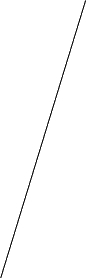
The initLineSegment() function is used to create and display an instance of the LineSegment class.
protected function initLineSegment():void
{
  currentPrimitive = new LineSegment(
    {
      edge: 500
    }
  );
  scene.addChild(currentPrimitive);
}
The following table lists the init object parameters accepted by the LineSegment class:
|
Parameter |
Data Type |
Default Value |
Description |
|---|---|---|---|
|
|
|
Sets the default line segment start and end points to be edge/2 units either side of the origin along the X axis. A value of 100 will create a line segment that starts at (-50, 0, 0) and ends at (50, 0, 0). | |
|
|
|
Sets the start point of the line segment. If specified, this parameter will override the default start point defined by the edge parameter. | |
|
|
|
Sets the end point of the line segment. If specified, this parameter will override the default end point defined by the edge parameter. | |
|
|
|
Sets the number of segments. |
The plane is a flat, rectangular shape that is only visible from one side, by default. When it is viewed from behind, the back-face culling process (which is used to improve the performance of an Away3D application by not rendering the back side of a triangle face) will prevent the primitive from being drawn. Setting the bothsides init object parameter to true will override this behavior, and ensure that the plane is visible from behind as well as from the front.
The initPlane() function is used to create and display an instance of the Plane class.
protected function initPlane():void
{
  currentPrimitive = new Plane(
    {
      bothsides: true
    }
  );
  scene.addChild(currentPrimitive);
}
The following table lists the init object parameters accepted by the Plane class:
|
Parameter |
Data Type |
Default Value |
Description |
|---|---|---|---|
|
|
|
Defines the width of the plane. | |
|
|
|
Defines the height of the plane. | |
|
|
|
Sets the number of segments per side, so a value of 2 would create a plane with 4 segments. | |
|
|
|
Defines the number of horizontal segments that make up the plane. This property defaults to the value assigned the segments property. | |
|
|
|
Defines the number of vertical segments that make up the plane. This property defaults to the value assigned to the segments property. | |
|
|
|
Determines if the plane should be oriented to point up along the Y axis. |
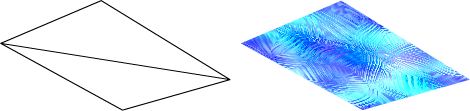
The Triangle class creates a three-sided primitive, and the Plane class creates one with four sides. The RegularPolygon class is a little more flexible, and can be used to create regular shapes with any number of sides (as long as it is more than three).
Just like the Plane class, an instance of the RegularPolygon class will not be visible from the back unless the bothsides init object parameter is set to true.
The initRegularPolygon() function is used to create and display an instance of the RegularPolygon class.
protected function initRegularPolygon():void
{
  currentPrimitive = new RegularPolygon(
    {
      bothsides: true
    }
  );
  scene.addChild(currentPrimitive);
}
The following table lists the init object parameters accepted by the RegularPolygon class:
|
Parameter |
Data Type |
Default Value |
Description |
|---|---|---|---|
|
|
|
Defines the radius of the polygon. | |
|
|
|
Defines the number of sides of the polygon. | |
|
|
|
Defines the subdivision of the polygon. Larger numbers increase the triangle count of the polygon. | |
|
|
|
If true, the polygon will be created lying on the X/Z plane. If false, it will be created lying on the X/Y plane. |
The RoundedCube class produces a cube that has rounded edges. It uses significantly more triangles than the Cube class, so care should be taken to use the RoundedCube class only in situations where the rounded edges can be seen. A rounded and a regular cube off in the distance will look much the same, but the additional triangles used to construct the rounded cube will still take an additional power to process.
The initRoundedCube() function is used to create and display an instance of the RoundedCube class.
protected function initRoundedCube():void
{
  currentPrimitive = new RoundedCube();
  scene.addChild(currentPrimitive);
}
The following table lists the init object parameters accepted by the RoundedCube class:
|
Parameter |
Data Type |
Default Value |
Description |
|---|---|---|---|
|
|
|
Defines the width of the cube. | |
|
|
|
Defines the height of the cube. | |
|
|
|
Defines the depth of the cube. | |
|
|
|
Defines the radius of the corners of the cube. | |
|
|
|
Defines the geometrical subdivision of the rounded cube. | |
|
|
|
Defines if the textures are projected considering the whole cube or adjusting per sides depending on radius. | |
|
|
|
A data structure that holds six materials, one for each face of the cube. | |
|
|
|
The same as the faces parameter (if the faces parameter is specified this parameter is ignored). |
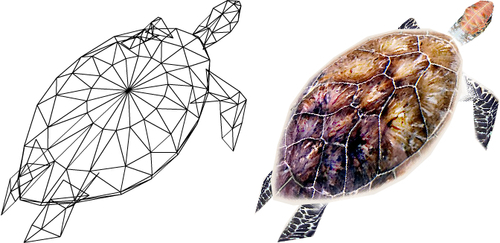
The sea turtle can't really be considered a primitive shape, but can be created and used just like any other primitive. The sea turtle features heavily in demos created by Rob Bateman, one of the core Away3D developers, whose personal website is http://www.infiniteturtles.co.uk/blog/ (no doubt there is a correlation between the URL and the inclusion of the sea turtle as a primitive with Away3D).
Unlike the other primitives, which have shapes that lend themselves to being generated programmatically, the SeaTurtle class is an example of a complex 3D model that has been exported into an ActionScript file. Chapter 6, Models and Animations, will cover the model formats supported by Away3D, and how they can be exported into ActionScript classes, in more detail.
The initSeaTurtle() function is used to create and display an instance of the SeaTurtle class.
protected function initSeaTurtle():void
{
  currentPrimitive = new SeaTurtle(
    {
      scale: 0.3
    }
  );
  scene.addChild(currentPrimitive);
}
The SeaTurtle class has no init object parameters.
Tip
The scale init object parameter, used here to uniformly scale down the size of the 3D object, is interpreted by the Object3D class, which is inherited by the SeaTurtle class. Chapter 3, Moving Objects, covers scaling in more detail.
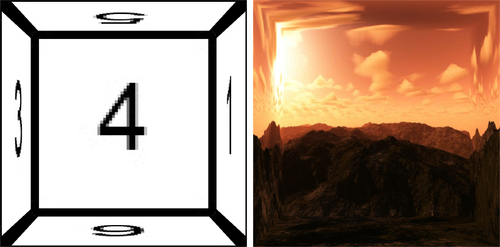
The Skybox class creates a massive cube whose sides face inwards. The dimensions of the skybox are 800,000 x 800,000 x 800,000 units. This compares with the default dimensions of the Cube class, which are 100 x 100 x 100 units. A skybox is designed to enclose the entire scene, including the camera, and usually has a material applied to it that displays a panoramic view displaying the world beyond the scene.
The following image shows two shots of the skybox from the outside, looking through the back of the cube. Usually the camera and all the other 3D objects in the scene will be enclosed by the skybox, but from the outside you can get a sense of how the six sides of the cube can be used to enclose the scene.
The skybox on the left has had some simple numbered bitmap materials applied to each of its sides. This makes it easy to see how the materials passed into the Skybox constructor map to the final result. The skybox on the right has had some specially formatted skybox textures applied to it. This is how a skybox would look in an actual Away3D application.
The initSkybox() function is used to create and display an instance of the Skybox class.
protected function initSkybox():void
{
  currentPrimitive = new Skybox(
    new BitmapFileMaterial("two.jpg"),
    new BitmapFileMaterial("one.jpg"),
    new BitmapFileMaterial("four.jpg"),
    new BitmapFileMaterial("three.jpg"),
    new BitmapFileMaterial("five.jpg"),
    new BitmapFileMaterial("six.jpg")
  );
  scene.addChild(currentPrimitive);
}
The SkyBox class does not take an init object. Instead, it takes six parameters, each one defining a material to be displayed on each of the six sides of the cube. These parameters are listed in the following table:
The Skybox6 class is used to create a skybox, just like the SkyBox class. The only difference is that it takes one material divided into two rows and three columns (much like the Cube class when the mappingType parameter is set to map6), with each of the six segments then being applied to one of the six sides of the cube.
The following figure is a sample of a texture that can be used with the SkyBox6 class:
The initSkybox6() function is used to create and display an instance of the Skybox6 class.
protected function initSkybox6():void
{
  currentPrimitive = new Skybox6(
    new BitmapFileMaterial("map6.jpg")
  );
  scene.addChild(currentPrimitive);
}
The SkyBox6 class does not take an init object. Instead, it takes a single parameter defining the material to be displayed on the cube.
The Sphere class is the second class that can be used to create a spherical 3D object.

The initSphere() function is used to create and display an instance of the Sphere class.
protected function initSphere():void
{
  currentPrimitive = new Sphere();
  scene.addChild(currentPrimitive);
}
The following table lists the init object parameters accepted by the Sphere class:
|
Parameter |
Data Type |
Default Value |
Description |
|---|---|---|---|
|
|
|
Defines the radius of the sphere. | |
|
|
|
Defines the number of horizontal segments that make up the sphere. | |
|
|
|
Defines the number of vertical segments that make up the sphere. | |
|
|
|
Determines if the triangle should be oriented to point up along the Y-axis. |
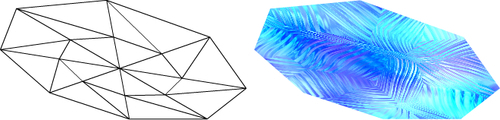
It has already been noted that the GeodesicSphere class produces a more uniform sphere than the Sphere class. So why would you use the Sphere class? The answer become apparent when you apply a bitmap material to 3D objects created using both classes. The following is a screenshot of a 3D object created by the Sphere class. As you can see, the material is neatly applied across the surface of the sphere.
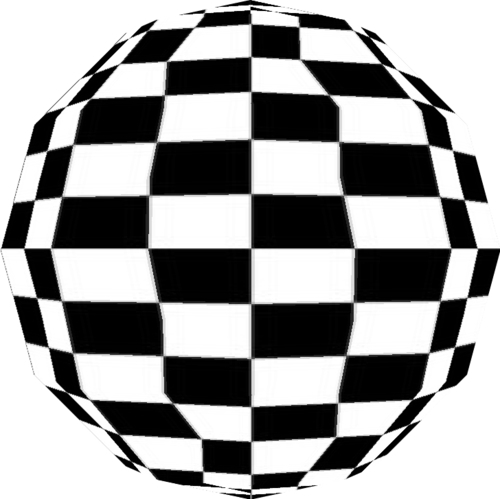
Compare this with how the same material is applied to a 3D object created with the GeodesicSphere class.
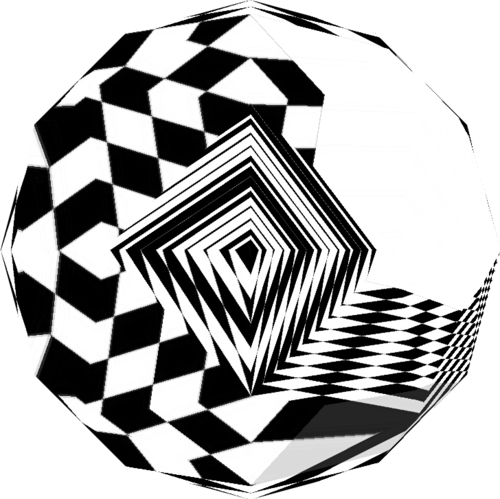
It's clear that while the GeodesicSphere class may produce a higher quality mesh, the UV coordinates are a bit of a mess. On the other hand, the Sphere class will apply a material in a much more consistent and usable fashion.
However, this is only an issue when using bitmap materials. When using simple materials like WireframeMaterial, WireColorMaterial, or ColorMaterial, the GeodesicSphere class may be the better choice.
The Torus class creates a doughnut-shaped 3D object.
The initTorus() function is used to create and display an instance of the Torus class.
protected function initTorus():void
{
  currentPrimitive = new Torus(
    {
      radius: 75,
      tube: 30
    }
  );
  scene.addChild(currentPrimitive);
}
The following table lists the init object parameters accepted by the Torus class:
|
Parameter |
Data Type |
Default Value |
Description |
|---|---|---|---|
|
|
|
Defines the overall radius of the torus. | |
|
|
|
Defines the tube radius of the torus. This parameter cannot be larger than the radius parameter. | |
|
|
|
Defines the number of radial segments that make up the torus. | |
|
|
|
Defines the number of tubular segments that make up the torus. | |
|
|
|
If true, the torus will be created lying on the X/Z plane. If false, it will be created lying on the X/Y plane. |
The Triangle class is built from a single triangle face. Like the Plane and RegularPolygon classes, instance of the Triangle class will not be visible from the rear unless the bothsides init object parameter is set to true.
The initTriangle() function is used to create and display an instance of the Triangle class.
protected function initTriangle():void
{
  currentPrimitive = new Triangle(
    {
      bothsides: true
    }
  );
  scene.addChild(currentPrimitive);
}
The following table lists the init object parameters accepted by the Triangle class:
The Trident class creates three-colored arrows that represent the X, Y, and Z axes. If the showLetters parameter is set to true each of these axes will also be labeled. It is very useful for debugging, as it can be used to show the orientation of a 3D object. Chapter 3, Moving Objects, explains how the orientation of a 3D object can affect the results of certain functions.
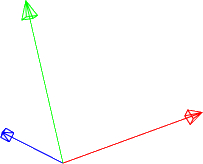
The initTrident() function is used to create and display an instance of the Trident class.
protected function initTrident():void
{
  currentPrimitive = new Trident(100);
  scene.addChild(currentPrimitive);
}
}
The Trident class constructor does not take an init object. The following two parameters in the table are passed directly to the constructor as regular parameters.