Away3D can not only create text 3D objects, it can also warp them by aligning them to arbitrary paths made up of straight lines or curves. This can be used to create some interesting effects, like wrapping text around another 3D object. The following TextWarpingDemo class demonstrates how to align a 3D text object to a wave-like curve, a path made up of two straight lines, and a simple, single curve.
package
{The Path and PathCommand classes are used to define the path that the text will align itself to.
  import away3d.core.geom.Path;
  import away3d.core.geom.PathCommand;
  import away3d.materials.ColorMaterial;
The PathAlignModifier class is responsible for transforming a 3D object to align it to a given path.
 import away3d.modifiers.PathAlignModifier;
  import away3d.primitives.TextField3D;
  import flash.geom.Vector3D;
  import flash.events.KeyboardEvent;

  import wumedia.vector.VectorText;

  public class TextWarpingDemo extends Away3DTemplate
  {
    [Embed(source="Fonts.swf", mimeType="application/octet-stream")]
    protected var Fonts:Class;
    protected var text:TextField3D;

    public function TextWarpingDemo()
    {
      super();
    }

    protected override function initEngine():void
    {
      super.initEngine();
      VectorText.extractFont(new Fonts());
    }

    protected override function initScene():void
    {
      super.initScene();
      this.camera.z = 0;
      followLine();
    }

    protected override function initListeners():void
    {
      super.initListeners();
      stage.addEventListener(
        KeyboardEvent.KEY_UP,
        onKeyUp
        );
    }

    protected function onKeyUp(event:KeyboardEvent):void
    {
      switch (event.keyCode)
      {
        case 49:  // 1
          followContinuousCurve();
          break;
        case 50: // 2
          followLine();
          break;
        case 51: // 3
          followCurve();
          break;
      }
    }
The setupText() function will remove an existing text 3D object (if one exists) and recreate it each time we align it to a new path when the followContinuousCurve(),
followLine(),
and followCurve() functions are called.
    protected function setupText():void
    {
      if (text != null)
      {
        scene.removeChild(text);
      }
You will notice that we have added a few extra spaces in the string we want to display as a 3D object. This is simply to allow the text to align nicely around the right angle we will add in the straight line path created in the followLine() function.
      text = new TextField3D("Vera Sans",
        {
          text: "Away3D    Essentials",
          size: 15,
          material: new ColorMaterial(0)
         }
      );
      scene.addChild(text);
}The next three functions are used to align the 3D text object to various paths. The followContinuousCurve() function will create a wave-like path to align the text 3D object.
    protected function followContinuousCurve():void
    {
We call the setupText() function to create our text 3D object.
setupText();
Next, we create a new Path object. It is this object that will contain the points that define the path that our text 3D object will align itself to.
var path:Path = new Path();
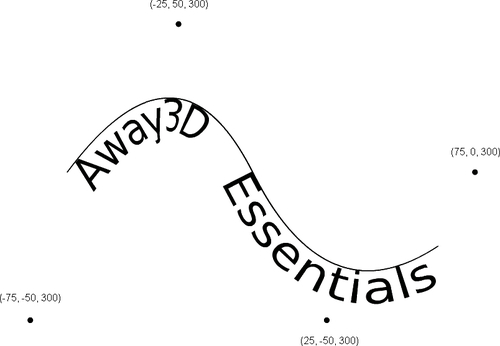
Here we have used the continousCurve() function to define a curve with four points, supplied as an array of Vector3D objects. We have defined a curve that starts at (-75, -50, 300), moves up towards (-25, 50, 300), then moves down towards (25, -50, 300), and finally moves towards the last point at (75, 0, 300).
    path.continuousCurve(
        [
          new Vector3D(-100, -50, 300),
          new Vector3D(-25, 50, 300),
          new Vector3D(25, -50, 300),
          new Vector3D(100, 0, 300)
        ]
      );
This creates a path that looks like the following image:
Tip
Due to the way the curve is calculated, it starts half way in between the first and second points and finishes half way between the last and the second last points. You can confirm this for yourself by adding the following code after the call to the continuousCurve() function:
scene.addChild(new Sphere({x: -75, y: -50, z: 300, radius: 1, material: new ColorMaterial(0)}));scene.addChild(new Sphere({x: -25, y: 50, z: 300, radius: 1, material: new ColorMaterial(0)}));scene.addChild(new Sphere({x: 25, y: -50, z: 300, radius: 1, material: new ColorMaterial(0)}));scene.addChild(new Sphere({x: 75, y: 0, z: 300, radius: 1, material: new ColorMaterial(0)}));path.debugPath(scene);path.showAnchors = false;
Note
The sphere 3D objects are positioned in the scene using the same locations as the points we supplied to the continuousCurve() function. Calling the debugPath() function will then create a PathDebug object, which will visually display the path. You will see that the start and end points of the curve lie inbetween the points we supplied to the continuousCurve() function.
We have also set the showAnchors property to false. When set to true (which is the default) the PathDebug object will add a number of sphere 3D objects to show the points that make up the path, much like we have just done manually. However, these spheres have a radius of 50 units, which would unfortunately completely fill up a scene like this. To work around this, you can modify the PathDebug class file, located in the away3d.core.geom package, to change the size of these debug spheres.
The first line of the addAnchor() function looks like this (it is line 72 of the PathDebug.as file):
var sphere:Sphere = new Sphere({material:mat, radius:50, segmentsH:2, segmentsW:2 });
Simply change the radius init object parameter to something like 5 instead of 50.
We create a new PathAlignModifier object, which will be used to modify our text 3D object so it is aligned to our path. The constructor takes the 3D object that is to be modified, and the path that it will be aligned to.
      var aligner:PathAlignModifier =
        new PathAlignModifier(text, path);
The execute() function will then make the required changes to the text 3D object.
      aligner.execute();
    }
The followLine() function is used to align the text 3D object along a path made up of a number of straight lines.
    protected function followLine():void
    {
      setupText();
      var path:Path = new Path();
Above, we used the continuousCurve() function from the Path class to create our path. Creating a path with straight lines is a little different. For this, we add a number of PathCommands objects to the array property of the Path class.
The first parameter we supply to the PathCommand constructor is the type of command that we are defining. Since we are defining a straight line, we use the PathCommand.LINE constant.
The second parameter is the starting point of the line.
The third parameter is a control point. This is used when defining a curve, but has no relevance when defining a straight line, so we leave it as null.
The fourth parameter is the end point of the line.
We
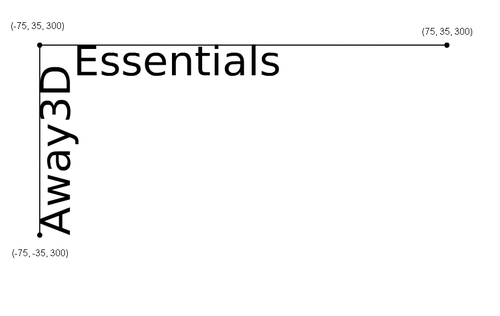
push() two new PathCommand objects on to the array property of the Path class with the following code snippet:
      path.array.push(
        new PathCommand(
          PathCommand.LINE,
          new Vector3D(-75, -35, 300),
          null,
          new Vector3D(-75, 35, 300)
        )
      );
      path.array.push(
        new PathCommand(
          PathCommand.LINE,
          new Vector3D(-75, 35, 300),
          null,
          new Vector3D(75, 35, 300)
        )
      );
This will define a path that looks like the following image:
Tip
Even though it makes no sense to have a modifier point when defining a straight line, you will find that the PathDebug class expects the modifier points not to be null. If you were to call the debugPath() function on the Path object with the straight line path we have defined above, you would see an error because the PathDebug object tries to read a null modifier point object. The easiest way to visually debug a straight line path is to use either the start or end point as a modifier point. In the following code, we have defined the same path as we did previously, with the exception that the start and modifier points are the same:
      path.array.push(
        new PathCommand(
          PathCommand.LINE,
          new Vector3D(-75, -35, 300),
          new Vector3D(-75, -35, 300),
          new Vector3D(-75, 35, 300)
        )
      );
      path.array.push(
         new PathCommand(
          PathCommand.LINE,
          new Vector3D(-75, 35, 300),
          new Vector3D(-75, 35, 300),
          new Vector3D(75, 35, 300)
        )
      );
Again we create a new PathAlignModifier object, supplying the text 3D object and the Path that it should be aligned to, and then call the execute() function to make the changes.
      var aligner:PathAlignModifier =
        new PathAlignModifier(text, path);
      aligner.execute();
    }
The followCurve() function will create a single curve to align the text 3D object.
protected function followCurve():void
{
setupText();
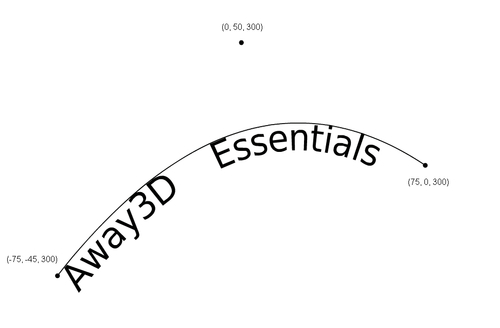
var path:Path = new Path();Just like with the straight line path we created above, the curve is defined by adding a PathCommand object to the array property of the Path class. We specify the type of the PathCommand using the PathCommand.CURVE constant, and then define the curve using a start, modifier, and end point.
      path.array.push(
        new PathCommand(
          PathCommand.CURVE,
          new Vector3D(-75, -45, 300),
          new Vector3D(0, 50, 300),
          new Vector3D(75, 0, 300)
        )
      );
This will define a curve that looks the like the following image:
Again, we create a new PathAlignModifier object, and call it's execute() function.
      var aligner:PathAlignModifier =
        new PathAlignModifier(text, path);
      aligner.execute();
    }
  }
}
When the application is run you can press the 1, 2, and 3 keys on the keyboard to see the results of warping a text 3D object along the three different types of paths.