In Flash programming, a sprite is usually a graphical object that is added to the stage. All the applications that have been presented in this book have made use of the Away3DTemplate class from Chapter 1, Building Your First Away3D Application, which extends the Flash Sprite class.
Away3D also includes a number of sprite classes. Despite the similar names, the Away3D sprite objects are added to a Mesh object and not the Flash stage. Away3D sprites are used to display a texture on a rectangle that is oriented so it always faces the camera.
The three Away3D sprite classes that will be covered in this chapter are:
Actually, the Sprite3D class has already been covered in Chapter 2, Creating and Displaying Primitives, but in this chapter we will look at a more practical implementation of the class.
Because they are fairly simple objects, many sprites can be added to the scene while still maintaining a reasonable frame rate. This allows large numbers of sprites to be used to simulate particle effects like smoke or explosions. We will look at how the Stardust particle system library, written by Allen Chou and available from http://code.google.com/p/stardust-particle-engine, can be integrated with Away3D to create 3D particle effects.
The Sprite3D class is the base for all the sprite classes included in Away3D. We saw a basic example of how it can be used in Chapter 2, Creating and Displaying Primitives. In the Sprite3DDemo class, we will look at a more practical example that uses the Sprite3D class to create a scene of rising balloons.
package
{
import away3d.core.base.Mesh;
import away3d.core.base.Vertex;
import away3d.core.utils.Cast;
import away3d.materials.BitmapMaterial;
import away3d.sprites.Sprite3D;
import flash.geom.Vector3D;
import flash.events.Event;
import flash.utils.getTimer;
[SWF(backgroundColor=0xFFFFFF)]
public class Sprite3DDemo extends Away3DTemplate
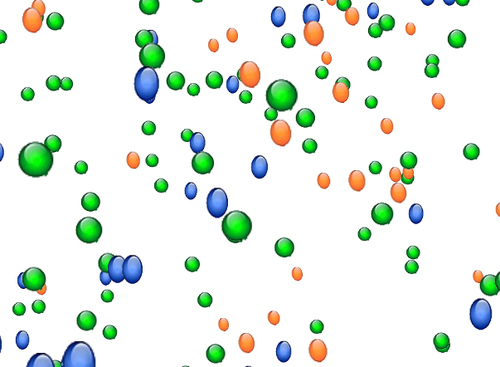
{Each balloon will be represented by one of the three textures. Here we embed a blue, a green, and an orange image.
    [Embed(source = "blueballoon.png")]
    protected var BlueBalloon:Class;
    [Embed(source = "greenballoon.png")]
    protected var GreenBalloon:Class;
    [Embed(source = "orangeballoon.png")]
    protected var OrangeBalloon:Class;
Each Sprite3D object will be added to a collection called balloons.
    protected var balloons:Vector.<Sprite3D> =
new Vector.<Sprite3D>();
The NUMBER_OF_BALLOONS constant defines how many balloons will be added to the scene.
    protected static const NUMBER_OF_BALLOONS:int = 1000;

    public function Sprite3DDemo()
    {
      super();
    }

    protected override function initScene():void
    {
      super.initScene();
The position of the camera is set to the origin of the scene.
this.camera.position = new Vector3D();
The balloonsTextures collection is filled with three BitmapMaterial objects, one for each of the three embedded textures.
      var ballonTextures:Array =
        [
          new BitmapMaterial(
            Cast.bitmap(BlueBalloon),
            {smooth: true}
          ),
          new BitmapMaterial(
            Cast.bitmap(GreenBalloon),
            {smooth: true}
          ),
          new BitmapMaterial(
            Cast.bitmap(OrangeBalloon),
            {smooth: true}
          )
        ];
As we saw in Chapter 2, Creating and Displaying Primitives, Sprite3D objects need to be added to a Mesh object before they are visible within the scene. Here we create a new Mesh object and add it to the scene.
      var mesh:Mesh = new Mesh();
      scene.addChild(mesh);
In this for loop, we create the Sprite3D objects that represent the balloons.
      var sprite:Sprite3D;
      for (var i:int = 0; i < NUMBER_OF_BALLOONS; ++i)
      {
Each Sprite3D object is created using a randomly selected material.
        sprite = new Sprite3D(
          ballonTextures[Math.round(Math.random() *
          (ballonTextures.length - 1))]
        );
The Sprite3D object is then randomly positioned in a box that is 1,000 x 1,000 x 2,000 units in size.
        sprite.x = Math.random() * 1000 - 500;
        sprite.y = Math.random() * 1000 - 500;
        sprite.z = Math.random() * 2000;
        balloons.push(sprite);
Finally, to make the Sprite3D object visible, we add it to the parent Mesh object.
        mesh.addSprite(sprite);
      }
    }

    protected override function onEnterFrame(event:Event):void
    {
      super.onEnterFrame(event);
Every frame we loop through the Sprite3D objects and modify their position so they appear to be floating up into space.
      for (var i:int = 0; i < NUMBER_OF_BALLOONS; ++i)
      {
The position of the Sprite3D objects along their X-axis is mapped to a sine wave. This gives them the appearance of swaying gently in the breeze.
balloons[i].x += Math.sin(getTimer() / 1000 + i);
The Sprite3D objects also rise along the Y-axis. When they reach the top of the imaginary box that contains them, they are dropped down to the bottom of the scene.
        if (balloons[i].y >= 500)
          balloons[i].y = -500;
        else
          balloons[i].y += 5;
      }
    }

  }
}
When the application is run, you will see an endless sea of balloons rising up into the sky. This simple example shows you the power of sprites. If we were to use a thousand sphere 3D objects to represent the balloons, the application would most likely run at only a few frames per second, but with Sprite3D objects we can create an application that runs quickly and smoothly.