Away3D supports a number of methods for displaying effects. As a Flash developer, you are probably already familiar with the standard Flash filter classes from the flash.filters package. Away3D supports the use of these classes, and they can be applied to individual 3D objects, or the entire view, to display effects like a blur effect, glow effect, and drop shadows. And thanks to the new functionality provided by the latest version of Flash, filters can also be applied using Pixel Bender shaders and the ShaderFilter class.
In addition to the filter classes provided by Flash, Away3D includes a FogFilter class. This class can be used to apply a fog-like effect to the scene, while also offering some performance benefits.
Finally, we will see how to make use of the BitmapSession class and the various functions available in Flash to manipulate bitmap images to create a custom effect.
This chapter covers the following topics:
- Applying the Flash filter classes to individual 3D objects, and the entire view
- Applying Pixel Bender shaders using the
ShaderFilterclass - Using the
FogFilterclass - An example of how to use the
BitmapSessionclass can be used to create a custom effect
Both Away3D and Flash define classes called filters that can be used to apply visual effects. Despite both being referred to by the same name, there are significant differences between the two.
Since Flash Player 8 developers have had access to a number of standard filters that can be applied to DisplayObject objects via their filters property, and the introduction of Pixel Bender in Flash Player 10 allows an almost unlimited variety of filters to be created and applied using the ShaderFilter class.
Because each 3D object within an Away3D scene is eventually displayed on the screen by an object that extends the DisplayObject class, the standard Flash filters can be applied to them. This allows for some interesting effects to be created with very little code.
The standard Flash filters can be applied to any individual 3D object whose ownCanvas property is set to true. The ownCanvas property was covered in Chapter 4, Z-Sorting, where it was used to draw a 3D object into its own canvas for the purposes of forcing its sorted depth within the scene. This canvas, as we noted previously, extends the DisplayObject class, which means it can have a Flash filter applied to it. In this way, we can selectively apply the Flash filter effects to individual 3D objects of our choosing.
The Flash filter effects can also be applied to all visible 3D objects at once by assigning them to the View3D object.
Let's create an application called OwnCanvasDemo to demonstrate how filters can be applied to individual and all 3D objects.
package
{
  import away3d.containers.ObjectContainer3D;
  import away3d.core.base.Mesh;
  import away3d.core.utils.Cast;
  import away3d.loaders.Max3DS;
  import away3d.materials.BitmapMaterial;
  import flash.display.BitmapDataChannel;
  import flash.display.Shader;
  import flash.events.Event;
  import flash.events.KeyboardEvent;
The classes imported from the flash.filters package will be used to apply the various effects that this application will demonstrate.
  import flash.filters.BitmapFilterQuality;
  import flash.filters.BlurFilter;
  import flash.filters.DisplacementMapFilter;
  import flash.filters.DisplacementMapFilterMode;
  import flash.filters.GlowFilter;
  import flash.filters.ShaderFilter;
  import flash.geom.Point;
  import flash.text.TextField;

  public class OwnCanvasDemo extends Away3DTemplate
  {
PBJ files are compiled Pixel Bender shaders. The cross-stitch shader used in this example was downloaded from the Adobe Pixel Bender Exchange (http://www.adobe.com/cfusion/exchange/index.cfm?event=productHome&exc=26), which is a website run by Adobe that provides a number of Pixel Bender shaders. Here we have embedded the crosstitch.pbj file as a raw data file.
    [Embed(source="crossstitch.pbj", mimeType="application/octet-stream")]
    protected var PixelBenderShader:Class;
We also embedded a number of other files, including a 3DS model file and two texture image files.
    [Embed(source="ship.3ds", mimeType="application/octet-stream")]
    protected var ShipModel:Class;
    [Embed(source="ship.jpg")]
    protected var ShipTexture:Class;
    [Embed(source="displacementmap.jpg")]
    protected var DisplacementMap:Class;
The filterText property will be used to reference a TextField object, which will be used to display the name of the currently applied filter.
protected var filterText:TextField;
We will create two 3D objects: one will have the filters applied to it, while the other will be an unmodified control. This allows a 3D object that has a filter applied to it to be easily compared with the original 3D object.
    protected var shipModel:ObjectContainer3D;
    protected var shipModel2:ObjectContainer3D;

    public function OwnCanvasDemo()
    {
      super();
    }
The TextField object referenced by the filterText property is initialized in the initUI() function.
    protected override function initUI():void
    {
      super.initUI();
      filterText = new TextField();
      filterText.x = 10;
      filterText.y = 10;
      filterText.width = 300;
      this.addChild(filterText);
    }

    protected override function initListeners():void
    {
      super.initListeners();
      stage.addEventListener(KeyboardEvent.KEY_UP, onKeyUp);
    }
The initScene() function is used to create and display two 3D objects. The process of loading a 3D object from an external model file is described in more detail in Chapter 6, Models and Animations.
    protected override function initScene():void
    {
      super.initScene();
      this.camera.z = 0;
      var shipMaterial:BitmapMaterial =
        new BitmapMaterial(Cast.bitmap(ShipTexture));
      shipModel = Max3DS.parse(Cast.bytearray(ShipModel),
        {
          scale: 0.15,
          z: 500,
          x: 75,
          autoLoadTextures: false,
By setting the ownCanvas init object parameter to true, we are in fact giving this 3D object its own Render Session object to be drawn into. This will allow us to apply filters to this individual 3D object, without affecting other 3D objects in the scene.
          ownCanvas: true
        }
      );
      for each (var child:Mesh in shipModel.children)
        child.material = shipMaterial;
      scene.addChild(shipModel);
A second 3D object is created. As this 3D object will not have any filters applied to it, we do not need to set the ownCanvas init object parameter.
      shipModel2 = Max3DS.parse(Cast.bytearray(ShipModel),
        {
          scale: 0.15,
          z: 500,
          x: -75,
          autoLoadTextures: false
        }
      );
      for each (child in shipModel2.children)
        child.material = shipMaterial;
      scene.addChild(shipModel2);
Calling the clearFilters() function will start the application with no filters applied.
      clearFilters();
    }
The onKeyUp() function is called when a key on the keyboard is released. We will use it to apply the various filters that this application demonstrates.
    protected function onKeyUp(event:KeyboardEvent):void
    {
      switch (event.keyCode)
      {
        case 49: // 1
          clearFilters();
          break;
        case 50: // 2
          applyBlurFilter();
          break;
        case 51: // 3
          applyDisplacementMapFilter();
          break;
        case 52: // 4
          applyGlowFilter();
          break;
        case 53: // 5
          applyShaderFilter();
          break;
        case 54: // 6
          applyViewBlurFilter();
          break;
      }
    }
The onEnterFrame() function is used to rotate each of the 3D objects around within the scene.
    protected override function onEnterFrame(event:Event):void
    {
      super.onEnterFrame(event);
      shipModel.rotationX = shipModel2.rotationX += 2;
      shipModel.rotationY = shipModel2.rotationY += 1;
    }
The clearFilters() function assigns an empty array to the filters property, which is defined by the Object3D class, on both the view and the 3D object referenced by the shipModel variable. This has the effect of removing any filters that may have been applied.
Tip
Despite having the same name, the filters property defined by the Object3D class is not the same as the filters property defined by the DisplayObject class (the Object3D class does not extend the DisplayObject class). However, the two properties can be used in much the same way. When the ownCanvas property for a 3D object is set to true, the array supplied to the filters property will be eventually applied to the filters property of the Render Session object used to draw that 3D object to the screen, making the result of the filter(s) (or lack thereof) visible on the screen.
    protected function clearFilters():void
    {
      filterText.text = "None";
      shipModel.filters = [];
      view.session.filters = [];
}The applyBlurFilter() function is used to blur the 3D object using the BlurFilter class. The BlurFilter class can be used to create the appearance of 3D object that is out of focus or obscured by fog.
    protected function applyBlurFilter():void
    {
The TextField object is updated to reflect the filter that is currently being applied.
filterText.text = "BlurFilter";
A new instance of the BlurFilter class is assigned to an array, which in turn is assigned to the 3D objects filters property.
The first two parameters passed to the BlurFilter constructor, blurX and blurY, define the amount of horizontal and vertical blur respectively.
The third parameter, quality, is used to define how many times the blur effect is applied. The BitmapFilterQuality class defines three constant values, LOW, MEDIUM, and HIGH, although you can directly supply an int value up to 15. The lower the value, the faster the effect will be rendered.
      shipModel.filters = [
        new BlurFilter(
          4,
          4,
        BitmapFilterQuality.LOW)
      ];
    }
The following image shows a 3D space ship object with a blue filter applied to it:

The applyDisplacementMapFilter() function applies an array with a new DisplacementMapFilter object to the filters property. The DisplacementMapFilter class is used to warp the appearance of a 3D object using a displacement map, which is simply an image whose color values are used to offset the position of the pixels in the original image (or in our case the 2D rendering of a 3D object) that it is applied to. This effect can be used to create a rippling effect like a 3D object being under water or behind textured glass.
The first parameter supplied to the DisplacementMapFilter constructor, mapBitmap, is set to a BitmapData object created from one of the embedded images.
The second parameter, mapPoint, is the location on the filtered image at which the top-left corner of the displacement filter will be applied. You can use this if you only want to apply the filter to part of an image, but in our case we want to apply the effect to the whole image, so we supply a new Point object, which has the default coordinates of (0, 0).
The third and fourth parameters, componentX and componentY, define which color channel of the displacement map image affects the X and Y position of pixels respectively. We have used the red channel, but since our displacement map is a gray-scale image, where the red, green, and blue color channels are all equal, the actual choice of color channel here would make no difference to the end result.
The fifth and sixth parameters, scaleX and scaleY, define the multiplier value, which specifies how strong the X and Y axis displacement is, respectively.
The seventh parameter, mode, determines what the Flash Player should do in any empty spaces created by pixels being shifted away. The DisplacementMapFilterMode class defines several options that can be used here.
|
|
Will display the original pixels. |
|
|
Will wrap the pixels around from the other side of the image. |
|
|
Uses the nearest shifted pixel. |
|
|
Fills in the space with a specific color. |
    protected function applyDisplacementMapFilter():void
    {
      filterText.text = "DisplacementMapFilter";
      shipModel.filters = [
        new DisplacementMapFilter(
          Cast.bitmap(DisplacementMap),
          new Point(),
          BitmapDataChannel.RED,
          BitmapDataChannel.RED,
          15,
          15,
          DisplacementMapFilterMode.CLAMP)
      ];
    }
The following image shows a 3D object with the DisplacementMapFilter class applied to it:
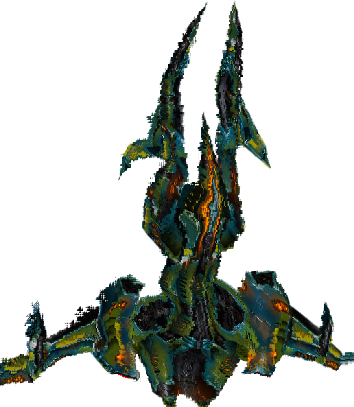
The applyGlowFilter() function is used to apply a new instance of the GlowFilter class, which surrounds the 3D object with a soft glow. This effect is great for highlighting a selection, or to create a halo-like effect.
The first parameter supplied to the GlowFilter constructor, color, defines the color of the glow effect.
The second parameter, alpha, defines the transparency of the glow color.
The third and fourth parameters, blurX and blurY, define the amount of horizontal and vertical glow, respectively.
    protected function applyGlowFilter():void
    {
      filterText.text = "GlowFilter";
      shipModel.filters = [
        new GlowFilter((
          0x4488FF,
          1,
          12,
          12)
      ];
}The following image shows a 3D object with the GlowFilter class applied to it:

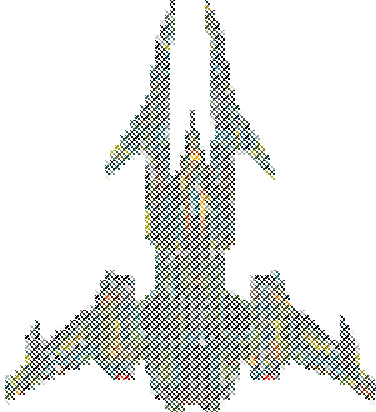
Pixel Bender excels when used to create filter-like effects, and can be used to create a huge variety of effects in addition to the handful of filters included in the flash.filters package. The applyShaderFilter() applies a cross-stitch shader obtained from the Adobe Pixel Bender Exchange as a filter.
Tip
We have already seen Pixel Bender in action with some of the materials covered in Chapter 5, Materials, with classes like Dot3BitmapMaterialF10, PhongPBMaterial, and FresnelPBMaterial. Pixel Bender materials and shaders are features that rely on Flash Player 10.
    protected function applyShaderFilter():void
    {
      filterText.text = "ShaderFilter";
In order to apply a Pixel Bender shader as a filter, we need to create a Shader object. The Shader constructor takes a new instance of the class representing the embedded PBJ file.
var shader:Shader = new Shader(new PixelBenderShader());
This Shader object is then passed to the constructor of a new ShaderFilter object.
var shaderFilter:ShaderFilter = new ShaderFilter(shader);
The ShaderFilter class allows us to use Pixel Bender shaders in the same manner as the filter classes shown previously by assigning it to an array passed to the filters property.
      shipModel.filters = [shaderFilter];
}The following image shows the effect of the cross-stick shader applied to a 3D object:
Filters can also be applied to the entire view instead of individual 3D objects. When a filter is applied to the view all 3D objects will be affected, regardless of whether or not their ownCanvas property is set to true.
Here we assign a BlurFilter to the View3D object, using the same method of passing an array to the filters property. The end result of this action will be that both the 3D objects appear blurred.
protected function applyViewBlurFilter():void
{
clearFilters();
filterText.text = "View BlurFilter";
view.session.filters = [new BlurFilter()];
}
}
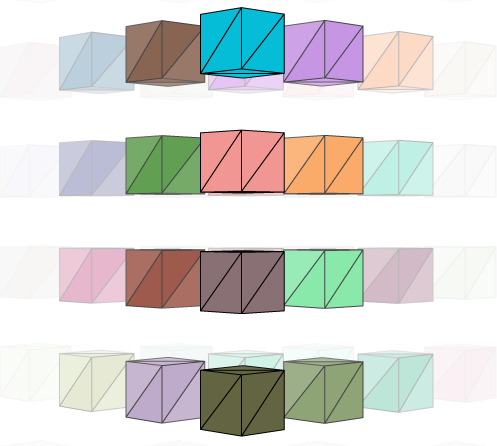
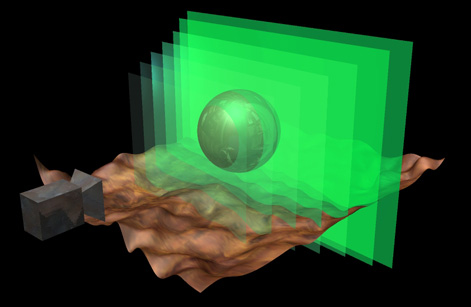
}The filters included with Away3D perform such tasks as sorting the 3D objects in the scene, removing those mesh elements that are further than a specified distance from the camera, or retaining only a specified number of mesh elements. In addition, the FogFilter class can be used to apply a fog-like effect to the scene, shading 3D objects with an increasingly opaque color the further they are from the camera. It does this by subdividing the scene and then shading each face of a 3D object depending on which subdivision they fall in. The following image illustrates a fog filter with seven such subdivisions:
The fog filter offers a performance benefit as well, as the mesh elements that fall behind the last segment are not rendered.
The following Away3DFilterDemo class demonstrates how the FogFilter class can be used by applying it to a scene containing a number of cubes that are rotated around the Y-axis. This rotation moves the individual cubes through the fog effect created by the FogFilter class.
package
{
  import away3d.containers.ObjectContainer3D;
  import away3d.core.filter.FogFilter;
  import away3d.core.render.BasicRenderer;
  import away3d.materials.ColorMaterial;
  import away3d.primitives.Cube;
  import flash.events.Event;

  public class Away3DFilterDemo extends Away3DTemplate
  {
    protected var container:ObjectContainer3D;

    public function Away3DFilterDemo()
    {
      super();
    }

    protected override function initScene():void
    {
      super.initScene();
      this.camera.z = 0;
A Container3D object is created. This will be used as the parent container of the cubes that make up the scene.
      container = new ObjectContainer3D(
        {
          z: 200
        }
      );
      scene.addChild(container);
The scene will be made up of a number of cubes lined up in a 6 x 6 x 6 grid, for a total of 216 cubes. Each cube is added as a child of the ObjectContainer3D object created previously.
      for (var primitveX:int = -50; primitveX <= 50; primitveX += 20)
      {
       for (var primitveY:int = -50; primitveY <= 50; primitveY += 20)
      {
       for (var primitveZ:int = -50; primitveZ <= 50; primitveZ += 20)
          {
            container.addChild(
              new Cube(
                {
                  x: primitveX,
                  y: primitveY,
                  z: primitveZ,
                  width: 10,
                  height: 10,
                  depth: 10
                }
              )
            );
          }
        }
      }
Here we create a new instance of the FogFilter class.
      var fogFilter:FogFilter = new FogFilter(
      {
The
FogFilter class uses a ColorMaterial class to generate the fog effect. Here we have created a new instance of the ColorMaterial class that will display a white color, which means the FogFilter will create a white-fog effect.
material: new ColorMaterial(0xFFFFFF),
The minZ parameter defines how far from the camera the fog effect starts.
minZ: 125,
The
maxZ parameter defines how far from the camera the mesh element in a 3D object can be before it is completely obscured by the fog (and therefore not rendered at all).
maxZ: 175,
The subdivisions parameter defines how many discrete layers there are to the fog effect. Larger values for this parameter produce a smoother appearance at the expense of using more memory.
          subdivions: 5
        }
      );
Despite being included in all the renderers available in Away3D (Chapter 4, Z-Sorting, explains renderers in more detail), the filters property is not a part of the base Renderer class that all the rendering classes implement. So to get access to the filters property, we need to cast the View3D renderer property to either the BasicRenderer or QuadrantRenderer type. Then we can assign the FogFilter class to the filters property as part of an array.
Tip
The BasicRenderer will always append a new ZSortFilter object, used to sort the 3D objects in the scene, to any array assigned to the filters property. The QuadrantRenderer does not append any of its default filters to the supplied array. So when assigning filters to a QuadrantRenderer object, it is best to add them one at a time to the existing array, like so:
(view.renderer as QuadrantRenderer).filters.push(fogFilter);
      (view.renderer as BasicRenderer).filters = [fogFilter];
    }
The container is rotated around its Y-axis. This will rotate its children in and out of the fog, providing an effective demonstration of the effect provided by the FogFilter class.
    protected override function onEnterFrame(event:Event):void
    {
      super.onEnterFrame(event);
      ++container.rotationY;
    }
  }
}
In the following image, you can see how the shading applied to the mesh elements that make up the cubes increases as the distance between them and the camera increases.