The fewer pixels that are drawn to the screen, the faster the rendering process will be. The area that the view will draw into can be defined by assigning a ClippingRectangle object to the clipping property on the View3D class.
To use the RectangleClipping class you first need to import it from the away3d.core.clip package. You can then define the area that Away3D will draw into by supplying the minx, maxX, minY, and maxY init object parameters to the RectangleClipping constructor like so:
view.clipping = new RectangleClipping(
  {
    minX: -100,
    maxX: 100,
    minY: -100,
    maxY: 100
  }
);
The preceding code will limit the output of the view to an area 200 x 200 units in size.
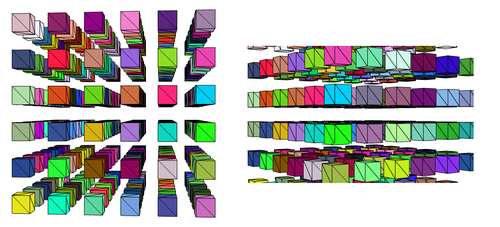
The ViewportClippingDemo application, which can be found on the Packt website, allows you to modify the size of the clipping rectangle at runtime using the arrow up and arrow down keys. You can see the difference that the clipping rectangle makes in the following image. On the left, the clipping rectangle is set to the full area of the stage. On the right, the clipping rectangle has been reduced.