
In this recipe, we are going to explore the possibilities of the Banana Pi to run dynamic web applications. We will install the Nginx web server, the MySQL database server, and the PHP scripting language. In order to get this complete, we are going to set up the widely used blog software, WordPress, on top of our upcoming web stack.
The following ingredients are required to cook the web stack:
- A running Banana Pi with a Debian-based Linux system
- A configured network on the Banana Pi
We need to split this recipe into four parts.
- The setup of the web server
- The setup of the database server
- The setup of PHP
- The setup of WordPress
There are a number of web servers on the market. In this recipe, we are going to use the Nginx (pronounced engine-x) web server as it performs well with the Banana Pi.
To set up the Nginx software, perform the following:
- Open a shell.
- Install Nginx:
$ sudo apt-get install nginx - Apt will ask you to confirm the installation of dependency packages.
- Enter
Yto confirm the dependency packages and continue the installation. After a few seconds to minutes, the web server is installed. - The next step is to configure Nginx. Edit
/etc/nginx/sites-available/default:$ sudo nano /etc/nginx/sites-available/default - Scroll down until you see the first server section (
server {). - You will see the so-called HTTP root (
root /usr/share/nginx/www). In this directory, we are going to put our files. - Below the
rootentry, you see anindexentry. Addindex.phpto the index list, so that the line looks like this:index index.html index.htm index.php;
- Scroll down again until you reach the commented out PHP section (
#location ~ .php$ {). - Uncomment the whole section except for the line:
fastcgi_pass 127.0.0.1:9000. - Your configuration file should look similar to the one shown in the next screenshot:

- Exit and save the nano editor by pressing Ctrl + X, followed by Y and Enter.
- Restart the Nginx web server to apply the changes:
$ sudo /etc/init.d/nginx restart
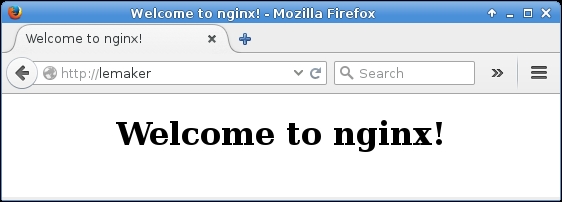
We have just installed the Nginx web server and prepared it to run PHP applications. You can check whether your web server is running. Enter the URL http://HOSTNAME/ (for example, http://lemaker/) into a browser that is on the same network. As mentioned in the previous recipes, you can also use the IP address of your Banana Pi instead of the hostname. You should see a page similar to the following screenshot:
The next step is to install the PHP interpreter for our Nginx web server.
- With the shell opened, install the following packages:
$ sudo apt-get install php5-fpm php5-mysql - Apt will ask you to confirm the installation of the dependency packages.
- Enter
Yto continue the installation. - Apt will configure some files. This may take a few minutes.
- After installing PHP, we are going to change the permissions of the HTTP root, so that our user can place files into that directory flawlessly:
$ sudo chown -R $USER.$GROUP /usr/share/nginx/www - Then we create a PHP script to test the PHP functionality with Nginx:
$ nano /usr/share/nginx/www/info.php - In the nano editor, we write the following PHP code:
<?php
phpinfo();
- Exit and save the newly created file by pressing Ctrl + X, followed by Y and Enter.
Now, PHP should be installed correctly. We test it by opening a browser and using the URL http://lemaker/info.php.
You should see a page with a lot of information about your PHP setup, as shown in the next screenshot:

Now that the web server is running and serving dynamic PHP pages, we need to install a database server as a lot of web applications require a database server:
- With the shell open, install the MySQL server:
$ sudo apt-get install mysql-server - Apt will ask you to confirm the installation of dependency packages.
- Enter
Yto continue the installation. - After some seconds, you will see a Package configuration wizard with a blue background on your shell.
- Choose a password for your MySQL root user. We are using
bananapi.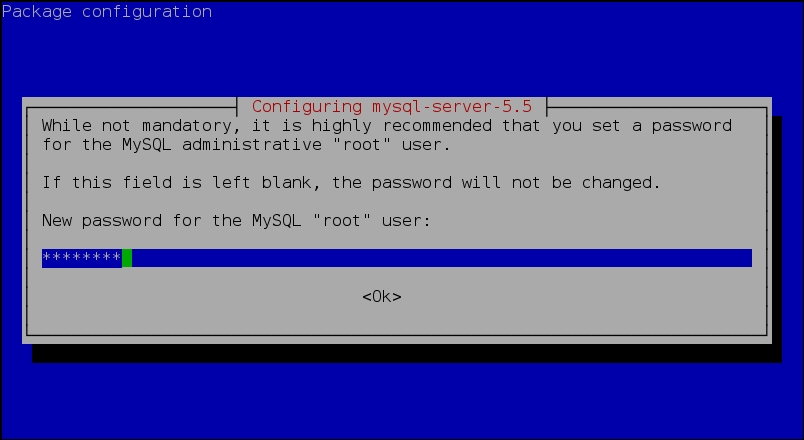
- Repeat the chosen password as requested in the next step.
- Apt will continue configuring the MySQL server.
- We install the default MySQL system tables:
$ sudo mysql_install_db - Then we secure our setup:
$ sudo /usr/bin/mysql_secure_installation - Enter your chosen MySQL root password when prompted.
- You can change your password here, but we continue without changing the root password by entering
n. - When requested whether to remove anonymous users, enter
Y. - Disallow the remote login of the root by entering
Yin the next step. - Next, we remove the test databases by entering
Y. - Finally, we reload the privileges by entering
Y.
We have MySQL installed successfully and can continue installing the blogging software WordPress.
WordPress is an open source blogging web application and content management system (CMS). It is programmed in PHP and uses MySQL as a database backend. In this section, we are going to install WordPress and create a test post:
- With a shell open, download the latest WordPress archive into the HTTP root of Nginx:
$ cd /usr/share/nginx/www
$ wget http://wordpress.org/latest.tar.gz
This will download WordPress blogging software.
- When the download is finished, we unpack the downloaded archive:
$ tar -xzvf latest.tar.gz - We have to create a new MySQL database for our WordPress setup. Enter the command-line tool for MySQL:
$ mysql -u root -p - Enter the MySQL root password.
- Add the new database in the MySQL command-line tool:
mysql> CREATE DATABASE wordpress; - Then we create a MySQL user and allow access to the new database:
mysql> GRANT ALL PRIVILEGES ON wordpress.* TO wordpress@localhost IDENTIFIED BY "wordpress_password"; - Reload the privileges to apply the changes:
mysql> FLUSH PRIVILEGES; - Quit the MySQL command line:
mysql> EXIT
- As shown in the preceding screenshot, the MySQL command line will respond with
Bye. - After setting up our WordPress database, we have to configure the database information for WordPress. Rename
wp-config-sample.phptowp-config.php:$ cd /usr/share/nginx/www/wordpress $ mv wp-config-sample.php wp-config.php
- Edit the
wp-config.phpfile:$ nano wp-config.php - Within
the wp-config.phpfile, scroll down to the define functions. - Modify the define values to the following:
define('DB_NAME', 'wordpress'), define('DB_USER', 'wordpress'), define('DB_PASSWORD', 'wordpress_password'), - Your
wp-config.phpfile should look like as shown in the following screenshot.
- Exit and save nano by pressing Ctrl + X, followed by Y and Enter.
- Execute the setup script on your browser. Go to
http://lemaker/wordpress/wp-admin/install.php. - Enter your desired login details into the installation form. We are using:
- Username:
bananapi_user - Password:
bananapi
- Username:
- Click on Install WordPress.
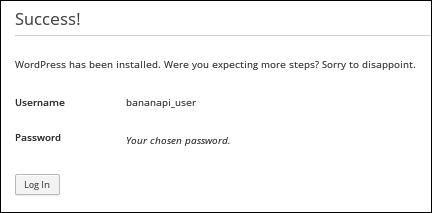
- The setup script will inform you that the installation was successful. The next screenshot shows the page that is shown after the successful installation:
- Click on Log In.
- You will see the login mask of the WordPress administration page.
- Enter your previously chosen login data (
bananapi_user/bananapi). - You are logged into the administration page of WordPress.
- Create a new blog post by clicking on Posts on the left menu and Add New on the upcoming page.
- Enter a title and a blog post text, for example, refer to the following screenshot:
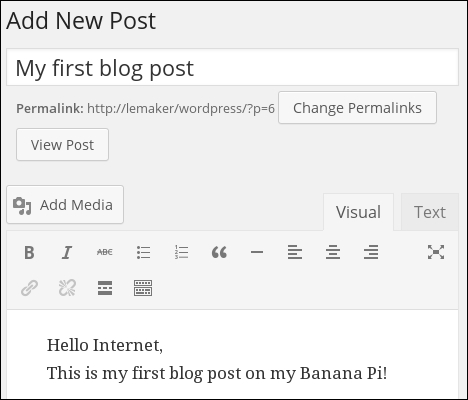
- When finished, click on Publish.
- To read your blog, open another browser tab and go to
http://lemaker/wordpress.
Congratulations! You just have installed a blog application onto your Banana Pi. In the next screenshot, we see our previously created first blog post:

Setting up a real web application such as WordPress from scratch is not a simple task. We have to install and configure several applications and the web application itself on top. But you are finished; you deployed a powerful web stack on your Banana Pi.
To run web applications in general, we must have a web server, a database server, a way to run scripting languages, and the desired web application. These components were installed in this recipe. Besides the installation, all components require configuration.
We started by configuring the default configuration of our web server Nginx. Within /etc/nginx/sites-available/default, we prepared the PHP support. Furthermore, we determined what the HTTP root directory is. It defines the directory that is used by Nginx to serve the websites. Open the browser and go to the hostname of the Banana Pi, the Nginx ascertains, if there is a so-called index file within the configured HTTP root directory and serves it. The index file is the start page. Indeed there is an index.html file within the HTTP root directory that contains HTML code.
This HTML is what Nginx sends to your browser, when going to http://lemaker/. The browser interprets the HTML code and you will see the message Welcome to nginx!.
A scripting language interpreter such as PHP enables us to run a program (a script) and let it create the HTML dynamically before the web server sends the HTML to the client. This is what happens when we create our info.php file containing just one PHP function: phpinfo().
When using PHP code, we have to tell the PHP interpreter that the upcoming code should be interpreted. This is why we are beginning the info.php file with the PHP tag:
<?php
You can also end the PHP part by adding the closing tag ?> at the end of the file. Still it is not necessary if the file is pure PHP (as in our example). Quite the contrary, it is preferable to omit the closing tag in pure PHP files.
So, when browsing the info.php file, the web server recognizes that we are requesting a page with a PHP script. Nginx then communicates with the PHP-FPM (PHP FastCGI Process Manager) service, which interprets the info.php file. The phpinfo() PHP function instructs the PHP interpreter to render information about the current PHP configuration as HTML. After the PHP interpreter finishes interpreting the PHP file, the produced HTML is sent back to Nginx. Nginx again serves the HTML from PHP via the HTTP protocol to the requesting browser.
If a lot of information needs to be saved for longer than one session, this information must be stored somehow. Sometimes data is stored in simple text files, but mostly they are stored in specialized databases. Most web applications store their data in databases. For example, the blog posts or user information of our WordPress setup are stored in our created WordPress database. PHP is able to use various database servers as persistence backends.
We downloaded WordPress by using the command-line tool wget (full name is GNU Wget). It is a program that retrieves files from web servers similar to a browser without the output in a browser window. Therefore, it is a great tool to download files from the Internet using your shell.
Each web application should have its own database. All databases are maintained by a DBMS (Database Management System). We use the open source DBMS MySQL. DBMS has its own users and permissions system. Therefore, we use the MySQL command-line tool to create a WordPress database and a database user that has access to the WordPress database via a password.
These three components (database name, database user, and the password) need to be configured in the web application as well. As we use WordPress, these values are configured in the wp-config.php (WordPress configuration) file.
First, we need to rename the sample configuration by using the mv (move) command. The mv command can move files or directories to other directories. Be careful when using mv; you can easily overwrite files when moving a filename to a filename that already exists. Instead of renaming the sample file, you can also copy the sample file to a real configuration file:
$ cp wp-config-sample.php wp-config.php
After we have configured the database information in the wp-config.php, we can finish the setup by executing the install.php file. That is done using the browser. You will have to enter some information about your blog and create an administrator user for your blog. When the installation is finished, you can log in to the administrator backend of WordPress (wp-admin) and create your first blog post.
You don't need to set up your MySQL database through the MySQL command line. There are more user-friendly tools. For example, one convenient tool is a web application itself called PhpMyAdmin.
You can set up PhpMyAdmin easily:
- With your shell open, change the directory to your HTTP root:
$ cd /usr/share/nginx/www/ - Download the PhpMyAdmin archive:
$ wget http://sourceforge.net/projects/phpmyadmin/files/latest/download -O phpmyadmin.zip - Unpack PhpMyAdmin:
$ unzip phpmyadmin.zip - Optionally, rename the PhpMyAdmin folder that we created:
$ mv phpMyAdmin* phpmyadmin - Change into the
phpmyadmindirectory:$ cd phpmyadmin - With your browser, go to
http://lemaker/phpmyadmin/. - Log in with your MySQL root user credentials:
- Username:
root - Password:
bananapi
- Username:
You are now able to create and modify databases and tables via your web browser and will not need to configure databases on the command line anymore. However, for readability, we still use the MySQL command-line tool to create database.
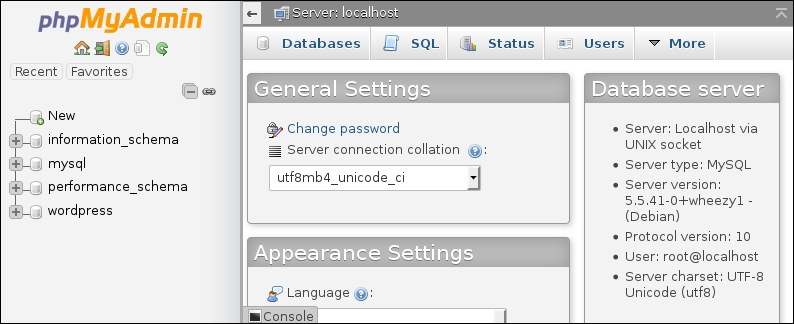
The following screenshot shows the PhpMyAdmin interface after a successful login. On the left-hand side menu, you can see the WordPress database we created:
For performance and convenience reasons, we installed a web application stack based on Nginx, MySQL, and PHP. This is often called a LEMP stack (Linux, Engine-X, MySQL, and PHP). There are other possible stack configurations.
An even more often used web stack is based on the well-known Apache web server (the LAMP web stack). There are also other relational database servers such as PostgreSQL, the MySQL drop-in replacement MariaDB, and many more. Some PHP-based web applications require additional PHP modules that you may need to install through Apt. Furthermore, there exist alternative scripting languages such as JavaScript, Perl, Python, and Ruby that are widely used for web applications. Every technology has its own purpose and fills its own books.
However, our installed stack is suitable for a huge number of web applications as most web applications these days are using PHP and MySQL as its main backend technologies. Still you will need to check out the system requirements of your desired web application. For every technology, there are thousands of websites and books available on how to install and configure them.
In general, you will always need a web server, a database, and a scripting language interpreter for your web application. As you have mastered the basic concepts in this recipe, you will be able to set up almost any web application. Nearly all web applications have a website with an installation manual. It is recommended to follow these guidelines. Besides the system requirements and helpful tips that are mentioned, you will get to know your web application by following these installation manuals.
- The official wiki from the developers of Nginx at http://wiki.nginx.org
- The official website of the PHP: Hypertext Preprocessor at http://php.net/
- A great online book about setting up and using MySQL at https://en.wikibooks.org/wiki/MySQL