
You can use SSH over the Internet by opening a port in your router configuration just as it is demonstrated in the Synchronizing files over the Internet recipe. When doing so, your Banana Pi's SSH server is accessible over the Internet. This means that everybody is able to log in to your Banana Pi. This is especially risky if you have not changed the default password.
There are several methods to improve the security of your SSH server on the Internet. The three most used methods are:
- You use a different port. For example, you could use port 22222 instead of the default 22. This will keep away a lot of potential attackers using superficial port scanners.
- You disable the password login to your SSH server by using SSH keys as the authentication method.
- You disable the possibility to log in as root by setting the variable
PermitRootLogintonoin the/etc/ssh/sshd_configfile.
In this recipe, we are going present the second method. Thus, we generate SSH keys and disable the password login. This will enhance the security of your SSH so that you can use SSH to your Banana Pi over the Internet.
The following ingredients are required on your Banana Pi:
- A running Banana Pi with a Debian-based Linux system
- A configured network on the Banana Pi
- A configured SSH server
- To generate the required key pair, you will need PuTTYGen on your Windows computer or the ssh-keygen application on your Linux computer.
You will have to generate an SSH key pair for your SSH client. Afterwards, we need to store the generated public key on the Banana Pi to be recognizable by the SSH server. After we configured the key authentication on both the Banana Pi and the client, we can disable the SSH password login.
On Windows, you can use the tool PuTTYGen to generate an SSH key pair. The PuTTYGen utility is packed within the putty.zip we presented in Chapter 2, Administration. Let's see how this can be done:
- Start the PuTTYGen application by running the
PuTTYGen.exefile. - Click on the Generate button.
- While the key pair is generated, move the mouse randomly over the blank area.
- After the generation, you will see your public key within the text area.
- To protect your private key, enter a Key passphrase and repeat it in the Confirm passphrase text field, for example,
bananapi. - The passphrase is like a password for your private key. This way you protect your private key in case someone gains access to it.
- Save your private key by clicking on Save private key, selecting a target directory, and entering the filename
private.ppk. - Copy the whole public key by marking the complete text on the text area above Key fingerprint and pressing Ctrl + C or by right-clicking on it and then clicking on Copy.
- The next step is to paste the public key into
/home/bananapi/.ssh/authorized_keyson your Banana Pi. - Open the normal PuTTY application and connect to your Banana Pi.
- Create the
~/.sshdirectory, if it does not exist right now, and set access permissions for the current user only:$ mkdir ~/.ssh $ chmod 700 ~/.ssh
- Edit
~/.ssh/authorized_keysusing an editor like nano:$ nano /home/bananapi/.ssh/authorized_keys - Paste the copied public key by right-clicking on the nano editor:
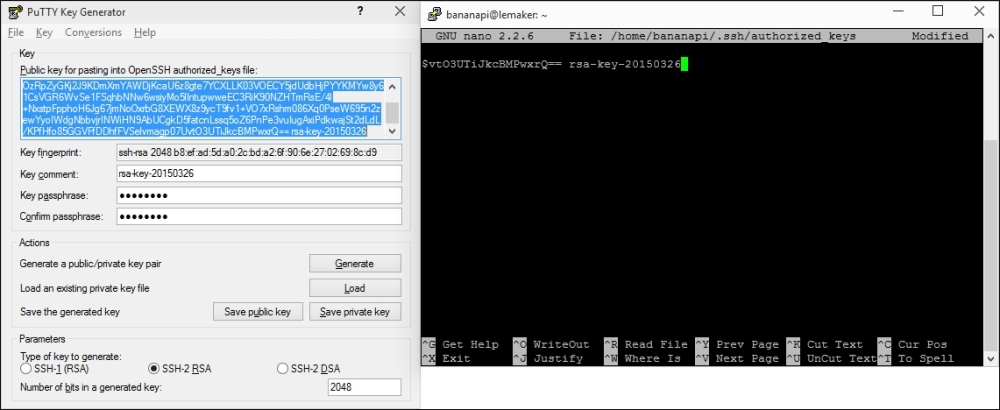
- In the preceding screenshot you can see the selected public key within PuTTYGen. This public key is then pasted into
~/.ssh/authorized_keysusing nano. - Exit and save nano by pressing Ctrl + X, followed by Y and Enter.
- Close the SSH session by pressing Ctrl + D or entering the
exitcommand.
The public key generated from PuTTYGen is now an authorized key. This means, you can connect using your private key and your passphrase from now on. Configure PuTTY to use the private key as the authentication method by following these steps:
- Reopen the normal PuTTY application.
- Click on your Banana Pi profile in Saved Sessions and click on Load.
- Navigate to Connection | SSH | Auth on the right menu.
- Click on Browse next to the Private key file for authentication text field.
- Select the
private.ppkkey file you generated previously. - Return to Session.
- Save the changes to your Saved Session profile.
- Open the connection to your Banana Pi.
- Instead of requesting the SSH password, PuTTY will ask you for the passphrase to unlock your private key.
- Enter the passphrase that you chose after generating the private key. In our example, we used the passphrase
bananapi.
You are logged in successfully using the more secure SSH key authentication.
On Linux systems, you can use the ssh-keygen tool to generate a key pair.
- On your Linux computer, open a shell.
- Generate a key pair:
$ ssh-keygen -t rsa - You will be asked where to save the private key. Confirm the default by pressing Enter.
- Type a passphrase to protect your private key; for example,
bananapi. - Enter the same passphrase again.
- Your private key is stored under
~/.ssh/id_rsaand your public key is stored under~/.ssh/id_rsa.pub. - Transfer the public key to the Banana Pi using the
ssh-copy-idcommand:$ ssh-copy-id bananapi@lemaker - You will be prompted to use the SSH password to transfer the public key. Enter the SSH password.
- Use the
-i(identity) parameter, to start an SSH connection using your private key:$ ssh -i ~/.ssh/id_rsa bananapi@lemaker - You should be able to log in to your Banana Pi when entering your private key's passphrase.
You are logged in successfully using the more secure SSH key authentication. On your client computer, you can now configure the used private key by appending an IdentityFile option to your host configuration in ~/.ssh/config:
Host lemaker
  HostName lemaker
  User bananapi
  IdentityFile ~/.ssh/id_rsa
Once we are able to log in to the Banana Pi via the SSH key authentication, we can disable the password login.
Make sure that you are able to log in via your private key; otherwise, you may lock out yourself. In this case, you have to turn off your Banana Pi, insert the SD card into a Linux computer, and restore the default sshd_config file on the SD card. Therefore, we are creating a backup of the default file in the following steps:
- Open a shell on your Banana Pi.
- Make a backup of the default
/etc/ssh/sshd_config:$ sudo cp /etc/ssh/sshd_config /etc/ssh/sshd_config.backup - Edit
/etc/ssh/sshd_config:$ sudo nano /etc/ssh/sshd_config - Press Ctrl + W to open a search dialog.
- Type
PasswordAuthenticationinto the search field and hit Enter. - You will be directed to the commented out
PasswordAuthenticationoption. - Remove the comment (delete the
#character) and change the value tono. It should look as shown in the next screenshot:
- Exit and save nano by pressing Ctrl + X, followed by Y and Enter.
- Restart the SSH server:
$ sudo /etc/init.d/ssh restart - Exit the SSH session by typing Ctrl + D or using the
exitcommand.
You should be able to log in using your private key as the authentication method only.
You can test it by forcing a password login on your Linux computer or removing the private key file in your PuTTY settings, for example:
- On your Linux computer, try to force a password login via the options (
-o) parameter:$ ssh -o PubkeyAuthentication=no bananapi@lemaker - You should see an error
Permission denied (publickey). - Now try to log in via the private key:
$ ssh -i ~/.ssh/id_rsa bananapi@lemaker - You should be able to log in after entering your correct passphrase.
You have successfully enhanced security by enabling the SSH key authentication.
In this recipe, we enabled the SSH authentication via an SSH key pair. A key pair consists of a public key and a private key (similar to the key pair we created for the SSL certificate). The client's public key can be stored on multiple SSH servers. The private key will remain on the client's machine.
When a client connects to the SSH server using his private key, the server checks whether the client's public key is stored on the server. If this is the case, the user has to enter the passphrase of his private key to unlock it.
The passphrase provides optional additional security. Imagine an attacker gaining access to your private key file. If you had no passphrase on your key file, the attacker could log in to your Banana Pi by just using that hijacked private key. However, as we secured our private key with the passphrase, the attack must have both your private key file and your passphrase to unlock it.
The private and public keys are generated by utilities such as PuTTYGen on Windows or ssh-keygen on Linux. You can store your public key on every SSH server that you have access to and log in via your private key. The private key, however, should be stored safely on your client's computer.
To log in via the SSH key authentication mechanism, you have to tell your SSH client (that is PuTTY or the ssh command) to use a private key file (the identity file). On PuTTY, you have to select the private key in the settings. The ssh command on Linux can take the -i (identity) parameter or use a host configuration in ~/.ssh/config.
Once we are able to log in via our SSH keys, we can disable the SSH password login completely. When this is done, you can safely establish a port forwarding in your router to the Banana Pi and log in from the Internet. Keep in mind that you will need to have your private key to log in.
If you want to add another public key, you can only add it if you log in with a previously permitted private key.
- A great Wiki article about SSH keys in general—SSH keys on Arch Linux wiki at https://wiki.archlinux.org/index.php/SSH_keys