There are two common ways to output audio on Banana Pi. You can pass-through the digital audio signal via HDMI to your television or audio/video receiver, or you can output the signal via the analog line out.
The following ingredients are required to handle audio on Banana Pi:
- A Linux system on Banana Pi
- Access to the shell
- Either an HDMI connection to your TV, audio/video receiver, or…
- A set of stereo headphones or stereo jack cable to any analog audio receiving device with 3.5 mm jack
We are configuring both the HDMI pass-through and the analog audio output in this recipe. In both cases, we have to configure the audio output via the system configuration file /etc/asound.conf (also called asoundrc).
The following steps explain how to enable the HDMI pass-through of the digital sound signal:
- Open a shell.
- With an editor such as nano, edit or create the system configuration file called
/etc/asound.conf:$ sudo nano /etc/asound.conf - Enter the following configuration in the file:
pcm.!default {
  type hw
  card 1
  device 0
}
ctl.!default {
  type hw
  card 1
}
The following screenshot shows the nano editor with the
/etc/asound.confconfiguration file to enable HDMI pass-through:
- Exit and save nano by pressing Ctrl + X, followed by Y and Enter.
- Reboot your Banana Pi to apply the changes:
$ sudo shutdown -r now
You have enabled the HDMI pass-through. If you now play an audio or video file, the digital sound stream will be directed to your receiving HDMI device attached to your Banana Pi.
The following steps explain how to enable the output of the sound signal via the analog line out jack:
- Open a shell.
- With an editor such as nano, edit or create the system configuration file called
/etc/asound.conf:$ sudo nano /etc/asound.conf - Enter the following configuration in the file:
pcm.!default { type hw card 0 device 0 } ctl.!default { type hw card 0 } - Exit and save nano by pressing Ctrl + X, followed by Y and Enter.
- Reboot your Banana Pi to apply the changes:
$ sudo shutdown -r now
You have activated the analog audio output. If you now play an audio or video file, the sound signal will be directed to your headphones or other 3.5 mm stereo jack cable attached to your Banana Pi.
To test the audio output, we are going to install a simple audio player, then download and play an open source audio file:
- Within an opened shell, install the Sound eXchange (SoX) application and the MP3 decoder for SoX:
$ sudo apt-get install sox libsox-fmt-mp3 - Provide or download a test music file, such as the following open source MP3 (Bring Me Home by Robert Kunin):
$ wget https://archive.org/download/RobertKunin-BringMeHomeJustTheBlues/RobertKunin-BringMeHome.mp3 - Play the audio file by using the
playcommand from SoX:$ play RobertKunin-BringMeHome.mp3 - You should hear the song playing.
- Abort the
playcommand by pressing Ctrl + C.
You have just configured your audio output using the ALSA sound system.
Linux systems use the Advanced Linux Sound Architecture (ALSA) system for sound-related tasks. ALSA is the fundamental component of the sound system of Linux computers used to get audio out of sound cards.
The default configuration file of the ALSA system is the /etc/asound.conf file (the so-called asoundrc file). This is where we define the system-wide default sound card we are using.
On Banana Pi, you have two sound cards on the board: the analog sound card (number: 0, name: sunxicodec or sunxi-CODEC) and the HDMI pass-through card (number: 1, name: sunxisndhdmi or sunxi-sndhdmi).
If we do not have asoundrc configuration, ALSA always uses the first card and its first device (that is the analog audio output) per the default plugin. We can modify the default behavior by creating the system-wide asoundrc file (/etc/asound.conf) and superseding the default plugin by declaring a !default section for the PCM and the control device. A PCM is the digital audio interface that generates or passes-through the sound signal. The control device (CTL) is used to help the user to control several aspects of the soundcard's behavior.
If you are using the analog sound card (sunxi-CODEC), you can control the volume via the AlsaMixer on the shell:
$ alsamixer
As you can see in the following screenshot, a shell frontend is presented where you can adjust the volume level of the output (Master) and the input (Line In) signal:
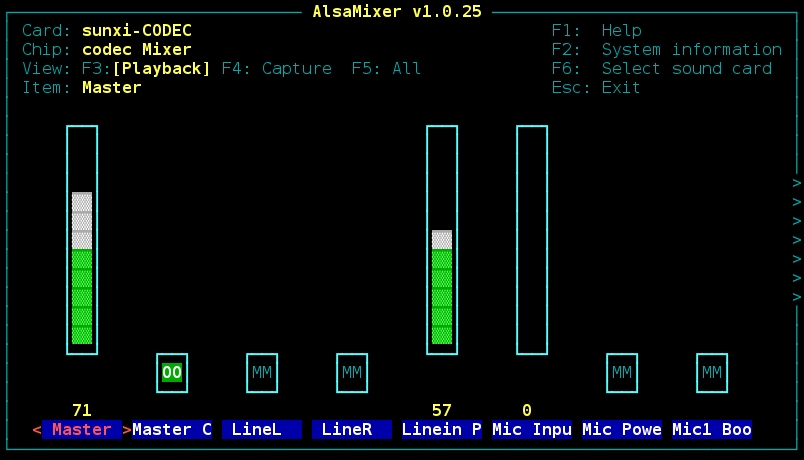
Raise the levels by pressing the up arrow key and lower the levels by pressing the down arrow key. To navigate through the mixer controls, you can also use the left/right arrow keys. You can toggle the muting of various mixers with the M key. By pressing F6, you can switch between the two sound cards. But keep in mind that the HDMI pass-through has no mixer controls, as you control the volume directly on the receiving device. Quit AlsaMixer by pressing Esc.
Tip
If you are using PuTTY on Windows, AlsaMixer might look distorted. You can fix it by setting the correct remote character set at Category | Window | Translation in the PuTTY settings. Depending on the configuration used, try either UTF-8 or any ISO-8859-1 character set as the remote character set.
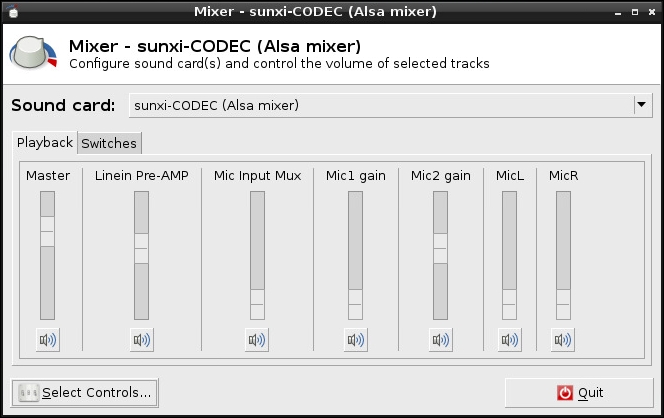
If you like to control the ALSA volume levels on the desktop, the Xfce Mixer is recommendable. Install it via Apt by typing:
$ sudo apt-get install xfce4-mixer
Start the GUI mixer by clicking on the LXDE icon and then navigating to Sound & Video | Mixer or by executing the xfce4-mixer command.
Select your desired mixer controls by clicking on Select Controls and choosing the controls. The following screenshot shows the Xfce Mixer with some activated mixer controls for the analog sound card:
As described in the How it works... section, ALSA is a rudimentary yet powerful low-level sound system for Linux. However, if you prefer to have more control or even route the sound signal through your network, you have the possibility to use the sound server PulseAudio in addition to your ALSA system. By using PulseAudio, you also have the opportunity to control the volume level of your HDMI signal, which is not possible using ALSA only. Yet, you should keep in mind that PulseAudio may cause a higher system load. For lack of space, we cannot discuss the configuration of PulseAudio here. However, there are great websites where PulseAudio is described in detail, for example, on the Debian Wiki (see the upcoming See also section).
- An article about asoundrc configuration on the official ALSA wiki at http://www.alsa-project.org/main/index.php/Asoundrc
- A library of millions of free books, movies, software, music, and more at https://archive.org
- The PulseAudio article on the Debian wiki at https://wiki.debian.org/PulseAudio