
Chapter 12
Fonts
When you're developing any types of applications, inevitably, you'll get the question, “Hey, can we change this font?” The answer depends on which fonts come with the platform, whether you can add other fonts, and how to apply them to the widget or whatever needs the font change.
Fonts in Android applications are no different. Android comes with some fonts, plus a means for adding new fonts. But, as with any new environment, there are a few idiosyncrasies to deal with, as you'll learn in this chapter.
Love the One You're With
Android natively knows three fonts, by the shorthand names of “sans”, “serif”, and “monospace”. These fonts are actually the Droid series of fonts, created for the Open Handset Alliance by Ascender (http://www.ascendercorp.com/oha.html). To use these fonts, you can just reference them in your layout XML, such as the following layout from the Fonts/FontSampler sample project:
<?xml version="1.0" encoding="utf-8"?>

<TableLayout

  xmlns:android="http://schemas.android.com/apk/res/android"

  android:layout_width="fill_parent"

  android:layout_height="fill_parent"

  android:stretchColumns="1">

  <TableRow>

    <TextView

      android:text="sans:"

      android:layout_marginRight="4px"

      android:textSize="20sp"

    />

    <TextView

      android:id="@+id/sans"

      android:text="Hello, world!"

      android:typeface="sans"

      android:textSize="20sp"

    />

  </TableRow>

  <TableRow>
<TextView
android:text="serif:"
android:layout_marginRight="4px"
android:textSize="20sp"
/>
<TextView
android:id="@+id/serif"
android:text="Hello, world!"
android:typeface="serif"
android:textSize="20sp"
/>
</TableRow>
<TableRow>
<TextView
android:text="monospace:"
android:layout_marginRight="4px"
android:textSize="20sp"
/>
<TextView
android:id="@+id/monospace"
android:text="Hello, world!"
android:typeface="monospace"
android:textSize="20sp"
/>
</TableRow>
<TableRow>
<TextView
android:text="Custom:"
android:layout_marginRight="4px"
android:textSize="20sp"
/>
<TextView
android:id="@+id/custom"
android:text="Hello, world!"
android:textSize="20sp"
/>
</TableRow>
</TableLayout>
This layout builds a table showing short samples of the four fonts. Notice how the first three have the android:typeface attribute, whose value is one of the three built-in font faces (e.g., “sans”).
More Fonts
The three built-in fonts are very nice. However, it may be that a designer, a manager, or a customer wants to use a different font, or perhaps you want to use a font for specialized purposes, such as a dingbats font instead of a series of PNG graphics. The easiest way to accomplish this is to package the desired font(s) with your application. Simply create an assets/ folder in the project root, and put your TrueType (TTF) fonts in that folder. You might, for example, create assets/fonts/ and put your TTF files there.
Then you need to tell your widgets to use that font. Unfortunately, you can no longer use layout XML for this, since the XML does not know about any fonts you may have tucked away as an application asset. Instead, you need to make the change in Java code:
public class FontSampler extends Activity {

  @Override

  public void onCreate(Bundle icicle) {

    super.onCreate(icicle);

    setContentView(R.layout.main);


    TextView tv=(TextView)findViewById(R.id.custom);

    Typeface face=Typeface.createFromAsset(getAssets(),

                                          "fonts/HandmadeTypewriter.ttf");


    tv.setTypeface(face);

  }

}
Here, we grab the TextView for our custom sample, and then create a Typeface object via the static createFromAsset() builder method. This takes the application's AssetManager (from getAssets()) and a path within your assets/ directory to the font you want.
Then it is just a matter of telling the TextView to setTypeface(), providing the Typeface you just created. In this case, we are using the Handmade Typewriter font (http://moorstation.org/typoasis/designers/klein07/text01/handmade.htm). Figure 12–1 shows the results.
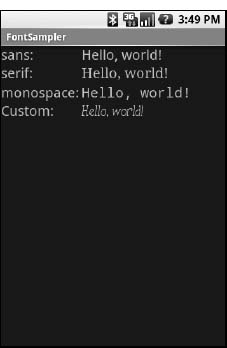
Figure 12–1. The FontSampler application
Note that Android does not seem to like all TrueType fonts. When Android dislikes a custom font, rather than raise an Exception, it seems to substitute Droid Sans (“sans”) quietly. So, if you try to use a different font and it does not appear to be working, the font in question may be incompatible with Android.
Also, you are probably best served by changing the case of your font filenames to be all lowercase, to match the naming convention used in the rest of your resources.
Android 1.6 added the ability to create Typeface objects based on TrueType files in the filesystem, such as on the user's SD card, via the createFromFile() static method on Typeface.
Here a Glyph, There a Glyph
TrueType fonts can be rather pudgy, particularly if they support an extensive subset of the available Unicode characters. The Handmade Typewriter font used in the previous example runs over 70KB. The DejaVu free fonts can run upwards of 500KB apiece. Even compressed, these add bulk to your application, so be careful not to go overboard with custom fonts, lest your application take up too much room on your users' phones.
Conversely, bear in mind that fonts may not have all of the glyphs that you need. As an example, let's talk about the ellipsis.
Android's TextView class has the built-in ability to “ellipsize” text, truncating it and adding an ellipsis if the text is longer than the available space. You can use this via the android:ellipsize attribute, for example. This works fairly well, at least for single-line text.
The ellipsis that Android uses is not three periods. Rather, it is an actual ellipsis character, where the three dots are contained in a single glyph. Hence, if you use the ellipsizing feature, any font that you display will need the ellipsis glyph.
Beyond that, though, Android pads out the string that is rendered on the screen, such that the length (in characters) is the same before and after ellipsizing. To make this work, Android replaces one character with the ellipsis, and replaces all other removed characters with the Unicode character ‘ZERO WIDTH NO-BREAK SPACE’ (U+FEFF). This way, the extra characters after the ellipsis do not take up any visible space on the screen, yet they can be part of the string. However, this means any custom fonts you use for TextView widgets that you use with android:ellipsize must also support this special Unicode character. Not all fonts do, and you will get artifacts in the on-screen representation of your shortened strings if your font lacks this character (e.g., rogue Xs appear at the end of the line).
And, of course, Android's international deployment means your font must handle any language your users might want to enter, perhaps through a language-specific input method editor.
Hence, while using custom fonts in Android is very possible, there are many potential problems. For your applications, you should weigh carefully the benefits of the custom fonts versus their potential costs.