
Signing Your Game's APK
After you have successfully registered as an official Android developer, it's time to prepare your application for publishing. In order to publish your application, you have to sign the APK file. Before you do that, you should make sure everything is in place. Here's a laundry list of things to do before signing the application:
- Remove the
android:debuggableattribute from the<application>tag in your manifest file. - In the
<manifest>tag, you'll find theandroid:versionCodeandandroid:versionNameattributes. If you have already published a previous version of your application, you must increase theversionCodeattribute, and you should also change theversionName. TheversionCodeattribute has to be an integer; theversionNamecan be anything you like. - If your build target is equal to or higher than SDK level 8 (Android 2.2), you should also make sure the
<manifest>tag has theandroid:installLocationattribute set topreferExternalorauto. This will satisfy your users by ensuring that your application is installed on external storage if possible. - Make sure you only specify the permissions that your game really needs. Users don't like to install applications that seem to demand unnecessary permissions. Check the
<uses-permission>tags in your manifest file. - Confirm that you set the
android:minSdkVersionandandroid:targetSdkVersioncorrectly. Your application will only be visible in the Android Market on phones that run a version of Android equal to or higher than the specified SDK version.
Double-check all of these items. Once you are done, you can finally export a signed APK filethat is ready to be uploaded to the market following these steps:
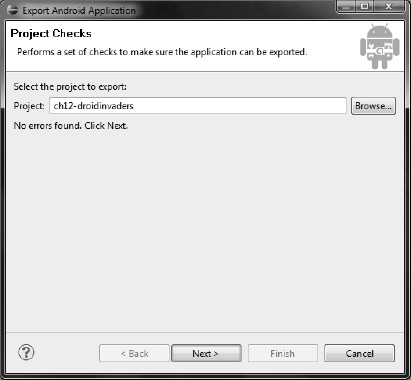
- Right-click your project in the package explorer view and select Android Tools
 Export Signed Application Package. You'll be greeted with the dialog shown in Figure 13–1.
- Click the
Nextbutton to bring up the dialog shown in Figure 13–2.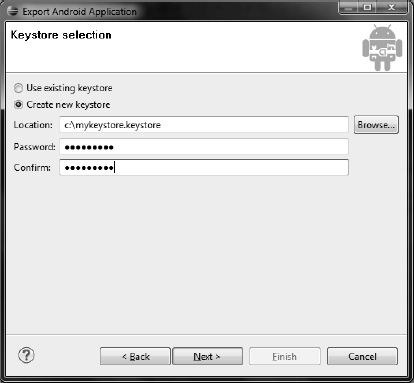
Figure 13–2. Choosing or creating the keystore
- A keystore is a password-protected file that stores the key with which you sign your
APKfile. Since you haven't created one yet, you'll do so now in this dialog. Just provide the location of the keystore, along with the password that you will use to secure it. If you have already created a keystore (for example, if you're publishing a second version of your application), you can select theUse existing keystoreradio button and simply provide the dialog with the location of the keystore file. Click theNextbutton to bring up the dialog shown in Figure 13–3.
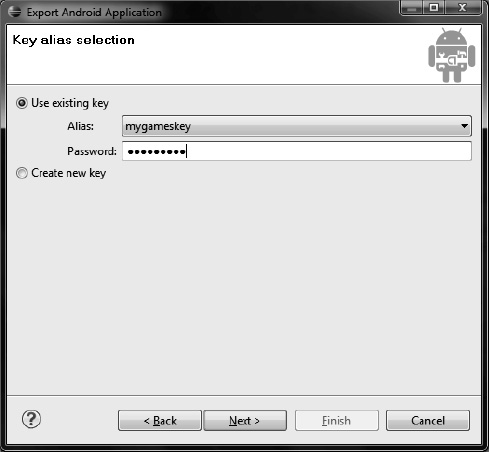
Figure 13–3. Creating the key for signing the
APK - To create a valid key, you have to fill out the alias, password, and validity in years, as well as a name in the
First and Last Namefield. The rest is optional, but it's a good idea to fill it out nevertheless. Another click onNext, and you are shown the final dialog (see Figure 13–4).
- Now, you are basically done. Just specify where the exported
APKfile should be stored and remember the path. You'll need it later when you want to upload thatAPKto the market.
When you want to publish a new version of a previously-published application, you can just reuse the keystore you created the first time you went through the dialog. In the dialog shown in Figure 13–2, just select the keystore file you created previously and provide the password for the keystore. You'll then see the dialog in Figure 13–5.
Just select the key you created previously, provide the password for it, and proceed as before. In both cases, the result will be a signed APK file that is ready for upload to the Android Market.
NOTE: Once you upload a signed APK, you have to use the same key to sign any subsequent versions of the same application.
So, you've created your first signed APK—congratulations! Now let's throw a wrench into the works, and inform you about the market's multiple APK support. For a single app, you can create multiple APKs that use device capability filtering to get the “best fit” for each user who installs your app. This is a great feature because it means you can do things like the following:
- Ship specific image sets that are compatible with specific GPUs.
- Have a limited feature set targeted for older versions of Android.
- Ship larger-scale graphics for larger screen sizes and regular-scale graphics for all others.
Google will surely add more filters as time goes by, but just the set outlined here enables you to really hone in on a target device (like tablets) without having to jump through too many hoops to keep the download at a reasonable size for first-generation device support.