
Texture Mapping: Wallpapering Made Easy
When we wrote Mr. Nom, we loaded some bitmaps and directly drew them to the framebuffer—no rotation involved, just a little bit of scaling, which is pretty easy to achieve. In OpenGL ES, we are mostly concerned with triangles, which can have any orientation or scale we want them to have. So, how can we render bitmaps with OpenGL ES?
Easy, just load up the bitmap to OpenGL ES (and for that matter to the GPU, which has its own dedicated RAM), add a new attribute to each of our triangle's vertices, and tell OpenGL ES to render our triangle and apply the bitmap (also known as texture in OpenGL ES speak) to the triangle. Let's first look at what these new vertex attributes actually specify.
Texture Coordinates
To map a bitmap to a triangle, we need to add texture coordinates to each vertex of the triangle. What is a texture coordinate? It specifies a point within the texture (our uploaded bitmap) to be mapped to one of the triangle's vertices. Texture coordinates are usually 2D.
While we call our positional coordinates x, y, and z, texture coordinates are usually called u and v or s and t, depending on the circle of graphics programmers of which you're a member. OpenGL ES calls them s and t, so that's what we'll stick to. If you read resources on the Web that use the u/v nomenclature, don't get confused: it's the same as s and t. What does the coordinate system look like? Figure 7–10 shows Bob in the texture coordinate system after we uploaded him to OpenGL ES.
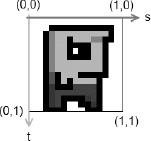
Figure 7–10. Bob, uploaded to OpenGL ES, shown in the texture coordinate system
There are a couple of interesting things going on here. First of all, s equals the x-coordinate in a standard coordinate system, and t is equal to the y-coordinate. The s-axis points to the right, and the t-axis points downward. The origin of the coordinate system coincides with the top-left corner of Bob's image. The bottom-right corner of the image maps to (1,1).
So, what happened to pixel coordinates? It turns out that OpenGL ES doesn't like them a lot. Instead, any image we upload, no matter its width and height in pixels, will be embedded into this coordinate system. The top-left corner of the image will always be at (0,0), and the bottom-right corner will always be at (1,1)—even if, say, the width is twice as large as the height. We call these normalized coordinates, and they actually make our lives easier at times. Now, how can we map Bob to our triangle? Easy, we just give each vertex of the triangle a texture coordinate pair in Bob's coordinate system. Figure 7–11 shows a few configurations.
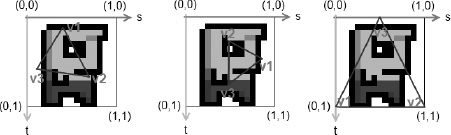
Figure 7–11. Three different triangles mapped to Bob; the names v1, v2, and v3 each specify a vertex of the triangle.
We can map our triangle's vertices to the texture coordinate system however we want. Note that the orientation of the triangle in the positional coordinate system does not have to be the same as it is in the texture coordinate system. The coordinate systems are completely decoupled. So, let's see how we can add those texture coordinates to our vertices.
int VERTEX_SIZE = (2 + 2) * 4;

ByteBuffer byteBuffer = ByteBuffer.allocateDirect(3 * VERTEX_SIZE);

byteBuffer.order(ByteOrder.nativeOrder());

vertices = byteBuffer.asFloatBuffer();

vertices.put( new float[] {    0.0f,   0.0f, 0.0f, 1.0f,

                             319.0f,   0.0f, 1.0f, 1.0f,

                             160.0f, 479.0f, 0.5f, 0.0f});

vertices.flip();
That was easy. All we have to do is to make sure that we have enough room in our buffer and then append the texture coordinates to each vertex. The preceding code corresponds to the rightmost mapping in Figure 7–10. Note that our vertex positions are still given in the usual coordinate system we defined via our projection. If we wanted to, we could also add the color attributes to each vertex, as in the previous example. OpenGL ES would then mix the interpolated vertex colors with the colors from the pixels of the texture to which the triangle maps on the fly. Of course, we'd need to adjust the size of our buffer as well as the VERTEX_SIZE constant accordingly; for example, (2 + 4 + 2) × 4. To tell OpenGL ES that our vertices have texture coordinates, we again use glEnableClientState() together with the glTexCoordPointer() method, which behaves exactly the same as glVertexPointer() and glColorPointer() (can you see a pattern here?).
gl.glEnableClientState(GL10.GL_VERTEX_ARRAY);

gl.glEnableClientState(GL10.GL_TEXTURE_COORD_ARRAY);


vertices.position(0);

gl.glVertexPointer(2, GL10.GL_FLOAT, VERTEX_SIZE, vertices);

vertices.position(2);

gl.glTexCoordPointer(2, GL10.GL_FLOAT, VERTEX_SIZE, vertices);
Nice—that looks very familiar. So, the remaining question is how can we upload the texture to OpenGL ES and tell it to map it to our triangle? Naturally, that's a little bit more involved. But fear not, it's still pretty easy.
Uploading Bitmaps
First, we have to load our bitmap. We already know how to do that on Android.
Bitmap bitmap = BitmapFactory.decodeStream(game.getFileIO().readAsset("bobrgb888.png"));
Here we load Bob in an RGB888 configuration. The next thing we need to do is tell OpenGL ES that we want to create a new texture. OpenGL ES has the notion of objects for a couple of things, such as textures. To create a texture object, we can call the following method:
GL10.glGenTextures(int numTextures, int[] ids, int offset)
The first parameter specifies how many texture objects we want to create. Usually, we only want to create one. The next parameter is an int array to which OpenGL ES will write the IDs of the generated texture objects. The final parameter just tells OpenGL ES to where it should start writing the IDs to in the array.
You've already learned that OpenGL ES is a C API. Naturally, it can't return a Java object for a new texture; instead, it gives us an ID (or handle) to that texture. Each time we want OpenGL ES to do something with that specific texture, we specify its ID. So here's a more complete code snippet showing how to generate a single new texture object and get its ID:
int textureIds[] = new int[1];

gl.glGenTextures(1, textureIds, 0);

int textureId = textureIds[0];
The texture object is still empty, which means it doesn't have any image data yet. Let's upload our bitmap. For this, we first have to bind the texture. To bind something in OpenGL ES means that we want OpenGL ES to use that specific object for all subsequent calls until we change the binding again. Here, we want to bind a texture object for which the method glBindTexture() is available. Once we have bound a texture, we can manipulate its attributes, such as image data. Here's how we can upload Bob to our new texture object:
gl.glBindTexture(GL10.GL_TEXTURE_2D, textureId);

GLUtils.texImage2D(GL10.GL_TEXTURE_2D, 0, bitmap, 0);
First, we bind the texture object with glBindTexture(). The first parameter specifies the type of texture we want to bind. Our image of Bob is 2D, so we use GL10.GL_TEXTURE_2D. There are other texture types, but we don't have a need for them in this book. We'll always specifyGL10.GL_TEXTURE_2D for the methods that need to know the texture type with which we want to work. The second parameter of that method is our texture ID. Once the method returns, all subsequent methods that work with a 2D texture will work with our texture object.
The next method call invokes a method of the GLUtils class, which is provided by the Android framework. Usually, the task of uploading a texture image is pretty involved; this little helper class eases our pain quite a bit. All we need to do is specify the texture type (GL10.GL_TEXTURE_2D), the mipmapping level (we'll look at that in Chapter 11; it defaults to zero), the bitmap we want to upload, and another argument, which has to be set to zero in all cases. After this call, our texture object has image data attached to it.
NOTE: The texture object and its image data are actually held in video RAM, not in our usual RAM. The texture object (and the image data) will get lost when the OpenGL ES context is destroyed (for example, when our activity is paused and resumed). This means that we have to re-create the texture object and re-upload our image data every time the OpenGL ES context is (re-)created. If we don't do this, all we'll see is a white triangle.
Texture Filtering
There's one last thing we need to define before we can use the texture object. It has to do with the fact that our triangle might take up more or less pixels on the screen than there are pixels in the mapped region of the texture. For example, the image of Bob in Figure 7–10 has a size of 128×128 pixels. Our triangle maps to half that image, so it uses (128×128) /2 pixels from the texture (which are also called texels). When we draw the triangle to the screen with the coordinates we defined in the preceding snippet, it will take up (320×480) / 2 pixels. That's a lot more pixels that we use on the screen than we fetch from the texture map. It can, of course, also be the other way around: we use fewer pixels on the screen than from the mapped region of the texture. The first case is called magnification, and the second is called minification. For each case, we need to tell OpenGL ES how it should upscale or downscale the texture. The up- and downscaling are also referred to as minification and magnification filters in OpenGL ES lingo. These filters are attributes of our texture object, much like the image data itself. To set them, we first have to make sure that the texture object is bound via a call to glBindTexture(). If that's the case, we can set them like this:
gl.glTexParameterf(GL10.GL_TEXTURE_2D, GL10.GL_TEXTURE_MIN_FILTER, GL10.GL_NEAREST);

gl.glTexParameterf(GL10.GL_TEXTURE_2D, GL10.GL_TEXTURE_MAG_FILTER, GL10.GL_NEAREST);
Both times we use the method GL10.glTexParameterf(), which sets an attribute of the texture. In the first call, we specify the minification filter; in the second, we call the magnification filter. The first parameter to that method is the texture type, which defaults to GL10.GL_TEXTURE_2D. The second argument tells the method which attributes we want to set; in our case, the GL10.GL_TEXTURE_MIN_FILTER and the GL10.GL_TEXTURE_MAG_FILTER. The last parameter specifies the type of filter that should be used. We have two options here: GL10.GL_NEARESTandGL10.GL_LINEAR.
The first filter type will always choose the nearest texel in the texture map to be mapped to a pixel. The second filter type will sample the four nearest texels for a pixel of the triangle and average them to arrive at the final color. We use the first type of filter if we want to have a pixelated look and the second if we want a smooth look. Figure 7–12 shows the difference between the two types of filters.

Figure 7–12. GL10.GL_NEAREST vs. GL10.GL_LINEAR; the first filter type makes for a pixelated look; the second one smoothes things out a little.
Our texture object is now fully defined: we created an ID, set the image data, and specified the filters to be used in case our rendering is not pixel perfect. It is a common practice to unbind the texture once we are done defining it. We should also recycle the Bitmap we loaded, as we no longer need it. Why waste memory? That can be achieved with the following snippet:
gl.glBindTexture(GL10.GL_TEXTURE_2D, 0);

bitmap.recycle();
Here, 0 is a special ID that tells OpenGL ES that it should unbind the currently bound object. If we want to use the texture for drawing our triangles, we need to bind it again, of course.
Disposing of Textures
It is also useful to know how to delete a texture object from video RAM if we no longer need it (like we use Bitmap.recycle() to release the memory of a bitmap). This can be achieved with the following snippet:
gl.glBindTexture(GL10.GL_TEXTURE_2D, 0);

int textureIds = { textureid };

gl.glDeleteTextures(1, textureIds, 0);
Note that we first have to make sure that the texture object is not currently bound before we can delete it. The rest is similar to how we used glGenTextures() to create a texture object.
A Helpful Snippet
For your reference, here's the complete snippet to create a texture object, load image data, and set the filters on Android:
Bitmap bitmap = BitmapFactory.decodeStream(game.getFileIO().readAsset("bobrgb888.png"));

int textureIds[] = new int[1];

gl.glGenTextures(1, textureIds, 0);

int textureId = textureIds[0];

gl.glBindTexture(GL10.GL_TEXTURE_2D, textureId);

GLUtils.texImage2D(GL10.GL_TEXTURE_2D, 0, bitmap, 0);

gl.glTexParameterf(GL10.GL_TEXTURE_2D, GL10.GL_TEXTURE_MIN_FILTER, GL10.GL_NEAREST);

gl.glTexParameterf(GL10.GL_TEXTURE_2D, GL10.GL_TEXTURE_MAG_FILTER, GL10.GL_NEAREST);

gl.glBindTexture(GL10.GL_TEXTURE_2D, 0);

bitmap.recycle();
Not so bad after all. The most important part of all this is to recycle the Bitmap once we're done; otherwise, we'd waste memory. Our image data is safely stored in video RAM in the texture object (until the context is lost and we need to reload it again).
Enabling Texturing
There's one more thing before we can draw our triangle with the texture. We need to bind the texture, and we need to tell OpenGL ES that it should actually apply the texture to all triangles we render. Whether or not texture mapping is performed is another state of OpenGL ES, which we can enable and disable with the following methods:
GL10.glEnable(GL10.GL_TEXTURE_2D);

GL10.glDisable(GL10.GL_TEXTURE_2D);
These look vaguely familiar. When we enabled/disabled vertex attributes in the previous sections, we used glEnableClientState()/glDisableClientState(). As we noted earlier, those are relics from the infancy of OpenGL itself. There's a reason why those are not merged with glEnable()/glDisable(), but we won't go into that here. Just remember to use glEnableClientState()/glDisableClientState() to enable and disable vertex attributes, and use glEnable()/glDisable() for any other states of OpenGL, such as texturing.
Putting It Together
With that out of our way, we can now write a small example that puts all of this together. Listing 7–7 shows an excerpt of theTexturedTriangleTest.java source file, listing only the relevant parts of the TexturedTriangleScreen class contained in it.
Listing 7–7.Excerpt from TexturedTriangleTest.java; Texturing a Triangle
class TexturedTriangleScreen extends Screen {

    final int VERTEX_SIZE = (2 + 2) * 4;

    GLGraphics glGraphics;

    FloatBuffer vertices;

    int textureId;
    public TexturedTriangleScreen(Game game) {

        super(game);

        glGraphics = ((GLGame) game).getGLGraphics();


        ByteBuffer byteBuffer = ByteBuffer.allocateDirect(3 * VERTEX_SIZE);

        byteBuffer.order(ByteOrder.nativeOrder());

        vertices = byteBuffer.asFloatBuffer();

        vertices.put( new float[] {    0.0f,   0.0f, 0.0f, 1.0f,

                                     319.0f,   0.0f, 1.0f, 1.0f,

                                     160.0f, 479.0f, 0.5f, 0.0f});

        vertices.flip();

        textureId = loadTexture("bobrgb888.png");

    }


    public int loadTexture(String fileName) {

        try {

            Bitmap bitmap = BitmapFactory.decodeStream(game.getFileIO().readAsset(fileName));

            GL10 gl = glGraphics.getGL();

            int textureIds[] = new int[1];

            gl.glGenTextures(1, textureIds, 0);

            int textureId = textureIds[0];

            gl.glBindTexture(GL10.GL_TEXTURE_2D, textureId);

            GLUtils.texImage2D(GL10.GL_TEXTURE_2D, 0, bitmap, 0);

            gl.glTexParameterf(GL10.GL_TEXTURE_2D, GL10.GL_TEXTURE_MIN_FILTER, GL10.GL_NEAREST);

            gl.glTexParameterf(GL10.GL_TEXTURE_2D, GL10.GL_TEXTURE_MAG_FILTER, GL10.GL_NEAREST);

            gl.glBindTexture(GL10.GL_TEXTURE_2D, 0);

            bitmap.recycle();

            return textureId;

        } catch(IOException e) {

            Log.d("TexturedTriangleTest", "couldn't load asset 'bobrgb888.png'!");

            throw new RuntimeException("couldn't load asset '" + fileName + "'");

        }

    }


    @Override

    public void present(float deltaTime) {

        GL10 gl = glGraphics.getGL();

        gl.glViewport(0, 0, glGraphics.getWidth(), glGraphics.getHeight());

        gl.glClear(GL10.GL_COLOR_BUFFER_BIT);

        gl.glMatrixMode(GL10.GL_PROJECTION);

        gl.glLoadIdentity();

        gl.glOrthof(0, 320, 0, 480, 1, -1);


        gl.glEnable(GL10.GL_TEXTURE_2D);

        gl.glBindTexture(GL10.GL_TEXTURE_2D, textureId);


        gl.glEnableClientState(GL10.GL_VERTEX_ARRAY);

        gl.glEnableClientState(GL10.GL_TEXTURE_COORD_ARRAY);


        vertices.position(0);

        gl.glVertexPointer(2, GL10.GL_FLOAT, VERTEX_SIZE, vertices);

        vertices.position(2);

        gl.glTexCoordPointer(2, GL10.GL_FLOAT, VERTEX_SIZE, vertices);
        gl.glDrawArrays(GL10.GL_TRIANGLES, 0, 3);

    }
We took the freedom to put the texture loading into a method called loadTexture(), which simply takes the filename of a bitmap to be loaded. The method returns the texture object ID generated by OpenGL ES, which we'll use in the present() method to bind the texture.
The definition of our triangle shouldn't be a big surprise; we just added texture coordinates to each vertex.
The present() method does what it always does: it clears the screen and sets the projection matrix. Next, we enable texture mapping via a call to glEnable() and bind our texture object. The rest is just what we did before: enable the vertex attributes we want to use; tell OpenGL ES where it can find them and what strides to use; and finally, draw the triangle with a call to glDrawArrays(). Figure 7–13 shows the output of the preceding code.
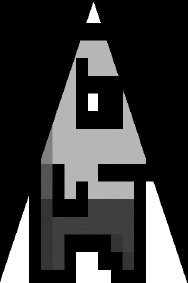
Figure 7–13. Texture mapping Bob onto our triangle
There's one last thing we haven't mentioned yet, and it's of great importance:
All bitmaps we load must have a width and height of a power of two.
Stick to it or else things will explode.
So what does this actually mean? The image of Bob that we used in our example has a size of 128×128 pixels. The value 128 is 2 to the power of 7 (2×2×2×2×2×2×2). Other valid image sizes would be 2×8, 32×16, 128×256, and so on. There's also a limit to how big our images can be. Sadly, it varies depending on the hardware on which our application is running. The OpenGL ES 1.x standard doesn't specify a minimally supported texture size; however, from experience, it seems that 512×512-pixel textures work on all current Android devices (and most likely will work on all future devices as well). We'd even go so far to say that 1024×1024 is OK as well.
Another issue that we have pretty much ignored so far is the color depth of our textures. Luckily, the method GLUtils.texImage2D(), which we used to upload our image data to the GPU, handles this for us fairly well. OpenGL ES can cope with color depths like RGBA8888, RGB565, and so on. We should always strive to use the lowest possible color depth to decrease bandwidth. For this, we can employ the BitmapFactory.Options class, as in previous chapters, to load an RGB888 Bitmap to a RGB565 Bitmap in memory, for example. Once we have loaded our Bitmap instance with the color depth we want it to have, GLUtils.texImage2D() takes over and makes sure that OpenGL ES gets the image data in the correct format. Of course, you should always check whether the reduction in color depth has a negative impact on the visual fidelity of your game.
A Texture Class
To reduce the code needed for subsequent examples, we wrote a little helper class called Texture. It will load a bitmap from an asset and create a texture object from it. It also has a few convenience methods to bind the texture and dispose of it. Listing 7–8 shows the code.
Listing 7–8. Texture.java, a Little OpenGL ES Texture Class
package com.badlogic.androidgames.framework.gl;


import java.io.IOException;

import java.io.InputStream;


import javax.microedition.khronos.opengles.GL10;


import android.graphics.Bitmap;

import android.graphics.BitmapFactory;

import android.opengl.GLUtils;


import com.badlogic.androidgames.framework.FileIO;

import com.badlogic.androidgames.framework.impl.GLGame;

import com.badlogic.androidgames.framework.impl.GLGraphics;


public class Texture {

    GLGraphics glGraphics;

    FileIO fileIO;

    String fileName;

    int textureId;

    int minFilter;

    int magFilter;


    public Texture(GLGame glGame, String fileName) {

        this.glGraphics = glGame.getGLGraphics();

        this.fileIO = glGame.getFileIO();

        this.fileName = fileName;

        load();

    }


    private void load() {

        GL10 gl = glGraphics.getGL();

        int[] textureIds = new int[1];
        gl.glGenTextures(1, textureIds, 0);

        textureId = textureIds[0];


        InputStream in = null;

        try {

            in = fileIO.readAsset(fileName);

            Bitmap bitmap = BitmapFactory.decodeStream(in);

            gl.glBindTexture(GL10.GL_TEXTURE_2D, textureId);

            GLUtils.texImage2D(GL10.GL_TEXTURE_2D, 0, bitmap, 0);

            setFilters(GL10.GL_NEAREST, GL10.GL_NEAREST);

            gl.glBindTexture(GL10.GL_TEXTURE_2D, 0);

        } catch(IOException e) {

            throw new RuntimeException("Couldn't load texture '" + fileName +"'", e);

        } finally {

            if(in != null)

                try { in.close(); } catch (IOException e) { }

        }

    }


    public void reload() {

        load();

        bind();

        setFilters(minFilter, magFilter);

        glGraphics.getGL().glBindTexture(GL10.GL_TEXTURE_2D, 0);

    }


    public void setFilters(int minFilter, int magFilter) {

        this.minFilter = minFilter;

        this.magFilter = magFilter;

        GL10 gl = glGraphics.getGL();

        gl.glTexParameterf(GL10.GL_TEXTURE_2D, GL10.GL_TEXTURE_MIN_FILTER, minFilter);

        gl.glTexParameterf(GL10.GL_TEXTURE_2D, GL10.GL_TEXTURE_MAG_FILTER, magFilter);

    }


    public void bind() {

        GL10 gl = glGraphics.getGL();

        gl.glBindTexture(GL10.GL_TEXTURE_2D, textureId);

    }


    public void dispose() {

        GL10 gl = glGraphics.getGL();

        gl.glBindTexture(GL10.GL_TEXTURE_2D, textureId);

        int[] textureIds = { textureId };

        gl.glDeleteTextures(1, textureIds, 0);

    }

}
The only interesting thing about this class is the reload() method, which we can use when the OpenGL ES context is lost. Also note that the setFilters() method will only work if the Texture is actually bound. Otherwise, it will set the filters of the currently bound texture.
We could also write a little helper method for our vertices buffer. But before we can do this, we have to discuss one more thing: indexed vertices.