By now you have ELK Stack configured and running. Nevertheless, we still haven’t addressed the most important part: security. When you deploy ELK Stack to a production environment, you cannot let the world have access to your data. You need a system and a set of restrictions for accessing your data. Today, when hackers, script kiddies, and bots are scouring the Internet for private corporate information, you must make sure that your data is secure and know just who is accessing that data and what they are retrieving.
Shield is a plug-in for Elasticsearch, and it is what you need to secure your Elasticsearch clusters. In a nutshell, here are the main Shield features :
IP filtering
Authentication
Authorization
Node encryption
Auditing
To learn more about these features, let’s install the Shield plug-in for Elasticsearch. Shield is a commercial plug-in, and a 30-day free-trial license is available.
Elastic Shield is a commercial plug-in. You will have to pay for it once the trial period expires. Why am I recommending a commercial product here? The answer is that when speaking about production servers and ELK clusters, you’ll require a program that has 24/7 support. If something goes wrong, you will be able to call someone to resolve the issue, rather than searching through public forums and possibly waiting for an answer to your question. Downtime in a production environment is very expensive for a company. Furthermore, the commercial plug-in is always up to date, with the latest versions of ELK Stack. To obtain a commercial license, you can subscribe using the following link: www.elastic.co/subscriptions .
Search Guard is an open source alternative to Shield. It is available at the following address: https://floragunn.com/searchguard/ .
Preinstallation Setup
To install the latest version of Shield, you should have the following:
Java 7 or Java 8
Elasticsearch 2.4 and the Elasticsearch license
Installing Shield on CentOS 7
On CentOS 7, the Elasticsearch home directory is set at /usr/share/elasticsearch. To change the directory, use the following:
[vishne0@centylog ∼]$ cd /usr/share/elasticsearch/Once inside the directory, you will install the plug-in.
[vishne0@centylog elasticsearch sudo bin/plugin install shield[sudo] password for vishne0:-> Installing shield...Trying https://download.elastic.co/elasticsearch/release/org/elasticsearch/plugin/shield/2.4.0/shield-2.4.0.zip ...Downloading ...............................................................................................................................................DONEVerifying https://download.elastic.co/elasticsearch/release/org/elasticsearch/plugin/shield/2.4.0/shield-2.4.0.zip checksums if available ...Downloading .DONE@@@@@@@@@@@@@@@@@@@@@@@@@@@@@@@@@@@@@@@@@@@@@@@@@@@@@@@@@@@@ WARNING: plugin requires additional permissions @@@@@@@@@@@@@@@@@@@@@@@@@@@@@@@@@@@@@@@@@@@@@@@@@@@@@@@@@@@@* java.lang.RuntimePermission setFactory
Visit the following link for descriptions of what these permissions allow and their associated risks: http://docs.oracle.com/javase/8/docs/technotes/guides/security/permissions.html .
Continue with installation? [y/N]yInstalled shield into /usr/share/elasticsearch/plugins/shield
Now that Shield is installed, as seen in Figure 8-1, let’s start Elasticsearch:
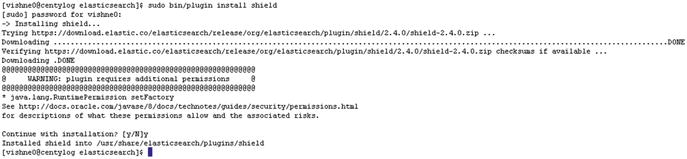
Figure 8-1. Installing Shield for Elasticsearch on CentOS 7
[vishne0@centylog ∼]$ sudo service elasticsearch startThis command checks the logs in /var/log/elasticsearch/youcluster.log, and you should see something like the following:
[2016-08-15 04:59:11,430][INFO ][plugins ] [centylog] modules [reindex, lang-expression, lang-groovy], plugins [license, shield], sites []Shield is now installed and loaded properly. You have to configure Shield for user authentication, but we will do that later.
Installing Shield on Ubuntu 16.04.1 LTS
The Ubuntu Elasticsearch home directory is located at /usr/share/elasticsearch. Change that directory to the following:
vishal_gnutech@instance-1:/$ cd /usr/share/elasticsearch/Now we will install Shield for Elasticsearch. First, install the license.
vishal_gnutech@instance-1:/usr/share/elasticsearch$ sudo bin/plugin install licenseNow let’s install the plug-in.
vishal_gnutech@instance-1:/usr/share/elasticsearch$ sudo bin/plugin install shieldShield is now installed on Ubuntu 16.04.1 LTS, as shown in Figure 8-2. Restart Elasticsearch to load the plugin.

Figure 8-2. Installing Shield for Elasticsearch on Ubuntu 16.04.1
Vishal_gnutech@instance-1:sudo service elasticsearch restartAs you can see in Figure 8-3, Shield is loaded and displaying a message that your plug-in is running, but it didn’t find any user in file /etc/elasticsearch/shield/users. We will configure the user in a later section. Before we move ahead, let’s review some Shield features in depth.
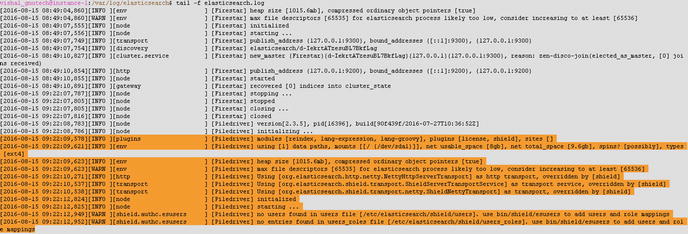
Figure 8-3. Shield for Elasticsearch is loaded
IP Filtering
You can do application-level filtering of IP addresses and decide what IPs you wish to allow and disallow. For example, you can write a rule such as the following in your elasticsearch.yml. To allow an IP:
shield.transport.filter.allow: "192.168.1.1"To disallow an IP:
shield.transport.filter.deny: "192.168.1.10"One thing to note here is that allow rules will always appear first, followed by deny rules. For example, they should be arranged as follows:
shield.transport.filter.allow: "192.168.1.1"shield.transport.filter.deny: "192.168.1.10"
These are just examples for now; you will see more realistic approaches in later sections.
Similarly, you can allow multiple IPs.
shield.transport.filter.allow: ["192.168.1.1", "192.168.1.11", "192.168.1.21", 192.168.1.99"]You can use an array as well, which will block all connections that are not allowed.
shield.transport.filter.deny: _allYou can do hostname filtering by using the following statement:
shield.transport.filter.deny: '*.yahoo.com'Authentication
Shield provides various methods for authentication. Authentication means that users must prove their identity, either by passwords, keys, or anything else that you want to check as input.
Shield supports various methods to authenticate a user. Per the official Shield documents, a realm is used to authenticate users. A realm is a user database employed by the Shield plug-in. The following types of realms are supported by Shield:
Native: This is the default built-in authentication system of Shield. You can add users, remove users, or assign roles using the REST API. For more information on how the REST API works, visit www.elastic.co/guide/en/shield/current/native-realm.html .
File: As the name suggests, this is a file-based authentication system built into Shield by default.
Shield also supports external systems to authenticate users:
LDAP: Authentication using the LDAP protocol.
Active Directory: Authentication using the Active Directory protocol.
PKI: Authentication via a public key
Adding a User to Shield
Now let’s start with adding an admin user.
[vishne0@centylog elasticsearch]$ sudo bin/shield/esusers useradd es_admin -r admin -p admin123 Now when we add a user in Shield, it updates two files in /etc/elasticsearch/shield: users and users_role. There is another file, roles.yml, in which you can see the roles defined by default, as follows (see also Figure 8-4):
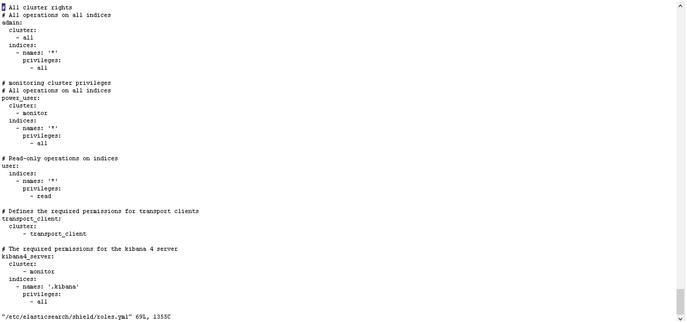
Figure 8-4. The content of roles.yml
[vishne0@centylog /]$# sudo vi /etc/elasticsearch/shield/roles.yml# All cluster rights# All operations on all indicesadmin:cluster:- allindices:- names: '*'privileges:- all# monitoring cluster privileges# All operations on all indicespower_user:cluster:- monitorindices:- names: '*'privileges:- all# Read-only operations on indicesuser:indices:- names: '*'privileges:- read# Defines the required permissions for transport clientstransport_client:cluster:- transport_client# The required permissions for the kibana 4 serverkibana4_server:cluster:- monitorindices:- names: '.kibana'privileges:- all
Save and quit the editor by entering :wq and pressing Enter. Now that you have added a user, restart Elasticsearch, as follows:
[vishne0@centylog elasticsearch]$ sudo service elasticsearch restartLet’s check to see if we can connect to Elasticsearch without a user.
[vishne0@centylog elasticsearch]$ curl -XGET 'http://localhost:9200/'{"error":{"root_cause":[{"type":"security_exception","reason":"missing authentication token for REST request [/]","header":{"WWW-Authenticate":"Basic realm="shield""}}],"type":"security_exception","reason":"missing authentication token for REST request [/]","header":{"WWW-Authenticate":"Basic realm="shield""}},"status":401}
As you can see, we can’t, so let’s now access it using user admin, which we created earlier.
[vishne0@centylog elasticsearch]$ curl -u es_admin -XGET 'http://localhost:9200/'Enter host password for user 'es_admin':{"name" : "centylog","cluster_name" : "Cluster 1","version" : {"number" : "2.3.5","build_hash" : "90f439ff60a3c0f497f91663701e64ccd01edbb4","build_timestamp" : "2016-07-27T10:36:52Z","build_snapshot" : false,"lucene_version" : "5.5.0"},"tagline" : "You Know, for Search"}
Now the Elasticsearch data is secured with Shield, as shown in Figure 8-5.
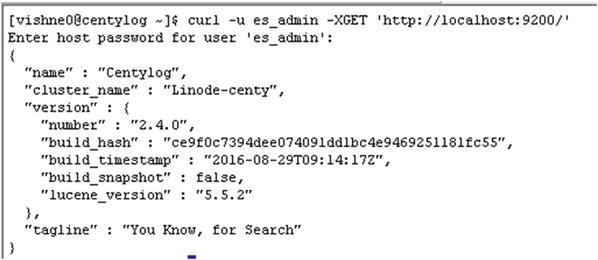
Figure 8-5. Testing user authentication
Figure 8-6 shows you that you are getting an Authentication Exception. As you have added a user es_admin with admin privileges, you will first add it to Kibana , and then you will try to access the web interface. Change the directory to /opt/kibana/config and open kibana.yml. Go to the following section:
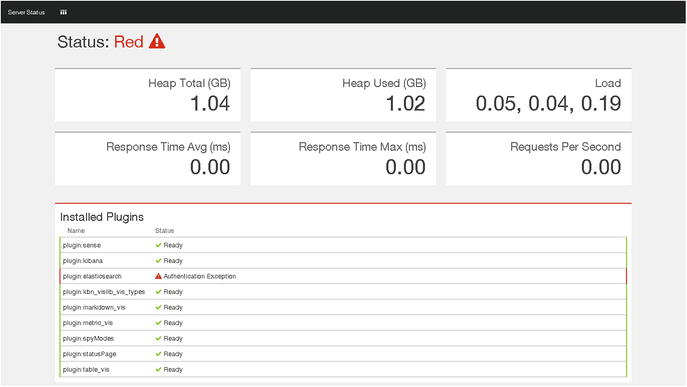
Figure 8-6. Kibana can’t access Elasticsearch data without user authentication
#elasticsearch.username:# elasticsearch.password:Uncomment both the fields and put the username/passwd as shown belowelasticsearch.username: "es_admin"elasticsearch.password: "admin123"
We have enabled user authentication in Kibana, as shown in Figure 8-7. Now press :wq to write and quit from the vi editor. Restart Kibana.
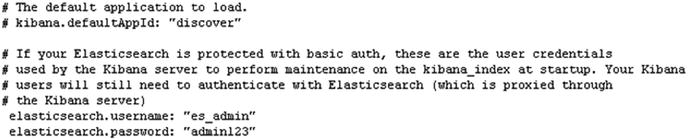
Figure 8-7. Adding a user in kibana.yml
[vishne0@centylog config]$ sudo service kibana restartWe have enabled user authentication in Kibana , as shown in Figure 8-7. Now press :wq to write and quit from the vi editor. Restart Kibana.
[vishne0@centylog config]$ sudo service kibana restartIt’s time to check if you can authenticate the Kibana interface with the credentials provided in kibana.yml. Open your browser and point it to http://localhost:5601 or, if it’s running on a public IP, http://yourip:5601.
As you can see in Figure 8-8, Kibana is now asking for the authentication information. Use the information from kibana.yml, and you will be able to access the dashboard.

Figure 8-8. Kibana is requesting authentication
Configuring Logstash to Use Authentication
Now you have to make changes in the conf files that you created in your Logstash. All that you have to do is add the username and password in the output section of the config file and then restart Logstash. For example, in your 01-webserver.conf file, edit it and include the user/password fields, as shown here:
output {elasticsearch {hosts => ["localhost:9200"]user => es_adminpassword => admin123}}[vishne0@centylog conf.d]$ sudo service logstash restart
And that’s all you really have to do to configure Logstash to use authentication.
Configuring Filebeat to Use Authentication
In Chapter 3, you installed Filebeat to send data from a remote server to your centralized ELK Stack. As you have now enabled authentication, you must make changes to Filebeat as well.
First, log into the remote server that you configured to send data to our ELK Stack, now for Filebeat. Once logged in, change the directory to /etc/filebeat and open filebeat.yml.
vishne0@srv [/etc/filebeat]# sudo vi filebeat.ymlOnce the file is opened, go to the section ###Elasticsearch as output, and scroll down a bit until it says the following:
# Optional protocol and basic auth credentials.#protocol: "http"#username: "es_admin"#password: "password"
Now uncomment three lines—protocol, username, and password—and fill out the username and password that you have created. The protocol will be only "http". The final entries should look like the following:
protocol: "http"username: "es_admin"password: "admin123
In the password field, you will put the password that you have set. Press :wq to save the file and exit from the editor.
We have enabled authentication over http, as shown in Figure 8-9. Now let’s check Kibana to see if we are receiving the data.
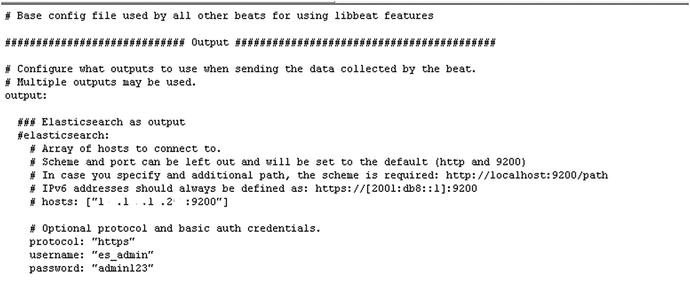
Figure 8-9. Configuring Filebeat to use authentication
As you can see in Figure 8-10, Elasticsearch, Logstash, Kibana, and Filebeat are now using the authentication that you have configured, and your data now is secure.

Figure 8-10. Kibana displaying output from the remote server using Filebeat
Authorization
While configuring the user, you have seen that roles.yml has predefined roles and authorization for Shield. Let’s take a look at the roles.yml file.
[vishne0@centylog conf.d]$ sudo vi /etc/elasticsearch/shield/roles.yml# All operations on all indicesadmin:cluster:- allindices:- names: '*'privileges:- all# monitoring cluster privileges# All operations on all indicespower_user:cluster:- monitorindices:- names: '*'privileges:- all# Read-only operations on indicesuser:indices:- names: '*'privileges:- read
As you can see in Figure 8-11, user roles are defined.
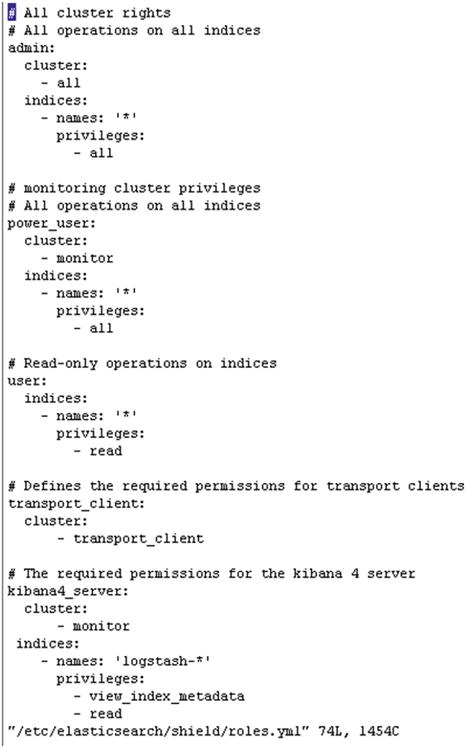
Figure 8-11. Showing the content of roles.yml in the Shield directory
In the preceding section, admin is a super user.
cluster is cluster-related privileges. Here, admins have privileges for all the clusters.
- all provides access to all indexes.
You can use predefined roles from this template while adding users with eusers. For example, you can add a user such as the following:
[vishne0@centylog elasticsearch]$ sudo bin/shield/esusers adduser -joe -p password -r logstashHere, the user is inheriting the role of user Logstash.
# The required role for logstash userslogstash:cluster:- manage_index_templatesindices:- names: 'logstash-*'privileges:- write- delete- create_index
Similarly, you can assign different roles and access privileges to different users.
Node Encryption
One of the features available in Shield is to encrypt traffic using SSL/TLS certificates. You can use a self-generated SSL/TLS certificate or a certificate authority (CA) signed by one of the certification authorities, such as Verisign. Traffic encryption halts the sniffing of your data in plain text. Refer to www.elastic.co/guide/en/shield/current/ssl-tls.html for more information.
Auditing of Security Events
It is very important that you keep track of events happening on your server, especially security events such as failed login attempts or perhaps refused connections or firewall warnings. Auditing gives you full insight into events on your nodes or information about attacks.
To enable auditing, all that you have to do is to add a line in your /etc/elasticsearch/elasticsearch.yml file.
shield.audit.enabled: trueYou can save audit logs in two ways:
In access.log
By creating an Elasticsearch index on the same cluster
For outputs, you have to enable shield.audit.outputs: [index, logfile]. You can specify different log types, for example:
authentication_failed [realm] for every realm failed authentication
access_denied
…and a lot more. You can also specify such levels as WARN, DEBUG, ERROR, and so forth.
Audit logging settings must be configured in /etc/elasticsearch/shield/logging.yml.
[vishne0@centylog elasticsearch]$ sudo vi /etc/elasticsearch/shield/logging.ymlAs you can see in Figure 8-12, by default, logs are stored in access.log, which is located in the /var/log/elasticsearch directory.
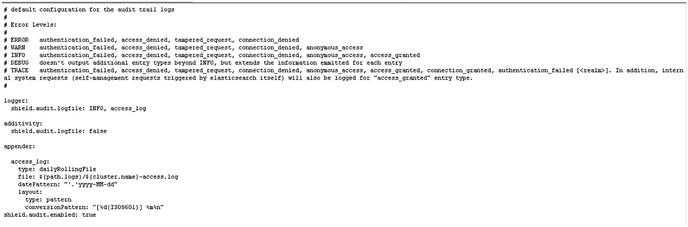
Figure 8-12. Default logging.yml
Summary
In this chapter, you learned how to secure your ELK Stack, using Shield and the basic authentication method. You also discovered some important Shield features, including
IP filtering
Authentication
Authorization
Node encryption
Auditing
In the next chapter, you will learn about Logstash input and output plug-ins.