
Letting you create user interfaces from a set of standard UI components wired to server-side objects
Making available four custom-tag libraries to handle those UI components
Providing a mechanism for extending the standard UI components
JSF transparently saves state information of the UI components and repopulates forms when they redisplay. This is possible because the states of the components live beyond the lifespan of HTTP requests. JSF operates by providing a controller servlet and a component model that includes event handling, server-side validation, data conversion, and component rendering. Not surprisingly, JSF doesn’t change the basic page life cycle that you already know from JSP: the client makes an HTTP request, and the server replies with a dynamically generated HTML page.
Be warned that JSF isn’t very easy to use, and it requires a non-negligible initial effort to get it going. However, the reward comes once you’ve familiarized yourself with JSF and can then develop user interfaces more quickly and efficiently.
You can download the latest JSF specification (JSR 372—JSF 2.3) by going to www.jcp.org/en/jsr/detail?id=372 and clicking the download page link.
myfaces-impl-2.3.6.jar
myfaces-api-2.3.6.jar
commons-beanutils-1.9.4.jar
commons-collections-3.2.2.jar
commons-digester-1.8.jar
commons-logging-1.1.1.jar
To be able to use JSF, you will need to copy these jars (or a newer version) into the lib folder of your project or to Tomcat’s lib folder.
You also need JAXB libraries that give an efficient and standard way of mapping between XML and Java code. Go to https://eclipse-ee4j.github.io/jaxb-ri/, download the library jakarta.xml.bind-api.jar, and copy it into your lib project folder or Tomcat server.
Let’s begin with a simple JSF application, so that you can see how JSF works in practice.
The simplef Application

The first page of simplef
The second page of simplef

Back to the first page of simplef
first.jsp
second.jsp
The first two lines of both JSP pages load two JSF libraries, core and html, that contain all custom-tag definitions that implement JSF.
The first JSF element you encounter in both pages is f:view, which is a container for all JSF actions. The next one is h:form, the JSF element that generates the pair <form>..</form> of HTML tags. The three JSF elements h:outputText, h:inputText, and h:commandButton generate, respectively, the three HTML elements <span>..</span>, <input type="text"../>, and <input type="submit"../>. If you had used h:commandLink instead of h:commandButton, JSF would have generated a hyperlink with the HTML-tag a and the attribute href instead of a submit button.
Notice that the value attributes of h:inputText in first.jsp and h:outputText in second.jsp contain the EL expression #{aStringBean.str}. This is the first time you encounter a practical example of an EL expression representing an lvalue (see the Expression Language section in Chapter 6).
The expression ${aStringBean.str} would have been evaluated by Tomcat immediately. Tomcat would have replaced it with the value obtained by executing the method aStringBean.getStr() .
But, with the # replacing the $, the only thing that happens is that JSF assigns an identifier to the attribute str of the object aStringBean .
HTML Generated by first.jsp
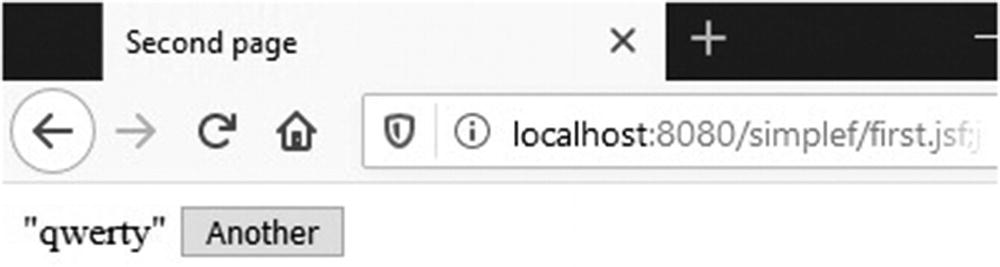
Whenever you see id, the generated code actually contained j_id_jsp_445772234. The two lines in bold are the result of the three JSF elements h:outputText, h:inputText, and h:commandButton.
JSF assigned to #{aStringBean.str} the identifier j_id_jsp_445772234_1:j_id_jsp_445772234_3. When processing on the server the request your browser sends when you click Submit, JSF will assign the value you have typed (e.g., the string "qwerty") to the str attribute of the object aStringBean . By saving the string in this way, JSF will have it available for the value of h:outputText in second.jsp and as the default value for h:inputText in first.jsp when it will need to render that page again.
index.jsp
web.xml
It defines a servlet of type javax.faces.webapp.FacesServlet. It is the JSF servlet, which I have informally called “JSF”. It is that servlet that assigns IDs to attributes and transfers data between pages. web.xml also maps the extension jsf to the servlet, thereby forcing all requests for pages with extension jsf to be sent to it.
This reveals part of the mystery: when you type http://localhost:8080/simplef/ in your browser, Tomcat executes index.jsp, which forwards the request to first.jsf (which actually doesn’t exist). But, because of the servlet mapping in web.xml, Tomcat diverts your request to the JSF servlet.
Defining the JSF Default Suffix in web.xml
The next mystery that we have to solve is how the request generated by the form in first.jsp reaches second.jsp. In other words, how does the action "goOn" cause a request to reach second.jsp?
faces-config.xml
Concentrate for the time being on the part I have highlighted. It tells JSF that when the page first.jsp ends with outcome goOn (i.e., executes h:commandButton with action goOn), control should go to second.jsp. In a more complex application, first.jsp would include different actions, which would correspond to different navigation-case elements. Then, the JSF servlet would have a function analogous to that of a Java switch statement.
We are almost there. The next thing that needs some explanation is the managed-bean element that you see in faces-config.xml immediately above the first navigation rule. It tells JSF to manage a session-scoped object named aStringBean of type AString, and to manage its attribute named str, which should be initialized to null. This also means that the JSF servlet will instantiate the object automatically.
This is where the name aStringBean you saw in the EL expressions of both first.jsp and second.jsp comes from. I could have chosen any name, but it is good practice to end the names of such managed beans with Bean.
Also, the default scope is request. But by specifying session, I ensured that the aStringBean is not destroyed after the first request. In the example, it would have meant that the input element in the second execution of first.jsp would have been without default. The request scope would have been sufficient to “remember” the default if first.jsp had executed itself instead of second.jsp. Note that you should be careful not to go overboard with storing information in the session, because you could affect the performance of your application. Remember that every new user causes a new session to be created.
AString.java
For simplef to work, AString.class should be in the classes subdirectory of WEB-INF.
AString is the simplest possible bean that you need for JSF. The implementation of Serializable is there because it makes possible for Tomcat to save the object to disk and to retrieve it from disk. The server possibly uses a hard disk to park session data when it is under a heavy load or when it is restarted. This is one more reason for keeping the session’s size as contained as possible. Note that Tomcat can only save objects that it is able to convert to output streams of data, and that requires the objects to be serializable.
The simplefx Application
first.jspx
After converting second.jsp to second.jspx in the same way, you also need to insert into web.xml the context-param element shown in Listing 8-6; otherwise, JSF will keep looking for files with extension jsp. Finally, to complete the conversion to XML, you will need to make a global replace from jsp to jspx in faces-config.xml, so that the navigation rules will keep working.
Notice that we didn’t need to do any conversion inside the body elements of the JSP pages. This is because there were no scripting elements to convert. With JSTL, JSF, and other custom actions that you acquire or develop yourself, you can write JSP in XML format without much effort.
Navigation Rules for simplexf
In particular, the first navigation rule tells JSF that when it executes the element <h:commandButton action="goOn" value="Submit"/> in first.jspx, it should transfer control to second.jspx (which JSF renames second.jsf so that a subsequent request from the user goes back to the JSF servlet).
The JSF Life Cycle

The JSF life cycle
- 1.
Restore View: The JSF servlet builds the view of the requested page as a component tree that contains the information associated with all components of the page. If the page is requested for the first time, JSF creates an empty view, wires event handlers and validators (if any) to its components, and saves it in a FacesContext object, before jumping directly to Render Response. By saving the view, JSF makes it possible to repopulate the page if necessary, for example, when the user doesn’t fill out a form as required. If the same page was displayed before and component states were saved, JSF uses that information to restore the page to its current state.
- 2.
Apply Request Values: JSF goes through the component tree and executes each component’s decode method , which extracts values from the request parameters, or possibly from cookies or headers. It also automatically converts the parameters that are associated with object properties of nonstring types. Conversion errors cause error messages to be queued to the FacesContext object. In some cases, typically when the user clicks controls, the servlet also generates request events and queues them to FacesContext. For components that have the immediate event-handling property set to true, JSF also validates them and saves them in their component instances within FacesContext.
- 3.
Process Validation: The servlet invokes the validate methods for all components of the validators that had been registered during Restore View. The validation rules are those you define or, by default, those predefined by JSF. For each validate method that returns false, the servlet marks the component as invalid and queues an error message to the FacesContext. At the end of this phase, if there are validation errors, JSF jumps directly to Render Response, so that error messages can be displayed to the user.
- 4.
Update Model Values: During this phase, the values of the components are copied to the corresponding properties of the managed beans that are wired to them. JSF does it by executing the component method updateModel , which also performs type conversions when necessary. Conversion errors cause error messages to be queued to FacesContext.
- 5.
Invoke Application: During this phase, the servlet processes the application-level events by executing the corresponding handlers. When the user submits a form or clicks a link of a JSF application, the JSF servlet generates a corresponding application-level event. One of the tasks you have to do when developing a JSF application is to assign a handler to each one of the possible application events. This is where you also specify what should happen next, by returning outcomes that you have linked to possible next pages, either with a navigation case or implicitly, as I showed you in the previous section.
- 6.
Render Response: The servlet creates a response component tree and delegates the rendering of the page to Tomcat. Each component renders itself as Tomcat goes through the corresponding JSF tags. At the end of this phase, the state of the response is saved so that the servlet can access it during the Restore View phase of subsequent requests to the same page.
Event Handling
Before looking at an application, I need to spend a few words on the JSF mechanism to handle events, because you cannot really understand how JSF works unless you know a thing or two about event handling.
As an example, let’s see what role the event handling plays when a user clicks a Submit button . The JSF UI components used to represent button HTML elements are objects of type javax.faces.component.html.HtmlCommandButton, which is a class extending the more general javax.faces.component.UICommand. As with any other HTML page, by clicking the Submit button in a JSF application, the user triggers the sending to the server of an HTTP request that contains the ID of the button as a parameter name.
As I’ve already mentioned, during the Apply Request Values phase, JSF executes the decode method of each component of the page. First, the decode method scans the parameter names to see whether one matches the ID of the component the method belongs to. In our example, the decode method of the UICommand object associated with the button clicked by the user finds the component ID among the request parameters, precisely because the user clicked the button. As a result of finding its own ID, the component instantiates an event object of type javax.faces.event.ActionEvent and queues it up.
At this point, you have to distinguish between situations in which all the input fields of a form need to be validated and those in which only a partial validation is appropriate. For example, in an online shop such as the eshop application, the shopper must be able to add further books to the shopping cart even after reaching the checkout page, where the shopper is asked to provide payment information. To make that possible, you must ensure that the validation of the payment data is skipped if the user selects a book category or searches for new titles. If you allowed the validation of empty or partially filled payment fields to proceed, the application would report one or more errors and prevent the shopper from going back to look for new books.
You solve this issue by specifying that the handling of both the book search and the category selection be done during Apply Request Values while leaving the handling of the payment data to follow the normal life cycle. If it turns out that the user wants to shop for new books rather than complete the checkout, control then jumps directly to the Render Response phase, thereby skipping the intermediate phases where payment data would have been validated and processed.
In the next chapter, you will see in detail how this is done in the JSF version of eshop.
The JSF Tag Libraries
The first two sections of this chapter showed you examples of simple JSF applications that used a handful of elements: f:view, h:form, h:outputText, h:inputText, and h:commandButton. You will recall that the prefix h was associated with the HTML component library and the prefix f with the JSF core library. Besides those two libraries, JSF consists of two additional custom-tag libraries: facelets, normally associated with the prefix ui, and composite, with prefix composite.
In the rest of this chapter, I will briefly describe the four libraries and show you more examples. In the next chapter, I will describe how to use more of the tags by referring to a JSF version of the eshop application.
The html Library
As its name suggests, JSF’s HTML library collects the tags associated with rendering HTML components. As you have already seen in the examples (e.g., with h:inputText), you associate objects of your data model to the corresponding components by assigning value expressions that refer to the objects to specific attributes of the component tags (e.g., <h:inputText value="#{aStringBean.str}"/>).
html Tags and HTML Elements
Tag Name | HTML Element |
|---|---|
h:body | body |
h:button | input type="button" |
h:column | -- |
h:commandButton | input type="submit" |
h:commandLink | a |
h:dataTable | table |
h:doctype | <!DOCTYPE> declaration |
h:form | form |
h:graphicImage | img |
h:head | head |
h:inputHidden | input type="hidden" |
h:inputSecret | input type="password" |
h:inputText | input type="text" |
h:inputTextarea | input type="textarea" |
h:link | a |
h:message | span or text |
h:messages | span or text |
h:outputFormat | span or text |
h:outputLabel | label |
h:outputLink | a |
h:outputScript | script |
h:outputStylesheet | link |
h:outputText | span or text |
h:panelGrid | table |
h:panelGroup | div or span |
h:selectBooleanCheckbox | input type="checkbox" |
h:selectManyCheckbox | multiple input type="checkbox" |
h:selectManyListbox | select and multiple option |
h:selectManyMenu | select and multiple option |
h:selectOneListbox | select and multiple option |
h:selectOneMenu | select and multiple option |
h:selectOneRadio | multiple input type="radio" |
The h:select* Elements

The output of testf
index.jspx for the testf Project
I have highlighted in bold the selection components. h:selectBooleanCheckbox renders a single checkbox; h:selectManyCheckbox, h:selectManyListbox, and h:selectManyMenu render multiple selections; and h:selectOneListbox, h:selectOneMenu, and h:selectOneRadio render single selections.
The tags wire to each HTML control a different property of the managed bean. Notice the use of the core JSF tags f:selectItem and f:selectItems to provide the information needed for the options of the HTML select elements.
From this example, you can also see how to use h:panelGrid and h:panelGroup to render an HTML table. Differently from HTML, where you need to identify rows with tr elements and cells within rows with td elements, with h:panelGrid you specify at the beginning the number of columns, and all the components between its begin and end tags “flow” from left to right into the table. If you need more than one component within the same cell, you group them together with h:panelGroup.
myPkg.MyBean.java for the testf Project
There isn’t really much to explain. JSF takes care of executing the initialization method of the bean, which initializes three values to be provided for selection through the select attribute and sets up the arrays needed to save the user’s choices.
The core Library
Converters: Converters let you convert between the data types of the components and those of your application objects.
Listeners: You register a listener with a component to handle events that the component generates.
Events: After the listener is registered with a component, the FacesServlet fires the events by invoking an event notification method of the corresponding listener.
Validators: Validators examine the value of a component and ensure that it conforms to a set of predefined rules.
core Tags
Tag Name | Operation |
|---|---|
f:actionListener | Adds an action listener |
f:ajax | Registers an Ajax behavior for one or more components |
f:attribute | Sets an attribute |
f:convertDateTime | Adds a date-time converter |
f:converter | Adds a converter |
f:convertNumber | Adds a number converter |
f:event | Adds a system-event listener |
f:facet | Adds a facet |
f:loadBundle | Loads a resource bundle into a Map |
f:metadata | Declares the metadata facet for a view |
f:param | Adds a parameter |
f:phaseListener | Adds a phase listener to a view |
f:selectItem | Specifies an item for :selectMany* and h:selectOne* |
f:selectItems | Specifies items for :selectMany* and h:selectOne* |
f:setPropertyActionListener | Adds an action listener that sets a property |
f:subview | Container for all JSF actions on pages included via jsp:include or c:import |
f:validateBean | Adds a bean validator |
f:validateDoubleRange | Adds a double-range validator |
f:validateLength | Adds a length validator |
f:validateLongRange | Adds a long-range validator |
f:validateRegex | Adds a validator against a regular expression |
f:validateRequired | Adds a check that a value is present |
f:validator | Adds a validator |
f:valueChangeListener | Adds a value change listener |
f:view | Container for all JSF actions of a page |
f:viewAction | Specifies an application-specific action |
f:viewParam | Adds a parameter to the metadata facet of a view |
I expect that you will find many of the tags listed in Table 8-2 obscure. You will be able to understand most of them after the next sections and chapters, but the use of some of them definitely falls outside the scope of this book.
If you are curious about what a facet is, I can tell you that it is a named subcomponent specific to a particular component. For example, h:gridPanel (which renders an HTML table) supports the two facets header and footer. If you include <f:facet "header"><h:outputText value="Whatever"/></f:facet> anywhere within the body of h:gridPanel, the rendered table will have the header “Whatever”.
I will talk about converters and validators in the next chapter, where I will describe a JSF version of the eshopx project I introduced in Chapter 7. In this chapter, as an interesting example of core tags, I will describe how to use f:ajax. In order to do that, I will first tell you about Ajax in general and show you how it was used before the introduction of f:ajax.
Ajax
I introduced JavaScript in the previous chapter: Asynchronous JavaScript and XML (Ajax) is a mechanism for letting JavaScript communicate with the server asynchronously, that is, without reloading the page. This is possible by means of the JavaScript built in object XMLHttpRequest.
time.jsp
You’ll perhaps see some other time zone, but the format will be identical. A good place to check out the abbreviation for your time zone is www.timeanddate.com/time/zones/.
ajax.xhtml
As you can see, I’ve highlighted two lines. The first is where you load the file ajax.js, which contains the JavaScript code to support the Ajax operation. The second line is where you execute the ajaxFun JavaScript function whenever you click the Update button. Notice that you pass to ajaxFun the names of the form and of the input element to be updated. You could have hard-coded the string "tForm.tElement" within JavaScript, but it would have been bad programming practice to use within ajax.js identifiers defined elsewhere. Global variables invariably lead to code that’s a nightmare to maintain and should be avoided whenever possible.
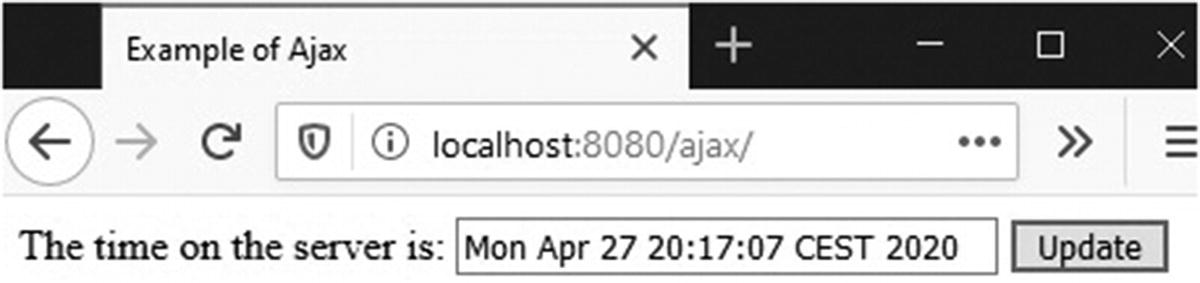
Server time with Ajax
ajax.js
First, you instantiate an object of type XMLHttpRequest.
When ajaxReq “holds” an object of the correct type, you set up the HTML request method (e.g., GET) and the target URL (in this case, the JSP module time.jsp). At this point, you can send off the request.
List of ajaxReq.readyState Codes
Code | Meaning |
|---|---|
0 | Uninitiated |
1 | Loading |
2 | Loaded |
3 | Processing |
4 | Complete |
I’ve taken a minimalist approach for this example. The idea is for your server to send back an XML document, which you can then parse on the client side.
web.xml
As you can see, it is almost empty. I have only added a couple of welcome-file elements so that Tomcat tries index.html (which is the default) only if index.xhtml is not there.
Now that you know how Ajax works without JSF, let’s see how to use f:ajax to achieve the same result.
f:ajax
Using f:ajax instead of the mechanism I described in the previous section has several advantages, the most important of which, in my opinion, is that you no longer need to write code in JavaScript, which adds another flavor of Java to the mix. Further, f:ajax is fully integrated with the other JSF libraries.
Figure 8-4 showed the six phases of the JSF life cycle. With f:ajax you can selectively execute components on the server by processing them through the first five phases or render them by passing them through the last phase. You ajaxify a component by enclosing it within the body of f:ajax or by passing to f:ajax the component id.
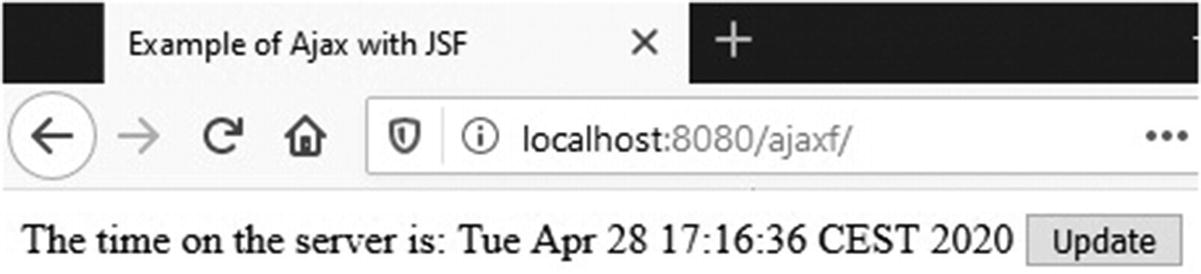
To convert the Ajax example of the previous section to JSF’s Ajax, let’s start from ajaxf.xhtml, shown in Listing 8-17. The interesting bits are those highlighted in bold.
ajaxf.xhtml
of second.jsp (Listing 8-2) that you encountered at the very beginning of this chapter.
But this time, I have added to h:outputText the setting of the id attribute. This is because we need to pass it to f:ajax, in the second group of highlighted lines.
The h:commandButton element , contrary to what you saw in previous examples, doesn’t transfer control to another page. Its purpose is only to create an event that triggers f:ajax. Accordingly, the action attribute is not there, and if you look at the WEB-INF folder of the application, you will see that no faces-config.xml to handle navigation is present.
Every time the user clicks the Update button, f:ajax sends a request to the server to obtain the value of serverTimeBean.when, which then the h:outputText element with id timeField displays. You don’t need to write JavaScript because JSF automatically generates the little script that sends the Ajax request.
ServerTime.java
The code is almost identical to that of AString.java (Listing 8-8), the major differences being that it has an initialization method and, obviously, generates a string with the current server time. In the software package, you will also find the files that complete the application, index.jsp and web.xml, but they are very similar to the equivalent files you already encountered with other applications.
Alternate h:body for ajaxf.xhtml
With this setting, you ajaxify all components of the form. As a result, when you click the Update button, JSF sends an Ajax request, as it did before, and because the render attribute is set to @form, serverTimeBean.when is updated, as before. Events applicable to whole forms are click, dblclick, keydown, keypress, keyup, mousedown, mousemove, mouseout, mouseover, and mouseup.
Yet Another h:body for ajaxf.xhtml
A modified ajaxf.xhtml
As long as you remain within the input field, nothing happens. When you hit enter or click outside it, Ajax sends a request to the server to update the property specified in h:inputText. In the example, it sends a request to set serverTimeBean.when to “Tue Apr 28 020”. JSF does it in the Update Model Value phase. Then, during Render Response, Tomcat prepares the Javax response with two values obtained from serverTimeBean.when, one for h:outputText and one for h:inputText. As ServerTime.java always produces a fresh time string, that’s what is returned to the browser, and what you typed in the input field remains unused in the bean’s variable when.
Possible events for input fields are blur, change, click, dblclick, focus, keydown, keypress, keyup, mousedown, mousemove, mouseout, mouseover, mouseup, select, and valueChange. The default is valueChange.
The value of the render attribute can be a single identifier, a space-delimited list of identifiers, or one of the special strings @all, @this, @form, and @none.
The facelet Library
What makes JSF’s facelet library interesting is that it supports templating. That is, a mechanism that allows you to minimize duplication of code when developing pages with the same layout or common content.
While JSP with jsp:include provides an easy mechanism to reuse content, it doesn’t provide any easy way to define the same layout for different pages. It is up to you to ensure that the pages look identical when viewed in a browser.
facelet Tags
Tag Name | Description | Templating |
|---|---|---|
ui:component | Creates a component | N |
ui:composition | Creates a composition | Y |
ui:debug | Creates a component to help you debug the page | N |
ui:decorate | Defines a fragment containing a composition | Y |
ui:define | Defines content to be inserted into a template | Y |
ui:fragment | Defines a fragment containing a component | N |
ui:include | Includes content from an XHTML file | N |
ui:insert | Inserts content into a template | Y |
ui:param | Defines a parameter for an included file or a template | Y |
ui:repeat | An alternative to h:dataTable and c:forEach | N |
ui:remove | Removes what is in its body | N |
The templ Application
In this section, I will describe templ , an application that uses facelet templating.
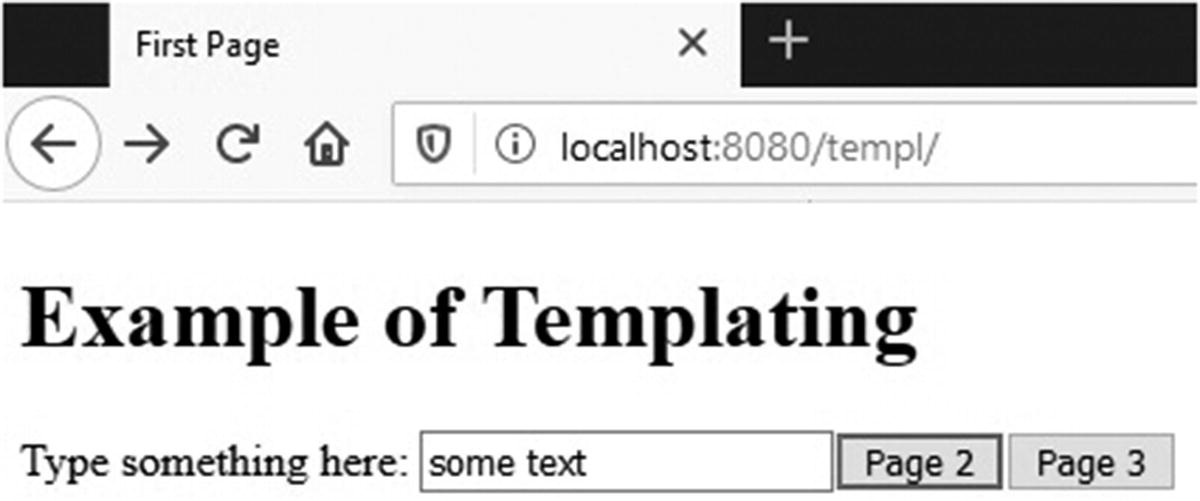
To create it, I started from the example simplefx I explained in this chapter. You will recall that it essentially consisted of two JSP documents that invoked each other: first.jspx asked you to type something into a text field, and second.jspx displayed what you had typed.
templ first page

templ second page
Notice that the header of the second page is gray instead of black. The third page is identical to the second one, but its title is “Third page” and the text before the button starts with “Page 3”. To try it out, import in Eclipse the project templ from the software package for this chapter, and then type in a browser http://localhost:8080/templ/.
first.xhtml
First of all, notice that I renamed the file first.xhtml. This is because facelet elements (i.e., those with prefix ui) only work inside h:body. This means that you can no longer use the HTML body tag. As h:body requires the extension of the document to be xhtml, I had to ditch the extension jspx. The same applies to first.xhtml, which remains a valid JSP document despite the change of name.
Another difference from first.jspx is that I moved the namespace declarations for the core and HTML JSF libraries from jsp:root to the html tag and then added to them the declaration for the JSF facelet library. As none of the JSF tags are used outside the html element, it makes sense to keep them there, which is where they normally are in XHTML documents.
Finally, notice that first.xhtml includes a standard header with ui:include.
page2.xhtml
Notice that there is no h:head element in page2.xhtml. This is because JSF, when it encounters a ui:composition element, it ignores everything other than the content of h:body. You got it right: JSF only looks at the lines I have highlighted in Listing 8-22.
page3.xhtml
Obviously, you cannot remove the JSP header elements and jsp:root when you use JSP code inside h:body. But you can use JSTL and your own custom-tag libraries without declaring the jsp namespace, as long as you declare the appropriate namespaces in the html tag. What you certainly cannot use in any case, with or without JSP declaration, are JSP scripting and directive elements, because anything enclosed between <% and %> is not valid XML.
Let’s go back to describing how JSF handles the pages that make use of templates.
The presence of the ui:composition element with a defined template attribute means that it is the template document that generates the page to be sent back to the user as a response, not the page that contains the ui:composition element.
layout.xhtml
The two highlighted lines identify two places where the template expects the “client” pages to insert content. If you go back to page2.xhtml and page3.xhtml (Listings 8-22 and 8-23), you will see that the two ui:defines inside ui:composition have the same name attributes as the two ui:inserts of the template.
When layout.xhtml is used to generate the response to a request sent to page2.xhtml, the element <ui:insert name="title">Default Title</ui:insert> is replaced with the string “Second page” and the element <ui:insert name="pageNum"/> is replaced with “2”. For page3.xhtml, the string is “Third page” and the page number is “3”. Notice that the body of ui:insert is the default value for that insert, to be used when the “client” page doesn’t define any value.
header.xhtml
In header.xhtml, the element ui:composition doesn’t define a template attribute. Its presence ensures that the rest of the page is ignored when header.xhtml is included with ui:include. Actually, the only line needed in header.xhtml is the one I have highlighted. But the advantage of having a well-formed XHTML page is that you can view it in a browser. With more complex pages, it is sometimes useful to be able to do so.
There is still something I need to clarify. Have you noticed that the header shown in the first page (see Figure 8-8) is black, while the header of the second page (see Figure 8-9) is gray?
loads a style sheet that defines the color of headers to be gray.
Still on the subject of linking to the style sheet with h:outputStylesheet: notice that the name of the resources folder doesn’t appear anywhere. This means that it is hard-coded within the component and that you are stuck with it. But the folder names templates and defaults are entirely my choice. Therefore, you can choose the names you like.
web.xml
faces-config.xml
The composite Library
JSF is based on user-interface components, but for a long time, it was difficult to create new components or combine existing components into a new one. JSF introduced the composite library with release 2.0 to make those tasks easier.
composite Tags
Tag Name | Description | Valid In |
|---|---|---|
composite:implementation | Container of the XHTML code that implements the component | |
composite:interface | Container of interface components | |
composite:actionSource | Exposes components that generate action events | interface |
composite:attribute | Declares attributes of components | interface |
composite:editableValueHolder | Exposes components with editable values | interface |
composite:extension | Inserts XML code in interface components | interface components |
composite:facet | Declares a component’s facet | interface |
composite:insertChildren | Inserts XHTML code into component | implementation |
composite:insertFacet | Inserts a facet | implementation |
composite:renderFacet | Renders a facet | implementation |
composite:valueHolder | Exposes components with non-editable values interface |
Define its namespace (i.e., where it is).
Specify its functionality (i.e., what it does).
Define how you use it (i.e., its interface).
Design how you code it (i.e., its implementation).
Some Examples
Define a namespace. I have chosen gz.
Specify its functionality. The component should compose a greeting message with a parameterized addressee.
Define how you use it. Just call it with an attribute to pass to it the addressee.
Design how you code it. Simple. An h:outputText will do.
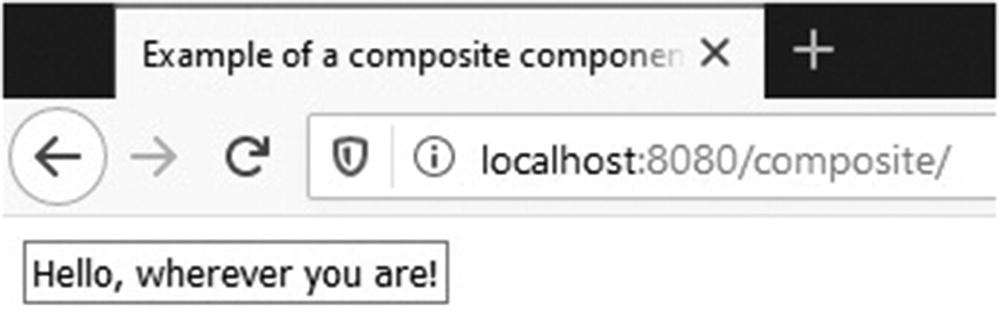
hello.xhtml
Not surprisingly, for such a trivial component, the code is also trivial. But it tells you a lot about developing components with the composite library.
First of all, inside h:body, you find two elements, a composite:interface and a composite:implementation. Inside the former, you define the attribute named x, and inside the latter, you define the logic of the component.
To access the attribute from within the implementation, you use the expression #{cc.attrs.x).
comp.xhtml

composite
Have you noticed anything unusual in comp.xhtml ? Instead of separately declaring the namespaces of the JSF composite library and of your custom components, you declare a single namespace composite/gz. For this to work, you need to create in the root of your application a folder named resources; create a folder (in the example, named gz) inside resources; and place your custom components there. The name of the component (e.g., hello) is obtained from the name of the component file (e.g., hello.xhtml) by removing its extension.
It is an established practice to use the same string for the prefix and for naming the folder inside resources, and I recommend that you follow it, but the two strings can be different.
It simply means that your new component will not have any attribute to set.
composite with input element
As it was in the previous examples, you use the expression #{cc.attrs.act} to access from the implementation the value of the act attribute declared in interface. In addition, unlike what happened in the previous examples, you also need a reference in the opposite direction, from interface to implementation. This is because JSF must be able to wire the method set in gz:flip to the h:commandButton component for which the method is meant. In fact, if there were more components in implementation, you could wire the same method to several of them by writing their identifiers in the targets attribute separated by spaces (this is why the name of the attribute is targets, plural, instead of target).
The element composite:actionSource exposes the h:commandButton component, and f:actionListener wires to it the appropriate action listener. Notice that the attribute actionListener has disappeared from h:commandButton.
JSF will take the body of the facet element defined in the using page and insert it where you invoke composite:renderFacet. If you like to insert those components as a facet, you need to use composite:insertFacet instead.
Summary
In this chapter, we have covered a lot of ground. I gave you a first taste of JSF with simple applications. Then, after describing the JSF life cycle, I went on to talk about all four JSF tag libraries html, core, facelet, and composite. I listed their tags and showed you with simple examples how to use the most common or significant tags.
In the next chapter, we’ll go back to eshop to see how we can convert it to a JSF application.