In the first three chapters, you learned a large portion of JSP’s components through brief examples, while in the fourth chapter you were introduced to the Eshop application and implemented the database. In this chapter, I will tell you how everything fits together in complex applications.
The insertion of Java code into HTML modules opens up the possibility of building dynamic web pages, but to say that it is possible doesn’t mean you can do it efficiently and effectively. If you start developing complex applications exclusively by means of scripting elements, you’ll rapidly reach the point where the code will become difficult to maintain. The key problem with mixing Java and HTML, as in “Hello World!”, is that the application logic and the way the information is presented in the browser are mixed. Often, the business application designers and the web-page designers are different people with complementary and only partially overlapping skills. While application designers are experts in complex algorithms and databases, web designers focus on page composition and graphics. The architecture of your JSP-based applications should reflect this distinction. The last thing you want to do is blur the roles within the development team and end up with everybody doing what somebody else is better qualified to do. And even if you develop everything yourself, by keeping presentation and application logic separate, you will build more stable and more maintainable applications.
A Better Online Bookshop
The online bookshop you saw in Chapter 3 was a good introduction to the MVC architecture, but in order to explore the use of the database created in Chapter 4, other JSP features, and JSF, we need an example with more substance.
Importing Eshop WAR File into Eclipse
You will find the code of the whole project in the software package for this chapter, and the easiest way to work on the application is to import it into Eclipse.

Eclipse—selecting to import a WAR file
When the next dialog comes up, browse to select eshop.war and click Finish. Eclipse will create the eshop project for you.
The Customer Interface

E-shop’s home page

A book category on E-shop
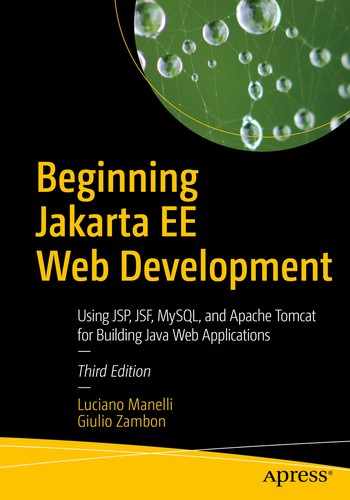
A book’s details on E-shop
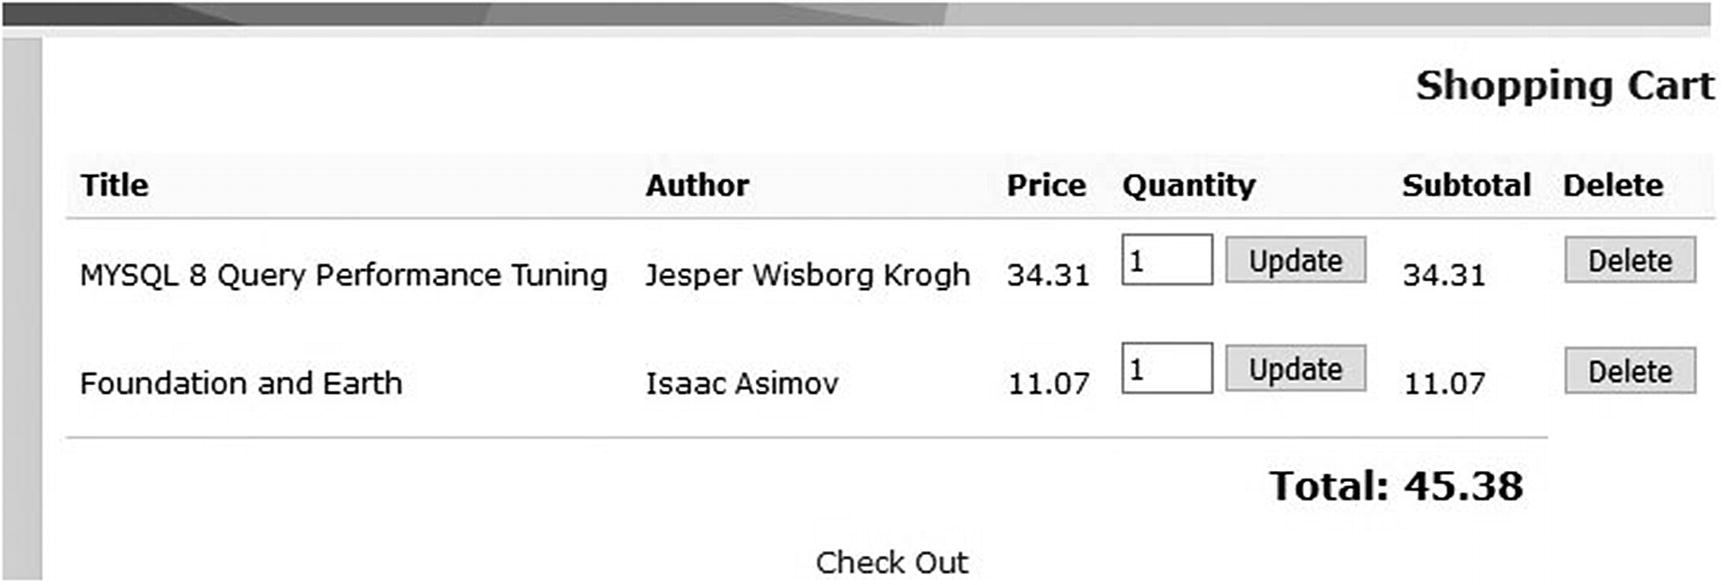
E-shop’s shopping cart
Pretty straightforward, isn’t it?
The E-shop Architecture
E-shop is an MVC application. The data and the business logic (the model) reside in a database and Java classes; the user interface (the view) is implemented in JSP; and the handler of client requests (the controller) is an HTTP Java servlet.
When the servlet receives a client HTTP request, it instantiates the model’s central class and forwards the request to the appropriate JSP page. The JSP page obtains data from the model and generates the HTML response. The model isn’t aware of what the JSP pages do with the data it provides, and the JSP pages aren’t aware of where and how the model keeps the data.
The Model
DataManager Methods
Type | Method |
|---|---|
String | getCategoryName(int categoryId) |
Hashtable | getCategories() |
ArrayList | getSearchResults(String keyword) |
ArrayList | getBooksInCategory(String categoryId) |
Book | getBookDetails(int bookId) |
long | insertOrder(String contactName, String deliveryAddress, String ccName, String ccNumber, String ccExpiryDate, Hashtable shoppingCart) |
Their purpose should be pretty clear. I would just like to make a couple of points concerning insertOrder. First, the value it returns is the order ID to be given back to the client. Second, in a more realistic case, all parameters, with the exception of the shopping cart, would be replaced by a customer ID, typically the customer’s email address. In this simple application, however, as it doesn’t keep track of the customers, there are no permanent customer records and customer IDs.
The Controller
Annotations were introduced in the Servlet API 3.0 (javax.servlet.annotation package) and make your life easier, because everything regarding a servlet is mapped in the servlet class (i.e., configuration and source code in the same place): if you use annotations, the deployment descriptor (web.xml) could be not required. First, when you create a servlet, you want to map it to some URL without going to another file to add the mapping. Moreover, using annotations, you do not need repeating same names in different files making mistakes, or renaming a servlet class forgetting to rename it in the web.xml: in these cases, you only discover the mistake at deployment time.
It is also possible to use annotations to set init parameters, but I suggest you do not, because if you use annotations to set up init parameters, you need to recompile your application every time a parameter is changed. In this case, the use of a deployment descriptor is better. Moreover, these two approaches are not mutually exclusive: for example, you can use annotations on servlet to define URL patterns or others fixed parameters and define database configuration in the web.xml (changing them without having to modify the code).
Servlet Initialization
ShopServlet.java—init Method
As you can see, the initialization consists of three main activities: instantiating and configuring the data manager, saving some parameters for later use by the JSP pages (remember that JSP can access the servlet context via the implicit variable application), and loading the driver necessary to access the database—JDBC stands for Java DataBase Connector.
Partial web.xml
Servlet Initialization Parameters
Name | Value |
|---|---|
base | /eshop/shop |
imageUrl | /eshop/images/ |
jdbcDriver | com.mysql.jdbc.Driver |
dbUrl | jdbc:mysql://localhost:3306/shop |
dbUserName | root |
dbPassword | root |
The initialization parameter values associated with the database are explained in Chapter 4.
From Chapter 2, you know that Tomcat makes available to JSP the servlet context by defining the implicit object application. Therefore, for example, the value set in ShopServlet.init() with context.setAttribute("imageUrl", ...) is available to JSP as the value returned by application.getAttribute("imageUrl").
Request Handling
Depending on what the user does, the page currently being displayed in the browser sends to the servlet a request with a specific value of the action parameter. The servlet then forwards each request to a JSP page determined by that value. For example, the page that shows the shopping cart also includes a button to check out. If the user clicks it, the page will send to the servlet a request with the action parameter set to "checkOut".
The View
JSP Pages
Name | Function | Mode of Access |
|---|---|---|
index.jsp | The initial page welcoming a new user | |
LeftMenu.jsp | Standard page sidebar | Included in all non-menu pages |
TopMenu.jsp | Standard page header | Included in all non-menu pages |
SelectCatalog.jsp | Lists books of a category | LeftMenu.jsp |
SearchOutcome.jsp | Lists books selected through a search | LeftMenu.jsp |
BookDetails.jsp | Shows the details of one book | SelectCatalog.jsp and SearchOutcome.jsp |
ShoppingCart.jsp | Displays the shopping cart | TopMenu.jsp and ShoppingCart.jsp |
Checkout.jsp | Requests a customer’s payment data | ShoppingCart.jsp |
OrderConfirmation.jsp | Confirms acceptance of an order | Checkout.jsp |
Additionally, you have a style-sheet file named eshop.css.
- 1.The user starts by accessing http://your-web-site/eshop/shop and sees the welcome page with a left-side menu containing a search box and a list of book categories. The user then can
Type a word in the search box and hit the Search button, or select a book category.
Select one of the books by clicking the corresponding Details link. The application then replaces the list of books with an image of the front cover of the book and all the information available in the database about that book.
Add the book to the shopping cart. The application then automatically takes the user to the shopping cart, where it is possible to update the number of copies or delete the book entry.
Repeat the previous steps until the user is ready to submit the order. From the shopping cart page, the user can then click the Check Out link.
- 2.
The checkout page asks the user to provide his or her personal and financial data. When the user clicks the Confirm Order button, the page tells the application to memorize the order.
At any time, the user can add books through the left-side menu or go to the shopping cart through the top-side menu to modify the order.
The E-shop Database Access
You operate on databases by executing SQL statements. To do so from within Java/JSP, you need an API consisting of several interfaces, classes, and method definitions included in the class libraries of JDK. Additionally, you also need a driver that implements that API for the specific DBMS (i.e., MySQL) in the native code of your system (i.e., a Windows PC).
Connecting to the Database
The first step to access a database from Java is to load the driver, without which nothing will work. To do so, you execute the method Class.forName("com.mysql.jdbc.Driver") in the init method of the servlet (see Listing 5-1).
The DataManager.getConnection Method
Port 3306 is the default for MySQL and can be configured differently. Obviously, in real life, you would use a different user and, most importantly, define a secure password.
The DataManager.putConnection Method
Once you’re done with one statement, you should release it immediately with stmt.close(), because it takes a non-negligible amount of space, and you want to be sure that it doesn’t hang around while your page does other things.
Accessing Data
The Statement class has many methods, plus some more inherited ones. Nevertheless, two methods are likely to satisfy most of your needs: executeQuery and executeUpdate.
The executeQuery Method
In the example, the method returns in the variable rs of type java.sql.ResultSet all the books in category 1, sorted by author name and title. The rows in the result set only contain the columns specified in the select statement, which in this example are book_id, title, and author.
The next method moves the cursor down one row. After the cursor goes past the last row, next() returns false, and the while loop terminates. Initially, the cursor is positioned before the first row. Therefore, you have to execute next() once in order to access the very first row.
Besides next(), there are other methods that let you reposition your cursor. Five of them return a boolean such as next(), which returns true if the cursor points to a row. They are absolute(row-position), first(), last(), previous(), and relative(number-of-rows). The beforeFirst() and afterLast() methods also move the cursor but are of type void, because they always succeed. The isBeforeFirst(), isFirst(), isLast(), and isAfterLast() methods check whether the cursor is in the corresponding positions, while getRow() returns the position of the row currently pointed to by the cursor.
ResultSet.TYPE_SCROLL_INSENSITIVE is what allows you to move the cursor forth and back within the result set. This parameter can only have one of the following two other values: ResultSet.TYPE_FORWARD_ONLY (the default) and ResultSet.TYPE_SCROLL_SENSITIVE. The difference between SENSITIVE and INSENSITIVE is that with INSENSITIVE, you’re not affected by changes made to the result set while you’re working with it (more about this in a moment). This is probably what you want.
ResultSet.CONCUR_READ_ONLY states that you don’t want to modify the result set. This is the default, and it makes sense in most cases. The alternative is to specify ResultSet.CONCUR_UPDATABLE, which allows you to insert, delete, and modify result rows. Now you can see why you might like to use ResultSet.TYPE_SCROLL_SENSITIVE as the first parameter: it lets you see the modifications made to the result set after you started working with it, rather than showing how it was before those changes. On the other hand, in a complex application with several threads operating on the same result set, you’ll probably prefer to ignore the changes made in other threads. In such a situation, it would have to be 100 percent clear which thread would be allowed to modify which rows; otherwise, you’d end up with a mess.
Note that there are no update methods for the types InputStream, Reader, and URL. You can also set a column to null with the methods updateNull(column-index) and updateNull(column-label).
The result set is automatically disposed of when the corresponding statement is closed. Therefore, you don’t really need to execute rs.close(), as long as you immediately close the statement when you no longer need it.
The executeUpdate Method
Transactions
In E-shop, I have defined two separate tables for data associated with a book order: one for the customer data and one for the individual books ordered. It would be bad if you completely lost an order, but perhaps it would be even worse if you lost some items and only processed a partial order. It would also be a problem if you saved the order details in the database but failed to save the customer data. That would leave some “orphaned” book items with no information concerning the buyer. You don’t need to worry about this if you save the customer data first: then, by the time you start saving the order details, the customer record is already on disk. But how do you ensure that the database only contains complete orders?
Normally, when you execute an SQL insert, the data is immediately stored into the database. To ensure the completion of orders, you could keep track of the updates you’ve already successfully executed and reverse them if you cannot complete the whole order. However, this would be very complicated, and there would be no guarantee of success. Moreover, in a more complex application, there might be several operations proceeding simultaneously and causing the same database records to be accessed concurrently. The solution is a built-in, foolproof mechanism capable of ensuring that some complex transactions are done “in one shot” or not at all.
- 1.
Immediately after connecting to the DB with conn = DriverManager.getConnection(...), execute conn.setAutoCommit(false). This tells MySQL not to make permanent changes to the database until you confirm them.
- 2.
Perform all the updates that form your complex transaction. Be sure that you place them inside a try block as part of a try/catch construct.
- 3.
In the catch block, include the statement conn.rollback(). If one of the updates fails, an SQLException will be thrown, and when the catch block is executed, the rollback will cause MySQL to “forget” the uncommitted updates.
- 4.
When all the updates have completed without being interrupted by any exception, execute conn.commit() to tell MySQL that it can finalize the updates.
The E-shop Data Model
All database operations are concentrated in the data model of an MVC architecture. JSP modules interact with the database by executing methods of the DataManager class, which accept and/or return data in the form of Java beans. By mediating DB access via the data manager and Java beans, you ensure that the view and the model can be developed independently.

The data model structure
The DataManager class sets up and closes connections to the database; however, concerning table access, it only acts as a clearinghouse. Specific classes perform the actual operations on individual tables. In this way, you ensure that changes to individual tables have the minimum impact on the application. This is actually an example of the Java Enterprise Edition pattern called Data Access Object (DAO).
The BookPeer.getBookID Method
In line 03, you open the database connection by invoking a method of the data manager that also reports an error in case of failure. Then you start a try block where you do the actual work. In the corresponding catch block, you display an error message (line 22), and in the finally block (line 25), you close the DB connection. Remember that the finally block is executed whether the try succeeds or not. In this way, you ensure that the connection is closed in case of failure.
Inside the outermost try (lines 05–20), you create a statement and set up the query string before starting a second try block (lines 09–17). Similar to what you did concerning the connection, you use the finally block to close the statement (line 19).
This is a technique of general applicability: every time you do something that needs to be undone, take care of it immediately inside a try block by placing the “undoing” statement in the corresponding finally. In this way, you’ll be sure not to leave any “ghosts” behind you. It’s true that Java’s garbage-collection mechanism should take care of removing unreferenced objects, but it’s good practice to clean up behind yourself as you go, especially when you’re dealing with databases and potentially large objects, such as statements and result sets. At the very least, your application will work more efficiently. And it feels good to write “clean” code.
Line 10 is where you actually execute the query. You know that you’re not going to get more than one row in the result set, because the book_id is a unique key of the book table.
You might be thinking, “Why should I go through the data manager at all? Couldn’t I simply execute the BookPeer method from JSP?” Well, you could, but it wouldn’t be clean, and dirtiness sooner or later causes problems.
The DataManager.insertOrder Method
The OrderPeer.insertOrder Method
The OrderDetailsPeer.insertOrderDetails Method
The methods throw the SQL exception rather than catch it locally, so that the data manager’s method catches it.
Summary
In this chapter, I described the E-shop project, which, in different versions, I will use to complete the description of JSP and to explain JSF. I showed you how to establish a connection, insert data, and perform queries. To complete the summary of essential DB operations, I also described how to group elementary updates into transactions.
In the next two chapters, I’ll take you through the remaining functionality of JSP. In particular, the next chapter will be dedicated to the action elements. To do that, I will use simple dedicated examples and the relevant aspects of the eshop application.