In Chapter 5, I introduced the eshop project, followed in Chapter 7 by eshopx, functionally identical to eshop except that I replaced the JSP pages containing scripting elements with JSP documents in XML format.
In this chapter, I am going to describe eshopf, a version of eshopx based on JSF. You will find both the WAR file and the expanded project in the software package for this chapter.
eshopf
Figure 9-1 shows the welcome page of eshopf. Although it is identical to that of eshop and eshopx, I include it here so that you can refer to it without having to flip forth and back across several chapters. Instead of commenting the listings of the whole application, I will concentrate on some interesting fragments as they relate to JSF.
Figure 9-1
eshopf’s home page
As a basis for developing eshopf, I used eshopx. If you look at the welcome pages of eshopx and eshopf, both named index.jspx, you will see at once that, in order to use JSF, I added the two namespace declarations for the core and html JSF tag libraries and the element f:view to enclose all JSF actions.
But there is another update that is less obvious. Check out Listing 9-1, which shows the body of the f:view element.
<h:form>
<jsp:include page="TopMenu.jspx" flush="true"/>
<jsp:include page="LeftMenu.jspx" flush="true"/>
</h:form>
<div class="content">
<h1>Welcome to e-Shop</h1>
</div>
Listing 9-1
eshopf: Body of f:view in index.jspx
In index.jspx of eshopx, the two jsp:includes were not wrapped inside a form. The reason for this change is due to the fact that, inside the jsp:included documents, as you will see in the following section, two HTML anchor elements are to be converted to h:commandLink components, which need to be inside h:form. It seemed reasonable to use a single form.
The Top Menu
Listing 9-2 shows TopMenu.jspx and its use of the h:panelGroup component.
The purpose of TopMenu.jspx is to provide a standardized access to the shopping cart.
Notice that I used f:subview to enclose all actions. Also notice that f:subview exists precisely to contain actions when they are included via jsp:include or any custom actions like c:include. Its purpose is equivalent to that of a pair of braces in Java: it limits the scope of its content. For example, the component IDs defined in one subview can be identical to those defined in other subviews of the same page.
With TopMenu.jspx, you don't necessarily need to wrap everything inside a subview, because the content of that document doesn’t conflict with what is inside LeftMenu.jspx or with index.jspx. Nevertheless, it’s good practice to avoid possible side effects of included modules. Subviews are required to have an ID, which is why I defined id="viewcart", even though we don’t actually have any use for it.
The attribute styleClass is the JSF equivalent of the HTML attribute class. Refer to the file /css/eshopf.jspx to see the style definition for each class.
The function of h:panelGroup is grouping together UI components. In this case, it makes possible to apply the style class header to all elements it contains.
The JSF equivalent of the HTML element img is h:graphicImage.
Notice that the immediate attribute of h:commandLink is set to true. You will recall from the previous chapter that by doing so, you force the execution of the action listener already in the Apply Request Values phase. This guarantees that, regardless of what page the user is viewing, perhaps with a partially and inconsistently filled in form, control goes directly to the page of the shopping cart. The action attribute of h:commandLink sets the outcome to be showCart.
The Left Menu (Part 1)
Listing 9-3 shows the top-level structure of LeftMenu.jspx, with the h:panelGrid component.
<?xml version="1.0" encoding="UTF-8"?>
<jsp:root
xmlns:jsp="http://java.sun.com/JSP/Page"
xmlns:c="http://java.sun.com/jsp/jstl/core"
xmlns:f="http://java.sun.com/jsf/core"
xmlns:h="http://java.sun.com/jsf/html"
version="2.1"
>
<jsp:directive.page
language="java"
contentType="application/xhtml+xml;charset=UTF-8"
/>
<f:subview id="leftMenu">
<h:panelGrid styleClass="menu">
Here goes the Search Box - See Listing 9-4
Here goes the Category Selection Box - See Listing 9-6
</h:panelGrid>
</f:subview>
</jsp:root>
Listing 9-3
eshopf: LeftMenu.jspx—Structure
As I showed in the previous chapter (see Listing 8-11), the h:panelGrid component is rendered with an HTML table; each component it contains is rendered as an HTML td element; and the optional attribute columns determines the length of the rows.
In LeftMenu.jspx, you could have written columns="1", but I omitted it because 1 is the default. Here you need h:panelGrid instead of h:panelGroup, because otherwise the search and category selection boxes would have not been rendered one below the other. The rows are filled in from left to right with the components in the order in which they appeared inside h:panelGrid, from top to bottom. The search box shown in Listing 9-4 consists of some descriptive text, an input text field, and a button to submit the search.
Notice that the action attribute of h:commandButton is set to a method of a managed bean instead of to a string literal. You encountered this mechanism in the section of the last chapter about Action Controllers and Action Listeners.
The attribute binding="#{shopManager.searchTxt}" shows how you can wire the input field to a data object on the server. You can establish a similar link with the value attribute, as I explained in the previous chapter (e.g., see Listing 8-1).
The difference is that with binding, you establish a two-way link, which lets your backing bean modify the value of the field, while with value, the backing bean cannot modify the data entered by the user. The shopManager bean doesn’t need to modify the search string entered in LeftMenu.jspx, but you still use binding for reasons that will become clear in a moment.
As with the shopping cart in TopMenu.jspx, the attribute immediate="true" tells JSF that the action should be executed during Apply Request Values, rather than during Invoke Application, which is the default for all actions. In this way, you can be sure that the user is always able to resume shopping from any page, even if it contains invalid input fields (e.g., from the checkout page with empty fields).
This immediate execution of the search action is why you need to use the binding attribute in the h:inputText component. With the value attribute, you could access the search string with the method getValue, but only during Invoke Application, after Process Validation and Update Model Value have done their job. This would have been too late, because, as I’ve just explained, the search action takes place during Apply Request Values. By using the binding attribute, you make available to the shop manager the whole h:inputText component. As a result, you can invoke the method getSubmittedValue (see line 120 of Listing 9-5) already during Apply Request Value, when the search action is executed.
Before completing the study of LeftMenu.jspx, we should look at the ShopManager Java bean, which I have already mentioned a couple of times.
The Shop Manager
The shop manager is a managed bean defined in the session scope.
In the previous section, I said that the following two attributes realize the linking of user inputs and server entities:
binding="#{shopManager.searchTxt}"
action="#{shopManager.searchBooks}"
To understand exactly how this works, let’s go through the relevant parts of ShopManager.java, as shown in Listing 9-5.
014: private List<Book> books;
...
023: private HtmlInputText searchTxt = new HtmlInputText();
147: public void setSearchTxt(HtmlInputText val) {
148: searchTxt = val;
149: }
Listing 9-5
eshopf Fragment: Searching for Books in ShopManager.java
The binding attribute listed means that during Update Model Values, the JSF servlet saves the search string typed by the user in the attribute searchTxt, which is of type javax.faces.component.html.HtmlInputText. It does so by using the method setSearchTxt. Later in the life cycle, during Render Response, it uses the getSearchText method to get the value needed to prefill the input text field in HTML. The HtmlInputTxt class has a series of properties and methods that enable you, among other things, to make it a required input and to validate the value typed in by the user.
The action attribute of the Search button causes the JSF servlet to execute the method searchBooks during Invoke Application. As you can see in Listing 9-5, the method simply obtains the value of the search string, executes the dataManager method to obtain the list of books from the database, saves the list in the object books, and returns the string "listBooks".
If you now look at the following fragment of faces-config.xml, you’ll see that by returning "listBooks", the searchBooks method forces JSF to switch from the current page to ListBooks.jspx:
<from-outcome>listBooks</from-outcome>
<to-view-id>/jsp/ListBooks.jspx</to-view-id>
<redirect/>
The presence (or absence) of the redirect element determines how this switch is done. If redirect is present, as in the example, JSF will send a redirect response to the client that will cause the browser to request the new page. Without the redirect element, during Render Response, JSF will directly use the content of the books object to render in HTML the list of books found in the database. But in that case, the list will effectively be a new rendering of the page that the user launched the search from. As a result, the URL shown in the browser will remain unchanged (e.g., http://localhost:8080/eshopf/).
The Left Menu (Part 2)
Now that you know how eshopf binds user inputs and actions to data objects and methods, we can complete the study of LeftMenu.jspx. Listing 9-6 shows the part where you select books by category.
JSF renders the h:dataTable component (line 03) with an HTML table element, in which every column is identified by an h:column component (line 04). In addition to the table functionality as you know it from HTML, JSF also provides an iteration mechanism similar to that of c:forEach and linked to the data model. The mechanism is based on two attributes: value, which contains an EL expression that returns a list of items, and var, which contains the name of a variable to which the items of the list are assigned one by one in sequence.
In this case, the EL expression #{shopManager.categories} executes the following method of shopManager:
068 public ListDataModel<Category> getCategories() {
017 private ListDataModel<Category> categoriesDataModel = new ListDataModel<Category>();
The result is that the List of categories obtained from the database via the dataManager.getCategories method is assigned to the value attribute of h:dataTable.
JSF implements an index that goes through all the items of the list, and the attribute var="category" defines the name of the variable that gives access to the current item. In practical terms, this means that when the JSF servlet renders the h:dataTable component during the Render Response phase, it renders the h:commandLink of lines 05–09 for each category found in the database.
The Checkout Page
The Checkout.jspx module of the eshopf application asks the user to provide the payment data (name, address, and credit-card information). Listing 9-7 shows the code associated with one of the input items.
The value of the h:inputText component is associated with the deliveryAddress attribute of the object customer, which is an instantiation of the class eshop.beans.Customer. Because the attribute required of h:inputText is set to true, if the user omits to fill in the field, the value of the attribute requiredMessage is displayed. If you define the the JSF element h:message, its location within the page and its style determine where the error message is displayed and how, as shown in Figure 9-2.
Figure 9-2
Incomplete input on Checkout.jspx
web.xml
Listing 9-8 shows the file WEB-INFweb.xml for the application eshopf.
Most of the tags should be familiar to you from previous examples.
The context-parameter element sets the file extension to be jspx, which is the extension of JSP documents, as those of eshopf. If you had left out this element, the extension would have been jsp, which is the extension of JSP pages.
The servlet element points to the class of the standard JSF servlet. By setting the element servlet-mapping to *.jsf, you specify that the JSP documents are to be accessed with that extension instead of their real extension, which is jspx. For example, when you select a book category in eshopf, the URL displayed in the browser is
http://localhost:8080/eshopf/jsp/ListBooks.jsf
while the JSP document is actually called ListBooks.jspx. This is called extension mapping.
The last element, resource-ref, states that the resource named jdbc/mysql is of type DataSource and that Tomcat does its own authentication. Tomcat provides a Java Naming and Directory Interface (JNDI) InitialContext for each application. This means that once you’ve registered a resource in web.xml, you can provide in a separate context file all the information necessary to link it to your server environment. For eshopf, the information is shown in Listing 9-9.
<?xml version="1.0" encoding="UTF-8"?> <!-- MySQL database context -->
As you can see, the resource attributes url, username, and password specify the MySQL database used in all versions of E-shop application and how to access it. The context file must be named context.xml and placed in the META-INF folder of your application directory.
In eshop and eshopx, you defined the database parameters in web.xml with init-param elements and retrieved them in the eshop.ShopServlet.init method to make them available to the data manager (see Listings 5-1, 5-2, and 5-3).
In eshopf, as you have just seen, you define the same parameters (it actually is the same database) in context.xml and make them accessible to the application by defining a resource-ref element in web.xml.
Accordingly, you have to update the data manager’s method getConnection. In practical terms, after removing all checks from the actual code for clarity, the line
The mechanism used in eshop and eshopx could not be used in eshopf because ShopServlet has been replaced by the JSF servlet. The mechanism relying on context.xml is in fact more flexible and elegant than the original one, but I think it was good for you to see both mechanisms.
Using and Creating Converters
As I said when describing the JSF life cycle, the JSF servlet executes the decode method of each component during Apply Request Values. The method saves the parameter values locally, but it first needs to convert the input strings to the corresponding types defined in the components, except when the components expect values of type String. JSF provides standard converters for the java.lang types Boolean, Byte, Character, Double, Enum, Float, Integer, Long, and Short and for the java.math types BigDecimal and BigInteger.
The standard converters perform a series of checks that you can use to validate, at least in part, the user's input. To do so, you have to enable the reporting of converter messages.
For example, in the eshopf application, the user can update the number of copies of a book that is already in the shopping cart. Clearly, it doesn’t make any sense to type a fractional number or a string that is not numeric. Therefore, you can write the input component in the ShoppingCart.jspx document as follows:
Then, you only need to add this line to display the error messages of the standard Integer converter:
<h:message for="quantity" styleClass="error"/>
This is not yet a perfect solution, because the application still accepts negative integers. That is, you can type in -1, and the application will happily display negative prices! To see how to solve this problem, you’ll have to wait for the section about validators.
Sometimes the standard converters are not sufficient. For example, you might like to save in a database a credit-card number without any dashes or spaces. To make a custom converter, you need to create an implementation of the javax.faces.Converter interface that overrides its methods getAsObject and getAsString. You must implement both directions of the converter. During Apply Request Values, JSF uses the getAsObject method to convert the input string to the data model object. During Render Response, JSF uses the getAsString method to do the conversion in the opposite direction, so that a string can be included in the HTML response. Once you complete the converter, you have to register it with the application.
To invoke the converter, you need to nest it as a property of f:converter or assign it to the converter attribute of the input component. Let’s go through the three steps (i.e., develop, register, and invoke) one at a time. The converter will just clean up a credit-card number of any non-numeric character. Notice that it is the task of a validator to check that the credit-card number is valid. This normally takes place during Process Validation, while the conversions, as I just said, take place during phases Apply Request Values and Render Response.
Writing the Converter in Java
Listing 9-10 shows the full code of the converter used in eshopf to convert the credit-card number when checking out.
package eshop.converters;
import javax.faces.convert.Converter;
import javax.faces.context.FacesContext;
import javax.faces.component.UIComponent;
import javax.faces.convert.ConverterException;
public class CCNumberConverter implements Converter {
//
// getAsObject extracts from the input string all numeric characters
public Object getAsObject(FacesContext ctx, UIComponent cmp,
The getAsObject method simply removes from the input string all the characters that are not decimal digits. The getAsString method inserts spaces to make the credit-card numbers more readable.
For example, if you during checkout type something such as 12-34. 56Abc78;90123--456, it will be reformatted to 1234 5678 9012 3456 as soon as you press the Check Out button. To verify that the object is correct, you can use the two println statements that you see commented out in the code. Here are a few examples taken from stdout_yyyymmdd.log in Tomcat’s logs folder:
As you can see, the output of getAsObject, which is also the input of getAsString, is always stripped of nondigit characters, while the output of getAsString is always formatted with spaces. Once more, the checking of correctness is a task for the validator, not for the converter.
Registering the Converter with the Application
You can register the converter with the application by adding the following lines to the faces-config.xml file:
You can choose any name you like inside the converter-id element, while the class in the converter-class element must match that of the converter that I described in the previous section.
Using the Converter
Here’s how to write the input element for the credit-card number in the Checkout.jspx module:
<h:inputText id="ccnumber" required="true"
value="#{shopManager.customer.ccNumber}"
requiredMessage="Value is required!"
converter="CCNumberConverter"
/>
As you can see, you only need to include the converter attribute and assign to it the converter-id you’ve registered in faces-config.xml. Alternatively, you could have nested an f:converter element inside the h:input component:
<f:converter converterId="CCNumberConverter"/>
The result would have been the same. This is a permissive converter, because it accepts almost everything without complaining. You could ask yourself whether a 30-character-long string that happens to include 16 digits is a valid credit-card number. I’ll leave that up to you.
Using and Creating Validators
How do you ensure that the user of the eshopf application doesn’t succeed in buying a negative number of books? Actually, the application should also reject any attempt of buying zero books. And what about checking the validity of a credit-card number? These are tasks for validators.
JSF features four types of validation mechanisms:
Built-in validation components
Application-level validation
Custom validation components
Validation methods in backing beans
Let’s go through them one by one.
Built-In Validators
JSF provides the following validation components:
f:validateBean: It delegates validation of the bean’s local value to the Bean Validation API.
f:validateDoubleRange: It validates that a numeric input is within a given range. It is applicable to values that you can convert to a double.
f:validateLength: It validates that the length of the input string is within a given range.
f:validateLongRange: It validates that a numeric input is within a given range. It is applicable to values that you can convert to a long.
f:validateRegex: It checks whether the String value of the component matches a given regular expression.
f:validateRequired: It checks whether a value is present. It is equivalent to setting the required attribute to true.
To use these validation components, you simply nest them inside the h:input component you need to validate. For example, to check that only positive quantities can be entered in the eshopf shopping cart, you modify the h:inputText component in ShoppingCart.jspx as follows:
All three validators also accept the maximum attribute to set the upper limit of the range. For example, you can force the user to enter the correct number of credit-card digits by modifying the corresponding h:inputText in Checkout.jspx:
<h:inputText id="ccnumber" required="true"
value="#{shopManager.customer.ccNumber}"
converter="CCNumberConverter"
requiredMessage="Value is required!"
validatorMessage="Only 15 or 16 digits accepted!"
>
<f:validateLength minimum="15" maximum="16"/>
</h:inputText>
As the validation takes place after the conversion, the limits of 15 (for American Express) and 16 (for all other credit cards) are applied to the user’s input after removing all nondigit characters.
Application-Level Validation
Application-level validation consists of performing checks inside the backing beans. This makes sense if you need to validate the business logic of your application, as opposed to validating formal correctness of individual fields. For example, before accepting an order, you might like to check that your bank has not blacklisted the credit-card number. Let’s see how it works.
In eshopf, when the user clicks the Check Out button after entering his or her name and credit-card data, the checkOut method of shopManager is executed, as shown in the following line taken from Checkout.jspx:
The dataManager.insertOrder method saves the order information in the database. The checkOut method returns an outcome that tells JSF what page should be displayed next.
If you want to do some application-level validation, you could insert its logic at the beginning of the checkOut method and make the database update and the method outcome dependent on the validation result. In case of validation failure, you could also send a message to the user, as shown in the following few lines:
If you want to create a message for a particular component, you need to replace the null argument of ctxt.addMessage with the clientId of the component. The clientId is a string containing all the IDs necessary to identify a particular component. For example, if you have <h:inputText id="it"...> inside <h:form id="fm"...>, the clientId of the input component is fm:it. I recommend that you don’t use this option, because it forces you to hard-code the clientId in your Java method.
Custom Validators
In the section “Using and Creating Converters” of this chapter, I explained how to implement a custom converter. To implement a custom validator, you follow an almost identical process:
Create an implementation of the interface javax.faces.validator.Validator that overrides the validate method.
Register the validator in faces-config.xml.
Within your JSF application, refer to the validator in an attribute or a component.
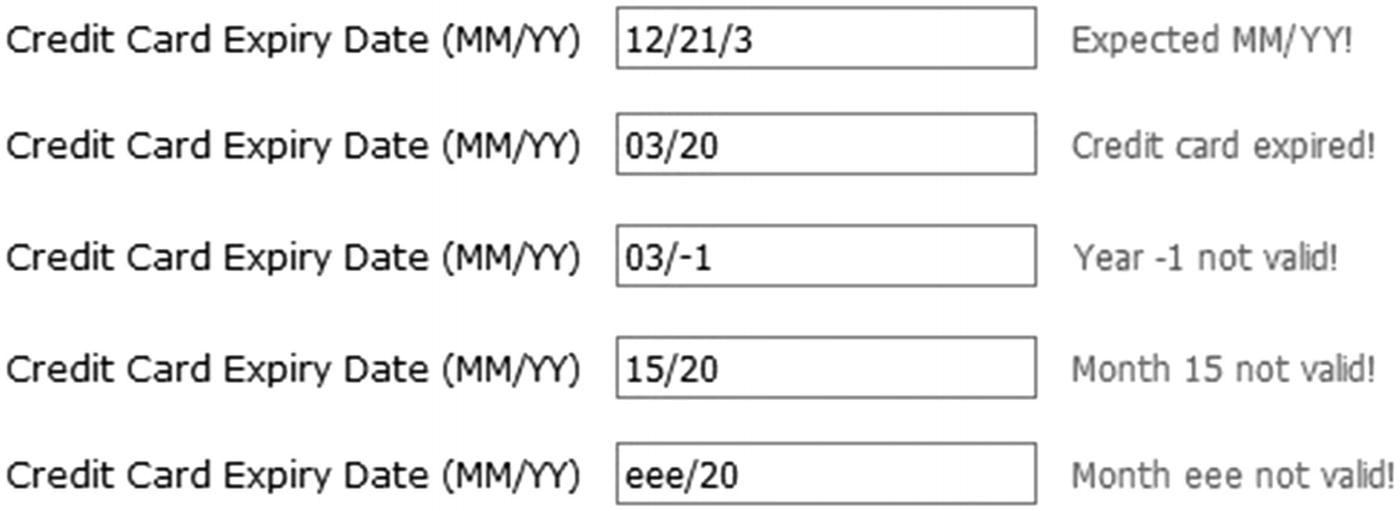
Suppose you want to ensure that the credit-card expiry date provided by the user during checkout is in the form MM/YY and that the card has not expired. Listing 9-11 shows the validator code.
package eshop.validators;
import javax.faces.validator.Validator;
import javax.faces.context.FacesContext;
import javax.faces.component.UIComponent;
import javax.faces.application.FacesMessage;
import javax.faces.validator.ValidatorException;
import java.util.GregorianCalendar;
import java.util.Calendar;
public class CCExpiryValidator implements Validator {
public CCExpiryValidator() {
}
public void validate(FacesContext cntx, UIComponent cmp, Object val) {
String messS = null;
String[] fields = ((String)val).split("/", 3);
if (fields.length != 2) {
messS = "Expected MM/YY!";
}
else {
int month = 0;
int year = 0;
try {
month = Integer.parseInt(fields[0]);
year = Integer.parseInt(fields[1]);
}
catch (NumberFormatException e) {
}
if (month <= 0 || month > 12) {
messS = "Month " + fields[0] + " not valid!";
}
else if (year < 0 || year > 99) {
messS = "Year " + fields[1] + " not valid!";
}
else {
GregorianCalendar cal = new GregorianCalendar();
int thisMonth = cal.get(Calendar.MONTH) + 1;
int thisYear = cal.get(Calendar.YEAR) - 2000;
if (year < thisYear || year == thisYear && month < thisMonth) {
messS = "Credit card expired!";
}
}
}
if (messS != null) {
FacesMessage mess = new FacesMessage(FacesMessage.SEVERITY_ERROR, messS, messS);
throw new ValidatorException(mess);
}
}
}
Listing 9-11
CCExpiryValidator.java
To register the validator with the application, you only need to add the following lines to faces-config.xml, for example, immediately below the registration of the converter:
Then, to validate the credit-card expiry date, you modify the h:inputText component used in Checkout.jspx as follows:
<h:inputText id="ccexpiry" required="true"
value="#{shopManager.customer.ccExpiryDate}"
requiredMessage="Value is required!"
>
<f:validator validatorId="CCExpiryValidator"/>
</h:inputText>
You’ll be rewarded with error messages like those shown in Figure 9-3 (which I obtained by taking several screenshots and then putting them together with a graphics program).
Figure 9-3
Expiry-date validation in Checkout.jspx
Validation Methods in Backing Beans
Instead of creating a new class as described in the previous section, you can add a method to a backing bean. In this case, you could do the following steps:
Copy the validate method from CCExpiryValidator.java to ShopManager.java, inside the class ShopManager, and rename it validateCCExpiry.
Copy the imports of FacesContext, UIComponent, FacesMessage, GregorianCalendar, and Calendar from CCExpiryValidator.java to the beginning of shopManager.java.
Replace in validateCCExpiry the line that throws the ValidatorException with ctxt.addMessage(cmp.getClientId(ctxt), mess);.
That’s it! To use this validator instead of the previous one, modify the h:inputText in Checkout.jspx as follows:
<h:inputText id="ccexpiry" required="true"
value="#{shopManager.customer.ccExpiryDate}"
validator="#{shopManager.validateCCExpiry}"
requiredMessage="Value is required!"
/>
The validator element in faces-config.xml, the element f:validator in Checkout.jspx, and the module CCExpiryValidator.java are then no longer needed.
Tip
To modify projects, always use Eclipse: duplicate the project by selecting its icon in Eclipse’s Project Explorer bar, and then copy and paste it. Eclipse will ask you to provide a new name for the duplicate project. In this way, it will be easier to go back to the original should you want to.
Creating Custom Components
The functionality of a component is centered on converting a user’s inputs (i.e., the HTTP request parameters) to component values (via the decode method during Apply Request Values) and converting component values back to HTML (via the encode method during Render Response).
In the previous chapter, you saw how to create custom components with the facelets and composite JSF tag libraries. In this chapter, I want to give you an example of how to create a new JSF component without those tags. This will give you a better understanding of how JSF works. I am always a great defender of doing things “by hand” at least once!
When you design a JSF component, you can choose to move encoding and decoding to a separate renderer class. The advantage of this approach is that you can develop more than one renderer for the same component, each with a different representation in HTML. You will then have the same behavior associated with different ways of reading data from the request and writing it to the response.
In general, considering that JSF is open source, you might consider modifying an existing component instead of developing a new one; or, thanks to the separation of components and renderers, perhaps you can modify an existing renderer.
The root class of all JSF components is the abstract javax.faces.component.UIComponent, and the root class of all renderers is javax.faces.render.Renderer. To develop a component, though, you’re always better off extending an existing component or, at the very least, the UIComponentBase class, which provides default implementations of all abstract methods of UIComponent. In this way, you only develop code for the methods you need to override. The same goes with the renderer.
To complete the picture of how to develop your custom component, you also need to create a custom tag that’s useable with JSP. The root class of all tag classes is javax.faces.webapp.UIComponentELTag.
In summary, to develop a custom component, you need to follow these steps:
1.
Create a component class that subclasses UIComponent by extending an existing component.
2.
Register the component in faces-config.xml.
3.
Create a renderer class that subclasses Renderer and overrides the methods for encoding and decoding.
4.
Register the renderer in faces-config.xml.
5.
Create a custom tag that subclasses UIComponentELTag.
6.
Create a TLD for the custom tag.
One last word about components and renderers: unless you really think that you’ll reuse the same component for different applications, it will be much easier to keep the renderer inside the component. I’ll first show you what to do when they’re separate, and then I’ll tell you how to keep them together.
I’ll show you how to develop a component that combines the functionality of all three standard components needed for accepting a user’s input: a label explaining what is expected, the text field to accept the input, and a message to report input errors. In other words, I’ll show you how to replace the following JSF code:
errorStyleClass="error" requiredMessage="Value is required!"
/>
I’ll also show you how this new eshop:inputEntry component prints an asterisk beside the label if you set required to true.
Component
The component is actually the easiest part. Let’s go through the methods one by one (see Listing 9-12).
01: package eshop.components;
02: import javax.faces.component.UIInput;
03: import javax.faces.context.FacesContext;
04:
05: public class InputEntryComponent extends UIInput {
06: private String label;
07: public InputEntryComponent(){
08: this.setRendererType("eshop.inputEntry");
09: }
10: public String getLabel() {
11: return label;
12: }
13: public void setLabel(String label) {
14: this.label = label;
15: }
16:
17: // Overridden methods
18: public String getFamily() {
19: return "eshop.inputEntry";
20: }
21: public void restoreState(FacesContext ctxt, Object state) {
22: Object val[] = (Object[])state;
23: super.restoreState(ctxt, val[0]);
24: label = (String)val[1];
25: }
26: public Object saveState(FacesContext ctxt) {
27: Object val[] = new Object[2];
28: val[0] = super.saveState(ctxt);
29: val[1] = label;
30: return ((Object)val);
31: }
32: }
Listing 9-12
InputEntryComponent.java
InputEntryComponent is the component initialization. Its only task is to register with the component the string that identifies the renderer. The only property of the component defined in InputEntryComponent.java is label. This is because you’re extending UIInput, which takes care of defining everything that has to do with the input field.
The getter and setter methods of the label property are getLabel and setLabel. Nothing special there.
You use the getFamily method to find all the renderers associated with this component. We’re going to create only one renderer, but it’s still appropriate to define a family rather than inherit the family of UIInput, because you couldn’t use UIInput’s renderers with InputEntryComponent. By overriding the default getFamily, you ensure that only your renderer is visible.
The state of the component consists of the state of UIInput plus the label property. Therefore, you define its state as an array of two objects. The saveState method forms the array and returns it, so that JSF can save it. The restoreState method receives the state, unpacks it, and stores it locally. Notice how the operations that have to do with UIInput are always delegated to it.
Now that you have the component, you have to register it. You do this by inserting the following lines into faces-config.xml:
The renderer is a bit trickier than the component. To implement it, you define a class that extends javax.faces.render.Renderer. Start by looking at the three methods that you need to override (see Listing 9-13).
59: public void decode(FacesContext ctxt, UIComponent cmp) {
As I said before, the only property that you add to UIInput is label, which the user cannot modify. Therefore, not surprisingly, as you don’t need to do anything concerning the label, you only need to decode the input field. In line 60, you typecast the component object to InputEntryComponent, so that you can work with it more comfortably. In lines 61–62, you get the map of the input parameters, and in line 63, you get from the FacesContext the clientId of the component, so that in line 64, you can finally get the input string as typed by the user. After that, you only need to save the input string as a submitted value. Remember that this method is executed during Apply Request Values.
The encoding process requires more work than the decoding process, because you have to send to the HTTP response all three components that were combined to form InputEntryComponent. This takes place during Render Response. In line 71 of the encodeBegin method, you get the response writer from the FacesContext. After executing the functions that write the three subcomponents, you flush the output, and you’re done.
Listing 9-14 shows the method to encode the label. It opens the HTML label element with the startElement method, writes the label with a plain write method, writes an asterisk—but only if the component is required—and closes the label element with the endElement method. The result is something like <label>Contact Name*</label>.
Listing 9-15 shows the method to encode the input field. It opens the HTML input element, adds the attributes with the writeAttribute method, and closes the element. The three parameters of writeAttribute are the name and value of the HTML attribute and the name of the component property. The result is something like the following element:
Listing 9-16 shows the method to encode the error message. It gets the list of all messages queued for the component but only displays the first one. If you want to display them all, you just need to replace the if keyword with a while. To display the message, the method opens the HTML span element, adds the class attribute to show the message with the correct style, displays the message itself, and closes the element. The result is something like the following element:
The custom component is done, but to use it with JSP, you need to define a corresponding custom tag I already explained how to define. Listing 9-17 shows the Java class that implements the tag handler.
package eshop.tags;
import javax.el.ValueExpression;
import javax.faces.component.UIComponent;
import javax.faces.webapp.UIComponentELTag;
public class InputEntryTag extends UIComponentELTag {
private ValueExpression errorStyleClass;
private ValueExpression label;
private ValueExpression required;
private ValueExpression requiredMessage;
private ValueExpression value;
// Setters
public void setErrorStyleClass(ValueExpression errorStyleClass) {
this.errorStyleClass = errorStyleClass;
}
public void setLabel(ValueExpression label) {
this.label = label;
}
public void setRequired(ValueExpression required) {
this.required = required;
}
public void setRequiredMessage(ValueExpression requiredMessage) {
As you can see, you define a property for each attribute supported by the tag, but not for the id attribute. The reason is that UIComponentELTag already defines it. Notice that you only have setter methods, without the corresponding getters. This is because you never need the get methods. The setProperties method copies the attribute values from the tag to the component, and the release method cleans up what is no longer needed.
Before you can use the custom tag in JSP, you still need to create a TLD to be placed in WEB-INF lds. See Listing 9-18.
In lines 09, 12, and 13, you define the eshop:inputEntry tag and associate it with the tag handler. The eshop.tags.InputEntryTag string means that you have to place InputEntryTag.class in the folder WEB-INFclasseseshop ags. In the rest of the TLD, you define all attributes and set them to accept the JSF expressions as values, with the exception of id.
With this, you’re ready to use the new JSF UI component h:inputEntry. You only need to add the eshop namespace declaration to the jsp:root element at the beginning of the JSP document:
xmlns:eshop="urn:jsptld:/WEB-INF/tlds/eshop.tld"
The result will look like the field shown in Figure 9-4. The version of eshopf you find in the software package for this chapter already has everything in it. To see the field, you only need to remove the comments around the relevant lines of code in Checkout.jspx.
Figure 9-4
Checkout.jspx—eshop:inputEntry
Inline Renderer
It’s possible to include the rendering functionality inside the component class, so that the component effectively renders itself. As I mentioned before, unless you plan to use more than one renderer with the same component, you might choose not to bother with a separate renderer.
To make eshop:inputEntry self-rendering, you need to do these:
1.
Move the methods of InputEntryRenderer.java to InputEntryComponent.java. You’ll need to make some cosmetic changes that I’ll explain in a moment. After you have done the move, you can delete the renderer file.
2.
Add the encodeEnd method to InputEntryComponent.java (more about this in a moment).
3.
Return null in the getRendererType method of InputEntryTag.java.
4.
Remove the registration of the renderer from faces-config.xml.
The UIInput class, which you extend to make the component, supports the three methods decode, encodeBegin, and getConvertedValue that you used in the separate renderer, but without the UIComponent parameter. It makes sense because the component object is directly accessible with the keyword this.
When you remove the cmp parameter from the three methods, you should also remove the line
from decode and encodeBegin, because it has become useless. Then, make a global replace of ieCmp with this and replace the four occurrences of cmp in decode and getConvertedValue with this.
You need the encodeEnd method to override the method in UIComponentBase, which throws a NullPointerException. In fact, you don’t need to do anything in encodeEnd; you can just write an empty method:
public void encodeEnd(FacesContext context) throws IOException { }
Note that you only need this method when a component renders itself, not when it uses a separate renderer class.
In InputEntryTag.java, the getRendererType method returns "eshop.inputEntry". If the method is to use its internal rendering methods, getRendererType has to return null. Finally, remove the seven lines of the render-kit element from faces-config.xml.
faces-config.xml
I’ve already explained all the elements of this file when I talked about the Shop Manager (<managed-bean> and <navigation-rule>) and when registering a converter (<converter>), a validator (<validator>), a component (<component>), and a renderer (<render-kit>). In this section, I only want to summarize with Table 9-1 the navigation rules of eshopf.
Table 9-1
Eshopf Navigation Rules
from-outcome
to-view-id
redirect
checkOut
/jsp/Checkout.jspx
Yes
listBooks
/jsp/ListBooks.jspx
Yes
orderConfirmation
/jsp/OrderConfirmation.jspx
No
showBook
/jsp/BookDetails.jspx
Yes
showCart
/jsp/ShoppingCart.jspx
Yes
Summary
In this chapter, I described how to use JSF to reimplement the user interface of eshopx, to create the application eshopf.
I showed how to work with the standard JSF components and then explained how to create your own converters, validators, and components. On the way, I also briefly described how to tie together the application with web.xml, faces config.xml, and context.xml.
Based on the content of this chapter and the previous one, you should now be able to write your own application.