In many cases, a web application is nothing more than a front end for a database (DB). In fact, what makes web pages dynamic is precisely the fact that there is a significant amount of data behind them. In this chapter you will learn to working with databases and SQL.
A database consists of organized data, that is, the data itself and a schema that provides data structures. Nowadays, most databases are organized in tables consisting of rows and columns. This is a natural way of organizing data, and you’re probably familiar with it through the use of spreadsheets. You can define the table characteristics independently of the actual data you’re going to store into it. This is another instance of the separation of formatting and content, which you’ve already encountered in Chapter 3, when we discussed web applications. For example, a table of employees would probably include columns named FirstName, LastName, and SocialSecurityNumber containing strings of text; columns named EmployeeNumber and YearSalary would contain numbers; and columns named DateOfBirth and EmployedSince would contain dates. The data associated with each employee would then all be stored into a row.
A field is an individual data item within a table, corresponding to the intersection of a row and a column. One or more columns can be specified as unique keys, used to identify each individual employee. For this purpose, you could use either one of the columns mentioned previously (e.g., EmployeeNumber) or the combination of first and last name and date of birth. The unique key used in preference over the others is called the primary key of a table.
An additional type of key is the foreign key. In this case, the column is defined as a reference to a unique key of another table. Besides avoiding duplication of data, this type of constraint increases the consistency of the database. For example, a table containing customer contracts could include a column referring to the column of employee numbers defined in the employee table. This would ensure that each contract would be associated with an existing salesperson.
Sometimes it’s useful to present only some columns and rows, as if they were a table in their own right. Such virtual tables are called views.
Atomicity: It guarantees that either all the individual steps of an operation are performed or none at all. You must not be able to perform partial transactions.
Consistency: It refers to the fact that a transaction is not supposed to violate the integrity of a database.
Isolation: It means that concurrent operations cannot see intermediate values of a transaction.
Durability: It refers to the capacity of a database to guarantee that a transaction, once completed, is never going to be “forgotten,” even after a system failure.
DBMS
A database management system (DBMS), such as MySQL, is a software package that lets you create, read, update, and delete (CRUD) both items of data and elements of the schema.
The data it contains
The structure you impose on the data in order to CRUD it efficiently
The software that allows you to manipulate both the data itself and the database structure (the DBMS)
Working with a database means that you’re interacting with its DBMS. You can do that through a command-line interface (CLI) , through graphical user interfaces (GUIs) provided by the DBMS vendor and third parties, or programmatically through an API.
The DBMS can build an index for each key, so that the data can be retrieved more quickly. This will obviously slow down insertion and deletion of rows (i.e., of new records), because the DBMS will have to spend time updating the indexes, but most databases are more frequently interrogated than modified. Therefore, it usually pays to define indexes, at least those that can speed up the most common queries.
In this chapter’s examples and in the book as Eshop database, I’ll use MySQL as the DBMS of choice, because, first, it’s available for free and, second, it’s the most widely used of the freely available DBMSs. As such, it has been proven to work reliably in all sorts of environments.
Structured Query Language
Structured Query Language (SQL) is the most widely used language to interact with DBMSs. Most DBMSs don’t support the whole SQL standard. Moreover, vendors sometimes add nonstandard elements that, in practice, prevent full portability across DBMSs. In general, regardless of whether we’re talking about database organization, table structure, or actual data, you’ll need to perform four CRUD operations. The corresponding SQL statements begin with a keyword that identifies the operation (e.g., INSERT, SELECT, UPDATE, or DELETE), followed when necessary by a keyword specifying on what type of entity the operation is to be performed (e.g., DATABASE, TABLE, or INDEX) and by additional elements. You use the SELECT statement for retrieving information.
You can create databases, tables, and indexes with the CREATE statement, update them with ALTER, and delete them with DROP. Similarly, you can create and delete views with CREATE and DROP, but you cannot update them once you’ve created them. You use INSERT to create new rows within a table, and you use DELETE to delete them. The UPDATE statement lets you modify entire rows or one or more individual fields within them.
The statements that let you modify the structures are collectively referred to as Data Definition Language (DDL), while those that let you modify the content are called Data Manipulation Language (DML).
In many applications, the structure of databases, tables, indexes, and views, once initially defined, remains unchanged. Therefore, you’ll often need within your applications only the statements operating on rows and fields. In any case, you’ll certainly need SELECT, which you use to interrogate databases both in terms of their structure and the data they contain. Finally, to complete the list of statements you’re likely to need when developing applications, there are START TRANSACTION, COMMIT, and ROLLBACK, which you need to use transactions.
When you want to retrieve, update, or delete rows, you obviously have to identify them. You do this with the WHERE keyword followed by a <where_condition>.
INSERT
The SQL Statement INSERT
You can use INSERT to create one row in a table (or a single-table view) from scratch or to create one or more rows by copying data from other tables.
UPDATE
The SQL Statement UPDATE
DELETE
The SQL Statement DELETE
SELECT
In particular, SELECT (that can be used also to obtain the result of applying a function to the data) retrieves data from one or more tables and views.
SELECT to Obtain Data
SELECT * is the simplest possible SELECT, but you’ll probably never use it. It returns everything you have in your database.
SELECT * FROM table is the simplest practical form of SELECT. It returns all the data in the table you specify.
SELECT a_col_name, another_col_name FROM table still returns all the rows of a table, but for each row, it returns only the values in the columns you specify. Use the keyword DISTINCT to tell the DBMS that it should not return any duplicate row.
SELECT * FROM table WHERE condition only returns the rows for which the condition you specify is satisfied.
SELECT * FROM table ORDER BY col_name returns all the rows of a table ordered on the basis of a column you specify.
The SQL standard has been widely adopted, and, as a result, most of what I’m going to say concerning SQL actually applies to all DBMSs. As you can imagine, there are still proprietary additions and variations that, in some cases, make SQL less portable than what it could and should be, but it won’t affect us. The SQL standard specifies a lot of reserved words as keywords; therefore, it should be clear that in this chapter, I couldn’t possibly give you more than a small introduction to SQL and DBMS.
At last, to write comments in an SQL script, you enclose them between /* and */, like Java’s block comments.
Introducing eshop application
Now, in this section, I will introduce the eshop application, which will remain with us through the rest of the book.
The first thing is to create a simple database, which we will use in the eshop application you will encounter in the next chapter. It is important to emphasize on design of database, because a good design ensures elimination of data redundancy, consistent data, and high-performance application.
Taking an object-oriented approach, I’ll begin by specifying the objects that the application needs to handle, the operations which those objects support, and the roles of the people who perform those operations.
Each role corresponds to a separate user interface, and the two main roles are the administrator and the customer. The administrators manage products, orders, and customer records, but for our purposes, it is sufficient to implement the public interface of a customer buying from a catalog.
Entities and Operations
In eshop we won’t keep track of orders and customers. Once the customer goes to the checkout, enters credit-card information, and checks out, we’ll save the order, but we won’t do anything with it. In the real world, we’d have to process the purchase by charging the credit-card account and dispatching the order.
Product Categories
It makes sense to group the products into categories, especially if the catalog is diversified and substantial. As eshop only sells books, its categories refer to broad book subjects, such as Historical Mysteries, Science Fiction, and Web Development.
Each category has a name and an identifier. The identifier is guaranteed to be unique, thereby allowing us to refer to each category without ambiguity. Normally, a category would have additional attributes, like description, status, date of creation, and so on. To implement the customer interface, the only operation you need with such a bare-bones category definition is obtaining a category name given its ID.
Books
Each book has a title, an author, a price, a unique identifier, a category ID, and an image of the front cover. Customers must be able to select books from a category, search for books, display the book details, and put books into a shopping cart.
Shopping Cart
The minimum amount of information stored in a shopping cart is a list of items, each consisting of a book identifier and the number of ordered copies. I decided to duplicate in the shopping cart title, description, and price of the books instead of using their book IDs. Besides simplifying the application, this also protects the customer from book updates that might occur while he or she is still shopping. In a more sophisticated application, when some book attributes change, you might want to inform the customers who’ve placed the book in their cart but haven’t yet completed the checkout. You wouldn’t be able to do so without saving the original information. Obviously, this only avoids a problem due to concurrent access of data. To protect the information from more serious occurrences like server failures, you would have to implement more general solutions, like saving session data on non-volatile storage and server clustering.
Customers must be able to change the number of copies of each book in the cart, remove a book altogether, and go to the checkout. They should also be able to display the shopping cart at any time.
Order
Although this sample application doesn’t cover orders, it’s useful to specify the structure of an order. You need two separate classes: one to represent the ordered items and one with the customer’s data.
For each ordered item, you need to save the book data obtained from the shopping cart. Additionally, for each order, you need to save the customer data and a unique order number.
Creating MySQL Schema and Tables
categories table
books table
orders table
order_details table
Categories Table
Field Name | Length | Type | Constraints |
|---|---|---|---|
category_id | – | INT | Primary Key Not null Index |
category_name | 70 | VARCHAR | Not Null |
Books Table
Field Name | Length | Type | Constraints |
|---|---|---|---|
book_id | – | INT | Primary Key Not null Index |
title | 70 | VARCHAR | Not Null |
author | 70 | VARCHAR | – |
price | – | DOUBLE | Not Null |
category_id | – | INT | Foreign Key of categories table Not null |
Orders Table
Field Name | Length | Type | Constraints |
|---|---|---|---|
order_id | – | BIGINT | Primary Key Not null Index |
delivery_name | 70 | VARCHAR | Not Null |
delivery_address | 70 | VARCHAR | Not Null |
cc_name | 70 | VARCHAR | Not Null |
cc_number | 32 | VARCHAR | Not Null |
cc_expiry | 10 | VARCHAR | Not Null |
Order_details Table
Field Name | Length | Type | Constraints |
|---|---|---|---|
id | – | BIGINT | Primary Key Not null Index |
book_id | – | INTEGER | Foreign Key of books table Not null |
title | 70 | VARCHAR | Not Null |
author | 70 | VARCHAR | |
quantity | – | INT | Not Null |
price | – | DOUBLE | Not Null |
order_id | – | BIGINT | Foreign Key of categories table Not null |
The Index speeds up the search of an element in a table.
I use VARCHAR data type for cc_number and cc_expire to simplify controls for these fields. In an application ready for production, you should use a numeric data type for cc_number and date data type for cc_expire. Note that I used INT for book id and categories, while I used BIGINT for orders and order details, because I supposed a number of orders bigger than the books.
shop_create.sql
Line 01 removes the database. The IF EXISTS option allows you to delete it only if it already exists. This option is used to prevent the reported error when you use the creation script the first time if the database does not exist. The DROP statement deletes the database and the physical disk files, so you should have a backup of the database if you want to restore it in the future.
Line 02 creates a blank database named shop.
Lines 03 to 08 create a table to store book categories.
Lines 09 to 19 create a table to store book records.
Lines 20 to 29 create a table to store book orders.
Lines 30 to 44 create a table to store book order_details.
Lines 06, 15, 27, and 38 set the primary keys in the tables.
Lines 18, 42, and 43 set the foreign keys in the tables.
To execute the SQL script, you can use the command-line client you see in Chapter 1. You will find the script in the software package for this chapter.
Log of shop_create.sql
shop_populate.sql

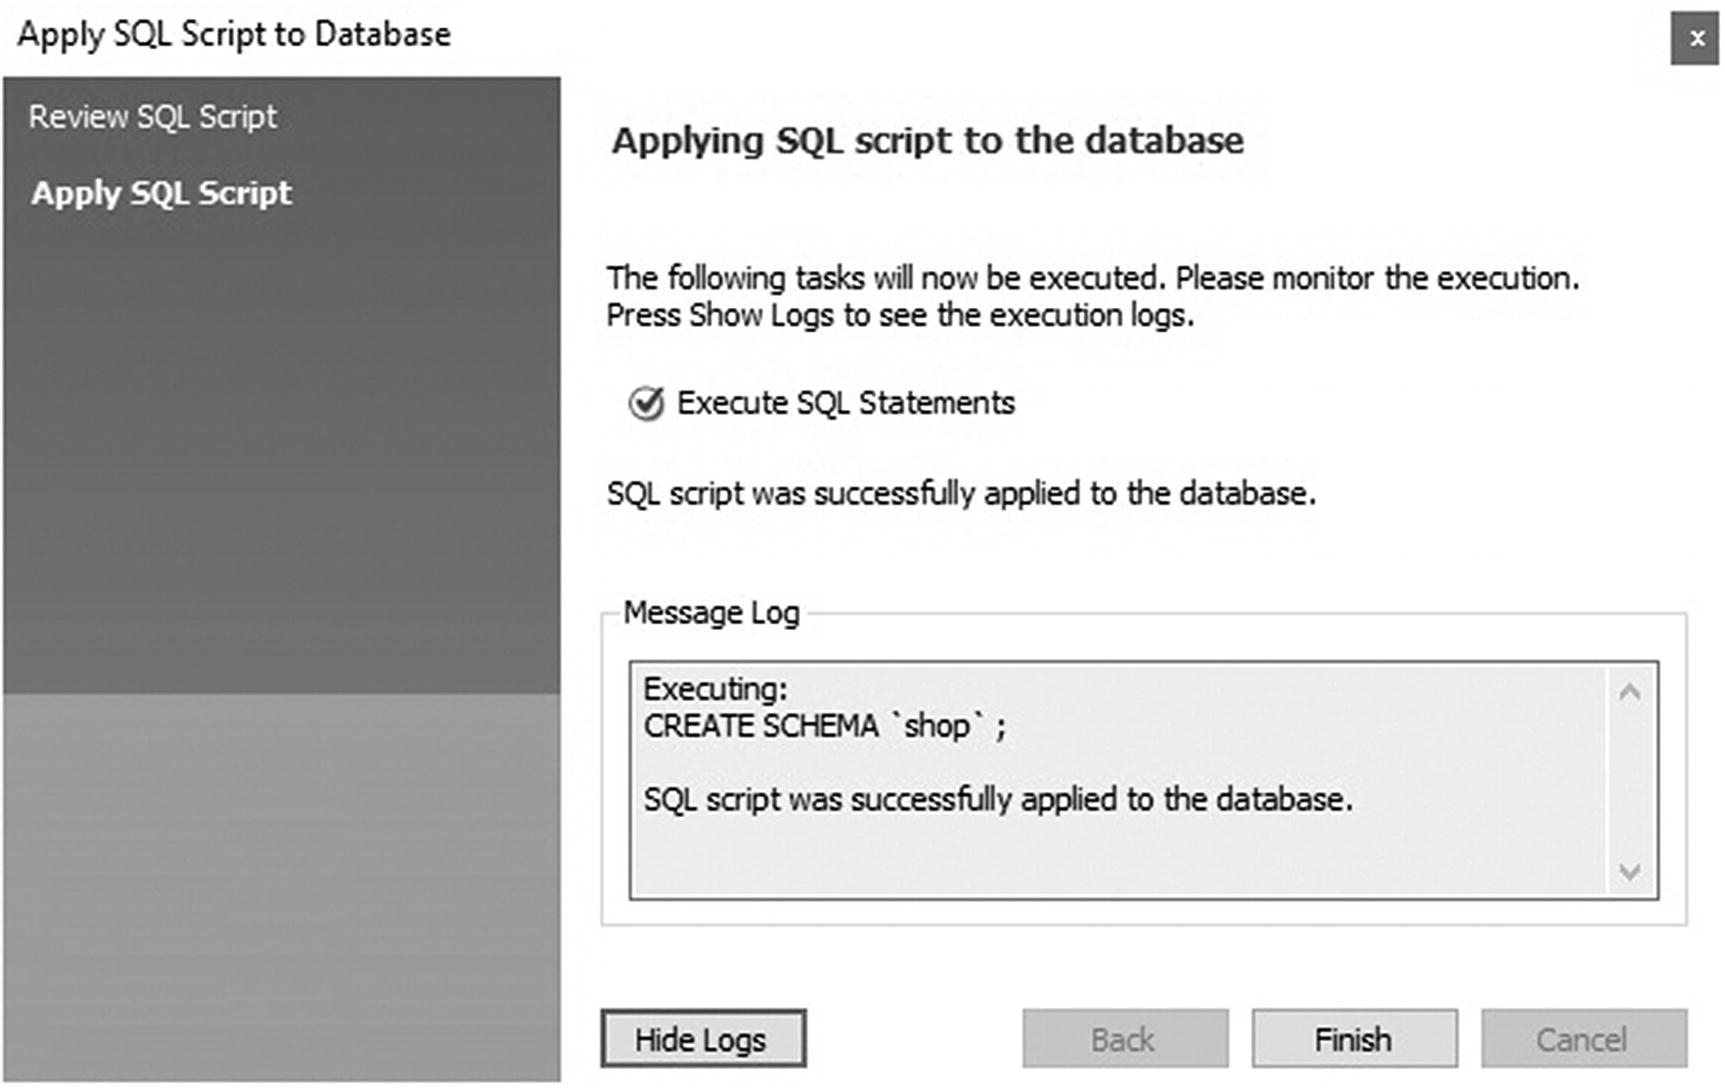
MySQL workbench—how to create a new schema

MySQL workbench—creating a new schema
MySQL workbench—execution of a script
MySQL workbench—how to create a new table

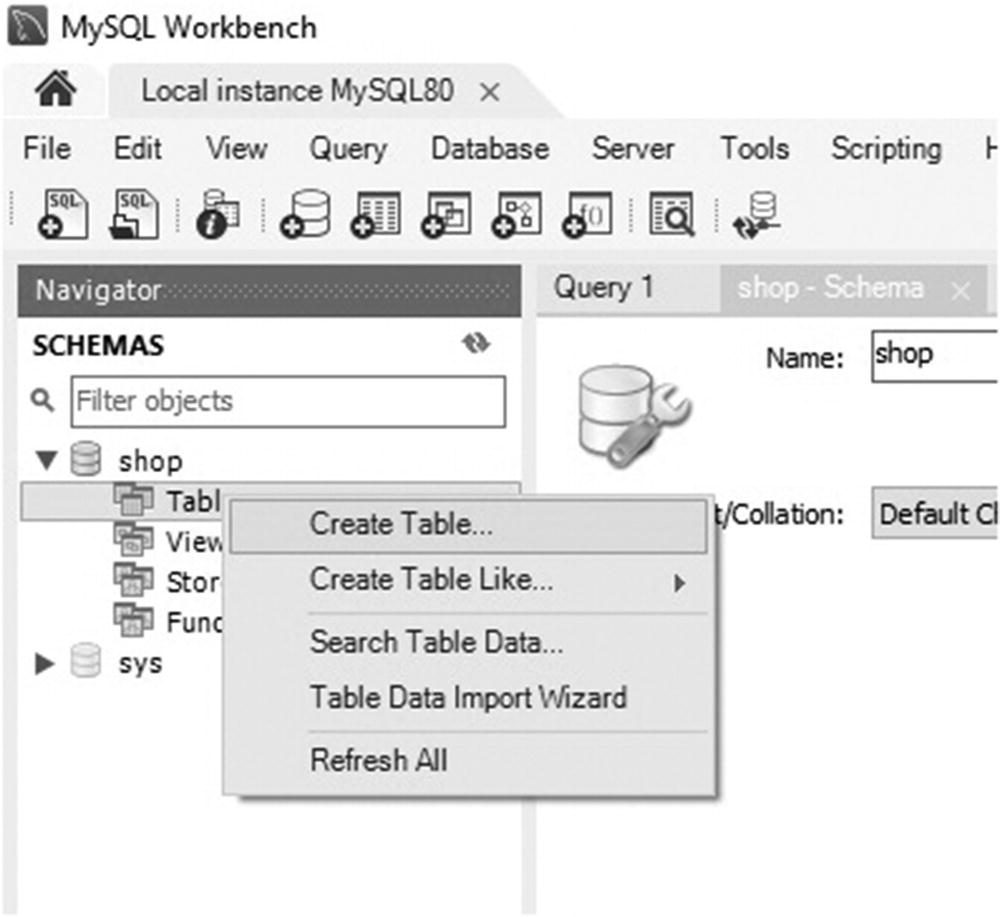
MySQL workbench—creating a new table
MySQL workbench—creating columns in a table
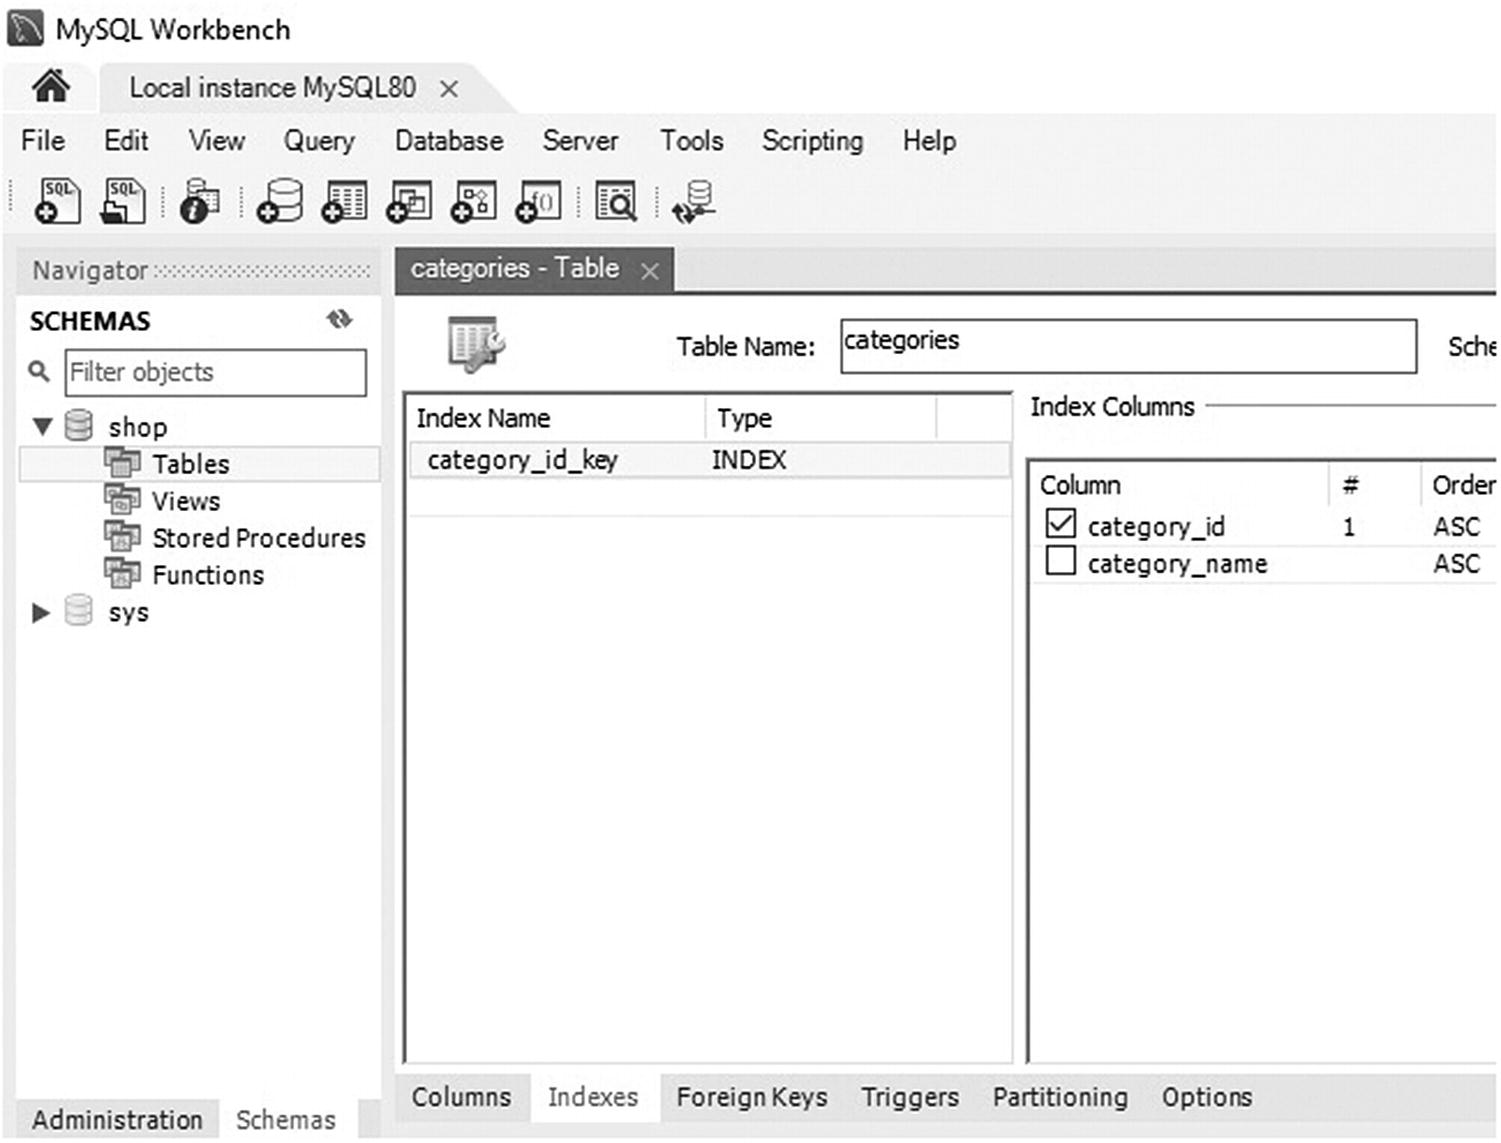
MySQL workbench—creating a new index
At the end, click “apply” for applying SQL script to the database. Then, after a control, the script is executed. It is possible to create the other tables in this way.
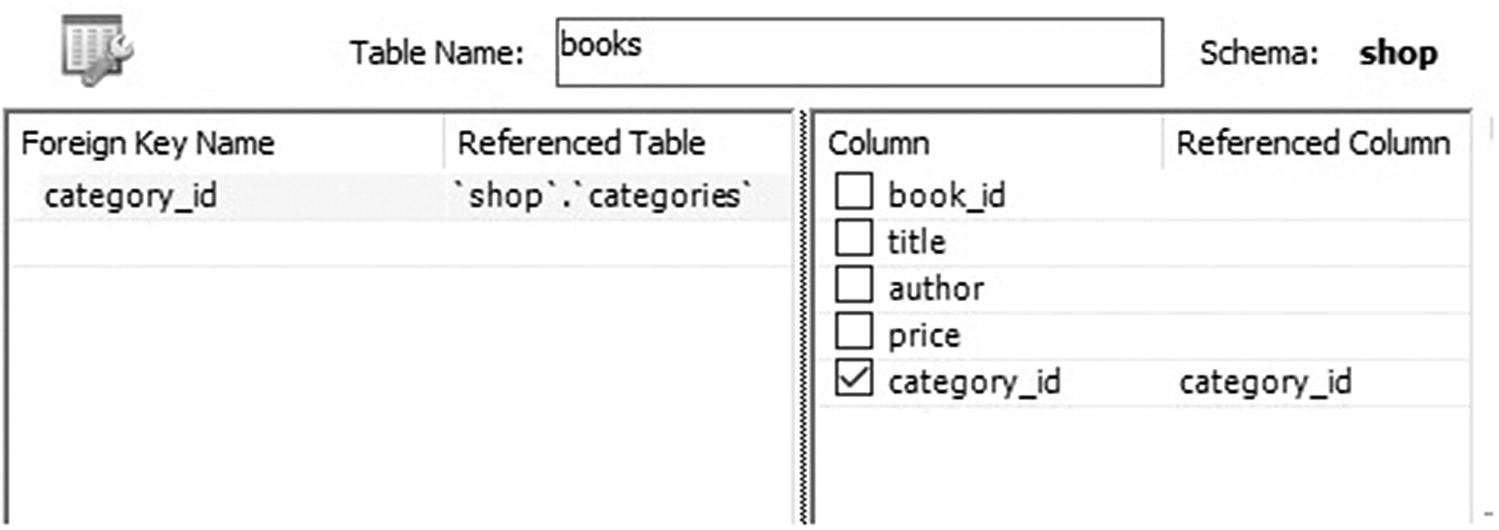
MySQL workbench—creating a foreign key
You can continue creating the other tables with Workbench.
It is also possible to create the database with a script.

MySQL workbench—creating the shop database
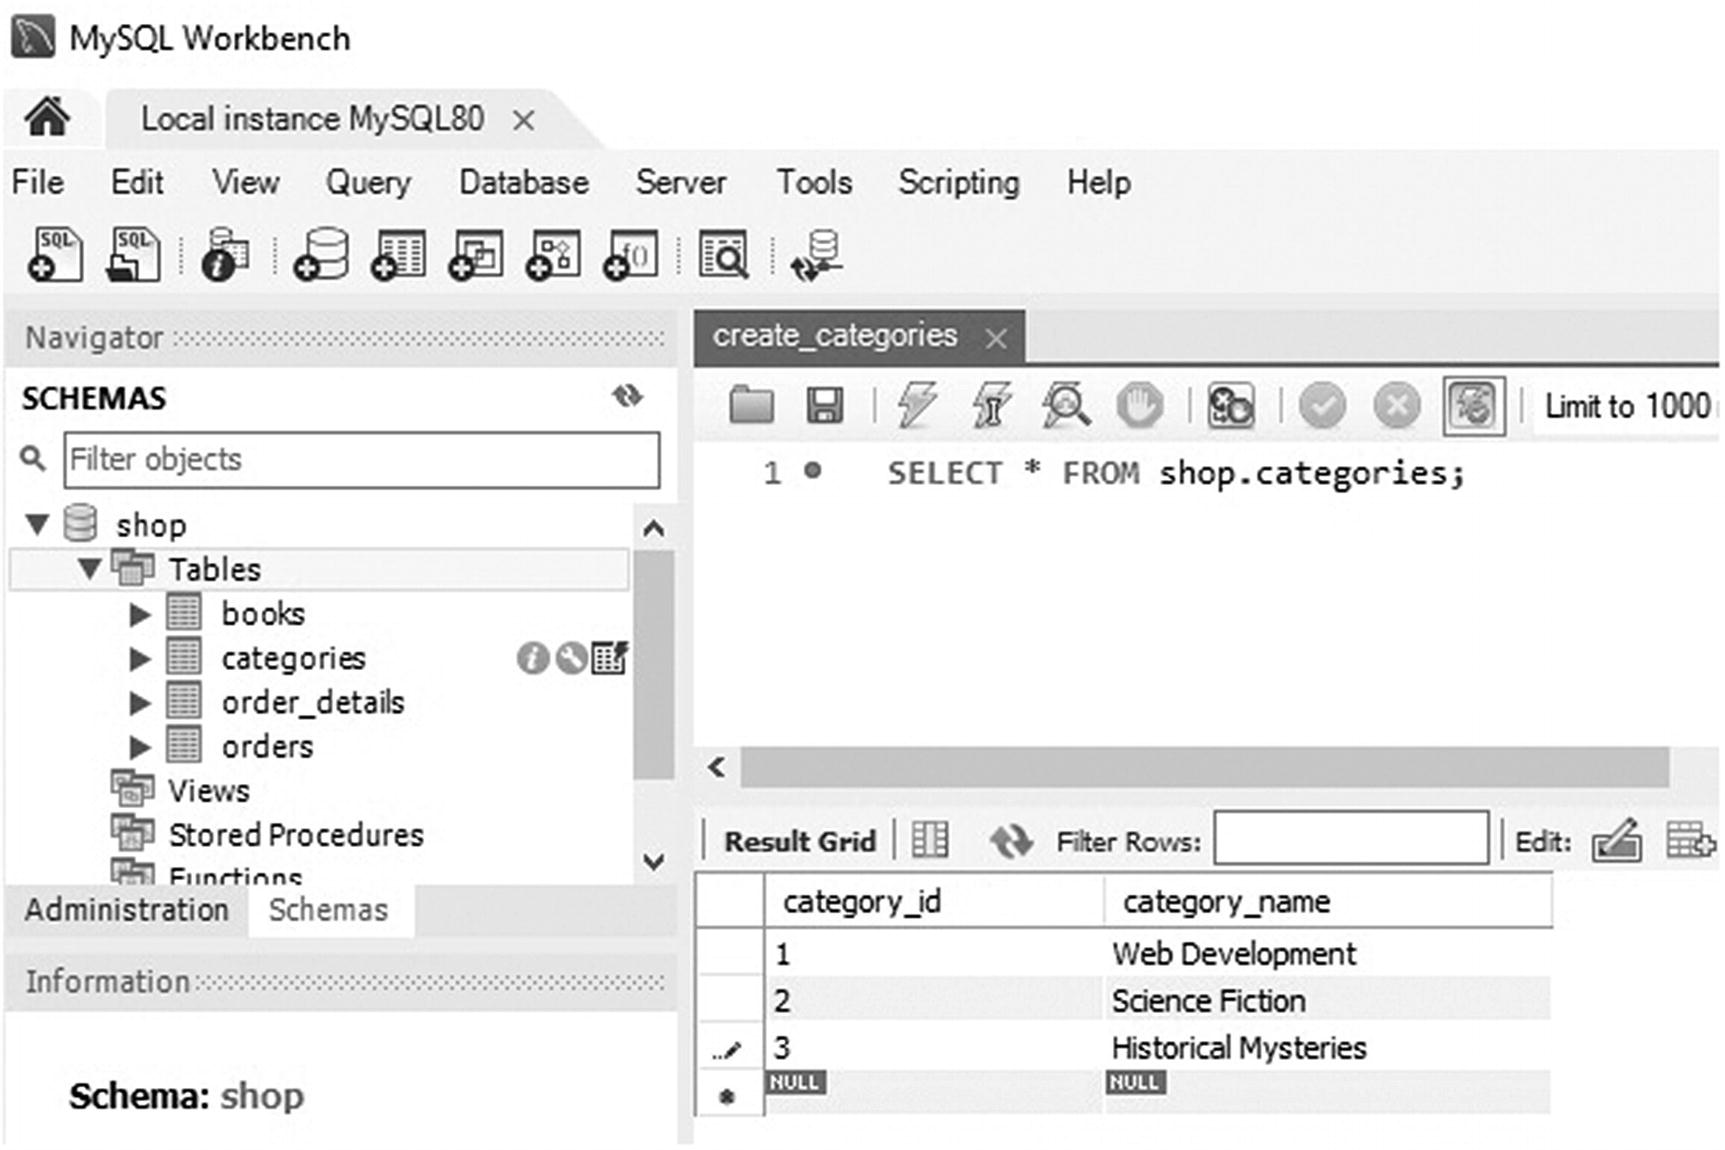
Workbench—list of all categories

List of all books
MySQL/Tomcat Test
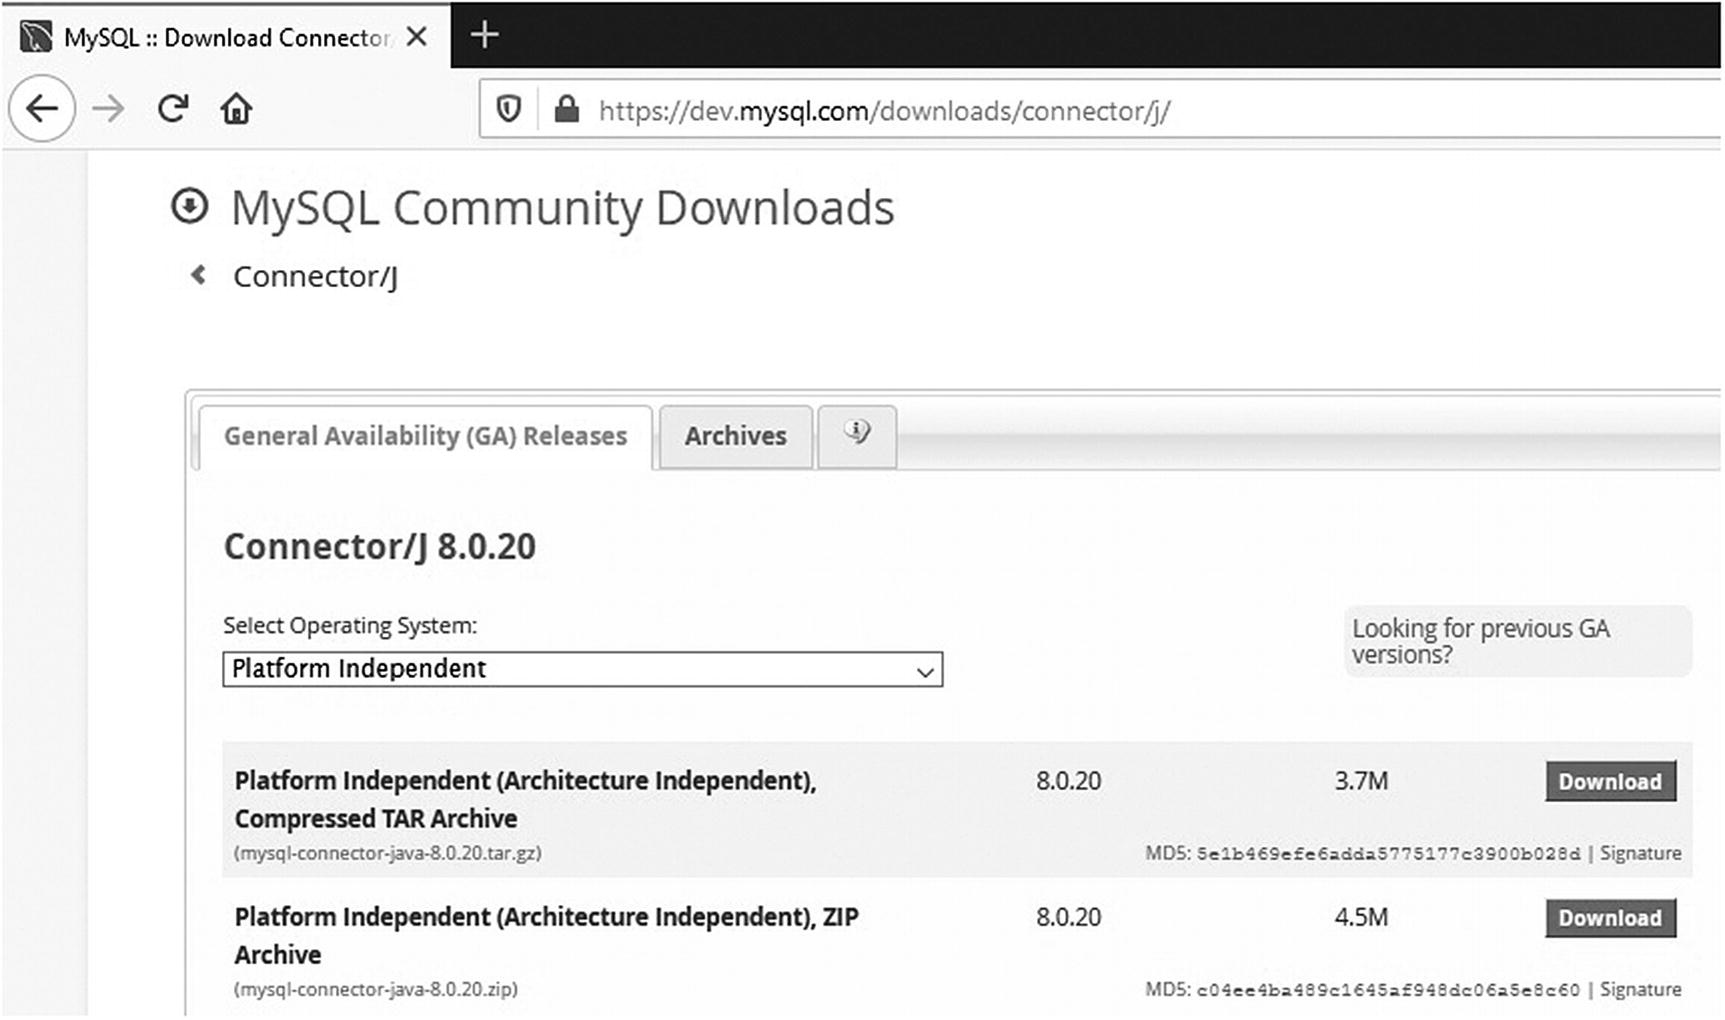
MySQL Connector download page
To install a JDBC, you can copy the JAR file in the lib folder of your web application, or better, you can copy its JAR file (mysql-connector-java-8.0.19.jar) into %CATALINA_HOME%lib. In the second case, you avoid an eventually memory lack of the server, while in the first case, you can use the application in different environments, without updating the lib folder of the servers.
jdbc.jsp
Don’t worry if things are not completely clear. Later in the next chapter, I will explain in detail how you access a database from Java. For the time being, I just want to give you an example of how you can test database connectivity with a simple JSP page.
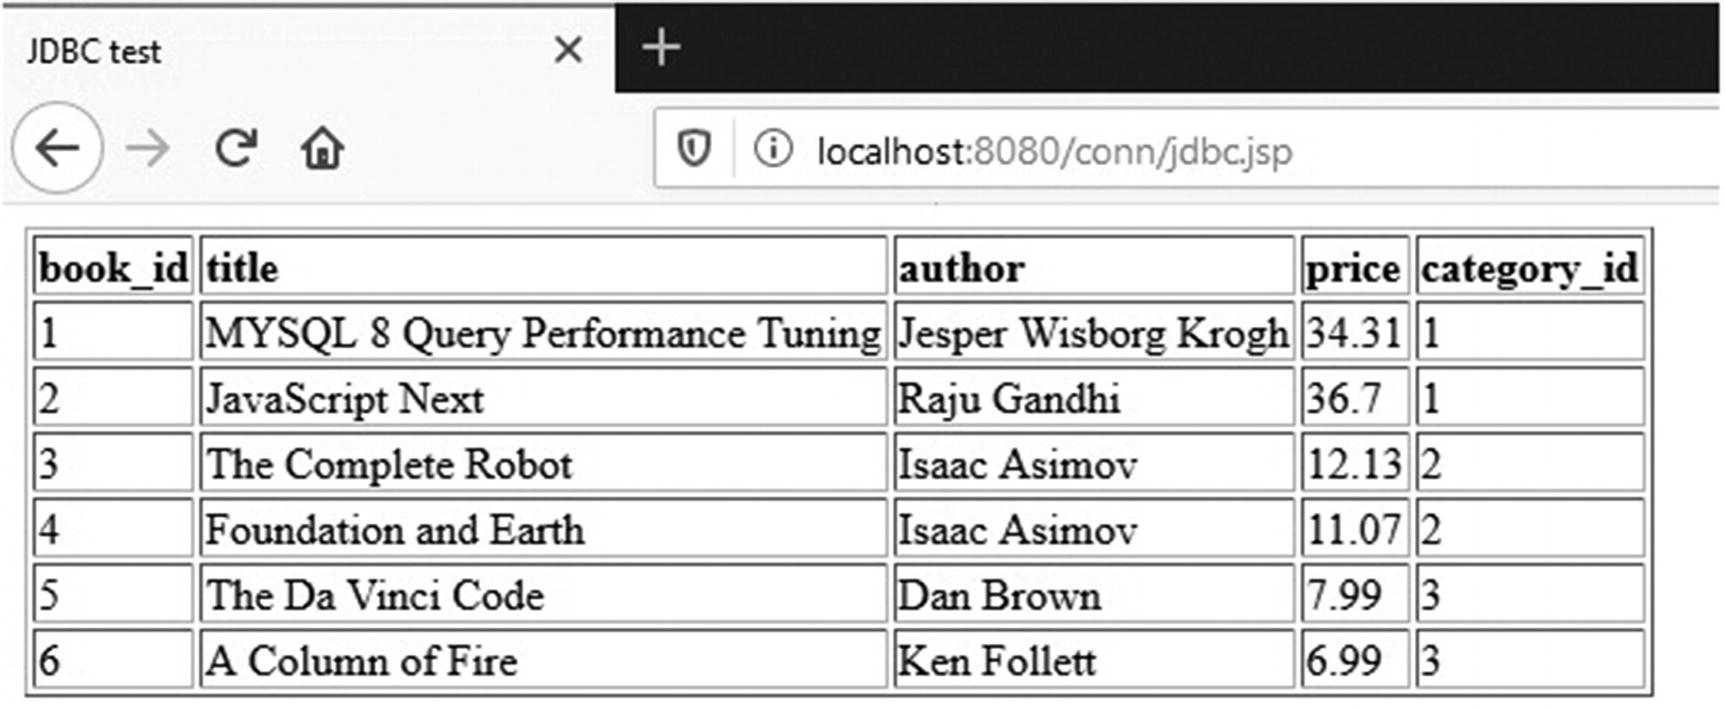
jdbc.jsp output
In a more realistic situation, you would replace the category identifiers with the category names, but I want to keep this first example as simple as possible.
There is one thing, though, that deserves a comment: it is bad practice to hard-code in a page the name of the database, of the user ID, and of the access password. Sooner or later, you might need to change one of those parameters, and the last thing you want to do is to go through all your pages to do it. The initialization parameters exist precisely to avoid such error-prone procedure.
web.xml Fragment to Define Initialization Parameters
In the example, my-database-name would be jdbc:mysql://localhost:3306/shop, and my-userID and my-password would be root.
You can modify the jdbc.jsp or create a new file (I created a new jdbcParam.jsp).
Database Architecture
In some cases, a database might contain a small amount of data, have a simple structure, and reside together with the application software on a home PC. In other cases, at the higher end of the scale, it might hold millions of records, have a data structure of great complexity, and run on a cluster of powerful servers.
The URL of your server
A user ID that allows you to access the DB
The password that goes together with the user ID
Once you establish the connection, you can then begin to manipulate the DB structure and its content via SQL statements. Be aware that although you need to provide a user ID and password when you connect to the server, this doesn’t automatically mean that a user has access to all databases on the same server. You can (and, in most cases, should) allow access to specific databases to some users and not others. In fact, you can define one or more new users for each new database you create and group them according to the capabilities they are required to have (i.e., database administrators, developers, etc.). This ensures total confidentiality of data when several users share a database server. It’s good practice to define different users for different applications so that you don’t risk “cross-polluting” data.
Category.java
Incidentally, be aware that SQL, contrary to Java, is not case-sensitive.
To retrieve all columns of a table, you replace the comma-separated list of columns with an asterisk. The WHERE clause can consist of several conditions composed by means of logical operators.
This lets you add a column to an existing table. If you replace add with modify or drop, the alter statement will let you redefine a column or remove it.
Classification of SQL Statements
Group | Description |
|---|---|
Data Definition Language (DDL) | Statements used to define the DB structure (e.g., create, alter, drop, and rename) |
Data Manipulation Language (DML) | Statements used to manage data (e.g., select, insert, update, and delete) |
Data Control Language (DCL) | Statements used to control access to the data (e.g., grant, used to give access rights to a user, and revoke, used to withdraw them) |
Transaction ControL (TCL) | Statements used to group together DML statements into logical transactions (e.g., commit and rollback) |
In the next chapter, I’ll explain how to execute any SQL statement, but we’ll concentrate mainly on DML.
Summary
In this chapter, I introduced you to working with databases and SQL. Then I introduced you to Eshop application and I guided you to the design of its database and to its creation with MySQL tools. At last, I explained how to access databases from a simple JSP.