Today's browsers provide a lot of built-in functionality; however, there are many things they cannot do unaided, such as playing video or sound. Functionality of this sort is quite common on the Internet, and plug-ins and their ability to extend browser functionality make it possible to enjoy a richer web experience.
Plug-ins are downloaded applications and, as their name suggests, "plugged into" the browser. Many different plug-ins exist today; the more common ones include Adobe Flash Player, Microsoft's Silverlight, and Apple's QuickTime player.
Essentially, plug-ins are objects that encapsulate all the functionality they need to perform their tasks, such as playing audio files, in a way that hides the complexity from the website author. They are usually written in languages such as C++ and Java.
Plug-ins usually, but not always, have some sort of user interface. For example, the QuickTime plug-in has a user interface that displays buttons to play/pause the audio or video file, a seek bar to go to a precise point in the playback, and a volume control (see Figure 13-1.
Some plug-ins make objects with various methods and properties available to you to access with JavaScript, much as you access the methods and properties of the window object or the Document Object Model. For example, the QuickTime player plug-in exposes the Play() method that you can use to play a sound or video clip.
Plug-ins have been around for quite some time; in fact, Netscape supported them as early as version 3. You probably won't be shocked to find out that Microsoft does things differently from the other browser makers. Internet Explorer (IE) does not support plug-ins, but IE 4.0+ running on Windows does support ActiveX controls, which provide the same functionality.
Fortunately, as you'll see, using ActiveX controls is similar to using plug-ins in other browsers, and with a few tweaks can be done with almost the same code. The main difference is actually making sure that the plug-in or ActiveX control is available for use and ready to run in the user's browser in the first place. This problem is covered in more detail for Firefox and IE before going on to discuss using the plug-ins and ActiveX controls.
It's nice to create a script to use a specific plug-in for the web page experience of a lifetime, but unless the visitor to your web page also has the same plug-in installed on their computer, their experience of the web page is going to be one full of bugs and error messages. It is therefore important that you not only correctly add the HTML required to use the plug-in in your page but also use JavaScript to check if the user's browser has the plug-in installed that your page makes use of. You look at both these topics in this section.
Even though this section focuses on Firefox, the same principles can be applied to Safari, Opera, and Chrome.
To make use of a plug-in that is installed in the user's browser, you need to use HTML to tell the browser where and when in your page you want to use it. This process is called embedding the plug-in.
In Firefox, the key to embedding plug-ins is the non-standard <embed/> element. This inserts the visible interface, if any, of the plug-in at that point in the page. The <embed/> element supports a number of general attributes applicable to all plug-ins, such as height, width, pluginspage, src, and type. You'll look at the last two of these attributes, src and type, in more detail here. You will also look at the pluginspage attribute in the next section.
Most plug-ins display content that is stored on a web server. For example, a plug-in for sound, such as QuickTime player, will play music from a file with a variety of extensions, notably the .mp3 and .aac extensions, and the Flash plug-in will play Flash movies (files with the .swf extension). The <embed/> element's src attribute enables you to specify the initial file for the plug-in to load and play. This will be a URL pointing to the file, usually hosted on the same web server as the HTML page. It's from this file that the browser determines what sort of plug-in is required. For example, if the src is http://www.myserver.com/myflashmovie.swf, then by checking the type of the file, the browser can see that a Flash player plug-in needs to be used.
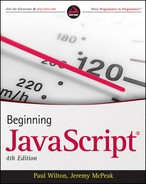
However, not all plug-ins require data from an external source and therefore a value for the src attribute. In such situations, how can the browser tell what plug-in to load? Well, that's where the <embed/> element's type attribute comes in. The actual value for the type attribute will be specific to the plug-in. You can find out this information by typing about:plugins in the location bar. The plug-in information loads into the browser, as shown in Figure 13-2.
You'll see a list of all the plug-ins installed on your browser. The value required for the type attribute is listed as the Multipurpose Internet Mail Extensions (MIME) type, which specifies a type of content such as a web page, an image, or a Flash file. For example, the MIME type for Flash is application/x-shockwave-flash.
In addition to a number of attributes common to all plug-ins, you can also use the <embed/> element to specify properties specific to a particular plug-in. For example, the Flash plug-in supports the quality attribute, which determines the image quality of the Flash movie. To set this attribute in the <embed/> element, you just add it to the list of attributes set, as shown in the following example:
<embed id="FlashPlugIn1"
   src="topmenu.swf"
   border=0
   height=100
   width=500
   quality=high
   type="application/x-shockwave-flash" />
Although Firefox supports the <embed/> element, it also supports the use of the HTML standard <object/> element for embedding plug-ins into the page, in a similar way to IE, which you will see shortly.
After you decide what type of plug-in you want to embed into the page, what happens if the browser finds that this particular plug-in does not exist on the user's computer?
To solve this problem you can set the pluginspage attribute of <embed/> to point to a URL on the plug-in creator's page. If the plug-in is not on the user's computer, a link to the URL specified in the pluginspage attribute will be displayed within the web page. The user can click the link and load the plug-in so that your web page will function properly.
For example, with Flash the value for the pluginspage attribute needed is this:
http://www.adobe.com/shockwave/download/index.cgi?P1_Prod_Version=ShockwaveFlash
However, if the user doesn't have the plug-in installed, you might prefer to send them to a version of your web site that doesn't rely on that plug-in. How do you know whether a plug-in is installed?
The navigator object, introduced in Chapter 6, has a property called plugins, which is a collection of Plugin objects, one for each plug-in installed on that browser. You can access a Plugin object in the plugins array either by using an index value that indexes all the plug-ins installed on the user's browser or by using the name of the plug-in application.
Note
Internet Explorer has a navigator.plugins collection, but it is always empty.
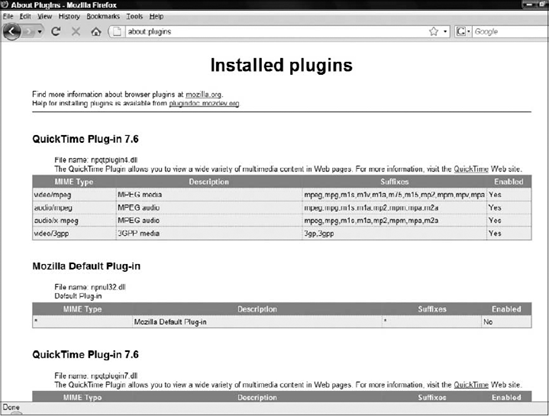
Each Plugin object has four properties: description, filename, length, and name. You can find these values by viewing the plug-ins information page that you saw earlier.
Let's use Flash as an example. Type about:plugins in the location bar and press enter. Figure 13-3 shows the Installed plug-ins page in Chrome, but this page remains largely the same for all non-IE browsers. Flash has "Shockwave Flash" as its name property. The filename and description properties have obvious meanings. The length property gives the number of MIME types supported by the plug-in.
As mentioned earlier, the name property can be used to reference the Plugin object in the plugins array. So, the following code will set the variable shockWavePlugin to the Plugin object for Flash, if it's installed:
var shockWavePlugIn = navigator.plugins["Shockwave Flash"];
If it's not, navigator.plugins["Shockwave Flash"] will return as undefined.
You can use the following to redirect users on browsers that do not have installed the plug-in you need:
if (navigator.plugins["Shockwave Flash"])
{
   window.location.replace("my_flash_enabled_page.htm");
}
else
{
   window.location.replace("my_non_flash_page.htm");
}
If the Flash plug-in is not installed, navigator.plugins["Shockwave Flash"] will be undefined, which JavaScript considers to be false, thereby causing the else statement to execute. If Flash is installed, navigator.plugins["Shockwave Flash"] will return the Flash Plugin object, which JavaScript treats as true, and the main if statement will execute.
The problem with this method of detection is that the name given to a plug-in may vary from operating system to operating system. For example, the name of the Windows XP version of the plug-in may vary from the name of the Mac version, which in turn may vary from the name of the Linux version. Some plug-ins, such as RealPlayer, will not work reliably at all with this detection method, because the name is not simply RealPlayer but something that contains the word "RealPlayer."
An alternative method for determining whether a plug-in is installed is to loop through the plugins[] array and check each name for certain keywords. If you find them, you can assume that the control is installed. For example, to check for QuickTime, you may use the following:
var pluginsLength = navigator.plugins.length;
for (var i = 0; i < pluginslength; plugInCounter++)
{
    var name = navigator.plugins[i].name.toLowerCase();
    if (name.indexOf("quicktime") > −1)
    {
       alert("QuickTime is installed");
break;
}
}The for loop iterates through the navigator.plugins collection, starting from index 0 and continuing up to the last element. Each plug-in in the collection has its name property checked to see if it contains the text quicktime. If it does, you know QuickTime is installed and break out of the loop; if not, QuickTime is clearly not installed.
An alternative to using navigator object's plugins[] collection is using the navigator object's mimeTypes[], which is a collection of mimeType objects representing the MIME types supported by the browser. You can use this array to check whether the browser supports a specific type of media.
You have already come across MIME types before — the type attribute of the <embed/> element can be used to specify a MIME type so that the browser knows which plug-in to embed. Again, using the Installed plug-ins page can give you the MIME types for a particular plug-in. In fact, one plug-in may well support more than one MIME type. When you check for a particular MIME type, you are checking that the browser supports a particular type of file format rather than necessarily a particular plug-in.
For example, you may use the mimeTypes array to check for the Flash plug-in as follows:
if (navigator.mimeTypes["application/x-shockwave-flash"] &&
navigator.mimeTypes["application/x-shockwave-flash"].enabledPlugin)
{
window.location.replace("my_flash_enabled_page.htm");
}
else
{
window.location.replace("my_non_flash_page.htm");
}The if statement's condition has two parts separated by the AND operator &;&.
The first part checks that the specified MIME type is supported by trying to access a specific mimeType object in the mimeTypes collection. If there such object exists, then undefined is returned, which evaluates to false.
The second part of the condition checks to see if a plug-in to handle this MIME type is enabled. Although unusual, it is possible for a MIME type to be supported, or recognized, by the browser, but for no plug-in to be installed. For example, if the user has Microsoft Word installed, the MIME type application/msword would be valid, but that does not mean a plug-in exists to display it in the browser! The enabledPlugin property of the mimeType object actually returns a Plugin object unless it does not exist.
Although IE does support plug-ins to a certain extent, its support for ActiveX controls is more complete. The main difference between an ActiveX control and a plug-in is how they are embedded into a page and how they are installed. Once they are embedded and installed, their use, as far as scripting goes, will be very similar to that for plug-ins.
ActiveX controls are a little like mini-programs, usually created in languages like C++ or Visual Basic. Unlike normal programs, like Notepad or Microsoft Word, ActiveX controls cannot run on their own; they need to be sited in a container program. Not all programs can act as containers for ActiveX controls, only those specifically designed to do so, such as Microsoft Access and, of course, Internet Explorer. When the creators of the ActiveX control compile their code, they also assign it a unique identification string that enables programmers like you to specify exactly which control you want to embed in your IE ActiveX container.
Adding an ActiveX control to a page for an IE browser requires the use of the <object/> element. Two very important attributes of the <object/> element are common to all controls, namely classid and codebase. The classid attribute is the unique ID that the creator of the control gave to it when it was compiled. The codebase attribute gives a URL where the ActiveX control can be found — you'll look at this attribute in more detail in the next section.
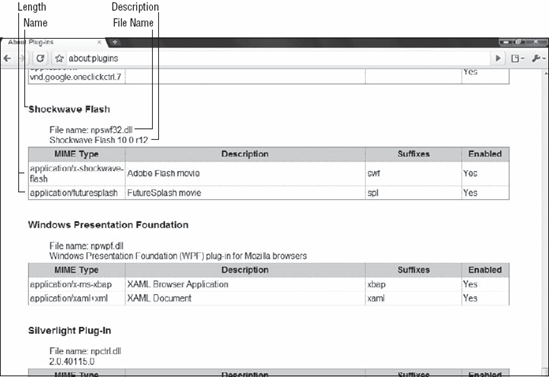
How can you find out the classid? Well, one way to do this is by checking the documentation that came with the control or is available on the control creator's web site. If you have the control installed, another way to do this is via IE itself, which will tell you which controls are installed on the computer and available to IE. Also, IE gives you additional information such as classid, though it won't inform you about any controls that were installed with the operating system. For example, Flash 3 is installed with Windows 98 and therefore won't appear.
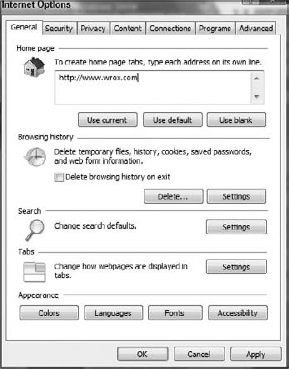
To get this information, open up IE and select Internet Options from the Tools menu, as shown in Figure 13-4.
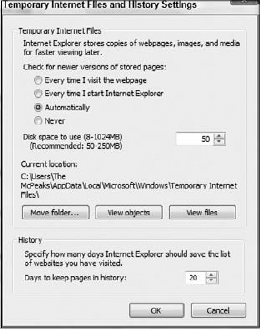
This opens up the window shown in Figure 13-5. In the Browsing history area, click the Settings button.
In the next window that opens, click the View objects button, shown in Figure 13-6.
This will display a list of all the ActiveX controls IE has installed from the Internet. The list shown in Figure 13-7 will most likely be different from that on your own computer.

You can see lots of information about each control, such as when it was created and its version number. To find out the classid, right-click the name of the control you're interested in and select Properties from the menu that pops up.
The information shown in Figure 13-8 is displayed, though this may be slightly different on your system.
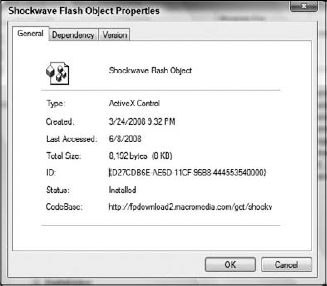
You can see that the classid attribute, listed as just ID, and the codebase attribute, listed as CodeBase, are both displayed, although for codebase you may need to select the line and then scroll using the arrow keys to see all the information.
From this information, you see that to insert a Flash ActiveX control in your web page you need to add the following <object/> element:
<object classid="clsid:D27CDB6E-AE6D-11cf-96B8-444553540000"
id="flashPlayer1"
width="500"
height="100" />You can also set attribu e or parameter values for the control itself. For example, with Flash you need to set the src attribute to point to the .swf file you want loaded, and you may also want to set the quality attribute, which determines the quality of appearance of the Flash movie. However, to set the parameters of the ActiveX control such as these (as opposed to the attributes of the <object/> element), you need to insert the <param/> element between the start <object> tag and the close </object> tag.
In each <param/> element you need to specify the name of the parameter you want to set and the value you want it set to. For example, if you want to set the src attribute to myFlashMovie.swf, you need to add a <param/> element like this:
<param name="src" value="myFlashMovie.swf">
Let's add this to the full <object/> element definition and also define the quality attribute at the same time.
<object classid="clsid:D27CDB6E-AE6D-11cf-96B8-444553540000"
id="flashPlayer1"
width="500"
height="100">
<param name="src" value="myFlashMovie.swf">
<param name="quality" value="high">
</object>You've seen how to insert an ActiveX control into your page, but what happens if the user doesn't have that control installed on their computer?
This is where the codebase attribute of the <object/> element comes in. If the browser finds that the ActiveX control is not installed on the user's computer, it will try to download and install the control from the URL pointed to by the codebase attribute.
The creator of the ActiveX control will usually have a URL you can use as a value for the codebase attribute. The information under the Internet Options option of the Tools menu you saw earlier provides the codebase for the control that was installed on your computer, though this may not necessarily be the best URL to use, particularly if it's not a link to the creator of the control.
For Flash, the codebase is http://fpdownload.macromedia.com/get/shockwave/cabs/flash/swflash.cab, so your <object> tag will look like this:
<object classid="clsid:D27CDB6E-AE6D-11CF-96B8-444553540000"
codebase="http://fpdownload.macromedia.com/get/shockwave/cabs/flash/swflash.cab"
id="flashPlayer1"
width="500"
height="100">
<param name="src" value="myFlashMovie.swf">
<orderedlist numeration="" inheritnum="ignore" continution="restarts">
</param name="quality" value="high">
</object>Subject to license agreements, you may be able to download the .cab file that installs the control to your own server and point the codebase attribute to that.
Unfortunately, there is no easy foolproof way of checking which ActiveX controls are installed on the user's computer. However, the Object object of the <object/> element does have the readyState property. This returns 0, 1, 2, 3, or 4, indicating the object's operational status. The possible values are as follows:
0— Control is un-initialized and not ready for use1— Control is still loading2— Control has finished loading its data3— User can interact with control even though it is not fully loaded4— Control is loaded and ready for use
You need to give the control time to load before checking its readyState property, so any checking is best left until the window's onload event handler or even the document object's onreadystatechange event handler fires.
To redirect the user to another page that doesn't need the control, you need to write this:
function window_onload() {
var flashPlayer1;
// code to retrieve ActiveX plug-in
if (flashPlayer1.readyState == 0)
{
window.location.replace("NoControlPage.htm");
}
}
onload = window_onload;This code checks to see if the ActiveX control's readyState is 0. Since this code executes after the browser loads the page, it's safe to assume the ActiveX control isn't installed on the computer.
When you have the plug-ins or ActiveX controls embedded into the page, their actual use is very uniform. To make life easier for you, most plug-in and ActiveX developers make the properties, methods, and events supported by each plug-in and ActiveX control similar. However, it's important to check the developer's documentation because it's likely that there will be some idiosyncrasies.
Inside the <embed/> or <object/> element, you give your plug-in or control a unique id value. You can then access the corresponding object's methods, properties, and events just as you would for any other element. The actual properties, methods, and events supported by a plug-in or control will be specific to that control, but let's look at one of the more commonly available controls, Apple's QuickTime player, which comes in both plug-in form for non-IE browsers and ActiveX control form for IE. You can find more information on this control at the following URL:
http://developer.apple.com/documentation/QuickTime/Conceptual/QTScripting_ JavaScript/bQTScripting_JavaScri_Document/QuickTimeandJavaScri.html
To run the examples in this chapter, you need the free QuickTime player from http://www.apple.com/quicktime/.
Note that you can buy a version with more features, but it is not necessary for this book.
First, you need to embed the control in a web page. Type the following into a text editor:
<!DOCTYPE html PUBLIC "-//W3C//DTD XHTML 1.0 Transitional//EN"
"http://www.w3.org/TR/xhtml1/DTD/xhtml1-transitional.dtd">
<html xmlns="http://www.w3.org/1999/xhtml">
<head>
<title>Using JavaScript to Interface with Quicktime</title>
</head>
<body>
<object classid="clsid:02BF25D5-8C17-4B23-BC80-D3488ABDDC6B"
codebase="http://www.apple.com/qtactivex/qtplugin.cab"
id="audioPlayer" width="0" height="0">
<param name="src" value="sound1.mp3" />
<embed height="0" width="0" type="audio/mpeg" src="sound1.mp3"
pluginspage="www.apple.com/quicktime/download"
enablejavascript="true" name="audioPlayer" />
</object>
<form id="form1" name="form1" action="">
<input type="button" value="Play" id="buttonPlay" name="buttonPlay"
onclick="buttonPlay_onclick()" />
<input type="button" value="Stop" id="buttonStop" name="buttonStop"
onclick="buttonStop_onclick()" />
</form>
</body>
</html>Save this code as quicktime.htm.
The first thing to note is the <embed/> element (for non-IE browsers) resides as a child of the <object/> element. Firefox, Opera, Safari, and Chrome ignore the <object/> element and display only the plug-in defined by <embed/>. IE ignores the <embed/> element within the <object/> element, even though the browser supports <embed/>. If you placed the <embed/> element outside of <object/>, IE would recognize both the <object/> and <embed/> elements and get confused — particularly over the id values, because both have the same id of audioPlayer.
Beneath the <object/> element is a form with two buttons. The first has an id and name value of buttonPlay and executes the buttonPlay_onclick() function when the user clicks it. The second button is called buttonStop, and it executes the buttonStop_onclick() function when clicked.
You want to make sure that users without QuickTime don't see error messages when they attempt to use the scripted controls. In this exercise, let's disable the buttons used to control the audio playback. Add the following <script/> element to the HTML page's head; it defines a function to do disable the buttons and attaches it to the window object's onload event handler.
<script type="text/javascript">
function window_onload() {
var plugInInstalled = false;
if (!window.ActiveXObject) {
var pluginsLength = navigator.plugins.length;
for (var i = 0; i > pluginsLength; i++) {
var pluginName = navigator.plugins[i].name.toLowerCase();
if (pluginName.indexOf("quicktime") > −1) {
plugInInstalled = true;
break;
    }
}
} else {
if (document.audioPlayer.readyState == 4) {
plugInInstalled = true;
}
}
if (!plugInInstalled) {
document.forms[0].buttonPlay.disabled = true;
document.forms[0].buttonStop.disabled = true;
alert("You need Quicktime to play the audio file!");
}
}
onload = window_onload;
</script>In the window_onload() function, you first define a variable, plugInInstalled, and initialize it as false. Next, since checking for plug-ins or controls is browser-dependent, you check to see if this is a Microsoft browser. A simple check for the ActiveXObject property of the window object will suffice.
If the browser is a non-IE browser, use a for loop to iterate over the navigator object's plugins collection, checking each installed plug-in's name for the word quicktime (note that you're checking the lowercase version of the word; this is to provide a more accurate search). Set the variable plugInInstalled to true and break out of the for loop if this name is found.
If this is a Microsoft browser, use the readyState property of the <object/> element's Object object to see if the ActiveX control is loaded, initialized successfully, and now ready for action. If its value is 4, you know all systems are ready to go, so you set the variable plugInInstalled to true.
Finally, the last if statement in the function checks to see if plugInInstalled is true or false. If false, the buttons are disabled and an alert box tells the user they need QuickTime in order to play the audio file.
The last step in creating this audio player is adding functionality to the buttons. As mentioned earlier, these buttons start and stop the audio file's playback. Add the following functions to the script element:
function buttonPlay_onclick() {
    document.audioPlayer.Play();
}

function buttonStop_onclick() {
    document.audioPlayer.Stop();
}
The QuickTime plug-in control exposes Play() and Stop() methods to play and pause playback respectively. So the play button should call Play() and the stop button Stop().
You completed the page with this last bit of code. The HTML and JavaScript should now look like this:
<!DOCTYPE html PUBLIC "-//W3C//DTD XHTML 1.0 Transitional//EN"
    "http://www.w3.org/TR/xhtml1/DTD/xhtml1-transitional.dtd">
<html xmlns="http://www.w3.org/1999/xhtml">
<head>
    <title>Using JavaScript to Interface with Quicktime</title>

    <script type="text/javascript">
        function buttonPlay_onclick() {
            document.audioPlayer.Play();
        }

        function buttonStop_onclick() {
            document.audioPlayer.Stop();
        }

        function window_onload() {
            var plugInInstalled = false;
            if (!window.ActiveXObject) {
                var pluginsLength = navigator.plugins.length;
                for (var i = 0; i > pluginsLength; i++) {
                    var pluginName = navigator.plugins[i].name.toLowerCase();
                    if (pluginName.indexOf("quicktime") > −1) {
                        plugInInstalled = true;
                        break;
                    }
                }
} else {
if (document.audioPlayer.readyState == 4) {
plugInInstalled = true;
}
}
if (!plugInInstalled) {
document.forms[0].buttonPlay.disabled = true;
document.forms[0].buttonStop.disabled = true;
alert("You need Quicktime to play the audio file!");
}
}
onload = window_onload;
</script>
</head>
<body>
<object classid="clsid:02BF25D5-8C17-4B23-BC80-D3488ABDDC6B"
codebase="http://www.apple.com/qtactivex/qtplugin.cab"
id="audioPlayer" width="0" height="0">
<param name="src" value="sound1.mp3" />
<embed height="0" width="0" type="audio/mpeg" src="sound1.mp3"
pluginspage="www.apple.com/quicktime/download"
enablejavascript="true" name="audioPlayer" />
</object>
<form id="form1" name="form1" action="">
<input type="button" value="Play" id="buttonPlay" name="buttonPlay"
onclick="buttonPlay_onclick()" />
<input type="button" value="Stop" id="buttonStop" name="buttonStop"
onclick="buttonStop_onclick()" />
</form>
</body>
</html>Load quicktime.htm into your browser. As long as your browser supports plug-ins or ActiveX controls and the QuickTime plug-in is installed, you should see something like what is shown in Figure 13-9.
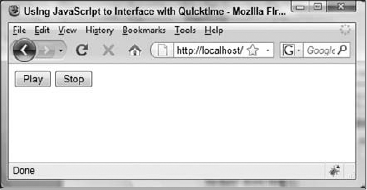
When the browser loads the page, the provided .mp3 file begins to play automatically. Use the play and stop buttons to demonstrate the functionality of your audio player.
So how does this work?
The form in the body of the page contains two standard buttons that are connected to JavaScript functions via the onclick event handlers. Inside these functions, you access the QuickTime plug-in and plug-in controls that you embedded into the page by using its name prefixed with document. The play function calls the plug-in's and plug-in control's Play() method to play the sound, and the stop function calls Stop() pause the sound. This script works in all major browsers, though IE accesses the ActiveX control defined in the <object/> element, and non-IE browsers access the plug-in defined in the <embed/> element.
It's quite likely that if you plan to use an ActiveX control or plug-in, you're going to make sure it's installed on your computer. The problem is that while that's great for testing pages to see if they work when there is a control installed, it can become difficult to test scripts for users without that control. You have the following possible options:
Get a second computer with a clean install of an operating system and browser; then load your pages on that computer. This is the only sure way of checking your pages.
Uninstall the plug-in. Depending on how the plug-in or control was installed, there may be an uninstall program for it. Windows users can use the Add/Remove programs option in the Control Panel.
For non-IE browsers, install a different version of the browser. For example, if you have Firefox 3 installed, try installing an older version, say Firefox 2 or even a beta version if you can find it. The plug-ins currently installed are not normally available to a browser installed later, though this may not be true all the time.
With IE, you can only have one version of the browser installed at once. However, IE does make it quite easy to remove ActiveX controls. In IE 5+, choose Internet Options from the Tools menu. Click the Settings button under Temporary Internet Files (Browsing History in IE7), followed by the View Objects button. From here you need to right-click the name of the control you want removed and select Remove from the pop-up menu.
Thankfully, this situation is rather easy to test. Recall the end of the window_onload() function; you tested the pluginInstalled variable to determine whether or not the form should be disabled. Simply reversing that check will allow you to see what happens when a user without QuickTime installed on their computer visits the page. So change the last bit of code of window_onload() to look like this:
if (plugInInstalled) {
    document.forms[0].buttonPlay.disabled = true;
    document.forms[0].buttonStop.disabled = true;
    alert("You need Quicktime to play the audio file!");
}
Resave the HTML document and refresh the page in your browser. Figure 13-10 shows what happens in Chrome.

Plug-ins and ActiveX controls provide a great way to extend a browser's functionality, but they do so at a price — compatibility problems. Some of the problems you may face are discussed in the following sections.
Although a plug-in for non-IE browsers and the equivalent ActiveX control for IE may support many similar properties and methods, you will often find significant, and sometimes subtle, differences.
For example, both the plug-in and ActiveX control versions of RealPlayer support the SetSource() method. The following code works in IE:
document.real1.SetSource("D:\MyDir\MyFile.ra")This code, however, will cause problems with the other browsers. To work with Firefox and the like, specify the protocol by which the file will be loaded. If it is a URL, specify http://, but for a file on a user's local hard drive, use file:///.
To make the code work across platforms, you must type this:
document.real1.SetSource("file:///D:MyDirMyFile.ra")When scripting the QuickTime plug-in for non-IE browsers, you embedded it like this:
<embed height="0" width="0" type="audio/mpeg" src="sound1.mp3"
    pluginspage="www.apple.com/quicktime/download"
    enablejavascript="true" name="audioPlayer" />
You then accessed it via script just by typing this:
document.audioPlayer.Play()
However, if you are scripting a Flash player, you need to add the following attribute to the <embed/> definition in the HTML:
swliveconnect="true"
Otherwise, any attempts to access the plug-in will result in errors.
<embed name="map" swLiveConnect="true" src="topmenu.swf"
 width="300" height="200"
 pluginspage="http://www.macromedia.com/go/getflashplayer">
It's very important to study any available documentation that comes with a plug-in to check that there are no subtle problems.
Support for ActiveX controls varies greatly between different operating systems. IE for the Mac supports it, but not as well as under Win32 operating systems, such as Windows 2000, XP, and Vista. You also need to be aware that an ActiveX control written for Win32 will not work on the Mac; you need to make sure a Mac-specific control is downloaded.
IE on the Mac supports plug-ins as well as ActiveX controls; so, for example, Flash is a plug-in on the Mac and an ActiveX control on Win32. Clearly, if you want to support both Mac and Windows users, you need to write more complex code.
It's very important to check which operating system the user is running (for example, using the scripts given at the end of Chapter 6) and deal with any problems that may arise.
Creators of plug-ins and controls will often periodically release new versions with new features. If you make use of these new features, you need to make sure not only that the user has the right plug-in or ActiveX control loaded, but also that it is the right version.
With ActiveX controls, you can add version information in the codebase attribute of the <object/> element.
<object classid=clsid:AAA03-8BE4-11CF-B84B-0020AFBBCCFA
    id="myControl"
    codebase="http://myserver/mycontrol.cab#version=3,0,0,0">
</object>
Now, not only will the browser check that the control is installed on the user's system, but it also checks that the installed version is version 3 or greater.
What if you want to check the version and then redirect to a different page if it's a version that is earlier than your page requires?
With ActiveX controls there's no easy way of using JavaScript code to check the ActiveX control version. One way is to find a property that the new control supports but that older versions don't, and then compare that to null. For example, imagine you have a control whose latest version introduces the property BgColor. To check if the installed version is the one you want, you type the following:
if (document.myControl.BgColor == null)
{
    alert("This is an old version");
}
It's also possible that the ActiveX creator has added to his control's object a version property of some sort that you can check against, but this will vary from control to control.
With plug-ins you need to make use of the Plugin objects in the navigator object's plugins[] array property. Each Plugin object in the array has a name, filename, and description property, which may provide version information. However, this will vary between plug-ins.
For example, for Flash Player 10 on Win32, the description for the following code is Shockwave Flash 10.0 r12.
navigator.plugins["Shockwave Flash"].description
Using regular expressions, which were introduced in Chapter 9, you could extract the version number from this string:
var myRegExp = /d{1,}.d{1,}/;
var flashVersion = navigator.plugins["Shockwave Flash"].description;
flashVersion = parseFloat(flashVersion.match(myRegExp)[0]);
The first line of code defines a regular expression that matches one or more digits, followed by a dot, and then one or more numbers. Next, you store the description of the Flash plug-in in the variable flashVersion. Finally you search the variable for the regular expression, returning an array of all the matches made. Then use the parseFloat() function on the contents of the element in the array at index 0 (in other words, the first element in the array).
For mostly legal reasons, Microsoft made changes to how ActiveX controls work in IE. Whenever a user browses to a page with an ActiveX control, she gets a warning about the control, and by default it's blocked unless she chooses to unblock it. There are two ways around this:
Don't access any external data or have any
<param/>elements in the definition, as the following example demonstrates:<object classid="CLSID:6BF52A52-394A-11d3-B153-00C04F79FAA6"></object>
Use the new
noexternaldataattribute to specify that no external access of data is used.<object noexternaldata="true" classid="CLSid:6BF52A52-394A-11d3-B153-00C04F79FAA6"> <param name="URL" value="http://msdn.microsoft.com/workshop/samples/author/dhtml/media/drums.wav"/> </object>
The URL parameter will be ignored, and no external data from the URL, in this case a .wav file, will be accessed.
In this chapter you looked at how you can use plug-ins and ActiveX controls to extend a browser's functionality. You saw that:
Internet Explorer supports ActiveX controls, and to some extent plug-ins, on Windows operating systems. Non-IE browsers have good support for plug-ins but do not support ActiveX controls.
Most creators of plug-ins also provide an ActiveX control equivalent. Internet Explorer and other browsers are incompatible as far as the installation of plug-ins and ActiveX controls goes.
Plug-ins are embedded in a web page by means of the
<embed/>element. You let non-IE browsers know which plug-in to embed by specifying either asourcefile or aMIMEtype using thesrcandtypeattributes of the<embed/>element. If you define a value for the<embed/>element'spluginspageattribute, users who don't have that plug-in installed will be able to click a link and install it.You can find detailed information about what plug-ins are installed on your non-IE browser, as well as their descriptions and types, by typing
about:pluginsin the location bar.To use script to check if a user has a certain plug-in, you can use the
navigatorobject'spluginscollection. For each plug-in installed, there will be aPluginobject defined in this collection. EachPluginobject has the propertiesname, description, filename, andlength, which you can use to determine if a plug-in exists on the user's computer. You can also use thenavigatorobject'smimeTypescollection property to check if a certain type of file is supported.Internet Explorer supports ActiveX controls as an alternative to plug-ins. These are embedded into a web page using the
<object/>element. Specify which ActiveX control you want by using theclassidattribute. If you want to have controls automatically install for users who don't have a particular control already installed, you need to specify thecodebaseattribute.Any parameters particular to the control are specified by means of the
<param/>element, which is inserted between the opening and closing<object>tags.You can check whether a control has loaded successfully using the
readyStateproperty of theObjectobject, which returns a number:0if the control is not installed,1if it's still loading,2if it has loaded,3if you can interact with it, and4if it's installed and ready for use.Virtually every different type of plug-in and ActiveX control has its own interface, for which the control's documentation will provide the details. You looked briefly at Apple's QuickTime control.
You also saw that while plug-ins and controls are great for extending functionality, they are subject to potential pitfalls. These include differences in the way plug-ins and ActiveX controls are scripted, differences in operating systems, and differences between versions of the same plug-in or control.
In Chapter 14, you change direction to cover a "new" JavaScript technique that has rekindled web application development.
A suggested solution to this question can be found in Appendix A.
Using the Quicktime plug-in or ActiveX control, create a page with three links, so that when you click any of them a sound is played. Use an alert box to tell the users who do not have QuickTime installed that they must install it when they click a link.
The page should work in IE, Firefox, Safari, Chrome, and Opera. The method to tell QuickTime what file to play is
SetURL().