As you've seen in several examples in this book, especially the latter chapters, the problem with client-side development is the many different web browsers you have to account for. Be it writing event-driven code or an Ajax application, somewhere down the line you'll run into the incompatibilities between the browsers.
Many professional developers found cross-browser development to be too time-consuming and cumbersome to deal with on a daily basis, so they set out to develop frameworks or libraries to aid in their cross-browser development. Some framework authors released their frameworks to the public, and a few of them gained quite a following, like jQuery, Prototype, and MooTools.
In this chapter, you'll take a look at three of the many JavaScript frameworks available on the Internet, and you'll learn how to use them to make your cross-browser development much easier.
Before beginning, a word of note from your authors: There is no doubt that JavaScript frameworks add benefit to your development time and process. But they are no substitute for a solid understanding of the JavaScript language and the intricacies of the different browsers you have to develop for. Frameworks and libraries come and go, but knowledge is forever.
Over the course of several years, the web has seen many JavaScript frameworks, and they can typically be categorized into two groups: general and specialty.
The aim of general frameworks is to balance the differences between browsers by creating a new, unified API to perform general tasks like DOM manipulation and Ajax functionality. Specialty frameworks, on the other hand, focus on a specific ability, such as animation. So identify what it is you want to achieve and choose a framework based on that. For example, if you wanted to perform animations and only animations, the script.aculo.us framework (http://script.aculo.us/) would be a good choice for you.
This chapter focuses on general frameworks, and even general frameworks differ in their goals. When deciding which framework to use, look at the framework's browser support, documentation, and community involvement. The frameworks covered in this chapter are a few years old, stable, and popular and are compatible with every major modern browser (and even some old ones like IE6). They are as follows:
jQuery: A framework whose primary emphasis is the ability to use CSS selectors to select and work with DOM objects. It also provides a plug-in architecture, as well as a companion UI framework. (
http://jquery.com)Prototype: A framework that provides a simple API to perform web tasks. While it offers ways of manipulating the DOM, Prototype's primary aim is to enhance the JavaScript language by providing class definition and inheritance. (
http://www.prototypejs.org)MooTools: A framework whose aim is to be compact while offering a simple API to make common tasks easier. Like Prototype, MooTools also aims to enhance the JavaScript languages — not just make DOM manipulation and Ajax easier. It also includes a lightweight effects component originally called moo.fx. (
http://www.mootools.net)
These three frameworks are just a sampling of what is available for you to use in your web pages. Other general frameworks not covered in this chapter are the following:
Yahoo! User Interface Framework (YUI): A framework that ranges from basic JavaScript utilities to complete DHTML widgets. Yahoo! has a team devoted to developing YUI. (
http://developer.yahoo.com/yui/)Ext JS: This framework started as an extension to the YUI. It offers customizable UI widgets for building rich Internet applications. (
http://www.extjs.com)Dojo: A toolkit designed around a package system. The core functionality resembles that of any other framework (DOM manipulation, event normalization, DHTML widgets, etc.), but it provides and allows a way to add more functionality by adding more packages. (
http://www.dojotoolkit.org)MochiKit: A framework that prides itself on its well-testedness (hundreds of tests according to the MochiKit site) and its compatibility with other JavaScript frameworks and libraries. (
http://www.mochikit.com)
Once you choose the framework you want to develop with, you need to install the framework and verify its installation before you do any work with the framework.
Installing a framework is very different from installing an application on your computer; there is no setup program, and the installation doesn't change any portion of your system. Basically, all you do is download a file and reference the file in your web page. The following sections will walk you through this process.
First, you need to acquire the framework's JavaScript file. Most frameworks come in at least two versions: compressed and uncompressed.
Compressed versions: These are minified (all comments and unnecessary white space are removed) in order to make their file size as small as possible; doing so makes them faster to download when someone visits your web page. Unfortunately, the minification process makes the JavaScript code difficult to read if you open it in a text editor, but that's a reasonable tradeoff in a production environment.
Uncompressed versions: These are not minified; they are simply normal JavaScript code files with their white space and comments intact. It's perfectly OK to use uncompressed JavaScript files. Since they are easier to read than compressed files, you can learn much from the gurus who design and develop these frameworks. However, if you plan to roll out a web page using a framework, be sure to download and use the compressed version, as their file sizes are smaller and download faster.
Unlike other downloads on the web, jQuery, Prototype, and MooTools do not use a compression algorithm (like ZIP or RAR) for their downloadable files; instead you download the JavaScript file itself. These files have an extension of .js.
First you need to acquire a copy of jQuery as follows:
Open your browser and go to
http://jquery.com.Find the Download button on the site's front page.
Before clicking the Download button, choose the version you want — either the production version (compressed) or the development version (uncompressed). jQuery will work the same regardless of what version you choose. At the time of this writing, jQuery project downloads are actually housed at Google code, so clicking the Download link will take you away from
jquery.com.Download the JavaScript file and save it in a location you can easily get to.
You can also see a list of all downloadable files at
http://code.google.com/p/jqueryjs/downloads/list.The production version of jQuery 1.3.2 is provided in the code download from Wrox.
Now point your browser to Prototype's download page at
http://www.prototypejs.org/download. Here, you'll be given the choice to download a bleeding edge version, a version still in testing, or the latest stable version. You can download the in-testing version if you'd like, but the examples in this book will use the stable version.
The stable version of Prototype 1.6.0.3 is provided in the code download from Wrox.
Now let's download MooTools. The download URL for MooTools is http://www.mootools.net/download. Like jQuery, the folks at MooTools offer you compressed and uncompressed versions of their framework. Of the compressed versions, you can choose a version compressed with YUI Compressor or JSMin. The current version at the time of this writing is MooTools 1.2.3, and the smallest-sized download is the YUI Compressor version, so download it. Smaller is typically better, since it takes less time to download.
The YUI compressed version of MooTool 1.2.3 is included in the code download.
Now that you've acquired the JavaScript framework files for each framework, you need to add them to a web page before you can use them. This is as simple as adding an HTML <script/> element to your page.
Keep in mind that you do not want to add each framework to the same page. It would certainly be nothing but awesomeness to have every framework work together seamlessly to give you all the features of every framework at the same time. Unfortunately, frameworks are notorious for stepping on each others' toes, so create a separate HTML page for each framework.
The following HTML page, called ch15_examp1_jq.htm, shows you how easy it is to add jQuery, or any other framework, to a web page.
<!DOCTYPE html PUBLIC "-//W3C//DTD XHTML 1.0 Transitional//EN"
    "http://www.w3.org/TR/xhtml1/DTD/xhtml1-transitional.dtd">

<html xmlns="http://www.w3.org/1999/xhtml">
<head>
    <title>Chapter 15: Example 1 jQuery</title>
    <script type="text/javascript" src="jquery-1.3.2.min.js"></script>
</head>
<body>

</body>
</html>
Simply use the <script/> element's src attribute, and set its value as the path to the JavaScript file. In this example, the jquery-1.3.2.min.js file is in the same directory as the HTML document. It is absolutely imperative that the value of the src attribute is correct; otherwise, the browser will not be able to find the framework file, download it, and load it — meaning that your code will not work.
Go ahead and type this page and save it. Then create two similar pages for MooTools and Prototype, and name them ch15_examp1_mt.htm and ch15_examp1_p.htm respectively. Don't forget to change the <script/> element's src attribute to point to the appropriate JavaScript file!
Now that you downloaded each library and added them to their respective pages, you should run through a quick test to ensure that everything works correctly. Because each library is different, you'll have to perform a similar test for each library. Start with jQuery.
At the heart of jQuery is the $() function (called the jQuery function), which returns jQuery objects. The jQuery function is quite powerful because it allows you to select elements by passing CSS selectors, create elements by passing HTML, and wrap jQuery functionality around DOM objects by passing the DOM objects you want to add functionality to.
To illustrate the jQuery function and the objects it returns, assume you want to run some code when the page loads. In plain JavaScript, you know you can assign a function to handle the window's load event. The jQuery equivalent is quite different:
function document_ready()
{
    alert("Hello, jQuery World!");
}

// the normal way
onload = document_ready;

// the jquery way
$(document).ready(document_ready);
Look at the last line of this code, which calls the jQuery function and passes the document DOM object to it. The jQuery function returns a jQuery object, of which ready() is a method. By passing a DOM object to the jQuery function, you've actually created a new object that wraps itself around the DOM object. This might be better understood with the following code:
var jDocument = $(document);
jDocument.ready(document_ready);
This code achieves the same results as the previous code, except you have a jQuery object contained in the jDocument variable, which you can reuse.
It's important to note that
jQueryobjects cannot be used in place of DOM objects. In the previous example, the jQuery function returns a completely different object than thedocumentobject it was passed.
This type of reuse — assigning a variable and reusing it later — is perfectly fine to use with jQuery objects, but jQuery adds the ability to chain method calls together. If the idea of method chaining is new to you, then consider the following code:
$(document.body).attr("bgColor", "yellow").html("<h1>Hello, jQuery World</h1>");The jQuery object has many methods, and nearly all of them return the current jQuery object. Because of this, you can call one method after another, thus enhancing readability while writing less code. This code uses the jQuery function and passes the document.body DOM object to it. Immediately after the function call, you call the attr() method to set the bgColor attribute to yellow. Since the jQuery function returns a jQuery object encapsulating a reference to the document.body DOM object, the bgColor attribute is set on the document.body DOM object.
After the attr() method call is yet another method call because attr() returns the same jQuery object encapsulating the document.body DOM object. The second method is the html() method, which accepts a string of HTML that is written to the page. The way in which html() writes HTML into the page is different from document.write(). Instead, jQuery's html() method uses the innerHTML DOM property to set the HTML inside a DOM object (in this case document.body).
As you can see from this example, chaining is a handy way of performing multiple tasks on one object, and jQuery is built around this concept.
Use this code to test your jQuery installation. Open ch15_examp1_jq.htm and add in the second <script/> element shown in the following code:
<!DOCTYPE html PUBLIC "-//W3C//DTD XHTML 1.0 Transitional//EN"
    "http://www.w3.org/TR/xhtml1/DTD/xhtml1-transitional.dtd">

<html xmlns="http://www.w3.org/1999/xhtml">
<head>
    <title>Chapter 15: Example 2 jQuery</title>
    <script type="text/javascript" src="jquery-1.3.2.min.js"></script>
    <script type="text/javascript">
    function document_ready($)
    {
        $(document.body).attr("bgColor", "yellow")
            .html("<h1>Hello, jQuery World!</h1>");
    }

    $(document).ready(document_ready);
    </script>
</head>
<body>

</body>
</html>
Save this as ch15_examp2_jq.htm, and open it in your browser. You should see something like Figure 15-1.
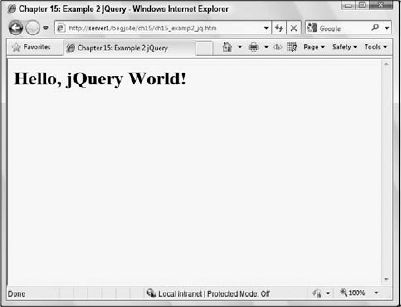
If the page's background color is not yellow and you don't see the Hello World message, then something is wrong with your installation. Make sure the jQuery .js file is in the same directory as your HTML file.
Now let's test your Prototype installation. Don't worry; you'll revisit jQuery soon enough.
The largest portion of the Prototype library is its DOM extensions. Like jQuery, it provides you a variety of helpful utility functions to make DOM programming a bit easier; it even has its own $() function (unlike jQuery, Prototype doesn't have a special name for this function; it's simply called the dollar function).
Prototype's $() function only accepts element id attribute values or DOM element objects to select and add extra functionality to DOM objects.
Prototype does have a function that allows you to use CSS selectors to select elements, and you'll see that in a later section.
Also unlike jQuery, there is no ready() method, or an equivalent method, to take the place of window.onload. Instead, you can take advantage of one of the many extensions that Prototype adds to the browser and DOM: the Event.observe() method.
function window_onload()
{
    alert("Hello, Prototype World!");
}

Event.observe(window, "load", window_onload);
The Event.observe() method accepts three arguments; the first is the DOM or BOM object you want to add an event handler to, the second is the event you want to handle, and the third is the function to call when the event fires. Event.observe() can be used to add an event handler to any DOM or BOM object that allows you to handle events. You'll look at this method, and other ways to handle events in Prototype, later in this chapter.
Like jQuery, you can chain method calls together on wrapper objects created with the $() function, although the method names are more verbose than jQuery's.
function window_onload()
{
    $(document.body).writeAttribute("bgColor", "yellow").
        insert("<h1>Hello, Prototype World!</h1>");
}

Event.observe(window, "load", window_onload);
The new body of the window_onload() function changes the page's background color to yellow and adds HTML to the page. The writeAttribute() method sets an attribute's value and accepts two arguments: the attribute name and the attribute value. The next method call, the insert() method, inserts the provided content into the document.body element, as specified by the DOM object passed to the initial $() function.
Use this code to test your Prototype installation. Open ch15_examp1_p.htm and add the second <script/> element as shown in the following code:
<!DOCTYPE html PUBLIC "-//W3C//DTD XHTML 1.0 Transitional//EN"
"http://www.w3.org/TR/xhtml1/DTD/xhtml1-transitional.dtd">
<html xmlns="http://www.w3.org/1999/xhtml">
<head>
<title>Chapter 15: Example 2 Prototype</title>
<script type="text/javascript" src="prototype-1.6.0.3.js"></script>
<script type="text/javascript">
function window_onload()
{
$(document.body).writeAttribute("bgColor", "yellow")
.insert("<h1>Hello, Prototype World!</h1>");
}
Event.observe(window, "load", window_onload);
</script>
</head>
<body>
</body>
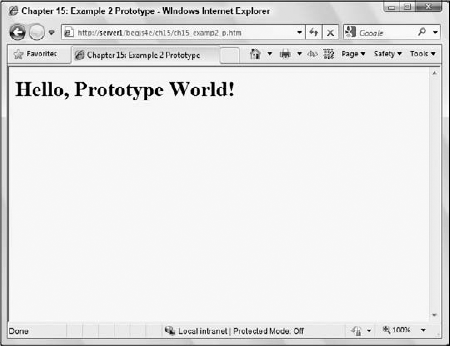
</html>Save this as ch15_examp2_p.htm, and open it in your browser. You should see something like Figure 15-2. If you do not, make sure that Prototype JavaScript file is in the same directory as the HTML file.
You'll dig deeper into Prototype in a moment; let's do one final test with MooTools to make sure your installation is correct.
Testing the MooTools installation will look similar to the jQuery and Prototype tests. Like those two frameworks, MooTools defines a dollar function, and its functionality is similar to Prototype's.
$("myDiv")Like Prototype, MooTool's dollar function accepts either a string containing an element's id or a DOM element, and returns the element or DOM object with an extended set of methods. One such method is the addEvent() method. This method accepts two arguments: the first is the event to watch for, and the second is the function to call when the event fires. The MooTools framework adds the addEvent() method to the window and document objects. So simply call the addEvent() method to add a domready event handler, like this:
function window_domready()
{
    alert("Hello, MooTools World!");
}

window.addEvent("domready", window_domready);
The domready event is also added by the MooTools framework, and it fires when the DOM is completely loaded.
Also like jQuery and Prototype, you can chain MooTools methods to perform multiple operations on an element with less code than if you didn't use a framework. Look at the following code:
function window_domready()
{
    $(document.body).setProperty("bgColor", "yellow")
        .set("html", "<h1>Hello, MooTools World!</h1>");
}

window.addEvent("domready", window_domready);
The new function body of window_domready() passes the document.body object to the dollar function. Then, by using the setProperty() method, it sets the bgColor attribute to yellow. It then calls the set() method and passes the string "html" as the first parameter to set the second parameter's value as the HTML within the page's body.
Use this code to test your MooTools installation. Open the ch15_examp1_mt.htm file and change it to look like the following code:
<!DOCTYPE html PUBLIC "-//W3C//DTD XHTML 1.0 Transitional//EN"
    "http://www.w3.org/TR/xhtml1/DTD/xhtml1-transitional.dtd">

<html xmlns="http://www.w3.org/1999/xhtml">
<head>
<title>Chapter 15: Example 2 MooTools</title>
<script type="text/javascript" src="mootools-1.2.3-core-yc.js"></script>
<script type="text/javascript">
function window_domready()
{
$(document.body).setProperty("bgColor", "yellow")
.set("html", "<h1>Hello, MooTools World!</h1>");
}
window.addEvent("domready", window_domready);
</script>
</head>
<body>
</body>
</html>Save this as ch15_examp2_mt.htm. Load it into your browser, and the page should look like Figure 15-3.
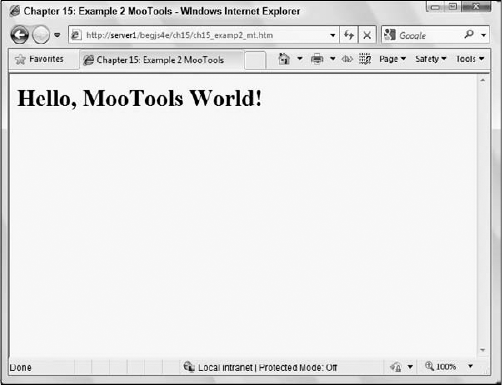
If you get the results shown in Figure 15-3, then you've set up MooTools correctly. If not, make sure the MooTools JavaScript file is located in the same directory as your HTML page.
Now that you have jQuery, Prototype, and MooTools installed and working correctly, you can begin to delve deeper into the frameworks to get a better understanding of how you can benefit by using them.
So come, young padawan, and take the crash course on jQuery, Prototype, and MooTools.
The code you wrote to test your jQuery installation gave you just a small taste of what the framework is capable of. You saw how easy it was to change property values and add HTML to the page; well, pretty much all operations are about as simple. Whether you're creating HTML elements and appending them to the page or making Ajax calls to the server, jQuery lets you do it in an easy fashion.
jQuery is a DOM-centered framework, and to do any DOM manipulation you first need to locate and retrieve specific elements.
The W3C DOM standard gives you the getElementById() and getElementsByTagName() methods to find and retrieve elements in the DOM. These methods work perfectly fine, but their most obvious drawback is they limit you on how you can select elements. You can either select elements by id attribute value or by tag name. There may be times you want to select elements based on their CSS class name or their relationship to other elements.
This is one area where jQuery truly shines; using CSS selectors, you can select elements based on their CSS class name, their relationship with other elements, their id attribute value, or simply their tag name. Let's start with something simple like this:
$("a")This code selects all <a/> elements within the page and returns them in an array. Because it is an array, you can use the length property to find out how many elements were selected, like this:
alert($("a").length);jQuery was designed to make DOM manipulation easy, and because of this design philosophy, you can make changes to several elements at the same time. For example, you built a web page with over 100 links in the document, and one day you decide you want them to open in a new window by setting the target attribute to _blank. That's a tall task to take on, but it is something you can easily achieve with jQuery. Because you can retrieve all <a/> elements in the document by calling $("a"), you can call the attr() method to set the target attribute. The following code does this:
$("a").attr("target", "_blank");Calling $("a") results in a jQuery object, but this object also doubles as an array. Any method you call on this particular jQuery object will perform the same operation on all elements in the array. By executing this line of code, you set the target attribute to _blank on every <a/> element in the page, and you didn't even have to use a loop!
The next way you can select elements is with CSS id syntax; that is, the value of an element's id attribute prepended with the pound sign (#). You could use the DOM's getElementById() method to perform the same task, but using the jQuery function requires less keystrokes, and you have the benefit of returning a jQuery object.
$("#myDiv")Even though you know only one element can be selected with this code, you can still use the length property to make sure the element was found in the page. If the element wasn't found, length will be 0. You can apply the same logic to select elements by their CSS class name. Simply pass the CSS selector to the jQuery function like this:
$(".myCssClass")Because jQuery uses CSS selectors to select elements, you can easily select elements based on their hierarchy. Consider the following HTML:
<p>
    <div>Div 1</div>
    <div>Div 2</div>
    <span>Span 1</div>
</p>
<span>Span 2</span>
This HTML code defines a <p/> element that contains two <div/> elements and a <span/> element. Outside the <p/> element is another <span/> element. You would have to write several lines of code to identify and retrieve the <span/> element inside the <p/> element if you use traditional DOM methods and properties. With jQuery, you only need to write one:
$("p > span")This line of code uses the parent > child CSS selector syntax to select all <span/> elements that are children to <p/> elements.
Internet Explorer 6 does not natively support this specific CSS selector; however, you would find it still works if you ran this code in that browser. JQuery and other frameworks support a wide array of CSS selectors — even if the selector is not supported by the browser. See the framework's web site for a complete list of supported CSS selectors.
The jQuery function also grants you the ability to use multiple selectors in one function call. Look at the following code as an example:
$("a, #myDiv, .myCssClass, p > span")Simply delimit each selector with a comma. This code retrieves all <a/> elements, an element with an id of myDiv, elements with the CSS class myCssClass, and all <span/> children of <p/> elements. If you wanted to set the text color of these elements to red, you could simply use the following code:
$("a, #myDiv, .myCssClass, p > span").attr("style", "color:red;");This isn't the best way to change an element's style. In fact, jQuery provides you with many methods to alter an element's style.
For a complete list of supported selectors, see
http://docs.jquery.com/Selectors.
As with the DOM, you change an element's style by changing individual CSS properties or by changing an element's CSS class. To do so, you use the css() method. This method can accept two arguments: the property's name and its value.
$("#myDiv").css("color", "red");This code sets the color property to red, thus making the text's color red. The property names you pass to the css() method can be in either style sheet format or in script format. That means if you wanted to change an element's background color, you can pass background-color or backgroundColor to the method, like this:
$("#myDiv").css("background-color", "yellow"); // CORRECT!!!
$("#myDiv").css("backgroundColor", "yellow"); // CORRECT, TOO!!!
Typically, though, if you want to change an element's style (that isn't animation-based), it's better to change the element's CSS class instead of the individual style properties. Doing so keeps the style content in the style sheet where it belongs.
The jQuery object exposes several methods to manipulate an element's className property. Before looking at them, you should know that it's legal for an element to have multiple CSS classes. Look at the following HTML:
<div class="myClass1 myClass2">
    My div with two CSS classes!
</div>
To apply two or more CSS classes to an element, simply separate the class names with spaces. In this HTML snippet, the style of two CSS classes are applied to the <div/> element: myClass1 and myClass2. This concept is being introduced to you because jQuery's methods to manipulate class names are built around this concept.
The first method, addClass(), adds the specified CSS class(es) to the element.
$("#myDiv").addClass("myClass1")
    .addClass("myClass2");
This code adds the myClass1 and myClass2 CSS classes to the element. You can shorten this code by simply passing both class names to the addClass() method in one call:
$("#myDiv").addClass("myClass1 myClass2");Just make sure you separate the class names with a space. When you want to remove a specific class or classes from the element, use the removeClass() method.
$("#myDiv").removeClass("myClass2");This code removes the myClass2 CSS class from the element, leaving myClass1 as the only CSS class applied to the element. The arguments passed to the removeClass() method are optional; all CSS classes are removed from the element if you do not pass an argument to the method. The following code removes all CSS classes from the element:
$("#myDiv").removeClass();The next method is the toggleClass() method. Unlike the previous CSS class methods, this method accepts only one class name. It checks if the specified class is present, and removes it if it is. If the class isn't present, then it adds the class to the element. Look at the following example:
$("#myDiv").addClass("myClass1 myClass2")
    .toggleClass("myClass2")
    .toggleClass("myClass2");
This code first adds the myClass1 and myClass2 CSS classes to the element. The first toggleClass() call removes myClass2 from the element, and the second call adds it back. This method is handy when you need to add or remove a specific class from the element. For example, the following code is plain old JavaScript and DOM coding to add and remove a specific CSS class depending on the type of event:
if (e.type == "mouseover")
{
    eSrc.className = "mouseover";
}
else if (e.type == "mouseout")
{
    eSrc.className = "";
}
With the toggleClass() method, you can cut this code down to the following four lines:
if (e.type == "mouseover" || e.type == "mouseout")
{
    $(eSrc).toggleClass("mouseover");
}
Using the toggleClass() method can make your code more efficient and quicker to download thanks to a reduced size, which is always a noble goal to shoot for.
The last CSS class method is the hasClass() method, and it returns true or false value depending on if the specified CSS class is applied to the element.
$("#myDiv").addClass("myClass1 myClass2")
    .hasClass("myClass1");
Like toggleClass(), this method accepts only one class name. In this code, hasClass() returns true because the element does indeed have the myClass1 CSS class applied to it. This example isn't very practical because you know exactly what classes are assigned to the element; it was merely provided to demonstrate how it can be used.
It's important to note that since this method returns
trueorfalse, you cannot chain any more methods after calling it.
jQuery makes other types of DOM manipulation easy, as you'll see by creating, adding, and removing objects from the DOM.
Think back to Chapter 12 and how you create and append elements to the page. The following code will refresh your memory:
function window_onload()
{
    var a = document.createElement("a");
    a.id = "myLink";
    a.setAttribute("href", "http://jquery.com");
    a.setAttribute("title", "jQuery's Website");

    var text = document.createTextNode("Click to go to jQuery's website");

    a.appendChild(text);
    document.body.appendChild(a);
}

onload = window_onload;
This code defines the window_onload() function, which is called when the browser completely loads the page. When window_onload() executes, it creates an <a/> element, assigns it an id, and sets the href and title attributes. Then you create a text node and assign the object to the text variable. Finally, you append the text node to the <a/> element, and then append the <a/> element to the document's <body/> element.
There's technically nothing wrong with this code; it is standard DOM element creation, population, and insertion. However, it is rather long and verbose. You can do the same thing with less typing with jQuery, and the following code shows you how:
function document_ready()
{
    var a = $(document.createElement("a"));
    $(document.body).append
    (
        a.attr("id", "myLink")
        .attr("href", "http://jquery.com")
        .attr("title", "jQuery's Website")
        .text("Click here to go to jQuery's website.")
    );
}

$(document).ready(document_ready);
Let's break the document_ready() function down to get a better understanding of what's taking place. First, you create the <a/> element with the document.createElement() method.
var a = $(document.createElement("a"));Instead of simply assigning the element to a variable, you pass it to the jQuery function so you can use the jQuery methods to populate it with attributes and text. Next, you pass the document.body object to the jQuery function and call the append() method.
$(document.body).append
(
The append() method is similar to the DOM appendChild() method in that it appends child nodes to the DOM object. The append() method accepts a DOM object, a jQuery object, or a string containing HTML content. Regardless of what you pass as the parameter to append(), it will append the content to the DOM object. In the case of this code, you pass the jQuery object that references the <a/> element you created earlier, and you assign attributes to the element.
a.attr("id", "myLink")
.attr("href", "http://jquery.com")
.attr("title", "jQuery's Website")
After you assign the id, href, and title attributes, you then add text to the link, and there are a couple of ways you can do this. You could use the append() method and pass the text to it, or you could use the text() method. Either method would result in the same outcome, but use text() in this case simply because you haven't used it yet.
.text("Click here to go to jQuery's website.")
);
Remember what makes method chaining possible in jQuery is that most methods return the jQuery object you called the method on. So the text() method returns the jQuery object referencing the <a/> element object to the append() method called on the jQuery object referencing the document.body object.
You could rewrite this code in a couple of other ways. First, you could do this:
function document_ready()
{
    var a = $(document.createElement("a"))
        .attr("id", "myLink")
        .attr("href", "http://jquery.com")
        .attr("title", "jQuery's Website")
        .text("Click here to go to jQuery's website.");

    $(document.body).append(a);
}
This code results in the same outcome, and it's a little bit easier to understand. However, if you wanted to save even more lines, you could do something like the following code:
function document_ready()
{
    $(document.body).append($(document.createElement("a"))
        .attr("id", "myLink").attr("href", "http://jquery.com")
        .attr("title", "jQuery's Website")
        .text("Click here to go to jQuery's website."));
}
This code certainly is smaller and more compact, and it is the type of code you'd see if you looked at lots of the jQuery-based code out on the Internet (and it's the type of code you'd see your authors write). You do lose some readability, however. The important thing is to code in a manner that you feel comfortable with. Method chaining can get a little confusing if several methods are chained together. For this purpose, the remainder of the code examples will put each method call on a separate line.
Removing elements from the DOM is also much easier with jQuery than with the traditional DOM methods. Using the latter, you have to find at least two elements in the DOM tree: the element you want to remove and its parent element. With jQuery, you only need to find the element you want to remove and call the remove() method, like this:
$("#myLink").remove();This code finds the <a/> element you created in the previous code example and removes it from the DOM. You can also remove all of a parent's child nodes by calling the empty() method.
$(document.body).empty();
This code empties the <body/> element, thus removing all content from the page.
Most DOM changes you'll make are in response to something the user did, whether it be moving their mouse over a particular element or clicking somewhere on the page. So naturally, you'll have to handle events at some point.
All jQuery objects expose a method called bind(), which you use to assign event handlers to specific events.
function myButton_click(event)
{
    alert("You clicked me!");
}

$("#myButton").bind("click", myButton_click);
This code assigns the myButton_click() function to handle the click event for an element with an id value of myButton element.
jQuery passes a jQuery.Event object to the function handling the event. Because of the extreme difference between the IE and W3C DOM event models, John Resig, the creator of jQuery, decided to merge both event models into his own, which is based on the W3C event model's Event and MouseEvent objects. That means you do not have to worry about checking for window.event or using any property of the IE event model; the jQuery.Event object provides you the same information as window.event, and you'll use the W3C Mouse and MouseEvent objects' properties to get at that information.
All this means is you have one unified object that works across all supported browsers, to work with events. To demonstrate, you can write something like the following code, and it'll work in every supported browser:
function myButton_click(event)
{
    alert(event.target.tagName + " clicked at X:" + event.pageX
        + " and Y:" + event.pageY);
}

$("#myButton").bind("click", myButton_click);
Figure 15-4 shows the results of this code in IE, and Figure 15-5 shows the results in Firefox.
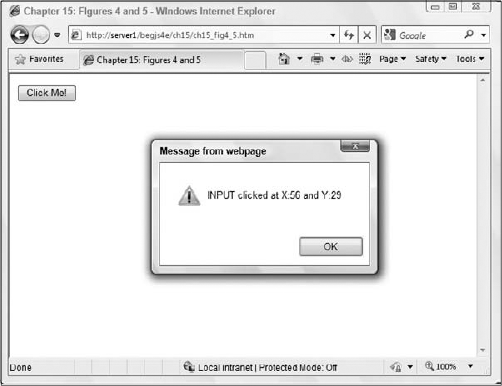
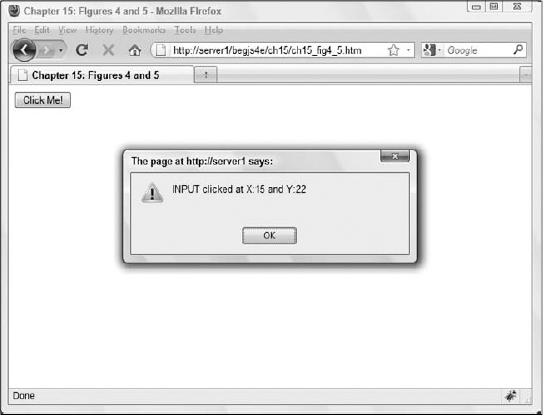
Because of the jQuery.Event object, you code using the W3C model, and it simply works in all browsers.
For a complete list of supported events, see jQuery's web site at
http://docs.jquery.com/Events.
You have learned how to retrieve elements in the DOM, change an element's style by adding and removing classes, add and remove elements from the page, and use events with jQuery.
Now you'll put this newfound knowledge to work by refactoring the DHTML toolbar from Chapter 12 (the answer to Chapter 12's second exercise question at the end of the chapter, to be exact).
The previous chapter walked you through the creation of a module to enable you to create and use XMLHttpRequest objects to retrieve data from the web server. The module you created certainly made Ajax requests easier to code, but Ajax requests are even easier with jQuery.
The jQuery function ($()) is the doorway into all things jQuery, and you've used it quite a bit throughout this chapter. However, there are other uses for this function. It was mentioned only once in this book, and it was as an aside comment, but functions are objects, too. If you look back at the end of Chapter 5, you created your own objects and reference types. When you did so, you used the prototype object, which is a property of the Function object.
Just like all other objects, you access a Function object's properties and methods using the object.property or object.method() syntax. As such, jQuery's Ajax functionality is provided by methods of the $ function object. For example, to make a request to the server, you use the get() method, as the following code shows:
$.get("textFile.txt");This code makes a request to the server to retrieve the textFile.txt text file, but it isn't useful, as you can't do anything with the data you retrieved. So like the HttpRequest module you built in the previous chapter, the $.get() method lets you assign a callback function that is called when the request successfully contacts the server and retrieves your specified data.
function get_callBack(data, status)
{
    alert(data);
}

$.get("textFile.txt", get_callBack);
This code adds a function called get_callBack(), which jQuery calls on a successful request. When jQuery executes an Ajax callback function, it passes two parameters to it. The first, data, is the data you requested from the server. The second, status, is the status of the request. Because jQuery only calls the callback function on a successful request, status is always "success".
Many developers forego using the second
statusparameter, because it's only possible value at this time issuccess. You can forego it as well.
jQuery's Ajax event handling is quite different from what you might expect. There are local events (that is, events of a specific request object) and global Ajax events. Global events are easier to use, and you can use them to add UI cues to enhance the user's experience. You set the global events to fire on any valid DOM object. One specific global event is the ajaxError event, and you set it to call an event handler with the jQuery object's ajaxError() method, or you can use the bind() method. The following code demonstrates the use of the ajaxError() method:
function request_ajaxError(event, request, settings)
{
    alert("An Ajax error occurred.");
}

$(document).ajaxError(request_ajaxError);
Ajax event handlers are passed the following three parameters:
An
eventobject that has information about the event.The
XMLHttpRequestobject that is used to make the request.An object containing the settings used for the request. With the
settingsobject, you can retrieve the URL of the request, its HTTP method, whether or not the request was sent in asynchronous mode, and much more.
You can build some pretty thorough error messages between the request and settings parameters.
Visit
http://docs.jquery.com/Ajaxfor a complete list of Ajax events.
Remember the examples from the previous chapter? You created a form that checked if user names and e-mail addresses were available using Ajax, and you sent those values to the server as parameters in the URL. For example, when you wanted to test a user name, you used the username parameter, like this:
phpformvalidator.php?username=jmcpeak
With the $.get() method, you can do the same thing by passing an object containing the key/value pairs to the method.
var parms = new Object();
parms.username = "jmcpeak";

function get_callBack(data, status)
{
    alert(data);
}

$.get("phpformvalidator.php", parms, get_callBack);
In this code, you create a new object called parms and add the username property to the object, assigning it the value of jmcpeak. You then write the get_callBack() function, and afterwards, you call $.get() and pass the URL, the parms object, and the callback function.
You can send multiple parameters to the URL by simply adding more properties to the object, like this:
var parms = new Object();
parms.username = "jwmcpeak";
parms.email = "[email protected]";
You can send as many parameters you want or need in a single request.
By default, the $.get() method sends requests in asynchronous mode, and in most cases, this is desired. However, you may find situations, like the answer to Question 2 in Chapter 14, where you want to use synchronous communication. You cannot specify what type of communication mode you want to use with $.get(), but jQuery does provide the $.ajaxSetup() method. This method accepts an object containing a number of properties to set options that affects all Ajax requests. One such option is the async option.
var options = new Object();
options.async = false;

$.ajaxSetup(options);
This code sets all Ajax calls to use synchronous mode. Again, only set this option to false when you absolutely need it. Most (about 99.9 percent) of the time, you want to use asynchronous communication.
Let's revisit the form validator script using XMLHttpRequest from the previous chapter, and you'll replace the HttpRequest module code with the Ajax capabilities of jQuery.
The
$.get()method is quite simple to use and provides basic functionality. jQuery offers much more advanced, low-level Ajax functionality, and you can find out more athttp://docs.jquery.com/Ajax.
jQuery is an extensive framework, and providing in-depth coverage and information requires more than this section can provide. However, the jQuery documentation is quite good, and you can view it at http://docs.jquery.com. jQuery's web site also lists a variety of tutorials, so don't forget to check them out at http://docs.jquery.com/Tutorials. The inclusion of its effects/animation components and the optional UI library makes jQuery a very versatile framework.
jQuery is probably the most popular framework today, but that crown used to sit upon Prototype's head. Unlike jQuery, Prototype's focus is augmenting the way you program with JavaScript by providing classes and inheritance. It does, however, also provide a robust set of tools for working with the DOM and Ajax support.
You were briefly introduced to Prototype, so let's dive a little deeper into this library and see what it can do for you with cross-browser scripting.
When testing your Prototype installation, you were introduced to the dollar function $(). This function is different from the jQuery function in that it simply extends the element you want to retrieve by adding many new methods. If you pass an element's id value, then it retrieves that element and extends it with more methods and properties.
$("myDiv")This code retrieves the element with an id of myDiv from the DOM and extends it. So you can use this extended object just like you would any other Element object, like this:
alert($("myDiv").tagName);You can also pass it an Element object, which results in an extended version of that element. The following code passes the document.body object to the dollar function:
$(document.body)
By doing this, you can use both native DOM methods and properties as well as the methods provided by Prototype.
Prototype's dollar function returns
nullif the specified element cannot be found. This is unlike jQuery's$()function because Prototype returns an extended DOM element object; even though it is extended, it is still a DOM element object.
Another difference between Prototype's dollar function and jQuery's $() function is that it does not accept CSS selectors; it only accepts element id values and Element objects. Prototype does, however, have another function that behaves similarly to jQuery's $() function, and that is the $$() function.
You can pass several selector types to the $$() function to locate and retrieve elements that match the selector. For example, the following code retrieves all <div/> elements in the page and returns them in an array, so you can use the length property:
$$("div")The $$() function always returns an array, so even if you use an id selector, you'll get an array with one element in it if the element is found. One downside to the double dollar function is that it returns an array of extended elements. If you want to perform an operation on every element in the array, you have to either loop through them or iterate over them with the Prototype-provided each() method.
The each() method is similar to the new Array.every() method you learned about in Chapter 5. It accepts a function as a parameter and executes that function on every element in the array. The following code demonstrates this:
function insertText(item)
{
    item.insert("This text inserted using the each() method.");
}

$$("div").each(insertText);
The
jQueryobject also has aneach()method that performs the same function.
You can use several CSS selector types to select elements with the double dollar function, and you can select elements based upon multiple selectors, although it is different from how you did it with jQuery.
$$("#myDiv", "p > span, .myCssClass");Instead of passing one string with commas separating each selector, you pass multiple strings with each string containing one selector. Once you retrieve an element (or elements), you can then begin to manipulate them, such as changing their style.
Prototype provides you several methods to change an element's style, and they are not unlike those found in the jQuery framework.
The setStyle() method lets you set individual style properties. To set style in this way, you must create an object, and create properties for this object whose names are those of CSS properties. For example, the following code sets an element's text color to red and underlines it:
var styles = new Object();
styles.color = "red";
styles.textDecoration = "underline";

$("myDiv").setStyle(styles);
As previously mentioned in the jQuery section, changing an element's style in this manner is undesirable because style should be defined in the page's style sheet. A better alternative is to manipulate an element's CSS class, and Prototype allows you to easily do that with the addClassName(), removeClassName(), toggleClassName(), and hasClassName() methods.
The first method, addClassName(), adds a CSS class name to the element. Simply pass the class name to the method, and it is applied to the element.
$("myDiv").addClassName("someClass");The second method, removeClassName(), removes the specified class from the element. The following code adds a class name and then removes it:
$("myDiv").addClassName("someClass")
    .removeClassName("someClass");
This code isn't very practical, but it demonstrates how both methods are used. Next is the toggleClassName() method. This method checks if the specified class is applied to the element and removes it if so. If the class name isn't found, then it applies the class to the element.
$("myDiv").hasClassName("someClass");
$("myDiv").toggleClassName("someClass");
$("myDiv").hasClassName("someClass");
This code demonstrates the toggleClassName() method and the fourth method: hasClassName(). The first line of code checks if the someClass CSS class is applied to the element. Since it's not, this method returns false. The second line calls the toggleClassName() method, which adds the someClass CSS class to the element. The final line calls hasClassName() again, which now returns true since someClass was added in the previous line.
These CSS methods closely resemble those of jQuery. However, other types of DOM manipulation such as creating and inserting elements are areas where Prototype differs greatly from jQuery. However, as you'll soon see, removing DOM objects is very similar.
Manipulating the DOM with Prototype is a simple process. The framework extends the Element object and allows you to create an element using a constructor, populate it with data, and remove it from the DOM.
The Element object's constructor accepts two arguments: the tag name and an object containing attributes and their values. The following code demonstrates creating an <a/> element and adds it to the document's body:
var attributes = new Object();
attributes.id = "myLink";
attributes.href = "http://www.prototypejs.org";
attributes.target = "_blank";

var a = new Element("a", attributes);
The first few lines of this code create an object called attributes. You create the id, href, and target properties and assign their values. You then create an <a/> element by using the Element object's constructor. You pass the string "a" as the first parameter and the attributes object as the second.
The update() and insert() methods both add content to the Element object. The difference is update() replaces all existing content while insert() simply adds the content to the existing content. Both methods can accept a string value, containing simple text or HTML, or an Element object.
The following code creates the <a/> element from the previous code example, adds content to it, and inserts it into the page:
var attributes = new Object();
attributes.id = "myLink";
attributes.href = "http://www.prototypejs.org";
attributes.target = "_blank";

var a = new Element("a", attributes).update("Go to Prototype's Website");
$(document.body).insert(a);
This code calls the update() method, which replaces the element's existing content with the new content as specified by the data passed to it (in this example, there was no existing content). Because the update() method returns the Element object you created, you assign the object to the variable a, which you then pass to the insert() method of the document.body object.
Removing elements from the DOM is even easier, and in fact is the same as in jQuery. You first find the element you want to remove from the DOM and then call the remove() method.
$("myLink").remove();This code finds the element with an id of myLink and removes it from the DOM. There's no need to find the element's parent and call the removeChild() method.
When you extend an Element object with the dollar sign function, you gain access to the observe() method, which registers an event handler on a DOM element. This method accepts two arguments: the name of the event to observe for and the function to call when the event fires.
function myDiv_click(event)
{
    // do something
}

$("myDiv").observe("click", myDiv_click);
This code registers the myDiv_click() function to handle the click event on the element with an id of myDiv. This isn't the only way to assign event handlers; you can use the Event.observe() method, too. The following code writes the previous code using Event.observe():
function myDiv_click(event)
{
    // do something
}

Event.observe("myDiv", "click", myDiv_click);
The first argument to Event.observe() can be a string value containing an element's id, or a BOM/DOM object you want to assign an event handler to, like window or document. This method is particularly useful for objects like window; you cannot pass window to the dollar function and use the observe() method because the browser will throw an error. Instead, you have to use Event.observe().
Unlike jQuery, Prototype doesn't emulate the W3C DOM event model. In fact, it doesn't aim to create a separate, unifying event model at all. Instead, it extends the event objects of both browsers and gives you a set of utility methods to obtain the information you want to acquire.
These methods are of the extended browser's Event object. For example, the element() method accepts an IE or W3C event object as a parameter and returns the value of the srcElement and target properties for IE and W3C DOM browsers, respectively.
For example, the following code gets the element that fired the event and toggles a CSS class called someClass:
function myDiv_click(event)
{
    var eSrc = event.element();
    eSrc.toggleClassName("someClass");
}

$("myDiv").observe("click", myDiv_click);
In order for this to work properly, the parameter your event handling function accepts needs to be called event. That way, IE's window.event object is referenced when you call the element() method as well as the event object passed to the function by W3C DOM browsers.
You now know how to retrieve elements, change an element's style, add and remove elements from the DOM, and wire up events, and get the element that fired the event with Prototype. Let's apply that knowledge and rewrite the DHML toolbar.
The Ajax support in Prototype isn't as straightforward as the high-level $.get() method in jQuery. Prototype's Ajax functionality centers on its Ajax object, which contains a variety of methods you can use to make Ajax calls. This object is much like the native Math object in that you do not create an instance of the Ajax object; you simply use the methods made available by the object.
At the heart of the Ajax object is the Ajax.Request() constructor. This constructor accepts two arguments: the first being the URL to make the request to and the second an object containing a set of options that the object uses when making a request. The options object can contain a variety of option properties to alter the behavior of Ajax.Request(); the following table describes just a few of them.
Option | Description |
|---|---|
| Determines whether the |
| The HTTP method used for the request. The default is |
| A callback function invoked when the request completes successfully. |
| A callback function invoked when the request completes, but results in an error status code. |
| Either a string containing the parameters to send with the request, or an object containing the parameters and their values. |
For a complete list of options, visit the Prototype documentation at
http://www.prototypejs.org/api/ajax/options.
All callback functions are executed and passed a parameter containing the XMLHttpRequest object used to make the request. Making a request with Prototype looks something like the following code:
function request_onsuccess(request)
{
    alert(request.responseText);
}

function request_onfailure(request)
{
    alert("An error occurred! HTTP status code is " + request.status);
}

var options = new Object();
options.method = "get";
options.onSuccess = request_onsuccess;
options.onFailure = request_onfailure;

new Ajax.Request("someTextFile.txt", options);
The first few lines of code define the request_onsuccess() and request_onfailure() functions. These functions all accept one parameter called request. The value of this parameter will be the XMLHttpRequest object used to make the request.
Prototype actually passes an
Ajax.Responseobject to all Ajax request callbacks. It is very similar to theXMLHttpRequestobject and adds extra functionality. To access theXMLHttpRequestobject directly, use thetransportproperty; for example,request.transport. After the function definition, you create anoptionsobject The first option you set is the method option, which you set toget. The next option is theonSuccessoption, and you assign therequest_onsuccess()function to this option. The final option isonFailure, which you assign therequest_onfailure()function.
Once all preparation is made, you finally make the request for the someTextFile.txt file, and you pass the options object to the Ajax.Request() constructor (don't forget the new keyword!!).
If you need to send parameters with your request, you'll have to do a bit more preparation before calling new Ajax.Request(). Like jQuery, you can create an object whose property names match those of the parameter names. For example, if your URL requires you to pass two parameters named name and state, you can do something like the following code:
var parms = new Object();
parms.name = "Jeremy";
parms.state = "Texas";

options.parameters = parms;
By adding parameters and then calling new Ajax.Request(), the parameters are added to the URL before the request is sent to the server.
Now that you've been given a crash course in Prototype's Ajax function, alter the form validator script from Chapter 14 to use Prototype instead of the HttpRequest module.
Prototype is a powerful framework that provides a rich set of utilities to change the way you write JavaScript. Like jQuery, a simple section such as this is far too small to cover the framework adequately. For further information on Prototype and the utility it offers, see the API documentation at http://www.prototypejs.org/api and the tutorials at http://www.prototypejs.org/learn.
At first glance, MooTools looks identical to Prototype, and rightly so. MooTools was first developed to work with Prototype, so it shouldn't be surprising to see some of the utility provided by MooTools is almost identical to that of Prototype.
However, MooTools is more of a cross between jQuery and Prototype as far as DOM manipulation is concerned. Like Prototype, MooTools' goal is to augment the way you write JavaScript, providing tools to write classes and inherit from them. Also like Prototype, MooTools adds in a rich set of extensions to make DOM manipulation easier, and you'll find that selecting DOM objects in MooTools is exactly the same as Prototype. But as you'll see in the following sections, the extension method names and the way in which you use them is reminiscent of jQuery.
When testing your MooTools installation, you saw the dollar function used, and you learned that it was similar to Prototypes. Well, let's clear it up now; they are exactly the same. They find the element and extend it, albeit with different methods that you'll see in the following sections.
$("myDiv")This code finds an element with an id of myDiv, extends it with MooTools' methods, and returns the extended element. You can use the methods and properties of the DOM Element object, as well as the methods provided to you by MooTools.
MooTools also gives you the double dollar function $$() and you use it, you guessed it, to retrieve elements using CSS selectors, and you can use multiple selectors by passing them as a parameter to the double dollar function.
$$(".myClass");
$$("div", ".myClass", "p > div")
One huge difference between MooTools and Prototype is you don't have to iterate over the returned array to perform operations on them.
$$("div", "a").setStyle("color", "red");This code selects all <div/> and <a/> elements in the page and sets their text color to red. Contrast that with Prototype in the following code example:
function changeColor(item)
{
    var styles = new Object();
    styles.color = "red";

    item.setStyle(styles);
}

$$("div", "a").each(changeColor);
So the $$() function is kind of a cross between Prototype's $$() function and jQuery's $().
The previous MooTools code example introduced you to the setStyle() method. It accepts two arguments: the first is the CSS property, and the second is its value. Like jQuery, you can use the CSS property used in a style sheet or the camel-case version used in script:
$("myDiv").setStyle("background-color", "red");
$("myDiv").setStyle("backgroundColor", "red");
Both lines of this code set the element's background color to red; so you can use either property name to set individual style properties.
This is, of course, not the ideal means of changing an element's style. MooTools adds the addClass(), removeClass(), toggleClass(), and hasClass() methods to Element objects.
The addClass() and removeClass() methods do just what their names imply. They add and remove the specified class to the element, as in the following code:
$("myDiv").addClass("someClass").removeClass("someClass");The toggleClass() method works as you would expect; if the element has the CSS class specified by the passed parameter, then toggleClass() removes the CSS class from the element. If the element doesn't have the CSS class, then toggleClass() adds it to the element.
$("myDiv").toggleClass("myClass").toggleClass("myClass");This code first adds the myClass CSS class to the element because you removed it in the previous example. The second toggleClass() call removes it again because you just added it to the element.
The hasClass() method returns a true or false value depending on whether the element has the CSS class or not.
$("myDiv").hasClass("myClass");This code returns false, since the CSS class myClass isn't applied to the element.
Changing an element's style is only part of the DOM manipulation equation, and MooTools fills in the other part with the ability to create, insert, and remove elements from the DOM.
Creating elements with MooTools is very similar to creating them with Prototype. You simply use the Element object's constructor and pass it the type of element you want to create along with an object containing the attributes you want the element to have. The following code creates an <a/> element; assigns its id, href, and target attributes; and adds the element to the document.
var attributes = new Object();
attributes.id = "myLink";
attributes.href = "http://www.prototypejs.org";
attributes.target = "_blank";

var a = new Element("a", attributes).appendText("Go to Prototype's Website");
$(document.body).adopt(a);
The first four lines of this code create an attributes object and its id, href, and target properties and assign their values. Then a new <a/> element is created with the Element object constructor, and text is added to the element with the appendText() method. Finally, the element is appended to the document.body object with the adopt() method.
Removing Element objects from the DOM is quite simple and straightforward; simply call the dispose() method. The following code demonstrates this:
$("myLink").dispose();This code finds the element with an id of myLink and then removes it from the DOM by calling the dispose() method.
When you extend an Element object with the $() function, MooTools adds the addEvent() method to the element. This method attaches an event handler to the element for a specified event. The following code is an example of its use:
function myDiv_click(event)
{
    alert("You clicked me!");
}

$("myDiv").addEvent("click", myDiv_click);
The addEvent() method accepts two arguments: the first is the event to watch for, and the second is a function to handle the event when it fires.
The
windowanddocumentobjects automatically have theaddEvent()method added to them by MooTools.
You can register multiple event handlers at one time with the addEvents() method. This method accepts an object whose property names mirror those of event types, and their values are the functions you want to handle the events with.
For example, the following code registers event handlers for the mouseover and mouseout events on an element:
function eventHandler(e)
{
    // do something with the event here
}

var handlers = new Object();
handlers.mouseover = eventHandler;
handlers.mouseout = eventHandler;

$("myDiv").addEvents(handlers);
When an event fires, and if the handler was set via the addEvent() or addEvents() method, MooTools passes its own Event object to the event handling function. This object has its own set of proprietary properties, some like the W3C Event and MouseEvent objects, and some unlike any property from either the IE or W3C event models even though they offer the same information. The following table lists some of the properties available with MooTools' Event object.
Property | Description |
|---|---|
| The horizontal position of the mouse relative to the browser window. |
| The vertical position of the mouse relative to the browser window. |
The horizontal position of the mouse relative to the client area. | |
| The vertical position of the mouse relative to the client area. |
| The event target. |
| The element related to the event target. |
| The type of event that called the event handler. |
Visit
http://mootools.net/docs/core/Native/Eventfor a complete list of properties of MooTools'Eventobject.
For example, the following code registers an event handler for the click event on an element with an id of myDiv:
function myDiv_onclick(e)
{
    var eSrc = $(e.target).addClass("myClass");

    alert("You clicked at X:" + e.client.x + " Y:" + e.client.y);
}

$("myDiv").addEvent("click", myDiv_onclick);
When the event fires and executes myDiv_onclick(), a MooTools Event object is passed to the function. The first line of the function extends the event target element and calls the addClass() method, adding the myClass CSS class to the element. The addClass() method returns the extended Element object, which you store in the eSrc variable. You then use an alert box to display the mouse pointer's coordinates relative to the viewport by using the client.x and client.y properties.
You've been introduced to MooTools DOM manipulation capabilities, so let's put them to good use and rewrite the DHTML toolbar from Chapter 12 (again!).
The Ajax utilities of MooTools are quite different from jQuery and somewhat different from Prototype. The MooTools Ajax utility revolves around the Request reference type. Like Prototype's Ajax.Request, you create an instance of Request, and pass it an object that contains a set of options. The following table lists some of these options.
Option | Description |
|---|---|
| Determines whether the |
| The HTTP method used for the request. The default is |
| A callback function invoked when the request completes successfully. |
| A callback function invoked when the request completes, but results in an error status code. |
| The URL to send the request to. |
Visit
http://mootools.net/docs/core/Request/Requestfor a complete list of options and callback functions.
All callback functions are executed and passed varying parameters. The onSuccess callback function is passed two parameters, the first being the XMLHttpRequest object's responseText and the second being the responseXML. The onFailure callback is simply passed the XMLHttpRequest object. Making a request using the Request reference type looks something like the following code:
function request_onsuccess(text, xml)
{
    alert(text);
}

function request_onfailure(request)
{
    alert("An error occurred! HTTP status code is " + request.status);
}

var options = new Object();
options.method = "get";
options.onSuccess = request_onsuccess;
options.onFailure = request_onfailure; options.url = "someTextFile.txt"; var request = new Request(options).send();
The first few lines of code define the request_onsuccess() and request_onfailure() functions. After the function definitions, you create an options object. The first option you set is the method option, which you set to get. The next two options are the onSuccess and onFailure options, and you assign them the request_onsuccess() and request_onfailure() functions. The final option is url, which you assign someTextFile.txt.
Once you have all the options created, you call the Request constructor and pass the options object to it. You then chain the send() method, which sends the request.
You can send parameters by using the send() method. Simply pass it a string containing the parameters, as the following code shows:
var request = new Request(options).send("name=Jeremy");Let's use MooTools' Ajax utilities to modify the form validator from the previous chapter one last time!
MooTools is a popular framework because it offers you utility similar to jQuery while maintaining aspects of traditional DOM programming like Prototype. MooTools also has an animation/effects component, making it a well-rounded framework. This section can hardly do the framework justice, so make sure to visit the API documentation at http://www.mootools.net/docs/core.
This chapter introduced you into the rather large world of JavaScript frameworks.
You learned that JavaScript frameworks were the answer to cross-browser development.
You learned that there are two types of frameworks: general and specific. You were also given a short list of the popular frameworks available today.
You learned where to obtain the files needed to use the jQuery, Prototype, and MooTools frameworks.
You installed jQuery, Prototype, and MooTools and tested each installation with an identical test page.
You learned how to select and retrieve elements, manipulate the DOM, and work with events with the jQuery, Prototype, and MooTools frameworks; and you rewrote the DHTML toolbar script using all three of the frameworks.
Finally, you learned how to make basic Ajax requests using the Ajax components of jQuery, Prototype, and MooTools; you also rewrote the form validator script using the Ajax capabilities of the three frameworks.
Suggested solutions for these questions can be found in Appendix A.
Modify the answer to Chapter 14's Question 2 using jQuery. Also add error reporting for when an error occurs with the Ajax request.
Alter the answer to Chapter 14's Question 2 using Prototype. Add error reporting for when an error occurs with the Ajax request.
If you guessed that this question would be: "Change the answer to Chapter 14's Question 2 using MooTools, and add error reporting for when an error occurs with the Ajax request" then you won!! Your prize is. . . completing the exercise.