Over the past few chapters, you've examined the core JavaScript language. You've seen how to work with variables and data, perform operations on those data, make decisions in your code, loop repeatedly over the same section of code, and even how to write your own functions. In the preceding chapter you moved on to learn how JavaScript is an object-based language, and you saw how to work with the native JavaScript objects. However, you are not interested only in the language itself; you want to find out how to write script for the web browser. Using this ability, you can start to create more impressive web pages.
Not only is JavaScript object-based, but the browser is also made up of objects. When JavaScript is running in the browser, you can access the browser's objects in exactly the same way that you used JavaScript's native objects in the last chapter. But what kinds of objects does the browser provide?
The browser makes available a remarkable number of objects. For example, there is a window object corresponding to the window of the browser. You have already been using two methods of this object, namely the alert() and prompt() methods. For simplicity, we previously referred to these as functions, but they are in fact methods of the browser's window object.
Another object made available by the browser is the page itself, represented by the document object. Again, you have already used methods and properties of this object. Recall from Chapter 1 that you used the document object's bgColor property to change the background color of the page. You have also been using the write() method of the document object to write information to the page.
A variety of other objects exist, representative of the HTML you write in the page. For example, there is an img object for each <img/> element that you use to insert an image into your document.
The collection of objects that the browser makes available to you for use with JavaScript is generally called the Browser Object Model (BOM).
You will often see this termed the Document Object Model (DOM); it is incorrect to do so. Throughout this book, we'll use the term DOM to refer to the W3C's standard Document Object Model, which is discussed in Chapter 12.
All this added functionality of JavaScript comes with a potential downside: there is no standard BOM implementation. Which collections of objects are made available to you is highly dependent on the brand and version of the browser that you are using. Some objects are made available in some browsers and not in others, whereas other objects have different properties and methods in different browsers. The good news is that browser makers typically do not change much of their browser's BOM, as doing so would create a rift in interoperability. This means if you stick to the core functionality of the BOM (the common objects in all browsers), your code is more likely to work between the different browsers and versions. This chapter's focus is the BOM core functionality. You can achieve a lot in JavaScript by just sticking to the core. You can find more information on the core objects online at http://www.w3schools.com/dhtml/dhtml_domreference.asp and http://msdn.microsoft.com/en-us/library/ms952605.aspx.
In this section, we introduce the objects of the BOM that are common to all browsers.
In Chapter 5, you saw that JavaScript has a number of native objects that you have access to and can make use of. Most of the objects are those that you need to create yourself, such as the String and Date objects. Others, such as the Math object, exist without you needing to create them and are ready for use immediately when the page starts loading.
When JavaScript is running in a web page, it has access to a large number of other objects made available by the web browser. Rather like the Math object, these are created for you rather than your needing to create them explicitly. As mentioned, the objects, their methods, properties, and events are all mapped out in the BOM.
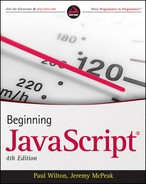
The BOM is very large and potentially overwhelming at first. However, you'll find that initially you won't be using more than 10 percent of the available objects, methods, and properties in the BOM. You'll start in this chapter by looking at the more commonly used parts of the BOM, shown in Figure 6-1. These parts of the BOM are, to a certain extent, common across all browsers. Later chapters will build on this so that by the end of the book you'll be able to really make the BOM work for you.
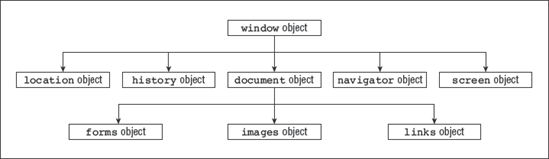
The BOM has a hierarchy. At the very top of this hierarchy is the window object. You can think of this as representing the frame of the browser and everything associated with it, such as the scrollbars, navigator bar icons, and so on.
Contained inside the window frame is the page. The page is represented in the BOM by the document object. You can see these two objects represented in Figure 6-2.
Now let's look at each of these objects in more detail.
The window object represents the browser's frame or window, in which your web page is contained. To some extent, it also represents the browser itself and includes a number of properties that are there simply because they don't fit anywhere else. For example, via the properties of the window object, you can find out what browser is running, the pages the user has visited, the size of the browser window, the size of the user's screen, and much more. You can also use the window object to access and change the text in the browser's status bar, change the page that is loaded, and even open new windows.
The window object is a global object, which means you don't need to use its name to access its properties and methods. In fact, the global functions and variables (the ones accessible to script anywhere in a page) are all created as properties of the global object. For example, the alert() function you have been using since the beginning of the book is, in fact, the alert() method of the window object. Although you have been using this simply as this:
alert("Hello!");You could write this with the same, exact results:
window.alert("Hello!");However, since the window object is the global object, it is perfectly correct to use the first version.
Some of the properties of the window object are themselves objects. Those common to all browsers include the document, navigator, history, screen, and location objects. The document object represents your page, the history object contains the history of pages visited by the user, the navigator object holds information about the browser, the screen object contains information about the display capabilities of the client, and the location object contains details on the current page's location. You'll look at these important objects individually later in the chapter.
Let's start with a nice, simple example in which you change the default text shown in the browser's status bar. The status bar (usually in the bottom left of the browser window) is usually used by the browser to show the status of any document loading into the browser. For example, on IE and Firefox, after a document has loaded, you'll normally see Done in the status bar. Let's change that so it says "Hello and Welcome."
To change the default message in the window's status bar, you need to use the window object's defaultStatus property. To do this, you can write the following:
window.defaultStatus = "Hello and Welcome";
Or, because the window is the global object, you can just write this:
defaultStatus = "Hello and Welcome";
Either way works, and both are valid; however, writing window in front makes it clear exactly where the defaultStatus property came from. Otherwise it might appear that defaultStatus is a variable name. This is particularly true for less common properties and methods, such as defaultStatus. You'll find yourself becoming so familiar with more common ones, such as document and alert(), that you don't need to put window in front to remind you of their context.
Let's put the code in a page.
<!DOCTYPE html PUBLIC "-//W3C//DTD XHTML 1.0 Strict//EN"
    "http://www.w3.org/TR/xhtml1/DTD/xhtml1-strict.dtd">

<html xmlns="http://www.w3.org/1999/xhtml">
<head>
    <title>Chapter 6: Example 1</title>
    <script type="text/javascript">
        window.defaultStatus = "Hello and Welcome";
    </script>
</head>
<body>
</body>
</html>
Save the page as ch6_examp1.htm and load it into your browser. You should see the specified message in the status bar.
At this point, it's worth highlighting the point that within a web page you shouldn't use names for your functions or variables that conflict with names of BOM objects or their properties and methods. If you do, you may not get an error, but instead get unexpected results. For example, the following code declares a variable named defaultStatus, and tries to set the defaultStatus property of the window object to "Welcome to my website". However, this won't change the default message in the status bar; instead the value in the defaultStatus variable will change.
var defaultStatus;
defaultStatus = "Welcome to my website";
In this situation you need to use a different variable name. This happens because any function or variable you define within the global scope actually gets appended to the window object. Look at this code as an example:
var myVariable = "Hello, World!";
alert(window.myVariable);
If you were to execute this code in a browser, the alert window will display the message "Hello, World."
As with all the BOM objects, you can look at lots of properties and methods for the window object. However, in this chapter you'll concentrate on the history, location, navigator, screen, and document properties. All five of these properties contain objects (the history, location, navigator, screen, and document objects), each with its own properties and methods. In the next few pages, you'll look at each of these objects in turn and find out how they can help you make full use of the BOM.
The history object keeps track of each page that the user visits. This list of pages is commonly called the history stack for the browser. It enables the user to click the browser's Back and Forward buttons to revisit pages. You have access to this object via the window object's history property.
Like the native JavaScript Array type, the history object has a length property. You can use this to find out how many pages are in the history stack.
As you might expect, the history object has the back() and forward() methods. When they are called, the location of the page currently loaded in the browser is changed to the previous or next page that the user has visited.
The history object also has the go() method. This takes one parameter that specifies how far forward or backward in the history stack you want to go. For example, if you wanted to return the user to the page before the previous page, you'd write this:
history.go(-2);
To go forward three pages, you'd write this:
history.go(3);.
Note that go(-1) and back() are equivalent, as are go(1) and forward().
The location object contains lots of potentially useful information about the current page's location. Not only does it contain the Uniform Resource Locator (URL) for the page, but also the server hosting the page, the port number of the server connection, and the protocol used. This information is made available through the location object's href, hostname, port, and protocol properties. However, many of these values are only really relevant when you are loading the page from a server and not, as you are doing in the present examples, loading the page directly from a local hard drive.
In addition to retrieving the current page's location, you can use the methods of the location object to change the location and refresh the current page.
You can navigate to another page in two ways. You can either set the location object's href property to point to another page, or you can use the location object's replace() method. The effect of the two is the same; the page changes location. However, they differ in that the replace() method removes the current page from the history stack and replaces it with the new page you are moving to, whereas using the href property simply adds the new page to the top of the history stack. This means that if the replace() method has been used and the user clicks the Back button in the browser, the user can't go back to the original page loaded. If the href property has been used, the user can use the Back button as normal.
For example, to replace the current page with a new page called myPage.htm, you'd use the replace() method and write the following:
window.location.replace("myPage.htm");This will load myPage.htm and replace any occurrence of the current page in the history stack with myPage.htm.
To load the same page and to add it to the history of pages navigated to, you use the href property:
window.location.href = "myPage.htm";
and the page currently loaded is added to the history. In both of the preceding cases, window is in front of the expression, but as the window object is global throughout the page, you could have written one of the following:
location.replace("myPage.htm");
location.href = "myPage.htm";
The navigator object is another object that is a property of window and is available in all browsers. Its name is more historical than descriptive. Perhaps a better name would be the "browser object," because the navigator object contains lots of information about the browser and the operating system in which it's running.
Probably the most common use of the navigator object is for handling browser differences. Using its properties, you can find out which browser, version, and operating system the user has. You can then act on that information and make sure users are directed to pages that will work with their browsers. The last section in this chapter is dedicated to this important subject, so we will not discuss it further here.
The screen object property of the window object contains a lot of information about the display capabilities of the client machine. Its properties include the height and width properties, which indicate the vertical and horizontal range of the screen, respectively, in pixels.
Another property of the screen object, which you will be using in an example later, is the colorDepth property. This tells you the number of bits used for colors on the client's screen.
Along with the window object, the document object is probably one of the most important and commonly used objects in the BOM. Via this object you can gain access to the HTML elements, their properties and methods inside your page.
Unfortunately, it's here, at the document object, that browsers can differ greatly. This chapter concentrates on the properties and methods that are common to all browsers. More advanced manipulation of the document object will appear in Chapter 12.
The document object has a number of properties associated with it, which are also array-like structures called collections. The main collections are the forms, images, and links collections. IE supports a number of other collection properties, such as the all collection property, which is an array of all the elements represented by objects in the page. However, you'll be concentrating on using objects that have cross-browser support, so that you are not limiting your web pages to just one browser.
You'll be looking at the images and links collections shortly. A third collection, the forms collection, will be one of the topics of the next chapter when you look at forms in web browsers. First, though, you'll look at a nice, simple example of how to use the document object's methods and properties.
You've already come across some of the document object's properties and methods, for example the write() method and the bgColor property.
As you know, you can insert an image into an HTML page using the following tag:
<img alt="USA" name="myImage" src="usa.gif" />
The browser makes this image available for you to manipulate with JavaScript by creating an img object for it with the name myImage. In fact, each image on your page has an img object created for it.
Each of the img objects in a page is stored in the images collection, which is a property of the document object. You use this, and other collections, as you would an array. The first image on the page is found in the element document.images[0], the second in document.images[1], and so on.
If you want to, you can assign a variable to reference an img object in the images collection. It can make code easier to read. For example, the following code assigns a reference to the img object at index position 1 to the myImage2 variable:
var myImage2 = document.images[1];
Now you can write myImage2 instead of document.images[1] in your code, with exactly the same effect.
You can also access img objects in the images collection by name. For example, the img object created by the <img/> element, which has the name myImage, can be accessed in the document object's images collection property like this:
document.images["myImage"]
Because the document.images property is a collection, it has the properties similar to the native JavaScript Array type, such as the length property. For example, if you want to know how many images there are on the page, the code document.images.length will tell you.
For each hyperlink element <a/> defined with an href attribute, the browser creates an a object. The most important property of the a object is the href property, corresponding to the href attribute of the tag. Using this, you can find out where the link points to, and you can change this even after the page has loaded.
The collection of all a objects in a page is contained within the links collection, much as the img objects are contained in the images collection, as you saw earlier.
There's no doubt that JavaScript is a useful tool in web programming. As you've seen thus far, it's capable of limited data processing. In most web applications, however, data processing is typically relegated to the server, as it is better suited for that task. The user uses the web application through the browser, and as such, the browser is responsive to the user's actions. Wouldn't it be great if you could execute code for a specific user action? Well, you can with events.
Events occur when something in particular happens. For example, the user clicking on the page, clicking on a hyperlink, or moving the mouse pointer over some text all cause events to occur. Another example, which is used quite frequently, is the load event for the page: the window raises (or fires) a notification when the page is completely loaded in the browser.
Why should you be interested in events?
Take as an example the situation in which you want to make a menu pop up when the user clicks anywhere in your web page. Assuming that you can write a function that will make the pop-up menu appear, how do you know when to make it appear, or in other words, when to call the function? You somehow need to intercept the event of the user clicking in the document, and make sure your function is called when that event occurs.
To do this, you need to use something called an event handler or listener. You associate this with the code that you want to execute when the event occurs. This provides you with a way of intercepting events and making your code execute when they have occurred. You will find that adding an event handler to your code is often known as "connecting your code to the event." It's a bit like setting an alarm clock — you set the clock to make a ringing noise when a certain event happens. With alarm clocks, the event is when a certain time is reached.
Chapter 5 introduced objects defined by their methods and properties. However, objects also have events associated with them. This was not mentioned before, because native JavaScript objects do not have these events, but the objects of the BOM (and Document Object Model, or DOM, which you'll see in Chapter 12) do.
Event handlers are made up of the word on and the event that they will handle. For example, the click event has the onclick event handler, and the load event has the onload event handler.
A number of ways exist to connect your code to an event using event handlers. In this chapter you'll look at two of the easiest ways to add events, ways that have been around a very long time and are supported even by older browsers, as well as by current ones. In Chapter 12 you're going to look at newer and standards-friendly ways of adding events.
The first and most common method is to add the event handler's name and the code you want to execute to the HTML element's attributes.
Let's create a simple HTML page with a single hyperlink, given by the element <a/>. Associated to this element is the a object. One of the events the a object has is the click event. The click event fires, not surprisingly, when the user clicks the hyperlink.
<!DOCTYPE html PUBLIC "-//W3C//DTD XHTML 1.0 Strict//EN"
    "http://www.w3.org/TR/xhtml1/DTD/xhtml1-strict.dtd">

<html xmlns="http://www.w3.org/1999/xhtml">
<head>
<title>Connecting Events Using HTML Attributes</title>
</head>
<body>
<a href="somepage.htm" name="linkSomePage">
Click Me
</a>
</body>
</html>As it stands, this page does nothing a normal hyperlink doesn't do. You click it, and it navigates the window to another page, called somepage.htm, which would need to be created. There's been no event handler added to the link — yet!
As mentioned earlier, one very common and easy way of connecting the event to your code is to add it directly to the opening tag of the element object whose event you are capturing. In this case, it's the click event of the a object, as defined by the <a/> element. On clicking the link, you want to capture the event and connect it to your code. You need to add the event handler, in this case onclick, as an attribute to the opening <a> tag. You set the value of the attribute to the code you want to have executed when the event occurs.
Let's rewrite the opening <a> tag to do this as follows:
<a href="somepage.htm" name="linkSomePage" onclick="alert('You Clicked?')">
Click Me
</a>This code adds onclick="alert('You Clicked?')" to the definition of the opening <a> tag. Now, when the link is clicked, you see an alert box. After this, the hyperlink does its usual stuff and takes you to the page defined in the href attribute.
This is fine if you have only one line of code to connect to the event handler, but what if you want a number of lines to execute when the link is clicked?
Well, all you need to do is define the function you want to execute and call it in the onclick code. Let's do that now.
<!DOCTYPE html PUBLIC "-//W3C//DTD XHTML 1.0 Strict//EN"
    "http://www.w3.org/TR/xhtml1/DTD/xhtml1-strict.dtd">

<html xmlns="http://www.w3.org/1999/xhtml">
<head>
<title>Connecting Events using HTML Attributes</title>
</head>
<body>
<script type="text/javascript">
function linkSomePage_onclick()
{
alert('You Clicked?'),
return true;
}
</script><a href="somepage.htm" name="linkSomePage"
onclick="return linkSomePage_onclick()">
Click Me
</a>
</body>
</html>Within the script block, you have created a standard function, and given it a descriptive name to help you when reading the code. Here we're using ObjectName_event()as the function name. That way you can instantly see what object on the page this relates to and which event is being connected to. So, in the preceding example, the function is called linkSomePage_onclick(), because you are referring to the onclick event handler for the a object with name linkSomePage. Note that this naming convention is simply something created by your authors; it's not compulsory, and you can use whatever convention you prefer as long as you are consistent.
The onclick attribute is now connected to some code that calls the function linkSomePage_onclick(). Therefore, when the user clicks the hyperlink, this function will be executed.
You'll also see that the function returns a value, true in this case. Also, where you define your onclick attribute, you return the return value of the function by using the return statement before the function name. Why do this?
The value returned by onclick="return linkSomePage_onclick()" is used by JavaScript to decide whether the normal action of the link — that is, going to a new page — should occur. If you return true, the action continues, and you go to somepage.htm. If you return false, the normal chain of events (that is, going to somepage.htm) does not happen. You say that the action associated with the event is canceled. Try changing the function to this:
function linkSomePage_onclick()
{
    alert("This link is going nowhere");
    return false;
}
Now you'll find that you just get a message, and no attempt is made to go to somepage.htm.
Not all objects and their events make use of the return value, so sometimes it's redundant. Also, it's not always the case that returning false cancels the action. For reasons of browser history rather than logic, it's sometimes true that cancels the action. Generally speaking, it's best to return true and deal with the exceptions as you find them.
Some events are not directly linked with the user's actions as such. For example, the window object has the load event, which fires when a page is loaded, and the unload event, which fires when the page is unloaded (that is, when the user either closes the browser or moves to another page).
Event handlers for the window object actually go inside the opening <body> tag. For example, to add an event handler for the load and unload events, you'd write the following:
<body onload="myOnLoadfunction()"
 onunload="myOnUnloadFunction()">
Now let's look at the second way to connect to events.
With this method, you first need to define the function that will be executed when the event occurs. Then you need to set that object's event handler property to the function you defined.
This is illustrated in the following example:
<!DOCTYPE html PUBLIC "-//W3C//DTD XHTML 1.0 Strict//EN"
    "http://www.w3.org/TR/xhtml1/DTD/xhtml1-strict.dtd">

<html xmlns="http://www.w3.org/1999/xhtml">
<head>
    <title>Chapter 6: Example 4</title>
</head>
<body>
<script type="text/javascript">
function linkSomePage_onclick()
{
    alert('This link is going nowhere'),
    return false;
}
</script>
<a href="somepage.htm" name="linkSomePage">
   Click Me
</a>
<script type="text/javascript">
 window.document.links[0].onclick = linkSomePage_onclick;
</script>
</body>
</html>
Save this as ch6_examp4.htm.
You define the function linkSomePage_onclick(), much as you did previously. As before, you can return a value indicating whether you want the normal action of that object to happen.
Next you have the <a/> element, whose object's event you are connecting to. You'll notice there is no mention of the event handler or the function within the attributes of the tag.
The connection is made between the object's event and the function on the final lines of script, as shown in the following code:
<script type="text/javascript">
   document.links[0].onclick = linkSomePage_onclick;
</script>
As you saw before, document.links[0] returns the a object corresponding to the first link in your web page, which is your linkSomePage hyperlink. You set this object's onclick property to reference your function — this makes the connection between the object's event handler and your function. Note that no parentheses are added after the function name. Now whenever you click the link, your function gets executed.
The first method of connecting code to events is easier, so why would you ever want to use the second?
Perhaps the most common situation in which you would want to do this is one in which you want to capture an event for which there is no HTML element to write your event handler as an attribute. It is also useful if you want the code attached to an event handler to be changed dynamically.
Try It Out: Displaying a Random Image when the Page Loads
Let's look at another example in which you connect to a hyperlink's click event to randomly change the image loaded in a page.
<!DOCTYPE html PUBLIC "-//W3C//DTD XHTML 1.0 Strict//EN"
"http://www.w3.org/TR/xhtml1/DTD/xhtml1-strict.dtd">

<html xmlns="http://www.w3.org/1999/xhtml">
<head>
    <title>Chapter 6: Example 5</title>
    <script type="text/javascript">
    var myImages = new Array("usa.gif","canada.gif","jamaica.gif","mexico.gif");

    function changeImg(that)
    {
        var newImgNumber = Math.round(Math.random() * 3);

        while (that.src.indexOf(myImages[newImgNumber]) != −1)
        {
            newImgNumber = Math.round(Math.random() * 3);
        }

        that.src = myImages[newImgNumber];

        return false;
    }
    </script>
</head>
<body>
    <img name="img0" src="usa.gif" border="0"
        onclick="return changeImg(this)" />

    <img name="img1" src="mexico.gif" border="0"
        onclick="return changeImg(this)" />
</body>
</html>
Save the page as ch6_examp5.htm. Again, you will need four image files for the example, which you can create or retrieve from the code download available with this book.
Load the page into your browser. You should see a page like that shown in Figure 6-3.
If you click an image, you'll see it change to a different image, which is selected randomly.

The first line in the script block at the top of the page defines a variable with page-level scope. This is an array that contains your list of image sources.
var myImages = new Array("usa.gif","canada.gif","jamaica.gif","mexico.gif");Next you have the changeImg() function, which will be connected to the onclick event handler of the <img/> elements defined in the page. You are using the same function for both images' onclick event handlers and indeed can connect one function to as many event handlers as you like. This function accepts one parameter called that. It is called that because you pass the this keyword to the function which gives you immediate access to the img object you click. You can actually name the parameter whatever you want, but most developers use the word "that" when it references this.
In the first line of the function, you set the newImgNumber variable to a random integer between 0 and 3:
function changeImg(that)
{
    var newImgNumber = Math.round(Math.random() * 3);
The Math.random() method provides a random number between 0 and 1, and you multiply that by three to get a number between 0 and 3. This number is rounded to the nearest whole number (0, 1, 2, or 3) by means of Math.round(). This integer will provide the index for the image src that you will select from the myImages array.
The next lines are a while loop, the purpose of which is to ensure that you don't select the same image as the current one. If the string contained in myImages[newImgNumber] is found inside the src property of the current image, you know it's the same and that you need to get another random number. You keep looping until you get a new image, at which point myImages[newImgNumber] will not be found in the existing src and −1 will be returned by the indexOf() method, breaking out of the loop.
while (imgClicked.src.indexOf(myImages[newImgNumber]) != −1)
    {
        newImgNumber = Math.round(Math.random() * 3);
    }
Next, you set the src property of the img object to the new value contained in your myImages array. You return false to stop the link from trying to navigate to another page; remember that the HTML link is only there to provide a means of capturing an onclick event handler.
that.src = myImages[newImgNumber];

    return false;
}
Now you connect the onclick event of the first <img/> element to the changeImg() function:
<img name=img0 src="usa.gif" border="0" onclick="return changeImg(this)">
And now to the second <img/> element:
<img name="img1" src="mexico.gif" border="0" onclick="return changeImg(this)">
Passing this in the changeImg() function gives the function direct access to this <img/> element's corresponding object. When you pass this to an HTML element's attribute event handler, the corresponding object of that element is passed to the function. It's a nice, clean way of accessing the element's object in your JavaScript code.
Events are an important matter for web developers — your authors wager that a good bulk of your code will handle events. Chapter 12 covers events again, but let's switch gears to another topic: the user's browser.
Many browsers, versions of those browsers, and operating systems are out there on the Internet, each with its own version of the BOM and its own particular quirks. It's therefore important that you make sure your pages will work correctly on all browsers, or at least degrade gracefully, such as by displaying a message suggesting that the user upgrade their browser.
Although you can go a long way with cross-browser-compatible code, there may come a time when you want to add extra features that only one browser supports. The solution is to write script that determines the user's browser and executes script that is compatible with the browser.
You can check for browser details in two main ways. The first is to see if the object and property you use in your code are actually available in the user's browser. Let's say for example that your code relies on the all collection of the document object in Internet Explorer (IE). If you write
if (window.all)
{
// our code using the document.all collection }
the if statement's condition will evaluate to true if the property returns a valid value. If the property is not supported, its value will be undefined, and the if statement will evaluate to false.
To check whether a particular method is supported, you can do the following:
if (document.getElementById)
{
    // code using document.getElementById()
}
else
{
    // code for browsers that do not have that method
}
You've "tested" the existence of the method as you did with properties. Just remember not to include the opening or closing parentheses after the method even if it normally has a number of parameters. The getElementById method, for example, has one parameter, and you'll look at it in Chapter 12.
Functions (and methods) are actually objects in the JavaScript language. While this advanced topic isn't covered in this book, Professional JavaScript for Web Developers by Nicholas Zakas (published by Wrox) provides an in-depth discussion on the topic.
The next example shows how to use object checking to ensure that you execute the right code for the right browser; this technique is not foolproof but can be very useful.
Sometimes people switch off JavaScript in their browsers, or use a browser that doesn't support JavaScript, though that's quite rare these days. To cover this situation, you can use the <noscript/> element. Any HTML inside opening and closing tags will be displayed only to browsers that don't support JavaScript or on which JavaScript has been disabled:
<!DOCTYPE html PUBLIC "-//W3C//DTD XHTML 1.0 Strict//EN"
    "http://www.w3.org/TR/xhtml1/DTD/xhtml1-strict.dtd">

<html xmlns="http://www.w3.org/1999/xhtml">
<head>
    <title>No Script</title>
</head>
<body>
<noscript>
    This website requires JavaScript to be enabled.
</noscript>
</body>
<html>The second method of checking browser details is using the navigator object property of the window object. In particular, you use the appName and userAgent properties of the navigator object. The main problem with this method is that a less common browser may well declare itself to be a particular version of one of the major browsers but not actually support all the JavaScript or BOM objects, properties, or methods of that browser. Therefore this method of "browser sniffing" has fallen out of favor and is not the recommended way of checking for compatibility. It's really a last resort when all other methods have failed, such as when two different browsers support the same object and property but implement them so that they work in two different ways. Object checking wouldn't help you in that circumstance, so you'd have to fall back on using the navigator object.
The appName property returns the model of the browser, such as "Microsoft Internet Explorer" for IE, "Opera" for Opera, or "Netscape" for Firefox, Safari, and Chrome.
The userAgent property returns a string containing various bits of information, such as the browser version, operating system, and browser model. However, the value returned by this property varies from browser to browser, so you have to be very, very careful when using it. For example, the browser's version is embedded in different locations of the string.
You've covered a lot in this chapter, but now you have all the grounding you need to move on to more useful things such as forms and user input and later to more advanced areas of text and date manipulation.
You turned your attention to the browser, the environment in which JavaScript exists. Just as JavaScript has native objects, so do web browsers. The objects within the web browser, and the hierarchy they are organized in, are described by something called the Browser Object Model (BOM). This is essentially a map of a browser's objects. Using it, you can navigate your way around each of the objects made available by the browser, together with their properties, methods, and events.
The first of the main objects you looked at was the
windowobject. This sits at the very top of the BOM's hierarchy. Thewindowobject contains a number of important sub-objects, including thelocationobject, thenavigatorobject, thehistoryobject, thescreenobject, and thedocumentobject.The
locationobject contains information about the current page's location, such as its file name, the server hosting the page, and the protocol used. Each of these is a property of thelocationobject. Some properties are read-only, but others, such as thehrefproperty, not only enable us to find the location of the page but can be changed so that we can navigate the page to a new location.The
historyobject is a record of all the pages the user has visited since opening his or her browser. Sometimes pages are not noted (for example, when thelocationobject'sreplace()method is used for navigation). You can move the browser forward and backward in the history stack and discover what pages the user has visited.The
navigatorobject represents the browser itself and contains useful details of what type of browser, version, and operating system the user has. These details enable you to write pages dealing with various types of browsers, even where they may be incompatible.The
screenobject contains information about the display capabilities of the user's computer.The
documentobject is one of the most important objects. It's an object representation of your page and contains all the elements, also represented by objects, within that page. The differences between the various browsers are particularly prominent here, but there are similarities between the browsers that enable you to write cross-browser code.The
documentobject contains three properties that are actually collections. These are thelinks,images, andformscollections. Each contains all the objects created by the<a/>,<img/>, and<form/>elements on the page, and it's a way of accessing those elements.The
imagescollection contains animgobject for each<img/>element on the page. You found that even after the page has loaded, you can change the properties of images. For example, you can make the image change when clicked. The same principles for using theimagescollection apply to thelinkscollection.You next saw that BOM objects have events as well as methods and properties. You handle these events in JavaScript by using event handlers, which you connect to code that you want to have executed when the event occurs. The events available for use depend on the object you are dealing with.
Connecting a function that you have written to an event handler is simply a matter of adding an attribute to the element corresponding to the particular object you are interested in. The attribute has the name of the event handler you want to capture and the value of the function you want to connect to it.
In some instances, such as for the
documentobject, a second way of connecting event handlers to code is necessary. Setting the object's property with the name of the event handler to your function produces the same effect as if you did it using the event handler as an attribute.In some instances, returning values from event functions enables you to cancel the action associated with the event. For example, to stop a clicked link from navigating to a page, you return
falsefrom the event handler's code.Finally, you looked at how you can check what type of browser the users have so that you can make sure the users see only those pages or parts of a page that their browser is compatible with. The
navigatorobject provides you with the details you need, in particular theappNameanduserAgentproperties. You can also check specific BOM properties to see if they are supported before using them. If a browser doesn't support a specific property needed for your code to work, you can either write alternative code or let users know to upgrade their browsers.
That's it for this chapter. In the next chapter, you move on to more exciting form scripting, where you can add various controls to your page to help you gather information from the user.
Suggested solutions to these questions can be found in Appendix A. Exercise 1 Questions
Create a page with a number of links. Then write code that fires on the window load event, displaying the href of each of the links on the page. (Hint: Remember that event handlers begin with on.)
Create two pages, one called
ieonly.htmand the other callednotieonly.htm. Each page should have a heading telling you what page is loaded. For example:<H2>Welcome to the Internet Explorer only page</H2>
Using the functions for checking browser type, connect to the
windowobject'sonloadevent handler and detect what browser the user has. Then, if it's the wrong page for that browser, redirect to the other page.Insert an image in the page with the
<img/>element. When the mouse pointer rolls over the image, it should switch to a different image. When the mouse pointer rolls out (leaves the image), it should swap back again. (Hint: These events aremouseoverandmouseout.)