So far, you've seen how to use JavaScript to get user input, perform calculations and tasks with that input, and write the results to a web page. However, a pocket calculator can do all this, so what is it that makes computers different? That is to say, what gives computers the appearance of having intelligence? The answer is the capability to make decisions based on information gathered.
How will decision-making help you in creating web sites? In the last chapter you wrote some code that converted temperature in degrees Fahrenheit to centigrade. You obtained the degrees Fahrenheit from the user using the prompt() function. This worked fine if the user entered a valid number, such as 50. If, however, the user entered something invalid for the Fahrenheit temperature, such as the string aaa, you would find that your code no longer works as expected. Now, if you had some decision-making capabilities in your program, you could check to see if what the user has entered is valid. If it is, you can do the calculation, and if it isn't, you can tell the user why and ask him to enter a valid number.
Validation of user input is probably one of the most common uses of decision making in JavaScript, but it's far from being the only use.
In this chapter you'll look at how decision making is implemented in JavaScript and how you can use it to make your code smarter.
All programming languages enable you to make decisions — that is, they enable the program to follow a certain course of action depending on whether a particular condition is met. This is what gives programming languages their intelligence.
For example, in a situation in which you use JavaScript code that is compatible only with version 4 or later browsers, the condition could be that the user is using a version 4 or later browser. If you discover that this condition is not met, you could direct him to a set of pages that are compatible with earlier browsers.
Conditions are comparisons between variables and data, such as the following:
Is A bigger than B?
Is X equal to Y?
Is M not equal to N?
For example, if the variable browserVersion held the version of the browser that the user was using, the condition would be this:
Is
browserVersiongreater than or equal to 4?
You'll notice that all of these questions have a yes or no answer — that is, they are Boolean based and can only evaluate to true or false. How do you use this to create decision-making capabilities in your code? You get the browser to test for whether the condition is true. If (and only if) it is true, you execute a particular section of code.
Look at another example. Recall from Chapter 1 the natural English instructions used to demonstrate how code flows. One of these instructions for making a cup of coffee is:
Has the kettle boiled? If so, then pour water into cup; otherwise, continue to wait.
This is an example of making a decision. The condition in this instruction is "Has the kettle boiled?" It has a true or false answer. If the answer is true, you pour the water into the cup. If it isn't true, you continue to wait.
In JavaScript, you can change the flow of the code's execution depending on whether a condition is true or false, using an if statement or a switch statement. You will look at these shortly, but first we need to introduce some new operators that are essential for the definition of conditions — comparison operators.
In Chapter 2 you saw how mathematical functions, such as addition and division, were represented by symbols, such as plus (+) and forward slash (/), called operators. You also saw that if you want to give a variable a value, you can assign to it a value or the result of a calculation using the equals sign (=), termed the assignment operator.
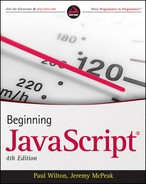
Decision making also has its own operators, which enable you to test conditions. Comparison operators, just like the mathematical operators you saw in the last chapter, have a left-hand side (LHS) and a right-hand side (RHS), and the comparison is made between the two. The technical terms for these are the left operand and the right operand. For example, the less-than operator, with the symbol <, is a comparison operator. You could write 23<45, which translates as "Is 23 less than 45?" Here, the answer would be true (see Figure 3-1).
There are other comparison operators, the more useful of which are summarized in the following table:
Operator Symbol | Purpose |
|---|---|
| Tests if LHS is equal to RHS |
| Tests if LHS is less than RHS |
| Tests if LHS is greater than RHS |
| Tests if LHS is less than or equal to RHS |
| Tests if LHS is greater than or equal to RHS |
| Tests if LHS is not equal to RHS |
You'll see these comparison operators in use in the next section when you look at the if statement.
Recall from Chapter 2 that operators have an order of precedence. This applies also to the comparison operators. The == and != comparison operators have the lowest order of precedence, and the rest of the comparison operators, <, >, <=, and >=, have an equal precedence.
All of these comparison operators have a precedence that is below operators, such as +, -, *, and /. This means that if you make a comparison such as 3*5>2*5, the multiplication calculations are worked out first, before their results are compared. However, in these circumstances, it's both safer and clearer if you wrap the calculations on either side inside parentheses, for example, (3*5)>(2*5). As a general rule, it's a good idea to use parentheses to ensure that the precedence is clear, or you may find yourself surprised by the outcome.
One very important point to mention is the ease with which the assignment operator (=) and the comparison operator (==) can be mixed up. Remember that the = operator assigns a value to a variable and that the == operator compares the value of two variables. Even when you have this idea clear, it's amazingly easy to put one equals sign where you meant to put two.
You can store the results of a comparison in a variable, as shown in the following example:
var age = prompt("Enter age:", "");
var isOverSixty = parseInt(age) > 60;
  document.write("Older than 60: " + isOverSixty);
Here you obtain the user's age using the prompt() function. This returns, as a string, whatever value the user enters. You then convert that to a number using the parseInt() function you saw in the previous chapter and use the greater-than operator to see if it's greater than 60. The result (either true or false) of the comparison will be stored in the variable isOverSixty.
If the user enters 35, the document.write() on the final line will write this to the page:
Older than 60: false
If the user entered 61, this will be displayed:
Older than 60: true
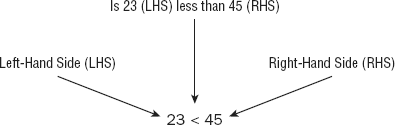
The if statement is one you'll find yourself using in almost every program that is more than a couple of lines long. It works very much as it does in the English language. For example, you might say in English, "If the room temperature is more than 80 degrees Fahrenheit, then I'll turn the air conditioning on." In JavaScript, this would translate into something like this:
if (roomTemperature > 80)
{
   roomTemperature = roomTemperature - 10;
}
How does this work? See Figure 3-2.
Notice that the test condition is placed in parentheses and follows the if keyword. Also, note that there is no semicolon at the end of this line. The code to be executed if the condition is true is placed in curly braces on the line after the condition, and each of these lines of code does end with a semicolon.
The curly braces, {}, have a special purpose in JavaScript: They mark out a block of code. Marking out lines of code as belonging to a single block means that JavaScript will treat them all as one piece of code. If the condition of an if statement is true, JavaScript executes the next line or block of code following the if statement. In the preceding example, the block of code has only one statement, so we could equally as well have written this:
if (roomTemperature > 80)
   roomTemperature = roomTemperature - 10;
However, if you have a number of lines of code that you want to execute, you need the braces to mark them out as a single block of code. For example, a modified version of the example with three statements of code would have to include the braces.
if (roomTemperature > 80)
{
   roomTemperature = roomTemperature - 10;
   alert("It's getting hot in here");
   alert("Air conditioning switched on");
}
A particularly easy mistake to make is to forget the braces when marking out a block of code to be executed. Instead of the code in the block being executed when the condition is true, you'll find that only the first line after the if statement is executed. However, the other lines will always be executed regardless of the outcome of the test condition. To avoid mistakes like these, it's a good idea to always use braces, even where there is only one statement. If you get into this habit, you'll be less likely to leave them out when they are actually needed.
Try It Out: The if Statement
Let's return to the temperature converter example from Chapter 2 and add some decision-making functionality.
Enter the following code and save it as
ch3_examp1.htm:<!DOCTYPE html PUBLIC "-//W3C//DTD XHTML 1.0 Transitional//EN" "http://www.w3.org/TR/xhtml1/DTD/xhtml1-transitional.dtd"> <html xmlns="http://www.w3.org/1999/xhtml"> <body> <script type="text/javascript"> var degFahren = Number(prompt("Enter the degrees Fahrenheit",32)); var degCent; degCent = 5/9 * (degFahren - 32); document.write(degFahren + "xB0 Fahrenheit is " + degCent + "xB0 centigrade<br />"); if (degCent < 0) { document.write("That's below the freezing point of water");} if (degCent == 100) document.write("That's the boiling point of water"); </script> </body> </html>Load the page into your browser and enter
32into the prompt box for the Fahrenheit value to be converted. With a value of32, neither of theifstatement's conditions will be true, so the only line written in the page will be that shown in Figure 3-3.Now reload the page and enter
31for the Fahrenheit value. This time you'll see two lines in the page, as shown in Figure 3-4.Finally, reload the page again, but this time, enter
212in the prompt box. The two lines shown in Figure 3-5 will appear in the page.
The first part of the script block in this page is taken from the example ch2_examp4.htm in Chapter 2. You declare two variables, degFahren and degCent. The variable degFahren is given an initial value obtained from the user with the prompt() function. Note the prompt() function returns a string value, which you then explicitly convert to a numeric value using the Number() function. The variable degCent is then set to the result of the calculation 5/9*(degFahren-32), which is the Fahrenheit-to-centigrade conversion calculation.
var degFahren = Number(prompt("Enter the degrees Fahrenheit",32));
var degCent;

degCent = 5/9 * (degFahren - 32);
Then you write the result of your calculation to the page.
document.write(degFahren + "xB0 Fahrenheit is " + degCent +
   "xB0 centigrade<br />");
Now comes the new code; the first of two if statements.
if (degCent < 0)
{
   document.write("That's below the freezing point of water");
}
This if statement has the condition that asks, "Is the value of the variable degCent less than zero?" If the answer is yes (true), the code inside the curly braces executes. In this case, you write a sentence to the page using document.write(). If the answer is no (false), the processing moves on to the next line after the closing brace. Also worth noting is the fact that the code inside the if statement's opening brace is indented. This is not necessary, but it is a good practice to get into because it makes your code much easier to read.
When trying out the example, you started by entering 32, so that degFahren will be initialized to 32. In this case the calculation degCent=5/9*degFahren - 32) will set degCent to 0. So the answer to the question "Is degCent less than zero?" is false, because degCent is equal to zero, not less than zero. The code inside the curly braces will be skipped and never executed. In this case, the next line to be executed will be the second if statement's condition, which we'll discuss shortly.
When you entered 31 in the prompt box, degFahren was set to 31, so the variable degCent will be -0.55555555556. So how does your if statement look now? It evaluates to "Is -0.55555555556 less than zero?" The answer this time is true, and the code inside the braces, here just a document.write() statement, executes.
Finally, when you entered 212, how did this alter the if statement? The variable degCent is set to 100 by the calculation, so the if statement now asks the question, "Is 100 less than zero?" The answer is false, and the code inside the braces will be skipped over.
In the second if statement, you evaluate the condition "Is the value of variable degCent equal to 100?"
if (degCent == 100)
   document.write("That's the boiling point of water");
There are no braces here, so if the condition is true, the only code to execute is the first line below the if statement. When you want to execute multiple lines in the case of the condition being true, braces are required.
You saw that when degFahren is 32, degCent will be 0. So your if statement will be "Is 0 equal to 100?" The answer is clearly false, and the code won't execute. Again, when you set degFahren to 31, degCent will be calculated to be -0.55555555556; "Is -0.55555555556 equal to 100?" is also false, and the code won't execute.
Finally, when degFahren is set to 212, degCent will be 100. This time the if statement is "Is 100 equal to 100?" and the answer is true, so the document.write() statement executes.
As you have seen already, one of the most common errors in JavaScript, even for experts, is using one equals sign for evaluating, rather than the necessary two. Take a look at the following code extract:
if (degCent = 100)
   document.write("That's the boiling point of water");
This condition will always evaluate to true, and the code below the if statement will always execute. Worse still, your variable degCent will be set to 100. Why? Because a single equals sign assigns values to a variable; only a double equals sign compares values. The reason an assignment always evaluates to true is that the result of the assignment expression is the value of the right-hand side expression and this is the number 100, which is then implicitly converted to a Boolean and any number besides 0 and NaN converts to true.
You should have a general idea of how to use conditions in if statements now, but how do you use a condition such as "Is degFahren greater than zero but less than 100?" There are two conditions to test here. You need to test whether degFahren is greater than zero and whether degFahren is less than 100.
JavaScript enables you to use such multiple conditions. To do this, you need to learn about three more operators: the logical operators AND, OR, and NOT. The symbols for these are listed in the following table.
Operator | Symbol |
|---|---|
|
|
|
|
|
|
Notice that the AND and OR operators are two symbols repeated: && and ||. If you type just one symbol, & or |, strange things will happen because these are special operators called bitwise operators used in binary operations — for logical operations you must always use two.
After you've learned about the three logical operators, you'll take a look at how to use them in if statements, with plenty of practical examples. So if it seems a bit confusing on first read, don't panic. All will become clear. Let's look at how each of these works, starting with the AND operator.
Recall that we talked about the left-hand side (LHS) and the right-hand side (RHS) of the operator. The same is true with the AND operator. However, now the LHS and RHS of the condition are Boolean values (usually the result of a condition).
The AND operator works very much as it does in English. For example, you might say, "If I feel cold and I have a coat, then I'll put my coat on." Here, the left-hand side of the "and" word is "Do I feel cold?" and this can be evaluated as true or false. The right-hand side is "Do I have a coat?" which again is evaluated to either true or false. If the left-hand side is true (I am cold) and the right-hand side is true (I do have a coat), then you put your coat on.
This is very similar to how the AND operator works in JavaScript. The AND operator actually produces a result, just as adding two numbers together produces a result. However, the AND operator takes two Boolean values (on its LHS and RHS) and results in another Boolean value. If the LHS and RHS conditions evaluate to true, the result will be true. In any other circumstance, the result will be false.
Following is a truth table of possible evaluations of left-hand sides and right-hand sides and the result when AND is used.
Left-Hand Side | Right-Hand Side | Result |
|---|---|---|
|
|
|
|
|
|
|
|
|
|
|
|
Although the table is, strictly speaking, true, it's worth noting that JavaScript doesn't like doing unnecessary work. Well, who does! If the left-hand side is false, even if the right-hand side does evaluate to true, it won't make any difference to the final result — it'll still be false. So to avoid wasting time, if the left-hand side is false, JavaScript doesn't even bother checking the right-hand side and just returns a result of false.
Just like AND, OR also works much as it does in English. For example, you might say that if it is raining or if it is snowing, then you'll take an umbrella. If either of the conditions "it is raining" or "it is snowing" is true, you will take an umbrella.
Again, just like AND, the OR operator acts on two Boolean values (one from its left-hand side and one from its right-hand side) and returns another Boolean value. If the left-hand side evaluates to true or the right-hand side evaluates to true, the result returned is true. Otherwise, the result is false. The following table shows the possible results.
Left-Hand Side | Right-Hand Side | Result |
|---|---|---|
|
|
|
|
|
|
|
|
|
|
|
|
As with the AND operator, JavaScript likes to avoid doing things that make no difference to the final result. If the left-hand side is true, then whether the right-hand side is true or false makes no difference to the final result — it'll still be true. So, to avoid work, if the left-hand side is true, the right-hand side is not evaluated, and JavaScript simply returns true. The end result is the same — the only difference is in how JavaScript arrives at the conclusion. However, it does mean you should not rely on the right-hand side of the OR operator to be executed.
In English, we might say, "If I'm not hot, then I'll eat soup." The condition being evaluated is whether we're hot. The result is true or false, but in this example we act (eat soup) if the result is false.
However, JavaScript is used to executing code only if a condition is true. So if you want a false condition to cause code to execute, you need to switch that false value to true (and any true value to false). That way you can trick JavaScript into executing code after a false condition.
You do this using the NOT operator. This operator reverses the logic of a result; it takes one Boolean value and changes it to the other Boolean value. So it changes true to false and false to true. This is sometimes called negation.
To use the NOT operator, you put the condition you want reversed in parentheses and put the ! symbol in front of the parentheses. For example:
if (!(degCent < 100))
{
   // Some code
}
Any code within the braces will be executed only if the condition degCent<100 is false.
The following table details the possible results when using NOT.
Right-Hand Side | Result |
|---|---|
|
|
|
|
The previous section started by asking how you could use the condition "Is degFahren greater than zero but less than 100?" One way of doing this would be to use two if statements, one nested inside another. Nested simply means that there is an outer if statement, and inside this an inner if statement. If the condition for the outer if statement is true, then (and only then) the nested inner if statement's condition will be tested.
Using nested if statements, your code would be:
if (degCent < 100)
{
   if (degCent > 0)
   {
      document.write("degCent is between 0 and 100");
   }
}
This would work, but it's a little verbose and can be quite confusing. JavaScript offers a better alternative — using multiple conditions inside the condition part of the if statement. The multiple conditions are strung together with the logical operators you just looked at. So the preceding code could be rewritten like this:
if (degCent > 0 && degCent < 100)
{
   document.write("degCent is between 0 and 100");
}
The if statement's condition first evaluates whether degCent is greater than zero. If that is true, the code goes on to evaluate whether degCent is less than 100. Only if both of these conditions are true will the document.write() code line execute.
Try It Out: Multiple Conditions
This example demonstrates multi-condition if statements using the AND, OR, and NOT operators. Type the following code, and save it as ch3_examp2.htm:
<!DOCTYPE html PUBLIC "-//W3C//DTD XHTML 1.0 Transitional//EN"
 "http://www.w3.org/TR/xhtml1/DTD/xhtml1-transitional.dtd">
<html xmlns="http://www.w3.org/1999/xhtml">
<body>

<script type="text/javascript">

var myAge = Number(prompt("Enter your age",30));

if (myAge >= 0 && myAge <= 10)
{
   document.write("myAge is between 0 and 10<br />");
}

if ( !(myAge >= 0 && myAge <= 10) )
{
   document.write("myAge is NOT between 0 and 10<br />");
}

if ( myAge >= 80 || myAge <= 10 )
{
   document.write("myAge is 80 or above OR 10 or below<br />");
}

if ( (myAge >= 30 && myAge <= 39) || (myAge >= 80 && myAge <= 89) )
{
   document.write("myAge is between 30 and 39 or myAge is between 80 and 89");
}

</script>

</body>
</html>
When you load it into your browser, a prompt box should appear. Enter the value 30, then press Return, and the lines shown in Figure 3-6 are written to the web page.
The script block starts by defining the variable myAge and initializing it to the value entered by the user in the prompt box and converted to a number.
var myAge = Number(prompt("Enter your age",30));After this are four if statements, each using multiple conditions. You'll look at each in detail in turn.
The easiest way to work out what multiple conditions are doing is to split them up into smaller pieces and then evaluate the combined result. In this example you have entered the value 30, which has been stored in the variable myAge. You'll substitute this value into the conditions to see how they work.
Here's the first if statement:
if (myAge >= 0 && myAge <= 10)
{
   document.write("myAge is between 0 and 10<br />");
}
The first if statement is asking the question "Is myAge between 0 and 10?" You'll take the LHS of the condition first, substituting your particular value for myAge. The LHS asks "Is 30 greater than or equal to 0?" The answer is true. The question posed by the RHS condition is "Is 30 less than or equal to 10?" The answer is false. These two halves of the condition are joined using &&, which indicates the AND operator. Using the AND results table shown earlier, you can see that if LHS is true and RHS is false, you have an overall result of false. So the end result of the condition for the if statement is false, and the code inside the braces won't execute.
Let's move on to the second if statement.
if ( !(myAge >= 0 && myAge <= 10) )
{
   document.write("myAge is NOT between 0 and 10<br />");
}
The second if statement is posing the question "Is myAge not between 0 and 10?" Its condition is similar to that of the first if statement, but with one small difference: You have enclosed the condition inside parentheses and put the NOT operator (!) in front.
The part of the condition inside the parentheses is evaluated and, as before, produces the same result — false. However, the NOT operator reverses the result and makes it true. Because the if statement's condition is true, the code inside the braces will execute this time, causing a document.write() to write a response to the page.
What about the third if statement?
if ( myAge >= 80 || myAge <= 10 )
{
   document.write("myAge is either 80 and above OR 10 or below<br />");
}
The third if statement asks, "Is myAge greater than or equal to 80, or less than or equal to 10?" Taking the LHS condition first — "Is 30 greater than or equal to 80?" — the answer is false. The answer to the RHS condition — "Is 30 less than or equal to 10?" — is again false. These two halves of the condition are combined using ||, which indicates the OR operator. Looking at the OR result table earlier in this section, you see that false OR false produces a result of false. So again the if statement's condition evaluates to false, and the code within the curly braces does not execute.
The final if statement is a little more complex.
if ( (myAge >= 30 && myAge <= 39) || (myAge >= 80 && myAge <= 89) )
{
   document.write("myAge is between 30 and 39 " +
                 "or myAge is between 80 and 89<br />");
}
It asks the question, "Is myAge between 30 and 39 or between 80 and 89?" Let's break the condition down into its component parts. There is a left-hand-side and a right-hand-side condition, combined by means of an OR operator. However, the LHS and RHS themselves have an LHS and RHS each, which are combined using AND operators. Notice how parentheses are used to tell JavaScript which parts of the condition to evaluate first, just as you would do with numbers in a mathematical calculation.
Let's look at the LHS of the condition first, namely (myAge>=30&&myAge><=39). By putting the condition into parentheses, you ensure that it's treated as a single condition; no matter how many conditions are inside the parentheses, it only produces a single result, either true or false. Breaking down the conditions in the parentheses, you have "Is 30 greater than or equal to 30?" with a result of true, and "Is 30 less than or equal to 39?" again with a result of true. From the AND table, you know true AND true produces a result of true.
Now let's look at the RHS of the condition, namely (myAge>=80&&myAge<=89). Again breaking the condition down, you see that the LHS asks, "Is 30 greater than or equal to 80?" which gives a false result, and the RHS asks, "Is 30 less than or equal to 89?" which gives a true result. You know that false AND true gives a false result.
Now you can think of your if statement's condition as looking like (true||false). Looking at the OR results table, you can see that true OR false gives a result of true, so the code within the braces following the if statement will execute, and a line will be written to the page.
However, remember that JavaScript does not evaluate conditions where they won't affect the final result, and the preceding condition is one of those situations. The LHS of the condition evaluated to true. After that, it does not matter if the RHS of the condition is true or false because only one of the conditions in an OR operation needs to be true for a result of true. Thus JavaScript does not actually evaluate the RHS of the condition. We did so simply for demonstration purposes.
As you have seen, the easiest way to approach understanding or creating multiple conditions is to break them down into the smallest logical chunks. You'll find that with experience, you will do this almost without thinking, unless you have a particularly tricky condition to evaluate.
Although using multiple conditions is often better than using multiple if statements, there are times when it makes your code harder to read and therefore harder to understand and debug. It's possible to have 10, 20, or more than 100 conditions inside your if statement, but can you imagine trying to read an if statement with even 10 conditions? If you feel that your multiple conditions are getting too complex, break them down into smaller logical chunks.
For example, imagine you want to execute some code if myAge is in the ranges 30-39, 80-89, or 100-115, using different code in each case. You could write the statement like so:
if ( (myAge >= 30 && myAge <= 39) || (myAge >= 80 && myAge <= 89) ||
     (myAge >= 100 && myAge <= 115) )
{
  document.write("myAge is between 30 and 39 " +
                 "or myAge is between 80 " +
                  "and 89 or myAge is between 100 and 115");
}
There's nothing wrong with this, but it is starting to get a little long and difficult to read. Instead, you could create another if statement for the code executed for the 100-115 range.
Imagine a situation where you want some code to execute if a certain condition is true and some other code to execute if it is false. You can achieve this by having two if statements, as shown in the following example:
if (myAge >= 0 && myAge <= 10)
{
   document.write("myAge is between 0 and 10");
}

if ( !(myAge >= 0 && myAge <= 10) )
{
   document.write("myAge is NOT between 0 and 10");
}
The first if statement tests whether myAge is between 0 and 10, and the second for the situation where myAge is not between 0 and 10. However, JavaScript provides an easier way of achieving this: with an else statement. Again, the use of the word else is similar to its use in the English language. You might say, "If it is raining, I will take an umbrella; otherwise I will take a sun hat." In JavaScript you can say if the condition is true, then execute one block of code; else execute an alternative block. Rewriting the preceding code using this technique, you would have the following:
if (myAge >= 0 && myAge <= 10)
{
   document.write("myAge is between 0 and 10");
}
else
{
   document.write("myAge is NOT between 0 and 10");
}
Writing the code like this makes it simpler and therefore easier to read. Plus it also saves JavaScript from testing a condition to which you already know the answer.
You could also include another if statement with the else statement. For example
if (myAge >= 0 && myAge <= 10)
{
   document.write("myAge is between 0 and 10");
}
else if ( (myAge >= 30 && myAge <= 39) || (myAge >= 80 && myAge <= 89) )
{
   document.write("myAge is between 30 and 39 " +
                  "or myAge is between 80 and 89");
}
else
{
   document.write("myAge is NOT between 0 and 10, " +
                  "nor is it between 30 and 39, nor is it between 80 and 89");
}
The first if statement checks whether myAge is between 0 and 10 and executes some code if that's true. If it's false, an else if statement checks if myAge is between 30 and 39 or 80 and 89, and executes some other code if either of those conditions is true. Failing that, you have a final else statement, which catches the situation in which the value of myAge did not trigger true in any of the earlier if conditions.
When using if and else if, you need to be extra careful with your curly braces to ensure that the if and else if statements start and stop where you expect, and you don't end up with an else that doesn't belong to the right if. This is quite tricky to describe with words — it's easier to see what we mean with an example.
if (myAge >= 0 && myAge <= 10)
{
document.write("myAge is between 0 and 10");
if (myAge == 5)
{
document.write("You're 5 years old");
}
else
{
document.write("myAge is NOT between 0 and 10");
}
Notice that we haven't indented the code. Although this does not matter to JavaScript, it does make the code more difficult for humans to read and hides the missing curly brace that should be before the final else statement.
Correctly formatted and with the missing bracket inserted, the code looks like this:
if (myAge >= 0 && myAge <= 10)
{
   document.write("myAge is between 0 and 10<br />");
   if (myAge == 5)
   {
      document.write("You're 5 years old");
   }
}
else
{
document.write("myAge is NOT between 0 and 10");
}As you can see, the code is working now; it is also a lot easier to see which code is part of which if block.
Up to this point, you have been looking exclusively at using comparison operators with numbers. However, they work just as well with strings. All that's been said and done with numbers applies to strings, but with one important difference. You are now comparing data alphabetically rather than numerically, so there are a few traps to watch out for.
In the following code, you compare the variable myName, which contains the string "Paul", with the string literal "Paul".
var myName ="Paul";
if (myName == "Paul")
{
   alert("myName is Paul");
}
How does JavaScript deal with this? Well, it goes through each letter in turn on the LHS and checks it with the letter in the same position on the RHS to see if it's actually the same. If at any point it finds a difference, it stops, and the result is false. If, after having checked each letter in turn all the way to the end, it confirms that they are all the same, it returns true. The condition in the preceding if statement will return true, so you'll see an alert box.
However, string comparison in JavaScript is case sensitive. So "P" is not the same as "p". Taking the preceding example, but changing the variable myName to "paul", you find that the condition is false and the code inside the if statement does not execute.
var myName ="paul";
if (myName == "Paul")
{
   alert("myName is Paul");
}
The >=, >, <=, and < operators work with strings as well as with numbers, but again it is an alphabetical comparison. So "A"<"B" is true, because A comes before B in the alphabet. However, JavaScript's case sensitivity comes into play again. "A"<"B" is true, but "a"<"B" is false. Why? Because uppercase letters are treated as always coming before lowercase letters. Why is this? Each letter has a code number in the ASCII and Unicode character sets, and the code numbers for uppercase letters are lower than the code numbers for lowercase letters. This is something to watch out for when writing your own code.
The simplest way to avoid confusion with different cases is to convert both strings to either uppercase or lowercase before you compare them. You can do this easily using the toUpperCase() or toLowerCase() function, which you'll learn about in Chapter 4.
You saw earlier how the if and elseif statements could be used for checking various conditions; if the first condition is not valid, then another is checked, and another, and so on. However, when you want to check the value of a particular variable for a large number of possible values, there is a more efficient alternative, namely the switch statement. The structure of the switch statement is given in Figure 3-7.
The best way to think of the switch statement is "Switch to the code where the case matches." The switch statement has four important elements:
The test expression
The
casestatementsThe
breakstatementsThe
defaultstatement

The test expression is given in the parentheses following the switch keyword. In the previous example, you are testing using the variable myName. Inside the parentheses, however, you could have any valid expression.
Next come the case statements. The case statements do the condition checking. To indicate which case statements belong to your switch statement, you must put them inside the curly braces following the test expression. Each case statement specifies a value, for example "Paul". The case statement then acts like if(myName=="Paul"). If the variable myName did contain the value "Paul", execution would commence from the code starting below the case"Paul" statement and would continue to the end of the switch statement. This example has only two case statements, but you can have as many as you like.
In most cases, you want only the block of code directly underneath the relevant case statement to execute, not all the code below the relevant case statement, including any other case statements.
To achieve this, you put a break statement at the end of the code that you want executed. This tells JavaScript to stop executing at that point and leave the switch statement.
Finally you have the default case, which (as the name suggests) is the code that will execute when none of the other case statements match. The default statement is optional; if you have no default code that you want to execute, you can leave it out, but remember that in this case no code will execute if no case statements match. It is a good idea to include a default case, unless you are absolutely sure that you have all your options covered.
Try It Out: Using the switch Statement
Let's take a look at the switch statement in action. The following example illustrates a simple guessing game. Type the code and save it as ch3_examp3.htm.
<!DOCTYPE html PUBLIC "-//W3C//DTD XHTML 1.0 Transitional//EN"
"http://www.w3.org/TR/xhtml1/DTD/xhtml1-transitional.dtd">
<html xmlns="http://www.w3.org/1999/xhtml">
<body>

<script type="text/javascript">

var secretNumber = prompt("Pick a number between 1 and 5:", "");
secretNumber = parseInt(secretNumber);

switch (secretNumber)
{
case 1:
   document.write("Too low!");
   break;

case 2:
   document.write("Too low!");
   break;

case 3:
   document.write("You guessed the secret number!");
   break;

case 4:
   document.write("Too high!");
   break;

case 5:
   document.write("Too high!");
   break;

default:
   document.write("You did not enter a number between 1 and 5.");
   break;
}
document.write("<br />Execution continues here");
</script>
</body>
</html>Load this into your browser and enter, for example, the value 1 in the prompt box. You should then see something like what is shown in Figure 3-8.
If, on the other hand, you enter the value 3, you should see a friendly message letting you know that you guessed the secret number correctly, as shown in Figure 3-9.
First you declare the variable secretNumber and set it to the value entered by the user via the prompt box. Note that you use the parseInt() function to convert the string that is returned from prompt() to an integer value.
var secretNumber = prompt("Pick a number between 1 and 5:", "");
secretNumber = parseInt(secretNumber);
Next you create the start of the switch statement.
switch (secretNumber)
{
The expression in parentheses is simply the variable secretNumber, and it's this number that the case statements will be compared against.
You specify the block of code encompassing the case statements using curly braces. Each case statement checks one of the numbers between 1 and 5, because this is what you have specified to the user that she should enter. The first simply outputs a message that the number she has entered is too low.
case 1:
   document.write("Too low!");
   break;
The second case statement, for the value 2, has the same message, so the code is not repeated here. The third case statement lets the user know that she has guessed correctly.
case 3:
   document.write("You guessed the secret number!");
   break;
Finally, the fourth and fifth case statements output a message that the number the user has entered is too high.
case 4:
   document.write("Too high!");
   break;
You do need to add a default case in this example, since the user might very well (despite the instructions) enter a number that is not between 1 and 5, or even perhaps a letter. In this case, you add a message to let the user know that there is a problem.
default:
   document.write("You did not enter a number between 1 and 5.");
   break;
A default statement is also very useful for picking up bugs — if you have coded some of the case statements incorrectly, you will pick that up very quickly if you see the default code being run when it shouldn't be.
You finally have added the closing brace indicating the end of the switch statement. After this you output a line to indicate where the execution continues.
}
document.write("<br />Execution continues here");
Note that each case statement ends with a break statement. This is important to ensure that execution of the code moves to the line after the end of the switch statement. If you forget to include this, you could end up executing the code for each case following the case that matches.
You may have spotted a problem with the switch statement in this example — you want to execute the same code if the user enters a 1 or a 2, and the same code for a 4 or a 5. However, in order to achieve this, you have had to repeat the code in each case. What you want is an easier way of getting JavaScript to execute the same code for different cases. Well, that's easy! Simply change the code so that it looks like this:
switch (secretNumber)
{
case 1:
case 2:
   document.write("Too low!");
   break;

case 3:
   document.write("You guessed the secret number!");
   break;

case 4:
case 5:
document.write("Too high!");
break;
default:
document.write("You did not enter a number between 1 and 5.");
break;
}If you load this into your browser and experiment with entering some different numbers, you should see that it behaves exactly like the previous code.
Here, you are making use of the fact that if there is no break statement underneath the code for a certain case statement, execution will continue through each following case statement until a break statement or the end of the switch is reached. Think of it as a sort of free fall through the switch statement until you hit the break statement.
If the case statement for the value 1 is matched, execution simply continues until the break statement under case 2, so effectively you can execute the same code for both cases. The same technique is used for the case statements with values 4 and 5.
Looping means repeating a block of code when a condition is true. This is achieved in JavaScript with the use of two statements, the while statement and the for statement. You'll be looking at these shortly, but why would you want to repeat blocks of code anyway?
Well, take the situation where you have a series of results, say the average temperature for each month in a year, and you want to plot these on a graph. The code needed for plotting each point will most likely be the same. So, rather than write the code 12 times (once for each point), it's much easier to execute the same code 12 times by using the next item of data in the series. This is where the for statement would come in handy, because you know how many times you want the code to execute.
In another situation, you might want to repeat the same piece of code when a certain condition is true, for example, while the user keeps clicking a Start Again button. In this situation, the while statement would be very useful.
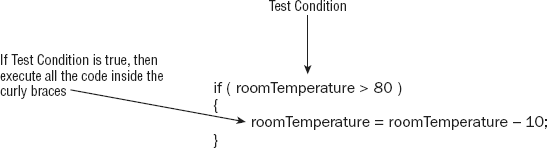
The for statement enables you to repeat a block of code a certain number of times. The syntax is illustrated in Figure 3-10.
Let's look at the makeup of a for statement. You can see from Figure 3-10 that, just like the if and switch statements, the for statement also has its logic inside parentheses. However, this time that logic split into three parts, each part separated by a semicolon. For example, in Figure 3-10 you have the following:
(var loopCounter = 1; loopCounter <= 3; loopCounter++)
The first part of the for statement's logic is the initialization part of the for statement. To keep track of how many times you have looped through the code, you need a variable to keep count. It's in the initialization part that you initialize variables. In the example you have declared loopCounter and set it to the value of 1. This part is only executed once during the execution of the loops, unlike the other parts. You don't need to declare the variable if it was declared earlier in the code.
var loopCounter;
for (loopCounter = 1; loopCounter <= 3; loopCounter++)
Following the semicolon, you have the test condition part of the for statement. The code inside the for statement will keep executing for as long as this test condition evaluates to true. After the code is looped through each time, this condition is tested. In Figure 3-10, you execute for as long as loopCounter is less than or equal to 3. The number of times a loop is performed is often called the number of iterations.
Finally, you have the increment part of the for loop, where variables in our loop's test condition have their values incremented. Here you can see that loopCounter is incremented by one by means of the ++ operator you saw in Chapter 2. Again, this part of the for statement is repeated with every loop of the code. Although we call it the increment part, it can actually be used to decrease or decrement the value — for example, if you wanted to count down from the top element in an array to the first.
After the for statement comes the block of code that will be executed repeatedly, as long as the test condition is true. This block of code is contained within curly braces. If the condition is never true, even at the first test of the loop condition, then the code inside the for loop will be skipped over and never executed.
Putting all this together, how does the for loop work?
Execute initialization part of the
forstatement.Check the test condition. If
true, continue; if not, exit theforstatement.Execute code in the block after the
forstatement.Execute the increment part of the
forstatement.Repeat steps 2 through 4 until the test condition is
false.
Try It Out: Converting a Series of Fahrenheit Values
Let's change the temperature converter so that it converts a series of values, stored in an array, from Fahrenheit to centigrade. You will be using the for statement to go through each element of the array. Type the code and save it as ch3_examp4.htm.
<!DOCTYPE html PUBLIC "-//W3C//DTD XHTML 1.0 Transitional//EN"
"http://www.w3.org/TR/xhtml1/DTD/xhtml1-transitional.dtd">
<html xmlns="http://www.w3.org/1999/xhtml">
<body>

<script type="text/javascript">

var degFahren = new Array(212, 32, -459.15);
var degCent = new Array();
var loopCounter;

for (loopCounter = 0; loopCounter <= 2; loopCounter++)
{
   degCent[loopCounter] = 5/9 * (degFahren[loopCounter] - 32);
}

for (loopCounter = 2; loopCounter >= 0; loopCounter--)
{
   document.write("Value " + loopCounter + " was " + degFahren[loopCounter] +
                  " degrees Fahrenheit");
   document.write(" which is " + degCent[loopCounter] +
                  " degrees centigrade<br />");
}

</script>

</body>
</html>
On loading this into your browser, you'll see a series of three lines in the page, containing the results of converting our array of Fahrenheit values into centigrade (as shown in Figure 3-11).

The first task is to declare the variables you are going to use. First, you declare and initialize degFahren to contain an array of three values: 212, 32, and -459.15. Next, degCent is declared as an empty array.
Finally, loopCounter is declared and will be used to keep track of which array index you are accessing during your looping.
var degFahren = new Array(212, 32, -459.15);
var degCent = new Array();
var loopCounter;
Following this comes our first for loop.
for (loopCounter = 0; loopCounter <= 2; loopCounter++)
{
   degCent[loopCounter] = 5/9 * (degFahren[loopCounter] - 32);
}
In the first line, you start by initializing the loopCounter to 0. Then the for loop's test condition, loopCounter<=2, is checked. If this condition is true, the loop executes for the first time. After the code inside the curly braces has executed, the incrementing part of the for loop, loopCounter++, will be executed, and then the test condition will be re-evaluated. If it's still true, another execution of the loop code is performed. This continues until the for loop's test condition evaluates to false, at which point looping will end, and the first statement after the closing curly brace will be executed.
The code inside the curly braces is the equation you saw in earlier examples, only this time you are placing its result into the degCent array, with the index being the value of loopCounter.
In the second for loop, you write the results contained in the degCent array to the screen.
for (loopCounter = 2; loopCounter >= 0; loopCounter--)
{
   document.write("Value " + loopCounter + " was " + degFahren[loopCounter] +
                  " degrees Fahrenheit");
   document.write(" which is " + degCent[loopCounter] +
                  " degrees centigrade<br />");
}
This time you're counting down from 2 to 0. The variable loopCounter is initialized to 2, and the loop condition remains true until loopCounter is less than 0. This time loopCounter is actually decremented each time rather than incremented, by means of loopCounter--. Again, loopCounter is serving a dual purpose: It keeps count of how many loops you have done and also provides the index position in the array.
Note that in these examples, you've used whole numbers in your loops. However, there is no reason why you can't use fractional numbers, although it's much less common to do so.
This loop works primarily with arrays, and as you'll see in the next chapter, it also works with something called objects. It enables you to loop through each element in the array without having to know how many elements the array actually contains. In plain English, what this loop says is "For each element in the array, execute some code." Rather than having to work out the index number of each element, the for. . .in loop does it for you and automatically moves to the next index with each iteration (loop through).
Its syntax for use with arrays is:
for (index in arrayName)
{
   //some code
}
In this code extract, index is a variable you declare prior to the loop, which will automatically be populated with the next index value in the array. arrayName is the name of the variable holding the array you want to loop through.
Let's look at an example to make things clearer. You'll define an array and initialize it with three values.
var myArray = new Array("Paul","Paula","Pauline");To access each element using a conventional for loop, you'd write this:
var loopCounter;
for (loopCounter = 0; loopCounter < 3; loopCounter++)
{
   document.write(myArray[loopCounter]);
}
To do exactly the same thing with the for. . .in loop, you write this:
var elementIndex;
for (elementIndex in myArray)
{
   document.write(myArray[elementIndex]);
}
As you can see, the code in the second example is a little clearer, as well as shorter. Both methods work equally well and will iterate three times. However, if you increase the size of the array, for example, by adding the element myArray[3]="Philip", the first method will still loop only through the first three elements in the array, whereas the second method will loop through all four elements.
Whereas the for loop is used for looping a certain number of times, the while loop enables you to test a condition and keep on looping while it's true. The for loop is useful when you know how many times you need to loop, for example when you are looping through an array that you know has a certain number of elements. The while loop is more useful when you don't know how many times you'll need to loop. For example, if you are looping through an array of temperature values and want to continue looping when the temperature value contained in the array element is less than 100, you will need to use the while statement.
Let's take a look at the structure of the while statement, as illustrated in Figure 3-12.

You can see that the while loop has fewer parts to it than the for loop. The while loop consists of a condition which, if it evaluates to true, causes the block of code inside the curly braces to execute once; then the condition is re-evaluated. If it's still true, the code is executed again, the condition is re-evaluated, and so on until the condition evaluates to false.
One thing to watch out for is that if the condition is false to start with, the while loop never executes. For example:
degCent = 100;

while (degCent != 100)
{
      // some code
}
Here, the loop will run if degCent does not equal 100. However, since degCent is 100, the condition is false, and the code never executes.
In practice you would normally expect the loop to execute once; whether it executes again will depend on what the code inside the loop has done to variables involved in the loop condition. For example:
degCent = new Array();
degFahren = new Array(34, 123, 212);
var loopCounter = 0;
while (loopCounter < 3)
{
   degCent[loopCounter] = 5/9 * (degFahren[loopCounter] - 32);
   loopCounter++;
}
The loop will execute so long as loopCounter is less than 3. It's the code inside the loop (loopCounter++;) that increments loopCounter and will eventually cause loopCounter<3 to be false so that the loop stops. Execution will then continue on the first line after the closing brace of the while statement.
Something to watch out for is the infinite loop — a loop that will never end. Suppose you forgot to include the loopCounter++; line in the code. Leaving this line out would mean that loopCounter will remain at 0, so the condition (loopCounter<3) will always be true, and the loop will continue until the user gets bored and cross, and shuts down her browser. However, it is an easy mistake to make and one JavaScript won't warn you about.
It's not just missing lines that can cause infinite loops but also mistakes inside the loop's code. For example:
var testVariable = 0;
while (testVariable <= 10)
{
   alert("Test Variable is " + testVariable);
   testVariable++;
   if (testVariable = 10)
   {
      alert("The last loop");
   }
}
See if you can spot the deliberate mistake that leads to an infinite loop — yes, it's the if statement that will cause this code to go on forever. Instead of using == as the comparison operator in the condition of the if statement, you put =, so testVariable is set to 10 again in each loop, despite the line testVariable++. This means that at the start of each loop, the test condition always evaluates to true, since 10 is less than or equal to 10. Put the extra = in to make if(testVariable == 10), and everything is fine.
With the while loop, you saw that the code inside the loop only executes if the condition is true; if it's false, the code never executes, and execution instead moves to the first line after the while loop. However, there may be times when you want the code in the while loop to execute at least once, regardless of whether the condition in the while statement evaluates to true. It might even be that some code inside the while loop needs to be executed before you can test the while statement's condition. It's situations like this for which the do. . .while loop is ideal.
Look at an example in which you want to get the user's age via a prompt box. You want to show the prompt box but also make sure that what the user has entered is a number.
var userAge;
do
{
   userAge = prompt("Please enter your age","")
}
while (isNaN(userAge) == true);
The code line within the loop —
userAge = prompt("Please enter your age","")— will be executed regardless of the while statement's condition. This is because the condition is not checked until one loop has been executed. If the condition is true, the code is looped through again. If it's false, looping stops.
Note that within the while statement's condition, you are using the isNaN() function that you saw in Chapter 2. This checks whether the userAge variable's value is NaN (not a number). If it is not a number, the condition returns a value of true; otherwise it returns false. As you can see from the example, it enables you to test the user input to ensure the right data has been entered. The user might lie about his age, but at least you know he entered a number!
The do. . .while loop is fairly rare; there's not much you can't do without it, so it's best avoided unless really necessary.
You met the break statement earlier when you looked at the switch statement. Its function inside a switch statement is to stop code execution and move execution to the next line of code after the closing curly brace of the switch statement. However, the break statement can also be used as part of the for and while loops when you want to exit the loop prematurely. For example, suppose you're looping through an array, as you did in the temperature conversion example, and you hit an invalid value. In this situation, you might want to stop the code in its tracks, notify the user that the data is invalid, and leave the loop. This is one situation where the break statement comes in handy.
Let's see how you could change the example where you converted a series of Fahrenheit values (ch3_examp4.htm) so that if you hit a value that's not a number you stop the loop and let the user know about the invalid data.
<script language="JavaScript" type="text/javascript">
var degFahren = new Array(212, "string data", -459.67);
var degCent = new Array();
var loopCounter;

for (loopCounter = 0; loopCounter <= 2; loopCounter++)
{
   if (isNaN(degFahren[loopCounter]))
      {
         alert("Data '" + degFahren[loopCounter] + "' at array index " +
               loopCounter + " is invalid");
         break;
      }

   degCent[loopCounter] = 5/9 * (degFahren[loopCounter] - 32);
}
You have changed the initialization of the degFahren array so that it now contains some invalid data. Then, inside the for loop, an if statement is added to check whether the data in the degFahren array is not a number. This is done by means of the isNaN() function; it returns true if the value passed to it in the parentheses, here degFahren[loopCounter], is not a number. If the value is not a number, you tell the user where in the array you have the invalid data. Then you break out of the for loop altogether, using the break statement, and code execution continues on the first line after the end of the for statement.
That's the break statement, but what about continue? The continue statement is similar to break in that it stops the execution of a loop at the point where it is found, but instead of leaving the loop, it starts execution at the next iteration, starting with the for or while statement's condition being re-evaluated, just as if the last line of the loop's code had been reached.
In the break example, it was all or nothing — if even one piece of data was invalid, you broke out of the loop. It might be better if you tried to convert all the values in degFahren, but if you hit an invalid item of data in the array, you notify the user and continue with the next item, rather than giving up as our break statement example does.
if (isNaN(degFahren[loopCounter]))
      {
         alert("Data '" + degFahren[loopCounter] + "' at array index " +
               loopCounter + " is invalid");
         continue;
      }
Just change the break statement to a continue. You will still get a message about the invalid data, but the third value will also be converted.
A function is something that performs a particular task. Take a pocket calculator as an example. It performs lots of basic calculations, such as addition and subtraction. However, many also have function keys that perform more complex operations. For example, some calculators have a button for calculating the square root of a number, and others even provide statistical functions, such as the calculation of an average. Most of these functions could be done with the basic mathematical operations of add, subtract, multiply, and divide, but that might take a lot of steps — it's much simpler for the user if she only needs to press one button. All she needs to do is provide the data — numbers in this case — and the function key does the rest.
Functions in JavaScript work a little like the function buttons on a pocket calculator: They encapsulate a block of code that performs a certain task. Over the course of the book so far, you have come across a number of handy built-in functions that perform a certain task, such as the parseInt() and parseFloat() functions, which convert strings to numbers, and the isNaN() function, which tells you whether a particular value can be converted to a number. Some of these functions return data, such as parseInt(), which returns an integer number; others simply perform an action but return no data. You'll also notice that some functions can be passed data, whereas others cannot. For example, the isNaN() function needs to be passed some data, which it checks to see if it is NaN. The data that a function requires to be passed are known as its parameter(s).
As you work your way through the book, you'll be coming across many more useful built-in functions, but wouldn't it be great to be able to write your own functions? After you've worked out, written, and debugged a block of code to perform a certain task, it would be nice to be able to call it again and again when you need it. JavaScript gives us the ability to do just that, and this is what you'll be concentrating on in this section.
Creating and using your own functions is very simple. Figure 3-13 shows an example of a function.

You've probably already realized what this function does and how the code works. Yes, it's the infamous Fahrenheit-to-centigrade conversion code again.
Each function you define in JavaScript must be given a unique name for that particular page. The name comes immediately after the function keyword. To make life easier for yourself, try using meaningful names so that when you see it being used later in your code, you'll know exactly what it does. For example, a function that takes as its parameters someone's birthday and today's date and returns the person's age could be called getAge(). However, the names you can use are limited, much as variable names are. For example, you can't use words reserved by JavaScript, so you can't call your function with() or while().
The parameters for the function are given in parentheses after the function's name. A parameter is just an item of data that the function needs to be given in order to do its job. Usually, not passing the required parameters will result in an error. A function can have zero or more parameters, though even if it has no parameters, you must still put the open and close parentheses after its name. For example, the top of your function definition must look like the following:
function myNoParamFunction()
You then write the code, which the function will execute when called on to do so. All the function code must be put in a block with a pair of curly braces.
Functions also give you the ability to return a value from a function to the code that called it. You use the return statement to return a value. In the example function given earlier, you return the value of the variable degCent, which you have just calculated. You don't have to return a value if you don't want to, but you should always include a return statement at the end of your function, although JavaScript is a very forgiving language and won't have a problem if you don't use a return statement at all.
When JavaScript comes across a return statement in a function, it treats it a bit like a break statement in a for loop — it exits the function, returning any value specified after the return keyword.
You'll probably find it useful to build up a "library" of functions that you use frequently in JavaScript code, which you can cut and paste into your page whenever you need them.
Having created your functions, how do you use them? Unlike the code you've seen so far, which executes when JavaScript reaches that line, functions only execute if you ask them to, which is termed calling or invoking the function. You call a function by writing its name at the point where you want it to be called and making sure that you pass any parameters it needs, separated by commas. For example:
myTemp = convertToCentigrade(212);
This line calls the convertToCentigrade() function you saw earlier, passing 212 as the parameter and storing the return value from the function (that is, 100) in the myTemp variable.
Have a go at creating your own functions now, taking a closer look at how parameters are passed. Parameter passing can be a bit confusing, so you'll first create a simple function that takes just one parameter (the user's name) and writes it to the page in a friendly welcome string. First, you need to think of a name for your function. A short but descriptive name is writeUserWelcome(). Now you need to define what parameters the function expects to be passed. There's only one parameter — the user name. Defining parameters is a little like defining variables — you need to stick to the same rules for naming, so that means no spaces, special characters, or reserved words. Let's call your parameter userName. You need to add it inside parentheses to the end of the function name (note that you don't put a semicolon at the end of the line).
function writeUserWelcome(userName)
Okay, now you have defined your function name and its parameters; all that's left is to create the function body — that is, the code that will be executed when the function is called. You mark out this part of the function by wrapping it in curly braces.
function writeUserWelcome(userName)
{
   document.write("Welcome to my website " + userName + "<br />");
   document.write("Hope you enjoy it!");
}
The code is simple enough; you write out a message to the web page using document.write(). You can see that userName is used just as you'd use any normal variable; in fact, it's best to think of parameters as normal variables. The value that the parameter has will be that specified by the JavaScript code where the function was called.
Let's see how you would call this function.
writeUserWelcome("Paul");Simple, really — just write the name of the function you want to call, and then in parentheses add the data to be passed to each of the parameters, here just one piece. When the code in the function is executed, the variable userName, used in the body of the function code, will contain the text "Paul".
Suppose you wanted to pass two parameters to your function — what would you need to change? Well, first you'd have to alter the function definition. Imagine that the second parameter will hold the user's age — you could call it userAge since that makes it pretty clear what the parameter's data represents. Here is the new code:
function writeUserWelcome(userName, userAge)
{
   document.write("Welcome to my website" + userName + "<br />");
document.write("Hope you enjoy it<br />");
document.write("Your age is " + userAge);
}You've added a line to the body of the function that uses the parameter you have added. To call the function, you'd write the following:
writeUserWelcome("Paul",31);The second parameter is a number, so there is no need for quotes around it. Here the userName parameter will be Paul, and the second parameter, userAge, will be 31.
What is meant by scope? Well, put simply, it's the scope or extent of a variable's availability — which parts of your code can access a variable and the data it contains. Any variables declared in a web page outside of a function will be available to all script on the page, whether that script is inside a function or otherwise — we term this a global or page-level scope. However, variables declared inside a function are visible only inside that function — no code outside the function can access them. So, for example, you could declare a variable degCent in every function you have on a page and once on the page outside any function. However, you can't declare the variable more than once inside any one function or more than once on the page outside the functions. Note that reusing a variable name throughout a page in this way, although not illegal, is not standard good practice — it can make the code very confusing to read.
Function parameters are similar to variables: They can't be seen outside the function, and although you can declare a variable in a function with the same name as one of its parameters, it would cause a lot of confusion and might easily lead to subtle bugs being overlooked. It's therefore bad coding practice and best avoided, if only for the sake of your sanity when it comes to debugging!
So what happens when the code inside a function ends and execution returns to the point at which the code was called? Do the variables defined within the function retain their value when you call the function the next time?
The answer is no: Variables not only have the scope property — where they are visible — but they also have a lifetime. When the function finishes executing, the variables in that function die and their values are lost, unless you return one of them to the calling code. Every so often JavaScript performs garbage collection (which we talked about in Chapter 2), whereby it scans through the code and sees if any variables are no longer in use; if so, the data they hold are freed from memory to make way for the data of other variables.
Given that global variables can be used anywhere, why not make all of them global? Global variables are great when you need to keep track of data on a global basis. However, because they are available for modification anywhere in your code, it does mean that if they are changed incorrectly due to a bug, that bug could be anywhere within the code, making debugging difficult. It's best, therefore, to keep global variable use to a minimum, though sometimes they are a necessary evil — for example, when you need to share data among different functions.
In this chapter you have concluded your look at the core of the JavaScript language and its syntax. Everything from now on builds on these foundations, and with the less interesting syntax under your belt, you can move on to more interesting things in the remainder of the book.
The chapter looked at the following:
Decision making with the
ifandswitchstatements. The ability to make decisions is essentially what gives the code its "intelligence." Based on whether a condition istrueorfalse, you can decide on a course of action to follow.Comparison operators. The comparison operators compare the value on the left of the operator (left-hand side, LHS) with the value on the right of the operator (right-hand side, RHS) and return a Boolean value. Here is a list of the main comparison operators:
The
ifstatement. Using theifstatement, you can choose to execute a block of code (defined by being in curly braces) when a condition istrue. Theifstatement has a test condition, specified in parentheses. If this condition evaluates totrue, the code after theifstatement will execute.The
elsestatement. If you want code to execute when theifstatement isfalse, you can use theelsestatement that appears after theifstatement.Logical operators. To combine conditions, you can use the three logical operators: AND, OR, and NOT, represented by
&&,||, and!, respectively.The AND operator returns
trueonly if both sides of the expression aretrue.The OR operator returns
truewhen either one or both sides of an expression aretrue.The NOT operator reverses the logic of an expression.
The
switchstatement. This compares the result of an expression with a series of possible cases and is similar in effect to a multipleifstatement.Looping with
for,for. . .in,while, anddo. . .while.It's often necessary to repeat a block of code a number of times, something JavaScript enables by looping.The
forloop. Useful for looping through code a certain number of times, theforloop consists of three parts: the initialization, test condition, and increment parts. Looping continues while the test condition istrue. Each loop executes the block of code and then executes the increment part of theforloop before re-evaluating the test condition to see if the results of incrementing have changed it.The
for. . .inloop. This is useful when you want to loop through an array without knowing the number of elements in the array. JavaScript works this out for you so that no elements are missed.The
whileloop. This is useful for looping through some code for as long as a test condition remainstrue. It consists of a test condition and the block of code that's executed only if the condition istrue. If the condition is nevertrue, the code never executes.The
do. . .whileloop. This is similar to awhileloop, except that it executes the code once and then keeps executing the code as long as the test condition remainstrue.breakandcontinuestatements. Sometimes you have a good reason to break out of a loop prematurely, in which case you need to use thebreakstatement. On hitting abreakstatement, code execution stops for the block of code marked out by the curly braces and starts immediately after the closing brace. Thecontinuestatement is similar tobreak, except that when code execution stops at that point in the loop, the loop is not broken out of but instead continues as if the end of that reiteration had been reached.
Functions are reusable bits of code. JavaScript has a lot of built-in functions that provide programmers services, such as converting a string to a number. However, JavaScript also enables you to define and use your own functions using the
functionkeyword. Functions can have zero or more parameters passed to them and can return a value if you so wish.Variable scope and lifetime. Variables declared outside a function are available globally — that is, anywhere in the page. Any variables defined inside a function are private to that function and can't be accessed outside of it. Variables have a lifetime, the length of which depends on where the variable was declared. If it's a global variable, its lifetime is that of the page — while the page is loaded in the browser, the variable remains alive. For variables defined in a function, the lifetime is limited to the execution of that function. When the function has finished being executed, the variables die, and their values are lost. If the function is called again later in the code, the variables will be empty.
Suggested solutions to these questions can be found in Appendix A.
A junior programmer comes to you with some code that appears not to work. Can you spot where he went wrong? Give him a hand and correct the mistakes.
var userAge = prompt("Please enter your age");

if (userAge = 0);
{
   alert("So you're a baby!");
}
else if ( userAge < 0 | userAge > 200)
   alert("I think you may be lying about your age");
else
{
   alert("That's a good age");
}
Using
document.write(), write code that displays the results of the 12 times table. Its output should be the results of the calculations.12 * 1 = 12 12 * 2 = 24 12 * 3 = 36 . . . 12 * 11 = 132 12 * 12 = 144
Change the code of Question 2 so that it's a function that takes as parameters the times table required and the values at which it should start and end. For example, you might try the four times table displayed starting with
4*4and ending at4*9.Modify the code of Question 3 to request the times table to be displayed from the user; the code should continue to request and display times tables until the user enters
-1. Additionally, do a check to make sure that the user is entering a valid number; if the number is not valid, ask the user to re-enter it.