
Since its inception, the Internet has used a transaction-like communication model; a browser sends a request to a server, which sends a response back to the browser, which (re)loads the page. This is typical HTTP communication, and it was designed to be this way. But this model is rather cumbersome for developers, as it requires web applications to consist of several pages. The resulting user experience becomes disjointed and interrupted due to these separate page loads.
In the early 2000s, a movement began to look for and develop new techniques to enhance the user's experience; to make Web applications behave more like conventional applications. These new techniques offered the performance and usability usually associated with conventional desktop applications. It wasn't long before developers began to refine these processes to offer richer functionality to the user.
At the heart of this movement was one language: JavaScript, and its ability to make HTTP requests transparent to the user.
Essentially, Ajax allows client-side JavaScript to request and receive data from a server without refreshing the web page. This technique enables the developer to create an application that is uninterrupted, making only portions of the page reload with new data.
The term Ajax was originally coined by Jesse James Garrett in 2005. He wrote an article entitled "Ajax: A New Approach to Web Applications" (www.adaptivepath.com/publications/essays/archives/000385.php). In it, Garrett states that the interactivity gap between web and desktop applications is becoming smaller, and he cites applications such as Google Maps and Google Suggest as proof of this. The term originally stood for Asynchronous JavaScript + XML (XML was the format in which the browser and server communicated with each other). Today, Ajax simply refers to the pattern of using JavaScript to send and receive data from the web server without reloading the entire page.
Although the term Ajax was derived in 2005, the underlying methodology was used years before. Early Ajax techniques consisted of using hidden frames/iframes, dynamically adding <script/> elements to the document, and/or using JavaScript to send HTTP requests to the server; the latter has become quite popular in the last few years. These new techniques refresh only portions of a page, both cutting the size of data sent to the browser and making the web page feel more like a conventional application.
Ajax opened the doors for advanced web applications — ones that mimic desktop applications in form and in function. A variety of commercial web sites employ the use of Ajax. These sites look and behave more like desktop applications than web sites. The most notable Ajax-enabled web applications come from the search giant Google: Google Maps and Google Suggest.
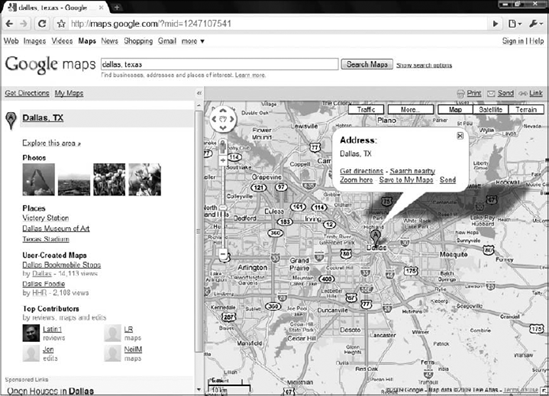
Designed to compete with existing commercial mapping sites (and using images from its Google Earth), Google Maps (http://maps.google.com) uses Ajax to dynamically add map images to the web page. When you enter a location, the main page does not reload at all; the images are dynamically loaded in the map area. Google Maps also enables you to drag the map to a new location, and once again, the map images are dynamically added to the map area (see Figure 14-1.
Google Suggest (http://labs.google.com/suggest/) is another Google innovation that employs the use of Ajax. Upon first glance, it appears to be a normal Google search page. When you start typing, however, a drop-down box displays suggestions for search terms that might interest you. To the right of the suggested word or phrase is the number of results the search term returns (see Figure 14-2.

Ajax is limited to the browser that runs the web application, and like every other advanced JavaScript concept covered in this book, Ajax capabilities differ from browser to browser. Thankfully, the most common forms of Ajax work in the following browsers:
When using hidden frames, a popular Ajax approach, with these browsers, you'll notice few differences in the code, as each Browser Object Model (BOM) handles frames the same way (frame-based Ajax is covered later in the chapter). However, when you start using other forms of Ajax, such as XMLHttpRequest, the differences in code become apparent.
As stated before, there are a variety of ways you can create Ajax-enabled applications. However, probably the most popular Ajax technique incorporates the JavaScript XMLHttpRequest object, which is present in all major browsers.
Despite its name, you can retrieve other types of data, like plain text, with
XMLHttpRequest.
The XMLHttpRequest object originated as a Microsoft component, called XmlHttp, in the MSXML library first released with IE 5. It offered developers an easy way to open HTTP connections and retrieve XML data. Microsoft improved the component with each new version of MSXML, making it faster and more efficient.
As the popularity of the Microsoft XMLHttpRequest object grew, Mozilla decided to include its own version of the object with Firefox. The Mozilla version maintained the same properties and methods used in Microsoft's ActiveX component, making cross-browser usage possible. Soon after, Opera Software and Apple copied the Mozilla implementation, thus bringing the easy-to-use object to all modern browsers.
The XMLHttpRequest object is no different from other web standards supported by the browsers, and the differences can be divided into two camps: ActiveX (for IE 5 and 6) and native support (for all other browsers). Thankfully, the two browser types only differ when you need to create an XMLHttpRequest object. After the object's creation, the remainder of the code is compatible for every browser.
Because the XMLHttpRequest object originated as a part of the MSXML library, an ActiveX XML parser, instantiating an XMLHttpRequest under these browsers, requires the creation of an ActiveX object. In Chapter 12, you created ActiveX objects to traverse the XML DOM. Creating an XMLHttp object isn't much different.
var oHttp = new ActiveXObject("Microsoft.XMLHttp");This line creates the first version of Microsoft's XMLHttpRequest. There are many other versions of Microsoft's XmlHttp, but Microsoft recommends using one of the following versions:
MSXML2.XmlHttp.6.0MSXML2.XmlHttp.3.0
You want to use the latest version possible when creating an XmlHttpRequest object as it contains bug fixes and enhanced performance. The downside is that not everyone will have the same version installed on their computer. However, you can write a function to use the latest version of XmlHttp installed on the user's computer.
With the previous version information, write a function called createXmlHttpRequest() to create an XMLHttpRequest object with the latest version supported by the user's computer.
function createXmlHttpRequest()
{
    var versions =
    [
        "MSXML2.XmlHttp.6.0",
        "MSXML2.XmlHttp.3.0"
    ];
    //more code here
}
This code defines the createXmlHttpRequest() function. Inside it, an array called versions contains the different version names recommended by Microsoft. Notice that the version names are listed starting with the newest first. This is done because you always want to check for the newest version first and continue with the next newest version until you find the version installed on the computer.
To decide what version to use, use a for loop to iterate through the elements in the array and then attempt to create an XMLHttpRequest object.
function createXmlHttpRequest()
{
    var versions =
    [
        "MSXML2.XmlHttp.6.0",
        "MSXML2.XmlHttp.3.0"
    ];

    for (var i = 0; i < versions.length; i++)
    {
        try
        {
            var oHttp = new ActiveXObject(versions[i]);
            return oHttp;
        }
        catch (error)
        {
          //do nothing here
        }
    }
    //more code here
}
An error is thrown if a specific version isn't installed on the user's computer. Therefore, use a try. . .catch block inside the loop to catch the error; this is the only way to determine if a version is installed on the computer. Code execution drops to the catch block if a version doesn't exist. Since nothing happens in this block, the loop iterates to the next element in the array. If no version is found on the computer, then the function returns null, like this:
function createXmlHttpRequest()
{
    var versions =
    [
        "MSXML2.XmlHttp.6.0",
        "MSXML2.XmlHttp.3.0"
    ];

    for (var i = 0; i < versions.length; i++)
    {
        try
        {
            var oHttp = new ActiveXObject(versions[i]);
            return oHttp;
        }
        catch (error)
        {
          //do nothing here
        }
    }

    return null;
}
Now you don't have to worry about ActiveX objects to create an XMLHttp object. If you call this function, it'll do all the work for you.
var oHttp = createXmlHttpRequest();
IE 7+, Firefox, Opera, Safari, and Chrome boast a native implementation of the XMLHttpRequest object; it is an object located in the window object. Creating an XMLHttpRequest object is as simple as calling its constructor.
var oHttp = new XMLHttpRequest();
This line creates an XMLHttpRequest object, which you can use to connect to, and request and receive data from, a server. Unlike the ActiveX object in the previous section, XMLHttpRequest does not have different versions. Simply calling the constructor creates a ready to use XMLHttpRequest object.
Just as with all other cross-browser issues, a solution can be found to create an XMLHttpRequest object for all browsers. You already wrote the createXmlHttpRequest() function, so expand it to provide cross-browser functionality.
function createXmlHttpRequest()
{
    if (window.XMLHttpRequest)
{
var oHttp = new XMLHttpRequest();
return oHttp;
}
else if (window.ActiveXObject)
{
var versions =
[
"MSXML2.XmlHttp.6.0",
"MSXML2.XmlHttp.3.0"
];
for (var i = 0; i < versions.length; i++)
{
try
{
var oHttp = new ActiveXObject(versions[i]);
return oHttp;
}
catch (error)
{
//do nothing here
}
}
}
return null;
}This new code first checks to see if window.XMLHttpRequest exists. If it does, then the function creates an XMLHttpRequest object with the XMLHttpRequest constructor. If not, the code checks for window.ActiveXObject for IE 5 and 6 and tries to create an object with the latest XMLHttp version. If no XMLHttpRequest object can be created any browser, then the function returns null.
The order in which browsers are tested is important; test for
window.XMLHttpRequestfirst because IE 7+ supports bothwindow.XMLHttpRequestandwindow.ActiveXObject.
Regardless of the user's browser, if it supports XMLHttpRequest, this revised function creates an XMLHttpRequest object.
Once you create the XMLHttpRequest object, you are ready to start requesting data with it. The first step in this process is to call the open() method to initialize the object.
oHttp.open(requestType, url, async);
This method accepts three arguments. The first, requestType, is a string value consisting of the type of request to make. The values can be either GET or POST. The second argument is the URL to send the request to, and the third is a true or false value indicating whether the request should be made in asynchronous or synchronous mode. For more on synchronous and asynchronous modes, see Chapter 12; as a refresher, requests made in synchronous mode halt all JavaScript code from executing until a response is received from the server.
Asynchronous mode is preferred for real applications.
The next step is to send the request; do this with the send() method. This method accepts one argument, which is a string that contains the request body to send along with the request. GET requests do not contain any information, so pass null as the argument.
var oHttp = createXmlHttpRequest();
oHttp.open("GET", "http://localhost/myTextFile.txt", false);
oHttp.send(null);This code makes a GET request to retrieve a file called myTextFile.txt in synchronous mode. Calling the send() method sends the request to the server.
Note
The send() method requires an argument to be passed; even if it is null.
Each XMLHttpRequest object has a status property. This property contains the HTTP status code sent with the server's response. The server returns a status of 200 for a successful request, and one of 404 if it cannot find the requested file. With this in mind, consider the following example:
var oHttp = createXmlHttpRequest();
oHttp.open("GET", "http://localhost/myTextFile.txt", false);
oHttp.send(null);
if (oHttp.status == 200)
{
alert("The text file was found!");
}
else if (oHttp.status == 404)
{
alert("The text file could not be found!");
}
else
{
alert("The server returned a status code of " + oHttp.status);
}This code checks the status property to determine what message to display to the user. If successful (a status of 200), an alert box tells the user the request file exists. If the file doesn't exist (status 404), then the user sees a message stating that the server cannot find the file. Finally, an alert box tells the user the status code if it equals something other than 200 or 404.
There are many different HTTP status codes, and checking for every code is not feasible. Most of the time, you should only be concerned with whether your request is successful. Therefore, you can cut the previous code down to this:
var oHttp = createXmlHttpRequest();
oHttp.open("GET", "http://localhost/myTextFile.txt", false);oHttp.send(null);
if (oHttp.status == 200)
{
alert("The text file was found!");
}
else
{
alert("The server returned a status code of " + oHttp.status);
}This code performs the same basic function, but it only checks for a status code of 200 and alert a generic message to the user for other status codes.
The previous code samples demonstrate the simplicity of synchronous requests. Asynchronous requests, on the other hand, add some complexity to your code because you have to handle the readystatechange event. In asynchronous requests, the XMLHttpRequest object exposes a readyState property, which holds a numeric value; each value refers to a specific state in a request's lifespan, as follows:
0— The object has been created, but theopen()method hasn't been called1— Theopen()method has been called, but the request hasn't been sent2— The request has been sent; headers and status are received and available3— A response has been received from the server4— The requested data has been fully received
The readystatechange event fires every time the readyState property changes, calling the onreadystatechange event handler. The fourth and final state is the most important; it lets you know that the request completed.
It is important to note that even if the request was successful, you may not have the information you wanted. An error may have occurred on the server's end of the request (a
404,500, or some other error). Therefore, you still need to check the status code of the request.
Code to handle the readystatechange event could look like this:
var oHttp = createXmlHttpRequest();
function oHttp_readyStateChange()
{
if (oHttp.readyState == 4)
{
if (oHttp.status == 200)
{
alert(oHttp.responseText);
}
else
{alert("The server returned a status code of " + oHttp.status);
}
}
}
oHttp.open("GET", "http://localhost/myTextFile.txt", true);
oHttp.onreadystatechange = oHttp_readyStateChange;
oHttp.send(null);This code first defines the oHttp_readyStateChange() function, which handles the readystatechange event; it first checks if the request completed by comparing readyState to 4. The function then checks the request's status to make sure the server returned the requested data. Once these two criteria are met, the code alerts the value of the responseText property (the actual requested data in plain text format). Note the open() method's call; the final argument passed to the method is true. This makes the XMLHttpRequest object request data asynchronously.
The benefits of using asynchronous communication are well worth the added complexity of the readystatechange event, as the browser can continue to load the page and execute your other JavaScript code while the request object sends and receives data. Perhaps a user-defined module that wraps an XMLHttpRequest object could make asynchronous requests easier to use and manage.
An
XMLHttpRequestobject also has a property calledresponseXML,which attempts to load the received data into an XML DOM (whereasresponseTextreturns plain text). This is the only way Safari 2 can load XML data into a DOM.
The concept of code reuse is important in programming; it is the reason why functions are defined to perform specific, common, and repetitive tasks. Chapter 5 introduced you to the object-oriented construct of code reuse: reference types. These constructs contain properties that contain data and/or methods that perform actions with that data.
In this section, you write your own Ajax module called HttpRequest, thereby making asynchronous requests easier to make and manage. Before getting into writing this module, let's go over the properties and methods the HttpRequest reference type exposes.
There's only one piece of information that you need to keep track of: the underlying XMLHttpRequest object. Therefore, this module will have only one property: request, which contains the underlying XMLHttpRequest object.
The methods are equally easy to identify.
With the properties and methods identified, let's begin to write the module.
A reference type's constructor defines its properties and performs any logic needed to function properly.
function HttpRequest(sUrl, fpCallback)
{
this.request = this.createXmlHttpRequest();
//more code here
}The constructor accepts two arguments. The first, sUrl, is the URL the XMLHttpRequest object will request. The second, fpCallback, is a callback function; it will be called when the server's response is received (when the request's readyState is 4 and its status is 200). The first line of the constructor initializes the request property, assigning an XMLHttpRequest object to it.
With the request property created and ready to use, it's time to prepare the request for sending.
function HttpRequest(sUrl, fpCallback)
{
this.request = this.createXmlHttpRequest();
this.request.open("GET", sUrl, true);
function request_readystatechange()
{
//more code here
}
this.request.onreadystatechange = request_readystatechange;
}The first line of the new code uses the XMLHttpRequest object's open() method to initialize the request object. Set the request type to GET, use the sUrl parameter to specify the URL you want to request, and set the request object to use asynchronous mode. The next few lines define the request_readystatechange() function. Defining a function within a function may seem weird, but it is perfectly legal to do so; it's an advanced technique called a closure. Closures, like the request_readystatechange() function, cannot be accessed outside their containing function (the constructor in this case), but they have access to the variables and parameters of the containing function. This function handles the request object's readystatechange event, and you bind it to do so by assigning it to the onreadystatechange event handler.
function HttpRequest(sUrl, fpCallback)
{
this.request = this.createXmlHttpRequest();
this.request.open("GET", sUrl, true);
var tempRequest = this.request;
function request_readystatechange()
{if (tempRequest.readyState == 4)
{
if (tempRequest.status == 200)
{
fpCallback(tempRequest.responseText);
}
else
{
alert("An error occurred trying to contact the server.");
}
}
}
this.request.onreadystatechange = request_readystatechange;
}The new lines of code may again look strange. The first new line creates the tempRequest variable. This variable is a pointer to the current object's request property, and it's used within the request_readystatechange() function. This is a technique to get around scoping issues. Ideally, you would use this.request inside the request_readystatechange() function. However, the this keyword points to the request_readystatechange() function instead of to the XMLHttpRequest object, which would cause the code to not function properly. So when you see tempRequest, think this.request.
Inside the request_readystatechange() function, you see the following line:
fpCallback(tempRequest.responseText);
This line calls the callback function specified by the constructor's fpCallback parameter, and you pass the responseText property to this function. This will allow the callback function to use the information received from the server.
There are two methods in this reference type: one is used inside the constructor, and the other enables you to send the request to the server.
The first method is createXmlHttpRequest(). The inner workings of cross-browser object creation were covered earlier in the chapter, so let's just see the method definition.
HttpRequest.prototype.createXmlHttpRequest = function ()
{
if (window.XMLHttpRequest)
{
var oHttp = new XMLHttpRequest();
return oHttp;
}
else if (window.ActiveXObject)
{
var versions =
["MSXML2.XmlHttp.6.0",
"MSXML2.XmlHttp.3.0"
];
for (var i = 0; i < versions.length; i++)
{
try
{
var oHttp = new ActiveXObject(versions[i]);
return oHttp;
}
catch (error)
{
//do nothing here
}
}
}
alert("Your browser doesn't support XMLHttp");
}In Chapter 5, you learned that user-defined reference type methods are assigned through the prototype object. This code follows that rule when writing the createXmlHttpRequest() method and the next method.
Sending a request to the server involves the XMLHttpRequest object's send() method. This send() is similar, with the difference being that it doesn't accept arguments.
HttpRequest.prototype.send = function ()
{
this.request.send(null);
}This version of send() is simple in that all you do is call the XMLHttpRequest object's send() method and pass it null.
Now that the code's been covered, open your text editor and type the following:
function HttpRequest(sUrl, fpCallback)
{
this.request = this.createXmlHttpRequest();
this.request.open("GET", sUrl, true);
var tempRequest = this.request;
function request_readystatechange()
{
if (tempRequest.readyState == 4)
{if (tempRequest.status == 200)
{
fpCallback(tempRequest.responseText);
}
else
{
alert("An error occurred trying to contact the server.");
}
}
}
this.request.onreadystatechange = request_readystatechange;
}
HttpRequest.prototype.createXmlHttpRequest = function ()
{
if (window.XMLHttpRequest)
{
        var oHttp = new XMLHttpRequest();
        return oHttp;
    }
    else if (window.ActiveXObject)
    {
        var versions =
        [
            "MSXML2.XmlHttp.6.0",
            "MSXML2.XmlHttp.3.0"
        ];

        for (var i = 0; i < versions.length; i++)
        {
            try
            {
                var oHttp = new ActiveXObject(versions[i]);
                return oHttp;
            }
            catch (error)
            {
              //do nothing here
            }
        }
    }

    return null;
}
HttpRequest.prototype.send = function ()
{
    this.request.send(null);
}Save this file as httprequest.js. You'll use it later in the chapter.
The goal of this module was to make asynchronous requests easier to use, so let's look at a brief code-only example and see if that goal was accomplished.
The first thing you need is a function to handle the data received from the request; this function gets passed to the HttpRequest constructor.
function handleData(sResponseText)
{
    alert(sResponseText);
}
This code defines a function called handleData() that accepts one argument called sResponseText. When executed, the function merely alerts the data passed to it. Now create an HttpRequest object and send the request.
var request = new HttpRequest("http://localhost/myTextFile.txt", handleData);
request.send();
Pass the text file's location and a pointer of the handleData() function to the constructor, and send the request with the send() method. The handleData() function is called in the event of a successful request.
This module encapsulates the code related to asynchronous XMLHttpRequest requests nicely. You don't have to worry about creating the request object, handling the readyStateChange event, or checking the request's status; the HttpRequest module does it all for you.
You've probably seen it many times: registering as a new user on a web site's forum or signing up for web-based e-mail, only to find that your desired user name is taken. Of course, you don't find this out until after you've filled out the entire form, submitted it, and watched the page reload with new data (not to mention that you've lost some of the data you entered). As you can attest, form validation can be a frustrating experience; thankfully, Ajax can soften this experience by sending data to the server before submitting the form — allowing the server to validate the data, and letting the user know the outcome of the validation without reloading the page!
In this section, you'll create a form that uses Ajax techniques to validate form fields. It's possible to approach building such a form in a variety of ways; the easiest of which to implement provides a link that initiates an HTTP request to the server application to check whether the user's desired information is available to use.
The form you'll build will resemble typical forms used today; it will contain the following fields:
Username(validated) — The field where the user types their desired user nameEmail(validated) — The field where the user types their e-mailPassword(not validated) — The field where the user types their passwordVerify Password(not validated) — The field where the user verifies their password
Note that the Password and Verify Password fields are just for show in this example. Verifying a password is certainly something the server application can do; however, it is far more efficient to let JavaScript perform that verification. Doing so adds more complexity to this example, and I want to keep this as simple as possible to help you get a grasp of using Ajax.
Next to the Username and Email fields will be a hyperlink that calls a JavaScript function to query the server with the HttpRequest module you built earlier in this chapter.
As mentioned earlier, Ajax is communication between the browser and server. So this example needs a simple server application to validate the form fields. PHP programming is beyond the scope of this book. However, I should discuss how to request data from the PHP application, as well as look at the response the application sends back to JavaScript.
The PHP application looks for one of two arguments in the query string: username and email.
To check the availability of a user name, use the username argument. The URL to do this looks like the following:
http://localhost/formvalidator.php?username=[usernameToSearchFor]
When searching for a user name, replace [usernameToSearchFor]
Searching for an e-mail follows the same pattern. The e-mail URL looks like this:
http://localhost/formvalidator.php?email=[emailToSearchFor]
A successful request will result in one of two values:
available— Means that the user name and/or e-mail is available for use.not available— Signifies that the user name and/or e-mail is in use and therefore not available.
These values are sent to the client in plain text format. A simple comparison will enable you to tell the user whether their name or e-mail is already in use.
This is a live-code Ajax example; therefore, your computer must meet a few requirements if you wish to run this example.
First, you need a web server. If you are using Windows 2000 (Server or Professional), Windows XP Professional, Windows Server 2003, Windows Vista Business or higher, or Windows Server 2008, you have Microsoft's web server software, Internet Information Services, freely available to you. To install it on Windows XP, open Add/Remove Programs in the Control Panel and click Add/Remove Windows Components. Figure 14-3 shows the Windows Component Wizard in Windows XP Professional.
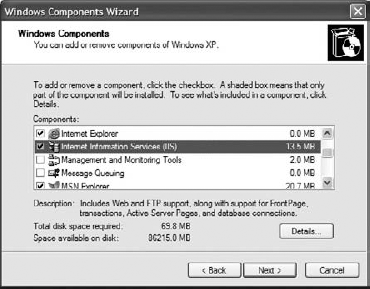
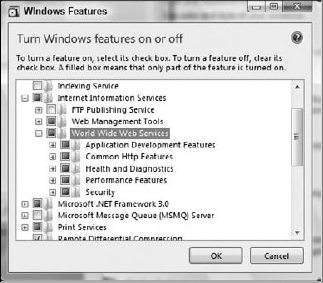
Check the box next to IIS and click Next to install. In Windows Vista, open the Programs and Features applet in the Control Panel and click the Turn Windows Features On or Off link in the side panel. Expand Internet Information Services and check the features you want to install. World Wide Web Services must be checked (Figure 14-4). You may need your operating system's installation CD to complete the installation.
If your operating system isn't in the preceding list, or you wish to use another web server application, you can install Apache HTTP Server (www.apache.org). This is an open-source web server and can run on a variety of operating systems, such as Linux, Unix, and Windows, to list only a few.
PHP is a popular open source server-side scripting language and must be installed on your computer if you wish to run PHP scripts. You can download PHP in a variety of forms (binaries, Windows installation wizards, and source code) at www.php.net. The PHP code used in this example was written in PHP 5.
Try It Out: XMLHttpRequest Smart Form
Open your text editor and type the following:
<!DOCTYPE html PUBLIC "-//W3C//DTD HTML 4.01//EN"
    "http://www.w3.org/TR/html4/strict.dtd">
<html>
<head>
    <title>Form Field Validation</title>
    <style type="text/css">
        .fieldname
        {
            text-align: right;
        }

        .submit
        {
            text-align: right;
        }
    </style>
    <script type="text/javascript" src="httprequest.js"></script>
    <script type="text/javascript">
        function checkUsername()
        {
            var userValue = document.getElementById("username").value;

            if (userValue == "")
            {
                alert("Please enter a user name to check!");
                return;
            }

            var url = "formvalidator.php?username=" + userValue;

            var request = new HttpRequest(url, checkUsername_callBack);
            request.send();
        }

        function checkUsername_callBack(sResponseText)
        {
            var userValue = document.getElementById("username").value;

            if (sResponseText == "available")
            {
                alert("The username " + userValue + " is available!");
            }
            else
            {
alert("We're sorry, but " + userValue + " is not available.");
}
}
function checkEmail()
{
var emailValue = document.getElementById("email").value;
if (emailValue == "")
{
alert("Please enter an email address to check!");
return;
}
var url = "formvalidator.php?email=" + emailValue;
var request = new HttpRequest(url, checkEmail_callBack);
request.send();
}
function checkEmail_callBack(sResponseText)
{
var emailValue = document.getElementById("email").value;
if (sResponseText == "available")
{
alert("The email " + emailValue + " is currently not in use!");
}
else
{
alert("I'm sorry, but " + emailValue + " is in use by another user.");
}
}
</script>
</head>
<body>
<form>
<table>
<tr>
<td class="fieldname">
Username:
</td>
<td>
<input type="text" id="username" />
</td>
<td>
<a href="javascript: checkUsername()">Check Availability</a>
</td>
</tr>
<tr>
<td class="fieldname">
Email:
</td>
<td><input type="text" id="email" />
</td>
<td>
<a href="javascript: checkEmail()">Check Availability</a>
</td>
</tr>
<tr>
<td class="fieldname">
Password:
</td>
<td>
<input type="text" id="password" />
</td>
<td />
</tr>
<tr>
<td class="fieldname">
Verify Password:
</td>
<td>
<input type="text" id="password2" />
</td>
<td />
</tr>
<tr>
<td colspan="2" class="submit">
<input type="submit" value="Submit" />
</td>
<td />
</tr>
</table>
</form>
</body>
</html>Save this file in your web server's root directory. If you're using IIS for your web server, save it as c:inetpubwwwrootvalidate_form.htm. If you're using Apache, you'll want to save it inside the htdocs folder: pathTohtdocshtdocsvalidate_form.htm.
You also need to place httprequest.js (the HttpRequest module) and the formvalidator.php file (from the code download) into the same directory as validate_form.htm.
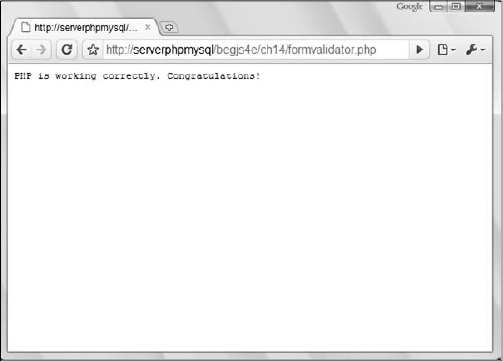
Now open your browser and navigate to http://localhost/formvalidator.php. If everything is working properly, you should see the text "PHP is working correctly. Congratulations!" as in Figure 14-5.
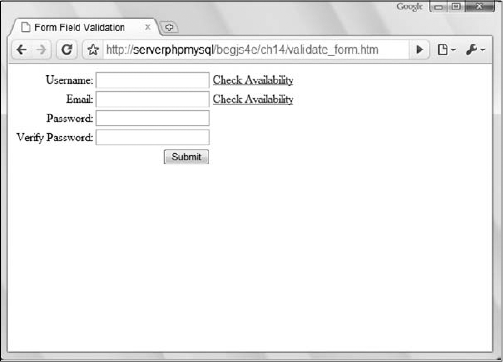
Now point your browser to http://localhost/validate_form.htm, and you should see something like Figure 14-6.
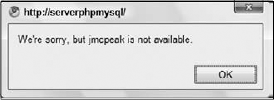
Type jmcpeak into the Username field and click the Check Availability link next to it. You'll see an alert box like the one shown in Figure 14-7.
Now type [email protected] in the Email field and click the Check Availability link next to it. Again, you'll be greeted with an alert box stating that the e-mail's already in use. Now input your own user name and e-mail into these fields and click the appropriate links. Chances are an alert box will tell you that your user name and/or e-mail is available (the user names jmcpeak and pwilton and the e-mails [email protected] and [email protected] are the only ones used by the application).
The body of this HTML page is a simple form whose fields are contained within a table. Each form field exists in its own row in the table. The first two rows contain the fields you're most interested in, the Username and Email fields.
<form>
    <table>
        <tr>
            <td class="fieldname">
                Username:
            </td>
            <td>
                <input type="text" id="username" />
            </td>
            <td>
                <a href="javascript: checkUsername()">Check Availability</a>
            </td>
        </tr>
        <tr>
            <td class="fieldname">
                Email:
            </td>
            <td>
                <input type="text" id="email" />
            </td>
            <td>
                <a href="javascript: checkEmail()">Check Availability</a>
            </td>
        </tr>
        <!-- HTML to be continued later -->
The first column contains text identifiers for the fields. The second column contains the <input/> elements themselves. Each of these tags has an id attribute, username for the Username field and email for the Email field. This enables you to easily find the <input/> elements and get the text entered into them. The third column contains an <a/> element. The hyperlinks use the javascript: protocol to call JavaScript code. In this case, the checkUsername() and checkEmail() functions are called when the user clicks the links. You'll examine these functions in a few moments.
The remaining three rows in the table contain two password fields and the Submit button (the smart form currently does not use these fields).
<!-- HTML continued from earlier -->
        <tr>
            <td class="fieldname">
                Password:
            </td>
            <td>
                <input type="text" id="password" />
            </td>
            <td />
        </tr>
        <tr>
            <td class="fieldname">
                Verify Password:
            </td>
            <td>
                <input type="text" id="password2" />
            </td>
            <td />
        </tr>
        <tr>
            <td colspan="2" class="submit">
                <input type="submit" value="Submit" />
            </td>
            <td />
        </tr>
    </table>
</form>
The CSS in this HTML page consists of only a couple of CSS rules.
.fieldname
{
    text-align: right;
}

.submit
{
    text-align: right;
}
These rules align the fields to give the form a clean and unified look.
As stated earlier, the hyperlinks are key to the Ajax functionality, as they call JavaScript functions when clicked. The first function, checkUsername(), retrieves the text the user entered into the Username field and performs an HTTP request using that information.
function checkUsername()
{
    var userValue = document.getElementById("username").value;

    if (userValue == "")
    {
alert("Please enter a user name to check!");
return;
}
var url = "formvalidator.php?username=" + userValue;
var request = new HttpRequest(url, checkUsername_callBack);
request.send();
}Use the document.getElementById() method to find the <input/> element and use the value property to retrieve the text typed into the text box. Then check to see if the user typed any text by comparing the userValue variable to an empty string (""). If the text box is empty, the function alerts the user to input a user name and stops the function from processing further. The application would make unnecessary requests to the server if the code didn't do this.
Next construct the URL to make the request to the PHP application and assign it to the url variable. The final steps in this function create an HttpRequest object, pass the URL and the callback function to the constructor, and send the request.
The checkUsername_callBack() function executes when the HttpRequest object receives a complete response from the server. This function uses the requested information to tell the user whether the user name is available. Remember, there are two possible values sent from the server, available and not available; therefore, you only need to check for one of these values.
function checkUsername_callBack(sResponseText)
{
    var userValue = document.getElementById("username").value;

    if (sResponseText == "available")
    {
        alert("The username " + userValue + " is available!");
    }
    else
    {
        alert("We're sorry, but " + userValue + " is not available.");
    }
}
If the server's response is available, the function tells the user that their desired user name is okay to use. If not, the alert box says that his user name is taken.
Checking the e-mail's availability follows an almost identical process. The checkEmail() function retrieves the text typed in the Email field, and passes that information to the server application.
function checkEmail()
{
    var emailValue = document.getElementById("email").value;

    if (emailValue == "")
    {
        alert("Please enter an email address to check!");
        return;
    }

    var url = "formvalidator.php?email=" + emailValue;
var request = new HttpRequest(url, checkEmail_callBack);
request.send();
}The checkEmail_callBack() function uses the same logic as checkUsername_callBack(), but it is based on the Email field's value.
function checkEmail_callBack(sResponseText)
{
    var emailValue = document.getElementById("email").value;

    if (sResponseText == "available")
    {
        alert("The email " + emailValue + " is currently not in use!");
    }
    else
    {
        alert("I'm sorry, but " + emailValue + " is in use by another user.");
    }
}
Once again, the function checks to see if the server's response is available, and lets the user know that the e-mail address is currently not being used. If the address is not available, a different message tells the user his e-mail is not available.
Using JavaScript to communicate between server and client adds tremendous power to the language's abilities. However, this power does not come without its share of caveats. The two most important issues are security and usability.
Security is a hot topic in today's Internet, and as a Web developer you must consider the security restrictions placed on Ajax. Knowing the security issues surrounding Ajax can save you development and debugging time.
Since the early days of Netscape Navigator 2.0, JavaScript cannot access scripts or documents from a different origin. This is a security measure that browser makers adhere to; otherwise, malicious coders could execute code wherever they wanted. The same-origin policy dictates that two pages are of the same origin only if the protocol (HTTP), port (the default is 80), and host are the same.
Consider the following two pages:
Page 1 is located at
http://www.site.com/folder/mypage1.htmPage 2 is located at
http://www.site.com/folder10/mypage2.htm
According to the same-origin policy, these two pages are of the same origin. They share the same host (www.site.com), use the same protocol (HTTP), and are accessed on the same port (none is specified; therefore, they both use 80). Since they are of the same origin, JavaScript on one page can access the other page.
Now consider the next two pages:
Page 1 is located at
http://www.site.com/folder/mypage1.htmPage 2 is located at
https://www.site.com/folder/mypage2.htm
These two pages are not of the same origin. The host is the same.. However, their protocols and ports are different. Page 1 uses HTTP (port 80) while Page 2 uses HTTPS (port 443). This difference, while slight, is enough to give the two pages two separate origins. Therefore, JavaScript on one of these pages cannot access the other page.
So what does this have to do with Ajax? Everything because a large part of Ajax is JavaScript. For example, because of this policy, an XMLHttpRequest object cannot retrieve any file or document from a different origin. You can easily overcome this hurdle by using the server in the page's origin as a proxy to retrieve data from servers of a different origin. This policy also affects the hidden frame/iframe technique. JavaScript cannot interact with two pages of different origins, even if they are in the same frameset.
One of the downsides of XMLHttpRequest is in ActiveX, and only affects Internet Explorer on Windows; however, IE currently has the highest market share of all browsers, and it seems that isn't going to change anytime soon. Over the past few years, more security concerns have been raised with ActiveX, especially since many adware and spyware companies have used the technology to install their wares onto trusting user's computers.
Because of this rise in the awareness of security concerns, Microsoft (and users) is taking steps to make the browser more secure from hijacking attempts by restricting access to ActiveX plug-ins and objects. If a user turns off ActiveX completely, or your site is flagged for a certain security zone, ActiveX objects cannot be created, rendering your XMLHttpRequest-based Ajax applications dead in the water.
Ajax breaks the mold of traditional web applications and pages. It enables developers to build applications that behave in a more conventional, non-"webbish" way. This, however, is also a drawback, as the Internet has been around for many, many years, and users are accustomed to traditional web pages.
Therefore, it is up to developers to ensure that the user can use their web pages, and use them as they expect to, without causing frustration.
One of the advantages of XMLHttpRequest is its ease of use. You simply create the object, send the request, and await the server's response. Unfortunately, this object does have a downside: most browsers do not log a history of requests made with the object. Therefore, XMLHttpRequest essentially breaks the browser's Back button. This might be a desired side-effect for some Ajax-enabled applications or components, but it can cause serious usability problems for the user.
At the time of this writing, IE 8 is the only browser that logs requests made with an
XMLHttpRequestobject in the history. One thing you have to keep in mind is that the Internet and browsers have been around much longer than Ajax, and users have come to expect certain behavior when they click the Back and Forward buttons. Breaking that behavior causes frustration for the user, and that's something a responsible developer must take into account when designing their application.
It's possible to avoid breaking the browser's navigational buttons by using an older Ajax technique: using hidden frames/iframes to facilitate client-server communication. You must use two frames in order for this method to work properly. One must be hidden, and one must be visible.
Note that when you are using an iframe, the document that contains the iframe is the visible frame.
The hidden-frame technique consists of a four-step process.
The user initiates a JavaScript call to the hidden frame. This can be done by the user clicking a link in the visible frame or some other form of user interaction. This call is usually nothing more complicated that redirecting the hidden frame to a different web page. This redirection automatically triggers the second step.
The request is sent to the server, which processes the data.
The server sends its response (a web page) back to the hidden frame.
The browser loads the web page in the hidden frame and executes any JavaScript code to contact the visible frame.
The example in this section is based upon the form validator built earlier in the chapter, but you'll use a hidden iframe to facilitate the communication between the browser and the server instead of an XMLHttpRequest object. Before getting into the code, you should first know about the data received from the server.
Note
The following example does not work in Safari 2, as it does not log the history of an iframe.
You expected only a few words as the server's response when using XMLHttpRequest to get data from the server. The response in this example is different and must consist of two things:
The data, which must be in HTML format
A mechanism to contact the parent document when the iframe receives the HTML response
The following code is an example of the response HTML page:
<!DOCTYPE html PUBLIC "-//W3C//DTD HTML 4.01//EN"
    "http://www.w3.org/TR/html4/strict.dtd">

<html>
<head>
    <title>Returned Data</title>
</head>
<body>
    <script type="text/javascript">
        //more code here
    </script>
</body>
</html>
This simple HTML page contains a single <script/> element in the body of the document. The JavaScript code contained in this script block is generated by the PHP application, calling either checkUsername_callBack() or checkEmail_callBack() in the visible frame and passing available or not available as their arguments. Therefore, the following HTML document is a valid response from the PHP application:
<!DOCTYPE html PUBLIC "-//W3C//DTD HTML 4.01//EN"
    "http://www.w3.org/TR/html4/strict.dtd">

<html>
<head>
    <title>Returned Data</title>
</head>
<body>
    <script type="text/javascript">
        top.checkUsername_callBack("available", "some_username");
    </script>
</body>
</html>
The user name is available in this sample response. Therefore, the HTML page calls the checkUsername_callBack() function in the parent window and passes the string available. Also, the searched user name (or e-mail) is sent back to the client because the client application will display the correct user name or e-mail when the Back or Forward button is pressed. With the response in this format, you can keep a good portion of the JavaScript code the same.
Try It Out: Iframe Smart Form
The code for this revised smart form is very similar to the code used previously with the XMLHttpRequest example. There are, however, a few changes. Open up your text editor and type the following:
<!DOCTYPE html PUBLIC "-//W3C//DTD HTML 4.01//EN"
    "http://www.w3.org/TR/html4/strict.dtd">

<html>
<head>
    <title>Form Field Validation</title>
<style type="text/css">
.fieldname
{
text-align: right;
}
.submit
{
text-align: right;
}
#hiddenFrame
{
    display: none;
}
</style>
<script type="text/javascript">
function checkUsername()
{
    var userValue = document.getElementById("username").value;

    if (userValue == "")
    {
        alert("Please enter a user name to check!");
        return;
    }

    var url = "iframe_formvalidator.php?username=" + userValue;

    frames["hiddenFrame"].location = url;
}
function checkUsername_callBack(data, userValue)
{
    if (data == "available")
    {
        alert("The username " + userValue + " is available!");
    }
    else
    {
alert("We're sorry, but " + userValue + " is not available.");
    }
}
function checkEmail()
{
var emailValue = document.getElementById("email").value;
if (emailValue == "")
{
alert("Please enter an email address to check!");
return;
}
var url = "iframe_formvalidator.php?email=" + emailValue;
frames["hiddenFrame"].location = url;}
function checkEmail_callBack(data, emailValue)
{
if (data == "available")
{
alert("The email " + emailValue + " is currently not in use!");
}
else
{
alert("We're sorry, but " + emailValue
+ " is in use by another user.");
}
}
</script>
</head>
<body>
<form>
<table>
<tr>
<td class="fieldname">
Username:
</td>
<td>
<input type="text" id="username" />
</td>
<td>
<a href="javascript: checkUsername()">Check Availability</a>
</td>
</tr>
<tr>
<td class="fieldname">
Email:
</td>
<td>
<input type="text" id="email" />
</td>
<td>
<a href="javascript: checkEmail()">Check Availability</a>
</td>
</tr>
<tr>
<td class="fieldname">
Password:
</td>
<td>
<input type="text" id="password" />
</td>
<td />
</tr>
<tr>
<td class="fieldname">
Verify Password:
</td><td>
<input type="text" id="password2" />
</td>
<td />
</tr>
<tr>
<td colspan="2" class="submit">
<input type="submit" value="Submit" />
</td>
<td />
</tr>
</table>
</form>
<iframe src="about:blank" id="hiddenFrame" name="hiddenFrame" />
</body>
</html>Save this file as validate_iframe_form.htm, and save it in your web server's root directory. Also locate the iframe_formvalidator.php file from the code download and place it in the same directory.
Open your web browser and navigate to http://localhost/validate_iframe_form.htm. You should see something like what is shown in Figure 14-8.

Check for three user names and e-mail addresses. After you clear the final alert box, press the browser's Back button a few times. You'll notice that it is cycling through the information you previously entered. The text in the text box will not change; however, the alert box will display the names and e-mails you entered. You can do the same thing with the Forward button.
The HTML in the body of the page remains unchanged except for the addition of the <iframe/> tag after the closing <form/> tag.
<iframe src="about:blank" id="hiddenFrame" name="hiddenFrame" />
This frame is initialized to have a blank HTML page loaded. Its name and id attributes contain the value of hiddenFrame. Use the value of the name attribute later to retrieve this frame from the frames collection in the BOM. Next, I set the CSS for the frame.
#hiddenFrame
{
display: none;
}This rule contains one style declaration to hide the iframe from view.
Hiding an iframe through CSS enables you to easily show it if you need to debug the server-side application.
Next up, the JavaScript.
function checkUsername()
{
var userValue = document.getElementById("username").value;
if (userValue == "")
{
alert("Please enter a user name to check!");
return;
}
var url = "iframe_formvalidator.php?username=" + userValue;
frames["hiddenFrame"].location = url;
}The checkUsername() function has undergone a small change: It makes a request via the iframe instead of using XMLHttpRequest. It starts by retrieving the value of the Username text box. It then checks to see if the user typed anything into the box; if not, an alert box displays a message to the user telling her to enter a user name. If the value isn't an empty string, then the function continues and constructs the request URL. The final step is to load the URL into the hidden iframe by using the frames collection and the location property.
The second function, checkUsername_callBack(), is also slightly changed. It now accepts two arguments: the first will contain either available or not available, and the second will contain the user name sent in the request.
function checkUsername_callBack(data, userValue)
{
if (data == "available")
{
alert("The username " + userValue + " is available!");
}
else
{alert("We're sorry, but " + userValue + " is not available.");
}
}The function first checks to see if the user name is available. If so, an alert box tells the user that the user name is available. If not, the user sees an alert box stating that the user name is not available.
The functions for searching e-mail addresses follow the same pattern as those for searching user names.
function checkEmail()
{
    var emailValue = document.getElementById("email").value;

    if (emailValue == "")
    {
        alert("Please enter an email address to check!");
        return;
    }

    var url = "iframe_formvalidator.php?email=" + emailValue;

    frames["hiddenFrame"].location = url;
}

function checkEmail_callBack(data, emailValue)
{
    if (data == "available")
    {
        alert("The email " + emailValue + " is currently not in use!");
    }
    else
    {
        alert("We're sorry, but " + emailValue + " is in use by another user.");
    }
}
The checkEmail() function retrieves the text box's value, checks to see if the user entered data, constructs the URL, and loads the URL into the iframe.
The checkEmail_callBack() function contains changes similar to those made to checkUsername_callBack(). The function now accepts two arguments, checks to see if the e-mail is available, and displays a message accordingly.
The web browser is just like any other conventional application in that user interface (UI) cues tell the user that something is going on. When a user clicks a link, the throbber animation runs, an hourglass appears next to the cursor (in Windows), and a status bar usually shows the browser's progress in loading the page.
This is another area in which Ajax solutions, and XMLHttpRequest specifically, miss the mark. This problem, however, is simple to overcome: Simply add UI elements to tell the user something is going on and remove them when the action is completed. Consider the following code:
function requestComplete(sResponseText)
{

    //do something with the data here

    document.getElementById("divLoading").style.display = "none";
}

var myRequest = new HttpRequest("http://localhost/myfile.txt", requestComplete);
document.getElementById("divLoading").style.display = "block";//show that we're loading
myRequest.send();
This code uses the HttpRequest module built earlier to request a text file. Before sending the request, retrieve an HTML element in the document with an id of divLoading. This <div/> element tells the user that data is loading; hide it when the request completes, which lets the user know that the loading process is completed.
Offering this information to your users lets them know the application is performing some operation that they requested. Otherwise, they may wonder if the application is working correctly when they click something and see nothing instantly happen.
In a perfect world, the code you write would work every time it runs. Unfortunately, you have to face the fact that many times Ajax-enabled web pages will not use the Ajax-enabled goodness because a user turned off JavaScript in his browser.
The only real answer to this problem is to build an old-fashioned web page with old-fashioned forms, links, and other HTML elements. Then, using JavaScript, you can disable the default behavior of those HTML elements and add Ajax functionality. Consider this hyperlink as an example:
<a href="http://www.wrox.com" title="Wrox Publishing">Wrox Publishing</a>
This is a normal, run-of-the-mill hyperlink. When the user clicks it, it will take them to http://www.wrox.com. By using JavaScript, you can override this action and replace it with your own.
<a href="http://www.wrox.com" title="Wrox Publishing"
   onclick="return false;">Wrox Publishing</a>
The key to this functionality is the onclick event handler, highlighted in this code, and returning a value of false. You can execute any code you wish with the event handler; just remember to return false at the end. This tells the browser to not perform its default action when the link is clicked. If the user's JavaScript is turned off, the onclick event handler is ignored, and the link behaves as it normally should.
As a rule of thumb, build your web page first and add Ajax later.
This chapter introduced you to Ajax, and it barely scratched the surface of Ajax and its many uses.
You looked at the
XMLHttpRequestobject, and how it differed between IE 5 & 6, and the other browsers. You learned how to make both synchronous and asynchronous requests to the server and how to use theonreadystatechangeevent handler.You built your own Ajax module to make asynchronous HTTP requests easier for you to code.
You used our new Ajax module in a smarter form, one that checks user names and e-mails to see if they are already in use.
You discussed how
XMLHttpRequestbreaks the browser's Back and Forward buttons, and addressed this problem by rebuilding the same form by using a hidden iframe to make requests.You looked at some of the downsides to Ajax, the security issues and the gotchas.
Suggested solutions for these questions can be found in Appendix A.
Extend the
HttpRequestmodule to include synchronous requests in addition to the asynchronous requests the module already makes. You'll have to make some adjustments to your code to incorporate this functionality. (Hint: Create anasyncproperty for the module.)It was mentioned earlier in the chapter that the smart forms could be modified to not use hyperlinks. Change the form that uses the
HttpRequestmodule so that the user name and e-mail fields are checked when the user submits the form. Use the form'sonsubmitevent handler and cancel the submission if a user name or e-mail is taken. Also use the updatedHttpRequestmodule from Question 1 and use synchronous requests. The only time you need to alert the user is when the user name or e-mail is taken, so make sure to returntrueif the user name and e-mail pass muster.