
CHAPTER 2
Quickstart: Setting Up a
Joomla! Site in 20 Minutes
Joomla installation can be a tricky process, because it leverages the operating system's security functions as well as three independently developed server systems: web server (Apache or IIS), code execution engine (PHP), and MySQL. Running into at least one problem during installation is fairly common.
For this reason, I've tried to include as many screen shots as possible in this Quickstart chapter, so you can see what's going on at each step of the process. If you encounter a problem, please take a deep breath and don't worry—you won't be left to your own devices. If you can't find the solution to your problem in the "Troubleshooting" section of the next chapter, you can turn to the thousands of people on the Joomla forums (http://forum.joomla.org) for help. It's been my experience that if you do so, you'll receive a quick and clear answer.
The figures included here are mostly from an installation performed on the Windows platform. Joomla is cross-platform, however, so regardless of whether your final deployment server runs Windows, you can execute design and development experiments on a different operating system.
Let's jump right in!
Note You have several ways to install Joomla. I chose to outline the manual approach in this chapter because it applies to the greatest number of users. However, your web hosting provider may have a custom installer available through a control panel or cPanel utility (or LxAdmin/Installapp; see http://lxlabs.com) that executes the installation via a script like those available from Fantastico (http://netenberg.com/fantastico.php). If you choose that route of installation, make sure the Joomla version available matches the most current version on the Joomla site. Also, you can use Joomla Stand Alone Server (JSAS; see http://jsas.joomlasolutions.com) if you want a turnkey installation for all the required servers.
Installing Joomla!
Before you begin, make certain that your web host can handle the Joomla system. The minimum system requirements are as follows:
- Apache 1.3 or above
- PHP 4.3.10 or above
- MySQL 3.23 or above
Almost all web hosts that support these technologies will have more advanced versions than the minimums just listed. Nonetheless, if your host provides at least the bare minimum requirements, most likely you will be able to install Joomla.
Don't spend too much time trying to track down the version numbers of the hosting servers, as web hosting providers are notorious for not documenting these sorts of things. If you run into problems with the installation, checking version numbers may put you on the right track toward resolving your problem.
Caution The PHP installation must also include support for MySQL, XML, and zlib (these are additional modules outside the vanilla PHP installation). In most cases, you won't be able to find whether these modules have been installed on the support section of your web host. If the host complies with the other requirements, you're probably best just trying a Joomla installation. The installer performs a preinstallation check and will let you know if these capabilities are missing.
Modern web browsers will have no trouble viewing either the user front-end or the Administrator interface of Joomla. Any version of Internet Explorer after 5.5 will work fine, and Opera version 7 and above displays Joomla properly. All versions of Mozilla Firefox and Apple Safari will display a Joomla site properly. For viewing the default front page of Joomla, a web visitor will not need JavaScript enabled, although many of the Joomla extensions use JavaScript to improve user interaction. The Administrator interface requires JavaScript, however, so be sure to have it enabled before you begin the installation.
The examples in this chapter are demonstrated using a web server running on Linux and a Windows Vista desktop machine for browser and FTP access. If your configuration is different from this one, you should still be able to follow the instructions, even if the graphical user interfaces don't match exactly. Once Joomla is installed and running, nearly all interaction will take place through the Joomla web interface, which should look identical on most platforms.
Downloading the Joomla! CMS
To begin, you'll need to download the Joomla archive with the most current stable release. When I tried to download Joomla for the first time, I was confused by all the files that appeared in the download list. The Joomla development team frequently releases patches to eliminate bugs or mend possible security holes. Therefore, the files that head the list on the Joomla web site tend to be the newest patches. Since you're doing a new installation, you need a complete installation of a stable release.
To start, go to the Joomla web site at www.joomla.org and click the Download Joomla link as shown in Figure 2-1. This will take you to the list of available download files.
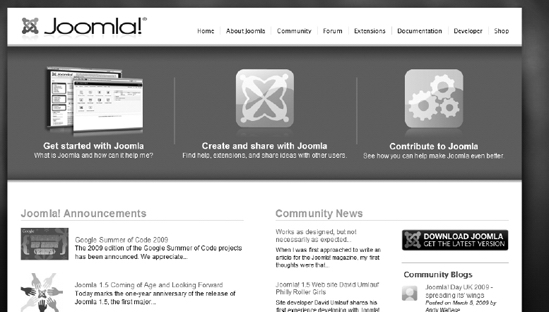
Figure 2-1. Click the Download link to access the Joomla file library.
Look through the list until you locate a file titled something like the following, where VVV is the current version:
Joomla_VVV Full Package ZIP
Figure 2-2 shows the Joomla download page and the list of files available. Since Joomla releases new versions frequently, it's a certainty that the version numbers on the files listed in the figure will not match the ones you see on your screen. You need to select the newest complete package (labeled "stable" or "full") equal to or greater than version 1.5.
If you're running on a Linux platform, you'll probably want to download one of the tarball archives (.tar.gz or .tar.bz2) instead of the ZIP file to perform the installation. Simply click the "Download other Joomla 1.5.x packages" link on the download page to gain access to all of the various download formats available. There should be no difference between the actual files contained in the different archives—only a different method used to collect and compress the files.
Click the desired Joomla link and save the file to your local drive.
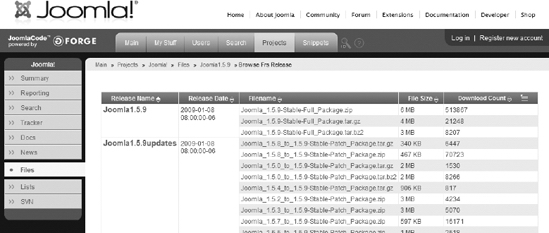
Figure 2-2. Find the latest full or stable package on the Joomla download site.
Extracting the Joomla! Files
Once the package file has been saved to your local drive, you will need to extract the installation files from the archive before you can upload them to the web server. If you're running Windows XP (or later) or Mac OS X, you can simply double-click the ZIP archive to open it. If you're running an older version of Windows, you'll have to download one of the numerous popular ZIP applications, such as WinZip or 7-Zip, from the Web in order to open the archive.
In Figure 2-3, you'll see that I've opened the file. While the files in your archive probably won't exactly match those shown in the figure, the folders and number of files should be similar. To extract them to your local drive, simply drag and drop them to the folder where they will be stored.
I created a folder called Joomla1_5install and extracted all of the Joomla files and folders into it. What you name this folder isn't important as long as you remember its location on your hard drive. In the next step, you'll use FTP to copy the files to your web server.
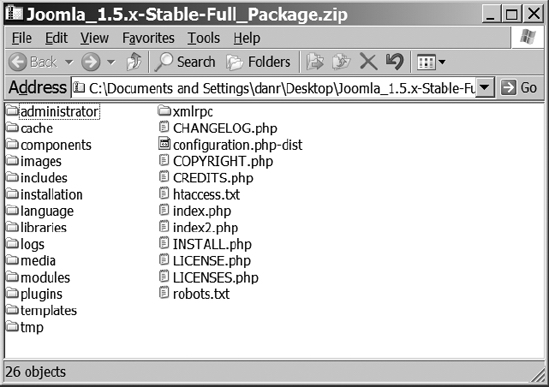
Figure 2-3. The opened archive shows all of the Joomla files and folders.
Uploading Files to Your Web Host FTP
Most FTP programs are very similar because FTP applications are specialty transfer utilities that serve one function and do it very well. If you have FTP software that you are already accustomed to using, please continue using that software here, as you should be able to easily adapt these instructions to your situation. If you don't have a preferred FTP program, I recommend downloading FileZilla from http://filezilla.sourceforge.net.
FileZilla is a full-featured, free, open source, multiplatform (Windows, Linux, Mac OS X, and Mac OS 9) FTP client. I use FileZilla here to demonstrate the Joomla upload. These general steps should parallel the process you'll use for most FTP applications.
Note There is also a free FileZilla FTP server available at the FileZilla web site if you would like to run an FTP server. If you will be running the web server that's hosting Joomla, you can install the FTP server to allow yourself or others to access files through an FTP program.
When you have FileZilla installed, execute it (or open your current FTP application). To access your FTP server, you can either put the parameters for your FTP site into the Quick-connect fields at the top of the screen or click the Site Manager icon (see Figure 2-4) to create a new site. I recommend creating a site entry because you will probably be editing some of the Joomla files and uploading them in the future.

Figure 2-4. Click the Site Manager icon to create a new site.
For the host, enter the address of your FTP server (likely it will be something like ftp.example.com). The standard FTP port is 21; that will work for most users. If you have problems connecting, check your firewall settings to make sure port 21 isn't blocked.
For logontype select Normal so FileZilla will send the username and password. Enter the username and password for the FTP server. Note that some web providers supply a different username/password for their FTP sites than their main web logins. Be sure to check the support area of your web provider's site for information on FTP configuration.
Note If your web host is Go Daddy, the FTP address that goes in the Host field in FileZilla will be the core of the URL from your web site (e.g., www.example.com) instead of an address that starts with ftp. Also, your FTP login will be the same username and password that you selected when you initially created the Go Daddy hosted site.
When you have entered the FTP information, click the Connect button. FileZilla will return you to the main screen and display the login progress. Once connected, the window labeled Remote Site should populate with the files on the web server. Most FTP sites on web servers navigate directly to the root directory of the web site. If your FTP host does not take you to the root automatically, navigate to it now.
For the Local Site directory in your FTP program, change the directory until it matches the folder where you earlier extracted the Joomla files and folders. Once you've reached the proper directory (i.e., Joomla1_5install), select all of the files and folders in the Joomla installation folder. You're now ready to upload Joomla.
In FileZilla, you can right-click any of the highlighted files or folders and select the Upload option. The items will begin uploading, and the bottom-right corner of the FileZilla window (see Figure 2-5) will display the total kilobytes in the queue to be transferred to the server. As the files upload, this queue total will decline until it reaches zero.
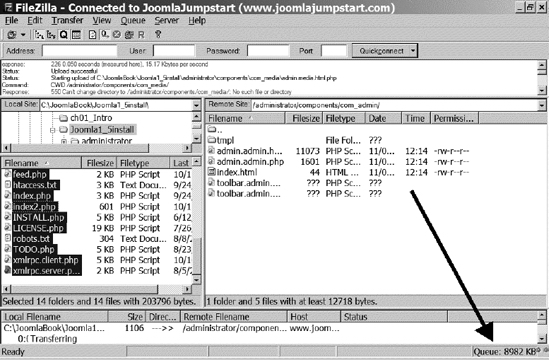
Figure 2-5. FileZilla shows the file upload progress in the bottom-right corner.
Once the files are uploaded, you're ready to configure MySQL for Joomla to store content data. With MySQL ready, you can move to the "Using the Joomla Installation Wizard" section of this chapter to complete the Joomla setup.
Note Don't delete the files for the Joomla installation on your local drive. You'll need them for a modification or two later. It is generally a good idea to keep a copy of the Joomla files that you'll be using on your site in case anything becomes corrupted (or hacked) on the main site. That way the proper files can be easily restored.
Preparing Go Daddy for Joomla!
Go Daddy (www.godaddy.com) is a very popular and inexpensive web hosting provider that makes a good host for a Joomla web site. Go Daddy was chosen for this Quickstart because of its general popularity and accessibility.
If you are using another web hosting provider, the following process may closely mirror the setup you will perform. The procedure described here is generally similar to the process used for many PHP/MySQL applications.
If you want to set up your own web server and run Joomla, I suggest turning to the next chapter and looking over the installation instructions there.
Tip Some providers that specialize in hosting Joomla web sites are said to have better site performance because they are specifically tuned to the needs of Joomla. That gives them advantages over Go Daddy, especially for sites with high visitor volume. If you haven't already selected a web hosting provider, be sure to do a web search for recommendations on the best Joomla host. You can find a list of some Joomla hosts at http://forum.joomla.org/index.php/topic,6856.0.html. Doing a little research will help you make an informed choice when considering the various factors (support, performance, price, etc.) of Joomla hosting.
The process described in this section details manual installation of Joomla on a Go Daddy web site account. You might have noticed that Go Daddy already includes Joomla as a Value-Added Application (VAA). You may be thinking that it would be much easier to simply use the version of Joomla that is available for free through your account. VAA installation is easier, but there are two reasons that I recommend you perform the installation by hand: directory location and version control.
With the Go Daddy VAA installation, you can't control the directory location of the installation. The Value-Added option sets the location automatically, and it's not at the root directory of your web site path, but instead within a folder named joomla. Given that location, the URL to the Joomla site must include the folder name, so it would appear like this:
http://www.example.com/joomla/index.php
For most people, this directory allocation is not ideal, even if they don't want Joomla at the root directory. By installing Joomla yourself, the URL can appear as you would expect it:
http://www.example.com/index.php
The other disadvantage of using the VAA installation is the lack of control over the version of Joomla that will be used. The Joomla installer on the Go Daddy site may not be (and often isn't) the most current. New versions have added features, important bug fixes, and strengthened security. When you install a version of Joomla available on www.joomla.org manually, you can choose exactly the revision you want.
Determining the Go Daddy Operating System
Before you begin the installation process, you'll need to make sure you can execute Joomla on the Go Daddy server, which means your account must be set to handle Linux/PHP. If your account is set to Windows/ASP, you won't be able to execute the PHP code to run Joomla. Don't worry if you currently have the account set to Windows, though—you can change it easily enough. Just be aware that once you change this setting, you will no longer be able to run your ASP applications on that site.
Log into the Go Daddy site and display your Managed Host list. In Figure 2-6, you can see my joomlajumpstart.com account in the list. Click the Open link in the Control Panel column of the site row.

Figure 2-6. Click the Open link to display the account Control Panel.
The Control Panel displays the configuration information for your account. In the Account Summary area, you will see the operating system that is currently selected for this account. To host Joomla, the account operating system should be Linux, as it is in Figure 2-7.
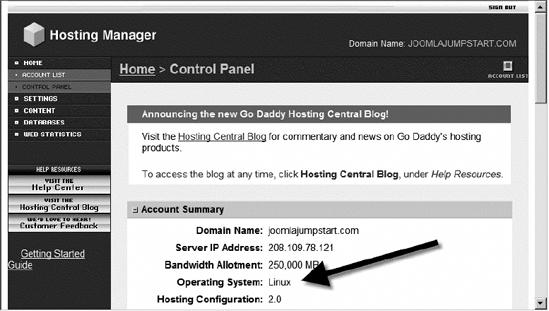
Figure 2-7. The operating system should be Linux for proper Joomla hosting.
If the wrong operating system is active, return to the Manage Host window. Select the check box to the left of the account you want to change. Click the Switch Operating System link (see Figure 2-8) to change the operating system to Linux.
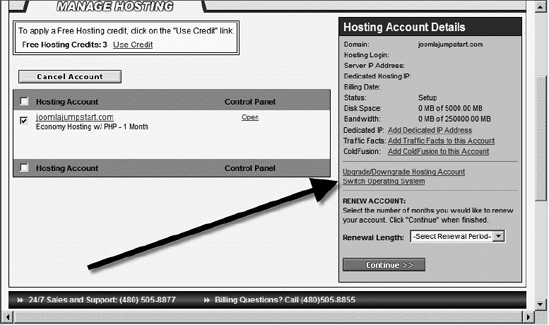
Figure 2-8. The Switch Operating System link will take you to the reconfiguration page.
Before you run the Joomla installer, you will create a MySQL database where Joomla can write content and settings. Database creation generally requires special permissions that many web providers restrict from automated access (so Joomla can't create the database itself). If you create the database by hand, you can still let Joomla do the heavy lifting of creating the tables and inserting the data into the database.
Note If you have administrator privileges on your MySQL server, you can let Joomla create the database for you. Since the procedure detailed here presumes that you're installing on a web hosting service, it instructs you on creating the database manually. See Chapter 3 if you want more information on Joomla automatic database creation.
Return to the Control Panel window if you left it to change the operating system. Scroll down until you reach the Databases area, which contains the MySQL button, as shown in Figure 2-9. Click the MySQL button to open the page that provides management for the MySQL databases.
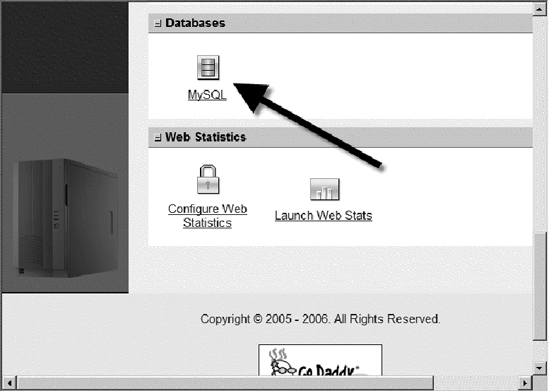
Figure 2-9. Click the MySQL button to open the database administration page.
The MySQL administration page will display the currently available databases. On the site shown in the figure, there are currently no databases. Below the database list is a Create New Database button. If you haven't already created the Joomla database, click the button (see Figure 2-10).
GoDaddy will take you to the template screen to enter the information to create a database. Enter JoomlaDB_Main in the Description field. Enter the same text in the User Name field (see Figure 2-11).
This may be slightly confusing, but the User Name field will actually be the name of the database that is created. Setting this field to the same text as the description makes things easier to manage. Note that the User Name is limited to 16 characters and must be unique on the shared MySQL server. On Go Daddy, many users share the same database server, and the database name must not match one already created by another user. Enter a password and a confirmation of that password, and then click the Continue button.
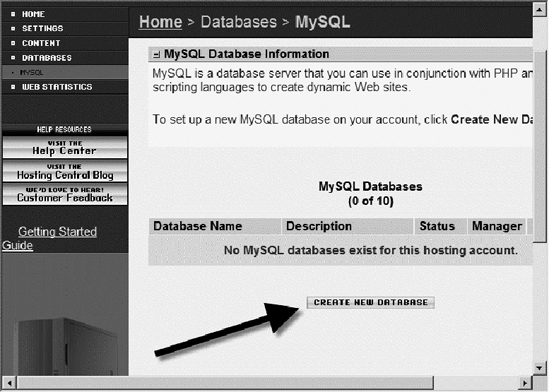
Figure 2-10. To add a new database, click the Create New Database button.
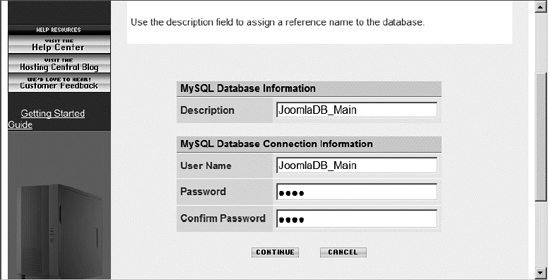
Figure 2-11. Enter the database name in the User Name field.
You will be asked to verify the entered information. Click the Create Database button to continue. Once Go Daddy creates the database, you'll be returned to the MySQL administration screen. Your database should be visible, as shown in Figure 2-12, and the entry in the Status column will most likely read Pending Setup. That means that the Go Daddy server is performing the administration setup tasks.

Figure 2-12. Go Daddy shows Pending Setup as the status when its servers are working on the setup procedure.
The Pending Setup status generally lasts about 15 minutes, but it can take up to several hours on a busy day. Click the MySQL link in the left menu to refresh the MySQL Databases page. Once setup is complete, the Status column will change to read Setup (see Figure 2-13) and the Open Manager button will be available to open the phpMyAdmin application.
The basic setup on Go Daddy is complete. The remainder of the setup is performed in the same manner as any Joomla installation: through the Joomla Installation Wizard.
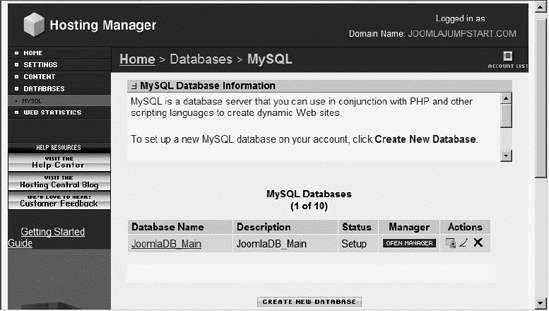
Figure 2-13. When database setup is complete, the Status column entry will change to Setup and the Open Manager button will activate.
Using the Joomla! Installation Wizard
With MySQL configured and Joomla uploaded to your web host, you're ready to begin the Joomla Installation Wizard. Open a browser window and enter the URL address of the location of the Joomla files. For example, on a site called "example," you might access the Joomla Installation Wizard with the following URL: http://www.example.com/index.php.
The Joomla wizard will load and display the first screen, which presents the language options for the site (see Figure 2-14).
Note If the Joomla application doesn't load, it's difficult to guess what the problem might be. Perhaps your web server isn't executing PHP, or maybe you copied the Joomla installation to a different location than the URL address you entered. If you can't figure out the issue, turn to the "Troubleshooting" section in the next chapter for help.
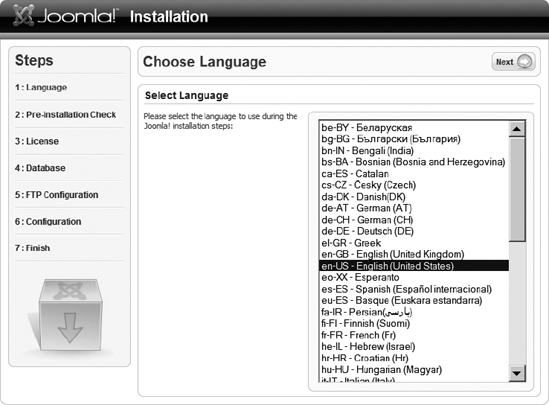
Figure 2-14. The first screen of the Joomla Installation Wizard allows you to select the language to use for the Joomla installation.
All of the user interfaces (including front-end, installation, and administration) will be presented in the selected language (if the installer you downloaded includes that language pack). Joomla has significant multilingual support. At the time of this writing, Joomla supports the following languages: Afrikaans, Arabic, Armenian, Basque, Belarusian, Bengali (India), Bengla/Bengali (Bangladesh), Bosnian, Bulgarian, Catalan, Chinese Simplified, Chinese Traditional, Croatian, Czech, Danish, Dutch, English, Esperanto, Finnish, French, Georgian, German (Austrian), Greek, Hebrew, Hungarian, Italian, Japanese, Korean, Laotian, Latvian, Lithuanian, Malay, Montenegrin, Norwegian, Persian, Polish, Portuguese (Brazil), Portuguese (Portugal), Romanian, Russian, Serbian, Sindhi, Sinhala, Slovak, Spanish, Swedish, Syriac, Tamil, Thai, Turkish, Ukrainian, and Vietnamese. That's quite a mouthful!
Once you've selected the language in which you intend to use Joomla, click the Next button at the top-right corner of the screen.
Note Joomla isn't limited to a single language. After the installation is complete, you can add additional languages to use for site presentation. Joomla even allows users to select the display language of the site from the installed language packs. This means (at least for the site interface) that a visitor can read the site in their native language. Further, different languages can be selected for the front- and back-ends.
The second step of the Installation Wizard is the preinstallation check. Figure 2-15 shows that the first set of Joomla checks confirm that the correct versions of PHP and MySQL are installed and that the configuration.php file is writable.
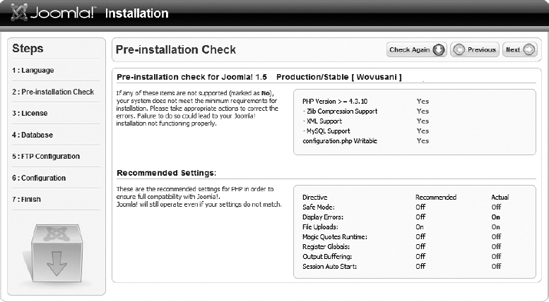
Figure 2-15. The preinstallation check queries the web server configuration and reports any problems on the Pre-installation Check screen.
If any of these settings do not match the Joomla recommendations, you should consult your service provider for ways to remedy the problem. If your provider offers no way of resolving these problems, you will have to change providers to run Joomla.
The Recommended Settings area of the Pre-installation Check screen displays the settings that will make Joomla operate best. Options on the PHP server such as Safe Mode, Display Errors File Uploads, Magic Quotes Runtime, Register Globals, Output Buffering, and Session Auto Start are all features that should be properly configured.
If everything checks out, click the Next button at the top-right corner of the screen.
GNU General Public License
On the screen shown in Figure 2-16, you must accept the GNU General Public License (GPL) to continue with the installation. I recommend you read the license, as it is straightforward and limits the amount of legalese you'll have to dig through to get to actual rights and restrictions.
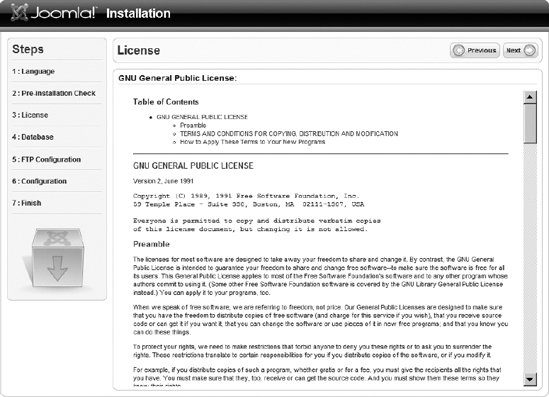
Figure 2-16. You must agree to the GNU GPL terms to use Joomla.
The most important points of the GNU GPL include the following:
- Grants the right to use the program for any desired purpose
- Grants the right to access the source code and modify it
- Grants the right to redistribute the program and its source code
- Grants the right to release program modifications to the public (but public release is not required; program modifications can be kept private or in-house)
- Stipulates the requirement that derivative works must also be licensed under the GPL (meaning you can't take Joomla, repackage it, and sell it as a proprietary application)
Note Following the release of Joomla 1.5, the Joomla team clarified their position on the GPL and stated that it was released under "(pure) GPL." This means that there can be no proprietary extensions for Joomla—essentially any Joomla extension that is publicly distributed must also be released under the GPL. If the extension is not distributed, it does not have to comply with the GPL source code distribution requirement (so private commercial consulting is still possible). Before performing commercial development, be sure to check on the Joomla site for the rules governing this area.
If you're okay with the terms of the GNU GPL, click the Next button to advance to the database configuration. This screen will likely be the most difficult to get configured properly—depending on your hosting provider.
MySQL Database Configuration
The MySQL Database Configuration screen (see Figure 2-17) accepts the parameters to address your (or your web host's) MySQL installation. The first database setting is an options box that allows you to choose your database type. Currently, mysql is the only database option, but there are plans for future versions to include support for Oracle, Microsoft SQL Server, and a variety of other database servers.
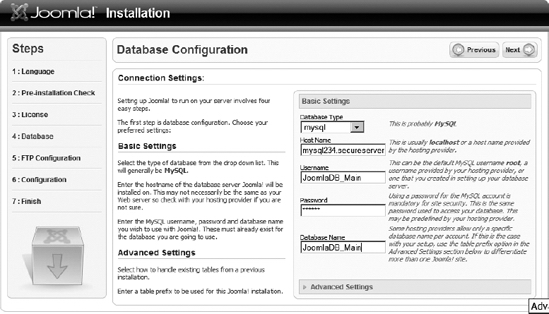
Figure 2-17. The Database Configuration screen lets you set up Joomla for interaction with the MySQL database.
If you're running Joomla on your own server, the Host Name setting will nearly always be localhost. This means that the database server will be running on the machine that is also hosting the web page.
On a web hosting provider, the procedure is a little different. For Go Daddy, you need to get the MySQL server address where your database is stored. At the main Control Panel in Go Daddy, you will need to click the Connection Settings icon shown in Figure 2-18.
A pop-up will display all of the important information for the MySQL connection. Figure 2-19's arrows indicate where the username, database name, and server address are located in the Connection Settings window. If you have the Joomla screen still open, you can simply copy the information from the Connection Settings window into the Joomla fields.
Enter the username and password now. You can click the Get Permissions button if you have full account administrator privileges.
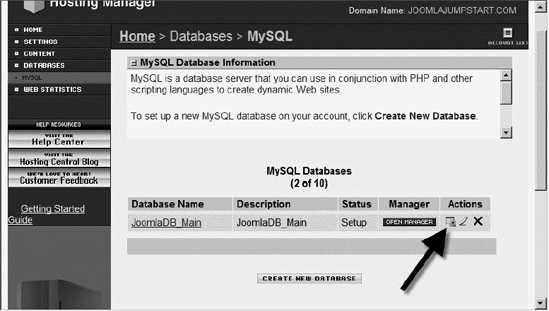
Figure 2-18. Click the Connection Settings icon for information about the MySQL connection.
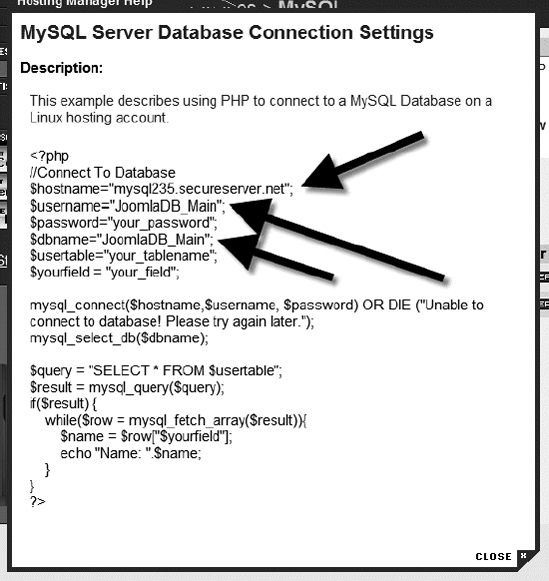
Figure 2-19. The connection settings you will need for Joomla MySQL configuration
Tip When you click the Get Permissions button, the Joomla system will attempt to connect to your MySQL database server for the first time. If the connection fails, MySQL is notorious for providing unhelpful error messages. No matter what the problem, you will likely get a simple message that essentially states, "Cannot connect to MySQL." If you have a connection problem, take a look at Chapter 3, where the solutions to a number of common MySQL problems are presented.
The installer will query the database to determine if you have account administrator privileges. If you are using a web host or have not given the account the proper security clearance, Joomla will display a message box like the one shown in Figure 2-20.
This message box lets you know that you have not been granted the proper permissions to create a database. Since you've already created the database, you don't need to create a fresh one. Before you can activate your existing database, click the Get Privileges button to make sure that the configuration settings are correct (see Figure 2-21).
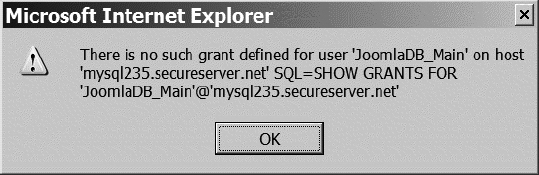
Figure 2-20. Message box explaining the lack of granted permissions on the server
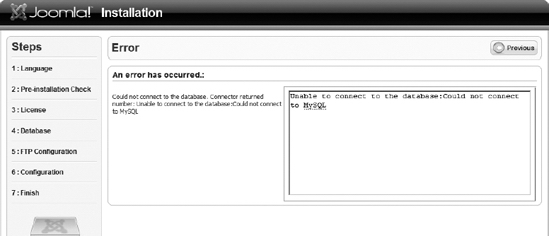
Figure 2-21. Click the Get Privileges button to check if the database configuration is correct. This error will be displayed if there is a connection problem.
You will be presented with a drop-down list of collation options. Depending on your MySQL configuration, you will most likely see a default setting of either latin-1 or utf8-general-ci. You can leave this default setting alone, as changing it is usually necessary only if you will be using a language other than English for Joomla access.
In the next field, Database Name, you will enter either the existing database name or the name of the database to create if Joomla will be creating the database for you. Enter JoomlaDB_Main to match the database you created earlier.
Finally, if you have old Joomla tables already installed that you don't want to write over, you can expand the Advanced Settings tab (see Figure 2-22). The settings here provide the opportunity to either delete (drop) the existing tables or back them up under adjusted table names. In the figure, you can see that I left the selected backup option just in case there is a previous installation.
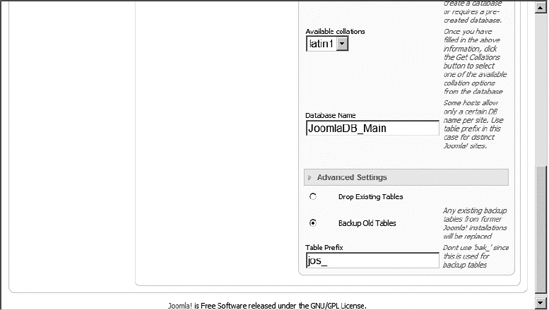
Figure 2-22. The Advanced Settings tab provides options for handling older Joomla tables.
FTP Configuration
Depending on your service provider, the FTP Configuration screen may or may not appear as shown in Figure 2-23. The settings on this screen enable Joomla to automatically handle tasks such as installing a template uploaded through the Joomla user interface directly to the proper web site directory. It also allows the upload of very large files, as Joomla will use the FTP protocol instead of the native PHP upload, which generally has size limitations. You can fill in this information now if you would like to do the setup, although you should be sure to set up a special FTP user with very restricted access to avoid creating potential security vulnerabilities. Joomla will allow you to enter it later through the Administrator interface if you prefer to leave it blank for now.
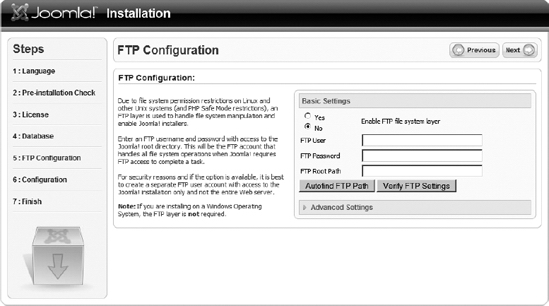
Figure 2-23. The FTP Configuration screen
Main Configuration
Click the Next button to move to the Main Configuration screen (see Figure 2-24). On this screen, enter the name of your Joomla web site. Also note the autogenerated administrator password. If you don't modify the password, write down the autogenerated password. You will need it to log into the administration portion of the web site. Right now, enter a custom password in the Admin password and "Confirm admin password" fields.
If you want to put an administrator e-mail on the site, enter it now in the Your E-mail field. Realize that this e-mail address will be available through the web site, so be careful you don't set it to your main e-mail account. Spammers run programs to harvest e-mail addresses from web sites, and you don't want your e-mail on any more spam lists than necessary.
You're now ready to select where the initial data for the site will originate from. If you have a previous version of Joomla running, you may want to transfer your content from there. For this example, it is assumed this is a new installation. Click the "Install sample data" button shown in Figure 2-25 to write the default site examples into the database.
If the data installs correctly, the button will be replaced by text that reads, "Sample data installed successfully." If an error message is generated, you may have made a mistake with the MySQL configuration a few screens back. You can click the Previous button to return to the MySQL settings screen and try again.
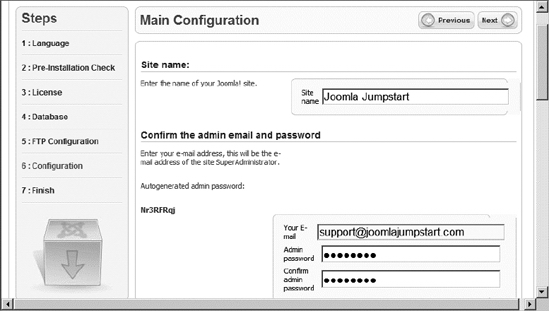
Figure 2-24. On the Main Configuration screen, you can enter a site name, an admin e-mail, and data loading information.
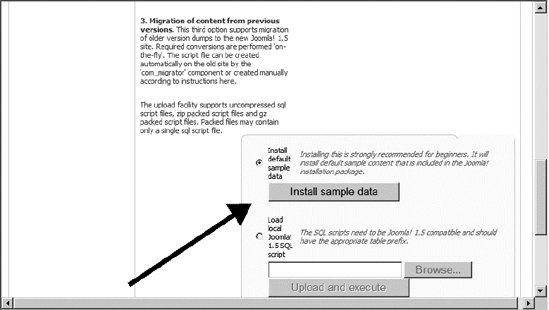
Figure 2-25. Click the "Install sample data" button to populate the Joomla database with dummy content.
Tip There's an old acronym known as KISS that is helpful when encountering problems in a situation like this one. A gentle version of this acronym is "keep it super simple." Joomla is a complex system. If you're having problems logging into MySQL through Joomla, go to a direct login for the database server and attempt to use the database from there. The problem may lie outside of Joomla's settings.
With the data installed correctly, click the Next button and you should be greeted by a success screen like the one shown in Figure 2-26. Congratulations! You're now ready to use this installation of Joomla for the first time.

Figure 2-26. Joomla is correctly installed.
The Finish screen has two buttons in the upper-right corner: Site, which links to the main site, and Admin, which links to the Administrator portion of the site. Right-click the Admin button and open the link in a new window, then return to the main window and click the Site button. With the Administrator interface open in one window and the main user interface in the other, you can easily flip back and forth between them. With a simple browser refresh, you'll instantly see the results of any changes made to the main user interface in the Administrator interface.
Caution On older versions of Joomla, you were required to delete the /installation directory before Joomla would run. The new version doesn't require deletion of the /installation directory, although it is recommended. If someone were to either mistakenly or with ill intent run the installation program, it could write over your existing Joomla site and its content. Be sure to remove this directory and all of the files it contains (or, at a bare minimum, rename the folder) before you go live with your web site.
Modifying the Joomla! Installation
Now that you have Joomla installed, you probably want to see what it looks like. When you access the web page on your server, a page similar to the one shown in Figure 2-27 displays. I've placed label arrows over the figure to point out the different parts of the interface. You will need to understand the various areas of the screen in order to determine where you need to go in the Administrator interface to make modifications.
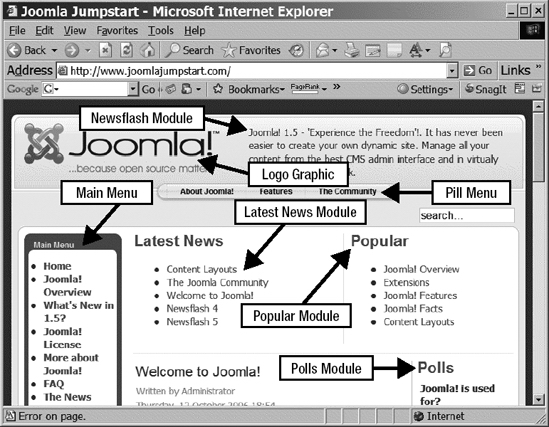
Figure 2-27. The default Joomla screen
In the next section, you'll use the Joomla interface to modify each of these items. With a basic understanding of the fundamental elements of a Joomla page, you can begin editing the site. You will perform all modifications through the Joomla Administrator web interface.
Note If you are having problems using the Joomla Administrator interface, make sure that JavaScript is enabled in your browser. Joomla uses JavaScript to provide an interactive graphical user interface for administration. In the case of Internet Explorer, JavaScript is available if the Medium security setting or less is currently selected. You can check the security setting on the Security tab of the Tools ![]() Internet Options menu.
Internet Options menu.
Adding a New Article
Text is the main type of content managed by a CMS like Joomla. Although a CMS may store other content in the form of pictures, report data, static HTML pages, and media, text is the meat and potatoes of most web sites. In this section, you'll add the text of a simple article to examine how Joomla manages new content.
For now, you will post an article directly as the administrator. An administrator can give permissions to registered users to submit articles and other content items for publication. In later chapters, you'll set up privileges so remote authors can post articles to the site—given publication approval from the administrator or designated moderator.
To begin, you'll need to log into the Joomla Administrator interface. To access the Administrator page, enter your site URL in the address bar of your web browser, followed by the directory reference to the Administrator folder. Most commonly, you will have a URL that reads something like this:
http://www.example.com/administrator
You should be presented with a login screen like the one shown in Figure 2-28. I suggest bookmarking this page in your browser so you can quickly and easily get to the administration portion of Joomla.
For the login, enter your username and password. Unless you changed it, your username will be admin and your password will be the random series of letters that you wrote down when you performed the first installation. When the username and password are accepted, you will be presented with the Control Panel of the Administrator interface. The Control Panel contains buttons for the most commonly used functions of the interface.
Tip The Administrator login screen can be accessed by anyone just as any other page on the web site. Therefore, make sure that your admin password is secure and not a simple and easily guessed password such as admin. Since the entire Joomla administration system rests in the /administrator folder, it is probably a good idea to put special web server security restrictions on that folder. If you're running Joomla on an Apache server, you can add a special .htaccess file to restrict the users that can even address the file. There is a complete tutorial on .htaccess security on the Apache web site (http://httpd.apache.org/docs/1.3/howto/htaccess.html).

Figure 2-28. The Joomla Administration Login screen
If the Administrator interface (see Figure 2-29) seems a little overwhelming when you first see it, don't be alarmed. Soon enough, navigating through it will become second nature. To add an article, click the Add New Article button in the top-left corner.
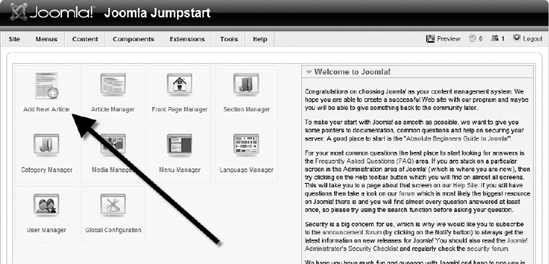
Figure 2-29. The Joomla Administrator interface home page
When Joomla returns the page to you, you should see the article editor, which has a nice WYSIWYG interface. To begin a new article, you need to give it a title, select a section and a category, and then enter the body text of the content. In Figure 2-30, note that I've filled in a basic article and set the main parameters.
The title for the article will appear in everything from the site map to the contents page, so make it descriptive, but not too long. The Section and Category fields are the means of organizing Joomla content. You'll learn about the importance of those for organization in a Chapter 4, but for now, just select News for Section and Latest News for Category. For the body, I entered the following simple text:
The quickest way to jumpstart a new web site is with Joomla!

Don't be afraid it will be too complicated because with

Joomla, site construction is so simple even a caveman could

do it.


 <-- Don't be afraid to use an emotion icon in your article body.
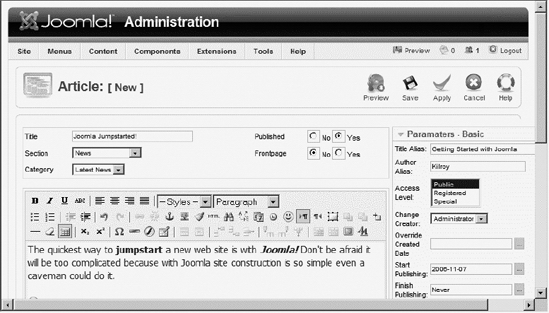
Figure 2-30. Enter the title, select the section and category, and enter the body text of the article in the article editor.
After I entered the text, I went back and used the bold icon to highlight the words "jumpstart" and "Joomla," and I threw in italics on the second word for good measure. Then I positioned the cursor in front of the <-- characters, clicked the Emotions button (the yellow smiley face icon in the second row of the toolbar), and added a little icon. From this simple demonstration, you can begin to get a feel for the way in which Joomla can help even a nontechnical person add rich text content to a web site.
When you have the article ready to go, you might add some basic parameters to the fields on the right side of the screen. These are optional settings (Title Alias, Author Alias, etc.) and can be left blank if you desire.
The one basic parameter you may want to change is the Start Publishing date. By default, that date is set to publish the new article the day of posting. If you want the article to appear later, you should change the setting to tomorrow or later. The article will then appear on the Front Page when that date is reached. You can click the button with the ellipsis (...) to the right of the date to bring up a calendar and select a new date.
Note You may see an article listed in the Article Manager with a small icon containing an exclamation point in the published column. If you go to the bottom of the table, you'll learn that this icon indicates the article is "Published, but is Pending," meaning that the article is published into the system, but will not appear on the site until the Start Publishing date is reached. To make the article appear on the site now, edit the article and change the Start Publishing date to any date before the current date.
Before you save the article and publish it to the web site, return to the area of the screen where you entered the article title. You'll see a label that reads "Front Page" followed by two radio buttons marked Yes and No. Click the Yes button to make the content appear on the Front Page. Front page content is special in that no matter where the content is filed (by section and category), any document that is set to appear on the Front Page is shown there in addition to its proper location.
Click the Save button and the article will be written into the Joomla system. After the article is saved to the database, Joomla will display a confirmation of a successful save (see Figure 2-31), followed by the rest of the Article Manager display, which presents a complete list of articles in the system. You probably won't see your article on the first page of this list; however, if you click the Select Section drop-down that sits above the table and choose News, the table will reformat and your article will likely be listed at the top.
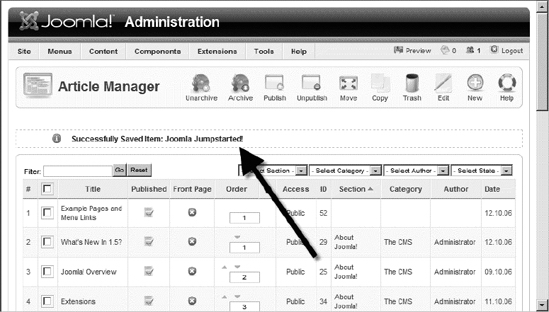
Figure 2-31. Joomla confirms that an article was saved in the database, and the Article Manager presents a list of articles in the system.
You've just published your first article! If you switch to the browser window that shows the main Joomla page and click the Refresh button, you should see your new content appear, as shown in Figure 2-32.
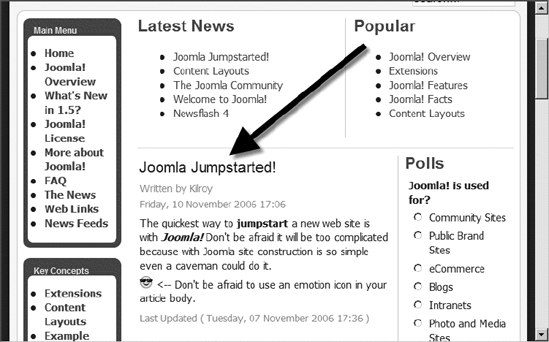
Figure 2-32. The Joomla Front Page displays newly published articles.
That's how easy it is to add content to Joomla. You'll notice that the headline and article citations are formatted using the same style as the other articles. You can also see that the formatting and emotion icon are displayed just as they were chosen in the editor. Before you add more content, you should modify the site itself to reflect the information that will be published here.
Editing the Main Menu
The default Joomla installation has four predefined menus: the Top Menu (horizontal menu), the Main Menu (vertical menu), the Other Menu, and the User Menu. The Top Menu runs horizontally across the top of the page. With the default template (named rhuk_milkyway), the Main Menu appears on the left side of the screen and shows the most common site options. The Other Menu appears at the bottom left of the screen and includes links to external web sites (Joomla Home, OSM Home, etc.). The User Menu doesn't appear on the screen until a user has properly logged into the web site. It has links to items such as Your Details and Log-out.
To begin editing the menus on the Front Page, in the Administrator interface return to the main page using the Site ![]() Control Panel menu selection. Once at the Control Panel, click the Menu Manager icon (see Figure 2-33).
Control Panel menu selection. Once at the Control Panel, click the Menu Manager icon (see Figure 2-33).
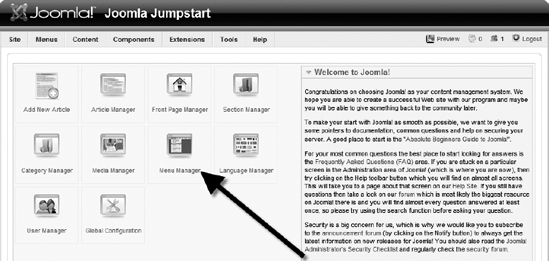
Figure 2-33. The Menu Manager icon
The Menu Manager shows a table of all of the menus currently on the site. You can see that the default site has six menus. The table column directly to the right of each menu title lists the type of menu.
Click the Main Menu link to move into the menu editor (see Figure 2-34). You can see the current menu text in the Title field. Change it from Main Menu to Joomla Jumpstart Menu and click the Save button to store the changes.
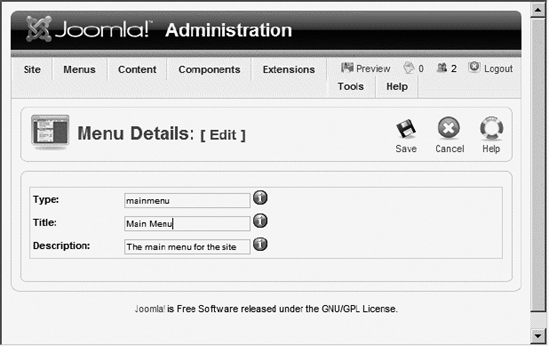
Figure 2-34. The menu editor's basic fields
In the Menu Manager, the column labeled Menu items contains an icon for each row. If you click that icon for your Joomla Jumpstart Menu, you will see all of the menu entries for each item that you see on the Front Page of your web site (see Figure 2-35).
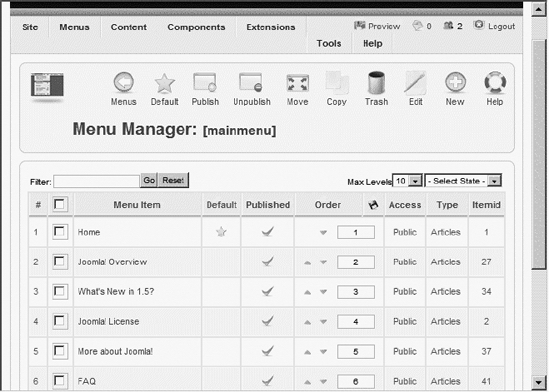
Figure 2-35. All of the items displayed in the central menu on the Front Page are listed here.
You won't need most of the entries for your new web site because they relate directly to the Joomla installation. Like a good administrator, though, you don't want to delete them yet because you haven't completed your web site planning. Therefore, you can simply unpublish them so they no longer appear in the Joomla Jumpstart Menu. Click the leftmost check box for each of the following entries:
- Joomla Overview
- What's New in 1.5?
- Joomla License
- More about Joomla
- FAQ
With all of these items selected, click the Unpublish button near the top of the screen. When Joomla returns the updated Menu Manager screen, you should see that all of the checked items now have a small red "X" in the Published column where a green check mark appeared before, as shown in Figure 2-36.
Return to the browser window showing the current site and click the Refresh button. Look in the menu box on the side of the window and you'll see the unpublished entries are gone! But you're not finished yet—you need to take more action to personalize your Joomla site.
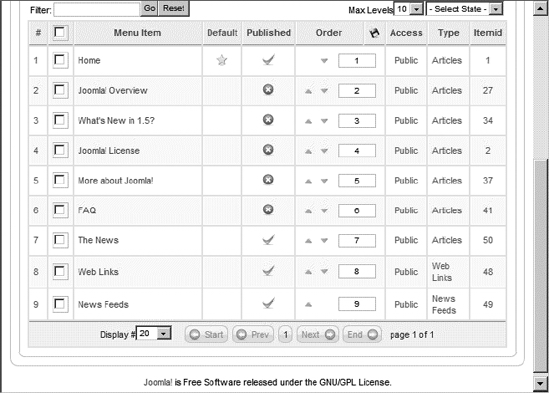
Figure 2-36. The unpublished menus now have a red "X" in the Published column.
Tip Menus are some of the most difficult items on a web site to get right. Poor menus hinder a user's navigation through the site. However, most web designers plan the menus at the beginning of the web site creation process and force the content into the preplanned selections, even if the process is akin to creating a round hole before knowing the shape of the pegs to fit in them (which may be square). Since Joomla makes menu modification so painless, do your visitors a favor and revisit the menu options near the end of the creation process, and change them to best represent the content each option describes.
Removing Modules
Most of the display on a Joomla page occurs in small distinct areas called modules. The poll on the right side of the main screen shown in Figure 2-32, for example, is the Polls module. The areas titled Latest News and Popular are modules that display the most recent content and the most popular content, respectively.
Currently, Latest News and Popular modules are cluttering up our new, streamlined interface. Let's get rid of them by unpublishing them. In the Administrator interface, select the Extensions ![]() Module Manager menu option. This takes you to the Module Manager, where you can scroll down until you reach these two modules in the list. Then click the Publish green check mark in the Publish column, and it will turn into the red "X," indicating that the item is being unpublished, as shown in Figure 2-37.
Module Manager menu option. This takes you to the Module Manager, where you can scroll down until you reach these two modules in the list. Then click the Publish green check mark in the Publish column, and it will turn into the red "X," indicating that the item is being unpublished, as shown in Figure 2-37.
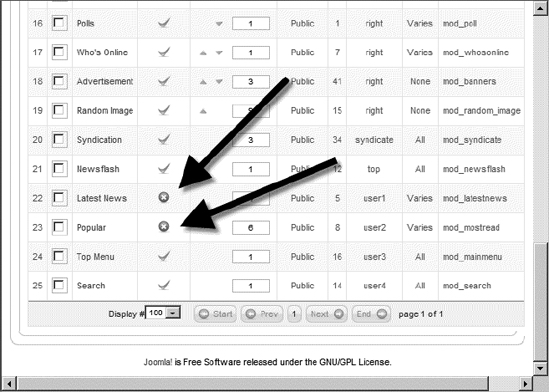
Figure 2-37. Unpublishing the Latest News and Popular modules
If you refresh the browser window showing your site, you'll see that those items have now disappeared (see Figure 2-38).
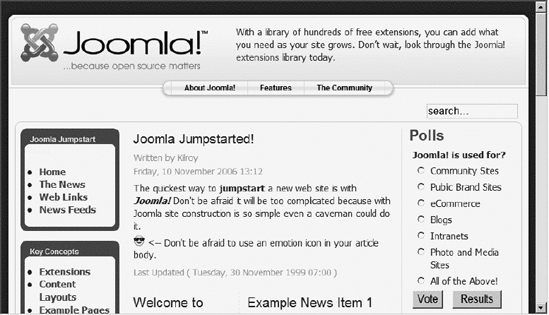
Figure 2-38. The updated Joomla site has no Latest News or Popular modules.
Unpublishing Whole Menus
You can also unpublish entire menus through the Module Manager. Each menu in the Joomla system uses a linked module that displays it on the page. If you unpublish the module associated with a menu, although the menu still exists, it has no method of display. The Key Concepts and Resources menus that appear below the main Joomla Jumpstart Menu aren't needed right now. In the Module Manager, locate the entries for these two menus and click the green check marks in the Publish column to unpublish them, as shown in Figure 2-39.
If you refresh the browser window showing your site, you'll see that those items have now disappeared (see Figure 2-40).
Now that you've rid the site of all the items you don't want, it's time to begin modifying the existing items to make the site your own. One of the hallmarks of a web site is the logo graphic that stretches across the top of the screen, so we'll tackle that in the next section. Leave the browser window showing the Administrator interface open; you'll need it after you create and upload your new graphic.

Figure 2-39. Unpublishing the Key Concepts and Resources menus
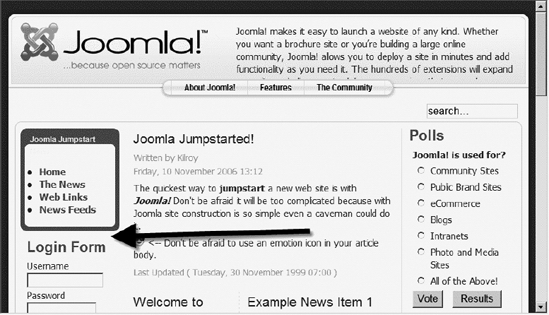
Figure 2-40. The updated Joomla site has no Key Concepts or Resources menus.
Changing the Front Page Logo Graphic
A good logo graphic gives your web site a sense of place. And if you have an e-commerce site, the logo is an important element in establishing your brand. It's time to replace the Joomla logo with a graphic of your own. This logo graphic is generally held within the directory of the current template.
Earlier you extracted the Joomla files to your local drive. You'll use the logo from the original template installation as the foundation for your new logo, and you'll use a painting program to edit the graphic. In this section, you'll learn how to modify the graphic with the simple Paint program included in Windows Vista (under Start ![]() All Programs
All Programs ![]() Accessories
Accessories ![]() Paint). In later chapters, you'll use Adobe Photoshop and GIMP (a free, open source paint program) to do more robust template editing, but to keep things simple, we'll use this primitive little application for now.
Paint). In later chapters, you'll use Adobe Photoshop and GIMP (a free, open source paint program) to do more robust template editing, but to keep things simple, we'll use this primitive little application for now.
Execute Paint and select File ![]() Open to load a new file. You'll have to navigate to the directory where you've stored the Joomla installation files and access the
Open to load a new file. You'll have to navigate to the directory where you've stored the Joomla installation files and access the mw_joomla_logo.png file in the images folder of the template. The path to this file might be something like this:
C:Joomla1_5install	emplates
huk_milkywayimagesmw_joomla_logo.png.
When you load the file into Paint, you should see the graphic that appears in the top-left corner of your Joomla Front Page (see Figure 2-41).
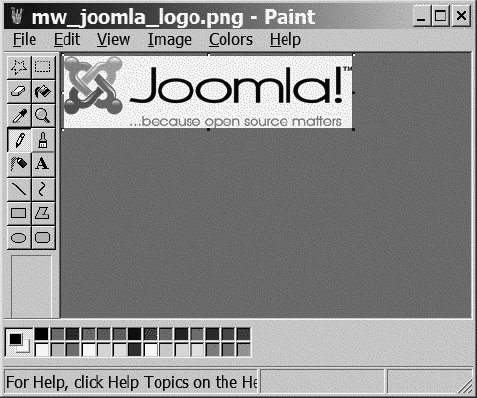
Figure 2-41. Load the existing Joomla logo into Paint.
To begin, we need to clear the existing graphic. Select Edit ![]() Select All (Ctrl+A) and press the Delete key to erase the canvas. Now that you have a blank canvas, what are you going to do with it? Anything you want!
Select All (Ctrl+A) and press the Delete key to erase the canvas. Now that you have a blank canvas, what are you going to do with it? Anything you want!
Briefly, here is what I did. First I set the color to dark blue. Then I selected the Fill with Color tool and clicked the background to fill the canvas with this color. Next I selected a lighter shade of blue and used the Airbrush tool to add some texture. Finally I needed to add my logo text. I unchecked the Image ![]() Draw Opaque option so the text box wouldn't blot out the background. I used the Text tool to stretch a text area to cover most of the canvas, entered the text Joomla Jumpstart, and adjusted the font and size until everything looked decent.
Draw Opaque option so the text box wouldn't blot out the background. I used the Text tool to stretch a text area to cover most of the canvas, entered the text Joomla Jumpstart, and adjusted the font and size until everything looked decent.
When I was done, I had something that wouldn't win any design awards (see Figure 2-42), but wouldn't embarrass my site either. I selected File ![]() Save As, set the filename as
Save As, set the filename as mw_joomlajumpstart_logo.png, and saved it to the same folder as the original logo.
You may already have a logo graphic that you want to use. If so, copy it to the images directory for convenience and make a note of the graphic's width and height. You'll need that information later.
Now you need to upload the image you just created so Joomla can use it. Fire up your FTP client program and log into your FTP server. If you created a site in FileZilla, you can bring up your Joomla directory in a single click. Once the program is logged into the site, navigate both the local site and the remote site to the images folder and upload your new logo there, as shown in Figure 2-43.
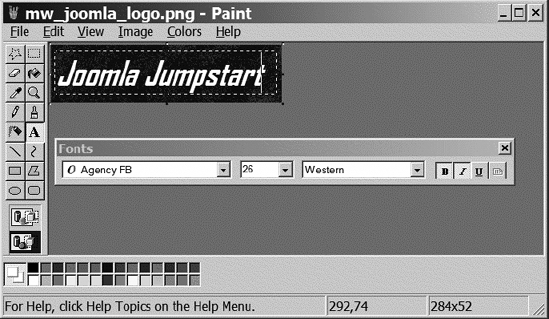
Figure 2-42. Create a simple logo and store it in the /images directory.
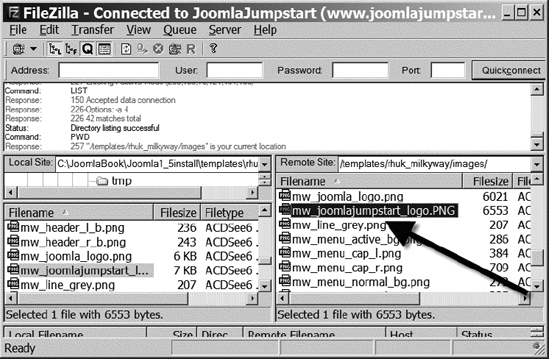
Figure 2-43. Upload the new logo to the Joomla FTP site.
You're all done on that front. Now you have to modify the style sheet to point to your new image.
Caution The template.css file that will reference the image is case sensitive. When Paint saves a file, it capitalizes the extension. Therefore, what was mw_joomlajumpstart_logo.png becomes mw_joomlajumpstart_logo.PNG. Make sure you exactly match the filename when you change it in the CSS file or the new logo won't load.
In the Joomla Administrator interface, select Extensions ![]() Template Manager to bring up the template configuration screen. In the Template Manager, select the default template and then click the Edit button as shown in Figure 2-44.
Template Manager to bring up the template configuration screen. In the Template Manager, select the default template and then click the Edit button as shown in Figure 2-44.
The Template Parameters screen will display. You're not interested in setting any of the template options. This screen provides the Joomla interface that lets you open the HTML and CSS editors. To adjust the logo graphic, you need to make a small change to the CSS, so click the Edit CSS button (see Figure 2-45).
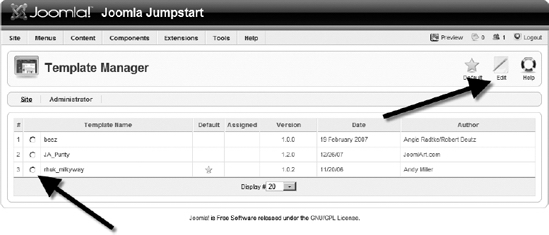
Figure 2-44. Select the default template and click the Edit button.
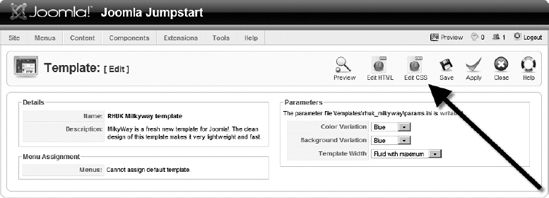
Figure 2-45. Click the Edit CSS button.
The template has more than one CSS file, as you can see in Figure 2-46. The main template.css file contains the reference to the logo, so select that file and click the Edit button.
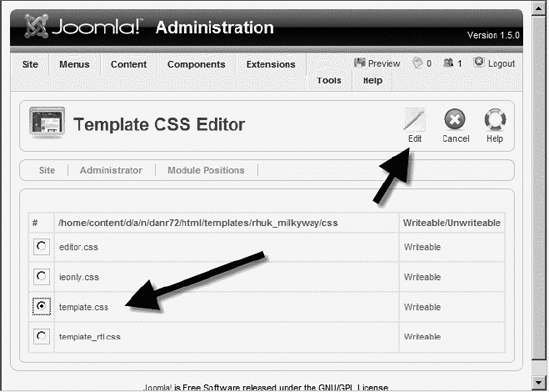
Figure 2-46. Select the template.css file and click the Edit button.
The text of the CSS file will be displayed for you. In later chapters, you'll learn how to use a special CSS editor that will make these items more understandable. Right now, you need to locate the CSS element known as div#logo. Scroll down through the text until you locate the entry. Once you find it, you can see that this element specifies a background attribute with the original filename of the logo, as shown in Figure 2-47.
Alter that file reference to reflect the name of your new logo. Remember that the filename is case sensitive, so make it identical to the actual filename. The logo I created was based on the original graphic, so the dimensions of the new graphic were identical. If you're using a different graphic, be sure to modify the width and height attributes of the element to match your graphic.
Click the Save button and you're done! Return to the browser window showing your Joomla site and click the Refresh button. You should now see the graphic you created; mine is shown in Figure 2-48.
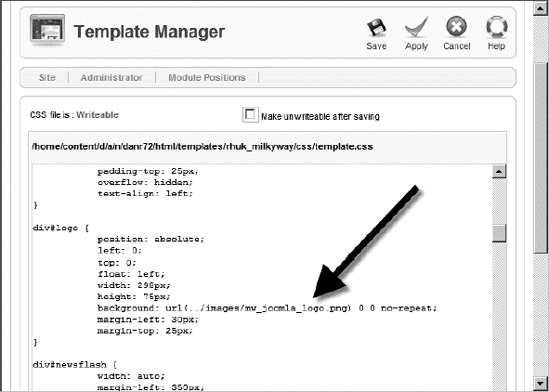
Figure 2-47. Scroll down to the div#logo entry and select the existing logo's filename.
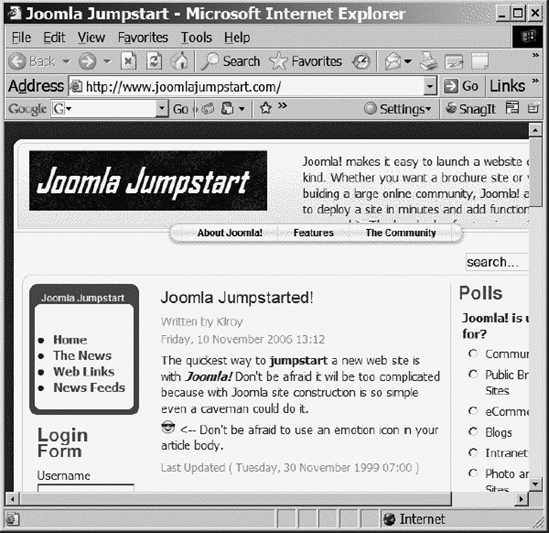
Figure 2-48. The new graphic will appear in place of the old.
Personalizing the Newsflash Text
You've changed the logo from the normal Joomla image to one of your own choosing. Still, to the right of the logo is the Joomla boilerplate text. The next step in personalizing the site, then, is to add new text there to match your site's intentions.
The static text that appears to the right of the logo is actually displayed by a Newsflash module. If you create a new article as Newsflash content, your site message can appear there.
On the main Control Panel screen, click the New Article button. Set the title to whatever you want (it won't be seen), and select News from the section drop-down and Newsflash from the category drop-down. Enter some text and perhaps a slogan or two, as shown in Figure 2-49.
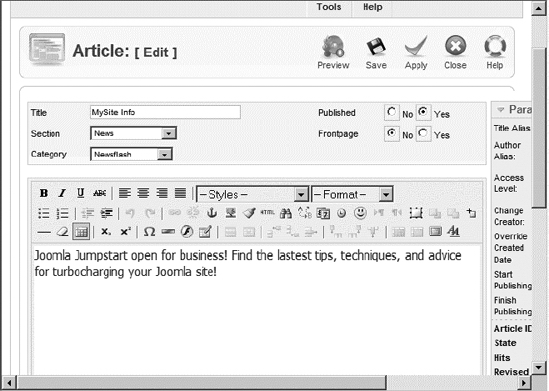
Figure 2-49. Create Newsflash content that describes your site.
When you've finished, click the Save button to return to the Article Manager. There are many articles on the default site, so instead of sorting through them for your new addition, click the Select Category filter drop-down and select Newsflash, as shown in Figure 2-50. Only the Newsflash articles will be displayed. In the default installation, there should be only five articles.
Instead of clicking the Published icons on each of the articles to unpublish them, you can use the check boxes to do a group select. Select the check boxes of all articles that aren't your new site description, and then click the Unpublish button, as shown in Figure 2-51.
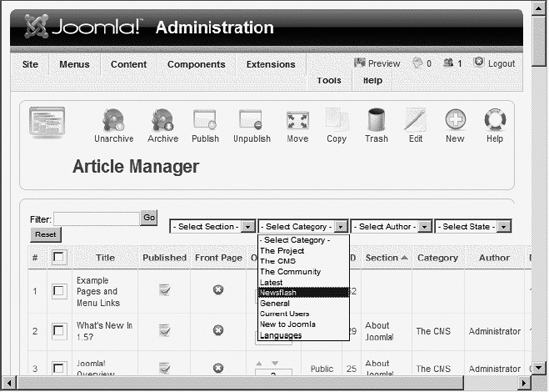
Figure 2-50. In the Article Manager, select Newsflash from the Select Category filter drop-down.
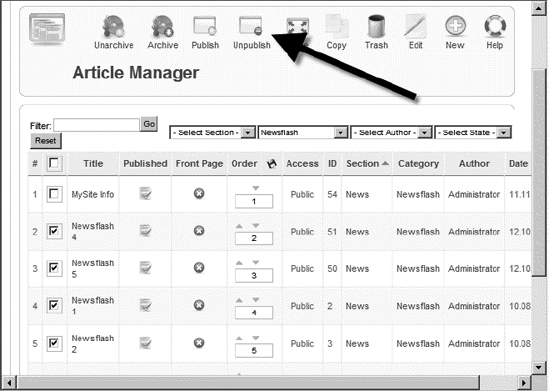
Figure 2-51. Unpublish all of the Newsflash articles except the one you just created.
When Joomla refreshes the page, your site description should be the only Newsflash published. Refresh your site browser window, and you should see the new text next for your new logo (see Figure 2-52). Now the site is really beginning to move away from the default presentation.

Figure 2-52. The new text is displayed in the Newsflash module.
Creating a Custom Poll
The current Polls module probably doesn't fit your site description either. It's time to create a new poll. Select Components ![]() Polls to display the Poll Manager. You can see the "default" poll that is included with the default installation. You'll need a new one that's tailored to your users. Click the New button to create a new poll (see Figure 2-53).
Polls to display the Poll Manager. You can see the "default" poll that is included with the default installation. You'll need a new one that's tailored to your users. Click the New button to create a new poll (see Figure 2-53).
For my page, I wanted to poll visitors about the operating system they use. In Figure 2-54 you can see that I've entered the title "What operating system are you running?" for the poll. To the right, I've entered the options I think are likely to be chosen by my web site visitors. Create any poll you like and click the Save button to store the poll in the Joomla database.
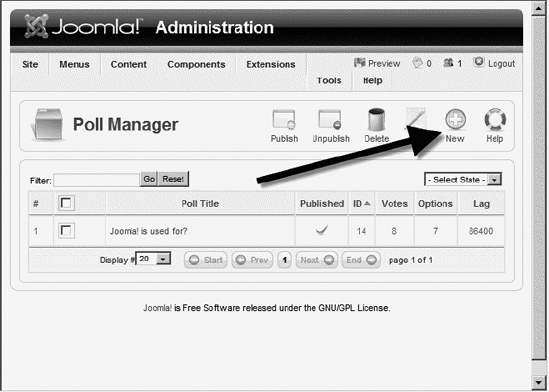
Figure 2-53. Click the New button to create a new poll.
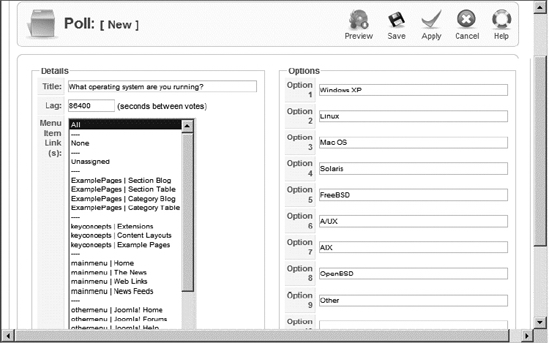
Figure 2-54. Create a new poll with an appropriate title and well-chosen options.
Back in the Poll Manager, you will see your new poll, which by default will be unpublished. To display it on the front page, publish your poll and then unpublish the existing one (see Figure 2-55).
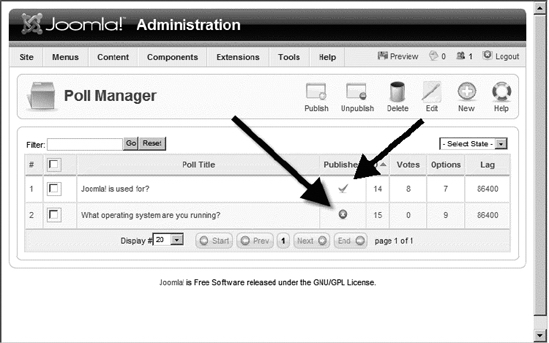
Figure 2-55. Click the red "X" to publish your poll and the green check mark to unpublish the original poll.
After refreshing your site page, you'll see your poll display, just like in Figure 2-56.
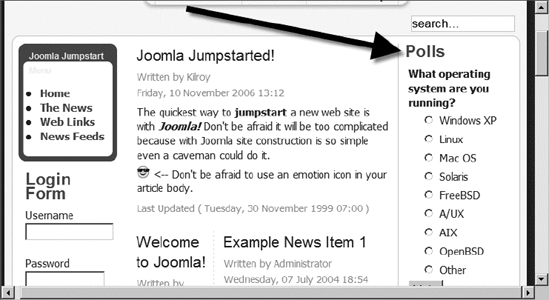
Figure 2-56. The new poll on the front page
Modifying the Pill Menu
The site is almost completely yours. Other than the Joomla-specific content in the Articles section that you'll gradually replace with your own, only the horizontal pill menu remains to remind you of the default sample data. The pill menu is so named because its appearance mirrors that of a gel-cap pill. I don't know if this type of interface originated on Mac OS, but that was the first place I can remember seeing it.
Although the pill menu looks different from any of the other menus, it's merely another menu with a specialty appearance that is defined in the CSS of the template. You don't need to alter the style sheet, however, to change the options presented on it.
Go directly to the Top Menu definition by selecting Menus ![]() Top Menu. Click the About Joomla menu item to bring up the item editor. Change the title of the menu to About Joomla Jumpstart, as shown in Figure 2-57. Now all you have to do is redirect the target of the link.
Top Menu. Click the About Joomla menu item to bring up the item editor. Change the title of the menu to About Joomla Jumpstart, as shown in Figure 2-57. Now all you have to do is redirect the target of the link.
On the right side of page, you'll see a Select Article section. If you click the Select button, a pop-up will display a list of article titles. Look through the articles until you find the "Joomla Jumpstarted!" article you created earlier (see Figure 2-58).
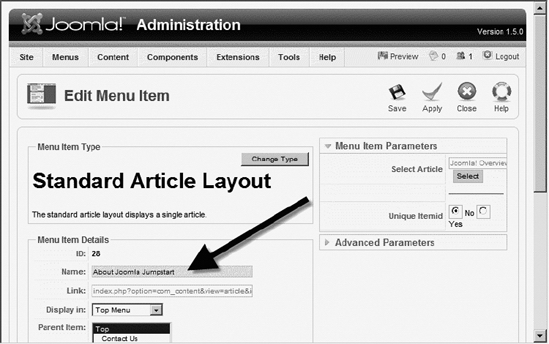
Figure 2-57. Change the title of the menu to About Joomla Jumpstart.
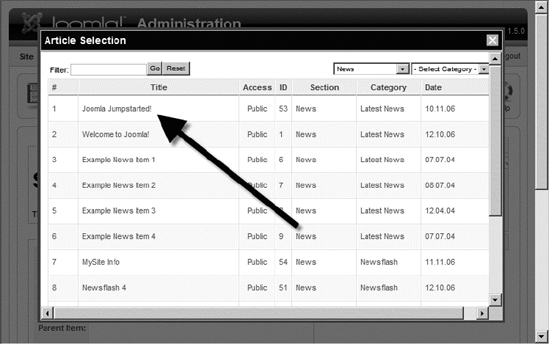
Figure 2-58. Find the "Joomla Jumpstarted!" article and click the title.
Click the article title to select it. The pop-up will disappear and you'll return to the Edit Menu Item screen.
You've completed all the menu editing, so click the Save button to write the menu changes into the database. Now if you refresh the browser window showing the main page, you'll see the pill menu has been updated as shown in Figure 2-59. If you click the About Joomla Jumpstart button, the link will take you to the "Joomla Jumpstarted!" article.
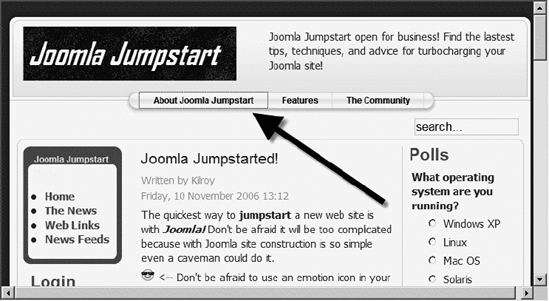
Figure 2-59. The pill menu has been updated to show the new menu setting.
Conclusion
After working through this Quickstart tutorial, you know how to install, set up, and run Joomla. You can add articles, make basic modifications to the template style sheet, change the logo display, publish and unpublish articles, and even set up your own poll.
As you can imagine, you've barely scratched the surface of Joomla's capabilities, but in approximately 20 minutes you've learned how to set up and manage a basic site. You could stop here and you would still know enough to run a respectable bloglike web site with a professional appearance. However, you undoubtedly want to squeeze every ounce of power from the Joomla CMS.
The next chapter guides you to a more thorough understanding of the installation and configuration process. After that, you'll learn all of the ways you can master the Joomla system and have a good time doing it. Now that you know the basics, it's a downhill ride from here.