
CHAPTER 13
Creating Extensions
In addition to being very friendly to administrators, the Joomla system is also pleasant to developers. Creating an extension (module, component, or plug-in) can be a pleasure, since the Joomla framework is designed with the developer in mind. In fact, since Joomla takes care of most of the interface presentation and has built-in routines for database access and security, creating a Joomla extension can be quite a bit easier than authoring even a simple standalone PHP application.
In this chapter, you'll learn to create three different types of extensions: a front-end module, an Administrator module, and a component. You'll find that implementation of each of these add-ons is very similar, as Joomla implements both a unified installer that works the same regardless of extension type and common presentation routines that are designed to minimize complexity.
Writing a Front-End Module
As you learned in Chapter 7, modules are primarily used for displaying data. To provide a sample of this capability, I'll walk you through the creation of a module that presents a simple greeting. This module, called mod_hellofrom, has a single parameter, location, that is set in the Module Manager and displayed along with the welcome message. As shown in Figure 13-1, the module will be displayed in the top of the left column.
All front-end modules are stored in folders within the /modules directory by the Extension Manager after installation. The name of each module folder matches the name of the module. All the files of the module, including the installation directives file, will be placed in this folder. Later, when you create a component, you'll notice that (unlike a module) the installation directives file is not copied into the associated component folder.
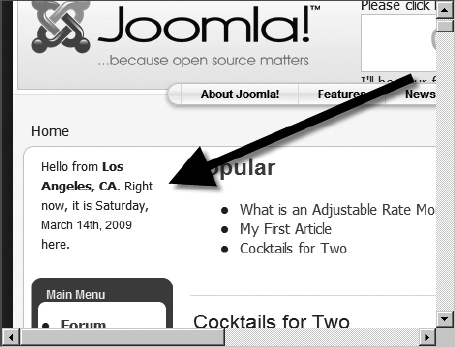
Figure 13-1. The mod_hellofrom module will display the time and date, as well as a greeting.
Tip When developing a new extension, the simplest process is usually to begin by roughing out the extension, compressing it into an archive, and then installing it into the Joomla system. The installation process will set up all of the necessary parameters within the Joomla database. Then you can access the actual code files in the /modules folder of the web site to make changes, add features, and perform debugging. When you make changes to the actual file, simply clicking the reload or refresh button of the browser will execute the new code.
Structure of the Module
At the most basic level, every module package contains a minimum of two files: a code file and an XML descriptor file. The code file is a PHP file that holds the execution code of the module display. The XML descriptor file contains all of the installation directives and information about the module. It also holds the module parameters that can be configured through the Module Manager interface.
Begin by creating a folder named mod_hellofrom on your local drive. All of the module files will be placed in this folder, and then an archive file (such as a ZIP or TAR file) will be created from it and installed via the Extension Manager.
The mod_hellofrom XML Descriptor File
For the Hello From module, the XML descriptor file will include all of the central elements (installation directives, module name, and file listing) plus some of the optional elements (creation date, version, author, etc.) that are used to document the module. The file also contains a single parameter that can be set in the Administrator interface to display the current server location.
Create a new file named mod_hellofrom.xml in the /mod_hellofrom folder, and enter the following code:
<?xml version="1.0" encoding="utf-8"?>

<install type="module" version="1.5.0">

    <name>Hello From</name>

    <author>Dan Rahmel</author>

    <creationDate>March 2009</creationDate>

    <copyright>(C) 2009 Dan Rahmel.

        All rights reserved.</copyright>

    <authorEmail>[email protected]</authorEmail>

    <authorUrl>www.joomlajumpstart.com</authorUrl>

    <version>1.0.0</version>

    <description>Module that displays the date/time of

        the server. <p /> Be sure to set the Location parameter

        in the Module Manager.</description>

    <files>

        <filename module="mod_hellofrom"

        >mod_hellofrom.php</filename>

    </files>

    <params>

        <param name="location" type="text"

            default="Los Angeles, CA"

            label="Server Location"

            description="The location of the server." />

    </params>

</install>
The descriptor file begins with a standard XML properties tag. The <install> tag that follows tells Joomla about the extension to be installed. The type attribute declares the extension type—which in this case is module. The version attribute specifies that this extension was made to run on Joomla version 1.5.0 or above.
The <name> element specifies the name of the module instance that will be created by Joomla when the module is installed. In Chapter 7, you learned that a module type is like a document template, and the module instance is like the document created from it. For this module, the module type is mod_hellofrom and the initial module instance will be named Hello From. The text in the <description> element will be displayed both when the module is first installed and also when the module is opened in the Module Manager, so it should have any necessary instructions to the administrator regarding the use of the module.
In the <filename> element, note that the module attribute will be stored in the Joomla database and used to reference the module. This name will be the module type that you will select when creating new instances of the module. Once the descriptor file is complete, you can create the PHP file that is the core of the module.
The PHP Code File
The main module file contains all of the PHP code that executes when the module is rendered. This code will strongly resemble standard PHP page code in that it uses the echo statement to send any output text to the user's browser.
You should always begin any extension with a check (under the no direct access section of this module) to ensure that the code is being executed by the Joomla system. This prevents hackers from using a direct URL and executing the extension, possibly using parameters that could compromise security. By ensuring execution through the Joomla framework, the module is shielded by the robust security built into the system.
Create a file named mod_hellofrom.php in the /mod_hellofrom folder and enter the following code:
<?php

/**

* @version $Id: mod_hellofrom.php 5203 2009-03-17 02:45:14Z Danr $

* @copyright Copyright (C) 2009 Dan Rahmel. All rights reserved.

* A module to display a hello from the location of the server.

*/


// no direct access

defined( '_JEXEC' ) or die( 'Restricted access' );


// Get the location parameter that was set in the Module Manager

$myLocation = $params->get('location', 0);

// Set a formatted date string

$myDateTime =  date("l, F dS, Y");


// Output the greeting

echo "<small>" . JText::_('Hello from ') . '<b>' .

    $myLocation . "</b>.";

echo JText::_(" Right now, it is ") . $myDateTime .

    JText::_(" here.") . "</small><br />";?>
If you understand PHP coding, the execution process of this module should be straightforward. After the code checks to make sure the code is executing under Joomla, the $myLocation variable is created. You can see that it uses the get() method of the $params object to obtain the current value of the module parameter called location, which was defined earlier in the XML descriptor file.
A second variable, named $myDateTime, is set to a formatted string holding the current system time and date. If you want to actually use this module, you may have to make some adjustments to the time if the web server that hosts your site resides in a different time zone than the location parameter indicates. The lines of code that follow these definitions use the echo() function to output the text to the browser page.
You might notice that all of the text is sent to the JText::_() method. This Joomla method sends any text passed to it to the Language Manager. If a language other than the default is selected for display, and the Language Manager (or Joom!Fish) has a translation of the current text in the selected language, the translation will be substituted and returned by the method. If not, the same text that was sent will simply be returned. Using this method allows your extension to expose itself to the Joomla internationalization features. If translation text of the passed string exists in the system, your extension can output text in one of the dozens of languages Joomla supports.
That's it! Now you're ready to package this code so you can install the module into the Joomla system. Archive the folder with both files into a file named after the module (e.g.,mod_hellofrom.zip)—although the name of the archive will have no effect (good or bad) on the installation. To install this module, go to the Extension Manager, browse to the archive file, and click the Install button. Once installed, you will need to configure it in the Module Manager.
Select the Module Manager and find your module instance in the list. By default, you will see that the module is not published (which is true for any newly installed extensions). Click the module name to open the module editor and then publish the module, set the location parameter (see Figure 13-2), and select where the module will be displayed. Click the Save button to store these parameters to the Joomla system.
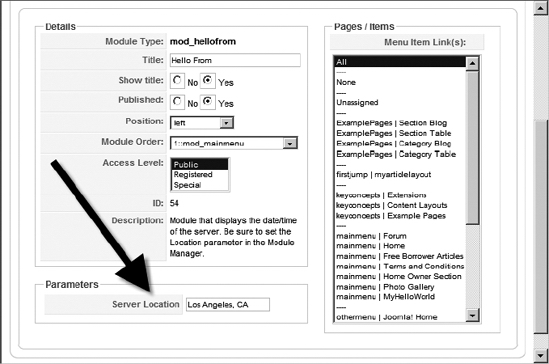
Figure 13-2. Set the location parameter to match the geographic location of your web server.
If you set the module to display in the left column location, open a browser window and you should see the greeting displayed. If you didn't change the order of the module in the Module Manager to appear first in the left column, you may have to scroll to the bottom of the column to see the display.
Congratulations! You've just implemented your first extension. However, this primitive module is probably not anything you would want to use in a real Joomla deployment. Most modules have more complex functions and often need to perform database access. The next module will add to the complexity of the current one and also throw in another twist—it will be an Administrator module.
Writing a Missing Metadata Administrator Module
Administrator modules function in the same way as front-end modules, but they are used within the Administrator interface. An Administrator module is never seen by a front-end user because it generally exposes private system information and may help with maintenance and administration of the site—neither of which you want shown to the visiting public. In this example, the module will list content articles that are missing key information—the article metadata.
For proper Search Engine Optimization (SEO), each web page (or article) should contain two pieces of unique metadata information: the metadescription and metakeywords fields. These fields are used by the search engine spider to determine how to index the page and display the content. In fact, Google uses the metadescription field of an article to display the brief summary of the page, as shown in Figure 13-3.
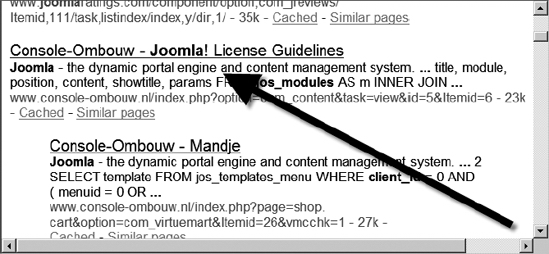
Figure 13-3. The metadescription field of a web page is displayed as the summary in search engines such as Google.
Despite the importance of this information, many Joomla sites have numerous articles where this information is left blank. Blank metadata fields can hurt the search engine ranking of the site and also make it more difficult for search engine users to know which pages they might want to examine. It is preferable for every article to have these two fields completed.
To solve this problem, you'll create an Administrator module that lists all articles that have empty metadata fields. In the module interface, each article title will be an edit link, so an administrator can simply click the title and the article will be displayed in Edit mode. The missing information can then be immediately added to the content. Only articles that are published will be displayed in the list presented by the module (unpublished and archived articles will not be displayed).
Begin by creating a folder named /mod_missingmeta on your local drive. Inside you will put the XML descriptor file and the module code file.
Creating the XML Descriptor
The XML descriptor file is much the same as the file for the previous Hello From module. This module also consists of a single code file (mod_missingmeta.php) that contains all of the querying code. In the /mod_missingmeta folder, create a file named mod_missingmeta.xml and enter the following code:
<?xml version="1.0" encoding="utf-8"?>

<install type="module" version="1.5.0" client="administrator">

    <name>Missing Metadata Items</name>

    <author>Dan Rahmel</author>

    <creationDate>March 2009</creationDate>

    <copyright>(C) 2009 Dan Rahmel. All rights reserved.</copyright>

    <authorEmail>[email protected]</authorEmail>

    <authorUrl>www.joomlajumpstart.com</authorUrl>

    <version>1.0.0</version>

    <description>Module to display any articles that have missing

    metadescription or metakeywords fields.</description>

    <files>

        <filename module="mod_missingmeta"

            >mod_missingmeta.php</filename>

    </files>

</install>
Notice that the <install> tag has an additional attribute named client that wasn't used in the previous module. If the client attribute is not included, the module is assumed to be a front-end module and is assigned the site client type. Since you want this module to only be available through the Administrator interface, set the client type as administrator, which will make the module an Administrator module and place it in the /administrator/modules directory.
Creating the Module File
The actual code for the Missing Metadata Items module requires both presentation code and logic. In a more sophisticated application, it would be wise to break up these two pieces like you did earlier in the book when you created a template. By putting the presentation aspects in a separate file such as a CSS file or a template file, they can be developed and modified independently. This module, however, is fairly simple, and in the interest of maintaining simplicity, all of the code will be contained in a single file.
Create a new file named mod_missingdata.php in the /mod_missingmeta folder, and enter the following code:
<?php

/**

* @version $Id: mod_missingmeta.php 2009-03-12 21:49:30Z Danr $

*/


// no direct access

defined( '_JEXEC' ) or die( 'Restricted access' );


$db =& JFactory::getDBO();

// Find all empty strings in metakey and metadesc and

// make sure the article is published (state=1).

$where = "(metakey = '' or metadesc = '') and state = 1 ";

$query = "SELECT id, title, metakey, metadesc"

    . " FROM #__content WHERE "

    . $where . " ORDER BY title ASC";


$db->setQuery( $query, 0);

?>


<table class="adminlist">

<tr>

    <td class="title">

        <strong><?php echo JText::_( 'Article' ); ?></strong>

    </td>

    <td class="title">

        <strong><?php echo JText::_( 'Empty Description' ); ?></strong>

    </td>

    <td class="title">

        <strong><?php echo JText::_( 'Empty Keys' ); ?></strong>

    </td>

</tr>


<?php

    // Make sure some rows match query

    if ($rows = $db->loadObjectList()) {

        foreach ($rows as $row) {

            // Create url to allow user to click & jump to edit article

            $url = "index.php?option=com_content&task=edit&" .

                "&id=" . $row->id;

            // Check meta fields for record and set Yes/No value

            if ($row->metadesc =="") $metad = JText::_("Yes");

                else $metad = JText::_("No");

            if ($row->metakey =="") $metak = JText::_("Yes");

                else $metak = JText::_("No");


            echo "<tr>";

            // Place article title inside link

            echo "<td><a href='" . $url . "'>" .

                $row->title . "</a></td>";

            // Display status of empty meta column

            echo "<td>" . $metad . "</td>";

            echo "<td>" . $metak . "</td>";

            echo "</tr>";

        }

    } else {

            // No articles with missing metadata found

            echo '<tr><td>None</td>';

            echo '<td>n/a</td>';

            echo '<td>n/a</td></tr>';

    }

?>

</table>
This module has code that is quite a bit more sophisticated than the earlier greeting module. The first section of PHP code requests a reference to the database object and stores it in the $db variable. The reference to the database is obtained using the getDBO() method, which is very handy for Joomla developers. Rather than having each extension require an individual connection to the database, the Joomla framework handles the foundation database connection. That way, when the extension is deployed to another Joomla site, no reconfiguration is required for that extension—it simply uses the connection parameters already configured for the site where it is being deployed.
After a reference to the database object is obtained, a WHERE statement is created for the MySQL query. The query will only select records that have either a metakey or metadesc field that is empty. The query also requires that the state of the article be set to a value of 1, which indicates that the article is published.
The $query variable is created to contain the entire search query and select the id, title, metakey, and metadesc columns to be returned in the data set. The query uses the #__content statement to specify that the Joomla content table should be searched. The #__ directive tells Joomla to add the current table prefix set by the user—usually the jos_ default prefix is used. The setQuery() method of the database object is called to store the query string.
The section that follows the PHP code contains HTML display code to create a table to display the article list. The table is set to use class attributes (such as adminlist and title) so that the style complies with the current template settings. Three columns are created to display the article title link, the indicator for whether the metadesc field is empty, and the indicator for whether the metakey field for page keywords is empty.
The second batch of PHP code actually outputs the article list. An if statement tests to make sure there are in fact articles with missing meta information. If the data set is empty, then the code execution jumps down and displays a single row with the values None, n/a, and n/a.
When there are articles that comply with the query parameters, a foreach loop cycles through each row or record. First, a URL is created for the links that will be added on the titles. Note that the URL includes the task parameter set to edit. This parameter will cause the link to bring up the article in Edit mode when it is clicked.
The two following if statements check to see if the fields are empty and set variables to display the word Yes or No in the appropriate column. Once again, the JText::_() method is used to convert the words Yes and No to the configured language if necessary. The remaining code outputs a three-column row for each record, including the title link and indicators of which field is empty.
Place this file along with the XML descriptor file inside an archive file (such as mod_missingmeta.zip) and use the Extension Manager to install it to the system. Bring up the Module Manager—notice that the file isn't present in the initial list. By default, the Module Manager displays all of the site or front-end modules, but not the Administrator modules. Click the Administrator link, as shown in Figure 13-4. The list that appears will show the Missing Metadata Items module.
Click the module name to bring up the editing screen. By default, a module is placed in the left position—even if the Administrator template doesn't have a left position. Set the Position drop-down list to cpanel to display the module in the main Administrator Control Panel (see Figure 13-5). Click the Save button to store your changes in the database.
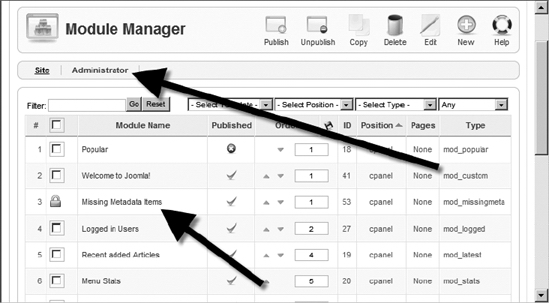
Figure 13-4. Click the Administrator link to display the Administrator modules.
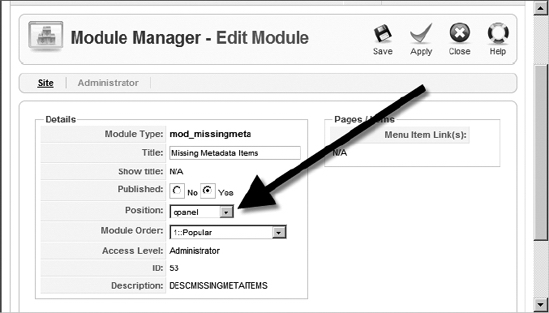
Figure 13-5. Set the position to cpanel.
Go to the Control Panel and look in the list on the right. You may have to scroll down to see the module listing. Click the Expand arrow and you will see a list of articles that lack metadata (see Figure 13-6).
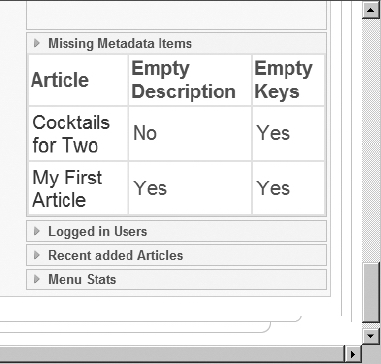
Figure 13-6. The new module will display a list of title links showing articles that lack metadata.
You should now have an understanding of how to implement an Administrator module in Joomla. Whenever you come across a maintenance feature that Joomla lacks, you have the capability of adding that feature yourself.
These modules provide a foundation for the creation of back-end display features to Joomla. But what if you need something a little more interactive, such as a form for user entry? In that case, the preferred method would not be the creation of a more powerful module; instead, you would want to develop a new component.
Structure of the Suggestion Box Component
A component has a structure very similar to a module. The primary difference comes from the user interface portions of the extension. A component can have a complete Administrator interface, whereas a module is limited to simple parameter settings. The interface for a component is accessible through the Components menu of the Administrator interface.
Additionally, since components are included in the central column of most templates, they have a great deal more control over the presentation of screen output than modules do. Components can also have direct menu links that take the user to the component display. Components can accept parameters, which you'll see in this section as you implement the Suggestion Box component.
One great way to improve your site is to encourage visitor feedback. An effective method of doing this is to include a suggestion box. A user can enter a suggestion that is stored to a database table for later examination by the administrator.
To create a Suggestion Box component, begin by creating a folder titled /com_suggestionbox on your local drive. You'll place all of the component files within this folder.
The XML Descriptor File
The descriptor file for the component is virtually identical to that of a module. One difference is that the <installer> element has the type attribute set to component, instead of indicating a module. There is also an additional section encapsulated by <administration> tags. The information held within this element defines the Administrator interface for the component.
In the case of the Suggestion Box component, there is no Administrator interface, yet in the following code, I have set the standard component interface to be displayed when the component is selected from the Components menu in the Administrator interface. Why bother to do this?
When Joomla installs a component, if it doesn't have an Administrator interface, it will not be listed in the Components menu. Most components should be listed in this menu whether they have a specialized interface or not so that an administrator can quickly and easily verify if the component is installed.
More importantly, a component must have an Administrator interface to be registered in the database for linking via a Joomla menu. Since you want the Suggestion Box component to be listed in the Main Menu on the Joomla Front Page, it must have an <administration> section in the XML descriptor file.
In the /com_suggestionbox folder, create a file named suggestionbox.xml and enter the following code:
<?xml version="1.0" encoding="utf-8"?>

<install version="1.5.0" type="component">

    <name>SuggestionBox</name>

    <author>Dan Rahmel</author>

    <version>1.0.0</version>

    <description>Displays a suggestions form and records

      suggestions in the jos_suggestion table.</description>

    <files>

        <filename component="com_suggestionbox"

            >suggestionbox.php</filename>

    </files>

    <administration>

        <menu>Suggestion Box</menu>

        <files>

            <filename component="com_suggestionbox"

                >suggestionbox.php</filename>

        </files>

    </administration>

</install>
The descriptor file should be ready to go. Now you will need to create the code file that contains the execution logic of the component.
The PHP Code File
The component code will perform a number of different operations. First of all, it will check to see if any parameters were posted by a form. For the component, the same URL will be used for the first stage of the suggestion box (presenting a form for user entry of the suggestion) as the second stage (writing the suggestion into the database). The first stage will post the form information, and the code, if it detects the form data, will write it into the table.
In the /com_suggestionbox folder, create a file named suggestionbox.php and enter the following code:
<?php

/**

* @version $Id: suggestion.php 5203 2009-03-27 02:45:14Z DanR $

* @copyright Copyright (C) 2009 Dan Rahmel. All rights reserved.

* This component accepts suggestions and stores them in a database.

*/


// no direct access

defined( '_JEXEC' ) or die( 'Restricted access' );


// Option #1: If there is form data present,

//           write the data into the database

if(JRequest::getVar( 'suggestion' )) {


    $db =& JFactory::getDBO();


    // Automatically try to create the table. If it already exists, this creation

    // will be ignored.

    $createTable = "CREATE TABLE IF NOT EXISTS `#__suggestions`" .

        "(`id` INTEGER UNSIGNED NOT NULL AUTO_INCREMENT, ".

        "`suggestion` text NOT NULL, `email` VARCHAR(45)," .

        "`location` VARCHAR(45), `created` TIMESTAMP NOT NULL, " .

        "`userip` VARCHAR(16), PRIMARY KEY(`id`))";

    $db->setQuery( $createTable, 0);

    // Execute table creation

    $db->query();


    // Grab and format all of the variable entries from the form.

    $fldSuggest = "'" . $db->getEscaped(JRequest::getVar('suggestion')) . "'";

    $fldEmail = "'" . $db->getEscaped(JRequest::getVar( 'email')) . "'";

    $fldLocation = "'" . $db->getEscaped(JRequest::getVar( 'location' )) . "'";

    // Store the IP of the user submitting the suggestion

    $userIp = "'" . $_SERVER['REMOTE_ADDR'] . "'";


    // Insert all variables into the jos_suggestions table

    $insertFields = "INSERT INTO #__suggestions " .

        "(suggestion, email, location, userip) " .

        "VALUES (" . $fldSuggest . "," . $fldEmail . "," . $fldLocation .

        "," . $userIp . ");";

    $db->setQuery( $insertFields, 0);

    $db->query();

?>


<h1 class="contentheading">Thanks for the suggestion!</h1>

    <?php


// Option #2: No form data is present,

//           display the suggestion form

} else {


?>


<h1 class="contentheading">Suggestion form</h1>


<form id="form1" name="form1" method="post"

    action="index.php?option=com_suggestionbox">

  <p>Enter suggestion here:<br />

    <textarea name="suggestion" cols="40" rows="4" id="suggestion"></textarea>

  </p>

  <p>Email (optional) :

    <input name="email" type="text" id="email" />

</p>

  <p>

    <label>Location (optional) : </label>

    <input name="location" type="text" id="location" />

  </p>

  <p>

    <input type="submit" name="Submit" value="Send Suggestion" />

  </p>

</form>


<?php    } ?>
The first part of the code checks if any form variables have been posted—specifically the suggestion field. If there is a suggestion variable passed to the component, the component begins processing the information. The code loads a reference to the database object.
It then performs a CREATE TABLE operation. In this case, it uses the IF NOT EXISTS qualifier so that if the table already exists, the operation is ignored. If not, it creates a table using the current table prefix (most likely creating a table named jos_suggestions) to hold the user data.
In the table definition, there are two fields generated by the MySQL system: id and created. The id field has a number that is automatically incremented by the database server so that every record has a unique key. The created field has the timestamp type, so when the suggestion is submitted, each record will automatically be logged with a time and date stamp to show when it was created.
After the table is created, the three fields of the suggestion form (suggestion, email, and location) are parsed and stored into variables. The getEscaped() method is used on each user entry to add any necessary escape characters to ensure that the text writes into the database properly. For example, if the user typed quotation marks within the suggestion, these would foul up the insertion routine if they were not modified by the getEscaped() method.
A fourth variable is created to store the IP address of the suggestion submitter. Although IP addresses that are sent with form data can be faked, or "spoofed," many abusers won't take the time or energy to counterfeit this information. Storing this value gives the administrator a chance to track down someone who abuses the system (such as spammers) or, in extreme cases, to ban their IP address from accessing the system.
With all four variables properly set, an Insert Into command is used to write the new record into the table. After the storage is completed, the user is thanked for their submission.
The remainder of the component is only displayed if there are no form variables detected. In this case, the suggestion entry form is presented for user entry. There are only two items in the form code that are worthy of note. First, the <h1> headline is set to a specific style via the class="contentheading" statement. By using the contentheading style, the component ensures that it will match the heading style of the currently selected template.
The second item of note is the action attribute of the form. It is set to the value of index.php?option=com_suggestionbox so that once the web visitor clicks the Submit button, the form will simply call the component again. When the component is called, it will detect the submitted form fields and the suggestion will be written into the database.
Installing the Component
From the /com_suggestionbox folder, create an archive by the name of com_suggestionbox.zip for upload into the Joomla system via the Extension Manager. Once the component is installed, you will have to click the Components tab of the Extension Manager and publish the component (by default components are unpublished).
The Components menu should now display a menu for the new component. You don't need to select it—just make sure it's there. Under the Menus menu, select the Main Menu option. Click the New button to create a new menu reference. From the Select Menu Item Type list, you should select the Suggestion Box component (see Figure 13-7).
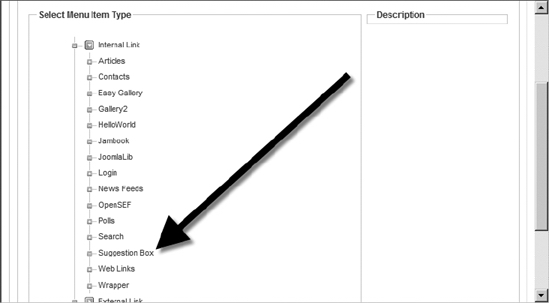
Figure 13-7. Select the Suggestion Box component to create a menu linking to it.
Name the component My Suggestion Box and open a browser window to the site Front Page. In the Main Menu (on the left), you should see the menu item listing. Click the link and you will be presented with the suggestion entry form, as shown in Figure 13-8.
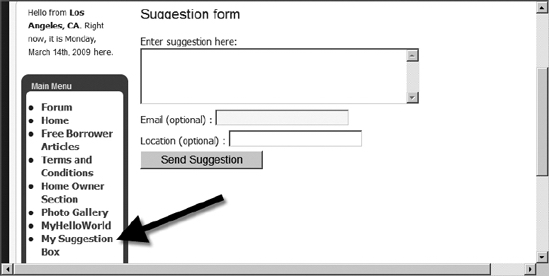
Figure 13-8. The Suggestion Box component will display an entry form.
Enter a sample suggestion and click the Submit button. The suggestion will be written into the database for examination by the Administrator. You've now created your first component and have the basic framework you need to create other components in the future.
Conclusion
In this chapter, you created three different extensions: a front-end module, an Administrator module, and a component. For most development needs, modules and components will allow you to add missing features that aren't available from existing third-party extensions.
While the first module only displayed a simple greeting, it showed how a presentation can be integrated into the Joomla system. The Administrator module was a bit more complex since it added database access and set the proper parameters to be available only from the Administrator interface. Finally, the component was the most complex of all, as it consisted of two parts: the data entry form and the database storage logic. This extension also demonstrated how a component can modify its behavior based on parameters passed to it.
I hope you've enjoyed this book on Joomla and have learned quite a bit about what is perhaps the most promising CMS available. Joomla can be used to create web sites for everything from hobbyist information to complete e-commerce solutions. Everyone will benefit if you'll join the Joomla community and make a contribution of information, money to the development team via the nonprofit Open Source Matters (see www.joomla.org and http://opensourcematters.org for more information), new templates, new extensions, or simply goodwill.
The Joomla community is made up of tens of thousands of enthusiastic users. I hope you will join us and become another proud Joomla supporter. See you online!