
CHAPTER 4
Adding Content
Content lies at the heart of any web site. The need to organize that content is the driving force behind the widespread adoption of CMS applications such as Joomla. You will find that adding new content consumes the majority of the time you spend in Joomla after the initial setup. Before you begin putting articles into your Joomla system, however, you should take the time to think about how the site material will be organized and arranged.
You might reasonably ask why you should devote time to organization before you've added any articles to the system. After all, since Joomla lets you reorganize items quickly and easily, you could always perform the clerical tasks later. Like any task delayed, the problem can grow quickly out of control and finally require a major effort for proper article categorization.
A disorganized Joomla site is like a computer drive where all the files are located in a single directory (or on the desktop)—it becomes impossible to find anything! By setting up appropriate categories initially so content is organized hierarchically (like a directory structure), you will be able to rapidly locate items and so will your users. Well-arranged categories make it easy to properly file a newly created article, preventing the chore of later revisiting and refiling a large number of documents.
Planning Your Content
Before you begin planning, you need to understand how Joomla organizes content. Joomla doesn't use an open system like a directory structure that may have unlimited levels (folders within folders within folders), but instead restricts the article hierarchy to two levels. These hierarchical levels, called sections and categories, should be enough for all but the largest of content sites.
Joomla also offers the designation of uncategorized content for static content. Static content includes articles that don't fit within the site hierarchy (such as a Terms and Conditions page) and therefore are not aggregated (like blog entries are) with other similar content. Uncategorized content can also be used as a catchall designation when the desired location for an article hasn't been determined. You will learn more about uncategorized content later in the chapter.
Joomla! Sections and Categories
Joomla is an advanced CMS, so articles are not organized in static directories on the web server. Instead, each article is stored in a database table and its location is specified within the hierarchy with an attribution field. This makes it easy to reorganize content since, unlike files that must be moved from one directory to another, changing the location of an article simply requires updating the attribution field.
All content in a Joomla web site is organized into a two-level (and only two-level) hierarchy. The top level is known as sections, the second level is categories. Some users new to Joomla have a hard time remembering the difference between sections and categories, and don't know how best to organize them.
One helpful method of simplifying Joomla site organization is to think of a web site as a small newspaper company. Each department or section (News section, Classified section, Help Desk section, Advertising section, etc.) has its own room in the building. Within each room/section are many filing cabinets. A Joomla category is a like a filing cabinet, with each filing cabinet containing one or more articles. If described like a directory hierarchy, the Joomla content structure might look like this:
Section/Category/Article
Using the same path notation, the "Joomla License Guidelines" article that's included in the sample data could be located via a path like this:
About Joomla.../The Project/Joomla! License Guidelines
Figure 4-1 shows the organization of the default Joomla web page. The highest level contains sections (such as About Joomla). Under each section are a number of categories. Categories separate the content into topic areas such as FAQs, News, and so on. All sections and categories are modifiable and new types of each can be freely added by the administrator.
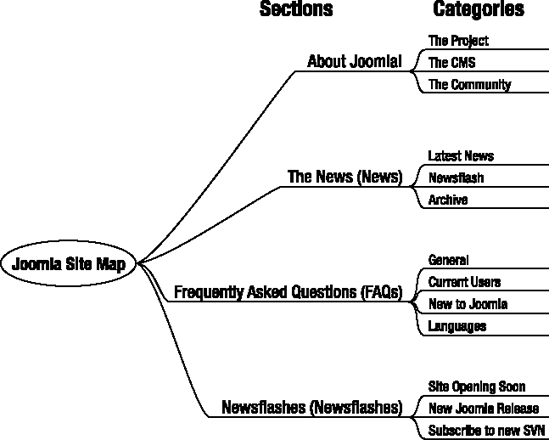
Figure 4-1. The organization of the default Joomla site
You can locate a content item in the Administrator interface by working down the tree from section to category and finally to the desired item. For this example, and because there are not many existing items in the default site, you'll view all of the content on the site in a single list.
Start by opening the Article Manager. By default, only 20 list items are displayed at a time. Scroll to the bottom of the screen, click the Display # drop-down list, and select 100, as shown in Figure 4-2.
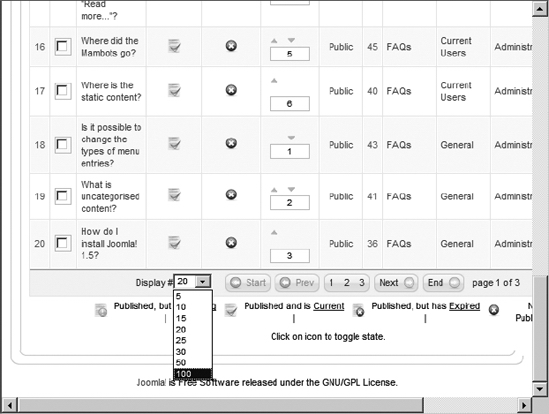
Figure 4-2. Set the number of displayed articles to 100 to view an unabridged list of items on the site.
You should see a list of around 43 entries. Scroll down until you locate an entry titled "Joomla Features." If you look at the columns for this article, you can see the items of data associated with it: name of the content, state of publication, flag for Front Page status, access designation, ID, section, category, author, date of last modification, and total number of hits.
Joomla can sort content in any desired order. Most commonly, Joomla displays content in reverse chronological order, so the most recent article will be displayed first. While this sort order will often be useful, just as often you will want to view only the articles contained in a particular section or category. The "Joomla Features" article is located in the About Joomla section, in the category titled The CMS. At the top of the article list table, select the About Joomla section from the Select Section drop-down list, as shown in Figure 4-3. You will see that the list instantly updates to show only articles listed in that section.
Additional selections may be used to filter the content list by category, author, and publication status. The Filter box is also available to search for text within an article title or to specify an article ID. There is a selection on the Select Section drop-down list for Uncategorized content that will show you the static content stored in the system.
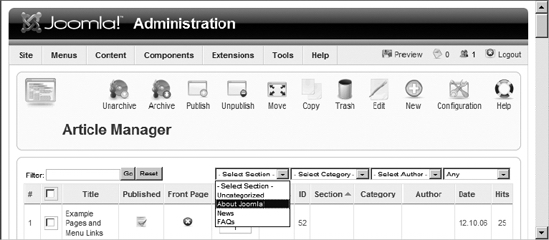
Figure 4-3. Select the About Joomla section from the drop-down list.
Uncategorized or Static Content
If you want to add content in a quick and dirty fashion, you can add an article and mark it as uncategorized or static content. Static content means that the article won't be compiled into a list (e.g., as a blog shows multiple subject items) and will appear as a separate static page.
Many webmasters begin their Joomla pages as a series of uncategorized articles so they can get the site up and running as soon as possible. This is generally not a good idea. Constructing a Joomla site from the top down (by first defining sections, then defining categories, and finally adding content) rather than the bottom up means your site will be more organized from the start and will likely grow more organically. That translates into planning out the top level of organization and then deciding which branches sprout from the central topic hubs. The small amount of time invested up front to determine how content should be filed will reap great rewards as the site grows in size.
Note In previous versions of Joomla (Joomla 1.0 and Mambo), a separate manager in the interface, the Static Content Manager, was used to track and administer static content not dynamically aggregated by the Joomla CMS. Beginning with version 1.5, this manager was eliminated and static content is managed with all the other articles in the Article Manager interface.
Documenting Your Organization Plan
With a clear understanding of the Joomla content structure, you can begin to determine what sections and categories will provide the best fit for the information on your site. It's a good idea to spend some time thinking through this site arrangement—doing so can make the difference between a clean, useful site and a cluttered, exasperating one.
Several computer programs are available to help you with this organizational task. Three popular programs are most commonly used for organizational design: Microsoft Word, FreeMind, and Leo. Each application has advantages and disadvantages, so you will have to determine the one that best fits your style. Think of the outline that you create as more than a simple map to the structure of the site. If constructed properly, the document can be an important part of the administrative documentation of the site.
Tip Even if you're setting up a site for your own administration, it is a good idea to make and keep site documentation. Often this documentation material is extremely useful for later reference when time has passed and original design considerations have been forgotten—but not lost. If the site grows dramatically and you have additional volunteers or hired help, documentation can also provide a good map of the territory to bring the new workers up to speed.
Microsoft Word's Outline View
Many web designers and developers perform the initial layout and categorization of a web site using Microsoft Word's Outline view mode. The Outline view lets you lay out ideas in a simple hierarchical fashion, as shown in Figure 4-4. I've used the popular CNN.com web site for this example because it provides an excellent skeleton for any news-based site. The main site is broken into subject areas such as Programs, Health, Education, Law, Local, Politics, and so on.
Word's Outline view has several significant advantages:
- Most Windows users have Word installed on their machine, so availability is widespread.
- Word's drag-and-drop editing capabilities allow you to reorganize content quickly and easily.
- You can use simple shortcut keys such as Tab and Shift+Tab (or Alt+Shift+right arrow and Alt+Shift+left arrow in more recent versions of Word) to demote or promote headings, respectively.
- If you are creating a simple HTML web site (instead of using an advanced CMS), you can save the final outline as an HTML document and all of the specified headings are automatically converted into their HTML style tag equivalent (Heading1, Heading2, etc.). The saved document can provide a rudimentary foundation for your web site.
The disadvantages to this method are many, however. Word's ability to translate an outline into any sort of effective site documentation is surprisingly poor. For a writing tool, the Outline view has terrible formatting problems when you attempt to print or even integrate the outline into a standard document. Further, the presentation of the individual outline levels in their full-sized font styles appear in an unattractive, large node presentation. There are several better alternatives that are free, open source, and cross-platform.
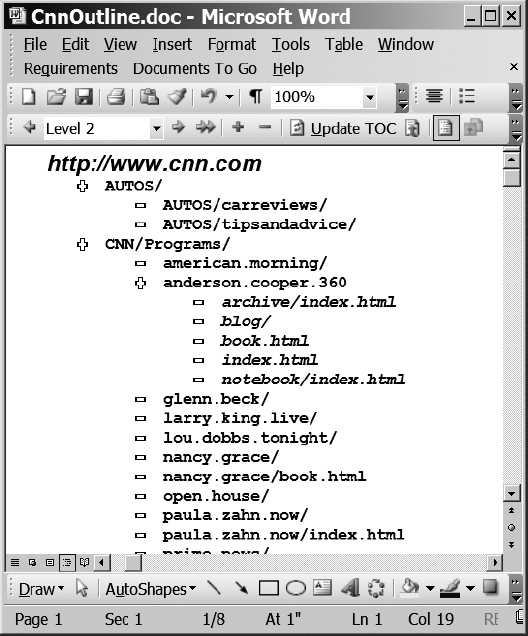
Figure 4-4. Microsoft Word's Outline view can aid in planning the structure of a web site.
FreeMind Mind Mapping
You may be unfamiliar with the concept of mind mapping. A technique formalized by educator Tony Buzan, mind mapping is a method of visual information organization that mirrors the way the human mind can most easily understand and remember information. Rather than forcing ideas, concepts, and information into the visually restrictive tree structure that most outlines adopt, a mind map spreads across the page like a tree.
In Figure 4-5, the basic organization of the CNN.com structure is presented as a mind map. This mind map was created with the Java-based FreeMind application, available for download at http://freemind.sourceforge.net. You can see a number of visual elements that help focus the information on the page, including icons, arrow connectors, and area clouds. Although you can't tell from this black-and-white reproduction, the mind map is in full color, making recognition and recall even easier.
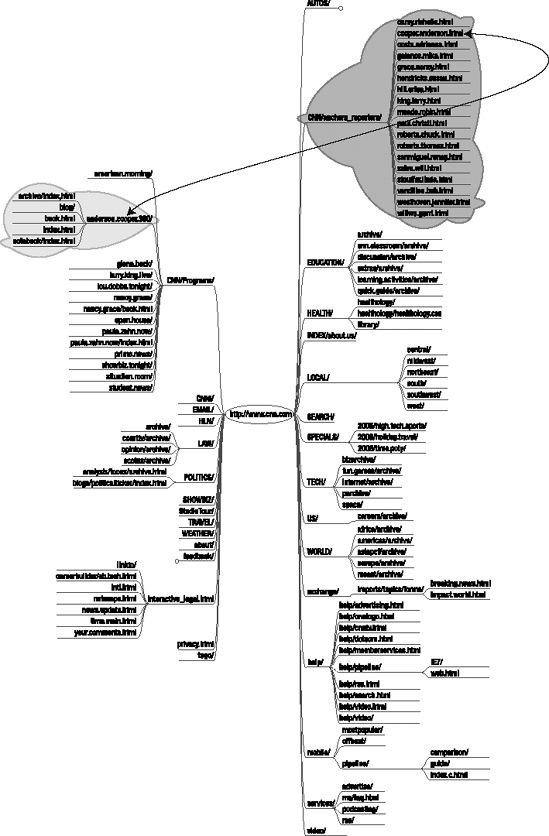
Figure 4-5. A mind map of CNN.com shows the visual power of organization using this method.
For web site organization, this is a fantastic free-form method of seeing an intended layout's strengths and weaknesses. For example, I created a simple mind map of a real estate site. Figure 4-6 shows a facsimile of the mind map for the site. Notice how unbalanced the initial organization turned out. The lopsided mind map shows most of the topics clustered in one area. A well-organized site would have a more balanced appearance.
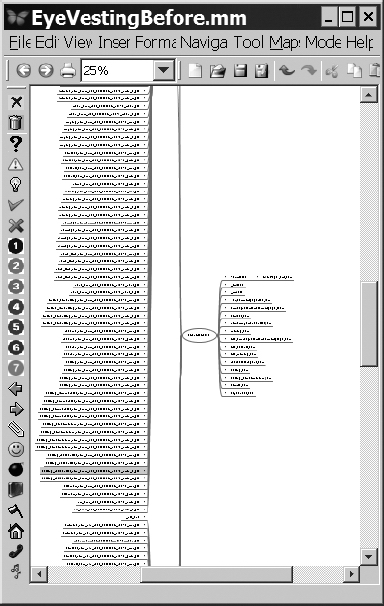
Figure 4-6. The large number of branches on the left shows how unbalanced the initial site organization can be.
After some revision, the updated mind map in Figure 4-7 shows an excellent balance of topics and categories. I even put in the titles of a few articles that would be needed by the site to make sure the content fit properly. This sort of testing makes organization and layout simple and helps ensure the right balance of sections and categories.
Mind maps seem to be the ideal method of drafting a web site—particularly a Joomla site. By creating such a map, you should be able to visually understand how your intended content can be divided among sections and categories. However, if you want to add any actual information to the structure (such as a draft of an article or further notes), a mind map has limitations. For those features, you could use a professional outlining tool such as Leo.
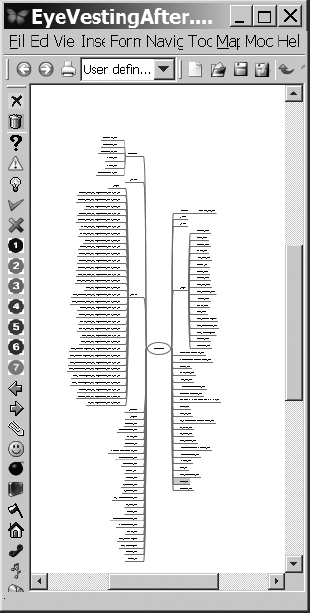
Figure 4-7. A more balanced mind map has the symmetry of a tree.
Leo Outliner
The tool I use most when designing or maintaining a Joomla site is Leo (Literate Editor with Outlines). Leo is a free, open source outliner and general hierarchical information organizer. Leo is written in Python, so it runs on most platforms that support the language (including Linux, Windows, and Mac OS). You can download Leo from http://groups.google.com/group/leo-editor.
Three core aspects of Leo set it apart from other outlining applications: file tangling, cloning, and node body text. File tangling is a slightly complex topic and is used primarily when dealing with code, so I'll save a description of that for Chapter 13, where you'll learn to create and code a Joomla extension. Leo also allows a node within the outline to be cloned so it can appear elsewhere in the outline. Any changes to a clone are immediately reflected in the connected clone nodes. This feature enables multiple ways of organizing the same information in an outline.
Note Leo has many other significant features than the three mentioned in this section. In fact, it has a complete Python interpreter accessible from within an outline (so scripts can be written inside nodes), and the entire Leo framework is exposed as an object model. You can write complete Python scripts, buttons, and plug-ins to perform any macro function. Although the features of Leo that are not relevant to Joomla implementation are beyond the scope of this book, if you're interested in learning more, be sure to check out the wiki devoted to Leo, at http://leo.zwiki.org.
For web developers, the significant feature of node body text is extremely simple in concept. In Figure 4-8, you can see that the Leo screen is divided into three panes: the outliner or headlines pane (top left), the log pane (top right), and the body pane. The outliner pane shows the same outline of CNN.com that you saw previously as a FreeMind mind map. Instead of a mind map display, the outline is displayed in a standard tree view.
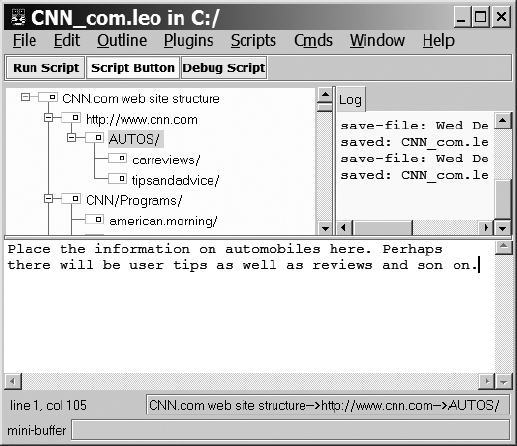
Figure 4-8. The Leo outliner application displays the CNN.com web site structure.
In the figure, did you notice how one node is selected? In the body pane along the bottom, you can see text stored in that node that describes the topic. Every node in the outline can have body text attached. Once you begin to use this feature for organization, you'll be astounded at how much functionality it provides.
For the initial installation of a web site, I've found Leo invaluable in drafting not only the outlined structure of a site, but also much of the initial content. Leo has plug-ins that provide spell checking, export of an outline to HTML/RTF/Microsoft Word/Microsoft Project, inclusion of URL links within the outline (that can launch a browser window), and code syntax coloring (including HTML, PHP, CSS, XML, SQL, and many other computer languages). The export functionality means that all of the work you do within Leo can be converted in two steps into your Joomla site.
Further, since additional child nodes can be added at any time, you can include things such as HTML code, PHP scripts, CSS items, and any other text-based information to the outline. As with any outliner, you can move nodes up, down, left, and right, and you can reorganize the tree with drag-and-drop functionality.
One powerful feature of an advanced outliner like Leo is the hoist function. If you want to focus on a particular aspect of the outline, you can select Outline ![]() Hoist, and the selected node and its child nodes will be isolated as if they were the complete outline, as shown in Figure 4-9.
Hoist, and the selected node and its child nodes will be isolated as if they were the complete outline, as shown in Figure 4-9.

Figure 4-9. Using the Hoist option in Leo isolates a single branch of the outline tree.
Once you have completed the draft of your web site structure, you can either manually re-create it within Joomla or use the Leo-to-HTML plug-in for export. This plug-in generates HTML code of the outline that can then be read into any HTML or text editor. The Leo-to–Microsoft Word export plug-in can generate an indented outline of the Leo file, so you can use it within the Outline view in Word if you need it.
Using Leo, Microsoft Word, or FreeMind (or any combination of the three) can help you draft your Joomla site to make sure that it will fill all of your needs. With a site plan in hand, you'll be ready to begin actual site construction.
Reincarnating a Web Site (EyeVesting) in Joomla!
Long ago I had an idea to create a web site where investors, analysts, and investment clubs could find and share information on value investing (the method used by Warren Buffett). I created a draft of this site with Microsoft Active Server Pages (ASP) code that would store all of the investment information in a Microsoft SQL Server database. It was free for use to anyone who wanted to track his or her investments through the system. One unexpectedly popular aspect of the site was the forum, where laymen and investment professionals could exchange tips, offer advice, and review material such as training books and videos.
Although I shut down the initial site some time ago because of the cost of development, it provides a useful exercise for this book to reincarnate the web site into a Joomla site. The web site offers a good foundation for everything from a custom template to a database access. Additionally, the virtual community that was growing on the site provides an excellent model of what type of interaction is possible through Joomla components.
Therefore, starting in this chapter, I'll use the structure of the EyeVesting web site as an example of how the functionality of Joomla can be used to create a real-world web presence. To start, Figure 4-10 shows the basic outline of the site I intend to create. I generated the outline in Leo and then began harvesting some of the original site articles for entry into Joomla.
I'll use this outline dynamically with my Joomla site creation. Since Leo can store everything from text to URL links to formatted content, I intend to use this Leo file as living documentation. I'll include the MySQL code for any custom tables I create to store information and documentation for the design choices I make along the way.
When complete, the Leo file will mirror the published site and allow me to archive a complete web site design document. With the basic sections and categories outlined in the document, I'll need to re-create the structure in the Joomla system.

Figure 4-10. A draft of the EyeVesting organization is first created in Leo.
Creating Sections and Categories
I hope you've created some type of plan to organize the site you want to create in Joomla—you'll need that plan right now. Most Joomla sites begin with constructing the sections and categories needed to organize content, so that's what you'll do in this section. Open the Administrator page of your Joomla site so you can begin to implement the necessary hierarchy.
Deleting the Sample Articles, Categories, and Sections
Before you can begin creating your new site, however, you must delete the sample content so you can start from scratch. A section can't be deleted until all of the categories it holds are deleted first. A category can't be deleted until all of the articles it holds are deleted. Therefore, you'll have to start the cleaning process at the article level.
Tip If you see an article, category, or section that has a small padlock in the selection column instead of a check box, that means the item is checked out and is being edited by you or another user. If you clicked the item in the past (which automatically checks it out) and then left the web page or closed the browser window without clicking the Close button, the item remains checked out. You need the item checked in before it can be deleted. Select Tools ![]() Global Checkin to check in all items on the Joomla site.
Global Checkin to check in all items on the Joomla site.
Bring up the Article Manager and set the Display # setting at the bottom of the page to show 100 articles. All the articles should now be displayed in a single list. In the column that holds the check boxes, you might have noticed that there is a check box in the column header. Click the check box and every item in the table will be selected, as shown in Figure 4-11.
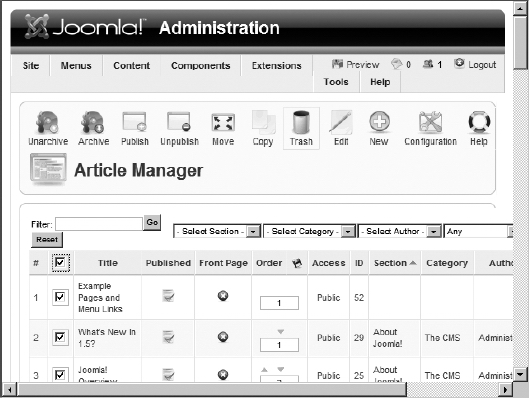
Figure 4-11. Check the box in the column header to select all items.
With all of the articles selected, clicking the Trash icon will send the articles to the trash. You still can't delete the container categories until the trash has been emptied, so select Content ![]() Article Trash to display the articles in the trash can (see Figure 4-12), and once again select all of the items.
Article Trash to display the articles in the trash can (see Figure 4-12), and once again select all of the items.
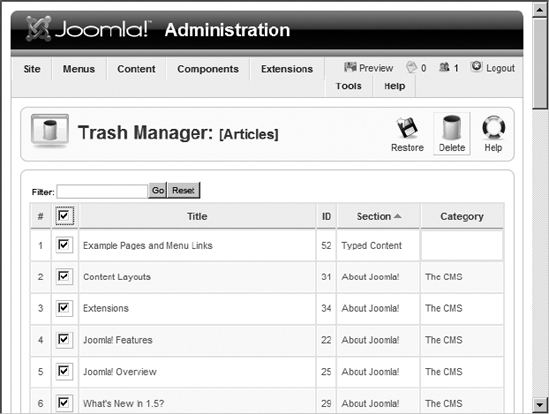
Figure 4-12. Select all of the items in the Trash Manager.
Click the Delete button. You will receive a delete screen summarizing the items about to be permanently erased. Confirm that you want to continue, and another warning box will display to make sure you want to delete the content. When you confirm the second deletion command, the articles will be removed and you should see an empty trash can.
Next you need to delete all of the categories. Go to the Content Manager and delete the categories using the same basic procedure you just followed to eliminate the articles. You won't need to take the extra step of going to the trash can because categories can be instantly deleted. After the category deletion is complete, delete all of the existing sections. Your Joomla site should now be a clean slate with regard to content!
Tip One problem most administrators encounter after running a popular Joomla site is loads and loads of unpublished content. Loath to delete valid content from an archive even if the content is no longer relevant, they simply unpublish it. This type of moribund content can grow explosively like the insidious kudzu weed and slowly but surely overwhelm a previously efficient Joomla installation. Be sure to back up older articles and then remove them from the site, or your site may become sluggish to visit and difficult to manage.
Adding New Categories and Sections
You should begin the creation of the new content structure at the top of the hierarchy by selecting Content ![]() Section Manager. The Section Manager allows you to add, delete, reorder, and modify sections on the Joomla site.
Section Manager. The Section Manager allows you to add, delete, reorder, and modify sections on the Joomla site.
Start by adding a new section by clicking the New button (see Figure 4-13). For the EyeVesting site, I'm going to begin by adding a section for company numbers. Take whatever is the first section of your hierarchical plan and enter it into the Title field. Title field text should be brief since it will appear in the menus. In my case, I set the Title to Company Numbers.

Figure 4-13. Click the New button to add a new section.
After the title are the following fields:
- Alias: Provides a machine-friendly version of the title (i.e. without spaces, all lowercase, and without special characters). For example, the title About Joomla! has an alias of about-joomla. The alias is used if you turn on the search engine–friendly (SEF) functions of the Joomla system. The URLs to articles in this section can then take the form of http://www.example.com/about-joomla/the-project/support-and-documentation.html.
- Section Name: Holds the name of the current section. Unlike the Title field text, which should be brief, as just mentioned, the name will appear at the top of the section when it's selected and can be as long as needed. I set this field to Company Numbers.
- Published: Determines whether or not the current section is published. This is a very powerful feature, because the system administrator can take a whole topic offline by simply unpublishing the section. Set this field to Yes.
- Ordering: Allows the placement of the current section to be set within the overall list. The exact position may be specified (from the drop-down list of sections), or the first or last directive may be selected to make the current item appear at either the beginning or the end of the list, respectively. Since this article is a new item, by default it will be placed at the end of the single item list.
- Access Level: Sets the access level of the section and the articles the section contains as Public, Registered, or Special. The access level determines the groups of users that can view content filed here. Set this field to Public so all visitors can see content in this section.
- Image: Sets the iconic image for the section. This drop-down list shows the titles of all of the images currently located in the
/image/storiesfolder in the Joomla system. I left this item set to No Image. - Image Position: Determines the location of the section image as left, center, or right. I left this set to the default.
- Details: Holds a description of the section. I set this field with a basic description of the items and documents an investor might expect to find within.
Once you're done, click the Save button to write the section into the database. Congratulations! You just created your first section. Continue adding sections until you have all the sections listed in your site plan.
Tip The Section Manager, Category Manager, and Article Manager all provide a drop-down list of basic images that can be added to the selected item. The images in this list are located in the /stories folder in the Joomla /images directory. The Upload button in the Media Manager can be used to upload or transfer additional images into the /stories folder for use from any of the Joomla managers.
To create a new category in the Category Manager, you'll use an interface identical to that used to add a new section, so there is no need for step-by-step instructions. There is one additional option for a new category, however: the section name. Since a category is a hierarchical child of a section, a section drop-down list is provided to let you choose which section will be the parent of the category being edited.
Open the Category Manager and add all of the categories from your site plan. Once you've finished, you can begin adding your articles.
Selecting a Text Editor
Before you begin adding articles, you should choose the What You See Is What You Get (WYSIWYG) editor that will be used for editing article content. Each user on the Joomla system can select from among the available editors, but the administrator can choose the default editor using a global configuration setting.
You can select from the editors installed on the system through the Configuration ![]() Site menu. In the Site Settings frame, the Default WYSIWYG Editor drop-down list contains the available editors. With the standard installation, Joomla includes two editors options: TinyMCE and XStandard Lite.
Site menu. In the Site Settings frame, the Default WYSIWYG Editor drop-down list contains the available editors. With the standard installation, Joomla includes two editors options: TinyMCE and XStandard Lite.
A Tale of Two Editors: TinyMCE and XStandard Lite
Joomla comes equipped with two editors with WYSIWYG functionality: TinyMCE and XStandard Lite. TinyMCE has historically been the editor of choice because of the excellent editing features it provides. XStandard Lite has added some capabilities (such as strict XHTML compatibility and accessibility features) that make it a good option.
You should try both editors and see which one you prefer. While the creators of both editors strive to make them compatible with most browser versions, there are sometimes limitations within certain browsers that inhibit some functionality. If you are going to have content contributors for your web site, it is a good idea to test the WYSIWYG editor with the browser the contributors will use to prevent any difficulty during posting.
Tip Although the TinyMCE and XStandard Lite editors are included with the standard Joomla installation, additional editors are available for use within Joomla. At the time of this writing, there are nine editors for Joomla that tout features such as Textile compatibility, advanced media management, and XML support. Check the WYSIWYG Editors category in the Extensions section of the Joomla site (extensions.joomla.org) for more information.
TinyMCE
TinyMCE (Tiny MoxieCodeEditor) has long been the standard editor for Joomla. It is written entirely in JavaScript and provides complete WYSIWYG functionality. TinyMCE is actually more like a small word processor than a text editor (see Figure 4-14). It even allows direct editing of the HTML source code of the posted content.
Figure 4-14. TinyMCE has many features that are generally found only in word processors.
The substantial editing features include the following:
- Multiple fonts, styles (including subscript and superscript), and font sizes
- Left, center, right, and full paragraph alignment
- Cut, copy, and paste (including options such as Paste as Plain Text and Paste from Word)
- Find and replace capabilities
- Lists (ordered and unordered) and indent settings
- Multiple undoes and redoes
- Insertion of date, time, hyperlinks, HTML anchors, horizontal ruler, symbol characters, smilies, embedded media (including Flash), page breaks, and images
- Text and background coloring
- Table insertion with full column and row manipulation capabilities
- Complete Cascading Style Sheets (CSS) support
TinyMCE also has excellent interface features, including the following:
- Spell checking
- Printing
- Support for international characters and left-to-right or right-to-left editing
- Full-screen editing mode
- Layers
- Absolute positioning
- Display of visual control characters
The current TinyMCE compatibility chart shows the editor to be functional with the following browsers: Microsoft Internet Explorer 5.5 SP2 and above (not compatible with Internet Explorer 5.0), Mozilla SeaMonkey 1.0.5 and above, Firefox 1.5.x and above, Safari 1.2 and above, Google Chrome, and Opera 9 and above. It is likely that all new JavaScript-enabled browsers will be able to use TinyMCE without complication.
Caution One limitation of TinyMCE is article size. Although there should be no problem with most online postings (since they tend to be brief), if your text gets into the 200KB–300KB range, the editor will bog down. This is more a constraint of JavaScript than the application itself. Nonetheless, this can be a limitation if you plan on using Joomla as a document repository.
New to Joomla when version 1.5 was first released, the XStandard editor has been added to provide extra capabilities in the area of accessibility and XHTML support. It requires the installation of a plug-in on the client side, which is handled automatically. The client browser will pop up a notification to install the XStandard XHTML WYSIWYG editor. At the time of this writing, the XStandard plug-in is available for the Windows and Mac OS X platforms. If you have contributors running Linux and you make XStandard the default editor, make sure they know they can configure their user account to use another text editor.
Joomla's XStandard Lite includes a number of unique features:
- CSS layout compatibility, XHTML-compliant code, and enhanced accessibility
- An image library from which images can be inserted
- A link library for hyperlinks
- The ability to insert markup snippets from a library
- Functionality to resize images in the editor
- Keyboard shortcuts for most functions
- Ability to save images from the editor to the local drive
- Controls to change table settings (such as column widths) with the mouse
The biggest single disadvantage of XStandard is its limited platform availability. The client-side plug-in requires installation and runs only on Windows and OS X—and then only in particular browsers (Internet Explorer, Firefox, Safari, and Opera). This limitation is in stark contrast to TinyMCE, which requires no installation and functions on nearly every platform with a JavaScript-capable browser. However, the native execution of the plug-in does give XStandard Lite a great performance advantage over script-based editors such as TinyMCE.
Note Before you can use XStandard Lite, you need to enable the plug-in in the Joomla Administrator interface (Joomla ships with it disabled). Use Extensions ![]() Plugin Manager to enable it.
Plugin Manager to enable it.
No Editor
When the selection of No Editor is made in the site configuration, it doesn't literally mean no editing of content is possible. When an editor such as TinyMCE is selected in the configuration, it essentially takes over the HTML text box area where the content of an article is modified. That means that any rendering of fonts, styles, images, and so on within the text area is performed by the selected editor.
When No Editor is selected, a standard scrolling text area displays the contents of the article. Since Joomla articles are HTML based, all of the HTML-encoded text is displayed in the text area with this option. Therefore, a simple message with a single heading and a single line of body text might appear like this when No Editor is selected:
<h1>MyHeading</h1><p>MyBody text.</p>
The No Editor selection is best used for sites that anticipate that advanced users will be the content contributors or when users need to cut and paste HTML-rich content directly into the body of an article (such as AdSense code, a newsletter sign-up form, etc.). On more general sites, beginners may be confused about the purpose and function of the HTML tags. Even if they understand how to use HTML, many will find it awkward and difficult to use in an authoring situation.
Tip The No Editor option is also useful when you want to embed items or JavaScript code into an article. By default, editors like TinyMCE have security protections to strip potentially harmful code from an article before it is saved to the database. Unfortunately, these cleaning routines may remove items that you do want, like Flash objects. The No Editor option doesn't have such a filter, so these items can be easily added. I usually keep two administrator accounts: one for standard article editing and another to add embedded objects or other things that would normally be stripped by the security routine.
Adding Articles
In Chapter 2, the initial Quickstart chapter, you learned how simple it is to add article content in Joomla. This time around you'll look more closely at some of the options provided. Not only will you learn about the article settings and how they relate to content display, but you will also discover how you can embed rich content media (such as Flash animations, images, and sounds) directly into an article.
Setting the Basic Article Parameters
The basic parameters of an article are those that can be set every time a new piece of content is added to the site. These are parameters such as publication date, title and author aliases, and so on. They determine the presentation and publication information for the article.
For every article placed on the system, the following basic parameters may be set:
- Title Alias: Provides an alternate title for the article that can be used by dynamic title scripts and also as an SEF name. For example, the Title Alias of the article "What's New in 1.5?" is "whats-new-in-15" to make it more code-friendly.
- Author Alias: Provides the option of displaying an alias or pseudonym (if the author's name is configured to be shown with the article).
- Access Level: Sets the access rights for the three groups of users (Public, Registered, or Special).
- Created Date: Allows the creation date as it appears to web visitors to be overridden. This feature is used to future-date content that will not appear on the site until later or to republish older content that has a newer reformatting or revision date.
- Start Publishing: Specifies the date when the article will automatically appear on the Joomla site. This is useful for perennial content, event-related content, and columns that feature a scheduled release, such as "Tuesday Cooking Corner." Columnists can upload an article that is published every Tuesday at any time before that. In military parlance, they can simply "fire and forget." After setting the publication date (and time if desired), the article will automatically appear on the site on the scheduled date.
- Finish Publishing: Specifies the date when the article will no longer appear on the site. If this parameter is left empty, the article will remain published until manually unpublished or deleted.
All date fields (such as Created Date, Start Publishing, and Finish Publishing) feature an ellipsis (...) button to the right of the editing area. Clicking the ellipsis button displays a graphic calendar that allows selection of a date from a calendar page.
Tip The Start and Finish Publishing dates provide an excellent opportunity to automatically activate seasonal content. You can create some information that is useful every year (e.g., instructions on how to wrap a gift) and set the Start and Finish dates so that the article appears between December 1 and December 26 of the year. Such an article can be created in the height of summer and then require no further attention. When Christmas rolls around, the article will automatically appear on the site at the proper time. At the end of the year, you can simply reset the start and finish dates to the following year, and your site will display this perennial content again.
Setting the Advanced Article Parameters
The Advanced Parameters tab (see Figure 4-15) configures the presentation settings of an article when the article is fully displayed (after the web visitor clicks the Read More link at the bottom of the article summary). A majority of articles have no advanced parameter modifications and are left with default settings.
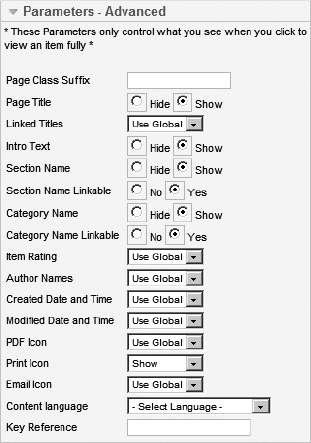
Figure 4-15. The Advanced Parameters tab contains the options for the article when it is viewed individually.
Many of the advanced parameters will override global settings. The default setting of Use Global will, in special cases, need to be changed for a particular article. In most cases, leaving the global setting is a good idea, so that any changes in policy on a particular setting can be made once in the Administrator interface, and the alterations will automatically propagate to all articles that don't have custom override settings.
The Advanced Parameters tab features the following settings:
- Page Class Suffix: Specifies a suffix to be used for the CSS of this article. Adding a suffix allows a custom style sheet to be used with this particular article. You'll use this feature later in the book to provide your site with a theme that uses styles for different pages, yet maintains a unified brand image.
- Page Title: Hides or shows the title of the article.
- Linked Titles: Allows the title of the article to be a link. If title is a link, when the visitor clicks it, the browser jumps to the same location as the Read More link.
- Intro Text: Shows the introductory text above the article. The intro text is the abbreviated article shown in an article aggregate (such as a listing of articles in a category) with the Read More link. Use the Read More button at the bottom of the editor window to insert a horizontal rule to separate Intro text from Read More text in the body of the article.
- Section Name and Section Name Linkable: Shows the Section Name at the top of the article. The Linkable option specifies whether the displayed section name is a link that will take the visitor to the section for other similarly filed articles.
- Category Name and Category Name Linkable: Shows the Category Name at the top of the article. The Linkable option specifies whether the displayed Category Name is a link that will take the visitor to the category for other similarly filed articles.
- Item Rating: Overrides to show this item's rating (from user selections). Note that a change from the Use Global setting should be carefully considered. If only one article on a site full of rated content doesn't have a rating, it may hint at censorship. Likewise if a single article shows a user rating while others do not, it will appear odd to the user.
- Author Names: Overrides to show this item's author name(s).
- Created Date and Time: Overrides to show this item's created date and time.
- Modified Date and Time: Overrides to show this item's modification date and time.
- PDF Icon: Overrides to show this item's PDF icon.
- Print Icon: Overrides to show this item's print icon.
- Email Icon: Overrides to show this item's e-mail icon.
- Content language: Overrides to select a language for this article.
- Key Reference: A text key that may be used to reference this article within the Joomla system (e.g., to link to a help topic).
While the advanced article settings are useful in rare instances, the Page Class Suffix and Key Reference fields are the only settings you are likely to change frequently for a given article.
Setting the Article Metadata Information
Metadata is information about information. In this case, it is information about the article that is, while invisible to the user, accessible to web search engines and used for purposes of indexing, filing, and description. The metadata is important for making sure your content is represented properly on the Web, and you'll learn more about it in Chapter 12 when search engine optimization (SEO) techniques are explained.
The following metadata fields are supported natively in Joomla:
- Description: Provides a summary description of the article content. This description will be displayed by some search engines (such as Google) directly under the site title on their search results page.
- Keywords: Shows any keywords that relate to the article.
- Add Sect/Cat/Title button: Inserts the section, category, and title information into the Keywords text box. Having this information in the keywords will help the article be found and categorized by search engines when they index the page's content.
- Change Creator: Sets the creator of the article to a different user. This feature is most useful when an administrator needs to post content from another contributor (such as an article that was submitted via e-mail).
Tip Most search engines don't place much emphasis on keywords since spammers have abused this metadata to camouflage the true nature of their sites. Therefore, don't spend too much time working on the keywords. Instead, make sure that any desired keywords are included in the site description and somewhere in the article itself. Generally, that strategy will have much better results in terms of the site being found. If you want to streamline this process, you can use one of several online automatic metatag generators (e.g., www.see-search.com/webdesign/seeMetaTag.htm) to extract keywords from your tags.
With every article you post, try to add this metadata at the time of original publication. It's unlikely you will ever return to fill in the information, so it is best to do it when you have the chance.
Adding an Article to Your Site
You should now have a much clearer idea of the settings and parameters available for each article, which will allow you to make better decisions about which publishing parameters to select. Now is the time to add a new article to your site structure.
Bring up the Article Manager or simply click the Add New Article button on the Administrator Control Panel screen. Enter the title of the article and a machine-friendly version of the title in the Title Alias field (or leave it blank and Joomla will create an alias from the page title). Select a section and a category, and set the article for publication to the Front Page. You can see the article I will be publishing in Figure 4-16.
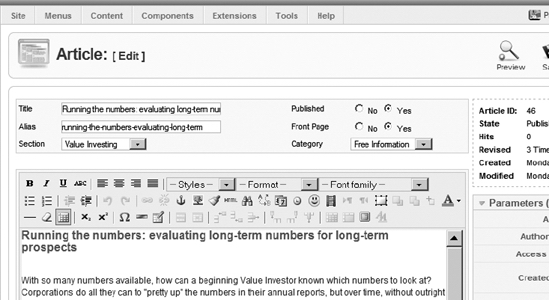
Figure 4-16. Enter the title, alias, section, category, and body of a new article.
Before I'm finished, I want to change a few settings in the Advanced Parameters. First I set the section and category names so that they are visible and linkable. Then I turn on the Print icon so visitors can print the article if they want (even if most items don't have a Print icon because the global setting is different). The parameters pane now appears as shown in Figure 4-17.
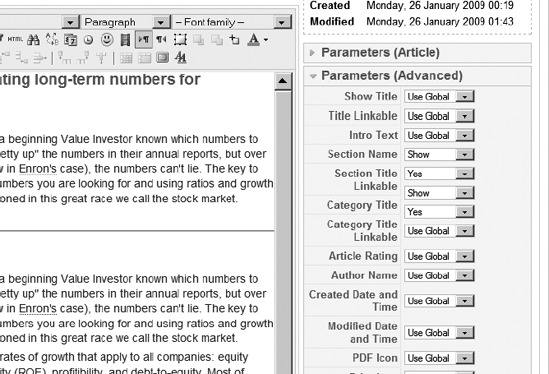
Figure 4-17. Change the advanced parameters to match the needs of the article.
Be sure to set the metadata for the article. I wrote up a brief description of the article, making sure all of the most important keywords were in the description. I also put together a list of keywords that I thought would properly reflect the article (see Figure 4-18).
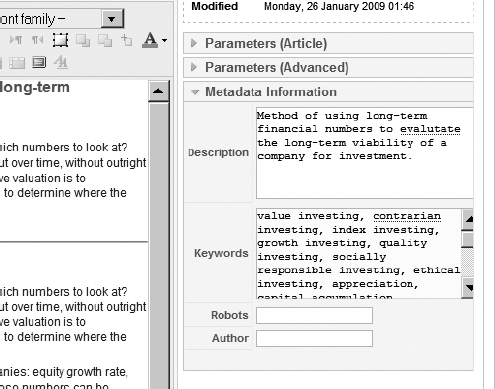
Figure 4-18. Be sure to add metadata so search engines can properly catalog the site content.
Before I save the article for publication, I'll add some media to it. First I upload a small PNG image of a home icon that should appear in the text. Later I'll add an introductory audio file to complete the media experience. You can alternatively add a Flash file or other media.
Place the text cursor at the place within your article text where you want an image to appear. Before you can add the media to the article, however, you have to upload it. Scroll to the bottom of the screen and you will see an Image button. Click the button and the Insert Image window will display. This window shows thumbnails of all of the current media stored in the default media folder on the site.
Tip If you have a number of content items or items that will be shared among several articles, you can upload them easily in the Media Manager.
I want to upload a custom icon, so I expand the Upload section at the bottom of the window and click the Browse button (see Figure 4-19). I select my houseicon.png file and click the Upload button. A thumbnail of the new graphic automatically appears in the images contact sheet.
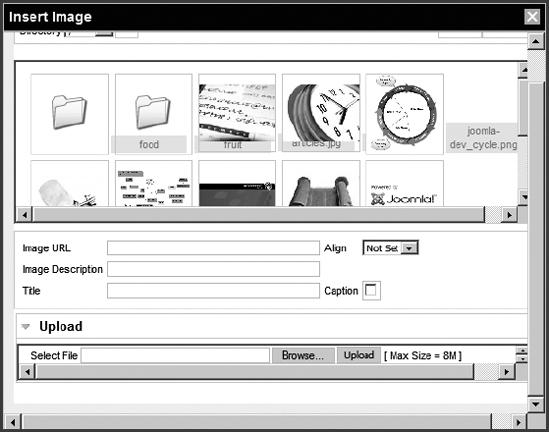
Figure 4-19. Click the Browse button at the bottom of the window to select an image file for upload.
Click your new image to select it for insertion. The Image URL field should be automatically filled with the path to the selected graphic. For my graphic, the path is images/stories/houseicon.png.
I entered an image description, which is very important for search engines and accessibility. Search engines can't "see" the content of a graphic, but they can read the HTML alt attribute for a text description of the item. The image description sets the alt attribute. Additionally, accessibility software (such as screen readers for the visually impaired) needs a text description to communicate to the user what is displayed on the screen.
For the title of the image, I simply duplicate the description field. I also want it captioned on the page, so I check the Caption box. Finally, I click the Insert button at the top-right corner of the screen to insert the image at my cursor position. Now the diagram is inserted directly into my article (see Figure 4-20).
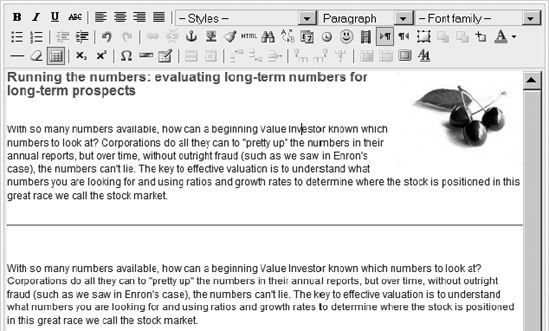
Figure 4-20. The image now appears where it was inserted in the article.
The article is ready to publish, so I click the Save button to store the article in the Joomla database. If you go to the home page now, you won't see the article. Why is this? Earlier when you wiped the slate clean, you deleted all of the old sections and categories. The Front Page was set to specifically display the organizational designations that no longer exist.
To show the new content, you'll need to add the new sections and categories to the Front Page. Before you do that, however, why not add one more article to test out the uncategorized content functionality?
Adding a Second Article
To understand the various types of Joomla filing, you should add a new article that will be uncategorized. With uncategorized content, you can test a direct link menu that takes the visitor to the specific article rather than a list of items in a section or category. An example of the type of document that would be uncategorized is a Terms and Conditions page of a web site.
Since the sections and categories are specifically organized around the subject area of the site, often documents such as terms and conditions, licensing, and use restrictions don't have a clear place in the hierarchical structure. Of course, you could create a catchall category if you wanted, but for this example you'll leave the article uncategorized.
Create a new article with any parameters and content you want. Be sure to leave the Section and Category drop-down lists set to Uncategorized (see Figure 4-21). Here I've placed text for the site's general terms and conditions as well as limitations of liability, and so on.
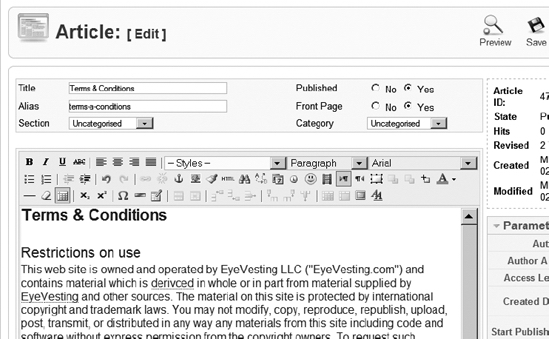
Figure 4-21. Post an uncategorized article that will be used for a direct link demonstration.
Unlike the last article, don't use the advanced parameters to set the display of a linkable section or category. However, you can use the advanced parameters to override the global settings for Author Names and Created Date and Time. I recommend you select the Hide option for both of these parameters, as there is no need for a system document such as this article to display such data (even if all other site articles do provide this information).
Once you've finished, click the Save button to publish the article into the database. You're ready now to create menus that can address these items.
Tip The home page of your Joomla site is called the Front Page by the Joomla system. The Front Page Manager is a shorthand way of examining the content that will be displayed on the Front Page. If you want to do a quick check of the home screen contents, you can easily jump to the manager through the Front Page Manager menu option or the Front Page button on the Control Panel. All of the Front Page material also remains available through the Article Manager.
Upon returning to the Article Manager, if the Published column for either article holds the pending icon (which displays an exclamation point), as shown in Figure 4-22, you'll have to change the publication date for the articles to display. Occasionally, Joomla takes the server date and time and then assigns a future time for publication to a new article. To publish the article now, simply edit the article and change the Start Publishing date to the present date.
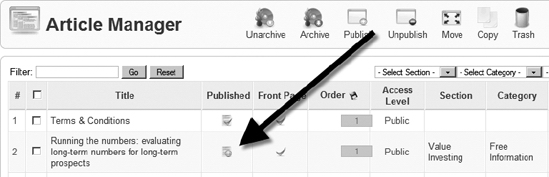
Figure 4-22. If the exclamation point pending icon is displayed, the publication date is set sometime in the future.
Adding Menus to Point to Content
Joomla is organized around articles, but to access and display articles, the menu system takes center stage. Every section, category, or individual document needs to be linked in one way or another to a menu for the user to access it. Menus in Joomla aren't always defined in the straightforward manner they are in a desktop application.
In Joomla, a menu may appear as a traditional desktop menu and show options either horizontally across the top of the screen or vertically running down the side. A menu may also look like a simple list of article summaries used by the visitor to navigate to the complete content of the article. Or a menu may contain articles listed in blog format.
The next chapter provides a complete explanation of each type of menu system. For now, you need to use one direct menu and one menu category to display the articles that you've added to Joomla.
Creating a Direct Menu to the Uncategorized Article
For the uncategorized article, you can create a menu that takes the visitor directly to that article. This direct menu will be created as a single menu item within the Main Menu.
To begin, open the Menu Manager and click the Edit Menu Items icon in the Menu Item(s) column of the Main Menu. Click the New icon to create a new menu item.
You will be presented with a screen like the one shown in Figure 4-23. This screen contains a list of all of the available types of content that may be linked to a menu items. To expand the possible article choices, click the Articles item under the Internal Link subject.
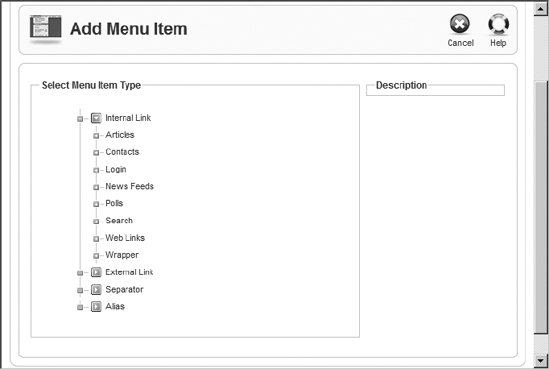
Figure 4-23. The Add Menu Item screen provides a tree list of available item types.
Select the Article Layout option for the menu type to create a direct menu link. Set the name of the menu item to Terms and Conditions or the title of your uncategorized article. Leave the "Display in" and Parent Item settings at their defaults (Main Menu and Top, respectively, as shown in Figure 4-24).
At the top-right of the screen is a button titled Select Article. Click the Select button and an article selection window pop-up will display (see Figure 4-25). Click the name of your uncategorized article to select it and you will be returned to the article window with the article title now appearing in the Select Article text field.
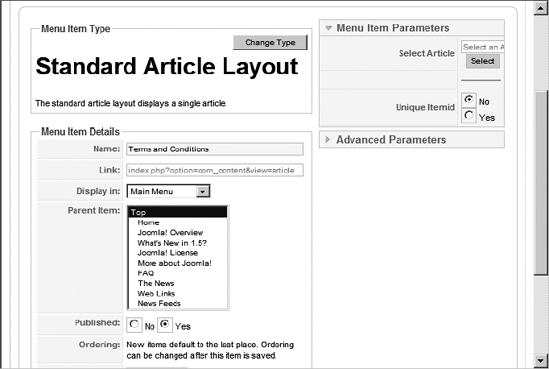
Figure 4-24. Leave the "Display in" and Parent Item parameters at their defaults.
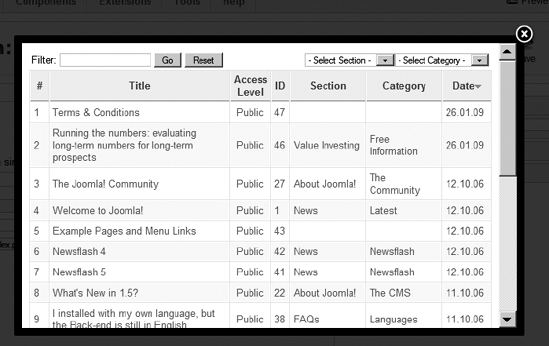
Figure 4-25. Click the article name to link this article to the current menu.
For this article, you don't need to change any of the advanced parameters, so click the Save button to store your new menu item.
If you bring up the Front Page of your Joomla site, you will now see the Terms and Conditions menu item at the bottom of the Main Menu, as shown in Figure 4-26. If you click the link to the article, you will see that it appears as an independent page without any section or category references.
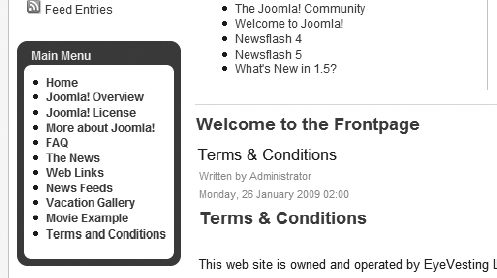
Figure 4-26. The Terms and Conditions menu item is now part of the Main Menu.
You can easily add any other direct menu items in this fashion. However, a CMS isn't very useful if you need to create a new menu each time an additional article is contributed to the site. Therefore, most of the menus you create will aggregate content so that Joomla can dynamically handle the presentation of new articles. The most common form of dynamic menu is the Category menu.
Displaying the Category Menu
In this section of the chapter, you can add a menu item that will display all of the articles in a specified category. Before you add the new menu, however, now is a good time to clear out the Main Menu references to all of the sample data content items since they no longer exist.
Start by opening the Menu Manager and clicking the Menu Items icon for the Main Menu. When the list of current items is displayed, select all of the menu items except Home and Terms and Conditions (this includes Joomla! Overview, What's New in 1.5?, Joomla! License, More about Joomla!, FAQ, The News, Web Links, and News Feeds). Click the Trash icon to remove them. Since you're not deleting the menu, you don't have to go immediately to empty the trash; you can leave the deleted items in the trash for the moment.
If you refresh the browser window showing your site's Front Page, you will see only the two remaining menu items. Now that you've cleaned the broken-link menu items off the site, it's time to add a new menu. While still within the Main Menu items screen, click the New button to begin a new menu entry.
In the same way you created the direct link menu, click the Internal Link ![]() Articles headline in the outline interface. This time, choose the Category List Layout option. You'll see a screen that's a bit different from the single article form of the last section. On the right side of the screen (see Figure 4-27), the Menu Item Parameters area lets you set up the configuration for the article display.
Articles headline in the outline interface. This time, choose the Category List Layout option. You'll see a screen that's a bit different from the single article form of the last section. On the right side of the screen (see Figure 4-27), the Menu Item Parameters area lets you set up the configuration for the article display.
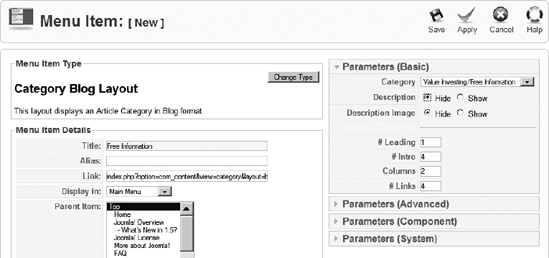
Figure 4-27. The Menu Item Parameters area contains settings that govern the display of the Category List layout.
You will need to begin by giving the menu item a title. For the EyeVesting site, I want all of the visitor documents from the General category to be displayed by this menu; therefore, I give the menu item the title Free Information. In the Menu Item Parameters area, I also set the category to Free Information, which is where I placed the main article I created.
When you've completed any other adjustments you want to make to the menu, click the Save button. The screen displaying the current menu items will display, showing your new menu at the bottom of the list. You actually want this menu to appear above your direct menu, so click the up arrow in the Order column, as shown in Figure 4-28.

Figure 4-28. Click the up arrow to move the current menu above the Terms and Conditions direct menu.
Refresh the browser window of the user display and you should see not only the menu items correctly ordered, but also the article you posted on the Front Page. The template is configured to display the content of the Main Menu, so your recent addition is automatically displayed. Now that you've begun to customize the content of your site, it's time to alter the appearance as well.
Installing a New Template
The most common method of changing the look of a Joomla site is downloading and installing a custom template. There are many wonderful freeware and commercial sites that can provide a new, high-quality skin for your web site. In this section, you'll learn to download and install a new template that can give a site a more targeted look and feel to enhance the site's brand image.
The theme of your Joomla web site is determined by the default site template. With a standard installation, the rhuk_milkyway template is selected by default. To give you an idea of the power of the template system, you'll be able to see the dramatic recasting of your web site by simply selecting a new template. The entire appearance of the site transforms instantly.
Before you begin, you'll need to locate a new template and download it. There are numerous excellent commercial sites where you can buy a subscription to gain access to all of the templates the site contains. For free templates, check out www.joomla24.com and www.joomlashack.com.
Tip Unfortunately, when you attempt to find free Joomla templates on search engines such as Google, you'll often get links to commercial sites that misrepresent themselves. Either the sites have the free templates buried so that they're difficult to find, or they really don't have any free templates at all. Don't give up, though—many free Joomla templates are available.
The template you'll download will most often be a stored as a ZIP or GZIP archive. Since Joomla can internally decode these types of archives, you won't need to extract the files from the archive onto your local drive. Joomla will let you simply upload the archive, and the system will expand the template files and put them in their appropriate locations.
A template typically consists of an assortment of files, including PHP code, style sheets (in CSS files), and images. In Figure 4-29, you can see the screen on the Joomla24 site where I downloaded the JS Optimus Free template in ZIP format. Find a template on this web site or another, download it, and save it to your local drive.
To change the template, you'll first need to upload it into the system via the Extension Manager. You can find the Extension Manager by selecting the Install/Uninstall option under the Extension menu. Select the file with the Browse button and then click the Upload File & Install button, as shown in Figure 4-30.
After the template upload has completed successfully, open the Template Manager screen. Currently the rhuk_milkyway template is selected. To change the site template, click the radio button to the left of the desired template. In this case, select the new template and click the Default button in the menu bar.
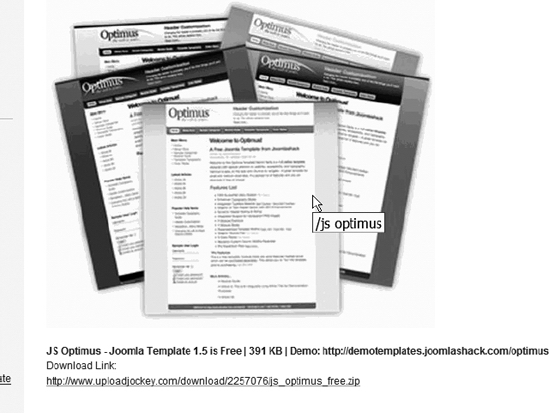
Figure 4-29. Click the Download link to download the archive of the new template.
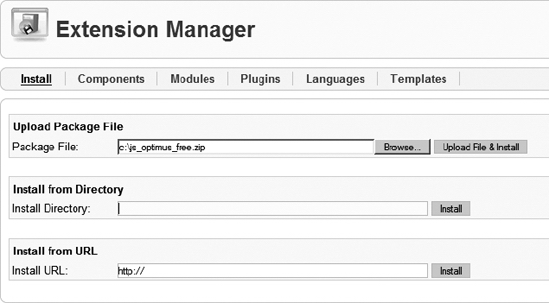
Figure 4-30. Click the Upload File & Install button to put the template on the site.
Open a browser window of the user's view of the site. When you click the Refresh button, the new look should be quite a change. Congratulations! You've just made a significant alteration to the look and feel of your new Joomla site. If you want to download some commercial templates, there are numerous sites that sell subscriptions to new templates, which you can download as they become available. You could even change the look and feel of your Joomla site every month!
Tip In the Template Manager, you can get a preview of any of the templates currently installed on your system by moving your mouse over the name of the template. A thumbnail of the main screen of the template will appear in a pop-up.
Collaborating with Outside Contributors
One of the tremendous advantages of a CMS over traditional web page construction is the ability to easily manage submitted content. If you have contributors, editors, or moderators who will work on the site content, you can spend a great deal more time on site promotion and other management tasks. Joomla allows you to assign registered users various roles that grant privileges to edit or modify your web site.
Even more powerful is the fact that you can allow contributors to submit their additions or changes to the site, but you can reserve final publishing approval for yourself. You can be the final arbiter of all site content.
Tip Joomla has the rudiments of a web personal information manager (PIM) included with the default installation. Any user added to the Joomla system can be linked to the more robust information store saved with each contact in the PIM. By selecting Components ![]() Contact
Contact ![]() Manage Contacts, you can create a new record and link it to the user record.
Manage Contacts, you can create a new record and link it to the user record.
When you set up a new account for a contributor, there are three categories into which the user will likely fit: Registered Author, Registered Editor, or Registered Publisher. You can add the user yourself or you can modify an existing registered user. As an example, open the User Manager and click the New button to create a new user.
For the sample login, I've entered the name of John Doe, the user name of jdoe, and an e-mail address. In the Group list box, I've selected Author, as shown in Figure 4-31. That group designation will allow the new user to contribute content.
Open a browser window and access the user front-end of your Joomla site. On the left side of the screen, scroll down to the login form, where a registered user can enter his or her username and password. Enter these text fields for the user you just created and click the Login button. When the system has logged you in, the browser will return to the home page. If you scroll down the screen to the place where the login fields had been, you'll find they've been replaced by a personalized greeting and a Logout button.
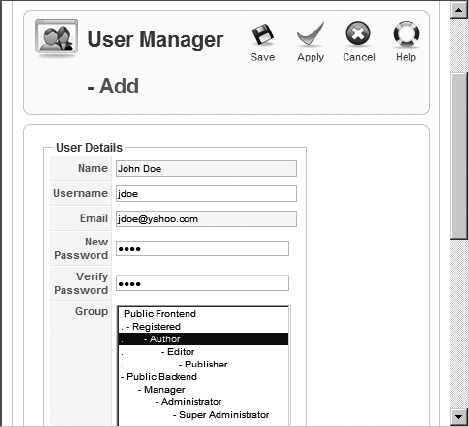
Figure 4-31. Select the Author designation in the Group list box.
To add a new article, the contributor has to select an existing category or section where articles are already located. Since you've created only a single category that has a menu selection, click that now (in my case, the menu is Free Information). When you scroll to the bottom of the article list, you'll see a link titled New, as shown in Figure 4-32.
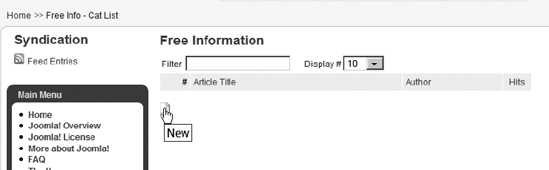
Figure 4-32. Click the New link to add an article to the current category.
Click the New link and the screen should display the WYSIWYG editor you've selected as the default. Below the text editor area, you'll find panels for most of the basic parameters and also an entry space for the article metadata.
Enter a sample article and fill out the article parameters as if you were a third-party contributor to the site. Once the article is complete, click the Save button. The article will be submitted into the site. Once a contributor has posted a new article, it is up to the administrator or moderator to decide if it should be published on the site.
Log in again as the administrator and open the Article Manager in the Administrator interface. You will see the article that was just submitted into the system. In the Published column is a red X signifying that the article is not presently published. Only the administrator or a user with Editor or Publisher permissions can accept the article for publication on the site.
Conclusion
You should now have a pretty solid grasp on publishing content on the Joomla system. In this chapter, you not only performed the preplanning of the site with a third-party application (such as Microsoft Word, FreeMind, or Leo), but also implemented your site plan by creating a structure of sections and categories that could be used to file each article properly.
The two editors included with the default Joomla installation (TinyMCE and XStandard Lite) for creating and modifying articles both offer robust features. TinyMCE has an excellent user interface and, being written in JavaScript, will run on nearly any browser. XStandard Lite, with a client component only available on the Windows and Mac OS X platforms, provides XHTML features as well as superior performance. You should now be able to choose the editor that best fits your needs.
You also learned how the basics of the menu system work, so you can create either a direct menu item link to an article or a menu item that presents an entire category. Finally, you created a new registered user and set the permissions needed to allow that user to contribute article content to the Joomla site.
In the next chapter, you'll greatly expand your knowledge of site administration so you can maintain not only the site itself, but also the virtual community of users.