By Dwight Goins
Foreword by Mansib Rahman
It may not be a surprise to many that the current state of affairs for the Kinect is in flux. While the core APIs and drivers are relatively stable, Microsoft has somewhat dropped the ball on further development. That is not necessarily a bad thing. They have taken their learnings and applied them to the development of newer technologies, such as HoloLens and other mixed-reality headsets. The Kinect for Windows v2 still offers a strong entry point for hobbyists, developers on a budget, and research/commercial developers looking for a proven depth-sensing technology.
So, when Microsoft (somewhat quietly) announced Kinect support for Windows 10, you can imagine I was pretty ecstatic. I had no expectations, so anything at all was welcomed by me. I really wanted to ensure that this book included what was essentially the start of the last chapter of Kinect for Windows v2, even at the risk of delaying publication by several months. Unfortunately, I simply did not have enough experience with the new programming paradigms for Windows 10 UWP and Kinect. I happened to know someone who did. Dwight, the author of this appendix, is a Kinect MVP and had the fortune of learning about Kinect development for Windows 10 before it was announced by Microsoft publicly. Thus, I did not hesitate to enlist his expertise and have him draft the following pages. Aside from some grammar and syntactic edits, I let him have purview of this entire appendix.
A lot of the theory and backstory in this appendix may be confusing for those not experienced with the Microsoft development stack. The story from Microsoft is not clear in itself, and Dwight was compelled to work with what he had at his disposal. If you find it difficult to grasp, do not hesitate to jump right to the code.
Additionally, I should warn you that the content in this appendix reflects the current state of affairs, which is subject to change by Microsoft at any time, depending on their overarching Windows 10 and mixed-reality strategies. This is the uncool part about being a developer (though admittedly, it does help justify our paychecks). As a result, some of the content here may not reflect what is current at the time of publishing.
Introduction
There are two different approaches to building applications for Windows 10. The first approach is to utilize a software development kit targeting Windows 10 traditional Win32 desktop-based application s running on x86 and x64-bit platforms, which have been around for the past 30 years. The second approach is to utilize an SDK targeting Windows 10 Universal Windows Platform (UWP). The second approach has only been around more recently.
To target the Windows 10 Win32 desktop, everything you’ve learned up to this point is how you would go about it. You would utilize the Kinect for Windows v2 SDK in both .NET and C++ libraries; there is nothing special you need to do. Just follow the steps mentioned in the previous chapters, and your application will work. This brings up a very important point: applications that you built using the Kinect for Windows v2 on Windows 8 will work unchanged on Windows 10 desktops.
On the other hand, to target the Windows 10 UWP and its store, there is a new paradigm you must learn. The architecture has changed, the design philosophy has changed, and the programming model is different. You can pretty much say it’s a new SDK and framework for building Windows 10 UWP applications altogether, which follow the Windows 10 UWP development mantra.
This section will take you through this new paradigm, the history of the Kinect v2 for UWP, architecture, and programming model, and show step by step the building blocks for how to build a Windows 10 UWP store application with Kinect.
Windows 10 UWP Paradigm
One Billion Devices
One of the main goals of Windows 10 UWP is to make sure it runs on as many Windows devices as possible. The goal is to reach one billion-plus devices over the next year. This includes device form factors such as IoT , hobby or prototyping programmable boards such as Raspberry Pi, Particle, and Arduino, mobile phones, tablets, desktops, laptops, and wearables. Even the more specific form factors such as HoloLens (head-mounted displays), Surface Hub (wall-mounted, large, shared-screen experience), and Xbox gaming and entertainment consoles are a part of this grouping. This means that, as a developer, when you create your UWP application it has the potential to run on over one billion devices, which means the potential to reach over one billion customers.
Reaching this many customers and running on this many types of devices requires a change in thinking and a change in development strategies. This is especially the case when it comes to display and form factors, as well as how an application runs and how an application closes down. The latter is typically known as lifecycle management. While the form factor is addressed through a fast and fluid design philosophy, there are many books and articles on how this is accomplished within the Windows 10 SDK. The lifecycle management, on the other hand, needs some more attention, as it relates to Kinect for Windows v2 development.
Lifecycle Management
The lifecycle management of a UWP application compared to legacy Win32 desktop applications is a lot like your father’s root beer, where anything may go into the drink and anything can happen if he stays on it too long. Traditional Win32 applications are typically controlled by the user, and anything can go in it. The application starts when the user wants, and it can stay running as long as the user wants; anything is likely to happen. The user terminates and closes down the application when the user wants by pressing the x-close button.
UWP applications, however, do not necessarily behave this way. The lifecycle of a UWP application is modeled as a state machine. A state machine, in this example, is a UWP application where states are maintained and can transition to different states based on events and data flowing between the states. A user can initiate the state machine, but there are many things outside the user’s control and within the UWP engine that can change the state of the application. A UWP application contains three main states: Running, Suspended, and Not Running. An application can go from Running to Suspended to Not Running. An application can also go from Suspended back to Running again without going to Not Running. Figure A1-1 shows UWP states an application can be in. As a Kinect UWP developer, these states must be accounted for in your application. The following is a quick diagram showing the possible states and events you have access to for determining which state you came from or are about to go into.
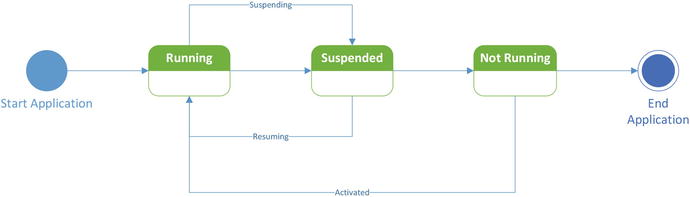
Figure A1-1. Diagram of UWP states
System Environment Changes
Traditionally, legacy-based applications have free rein as to what resources are available for use. When running legacy applications with administrative permissions, the application can access and modify registry settings, connected devices, and any file on the system, including system files, and can basically communicate with any other running applications. These legacy applications took the concepts of standard C—trust the programmer and don’t prevent the programmer from doing what needs to be done—and ran with it. Legacy applications became kings of the computer. Well, in the hands of untrustworthy developers, these king-like legacy applications led to viruses, and eventually led to a concept called secure computing.
Fast forward to 30 years later, when trustworthy developers and secure applications are at the top of everyone’s list. As a developer now, we must be security conscious. Along with this responsibility comes the idea of secure applications running on one billion devices, and the philosophy is now the anti-C theorem: do not “trust the programmer”; you must prevent the programmer from doing whatever he or she wants. This, for the most part, is what Windows 10 and the UWP is all about—providing a safe environment and giving control back to the user and safe engine and taking it out of the hands of the untrustworthy programmer. In UWP applications, a user must decide if they trust the programmer. By default, nearly all capabilities within the application are restricted from running. The user has the ability to allow various capabilities to run within an app. As a developer, if you don’t request the permissions for the capabilities you need for your application from the user, it will run with the bare minimum of features, basically just displaying some hard-coded text and embedded pictures. Keep in mind that the user also has the ability to say no, which means as a developer your application must account for this.
A UWP application provides a manifest file that contains declared capabilities that a developer requests from a user in order to run on a target system. These capabilities can be declared in the package manifest file or programmatically. The capabilities are grouped into general capabilities, device capabilities, and special capabilities.
General capabilities apply to the most common UWP application scenarios and contain features such as access to the Music, Pictures, Videos, and Removable Storage folders and libraries. If your application requires network connectivity, there’s the Internet and public networks capabilities, as well as home and work networks. There is also support for appointments, contacts, code generation, AllJoyn, phone calls, VOIP calling, 3D objects, chat messaging, and a few more.
If your application requires a scenario for accessing peripheral and internal devices, you must include device capabilities. The Kinect, for example, is a peripheral device that has many sensors and capabilities.
If I may, I’d like to go on a tangent for a second. In the new Windows 10 and beyond world, we must think about the Kinect for Windows v2 as a set of capabilities instead of as just a device. Just for a second, you could re-imagine the development strategy of UWP and Kinect. Microsoft has always been more focused on the software side rather than the hardware side. For this one- billion-device plan to work, they have to build software and frameworks for device-agnostic capabilities that have depth, perception, color, sound, and location. Well, that’s exactly what the UWP SDK provides—a generic pattern where we as developers can now build device-agnostic applications. We can build a suite of applications that take advantage of capabilities rather than tie ourselves to specific devices. These capabilities can be embedded in apparel (wearables), glasses (HMD), TVs, phones, laptops, desktops, household appliances, cars, and other creative mediums. Now, hopefully, you can imagine how emerging technologies can lead to emerging experiences that explode like tiny DNA explosions, changing your molecular structure into a new being.
Sorry for the aside; let’s get back to the point. A Kinect UWP application needs to explicitly request one or more of these capabilities. For example, if you want to access any generic microphone connected either internally or externally (such as the Kinect for Windows v2 microphone array), you must add the Microphone capability to the package manifest. There are device manifests for Location-aware scenarios (GPS sensors), Proximity (Bluetooth/Wi-Fi or Internet), Webcam (i.e., Kinect’s web camera), USB, Human Interface Device (HID), Bluetooth GATT, Bluetooth RFCOMM, and Point of Sale (POS) features. Even though these capabilities seem specific and special enough, there’s actually one last unique category left: the special capabilities.
The special capabilities are meant to be for specific scenarios that include Enterprise authentication, Share User certificates, and a special use case for the documents library when accessing files offline or in OneDrive, or when your UWP can’t use a file-picker user interface control for selecting files in the folder of your choosing.
Now that you have a general understanding of capabilities, it’s time to talk about how packaging and installation works in a UWP application.
Packaging and Store Submission
Packaging is where a developer takes all the files necessary to run the application-included configuration entries and combines them into one file or folder for the purpose of transferring the package to the user. Back in the day, this was done with a packaging utility or installer software, such as InstallShield or WISE. In more modern applications such as .NET, we have the Wix Toolset and set up projects included inside of Visual Studio .NET. These utilities package the application and make it easy to transfer the application to a user system. One of the issues with packaging has always been deciding where you should store the package for high visibility, and also how you know what version of the software is inside the package. Along with answering these questions, it would be great to also have a rating and/or ranking system and comments for other users. Taking a lesson from other vendors, Microsoft realized a repository of trusted packages and versioning was needed, and while they were at it, they added a way to allow developers to monetize the application, along with a way for users to show their trust in the developer, or their distrust. This repository is called the Windows App Store. For UWP applications, you can easily create an App Store–ready package, and Microsoft provides a PowerShell script to make it easy to install the package on a user system for development and testing purposes if you don’t care to submit your application to the store. This is known as sideloading your application. However, if you do decide to submit your application, it will go through a certification process. This certification process will run automatic tests to check a system shutdown scenario, residual entries upon installation and uninstallation steps, OS Version check, compatibility issues, crashes, user-access control, writing to correct folders, multi-user sessions, and other tests. Once the tests have been passed, a few poor souls at Redmond then have the task of manually reviewing the application and testing it to make sure there’s no offensive content and that it is in line with Microsoft store policies. If the manual test is approved, the application is published to the Microsoft App Store .
Now, with the Windows 10 paradigm out of the way, let’s take a trip down memory lane for a second to understand how the Kinect’s new UWP APIs made it into being.
History of the Kinect and Windows 10
I’ve been fortunate enough to be a Microsoft Most Valuable Professional (MVP) for Kinect and Emerging Experiences for the past few years. Being an MVP gives me and my fellow MVP colleagues the privilege of sitting down at the table with key members of the Analog team at Microsoft, many of whom either built the Kinect drivers or Kinect SDK and samples. We were even fortunate to participate in multiple future Kinect meetings of the minds and whiteboard talks. While most of those conversations are laced with non-disclosure agreements, I can say that the then-present Analog team members eventually realized the importance of building a Windows-based sensor-agnostic library and SDK, the reason being that the future is teeming with new devices and new capabilities. These new devices are being created in new form factors. They are getting smaller, faster, and better equipped to handle a wide range of scenarios.
If you take a look a Moore’s law during 1990–2010, you could say that we were in a 2D mindset based on the type of software and applications that were in existence. Everything was focused on the X, Y plane. We as an industry were focused on the color pixels on a flat screen. Figure A1-2 shows the number of transistors, clock speed, and power available to run these types of applications. The experiences were all about using either a mouse or a keyboard to interact with a 2D application.
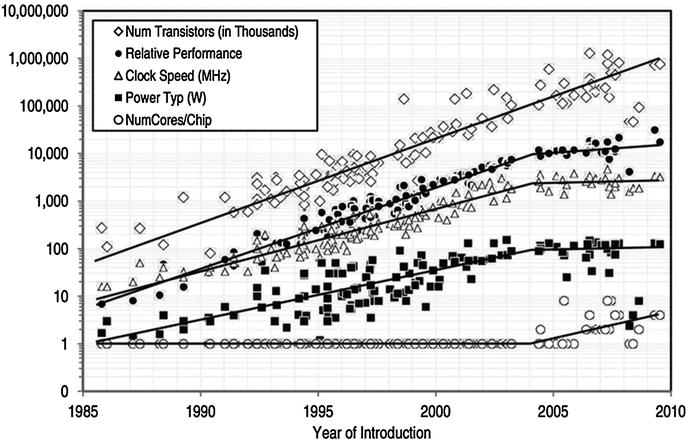
Figure A1-2. Moore's Law, count of transistors from 1985 to 2010. Source: “2 What Is Computer Performance?." National Research Council. 2011. The Future of Computing Performance: Game Over or Next Level?. Washington, DC: The National Academies Press. doi: 10.17226/12980 .
I ask, how many transistors does it take to display a pretty image on a flat screen? Apparently according to the chart above: 1 million.
When the Kinect v1 device came out in the later part of 2010, this introduced the 3D (3 Dimensions) plane. Figure A1-3 shows the more current Moore’s Law count of transistors from 2010 to 2016. What you should notice is that from 2010 to 2012 we saw an increase in about 3 billion transistors.
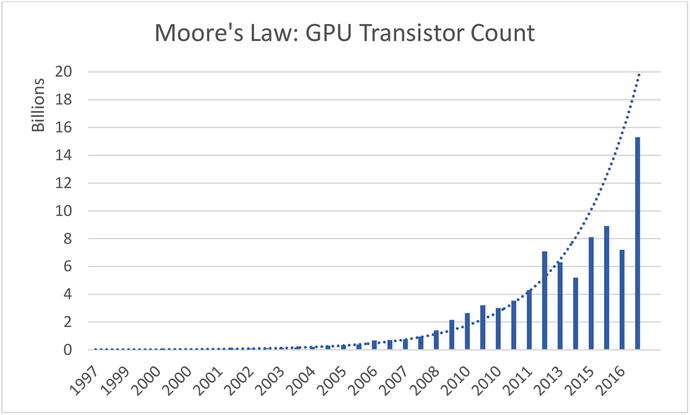
Figure A1-3. GPU transistor count from 1997 to 2016
Now we have devices and software to bring about new experiences that deal with X, Y, and now Z, also known as depth, or how far something is from us. We have depth sensors such as the Kinect device, Intel RealSense, Orbbec Astra, and Leap Motion. We also have 3D printers, 3D scanners, 3D monitors, and 3D glasses all on the market today.
Note
A good comparison of the available depth sensors today can be found at https://stimulant.com/depth-sensor-shootout-2/ .
All this and we’ve only begun to take advantage of 3D applications and thought patterns, and all the while more and more transistors are being brought to life. I ask the same question today: how many transistors does it take to create a 3D experience? Again, if we consult the modern chart from Figure A1-3, the answer is apparently three billion.
However, let’s not stop there. With new transistors come new capabilities. If three billion more transistors go toward 3D processing, looking at Figure A1-3 going past 2016 into 2017 we see a total of at least fifteen billion transistors. That’s seven billion more than we had in 2015. What are we as developers going to use the remaining seven billion transistors for?
I have a suggestion. We are now moving into, dare I say it, out-of-the-box experiences. Out-of-the-box as in literally out of the concept of a three-dimensional box. We are now talking out of the 3D spectrum. We are talking 1D and 4D experiences.
The 1D concept is conversation as a platform. The idea behind this concept is that of an automated service taking requests and returning automated responses, a.k.a. a Bot. It’s considered one-dimensional because there is no user interface. There are no X and Y planes, only input and output. Let’s call this the W plane. Now, for the geeky people, we could argue that’s still 2D, as output is a function of the input, but we’re specifically talking about the user interface and how that relates to the user experience.
On the other side of the box, let me be one of the first to introduce you to the 4D concept. This is the idea that we can model a 3D object and print it out. However, with this object, we create changes over time, such that it’s no longer what we printed out, but rather it itself changes into the best-shaped object for its purpose. We do this with the instructions we give it. Envision an architect creating the blueprint for a toy car and printing out that car with a 3D printer. This 3D car also has an embedded interpreter, sensor, printer, and compiler, such that if that car senses water, it can recompile its makeup and print out floatable buoys, thus making it behave like a boat. Researchers at MIT are already trying out biochemical components for CPUs that are embedded with sensors and instruction sets so that these components can be used for biological experiments. Think: mechanical implants that grow into place.
With the 1D to 4D spectrum, it’s easy to see we that have new devices and many more transistors, and they are being coupled with integrated computers (a.k.a. Orbbec Persee). They are also getting integrated into wearables such as glasses (a.k.a. the Microsoft HoloLens). They are now also being embedded into laptops, cellphones, and drones (Intel RealSense). Thus, the questions for Microsoft started piling in.
Just how, exactly, is any future version of the Kinect device going to fare in this new wave of crazy gadgets? Microsoft led the way, now should it continue? We asked the same and even asked about the focus. There were many ideas that floated around, and one thing sounded loud and clear. Microsoft is a great software company, and I’d say a decent hardware company. Many, including myself, felt Microsoft’s focus shouldn’t be on the device itself, but rather on the device’s capabilities. Fast forward into 2017, and the focus is indeed on building the best platform for developers so they are able to take advantage of all these potential Windows-based devices. The key is Windows-based devices. As long as all the aforementioned new-wave devices are Windows based—and this simply means they can work on Windows, or even better run Windows 10—then expect a Microsoft development platform that can target it: UWP.
Now, the next obvious question became how was the Analog team going to do their part? The details weren’t quite ironed out, and the question of which patterns they were going to use was still up in the air, but one thing was certain: it all had to align with the current Windows OS and development platform during that time.
Enter the first attempt: Windows 8 Run Time (WinRT ). At the very core, a new engine was brought to light, rewritten from the ground up. I’ll spare all the details about its coolness and wackiness and only shed light on how it affected the Kinect for Windows. Microsoft released a WinRT Runtime library (WRL) that wrapped the Kinect’s core functionality. It was a somewhat futile attempt (Mansib’s edit: Hey!) to keep the Kinect device working with its current design and architecture, yet follow the programming model of WinRT. This component was released as the WindowsPreview.Kinect runtime library .
As a developer, to utilize this library you first had to create a project that targeted the Windows 8 platform SDK and WinRT engine. Most of the time, you couldn’t just convert or retarget an existing project, simply because the WinRT engine followed a different programming paradigm as far as access, APIs, and libraries were concerned. Additionally, it only had a subset of .NET’s assemblies. This meant you had to create a new project from scratch and bring over concepts, code, and implementation judiciously.
Once you targeted Windows 8 WinRT, the next step was to add a reference to the Kinect Windows 8 WinRT Extensions; in other words, the Windows Preview Kinect (WRL). You could download this WRL preview from Microsoft, and once downloaded and installed these extensions were physically found on your computer at the default path: Program Files (x86)Microsoft SDKsWindowsv8.0ExtensionSDKsWindowsPreview.Kinect2.0ReferencesCommonConfiguration eutralWindowsPreview.Kinect.winmd. There were also WRL extensions for Kinect Face, Kinect Tools, and Visual Gesture Database. The upside behind this WRL was that the classes, methods, and events remained exactly the same as was what was exposed in .NET. In other words, you could take your C# code from a WPF application and copy and paste it into a WinRT Windows 8 Store application. The only thing you had to focus on was the differences in asynchronous design and behavior for Windows 8 RT as opposed to .NET.
One thing to note is the name of the WRL, WindowsPreview.Kinect. The word Preview, in my opinion, was a slight admission of their not being ready. This WRL wasn’t quite ready for prime time, nor was it a true rewritten-from-scratch component. It was just a wrapper with the purpose of supporting Windows 8 Store applications.
The Windows 8 Kinect Preview WRL and its popularity lasted just about as long as Windows 8/8.1 did. During this time, there were concerns that the Kinect as a brand or product was in its sunset years, but that its capabilities would emerge in a new form factor. Enter Windows 10 and UWP.
Windows 10 UWP Kinect Architecture
The Kinect for Windows UWP support is a complete rewrite of components that adhere to the Windows 10 mantra. It is based on Microsoft Media Foundation (MF), a Windows.Devices.Perception sensor provider, a new hardware driver, and the notion that Windows 10 UWP applications provide an underlying set of contracts known as the Application Binary Interface (ABI) that dictates how a device and software can interact with Windows 10 and each other. Any device that adheres to this set of contracts can be considered a Windows-based device and provide implemented features exposed by the contracts.
Some of the features provided by these contracts are security and authentication through facial recognition, standard camera capabilities, and speech recognition through the microphone. These features make the Kinect device’s capabilities available to all UWP applications on Windows 10. The Kinect for Windows UWP support effectively conforms to the various ABIs for a web camera, microphone, IR, and even a custom contract for body tracking. In other words, the Kinect is no longer perceived as a specific device with its own SDK by Windows, but rather as a series of sensors that afford data through the various ABI contracts. In Figure A1-4, you can see the Kinect camera being exposed as a web camera in Skype .
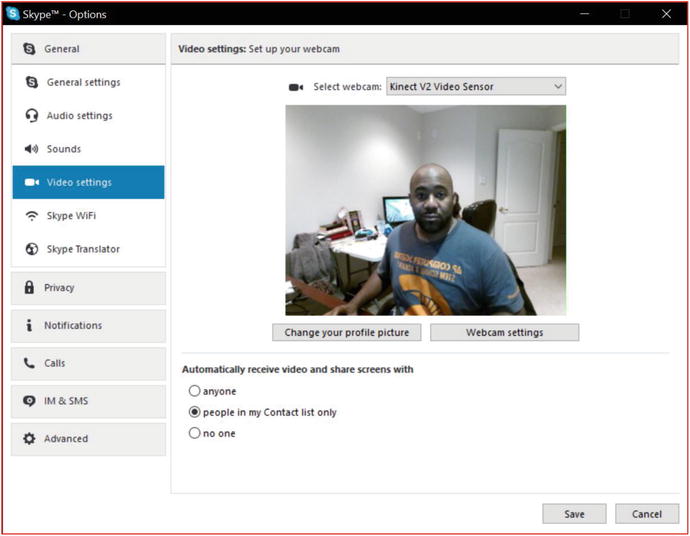
Figure A1-4. Kinect Color Camera exposed as a web camera for Skype
How Do the New Components Work Together?
The Kinect UWP support implements the ABI contracts through three major components: the Windows 10 Kinect Driver version 2.2, the Kinect UWP Device Perception Provider, and a new Microsoft Media Foundation COM library. Figure A1-5 shows the details and date of the most updated Kinect driver installed on a Windows Anniversary 10 updated system.

Figure A1-5. Kinect updated UWP driver
The purpose of the driver is to communicate with the specific device and send the appropriate device hardware commands to turn on the cameras, read and process the gigabytes of data that is generated from the device and its transistors, and eventually send the interpreted results to the software layer through a service called the SensorDataService or the Microsoft Media Foundation (MF) library. The SensorDataService is a Windows service that loads up device perception providers that are registered for use with Windows Hello. It allows for interacting with various devices that want to provide perception and depth through infrared cameras to adhere to the security standards for Windows Hello. The device perception provider is the software layer that provides access to the various UWP generic classes for accessing perception frames for the IR camera. The MF library is a set of components and functions that contain a custom Media Foundation Source that adheres to the Media Foundation Pipeline. It is the core component that provides the color, depth, and IR feeds to standard Windows 10 UWP applications.
Microsoft Media Foundation (MF)
Microsoft Media Foundation is a technology that has been around since Windows Vista, and its core purpose is to be a low-level set of APIs for media development. It is the replacement for Microsoft DirectShow, Microsoft Direct X Media Objects (DMO), and Microsoft Video for Windows frameworks. MF provides a developer with the ability to create videos and audio, enhance them, and create audio and video editing–type applications and other advanced media-based filters. It is the core functionality behind Windows 8/8.1 Media Capture XAML elements and is used to provide Internet Explorer and Microsoft Edge with their video rendering capabilities. Another way of stating it is as follows: MF is the hard-core media pundit. All things go through MF, ’cause it’s one bad MF. In previous releases of MF, there was no ability to treat videos as frames or pixel buffers except through the MF Pipeline, also known as the topology. The MF topology is a graph, or a series of tasks handled by individual COM-based components that take some input stream, process the data, and return 0 or more output streams.
There are several different types of components, such as sources, sinks, and transforms. Sources provide the source of the data-input stream. Sinks provide a destination (think file on a drive, or endpoint to a network stream). Transforms are middleware that aggregate, divide, remix, modify, encode, decode, compress, decompress, convert, and anything else you can think of that happens in the middle of processing media files.
Microsoft created a Media Foundation Source that adheres to the Media Foundation Pipeline specifically for the Kinect v2. This source captures all the video and audio streams that the Kinect device offers. There is a video source input for Color, Depth, and IR. This can be seen in the Figure A1-6 using the MF topology editor (topoedit.exe). I won’t go into detail about the MF topology, as that is beyond the scope of this book. However, I will say that the MF topology provides a low-level architecture to expose the Kinect device as a set of media sources for video and audio to the Windows OS. This mechanism is what allows the Kinect device to be used with Skype, the Windows 10 Camera, and other applications. It is also what allows the Kinect to be exposed to the Windows 10 UWP MediaCapture API and XAML controls.
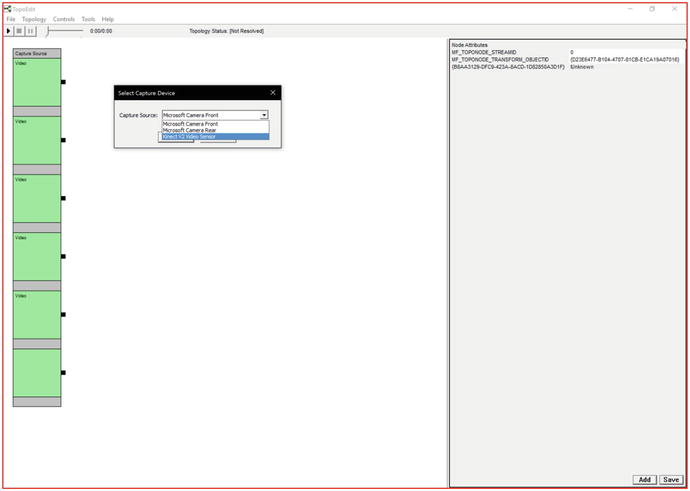
Figure A1-6. Kinect MF Custom Source in TopoEdit
The Kinect Media Foundation library can be found at C:WindowsSystem32KinectKinectMFMediaSource.dll
Note
KinectMFMediaSource.dll is the core component that was missing in previous releases of Kinect for Windows that makes it an actual media device for Windows 10.
In previous versions of MF, it was very difficult to get to the underlying audio and video frames and buffers. With the Windows 10 Anniversary update, Microsoft provided a set of new APIs in the Windows.Media.Capture and Windows.Media.Capture.Frames namespaces that makes it very easy to access video frames and buffers for doing computer vision.
Device Perception Provider
Windows 10 also provides a set of APIs in the Windows.Devices.Perception and Windows.Devices.Perception.Providers namespaces that allows hardware vendors to expose depth and infrared streams of data from their devices into a generic class for perception: the perception frame. This is made possible by the Device Perception Provider. If a device wants to provide access to its data streams to Windows 10 as perception frames, it must conform to the DevicePerception Provider ABIs. In previous versions of this provider, color, depth, and infrared streams were made available; however, this provider was purposed only for use with Windows Hello. Windows Hello only utilizes the infrared camera for its functionality, and thus the Analog team removed the color and depth streams from this provider.
By default, you can find the device providers at ComputerHKEY_LOCAL_MACHINESOFTWAREMicrosoftAnalogProviders.
In Figure A1-7, you can see some of the default providers available on a Windows 10 Anniversary Update.
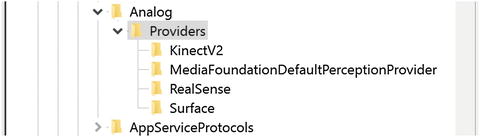
Figure A1-7. Registry hive showing default perception providers
Note
I have a Surface Book (first generation) with the Kinect and Intel RealSense cameras.
Specifically, the Kinect perception provider can be found at %SystemDrive%windowssystem32Kinect.PerceptionFrameProvider.dll.
Note
In Figure A1-7, I also have a device perception provider for Surface. This is because in addition to the Kinect device, the Surface Book also contains an embedded infrared camera that is used for Windows Hello face authentication.
As an Independent Hardware Vendor (IHV), Original Equipment Manufacturer (OEM), or hobbyist maker, you can implement your own PerceptionFrameProvider. To do so, you have to create a driver for your device that can generate data to send to the SensorDataService through the IPerceptionFrameProvider and IPerceptionFrameProviderManager interfaces. Implementing these interfaces and the exact steps required is beyond the scope of this book .
Updated Kinect Driver
The Kinect for Windows v2 hardware driver was updated to support sending data to the sensor provider so that the provider could create perception frames to send to the SensorDataService. The Kinect Device Perception Provider is what allows the Kinect to also support Windows Hello. This driver was also updated to support Media Foundation for sending color, depth, IR, and audio streams into the MF Pipeline. With all these new updates, one would think that the old functionality would take a hit and not work anymore, but that is not the case. Microsoft did not modify the old behavior of the driver. This means it still works the same way for previous applications. It is backward-compatible with the pre–Windows 10 UWP SDK and framework. This means that applications built with the .NET framework and C++ libraries will still continue to function as normal. Also, as an added bonus, the new UWP framework does not hinder the old framework and actually can work side by side simultaneously. Figure A1-8 shows an application running the DirectX Depth Sample found in the previous SDK and the UWP Camera Frames sample simultaneously.
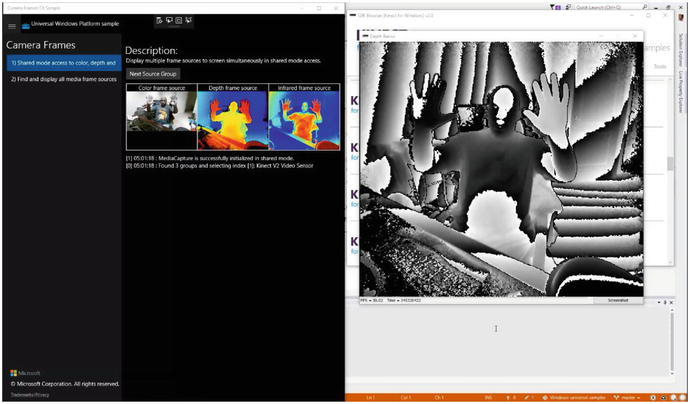
Figure A1-8. .NET and UWP Kinect applications running simultaneously
If you didn’t catch this the first time I mentioned it, this means you can run your old .NET or C++ Kinect-based applications at the same time as you run newer UWP store Kinect-based applications. Along with running the applications side by side, as you start to develop with UWP Kinect-based applications, you’ll notice a similar programming pattern when it comes to asynchronous behavior and listening for events and frames. Let’s discuss that next.
Similarities in the Architecture
I know that it was stated earlier that developing a Kinect application for UWP is a completely new paradigm, and this leaves the impression that there will be a steep learning curve. However, to our advantage, the learning curve isn’t very steep at all. This is because if you’ve ever done any Kinect programming in the past, even by reading through this book up to this point, you’ll be comforted to know that there are some very similar development patterns with UWP. For example, Windows 10 UWP applications are based on an asynchronous design pattern, so if you’ve worked with the await keyword in C#, nothing has changed. Next, there is the concept of frames. If you remember, in previous chapters we had ColorFrames, DepthFrames, and InfraredFrames. In UWP, we have Media Capture frames and perception frames. Similarly, if you remember, each type of frame was able to generate various events, such as the FrameArrived event. In UWP, we have the same pattern. Perception and Media Capture frames also generate an arrived event, and as developers we can subscribe to these events to listen for data. Another similarity we have is the concept of disposing of a frame as fast as we possibly can once we’re done with it. In UWP Kinect-based applications, we follow the same principle. As you can see, the learning curve isn’t as steep as it may appear when it comes to media frames. With the architecture out of the way, let’s start creating our UWP Kinect-based Store app.
Creating a Windows 10 UWP Kinect-Based Store App
To start developing with Windows 10 UWP and Kinect, you are going to need to get the latest Kinect for Windows v2 drivers. The first thing you want to do is make sure Kinect for Windows v2 is running with version 2.0.xx+ and Windows 10. If not, download and install the Kinect for Windows v2 SDK as described in the first chapter of this book. Once your system is up and running with the Kinect, we can move forward.
How to Get the Latest Drivers
The next and easiest, but probably most time-consuming, step is to upgrade your Windows 10 to the Anniversary edition: version 10.0.14394.xxx or above. If you’re not sure what version of Windows 10 you’re running, click the Start button or press the Windows key and type version. In Figure A1-9, you’ll see the System Information application reveal what version of Windows 10 you are running. If you’re on version 10.0.14394 or above, you’re good to go. If not, go ahead and head over to your system settings, navigate to Windows Update, and update to the Anniversary edition .

Figure A1-9. Windows 10 System Information and version details
If you don’t have the Anniversary edition, you can still get the latest driver, which is the preview “test” version but is the latest none the less. To get this version, you will also have to be a Windows 10 Insider and opt in for test drivers. Search how to opt in for test drivers on Windows 10. It’s a registry setting. Turn on Windows Hello, and you should be ready to go. I won’t go into the specifics simply because I recommend you go the safer route of updating to the Anniversary edition.
Once you are on the Anniversary edition, plug your device in and open up Device Manager by clicking on the Start button and typing device manager. Locate the Kinect device, expand it, right-click on WDF KinectSensor Interface 0, and select Update driver. Let Windows choose the best and most updated driver. Figure A1-10 shows the menu item to select.
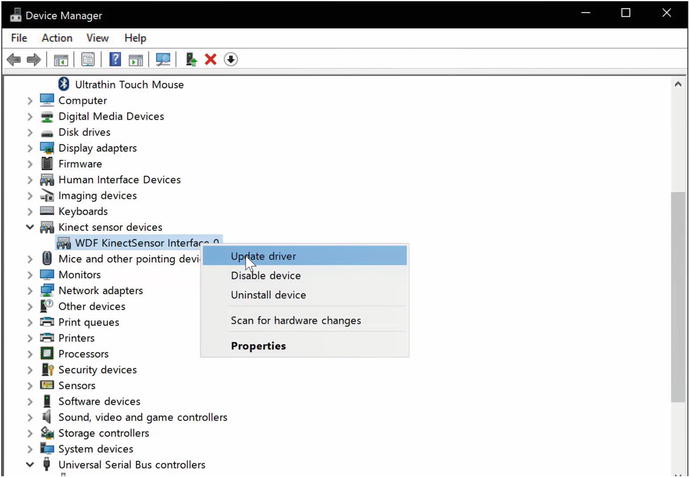
Figure A1-10. Selecting Update driver in Device Manager
If everything goes well without an error, then your driver should be updated to the latest version. Figure A1-11 shows the properties of the latest Kinect UWP driver from Device Manager.
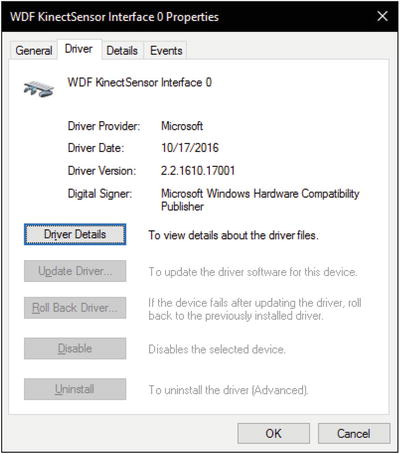
Figure A1-11. Kinect’s latest driver details
To verify your Kinect driver is working with UWP, run the Windows 10 Camera application and cycle through your cameras, verifying that your Kinect turns on and that the Kinect v2 is listed as the camera. Figure A1-12 shows the Kinect device as a camera available for selection in the UWP Camera application. No camera feed might show.
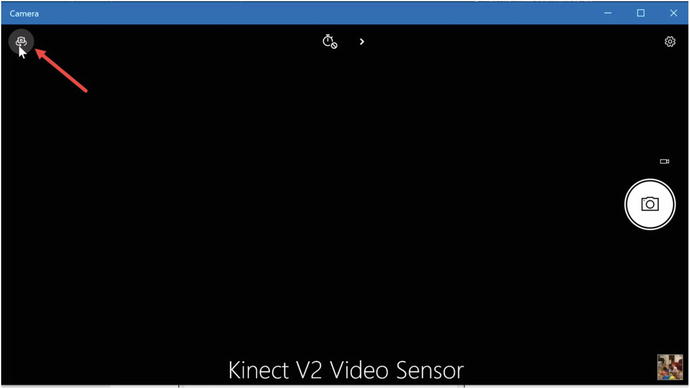
Figure A1-12. Kinect Device selected in the Camera application
Note
After updating your driver, if your Kinect camera does not turn on make sure the KinectMonitor.exe window service is running from within your services in the system settings control panel.
To run the standard Camera application, click the Start button and type camera.
Building a UWP Store application
We will start up by building a very simple UWP Kinect-based application that can show the color web camera stream and allow you to take a picture of the color stream. The application will make use of the Media Frame Source Group, Media Frame Reference, Media Frame, Software Bitmap, XAML Image Element, and XAML Writeable Bitmap.
Let’s start from scratch building a Visual Studio 2015 C# UWP project. Name the project WorkingWithMediaCaptureFrames.
Tip
You can find the solution on my GitHub page at https://github.com/dngoins/KinectUWPApps.git .
Add the namespaces seen in Listing A1-1 to the MainPage.xaml.cs file.
Listing A1-1. Media Capture Namespaces
using Windows.Media.Capture;using Windows.Media.Capture.Frames;
These are the core namespaces required for the Media Capture and Media Capture Frames classes.
Add the remaining namespaces to include asynchronous behavior, software bitmaps, and file storage functionality, as shown in Listing A1-2.
Listing A1-2. Namespaces for Async, Imaging, and File Storage
using System.Threading.Tasks;using Windows.Graphics.Imaging;using Windows.UI.Xaml.Media.Imaging;using Windows.Storage;using Windows.Storage.Pickers;using Windows.Storage.Streams;
Add the private class member variable seen in Listing A1-3.
Listing A1-3. MediaCapture Variable Declaration
// MF Capture device to start upMediaCapture _mediaCapture;
This variable represents the Media Foundation Media Capture device. Basically, this represents the Kinect Device as a Media Foundation UWP object. Now, add the remaining private member class variables that will be used to help us display and save the color image, as shown in Listing A1-4.
Listing A1-4. Imaging Variable Declarations
private enum FileFormat{Jpeg,Png,Bmp,Tiff,Gif}// Constants that let us decide on which frame source kind we wantconst int COLOR_SOURCE = 0;const int IR_SOURCE = 1;const int DEPTH_SOURCE = 2;const int LONGIR_SOURCE = 3;const int BODY_SOURCE = 4;const int BODY_INDEX_SOURCE = 5;// UWP BitmapSourceprivate SoftwareBitmapSource source = new SoftwareBitmapSource();// XAML Bitmap for updating bitmaps in XAMLprivate WriteableBitmap extBitmap;
The preceding variables are used to help us determine which file format we’d like to use to save the color image, which Media Capture frame source types we are going to display, the UWP bitmap source, and the XAML bitmap source, respectively. The remaining steps deal more with how to access various data streams and work with the individual streams (i.e. color, depth, and infrared).
How to Access Data Streams
To get access to the various data streams from a Media Capture device, we must request permission to access the device. We can do this declaratively using the package.appxmanifest file. Double-click on the package manifest and click on the Capabilities tab. Select Webcam and Pictures Library. Figure A1-13 shows the package.appmanifest file opened inside Visual Studio 2015.

Figure A1-13. Declaring capabilities with package manifest
Selecting these options will have the application asking or requesting permission to read and write to the Pictures Library, as well as asking for permission to show and use the device camera (the Kinect, in our case).
Once we have requested the proper capabilities, we focus our attention on how to access them. UWP treats a Media Capture device as a set of features. This set or collection is known as a MediaFrameSourceGroup. For each MF device, if it can send at least one type of data stream, then it is represented as one of this group. This is where things start to differ from traditional Kinect development. Normally, with the Kinect device you’d call GetDefault(), which will provide you with the default device that represents the Kinect.
In the UWP paradigm, you query for a group, the MediaFrameSourceGroup. The concept is that one or more devices will have a group of sensors. Plus, as a developer you may want to access these sensors synchronously. Basically, each device (a.k.a. MediaFrameSourceGroup) will return with data that contains one or more sources of information regarding each data stream that may be exposed by that device (a.k.a. MediaFrameSourceGroup). This group is more akin to a single device with a collection of capabilities. The MediaFrameSourceGroup is an abstraction over that aforementioned idea. A MediaFrameSourceGroup provides a collection of sources. These are the Data Sources. They are represented in the UWP platform as a class called SourceInfos. The SourceInfos is a collection that contains a collection of data streams. A data stream is of a particular type; for example, it could be a color stream, depth stream, infrared stream, or custom stream. We determine which type of stream it is by the property of source info called the SourceKind. SourceInfos also contain information about the source’s DisplayName, Location, and CameraIntrinsics. It’s here that you can filter out which device group you want to listen to for frame events. Let’s add the method shown in Listing A1-5 to the class.
Listing A1-5. Color Frame Initialization
async void InitializeColorFrames(){// Devices come grouped together as a set of capabilities// Find all the media frame source devices - as a collection of groupsvar allGroups = await MediaFrameSourceGroup.FindAllAsync();// Let's filter using LINQ, based on a device group with a DisplayName of "Kinect"var eligibleColorGroups = allGroups.Where(g => g.SourceInfos.FirstOrDefault(info => info.SourceGroup.DisplayName.Contains("Kinect") ) != null).ToList();// Check to see if we found a deviceif (eligibleColorGroups.Count == 0){//No kinect camera foundreturn;}//Only one Kinect camera supported, so always take the first in the listvar kinectColorGroup = eligibleColorGroups[0];try{// Initialize MediaCapture with selected group.// This can raise an exception if the source no longer exists,// or if the source could not be initialized.await InitializeMediaCaptureAsync(kinectColorGroup);}catch (Exception exception){//Release any resources if something goes wrongawait CleanupMediaCaptureAsync();return;}// Let's get a Device Capability; in this case, let's get the color source streamMediaFrameSourceInfo colorInfo = kinectColorGroup.SourceInfos[COLOR_SOURCE];if (colorInfo != null){// Access the initialized frame source by looking up the the ID of the source found above.// Verify that the ID is present, because it may have left the group// while we were busy deciding which group to use.MediaFrameSource frameSource = null;if (_mediaCapture.FrameSources.TryGetValue(colorInfo.Id, out frameSource)){// Create a frameReader based on the color source streamMediaFrameReader frameReader = await _mediaCapture.CreateFrameReaderAsync(frameSource);// Listen for Frame Arrived eventsframeReader.FrameArrived += FrameReader_FrameArrived;// Start the color source frame processingMediaFrameReaderStartStatus status = await frameReader.StartAsync();// Status checking for logging purposes if neededif (status != MediaFrameReaderStartStatus.Success){}}else{// Couldn't get the color frame source from the MF Device}}else{// There's no color source}}
The preceding method uses the static MediaFrameSourceGroup.FindAllAsync() method to get back a collection of device “groups” that have a synchronous collection of data streams. A LINQ statement follows, which filters the collection of groups based on the SourceInfo’s DisplayName. If the groups’ DisplayName contains the word Kinect, then the group represents the Kinect’s collection of synchronized capabilities.
Note
In the previous programming model, we had two modes of retrieving frames: each data feed individually without synchronization and the multisource frame, which synchronizes all the frames together. In UWP, we don’t have the non-synchronous option.
SourceInfo Class
There are various other values in the SourceInfo metadata that allow you to further filter the data streams you’re interested in. The SourceInfo is kind of a mixture between the FrameDescription class and the actual xSource (ColorFrameSource, DepthFrameSource, InfraredFrameSouce) we had in previous frameworks. For example, you can look at metadata properties for a source stream using the SourceInfo.Properties map. You can access the device that the individual source stream using the SourceInfo.DeviceInformation property. There’s also the SourceInfo.SourceKind mentioned earlier. This is an enumeration that specifies the different types of MF sources, such as Color, InfraRed, Depth, and Custom (used for body and bodyIndex or hand tracking). There’s also the MediaStreamType, which allows you to determine if the source stream is for photo, video, or audio, and, last but not least, there is the CoordinateSystem property. This is a Windows.Perception.SpatialCoordinateSystem class that allows you to get to a matrix representing where the device thinks it’s positioned and transform it to other coordinate systems for advanced projection mapping and 3D positioning and rotation mechanisms. In summary, the SourceInfo class will be utilized heavily in your applications, so get comfortable with all its properties and methods. It will make UWP Kinect-based development easy.
Initializing the Media Capture Object
After we’ve retrieved the MediaFrameSourceGroup we’re interested in from MF, we need to initialize the Media Capture device. This is accomplished with the call to InitializeMediaCaptureAsync, as shown in Listing A1-6.
Listing A1-6. Media Capture Initialization
private async Task InitializeMediaCaptureAsync(MediaFrameSourceGroup sourceGroup){if (_mediaCapture != null){return;}// Initialize mediacapture with the source group._mediaCapture = new MediaCapture();var settings = new MediaCaptureInitializationSettings{SourceGroup = sourceGroup,// This media capture can share streaming with other apps.SharingMode = MediaCaptureSharingMode.SharedReadOnly,// Only stream video and don't initialize audio capture devices.StreamingCaptureMode = StreamingCaptureMode.Video,// Set to CPU to ensure frames always contain CPU SoftwareBitmap images// instead of preferring GPU D3DSurface images.MemoryPreference = MediaCaptureMemoryPreference.Cpu};await _mediaCapture.InitializeAsync(settings);}
This method initializes the _mediaCapture private variable using a MediaCaptureInitializationSettings class. We use the IntializationSettings class to specify the device we want MF to use. In this case, it’s the Kinect device, represented as the SourceGroup of capabilities we queried and filtered on with the MediaFrameSourceGroup.FindAllAsync() earlier. The next property we must set on the settings class is whether we want MF to initialize the device in ExclusiveControl or ShareReadOnly mode. ExclusiveControl gives our application sole control over the device. Using this mode allows us to change settings on the device, such as the white balance, frame height and width, and other advanced properties we didn’t have with the previous versions of the Kinect SDK. There’s one catch, however. If another application is currently using the Kinect, either UWP or a previous framework, then when we request exclusive control it will throw an error. You will have to wait until the other application has finished usage. This option is great for doing more creative things with your device, such as changing the white balance of the sensors and changing resolution and modes. However, with great power comes great responsibility. Using exclusive mode blocks other applications and could potentially cause other side effects if you’re not careful.
For the most part, SharedReadOnly mode will be the mode we choose. This mode allows multiple applications to use the Kinect device in a sharing, read-only fashion. This means you can’t modify metadata or camera intrinsics .
After setting the SharingMode property, we must set the StreamingCaptureMode. This is an enumeration that accepts three possible values: Video, Audio, AudioAndVideo. These three values are self-explanatory; if the device SourceGroup supports audio and video, you have a choice of which capture you want to work with. You can choose audio only, video only, or both.
The last property of the MediaCaptureInitializationSettings class we set is the MemoryPreference value. This value tells the Media Foundation how and where it should construct the pixel buffer array. The options are Cpu and Auto. Cpu instructs MF to create SoftwareBitmap classes on the CPU. Auto instructs MF to use Hardware Acceleration where available and check for a DirectX-compatible GPU if present. If a GPU is available, then create an ID3DSurface object in which to store the pixel buffer array. When rendering, D3DSurface provides the best performance; however, the use of DirectX and Direct3D is outside the scope of this book. There are many more settings you can apply to the MediaCaptureInitializationSettings class, but these are some of the more common you’ll use for Kinect-based UWP applications.
Once all the settings are populated with their respective values, the MediaCapture instance invokes InitializeAsync(settings), passing in the settings object. Add the helper method shown in Listing A1-7 for cleanup.
Listing A1-7. Media Capture Cleanup
/// <summary>/// Unregisters FrameArrived event handlers, stops and disposes frame readers/// and disposes the MediaCapture object./// </summary>private async Task CleanupMediaCaptureAsync(){if (_mediaCapture != null){using (var mediaCapture = _mediaCapture){_mediaCapture = null;}}}
The CleanupMediaCaptureAsync() is used to free up resources of the MF mediaCapture instance. This instance represents the actual device, and it needs to be freed from memory if anything goes wrong, or you’re finished using it. We do this simply by setting the private member variable to null. Now, with all the MF setup and clean up out the way, let’s focus our attention on getting the color frames and processing individual color buffers .
How to Work with Color
Up to this point, we’ve discussed the basic setup for accessing the Kinect device through Media Foundation. We have the mediaCapture object, and we have the Kinect source data streams through two different objects: mediaSourceGroup (a synchronized grouping of all the source streams, similar to the MultiSourceFrameReader in the previous SDK) and SourceInfo object, which represents the individual source stream and description. Let’s revisit a section of code in the InitializeColorFrames() method. There’s a section of code we haven’t discussed yet, and this section of code is how we work with the core source data streams . See Listing A1-8.
Listing A1-8. Handling the Color Data Source
//...// Let's get a Device Capability, in this case let's get the color source streamMediaFrameSourceInfo colorInfo = kinectColorGroup.SourceInfos[COLOR_SOURCE];if (colorInfo != null){// Access the initialized frame source by looking up the ID of the source found above.// Verify that the ID is present, because it may have left the group// while we were busy deciding which group to use.MediaFrameSource frameSource = null;if (_mediaCapture.FrameSources.TryGetValue(colorInfo.Id, out frameSource)){// Create a frameReader based on the color source streamMediaFrameReader frameReader = await _mediaCapture.CreateFrameReaderAsync(frameSource);// Listen for Frame Arrived eventsframeReader.FrameArrived += FrameReader_FrameArrived;// Start the color source frame processingMediaFrameReaderStartStatus status = await frameReader.StartAsync();// ...
The preceding section of code queried all the source groups and filtered down the specific device source group we’re interested in. If you remember from earlier, it was the source group that had a display name of “Kinect” contained inside its string’s full name. Once we’ve selected the source group, we can get to the capability list, better known as the SourceInfo collection. In the preceding code I use an indexed array, as follows:
//...// Let's get a Device Capability, in this case let's get the color source streamMediaFrameSourceInfo colorInfo = kinectColorGroup.SourceInfos[COLOR_SOURCE];
Where COLOR_SOURCE is a constant representing the positional index that is retrieved from the MF Kinect’s color stream representation. However, if you’re working with other source groups for other devices, this may not be the best way to go, because each device has the option of changing how it presents the collection of source streams and in what order. Again, remember the SourceInfo collection allows you to determine which source stream you want using SourceKind, MediaStreamType, Device Information, and many other properties. I chose the simplest way for this demo.
The next lines of code should be somewhat familiar:
MediaFrameSource frameSource = null;if (_mediaCapture.FrameSources.TryGetValue(colorInfo.Id, out frameSource)){// Create a frameReader based on the color source streamMediaFrameReader frameReader = await _mediaCapture.CreateFrameReaderAsync(frameSource);// Listen for Frame Arrived eventsframeReader.FrameArrived += FrameReader_FrameArrived;// Start the color source frame processingMediaFrameReaderStartStatus status = await frameReader.StartAsync();
These lines use the mediaCapture.FrameSources.TryGetValue() method to get a generic MediaFrameSource. This MediaFrameSource represents a generic version of the ColorFrameSource, DepthFrameSource, and InfraredFrameSource found in previous versions. Once we have the frame source, we use the mediaCapture object to create a MediaFrameReader. This frame reader is used to listen for FrameArrived events. The MediaFrameReader also supports the polling design. There is a TryAcquireLatestFrame() method that you can use to get the latest frame in a polling pattern if you need to use that design. The MediaFrameReader also contains the methods to StartAsync() and StopAsync() the frames from being processed on the device.
Let’s now add the FrameReader_FrameArrived method to our class, as shown in Listing A1-9.
Listing A1-9. FrameArrived Event Handler
private void FrameReader_FrameArrived(MediaFrameReader sender, MediaFrameArrivedEventArgs args){// Try to get the FrameReferenceusing (var frameRef = sender.TryAcquireLatestFrame()){if(frameRef != null){if (frameRef.SourceKind == MediaFrameSourceKind.Color){// Process the frame drawing the color pixels onto the screenProcessColorFrame(frameRef);}}}}
This method provides us with a signature that takes in a MediaFrameReader, as well as MediaFrameArrivedEventArgs parameters. Normally in .NET programming the EventArgs parameter provides context information about the event being generated; however, in this framework EventArgs are not used at all, so you can safely ignore that parameter. In this method, we use the MediaFrameReader parameter to try to get the latest frame. This method returns a MediaFrameReference, similar to in the previous SDK. Once we have the media frame reference, we can access the specific frame we’re interested in. Some of you may have noticed that it’s generic. In the previous framework, we had a specific frame reference—one for Color, one for Body, one for Depth, and one for Infrared. In this new UWP framework, there’s only one. This means we have to check for which type of frame reference it is by using the SourceKind enumeration property.
Now, let’s add the ProcessColorFrame method, as shown in Listing A1-10.
Listing A1-10. Processing Color Data
private void ProcessColorFrame(MediaFrameReference clrFrame){try{// Get the Individual color Framevar vidFrame = clrFrame?.VideoMediaFrame;{if (vidFrame == null) return;// create a UWP SoftwareBitmap and copy Color Frame into BitmapSoftwareBitmap sbt = new SoftwareBitmap(vidFrame.SoftwareBitmap.BitmapPixelFormat, vidFrame.SoftwareBitmap.PixelWidth, vidFrame.SoftwareBitmap.PixelHeight);vidFrame.SoftwareBitmap.CopyTo(sbt);// PixelFormat needs to be in 8bit BGRA for Xaml writeable bitmapif (sbt.BitmapPixelFormat != BitmapPixelFormat.Bgra8)sbt = SoftwareBitmap.Convert(vidFrame.SoftwareBitmap, BitmapPixelFormat.Bgra8);if (source != null){// To write out to writeable bitmap which will be used with ImageElement, it needs to run// on UI Thread thus we use Dispatcher.RunAsync()...var ignore = Dispatcher.RunAsync(Windows.UI.Core.CoreDispatcherPriority.Normal, () =>{// This code runs on UI Thread// Create the writeableBitmap for ImageElement displayextBitmap = new WriteableBitmap(sbt.PixelWidth, sbt.PixelHeight);// Copy contents from UWP software Bitmap// There are other ways of doing this instead of the double copy, 1st copy earlier// this is a second copy.sbt.CopyToBuffer(extBitmap.PixelBuffer);extBitmap.Invalidate();// Set the imageElement sourcevar ig = source.SetBitmapAsync(sbt);imgView.Source = source;});}}}catch (Exception ex){}}
The process color frame method is used to retrieve either the VideoMediaFrame or a BufferMediaFrame. The BufferMediaFrame is used to retrieve body skeletal data through an IBuffer interface. The VideoMediaFrame is used for all other data. We use the VideoMediaFrame to determine if we have data in the Direct3DSurface or SoftwareBitmap, get access to the depth- and infrared-specific properties, get access to camera intrinsics, and determine video format. The video media frame is the key to processing and displaying frames.
Once we have the video media frame, we use the frame’s SoftwareBitmap to copy the contents of the bitmap to another SoftwareBitmap, which we can use inside a writeable bitmap for saving out to a file and also for re-copying to a SoftwareBitmapSource class for use with the XAML Image element.
Note
There are more efficient ways to share the bitmap contents. These can be found in the UWP samples located at https://github.com/Microsoft/Windows-universal-samples/tree/master/Samples/CameraFrames . However, these samples deal with locking strategies and multiple dispatcher calls that require a lot more explanation than what is possible for the scope of this book.
As an aside, because we are updating an XAML user interface control (the Image element), we are confined to only updating this control on the user interface thread. The way to do this is to use the Dispatcher.RunAsync() method call. This is the reason for all the SoftwareBitmap copy code living inside the RunAsync call.
Finally, let’s add the final helper methods and user interface so we have something to show. Add the helper methods shown in Listing A1-11 to your class.
Listing A1-11. Helper Methods for Screenshotting
private async Task<StorageFile> WriteableBitmapToStorageFile(WriteableBitmap WB, FileFormat fileFormat, string fileName = ""){try{string FileName = string.Empty;if (string.IsNullOrEmpty(fileName)){FileSavePicker savePicker = new FileSavePicker();savePicker.SuggestedStartLocation = PickerLocationId.PicturesLibrary;// Drop-down of file types the user can save the file assavePicker.FileTypeChoices.Add("jpeg", new List<string>() { ".jpg", ".jpeg" });// Default file name if the user does not type one in or select a file to replacesavePicker.SuggestedFileName = "WorkingWithMediaCapture.jpg";fileName = (await savePicker.PickSaveFileAsync()).Name;}FileName = fileName;Guid BitmapEncoderGuid = BitmapEncoder.JpegEncoderId;switch (fileFormat){case FileFormat.Jpeg:// FileName = string.Format("{0}.jpeg", fileName);BitmapEncoderGuid = BitmapEncoder.JpegEncoderId;break;case FileFormat.Png:// FileName = string.Format("{0}.png", fileName);BitmapEncoderGuid = BitmapEncoder.PngEncoderId;break;case FileFormat.Bmp:// FileName = string.Format("{0}.bmp", fileName);BitmapEncoderGuid = BitmapEncoder.BmpEncoderId;break;case FileFormat.Tiff:// FileName = string.Format("{0}.tiff", fileName);BitmapEncoderGuid = BitmapEncoder.TiffEncoderId;break;case FileFormat.Gif:// FileName = string.Format("{0}.gif", fileName);BitmapEncoderGuid = BitmapEncoder.GifEncoderId;break;}var file = await Windows.Storage.KnownFolders.PicturesLibrary.CreateFileAsync(FileName, CreationCollisionOption.GenerateUniqueName);using (IRandomAccessStream stream = await file.OpenAsync(FileAccessMode.ReadWrite)){BitmapEncoder encoder = await BitmapEncoder.CreateAsync(BitmapEncoderGuid, stream);Stream pixelStream = WB.PixelBuffer.AsStream();byte[] pixels = new byte[pixelStream.Length];await pixelStream.ReadAsync(pixels, 0, pixels.Length);encoder.SetPixelData(BitmapPixelFormat.Bgra8, BitmapAlphaMode.Ignore,(uint)WB.PixelWidth,(uint)WB.PixelHeight,96.0,96.0,pixels);await encoder.FlushAsync();}return file;}catch (Exception ex){return null;// throw;}}private void btnExternalCapture_Click(object sender, RoutedEventArgs e){if (extBitmap != null){var ignore = Dispatcher.RunAsync(Windows.UI.Core.CoreDispatcherPriority.Normal, async () =>{var file =await WriteableBitmapToStorageFile(extBitmap, FileFormat.Jpeg, "WorkingWithMediaCaptureFrames.jpg");fileLocation.Text = file.Path;});}}
The preceding two methods take the writeable bitmap and save the contents out to a file in the Pictures library. The second method is an event handler that listens for the button client event for the External Capture button in the XAML shown in Listing A1-12 .
Listing A1-12. MainPage.xaml Markup
<Grid Background="{ThemeResource ApplicationPageBackgroundThemeBrush}"><StackPanel Margin="5" VerticalAlignment="Center" HorizontalAlignment="Center"><TextBlock >External Cameras View:</TextBlock><Image x:Name="imgView" Stretch="UniformToFill" MaxWidth="600" ></Image><Button x:Name="btnExternalCapture" HorizontalAlignment="Right" Click="btnExternalCapture_Click">Save External Camera Shot</Button><TextBlock>FilePath:</TextBlock><TextBox x:Name="fileLocation" TextWrapping="Wrap" /></StackPanel></Grid>
Compile your application and run it. The final result is shown in Figure A1-14.
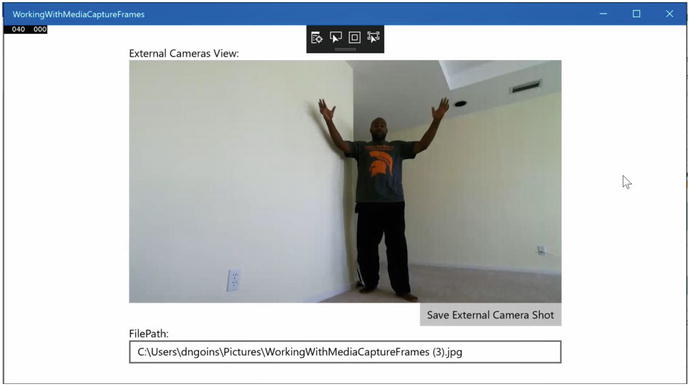
Figure A1-14. Using Color stream with Kinect in UWP application
How to Work with Depth
Working with Depth is exactly the same as working with Color frames. Let’s revisit the code to retrieve Color Source Info, which gives us access to the color frames:
//...// Let's get a Device Capability, in this case let's get the color source streamMediaFrameSourceInfo colorInfo = kinectColorGroup.SourceInfos[COLOR_SOURCE];
To use Depth, we simply change out which SourceInfo item we want. We can simply change this to DEPTH_SOURCE, where DEPTH_SOURCE is a constant representing the positional index that is retrieved from MF Kinect’s Depth stream representation.
//...// Let's get a Device Capability, in this case let's get the depth source streamMediaFrameSourceInfo depthInfo = kinectColorGroup.SourceInfos[DEPTH_SOURCE];
Again, remember that if you’re working with other SourceGroups (i.e. other devices), this may not be the best way to do this, because each device has the option to change how it presents the collection of source streams and in what order. The SourceInfo collection allows you to determine which source stream you want by using the SourceKind, MediaStreamType, Device Information, and many other properties. I chose the simplest way for this demo.
How to Work with IR
Working with Infrared is exactly the same as working with Color frames. Let’s revisit the code to retrieve Color Source Info, which gives us access to the color frames:
//...// Let's get a Device Capability, in this case let's get the color source streamMediaFrameSourceInfo colorInfo = kinectColorGroup.SourceInfos[COLOR_SOURCE];
To use either the default IR or the LongIR, we simply change out which SourceInfo item we want. We can simply change this to IR_SOURCE or LONGIR_SOURCE, where IR_SOURCE or LONGIR_SOURCE is a constant representing the positional index that is retrieved from the MF Kinect’s Infrared stream representation.
//...// Let's get a Device Capability, in this case let's get the IR source streamMediaFrameSourceInfo irInfo = kinectColorGroup.SourceInfos[IR_SOURCE];MediaFrameSourceInfo longIRInfo = kinectColorGroup.SourceInfos[LONGIR_SOURCE];
How to Work with Custom Data Streams (Preview)
The Media Capture frames API supports devices’ being able to yield custom data streams. This means devices like the Kinect can send body, body index, and other data through the custom data streams pattern. This also means other devices, like Leap Motion, can send hand-tracking data. There is no limit to the types of data that can be sent through the custom data streams.
As of the time of this writing, the Kinect device is the only device that makes use of this custom data stream, and its current implementation is in preview, which means it’s likely to change by the time this feature is finalized.
Working with Kinect Body Streams
The current implementation of Body frames is through the Custom SourceKind data stream. This data stream defines a very unique buffer layout and set of properties that outline the various body joint data, similar to the previous Kinect SDK. This implementation contains the same number of joints, 25, in pretty much in the same physical areas of the body. The joints also expose the joint position and orientation. Body-tracking statuses of tracked, not tracked, and inferred are also exposed; thus, nothing has changed when comparing to the previous framework’s functionality.
What has changed, however, is how you access the body joint information. Body joints are accessed through custom SourceInfo as a form of enum from the WindowsPreview.Media.Capture.Frames.BodyPart enumeration. The position and orientation come from the WindowsPreview.Media.Capture.Frames.TrackedPose class. The tracking status comes from the WindowsPreview.Media.Capture.Frames.TrackingStatus enumeration.
Note
These enums and classes are currently a part of the PoseTrackingPreview project, which can be found on GitHub at https://github.com/Microsoft/Windows-universal-samples/tree/master/Samples/CameraStreamCorrelation .
The custom data stream has a specific structure. This structure is basically a byte array of various components that stream the BodyPart, TrackedPost, TrackingStatus, and another object called the TrackingEntity. See Listing A1-13.
Listing A1-13. Structure of Pose-Tracking Entity
// The layout of a pose frame buffer is:// 1. PoseTrackingFrameHeader: Common structure for all providers.// 1. CustomDataTypeGuid: Guid corresponding to specific provider (16 bytes).// 2. EntitiesCount: How many entities are in this frame (4 bytes).// 3. EntityOffsets: Offsets of entity data from buffer start (4 * EntitiesCount bytes).//// 2. Provider-specific, per-frame data.//// 3. PoseTrackingEntityData #0: First entity data. Common structure for all providers.// 1. DataSizeInBytes: Size of entire entity (PoseTrackingEntityData + custom data) in bytes (4 bytes).// 2. EntityId: Allows correlation between frames (16 bytes).// 3. PoseSet: Guids for Body (such as Kinect), Handtracking, etc.: defines the meaning of each Pose (16 bytes).// 4. PosesCount: Count of poses in this entity data (4 bytes).// 5. IsTracked: Whether or not this entity is being tracked (1 byte).// 6. Poses: Array of common structure TrackedPose (sizeof(TrackedPose) * PosesCount bytes).// 7. Customer-specific data for this entity (DataSizeInBytes - sizeof(PoseTrackedEntityData) - sizeof(TrackedPose) * (PosesCount -1) bytes)//// 4. Provider-specific data for entity #0 in this frame.//// 5. PoseTrackingEntityData #1: Second entity data. Common structure for all providers.//// 6. Provider-specific data for entity #1 in this frame.struct PoseTrackingFrameHeader{// This Guid allows the consumer of the buffer to verify that// it has been written by the expected providerGUID CustomDataTypeGuid;uint32_t EntitiesCount;uint32_t EntityOffsets[1]; // actual length is EntitiesCount};struct PoseTrackingEntityData{uint32_t DataSizeInBytes;GUID EntityId;GUID PoseSet;uint32_t PosesCount;bool IsTracked;TrackedPose Poses[1]; // actual length is PosesCount};
The easiest way to access the Body information is to add a reference to the PoseTrackingPreview project and utilize its logic. This project contains all the code to unpack the stream and convert the data into programmable objects in code for easy access.
You can review the sample listed in the aforementioned link to see exactly how it’s done. One note of caution: the sample is rather complex and involved and is likely to change to a more encapsulated and basic design when this feature is released.
How to Use Audio
There is nothing special about using Kinect audio within a UWP application. As a matter of fact, we lose some capabilities here. In previous frameworks, we had the ability to do beamforming and to determine where sound was coming from using the Microphone array. We could even figure out which sound was coming from which tracked user. I’m afraid to say these features are not implemented in UWP audio for Kinect. I’m also afraid to say I haven’t heard any rumors about whether there will even be an update to include these features in the near future. However, if you know Microsoft, if we as a community provide enough vocal feedback and devise a real usage scenario for them, they will consider it. After all, that is how we got the exclusive mode option in the Kinect, as well as many other features.
Using audio in a UWP Kinect-based application requires working with the Audio graph class. The Kinect microphone array is treated like any other standard microphone. This means that the standard audio samples that come with the UWP samples will work for Kinect. I won’t go into detail on this since no special settings or functionality are required to get it working.
Tip
You can find one Audio sample here: https://github.com/Microsoft/Windows-universal-samples/tree/master/Samples/AudioCreation and many more here: https://github.com/Microsoft/Windows-universal-samples .
What About Kinect Fusion, Face, HD Face, Visual Gesture Builder, and Kinect Studio Tools?
I’m sad to say that in this current release there are no features or capabilities to work with Kinect Face, HD Face, Fusion, Visual Gesture Builder, or Kinect Studio tools for unit testing and automating replay mechanisms. These topics suffer the same fate as the more specific Kinect Audio capabilities. I do offer some advice and alternatives though.
Kinect Fusion is all about volumetric rendering and can be accomplished by extrapolating on the basic Data Sources. We have all the core components in the Media Capture APIs to establish a generic framework for doing volumetric rendering.
Kinect Face can be accomplished using the Windows.Media classes. There are classes inside of UWP that provide the ability to locate a face and various face points using any camera, not just Kinect. More advanced face features can be accomplished using OpenCV and other computer-vision tools. HD Face can specifically be accomplished using volumetric rendering on top of Windows.Media classes and OpenCV.
Visual Gesture Builder and Kinect Studio tools, on the other hand, are separate applications that will require more involved effort. Their current versions may be able to work with UWP applications as is, but it will require some thought .
Summary
Microsoft changed the game plan when it comes to developing Kinect-based applications for the UWP Store. They have a new paradigm, framework, and philosophy for dealing with device-agnostic apps. This change does not put Kinect in the tomb, but rather forces the developer to treat the device as a group of capabilities that can be used across Windows 10 devices. Learning the new paradigm doesn’t mean you have to start from scratch, especially since a lot of the patterns and design dealing with frames, events, and asynchronous behavior are practically the same. Where Microsoft will take the Kinect from here on out is left to be seen.