In the previous chapter, we covered the Kinect’s depth camera. In conjunction with its gesture-recognition capabilities, the depth camera tends to be the Kinect’s most touted feature. The Kinect’s audio and speech abilities, on the other hand, are typically overlooked. This is partly to do with marketability. From a video-gaming perspective, these features just do not help sell the Kinect nearly as much as the more immersive aspects do, such as gestures. The other important reason, though, is that the paradigm for audio input is somewhat misunderstood. We have all witnessed the “Xbox. . .” commands used to manipulate our video game consoles, but let us be completely honest: it is often easier to rely on the controller. To best realize the potential of the Kinect’s audio capabilities, we have to be sincere with ourselves. Audio is not a replacement for hand input, whether that be with a mouse, an Xbox One controller, or a touchpad. It only takes a discreet 2mm translation of our thumb to confirm a selection using a gamepad. We have to clear our voice and awkwardly talk to our device and wait for some latency in the voice-recognition technology to do the same with a microphone.
Thus, most applications that introduce voice commands for the Kinect need to create novel ways for the user to communicate their intentions. There is only so much data bandwidth we can convey to the user using a Graphical User Interface and so much we can take in from hand peripherals. What audio does is provide us with another channel by which to convey information between the user and the software. Take, for example, how what we can do in a video game, in contrast to what the developers and the players would like to do, is often limited by how many keys are found on the controller and how many digits a pair of human hands have to physically key them (which are usually limited to the thumb and index fingers anyway). We have some clever ways of trying to overcome this, such as button combinations for special moves in fighting games. This is not ideal for other genres, however.
Let us consider an example from a first-person shooter. Say we were trying to introduce an airstrike radio call capability in an FPS game such as Battlefield, where a user could call for a fighter jet to drop munitions on a specific location (yes, I know, that would be OP). We would currently have to take the user out of the game context and have them manipulate a crosshair on a top-down map to select where to drop their ordinance (think Call of Duty Predator missile). In the heat of battle, which is when such an airstrike could come most in handy, this would prove very distracting, taking the soldier off the front line and hindering her from aiding her teammates. This might also make the capability unacceptably unrealistic by allowing the player to target areas of the map where they have no situational awareness (e.g., the home-base spawn point). If we incorporated the use of voice in this hypothetical scenario, the player could call the airstrike based on the description of their local environment while still being able to maneuver on the battlefield. They could say, “Calling firing mission behind the tree line at Radio Tower, approaching from the east, danger close.” Forgiving my poor knowledge of military jargon, you can see how a user could conveniently convey much more information this way while at the same time giving themselves the ability to do other things with their hands.
In addition to giving average users the power to do more, let us not forget that audio also helps us bridge the accessibility gap for visually impaired individuals as well as those who have difficulty using hand-input devices because of physical constraints (paralysis, injury, age, etc.). Although having to confirm selections by voice might be tedious for some, for others it could be an indispensable blessing. Thus, even if it is potentially redundant for your application’s typical users, you should still strive to make voice equivalents for gesture or peripheral commands. The World Health Organization has defined disability as “a mismatch in interaction between the features of a person’s body and the features of the environment in which they live.” Directional audio enhanced with speech recognition in union with the Kinect’s other capabilities grants us an unprecedented opportunity to create venues in which disabled individuals can interact with the environment.
Working with Kinect’s Audio Features
The Kinect has a directional microphone array, meaning your application can figure out where in the room sound is coming from. The manner in which this works is analogous to how a telescope is used. Normally, our eyes have a combined horizontal vision range of about 200 degrees. If we wanted to focus on a 1-degree strip from this range, we could use a telescope so that only photons within its conical field of view would be seen by our eyes. Likewise, the Kinect’s microphone array has a horizontal range of about 180 degrees, and we can find out where audio is coming from within 5-degree increments of this range; these increments are called audio beams. The Kinect also features ambient noise cancellation, which tries to completely ignore sounds coming from the rear and single out voices coming from the front.
Recording Audio
Let us start off by developing a very barebones microphone application. We will take in audio from the Kinect when a Record button is clicked and stop recording when the Stop button is clicked. The resulting audio will be saved to disk in a .wav file.
As we have done a handful of times before, create a new WPF project in Visual Studio. Make sure that when you do that, .NET Framework 4.5 is selected in the New Project dialog (see Figure 4-1).

Figure 4-1. The .NET Framework selector in the New Project dialog. Those are . . . uh, my sister’s COBOL templates.
The namespaces and reference we will be using this time around are System.Windows, System.IO, System.Collections.Generic, System.Text, System, and, as always, Microsoft.Kinect. Many of these will be included by default in any new WPF project. AudioSource is the one Data Source whose data is not gleaned visually (i.e., with a camera). Consequently, the audio data is extracted in a slightly different manner from the other Data Sources. Normally, we have a reader that presents us with a series of frames from which we can access individual data buffers. With audio, we receive frames with references to AudioBeamsFrameLists. These in turn contain AudioBeamSubFrames, from which we gather our raw audio buffer data as well as beam metadata. Our application will progressively copy the audio buffer data to a .wav file if the user has chosen to record. See Listing 4-1.
Listing 4-1. MainWindow.xaml.cs Variable Initialization for Audio Recording
public partial class MainWindow : Window{private KinectSensor kinect = null;private AudioBeamFrameReader audioBeamFrameReader = null;private readonly byte[] audioBuffer = null;private bool isRecording = false;private int size = 0;private FileStream fileStream;...
As with every Data Source, we start off with the KinectSensor and reader variables. An array of bytes is created to hold our raw audio data. The isRecording Boolean will be toggled by our Recording/Stop button to keep track of the button state. size will keep track of how many bytes of audio data are going into the .wav file, which we will later include as a part of the file’s header data. Filestream is an I/O object we saw earlier in the screenshot example in Chapter 3. We will write our .wav file with it. See Listing 4-2.
Listing 4-2. MainWindow.xaml.cs Variable Assignment and Data Source Bootstrapping for Audio Recording
public MainWindow(){this.kinect = KinectSensor.GetDefault();this.kinect.Open();AudioSource audioSource = this.kinect.AudioSource;this.audioBuffer = new byte[audioSource.SubFrameLengthInBytes];this.audioBeamFrameReader = audioSource.OpenReader();this.audioBeamFrameReader.FrameArrived += Reader_FrameArrived;this.audioBeamFrameReader.IsPaused = true;InitializeComponent();}
The constructor in Listing 4-2 is pretty average looking. The audio buffer array is given a size of 1024 bytes, which is exactly enough to hold the data from each AudioBeamSubFrame. Each sub-frame is 16 milliseconds long and is sampled at 16 KHz; thus, we get 256 samples. Each sample is 4 bytes, which is how we get to the figure of 1024 bytes.
The reader is initialized in a paused state, and we re-enable it whenever the user starts recording. There are other ways to control the sensor’s recording process, such as adding and subtracting FrameArrived event handlers or creating and disposing of readers, but I chose to pause the reader instead as it is remarkably convenient for our simple application. Other methods may be more suitable for more complex, multipart applications.
Tip
When we refer to sampling rate, i.e., sampled at 16 KHz, we refer to how often an electronic audio signal is measured in a given interval. Normally, sound waves consist of continuous signals, but as with everything else digital, we must convert them to a discrete signal so that the computer can interpret them with bits. When we get 256 samples, we are saying we measured the amplitude of the sound wave 256 times within the 16-millisecond timeframe. This is later reconstructed as a continuous signal for analog circuits in your speakers to amplify and play back. The discrete digital signal can be processed in a way similar to what we did with images to change the character of the sounds.
Let us explore the Record button code before we check the FrameArrived event handle r and other ancillary code. The program’s primary logic starts and ends here, so it will be easier to understand the rest after looking here first.
Listing 4-3. MainWindow.xaml.cs button_Click Event Handler for Audio Recording
private void button_Click(object sender, RoutedEventArgs e){//If currently recording, then stop recordingif (isRecording == true){button.IsEnabled = false;button.Content = "Record";this.isRecording = false;audioBeamFrameReader.IsPaused = true;fileStream.Seek(0, SeekOrigin.Begin);WriteWavHeader(fileStream, size);fileStream.Seek(0, SeekOrigin.End);fileStream.Flush();fileStream.Dispose();size = 0;button.IsEnabled = true;}//If not recording, start recordingelse if (isRecording == false){button.IsEnabled – false;button.Content = "Stop";this.isRecording = true;audioBeamFrameReader.IsPaused = false;string time = DateTime.Now.ToString("d MMM yyyy hh-mm-ss");string myMusic = Environment.GetFolderPath(Environment.SpecialFolder.MyMusic);string filename = System.IO.Path.Combine(myMusic, "Kinect Audio-" + time + ".wav");fileStream = new FileStream(filename, FileMode.Create);WriteWavHeader(fileStream, size);button.IsEnabled = true;}}
The button event handler in Listing 4-3 basically toggles whether the application is recording or not. In either case—stop recording and start recording—we commence by disabling the button and finish by re-enabling it, so that the application completes the file-encoding process before permitting further action. This will likely never be a problem, as the process is fairly quick. We then toggle whether AudioBeamFrameReader is recording by setting its IsPaused property.
If we are ending the recording process, we move to the start of the soon-to-be .wav file’s FileStream with its Seek(long offset, SeekOrigin origin) method (as seen in the screenshot examples in Chapter 3) and append a header with the WriteWavHeader method, which we will be creating shortly. Once the header is written, we move back to wherever we were in the stream and write all the buffered data to the file with Flush(). The FileStream is disposed of to free up resources and so that it will be ready to be reused for future recording operations.
To start the recording process, we create a new file in the My Music folder with a unique timestamp and then write a placeholder header in the file with WriteWavHeader. We do this to ensure that the start of the file’s data is not occupied by sound data before we include the proper header during completion.
In C#, there is no built-in way to write .wav files, as we saw for images with classes like PngEncoder and BitmapEncoder. Thus, we must create our own metadata and write it to the start of the file as its header. Following convention, we use a custom C# adoption of the WAVEFORMATEX structure found in the DirectShow API (which is a part of the Windows SDK) used to define our data as waveform-audio. The WriteWavHeader method is used to work with the structure.
Listing 4-4. MainWindow.xaml.cs WriteWavHeader and Associated Code
private static void WriteWavHeader(FileStream fileStream, int size){using (MemoryStream memStream = new MemoryStream(64)){int cbFormat = 18;WAVEFORMATEX format = new WAVEFORMATEX(){wFormatTag = 3,nChannels = 1,nSamplesPerSec = 16000,nAvgBytesPerSec = 64000,nBlockAlign = 4,wBitsPerSample = 32,cbSize = 0};using (var bw = new BinaryWriter(memStream)){WriteString(memStream, "RIFF");bw.Write(size + cbFormat + 4);WriteString(memStream, "WAVE");WriteString(memStream, "fmt ");bw.Write(cbFormat);bw.Write(format.wFormatTag);bw.Write(format.nChannels);bw.Write(format.nSamplesPerSec);bw.Write(format.nAvgBytesPerSec);bw.Write(format.nBlockAlign);bw.Write(format.wBitsPerSample);bw.Write(format.cbSize);WriteString(memStream, "data");bw.Write(size);memStream.WriteTo(fileStream);}}}private static void WriteString(Stream stream, string s){byte[] bytes = Encoding.ASCII.GetBytes(s);stream.Write(bytes, 0, bytes.Length);}struct WAVEFORMATEX{public ushort wFormatTag;public ushort nChannels;public uint nSamplesPerSec;public uint nAvgBytesPerSec;public ushort nBlockAlign;public ushort wBitsPerSample;public ushort cbSize;}
I will not cover the code in Listing 4-4 in too much detail, as it is beyond the scope of this book. What is important to know is that the WriteWavHeader method writes the WAVEFORMATEX structure to the header of the .wav file. We have a WriteString helper method that writes certain strings to the memory stream using bytes. These strings demarcate the different parts of the WAVEFORMATEX construct in the .wav file. WAVEFORMATEX consists mainly of data that helps an audio player like VLC or Windows Media Player interpret the data into sound. This is where knowing the Kinect’s audio specs is critical; for example, setting the nSamplesPerSec value to anything but 16,000 would result in unintelligible audio. You might be able to tamper with the values I have used to get a more enhanced sound, but, in my experience, this is the best configuration.
It is noteworthy that we write the size of all the audio buffer data into the memory stream with the bw.Write(size); statement. This size value is gathered progressively as we get more frames and the length of the audio file grows.
Tip
WAVEFORMATEX is essentially an extension of the basic 16-byte WAVEFORMAT structure with the addition of a 1-byte cbSize value to keep track of metadata size and additional bytes for the metadata itself. All additional data would be written after cbSize is written to the memory stream. For a cool write-up of the history of WAVEFORMAT[EX], check out this informative MSDN post: https://blogs.msdn.microsoft.com/larryosterman/2007/10/18/the-evolution-of-a-data-structure-the-waveformat/
The final piece of the code-behind to cover is the FrameArrived event handler . Its only purpose is to chunk audio data into the .wav file and keep track of the buffer’s size.
Listing 4-5. MainWindow.xaml.cs Reader_FrameArrived Event Handler for Audio Recording
private void Reader_FrameArrived(object sender, AudioBeamFrameArrivedEventArgs e){AudioBeamFrameReference frameReference = e.FrameReference;AudioBeamFrameList frameList = frameReference.AcquireBeamFrames();if (frameList != null){using (frameList) {IReadOnlyList<AudioBeamSubFrame> subFrameList = frameList[0].SubFrames;foreach (AudioBeamSubFrame subFrame in subFrameList){subFrame.CopyFrameDataToArray(this.audioBuffer);if (fileStream.CanWrite == true){fileStream.Write(audioBuffer, 0, audioBuffer.Length);size += audioBuffer.Length;}}}}}
In Listing 4-5, after having extracted the AudioBeamFrameList, we acquire the AudioBeamSubFrame with the IReadOnlyList<AudioBeamSubFrame> subFrameList = frameList[0].SubFrames statement. The AudioBeamFrameList only ever contains one beam, which is why we access the zeroth index instead of iterating through the list. We then loop through all the sub-frames, which will typically number from 1 to 3, but sometimes up to 8, and copy their data to the Filestream if it is open. We also add to the total size counter.
The front end is probably the simplest you will encounter in this book. I have made uglier UIs, so try not to cringe too much (Listing 4-6).
Listing 4-6. MainWindow.xaml Audio Recording UI
//Use rest of <Window/> scaffolding code from your own project<Window Height="75" Width="100" ... ><Grid><Button x:Name="button" Content="Record" HorizontalAlignment="Left" Margin="10, 10, 10, 10" VerticalAlignment="Top" Width="75" Click="button_Click" /></Grid></Window>
The finished result will look like Figure 4-2. Once you click Record, simply click Stop when you have recorded what you need. The resulting .wav recording of the Kinect’s audio will be saved to the My Music folder. It can be played back with pretty much any modern music player. When playing the recorded audio, you will notice that when there was no prominent noise the Kinect ignored any minor noises. This might include low-volume music, whispering, shuffling, and so on. During a loud song, it might cut out when the song features an instrumental or a decrease in volume on a certain beat and then pick up again momentarily when the volume or human voice is restored. This is the Kinect filtering out ambient noise on its own accord. While the Kinect for Windows SDK v1 had ways to configure this, the SDK v2 does not.

Figure 4-2. The Kinect audio recording application. The Record button becomes the Stop button once started.
Recording Audio in Windows Store Apps
The process of recording audio in a Windows Store app is very similar to doing so in a WPF app. I will not cover it in detail, as there are only minor differences in the Windows Store APIs. The source code to do so is included in the book samples, however. Before you proceed to copy it, I encourage you to attempt to convert the WPF code yourself.
The main difference you have to keep in mind is how I/O is done. There is no Filestream class in Windows Store apps. Instead, as you saw in the screenshot example in Chapter 3, we rely on the StorageFile class. This can open a stream that can be written to. Remember to take into account that much of the code will be async.
Audio Beam Properties
What really differentiates the Kinect’s microphone array from any run-of-the-mill laptop microphone is its ability to determine from which direction a sound is coming. As mentioned earlier, the Kinect achieves this with the help of audio beams. Audio beams can be configured in two ways. We can either set it to Automatic mode, in which the Kinect tries to find the most prominent voice in the area, or Manual mode, where you choose an angle at which to focus and the Kinect favors sounds coming from that direction.
I say audio beams , but I should really say audio beam, because the Kinect will only ever return one audio beam to you. This audio beam is a weighted sum of all the audio beams it detects internally. So if, for example, two humans are talking near the Kinect, one louder than the other, the Kinect will process two separate beams internally and return one AudioBeamSubFrame to you with the BeamAngle aimed toward the louder speaker. BeamAngle is the property that gives you the angle of the sound source from the center.
Note
While it is not possible to get the multiple internal audio beams that are summed to give the resulting audio beam in the API, it may be possible to access them by using the Windows Audio Session API (WASAPI). It is unlikely that Microsoft will implement this functionality in the foreseeable future.
For a great visualization of how audio beams work, you should check out the AudioBasics-WPF (or D2D) sample in SDK Browser v2.0. As shown in Figure 4-3, it features a needle that points to the loudest audio source in front of the Kinect, as well as an energy bar representing the intensity of that audio.

Figure 4-3. Audio Basics sample picking up my voice
If you tried to register sounds from both sides of the Kinect, you will notice that the beam angle only ever goes ± 50 degrees from the center (negative being left of the Kinect and vice versa). I told a small lie earlier when I said the microphone detects anything in a 180-degree range. While it does technically do this, the Kinect team has limited the value that the API returns to within ± 0.87 radians, or ± 50 degrees from the center. Even if a sound is originated at 51 degrees right of the center, the Kinect will not inform you of this. In manual mode, you can set the beam angle to anything within ![]() radians or ± 90 degrees from the center, but you will not receive any audio from values approximately larger than ± 0.915 radians or ± 53 degrees from the center.
radians or ± 90 degrees from the center, but you will not receive any audio from values approximately larger than ± 0.915 radians or ± 53 degrees from the center.
Beam Angle Confidence refers to how confident the Kinect is that the loudest sound came from the direction of the beam angle. Its value ranges from 0 to 1.0, where 0 refers to no sound being present and 1.0 refers to total confidence of sound being present. In Manual mode, the value can be either 1 or 0, whereas in Automatic mode it can be anything in between.
By default, Automatic mode is configured for use by the Kinect. Taking a look at the AudioBasics-WPF sample, you will notice the following lines commented out in the constructor of MainPage:
audioSource.AudioBeams[0].AudioBeamMode = AudioBeamMode.Manual;audioSource.AudioBeams[0].BeamAngle = 0;
As we saw earlier, there is only one AudioBeam available for use, so we can simply access it through the first index of the AudioBeams property of the Kinect’s AudioSource. Setting the AudioBeamMode back to automatic is simply a matter of writing audioSource.AudioBeams[0].AudioBeamMode = AudioBeamMode.Automatic;.
To access the AudioBeam values returned by the Kinect during operation, we must grab them from the AudioBeamSubFrame. We can easily access its BeamAngle or BeamAngleConfidence properties this way:
foreach (AudioBeamSubFrame subFrame in subFrameList){// Check if beam angle and/or confidence have changedbool updateBeam = false;if (subFrame.BeamAngle != this.beamAngle){this.beamAngle = subFrame.BeamAngle;updateBeam = true;}if (subFrame.BeamAngleConfidence != this.beamAngleConfidence){this.beamAngleConfidence = subFrame.BeamAngleConfidence;updateBeam = true;}...}
Note
If AudioBeamMode is Manual, the application must be actively in the foreground for beamforming to work. The code relevant to manual beamforming cannot run in a background thread either.
The AudioBeamSubFrame has an additional property called AudioBodyCorrelations. In conjunction with the skeletal data received from the BodyFrameSource (which will be explored in Chapter 5), it enables us to figure out who is currently speaking. It only tells us the ID of the most prominent voice speaking at the time. To get this ID, access the BodyTrackingId of the property’s first index, as follows:
if (subFrame.AudioBodyCorrelations.Count != 0) {AudioTrackingId = subFrame.AudioBodyCorrelations[0].BodyTrackingId;}
Note
The reason AudioBodyCorrelations is a list and not a single value is because there was the potential to support the detection of multiple voice sources simultaneously, but seeing as multiple audio beams were not incorporated, this never came about.
Using Kinect for Speech Recognition
Developers will most probably use the Kinect’s microphone array for speech recognition above all else. Other than some language models that were custom-prepared by Microsoft, there is not much to developing speech recognition that is inherent to the Kinect. The extent of the Kinect’s built-in audio capabilities was covered in the first half of this chapter. The rest must be developed and integrated by us. Fortunately, this is not as torturous a task as it might sound at first. Microsoft has a separate Speech SDK that we can use in our application. You are not obliged to use this SDK; you can use the Bing Speech API (not the same as the Microsoft Speech SDK we are using) or probably even the recently announced (this section was written in 2016) Google Speech API, among others. We will be using Microsoft Speech because, as mentioned earlier, Microsoft has prepared Microsoft Speech language models specifically for the Kinect. These will have better recognition capabilities than other speech recognizers when used by the Kinect. This is because they take into account that users will be far away from the microphone array, whereas other language packs assume the user’s microphone is within arm’s width.
Tip
Language models represent the ways in which the words of a language are combined. Along with acoustic models (speech patterns) and lexicons (word lists and their pronunciations), they make up language packs, which are used by the Microsoft Speech runtime to interpret audio into a specific language. There are a handful of language packs prepared specifically for the Kinect. If your language is represented by one of them, you should definitely use them, barring other constraints. Else, you can use one of the generic language packs that are available for a greater variety of languages. The Kinect-specific language packs are available for Canadian English, American English, British English, Australian English, New Zealand English, Irish English, Canadian French, France French, Spain Spanish, Mexican Spanish, German, Italian, and Japanese.
Installing Microsoft Speech
Before we get started, you need to ensure that the Microsoft Speech SDK 11.0 is installed, along with the associated runtime and language packs. You can grab these in the Kinect SDK 2.0 Browser, or you can download them at the following links. The Kinect for Windows team recommends that you get the x86 version of the SDK and runtime.
Microsoft Speech Platform SDK Version 11.0 – https://www.microsoft.com/en-us/download/details.aspx?id=27226
Microsoft Speech Platform Runtime Version 11.0 – https://www.microsoft.com/en-us/download/details.aspx?id=27225
Kinect for Windows SDK 2.0 Language Packs – https://www.microsoft.com/en-us/download/details.aspx?id=43662
Many developers have had trouble getting speech recognition to work because of configuration issues with the SDK. For this reason, it is generally recommended that you install the necessary components in a specific order:
Kinect for Windows SDK
Microsoft Speech Platform SDK
Microsoft Speech Platform Runtime
Language Packs
The language packs do not seem to give a confirmation once they have finished installing. You can check whether they have been properly installed by looking for their entries on Windows’ Programs and Features page. You might have to restart your machine to complete the installation. I recommend you try out the SpeechBasics-WPF sample to verify that everything has been installed properly .
Integrating Microsoft Speech in an Application
This time around, our little demo project will be a speech-driven Tic Tac Toe game. It will be played against a dumb AI, and the available voice commands will be “Start,” “Restart,” and the names of the various Tic Tac Toe boxes (e.g., “Top Left” or “Center”). When the user says a command, a circle will be drawn on the box of the user’s choice, and the AI will then take a turn. The dependencies we will be using are System, System.Collections.Generic, System.Windows, System.Windows.Controls, Microsoft.Kinect, Microsoft.Speech.Recogniton, and Microsoft.Speech.AudioFormat. The two Microsoft.Speech.* dependencies need to be added in the Reference Manager. You might not see it listed as an option, so you may need to click “Browse. . .” and grab it from C:Program Files (x86)Microsoft SDKsSpeechv11.0Assembly.
We will need to create a KinectAudioStream class that wraps around the Stream class. This is because the Kinect’s audio data comes in 32-bit IEEE float format, whereas Microsoft Speech uses signed 16-bit integers to represent its audio data. To add a new class, press Shift + Alt + C. Name the class KinectAudioStream and confirm (Listing 4-7).
Listing 4-7. KinectAudioStream.cs
namespace KinectTicTacToe{using System;using System.IO;internal class KinectAudioStream : Stream{private Stream kinect32BitStream;public KinectAudioStream(Stream input){this.kinect32BitStream = input;}public bool SpeechActive { get; set; }public override bool CanRead{get { return true; }}public override bool CanWrite{get { return false; }}public override bool CanSeek{get { return false; }}public override long Position{get { return 0; }set { throw new NotImplementedException(); }}public override long Length{get { throw new NotImplementedException(); }}public override void Flush(){throw new NotImplementedException();}public override long Seek(long offset, SeekOrigin origin){return 0;}public override void SetLength(long value){throw new NotImplementedException();}public override void Write(byte[] buffer, int offset, int count){throw new NotImplementedException();}public override int Read(byte[] buffer, int offset, int count){const int SampleSizeRatio = sizeof(float) / sizeof(short);const int SleepDuration = 50;int readcount = count * SampleSizeRatio;byte[] kinectBuffer = new byte[readcount];int bytesremaining = readcount;while (bytesremaining > 0){if (!this.SpeechActive){return 0;}int result = this.kinect32BitStream.Read(kinectBuffer, readcount - bytesremaining, bytesremaining);bytesremaining -= result;if (bytesremaining > 0){System.Threading.Thread.Sleep(SleepDuration);}}for (int i = 0; i < count / sizeof(short); i++){float sample = BitConverter.ToSingle(kinectBuffer, i * sizeof(float));if (sample > 1.0f){sample = 1.0f;}else if (sample < -1.0f){sample = -1.0f;}short convertedSample = Convert.ToInt16(sample * short.MaxValue);byte[] local = BitConverter.GetBytes(convertedSample);System.Buffer.BlockCopy(local, 0, buffer, offset + (i * sizeof(short)), sizeof(short));}return count;}}}
You might be puzzled as to why we have so much dead code in Listing 4-7. We are deriving the Stream class, so we have to inherit all its abstracted members. Almost none of it will be used by the Microsoft Speech API. Only Read(byte[] buffer, int offset, int count) and a few helper members are really necessary for the code to work. This is because Microsoft Speech will be doing nothing else but reading audio data from the stream to get voice commands. It has no need to write to it or do other operations. There are still some expected return values for the inherited methods, however, so just plastering ThrowNotImplementedException() in them will not cut it. Understanding the Read method is not too important. As mentioned earlier, it reads 32-bit float samples from the stream and translates them to 16-bit signed integers. At first, it keeps writing data into the kinectBuffer byte array within the while loop until it has no more data to stream. It takes a 50-millisecond break on each iteration because the speech engine can read data faster than the Kinect’s microphones can provide it. It then extracts the 32-bit values from kinectBuffer, converts them, and then puts in the buffer to be used by Microsoft Speech.
Listing 4-8. MainWindow.xaml.cs Private Variables for Kinect Tic Tac Toe
public partial class MainWindow : Window{private bool inGame = false;private TextBlock[,] textBlockGrid = new TextBlock[3, 3];private KinectSensor kinect = null;private KinectAudioStream kinectAudioStream = null;private SpeechRecognitionEngine speechEngine = null;...
In Listing 4-8, we see that all our game-state logic is contained in the inGame and textBlockGrid variables. We could have opted for an internal representation of the game grid, but for this simple example, all the code will operate based on what characters (i.e., “X” or “O”) show up on the UI. We initialize an instance of the KinectAudioStream class that we just created. Our SpeechRecognitionEngine speechEngine is then declared. It works similarly to one of the Kinect’s Data Sources. After being configured, it has an event handler that gets called every time a new voice command has been received.
Listing 4-9. MainWindow.xaml.cs Constructor for Kinect Tic Tac Toe Part 1: Kinect Setup
public MainWindow(){kinect = KinectSensor.GetDefault();kinect.Open();IReadOnlyList<AudioBeam> audioBeamList = this.kinect.AudioSource.AudioBeams;System.IO.Stream audioStream = audioBeamList[0].OpenInputStream();this.kinectAudioStream = new KinectAudioStream(audioStream);...
In Listing 4-9, instead of having an event handler for audio frames, we open a direct stream and wrap the KinectAudioStream class around it. This converted stream will be piped into the speech engine.
Listing 4-10. MainWindow.xaml.cs Constructor for Kinect Tic Tac Toe Part 2: Speech Engine Vocabulary Creation
...RecognizerInfo ri = TryGetKinectRecognizer();if (null != ri){this.speechEngine = new SpeechRecognitionEngine(ri.Id);Choices commands = new Choices();commands.Add(new SemanticResultValue("start", "START"));commands.Add(new SemanticResultValue("restart", "RESTART"));commands.Add(new SemanticResultValue("top left", "TOPLEFT"));commands.Add(new SemanticResultValue("top left corner", "TOPLEFT"));commands.Add(new SemanticResultValue("upper left corner", "TOPLEFT"));commands.Add(new SemanticResultValue("top", "TOP"));commands.Add(new SemanticResultValue("top center", "TOP"));commands.Add(new SemanticResultValue("top right", "TOPRIGHT"));commands.Add(new SemanticResultValue("top right corner", "TOPRIGHT"));commands.Add(new SemanticResultValue("upper right corner", "TOPRIGHT"));commands.Add(new SemanticResultValue("left", "LEFT"));commands.Add(new SemanticResultValue("center left", "LEFT"));commands.Add(new SemanticResultValue("center", "CENTER"));commands.Add(new SemanticResultValue("middle", "CENTER"));commands.Add(new SemanticResultValue("right", "RIGHT"));commands.Add(new SemanticResultValue("center right", "RIGHT"));commands.Add(new SemanticResultValue("bottom left", "BOTTOMLEFT"));commands.Add(new SemanticResultValue("bottom left corner", "BOTTOMLEFT"));commands.Add(new SemanticResultValue("lower left corner", "BOTTOMLEFT"));commands.Add(new SemanticResultValue("bottom", "BOTTOM"));commands.Add(new SemanticResultValue("bottom center", "BOTTOM"));commands.Add(new SemanticResultValue("bottom right", "BOTTOMRIGHT"));commands.Add(new SemanticResultValue("bottom right corner", "BOTTOMRIGHT"));commands.Add(new SemanticResultValue("lower right corner", "BOTTOMRIGHT"));...
The first thing we do in Listing 4-10 is look for installed language packs on the PC. Our TryGetKinectRecognizer() method, which we will write later, will take care of this. If we find a language pack, we proceed to add all the different voice commands that can be accepted by our application. The first input of SemanticResultValue(string phrase, object value) is the spoken phrase that will trigger a speech-recognized event, and the second input is the value that will be provided by the event handler for us to work with. A value can have more than one phrase that triggers it, but you should not try to trigger more than one value with a single phrase. We are not obliged to add all the voice commands programmatically. You can also create an XML file, parse it, and pass the resulting string into the Grammar object, which is then loaded onto the speech engine.
Listing 4-11. MainWindow.xaml.cs Constructor for Kinect Tic Tac Toe Part 3: Speech Engine Configuration
...var gb = new GrammarBuilder { Culture = ri.Culture };gb.Append(commands);var g = new Grammar(gb);this.speechEngine.LoadGrammar(g);this.speechEngine.SpeechRecognized += this.SpeechRecognized;this.kinectAudioStream.SpeechActive = true;this.speechEngine.SetInputToAudioStream(this.kinectAudioStream, new SpeechAudioFormatInfo(EncodingFormat.Pcm, 16000, 16, 1, 32000, 2, null));this.speechEngine.RecognizeAsync(RecognizeMode.Multiple);}else{Application.Current.Shutdown();}...
In Listing 4-11, the GrammarBuilder object takes our voice command list as well as our language pack and creates a Grammar object. This is loaded into the speech engine, after which we assign it the SpeechRecognized event handler. We input the KinectAudioStream into it with the format of the audio data. You will notice that it is a bit different from the values we used in WAVEFORMATEX. This is because we changed the sample value to 16-bit. The RecognizeAsync(RecognizeMode mode) method then starts the engine asynchronously. The RecognizeMode can either be either Single or Multiple. Single stops the recognition after the first phrase is completed. Multiple does not.
Listing 4-12. MainWindow.xaml.cs Constructor for Kinect Tic Tac Toe Part 4: Gameboard Setup
...InitializeComponent();textBlockGrid[0, 0] = topLeft;textBlockGrid[0, 1] = top;textBlockGrid[0, 2] = topRight;textBlockGrid[1, 0] = left;textBlockGrid[1, 1] = center;textBlockGrid[1, 2] = right;textBlockGrid[2, 0] = bottomLeft;textBlockGrid[2, 1] = bottom;textBlockGrid[2, 2] = bottomRight;}
In Listing 4-12, we fill a grid with the location of each square on the Tic Tac Toe board for more convenient access. topLeft, top, topRight, and so on are all TextBlock controls that are declared in the XAML. They will display the “X” or “O” value on the UI in the correct location. InitializeComponent() must be called first so that they can be created before we do anything with them.
Listing 4-13. MainWindow.xaml.cs TryGetKinectRecognier Method
private static RecognizerInfo TryGetKinectRecognizer(){IEnumerable<RecognizerInfo> recognizers;try{recognizers = SpeechRecognitionEngine.InstalledRecognizers();}catch (System.Runtime.InteropServices.COMException){return null;}foreach (RecognizerInfo recognizer in recognizers){string value;recognizer.AdditionalInfo.TryGetValue("Kinect", out value);if ("True".Equals(value, StringComparison.OrdinalIgnoreCase) && "en-US".Equals(recognizer.Culture.Name, StringComparison.OrdinalIgnoreCase)){return recognizer;}}return null;}
In Listing 4-13, TryGetKinectRecognizer() first checks to see what language packs are installed on our computer. The gist of its logic is found in the statement recognizers = SpeechRecognitionEngine.InstalledRecognizers();. We have to wrap it around a try block to deal with the possibility that no language packs or runtime are installed on the machine. We then loop through the installed recognizers looking for one with “Kinect” in its title as well as “en-US”. If you have another language pack that you want to use, you can ignore the “Kinect” requirement and/or change the “en-US” string to one that reflects your chosen language pack.
Note
Microsoft has some server-side speech recognizers in addition to client-side ones. These will not work with the Kinect. InstalledRecognizers() will find the server one by its registry entry, which is very similar to the client recognizer’s.
Listing 4-14. MainWindow.xaml.cs SpeechRecognized Event Handler
private void SpeechRecognized(object sender, SpeechRecognizedEventArgs e){if (e.Result.Confidence >= 0.35){switch (e.Result.Semantics.Value.ToString()){case "START":if (inGame == false){for (int i = 0; i < 3; i++){for (int j = 0; j < 3; j++){textBlockGrid[i, j].Text = "";textBlockGrid[i, j].Foreground = System.Windows.Media.Brushes.Black;}}inGame = true;resultbox.Text = "Playing... Say 'Restart' to Restart";AITurn();}break;case "RESTART":if (e.Result.Confidence >= 0.55){if (inGame == true){for (int i = 0; i < 3; i++){for (int j = 0; j < 3; j++){textBlockGrid[i, j].Text = "";textBlockGrid[i, j].Foreground = System.Windows.Media.Brushes.Black;}}AITurn();}}break;case "TOPLEFT":if (inGame == true)HumanTurn(0, 0);break;case "TOP":if (inGame == true)HumanTurn(0, 1);break;//Omitted for redundancy, have a case for each value[ ... ]case "BOTTOMRIGHT":if (inGame == true)HumanTurn(2, 2);break;}}}
In Listing 4-14, the first thing we do after receiving a voice command is check the confidence values with e.Result.confidence. This value ranges from 0 to 1 for low to high confidence, respectively. They do not indicate absolutely whether an input was recognized. Rather, they are relative values used to compare the likeliness of being recognized. For example, a phrase recognized with 0.1223 confidence is a lot less likely to be the correct match for the desired input than a phrase with 0.7625 confidence. It does not mean that they have a 12.23 percent or 76.25 percent chance of matching, respectively.
We then extract the value derived from the recognized phrase with e.Result.Semantics.Value.ToString(). This is put through a switch statement so that we can decide what to do for each situation. If the input is the command to draw a circle in one of the boxes, we attempt to put a circle in the relevant box with the HumanTurn() method. Otherwise, if the commands are “Start” or “Restart,” it resets the board accordingly and lets “X” (the AI) play a turn. For brevity, most of the possible cases for values were omitted from Listing 4-14. You can probably figure them out on your own, but they are available to be copied from the code samples included with the book should you need them.
Pay heed to the fact that there was a further confidence value check for the “RESTART” command. We want it to be harder for a user to restart a game so that they do not accidentally restart while saying another command. Ideally, we would have done the same for the commands to draw a circle on the corner boxes. “Upper left corner” and “lower left corner” can be easily misinterpreted by the speech engine, as two-thirds of each phrase is the same as the other phrase.
Note
Although we received a value from the speech engine in response to a voice command, we could have also directly accessed the phrase the user uttered with their voice. e.Results, which consists of an object named RecognizedPhrase, has a member called Words that contains an array of the words in the inputted phrase. It also has a Text property that returns the input normalized into a display form. For example, if you had said “two kilo apple,” e.Results.Words[1] would return the string “kilo”, and e.Results.Text would return the string “2kg apple”. For more information on the results returned by the speech engine, check out the MSDN documentation for RecognizedPhrase at https://msdn.microsoft.com/en-us/library/system.speech.recognition.recognizedphrase(v=vs.110).aspx
Listing 4-15. MainWindow.xaml.cs Game-Logic Methods
//AI plays a turnvoid AITurn(){Random r = new Random();while (true){int row = r.Next(0, 3);int col = r.Next(0, 3);if (textBlockGrid[row, col].Text == ""){textBlockGrid[row, col].Text = "X";break;}}if (CheckIfWin("X") == true){inGame = false;resultbox.Text = "Oh no! You lost :( Say 'Start' to play again";return;}if (CheckIfTie() == true){inGame = false;resultbox.Text = "Game is a TIE :/, say 'Start' to play another round";return;}}//Human plays a turnvoid HumanTurn(int row, int col){if (textBlockGrid[row, col].Text == ""){textBlockGrid[row, col].Text = "O";if (CheckIfWin("O") == true){inGame = false;resultbox.Text = "Congrats! You won! Say 'Start' to play again";return;}if (CheckIfTie() == true){inGame = false;resultbox.Text = "Game is a TIE :/, say 'Start' to play another round";return;}AITurn();}}//Check if player wonprivate bool CheckIfWin(string v){if (textBlockGrid[0, 0].Text == v && textBlockGrid[0, 1].Text == v && textBlockGrid[0, 2].Text == v){textBlockGrid[0, 0].Foreground = System.Windows.Media.Brushes.Red;textBlockGrid[0, 1].Foreground = System.Windows.Media.Brushes.Red;textBlockGrid[0, 2].Foreground = System.Windows.Media.Brushes.Red;return true;}else if (textBlockGrid[1, 0].Text == v && textBlockGrid[1, 1].Text == v && textBlockGrid[1, 2].Text == v){textBlockGrid[1, 0].Foreground = System.Windows.Media.Brushes.Red;textBlockGrid[1, 1].Foreground = System.Windows.Media.Brushes.Red;textBlockGrid[1, 2].Foreground = System.Windows.Media.Brushes.Red;return true;}//Omitted for redundancy[...]return false;}//Check if there is a tiebool CheckIfTie(){for (int i = 0; i < 3; i++){for (int j = 0; j < 3; j++){if (textBlockGrid[i, j].Text == ""){return false;}}}return true;}
There is nothing special about the game-logic code in Listing 4-15. I could have gone with Minimax or alpha-beta pruning, but instead I let the AI literally be a pseudo-random number generator that places Xs on the board at random. Seeing as this makes it fallible, it is actually somewhat more fun to play (and it still beat me half the time. . .). CheckIfWin() goes through one of the eight possible solutions and checks whether there is a line of three TextBlocks with characters that match. Again, I omitted six of the solutions for brevity, but you can easily divine what they are or copy them from the provided samples.
Listing 4-16. MainWindow.xaml Kinect Tic Tac Toe XAML Front End
<Window x:Class="KinectTicTacToe.MainWindow"xmlns="http://schemas.microsoft.com/winfx/2006/xaml/presentation"xmlns:x="http://schemas.microsoft.com/winfx/2006/xaml"xmlns:d="http://schemas.microsoft.com/expression/blend/2008"xmlns:mc="http://schemas.openxmlformats.org/markup-compatibility/2006"xmlns:local="clr-namespace:KinectTicTacToe"mc:Ignorable="d"Title="Kinect Tic Tac Toe" Height="375" Width="330"><Grid Margin="0,0,0,5.5"><Grid HorizontalAlignment="Left" Height="300" Margin="10,10,0,0" VerticalAlignment="Top" Width="300" Grid.Column="3"><Grid.RowDefinitions><RowDefinition Height="100"/><RowDefinition Height="100"/><RowDefinition Height="100"/></Grid.RowDefinitions><Grid.ColumnDefinitions><ColumnDefinition Width="100"/><ColumnDefinition Width="100"/><ColumnDefinition Width="100"/></Grid.ColumnDefinitions><Border BorderBrush="Black" BorderThickness="0,0,2,2"><TextBlock x:Name="topLeft" HorizontalAlignment="Left" TextWrapping="Wrap" Text="" VerticalAlignment="Top" FontSize="48" Height="100" Width="100" TextAlignment="Center"/></Border><Border BorderBrush="Black" BorderThickness="2,0,2,2" Grid.Column="1"><TextBlock x:Name="top" HorizontalAlignment="Left" TextWrapping="Wrap" Text="" VerticalAlignment="Top" FontSize="48" Height="100" Width="100" TextAlignment="Center"/></Border><!—Omitted for redundancy-->[...]</Grid><TextBox x:Name="resultbox" HorizontalAlignment="Left" Height="22" Margin="10,316,0,0" TextWrapping="Wrap" Text="Say 'Start' to commence a new round" VerticalAlignment="Top" Width="305"/></Grid></Window>
Listing 4-16 features a Grid element with TextBlocks in each square. The Border element draws the lines of the Tic Tac Toe grid. There is a TextBlock on the bottom that informs the user of the game’s state. Compile the application and run it. The final result should look like Figure 4-4.
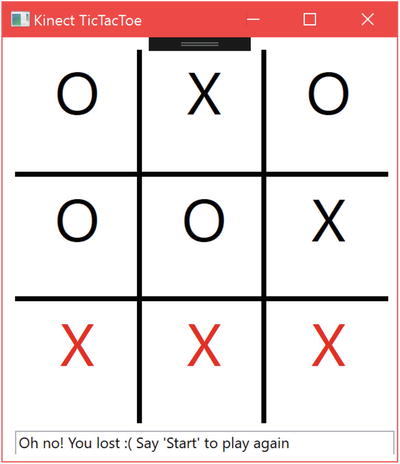
Figure 4-4. Kinect Tic Tac Toe game window. Getting whooped by the “dumb” AI.
The quality of the speech recognition depends on your local environment, accent, and the integrity of the Kinect’s microphone array, but at least for all the occasions I have seen it used, it has been remarkably accurate. Of the two dozen rounds of Tic Tac Toe that I have played with the Kinect, my command was only misrecognized once, when I said “lower right corner” and the speech engine detected “upper right corner.”
While the form of speech recognition we just implemented is suitable for a variety of applications, keen readers will realize that it has its limitations. The Microsoft Speech SDK is appropriate for short voice commands, but not for dictation. It is no Cortana. This is because Microsoft Speech is supposed to be a server-based speech engine. It is suited to dealing with grainy, telephone-quality audio with latency. Thus, the Battlefield airstrike example we saw at the start of the chapter is not as practical, unless all the commands follow a strict pattern.
There is another speech engine that is included with .NET that you can make use of. The System.Speech library is an API that on its face is similar to Microsoft.Speech. It enables dictation and has better recognition than Microsoft.Speech. Then, why are we not using it? It does not have Kinect language packs, so the recognition ultimately suffers. Despite this, System.Speech can be adapted for use with the Kinect. The code is largely the same, though it has some extra classes so as to work with dictation.
Speech Recognition in Windows Store Apps
It is sad to say, but the previously discussed code is totally unusable for Windows Store apps, as Microsoft Speech is not available for use with it. Instead, Microsoft recommends that you use the Bing Speech API. This is a paid API that you need to have a Microsoft Azure account to use. You can make 500,000 free calls to it each month, so for personal projects, it is not too bad.
The interesting thing about using the Bing Speech API with the Kinect is that you do not reference the Kinect in any way within the code. The API just opens your default microphone and works with what it’s given. Given the circumstances, exploring the API is out of the scope of this book. If you do need to use its services, however, you should check out Microsoft’s official tutorial at http://kinect.github.io/tutorial/lab13/index.html .
Human Interface Guidelines for Voice Input
When it comes to voice input, the possibilities for how the user can interact with the Kinect are endless. That is not necessarily a good thing, however. An ambiguous user experience can hinder the user from being able to appreciate your application. For this reason, Microsoft has drafted a set of Human Interface Guidelines to help developers design their projects in a manner that appeals to a potential user. These guidelines are based on insights gathered from the Kinect v1 years, as well as on the feedback received during the beta phase of the Kinect v2. Adhering to these suggestions can help build a positive and coherent experience for your users.
Environment
Unless your workplace promotes the dreaded “open plan” office, you are likely developing your Kinect applications in a relatively quiet place. The Tic Tac Toe speech-recognition sample works great in my basement, but if I were to bring it to an elementary school during recess, I would experience the Kinect equivalent of Twitch Plays Pokémon. The Kinect’s ambient noise-cancellation works for noises up to 26 decibels. An average human conversation is 50 decibels. In a loud conference, the ambient noise is 60–70 decibels, and speech recognition may no longer be feasible. You should try out your application in its target environment before putting it into production to mitigate these types of issues. How close the user is to the Kinect also affects the recognition quality. If the user is eight meters away and is shouting to speak the voice command, the speech engine might have difficulty parsing the user’s words. If you cannot control these environmental constraints, you can try to hack together homegrown noise-cancellation algorithms or use third-party APIs. There is no magic solution to pick out a voice from a crowd of a thousand, but you might be able to cancel out certain songs or sounds if you know they will be present at the time of the application’s use.
Not only can the environment interfere with the Kinect, but the Kinect can interfere with the environment as well. Voice inputs are not always appropriate. In a quiet office space or library, raised voices might cause distractions and draw weird looks from bystanders, making your user feel uneasy. Even when using voice commands might be appropriate, the exact phrases being used might not. For example, having a Kinect game where the user has to loudly and repeatedly exclaim “Faster!” inside of a department store might prevent the user from wanting to try it out.
Confidence Levels
The acceptable range of possible confidence-level values that do not cause either incessant false positives or exasperation for the user from having to strain their voice can be very small. The environment can affect the appropriateness of the confidence-level requirements as well. Developers should strive to make them accommodating of the different situations in which the applications might be used.
As we saw earlier with the “restart” and “upper/lower left/right corner” voice commands, not every voice command needs to have the same confidence-level requirement. The situations in which this is particularly important are when the user’s resources (e.g., time, money, files) are being expended or when they are being removed. A command to purchase or delete something should always require a lot of confidence in the user’s voice input. Some other situations, such as adding a friend on a social network, can also fall in that category. Sometimes it might even be worth it to ask the user for a confirmation.
Word Choice
Voice commands that sound the same can be difficult for the speech engine to distinguish. Generally, these include words that rhyme or that for the most part have the same letters. This applies to phrases as well. Take, for example, a hypothetical Kinect dating app called “Date or No Date.” You can probably already guess how the app works. The user is presented with a potential partner, and they must say “Date” or “No Date.” These are voice commands that are easily misinterpreted by the recognition engine. Not only do they mostly have the same letters, but they also have the same words! “Yes” or “No” and “Love” or “Ignore” are better voice commands that can help users avoid any awkward encounters.
The voice commands should be as short as possible while still describing the action. “I Agree” can be shortened to “Agree,” and “Clear the board” can be replaced with “Clear” or “Restart.” That being said, if you are having issues with false positives, longer phrases can be a solution. “Clear the board” can be a lot less ambiguous for the speech engine than “Clear.” You have to try out the different variations and see whether your speech engine or users have issues with them, then balance the concerns. The voice command should also be straightforward and intuitive. With this aim, you should try to limit the number of available voice commands the user has at their disposal. If there are a lot of options from which a user can pick on a menu, it could be better to have numbers associated with each option instead of a phrase (e.g., Option 6).
What might be intuitive for a certain demographic of users might not be for others. A Kinect application that allows a user to order from McDonald’s could have the voice command “supersize” in the United States and in Canada, but other English-speaking countries have different vernaculars and another saying, such as “extra-large,” might be more appropriate for them.
Interaction Design
The way the user interacts with the application should always be constrained and consist of a catered experience. This is not limiting the user’s freedom. Quite the contrary, this provides them with guidelines on how they can most efficiently take advantage of the application, thus empowering them to focus on the actual task at hand. This art of setting clear paths for the user to follow is called interaction design.
A prime example of this is the “Xbox. . .” command on the Xbox. Since the speech engine is only listening for that one word, it eliminates false positives arising from chatter in the area. The word is rather unique as well, so it is not likely to be confused by the speech engine.
More important, it defines guidelines as to how a user should interact with the application. As soon as you say “Xbox,” a screen with available commands is presented. This prevents a list of possible commands from occluding the view permanently, which is normally detrimental to experienced users. The user knows that if they want to interact with the application, they have to follow this procedure. The alternative is to have them talk freely, and although certain commands would work out fine, others might never be discovered by the user.
In general, some form of trigger activation will usually be desired. When the speech engine is always listening for a set of words, it tends to pick up many more false positives. If a button or voice command is used to signify that the user wants to communicate with the app, you can be certain that the subsequent inputs picked up by the microphone array are not erroneous. If the microphone is always listening, it may be wise to indicate this with an icon or other sign.
Often, when you type a query into Google, you can envision the result you are searching for in your head, but you do not know the words to describe it exactly. After making a query, Google might ask you “Did you mean X” to launch another query and guide you to a better search term. The effectiveness of the suggestion is even more pronounced to those who are new to computers and are not accustomed to writing search queries on Google. Doing something similar with the voice commands of your application when the user’s commands are unclear or have low confidence readings can be similarly helpful. Your Kinect File Explorer app might have a “delete” command to delete files, but a user with a weaker mastery of the English language might say “destroy” instead. Just like a search engine, your application can suggest the proper command for the user to say .
Summary
The Kinect’s audio and speech capabilities are a powerful and underused asset in the toolbox of any developer. They empower users by granting them additional ways to communicate with the application. There is no standard .NET library to record audio, so we must encode it ourselves. With the help of its directional capabilities, we build experiences where the Kinect knows the source of the audio. The Microsoft Speech Platform can further enhance these experiences by providing a framework in which to interpret the audio data into instructions for our applications to act upon. Taking into account the Human Interface Guidelines, we can couple the technology with user experience design to grant the users the additional communication venues that we so desire.
Let us venture on. In the next chapter, we will learn how to detect bodies and use their data in our applications.