Although it is conceivable that we can learn to build a house without an education in physics, learn to be a chef without taking a course in food chemistry, and learn about programming without learning how a computer fundamentally relies on transistors and machine code, there is a reason that engineering schools, cooking academies, and computer science programs typically teach the theory that begot the profession before they teach how to actually take part in the profession. We may know to sear steak above a certain temperature for a certain time to hit medium rare, but if we know the Maillard reaction, we are on our way toward knowing how to cook hundreds of foods with perfect browning and flavor, even ones we have never before encountered. Similarly, in this chapter we will cover how the Kinect fundamentally works from an engineering perspective, followed by an overview of its software interface.
Exploring the Hardware
The Kinect is a quite revolutionary piece of hardware, if I may say so myself (though I admit that I may potentially harbor the slightest of biases). It is not so much that the Kinect’s features are unprecedented, but rather the fact that Microsoft was able to package all of them in a neat little black plastic box for a comparatively cheap price. Commercial systems with only a subset of the Kinect’s capabilities ran in the thousands of dollars only a few years ago. Microsoft was only able to retail the Kinect for consumer use so cheaply because of its having development budgets in the hundreds of millions (the advertising budget for the Kinect for Xbox 360 alone was an estimated 500 million USD), elite scientists at Microsoft Research offices across the globe, and a strong market position in the multi-billion-dollar gaming industry.
While the new Kinect for Xbox One largely has the same or better capabilities than the original Kinect, the hardware behind it has actually been rebuilt from the ground up. It was not simply a matter of adding higher-resolution cameras; the actual technology behind the Kinect v2 is fundamentally different. The original relied on a structured lighting approach, which involved plastering a distinct pattern of infrared dots from its laser, somewhat like a QR code, on everything within its field of view. Knowing that objects farther away would have more distorted infrared dot patterns, the Kinect v1’s infrared camera captured this distortion through triangulation and determined the depth of any scenery within its field of view.
Microsoft initially licensed this technology from an Israeli company called PrimeSense (which was later acquired by Apple). During the incubation period of the first Kinect, Microsoft also had a competing team working on a Kinect that relied on technology from two other companies, Canesta and 3DV. By 2010, both of these companies had been acquired by Microsoft, the price being 35 million USD for 3DV and an undisclosed amount for Canesta. While it was initially assumed that these acquisitions were for some form of patent protection, it turned out that the technology from these two companies found its way into the Kinect for Xbox One . Unlike the Kinect v1, the new Kinect employs a time-of-flight, or ToF, camera. ToF cameras function by measuring the time it takes for light emitted by a Kinect to reach an object and come back. Knowing the speed of light in a typical living room atmosphere, the Kinect can calculate the distance between itself and the object. Since the Kinect must be able to work with the speed of light, its IR sensor had to have the precision required to measure in picoseconds, or trillionths of a second.
All this results in a depth image with three times the fidelity, a quarter of the motion blur, less image degradation from ambient lighting, better tracking, and a much larger field of view than the original Kinect. Essentially, Microsoft looked at every issue that developers had qualms about in the first Kinect and sought to quench them.
Inside the Kinect
You should never try to take apart your Kinect (whether that is an implicit license to take it apart, I cannot say). To save you the trouble of having to figure out what is in that little black box, I have taken the time to show you the innards right here. Figure 2-1 shows a Kinect without its protective cover. All the coolest parts of the Kinect are on the front face. All the way to the left, we have our regular color camera. The smaller circle in between that and the middle is the depth camera. The depth camera does not show up on the front face of the casing like the color camera does, because the casing is transparent but tinted. An interesting effect of the separation between the color camera and the depth camera is that they see the world from slightly different perspectives. That is to say, their respective images do not correspond to each other, and if they were overlaid on top of each other, they would show discrepancies. This can be corrected through the SDK. Right beside the depth camera we have three white rectangles, which are the infrared (IR) emitters. The last thing of interest is the black bar at the bottom. That contains the directional microphone array, which consists of no less than four microphones. The microphone array relies on the differences in phase of the sound waves arriving at each individual microphone to determine the position of the sound, a method that is similar to that used by our own ears. The microphone array is also capable of filtering out sounds that are not voices. You can see their exact positioning by looking at the foam slits underneath the microphone bar.
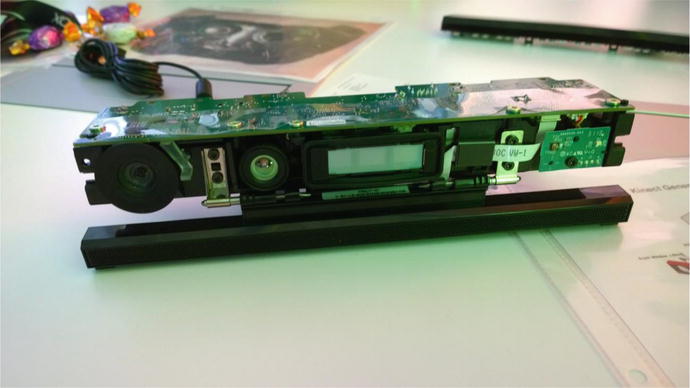
Figure 2-1. A Kinect without its plastic casing
In addition to the Kinect unit, you will notice the much thicker and more advanced USB 3.0 wiring. The Kinect has really been pushed to the limit this time and has a much larger bandwidth throughput. The upgrade to 3.0 was because USB 2.0 could no longer transport the copious amounts of data from the Kinect, which now typically transfers at around 2.1 Gbit/s. There is 5GB of data on a frame being processed through the Kinect’s motherboard before being whittled down for the USB ports.
Comparing the Kinect for Windows v1 to the Kinect for Windows v2
The Kinect for Windows v2 is vastly superior to the Kinect for Windows v1, but you would not know it if you just read the first result off Google. My hard drive is teeming with Microsoft Kinect marketing materials that I obtained at various events and from the net, and they all highlight different things! Let us go through the gamut of improvements in the Kinect for Windows v2 and see where they really made changes. The Kinect is probably capable of even more than what I have listed in Table 2-1. Unfortunately, a lot of these functionalities are hard to find because Microsoft has not advertised them cohesively.
Table 2-1. A Side-by-side Comparison of the Kinect for Windows v1 and the Kinect for Windows v2
Feature | Kinect for Windows v1 | Kinect for Windows v2 |
|---|---|---|
Color Camera | 640 x 480 x 24 bits per pixel 4:3 @ 30 Hz RGB (VGA), 640 x 480 x 16 bits per pixel 4:3 @ 15 Hz YUV | 1920 x 1080 x 16 bit per pixel 16:9 YUY2 @ 30 Hz (15 Hz in low light, HD) |
Depth Camera | 320 x 240 x 16 bits per pixel @ 30 Hz 11-bit IR depth sensor | 512 x 424 x 16 bits per pixel 16-bit ToF depth sensor IR can now be used at the same time as color |
Range | Practical: 0.8m to 4.5m (2.6 ft.–14.7 ft.) Default 0.4m to 3m (1.4 ft.–9.8 ft.) Near Mode Absolute: 0.4m to 8m (1.4 ft.–26.2 ft.) | Only one configuration: 0.5m to 8m (1.6 ft.–26.2 ft.) Quality degrades after 4.5m (14.7 ft.) |
Angular Field of View | 57.5° Horizontal – 43.4° Vertical | 70° Horizontal – 60° Vertical |
Audio | 16-bit per channel with 16 kHz sampling rate | 16-bit per channel with 48 kHz sampling rate |
Skeletal Joints | 20 joints tracked | 25 joints tracked; the additional joints are Neck, left and right Thumbs and Hand Tips |
Skeletons Tracked | 2 with joints, 6 in total | 6 with joints (renamed to Bodies) |
Vertical Adjustment | Tilt motor with ±27 degrees of freedom | Manual, also ±27 degrees of freedom |
Latency | ∼100ms | ∼50ms |
USB | 2.0 | 3.0 |
Quick Comparison
Windows Store Support
Windows Store support has long been requested by Kinect developers, and the Kinect for Windows v2 now enables this. The APIs are pretty much the same as the ones for WPF. While the market for general Window Store Kinect consumer apps is admittedly bleak, such apps are perfect for special use cases like booths or commercial use because of their accessibility. A great example of a Windows Store app that uses Kinect is 3D Builder, which allows you to scan objects and prepare them for 3D printing.
Note
UWP is not fully supported at the time of writing, but there are plans to do so. This book contains an appendix with details on how to get started with UWP and Kinect.
Unity Support
Much-anticipated Unity support is now available for the Kinect for Windows v2. Most developers should be familiar with Unity by now, but for those still programing their games in BASIC, you should take a serious look at Unity. Unity makes it exceedingly easy for any developer to make nearly AAA-quality games for dirt cheap. With the new Kinect plugin, we can now make complex games with the Kinect without having to maintain an entire development team. In a few easy steps, we can add skeletal tracking to Unity games and do cool stuff like avateering or green-screening. While a paid license was initially required, after the release of Unity 5, anyone can use the Kinect plugin with their apps for free.
Unity apps can be deployed to both the desktop and the Windows Store. A thorough discussion on Unity is available in Chapter 7.
Note
There is also Unreal support available for the Kinect. It is arguably easier to use than the Unity plugin, but is not free. This plugin will not be covered in this book.
Hand-Gesture Support
There is now support for hand-gesture tracking . The Kinect can let us know whether a user’s hands are in any one of three recognized gestures or two non-gestures. The three recognized gestures, as shown in Figure 2-2, are Open, when a user opens their palm flat; Closed, when a user clasps their hand in a clenched fist; and Lasso, a gesture that is oft-mistaken for flipping the bird but is really a pointing gesture with two fingers (the middle and index). The non-gestures are Unknown and NotTracked. Recognizing these hand gestures in our applications enables better user experiences by facilitating user interactions with prompts (e.g., holding Closed grip to signify that the user confirms the selection).

Figure 2-2. Open, Closed, and Lasso hand gestures
Visual Gesture Builder
There was no official tool with which to integrate gestures into apps with the Kinect for Windows v1, which meant that the average developer had to essentially track gestures with an assortment of conditional statements. This was very prone to error, not to mention irritating to program. The Kinect for Windows v2 comes with Visual Gesture Builder, a tool that uses machine-learning techniques to help you train gestures and integrate them into your app. The tool is very easy to use and requires no prior knowledge of machine learning.
Face & HD Face API
The original Kinect SDK tracked up to 40 points on a user’s face. As with skeletal gestures, we had to make assumptions based on the positional heuristic of face joints to see if a user was making a certain facial gesture. The kind folks at Microsoft went ahead and included a handful of facial gesture–detection algorithms with the Kinect for Windows v2 SDK. These gestures include closed eyes, eyes looking away/not interested, open mouth, moving mouth, happy expression, and neutral expression. Additionally, the Kinect can detect if the user is wearing glasses. The use for this Face API is immediately obvious: we can now determine if a spectator is engaged with our product or not.
There is also an additional HD Face API. HD Face supports a whopping 613 HD face points. It is 3D, whereas the regular Face API is 2D. HD Face can be used for advanced character rigging and character facial animation, among other things.
Kinect Fusion
Kinect Fusion enables 3D object scanning and model creation using the Kinect. The original Kinect Fusion was pretty nifty, but because of throughput issues, low camera resolution, and weakly optimized code, the results were somewhat lackluster. The new Kinect Fusion, depicted in Figure 2-3, has been drastically improved and is much more performant.

Figure 2-3. Kinect Fusion reconstruction of the author working on his book
Kinect Studio
If you have worked with Kinect Studio which was introduced in Kinect for Windows SDK v1.7 onward, you will be glad to know that Kinect Studio makes a comeback in SDK v2. Kinect Studio is an application that allows you to record data with your Kinect and replay it for your apps so as to avoid having to physically debug each time around. It is much more comprehensive than its earlier incarnation, and you now have the capability to toggle the data streams you want to capture. A rundown of the tool will be provided later in this chapter.
Kinect Ripple
The Kinect Ripple is one of the coolest Kinectabilities (can this be a word?) that I have had a chance to play with. Unfortunately, it was never advertised anywhere but within the core Kinect developer circles and in India, and thus never received all the attention that it deserved. Basically, the concept is that you have a projector displaying an image on a wall or screen and another projector displaying an image on the floor. The Kinect is positioned underneath the wall projection, facing away, like in Figure 2-4. The floor projection will become interactive, and you can step on it to activate buttons or tiles. The one on the wall can show a presentation or content based on the interaction with the floor projection. The whole thing can be programmed in JavaScript.

Figure 2-4. A Kinect Ripple system set up at Microsoft’s Hyderabad office
Kinect RoomAlive Toolkit
Another one of the Kinect’s coolest capabilities is RoomAlive . True to its name, it brings your living room to life, and it achieves this by enabling you to do immersive, dynamic projection mapping. The toolkit takes care of calibrating the combined Kinect and projector units (dubbed procams), and any surface covered by these units receives a projection-mapping treatment.
In Figure 2-5, we have a real example of a person playing with a RoomAlive app. Creatures are able to erupt from any surface and attack the user. The user can in turn retaliate by hitting them with their limbs or by firing their rifle. You can see where the HoloLens, in particular with its robot shooting game, got its inspiration.

Figure 2-5. A whack-a-mole type game with a toy rifle (© Microsoft)
Setting up the system is beyond the scope of this book, but if you want to learn more, you can visit www.github.com/Kinect/RoomAliveToolkit . (A future blog post by the author maybe in the works however.
Multi-App Support
The Kinect for Windows v2 now allows for the ability to have multiple apps using the Kinect at the same time. It is a bit of a niche capability, but a very much welcome one in several circumstances. If we created a Dance Dance Revolution–type game, for example, we could set up two monitors with two instances of the game running at the same time for two participants competing against each other, while only running one Kinect. Another use case could be having a therapist run a Kinect exercise suite app for one of her patients while at the same time running a general body-analysis app. The analysis app might need to be utilized for many different exercises, so it saves having to integrate it with every new exercise app that is developed.
Exploring the Software Interface
The Kinect for Windows v2 SDK has a robust API that makes extracting any data of interest a cinch. All the sensors in the Kinect have similar design patterns and developer experiences. This pattern generally involves starting the Kinect, delineating which data types we want, and then performing our data manipulation and analysis on frames from a stream of a specific data type. At the forefront of all of this are Data Sources, an API construct that allows us to access data of a specific type.
Understanding Data Sources
Most of the Kinect’s data can be conveniently accessed through Data Sources defined by the API. Those of you who have tinkered with the Kinect for Windows v1 will know them to be similar to Streams (the name change was the result of a stronger adherence to the Windows Design Guidelines at the time of the API’s development, which mandated a different definition for the concept of stream). Each Data Source focuses on one type of data provided by the Kinect, such as depth data for DepthFrameSource; the full list is described in Table 2-2. Each Data Source provides us with metadata about itself (e.g., whether this Data Source is being actively used by the Kinect) and enables us to access its data through readers, which are covered next.
Table 2-2. The Different Data Sources Available for the Kinect
Data Source | Description |
|---|---|
AudioSource | Supplies audio from the Kinect’s microphone array bar. Audio is captured from all directions, but is focused in the form of beams that emphasize sounds from a specific direction. Sounds are split into frames that sync with the camera feeds. |
BodyFrameSource | Exposes all data about humans in view of the Kinect sensor. Provides skeletal joint coordinates and orientations for up to six individuals. Start point for any activity requiring the tracking of users. |
BodyIndexFrameSource | Yields information on whether a pixel corresponding to a depth image contains a player. Can determine which player occupies a pixel. Useful for green-screening and similar activities. |
ColorFrameSource | Provides image data from the Kinect’s 1080p HD wide-angle camera. Can be accessed in multiple color formats, such as RGB and YUV. Useful for standard camera-filming and picture-taking operations. |
DepthFrameSource | Provides depth data derived from the Kinect’s depth camera. Depth distance is given in millimeters from the camera plane to the nearest object at a particular pixel coordinate. Can be used to make custom tracking algorithms and size measurements (do not rely on its accuracy for critical applications). |
InfraredFrameSource | Exposes an infrared image from the Kinect’s 512 x 424 pixel time-of-flight (ToF) camera. Suitable for computer vision algorithms, green-screening, tracking reflective markers, and imaging in low-light situations. |
LongExposureFrameSource | Enables long-exposure infrared photography using the same ToF infrared sensor as InfraredFrameSource. Generates sharp images of stationary features at the expense of blurring bright, fast-moving objects (an effect which can be desired). |
FaceFrameSource | Provides recognition of five points on a face in two dimensions (X andY coordinates). This data source also provides data on facial expressions, such as happy and sad. Suitable for facial tracking, facial-expression recognition, and real-time face masking. |
HighDefinitionFaceFrameSource | Provides recognition of 36 standard facial points and over 600 more vertices of non-standard facial points in three dimensions (X, Y, and Z coordinates). Suitable for facial recognition, facial micro-expression recognition, and character facial animation. |
Readers and Frames
Readers
Most of the Kinect’s data is read through readers. The reader’s job is to read from the Data Sources and fire an event each time there is a data frame available for use, which I will explain briefly.
Readers can access frames in either one of two methods: Events and Polling. If you have worked with .NET before, Events should be nothing new to you, but for those of you have not, the gist is that a class can use events to notify other classes that something of interest has occurred. In the case of the Kinect SDK, readers raise events that let us know whenever there is a new frame available for us to use. For your typical WPF or Windows Store application, events are the way to go.
The other method, Polling, is a reverse Event of sorts. If you have dabbled with Microsoft’s XNA, this should be familiar to you. Instead of waiting for the specific class to drive an interrupt, our application code continuously calls or polls the class asking for the current status of whatever you are interested in. So, for example, if you want to know if the Jump button was pressed, your application loop checks to see the status of Jump on each loop, and if it has been pressed you execute the code to handle this. The end result generally is that while you will find out faster whether something of interest has occurred, the system will be taxed unnecessarily as many to most of the calls will return a negative. Of greater concern is the added complexity for any application other than those with the smallest of scopes. Typically, you will go with polling if you are working with game loops or something of the sort.
Accessing Data Sources with readers is as simple as simple can get. Listing 2-1 demonstrates how we would access ColorFrameSource and open a ColorFrameReader.
Listing 2-1. Opening a Data Source with a Reader
private ColorFrameReader colorFrameReader = null;...this.colorFrameReader = this.kinect.ColorFrameSource.OpenReader();
When a reader is not being utilized, it is best to pause it to minimize the creation of unnecessary frames. If we reach a point in the application where we no longer need to use the Kinect, we can shut off the Kinect sensor altogether, as we saw in Listing 1-5 in Chapter 1. However, if we only need to temporarily pause the collection of data from one Data Source, we are better off pausing the readers, as shown in Listing 2-2.
Listing 2-2. Pausing a Reader
this.colorFrameReader.IsPaused = true;//to re-enablethis.colorFrameReader.IsPaused = false;
If we are done with the reader for good, it is best practice to dispose of it, as shown in Listing 2-3.
Listing 2-3. Disposing of a Reader
if (this.colorFrameReader != null){// ColorFrameReader is IDisposablethis.colorFrameReader.Dispose();this.colorFrameReader = null;}
Unlike in the first Kinect SDK, we can now have multiple readers per source. This permits us to modularize our code. An example of this could be for a first-person sports game in which we could have the majority of the screen dedicated to an activity—say, a user trying to hit a target with a bow and arrow—and on the corner of the screen we could have an optional 3D avatar visualization of the person that could be turned off and on. Both the main game and the 3D avatar visualization use the BodyFrameReader, but since we want to be able to toggle the 3D avatar visualization and use it for other sports activities like dancing, we put it in its own code module and give it its own reader that can be turned off individually.
Note
In addition to the Data Sources listed in the previous section, there is an additional reader that allows us to get all or some of the data (excluding audio and Face API data) at the same time and in sync—the MultiSourceFrameReader.
Those who have worked with the Kinect for Windows v1 SDK will find this similar to the AllFramesReady event, which also allowed us to access all the streamed data relatively synchronously.
Frames
The frame contains all our precious, precious data, in addition to metadata such as dimensions or formatting. Frames are obtained from FrameReferences, which are in turn obtained from readers. FrameReferences exist mainly to help you keep your frames in sync. Other than the frame itself, FrameReferences contain a TimeSpan (.NET structure that describes an interval of time) called RelativeTime, which informs us when the frame was created. The start time of RelativeTime is unknown to us, so we compare it with the RelativeTimes of other types of frames to see if they were produced at around the same time.
To access the frames, we add an event handler to our reader, as in Listing 2-4, and whenever our reader raises an event, we will be provided with the most recently produced frame.
Listing 2-4. Adding an Event Handler to a Reader
this.colorFrameReader.FrameArrived += this.Reader_ColorFrameArrived;To access the frame, we should make use of the Dispose pattern. Kinect data is very memory intensive, and it can easily eat up all our system resources if we are not careful. We do this by relying on the using keyword, which will automatically dispose of unneeded resources when we are finished. Accessing frames with the use of this pattern is demonstrated in Listing 2-5.
Listing 2-5. Accessing a Frame from an Event Handler
private void Reader_ColorFrameArrived(object sender, ColorFrameArrivedEventArgs e){using (ColorFrame colorFrame = e.FrameReference.AcquireFrame()){if (colorFrame != null){...//do work with Frame...}}}
Once the event handler is called, we can obtain the FrameReference from the event arguments e and then call its AcquireFrame() method to extract the frame. Whenever we receive a frame, we should endeavor to make a local copy or to directly access its data buffer to avoid holding up the system.
Note
Are you not getting new frames for some reason? Then stop being so greedy with them! The Kinect SDK will refrain from giving you new frames if it realizes that you are not getting rid of the old ones. This is because the SDK aims to not hog up all your memory and is helping you do the same. Copy the data you need and chuck the rest.
Working with Kinect Studio
In the course of testing and debugging your Kinect application, you will invariably get tired of performing the same gestures repeatedly. I recall working on a project that involved analyzing respiratory rates with the Kinect for Windows v1 and having to take quick and deep breaths to gauge the accuracy of my algorithms. As you would expect, this lead to hyperventilation, and ultimately I passed out! Thus, you can understand the importance of being able to replay a particular recording to your Kinect application instead of having to redo the gestures or the scene footage.
Enter Kinect Studio. Kinect Studio is an application bundled with the SDK that allows you to capture and replay data collected by the Kinect. You can pretty much film a scene with the Kinect, including all the various Data Sources, and watch it in something sort of like a video player. This data can be fed to your Kinect applications instead of your having to generate footage each time around. Not only does this reduce repetitive, tiring gestures, but it also allows you to set up controls for your algorithmic experiments so that you can determine exact differences in their performance.
Using Kinect Studio
Before starting Kinect Studio, make sure KinectMonitor.exe is running on your machine and that your Kinect is turned on. To run Kinect Studio, either find its executable in the Tools folder of your Kinect for Windows SDK 2.0 or search kstudio or Kinect Studio on your computer (Windows key + S key).
At first you will be brought to the Monitor page. The Monitor page allows you to view all the data being streamed from your Kinect’s sensors. You can turn off certain sensors and view the scene from a 3D perspective.
The first thing to do is to click the Connect to Service button (Figure 2-6) at the top left (under File). As soon as you click it, you should see a colored depth stream from your Kinect being played back. If at any time you want to stop, you can simply click the Stop button right beside it.
Figure 2-6. The Connect to Service button
The panel on the left (Figure 2-7) contains the switches for all the streams. You must stop the streams before you can toggle any of them. To turn off a stream, simply click the checkmark icon. For convenience, you can hide the streams from appearing on the panel with the eye icon. The topmost eye icon toggles whether hidden streams are shown.

Figure 2-7. Toggling Data Sources in Kinect Studio
If you click the Monitor 3D View tab, you should be able to see a 3D depth stream from your Kinect (Figure 2-8). The red frustum represents everything that falls in the Kinect’s reliable field of view. You might be able to see objects beyond it depending on circumstances, but the quality will be degraded. Its smaller rectangular face is where a cutting plane separates itself from a pyramid’s apex. The original pyramid covers the entire field of view of the Kinect starting from its camera through a point-origin perspective, but since the Kinect does not accurately sense near itself, the field of view is truncated. The apex of this original pyramid is colored gray.

Figure 2-8. A 3D depth stream from the Kinect, including a body and its skeleton. The blue circle represents a pointing hand (or lasso).
You are not limited to a colored depth stream in 2D or a gray point cloud in 3D. To access the other streams, click the Settings icon, as shown in Figure 2-9. From there you can configure various plugins (Figure 2-10).
Figure 2-9. The Settings icon, situated above the monitor view

Figure 2-10. The plugins page where Data Sources can be configured
It is best that you play around with the options to see what suits you, as there are many configurations. You can alter the Data Sources to visualize what your Kinect sees differently. For example, you can exchange the gray point cloud for a color one, like the one in Figure 2-11. To get color or infrared in 3D, you will have to check the Surface can be textured checkbox and then turn on the color or infrared plugin respectively. To the right of the Settings icon in 3D view, you can also click the default view (house), front view, left view, and top view icons to view the 3D image from different planes. You also have the option to zoom in and out, though you will find it much quicker to achieve the same effect by holding CTRL while scrolling with your mouse wheel. Left-clicking and dragging your mouse will enable you to pan the camera, while scrolling will enable you to translate up and down on whichever axis is vertical on the screen. Look at the cube at the top-right of the view window to find out which axis is vertical; when left-view is selected, it is the Y-axis.
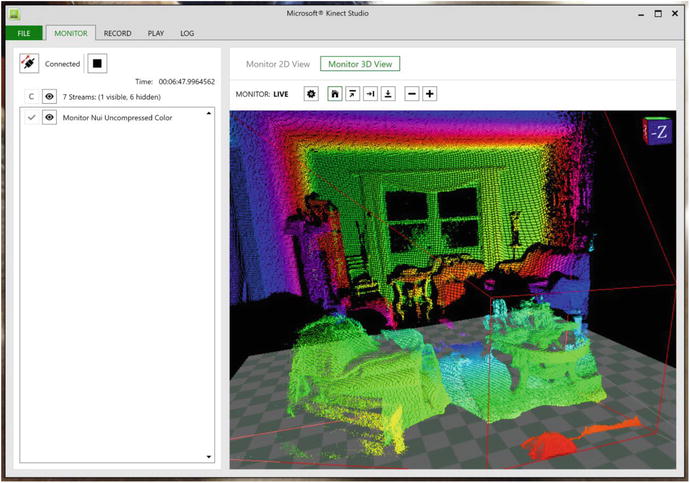
Figure 2-11. Colored point cloud
Note
You have to keep the depth plugin and Data Source turned on in 3D view or you will not be able to see color or infrared. This is because there is no point cloud to project on without depth. You also cannot see the infrared and color streams at the same time.
Recording and Playing Back
While the Monitor feature of Kinect Studio is pretty dandy, being able to record and replay scenes from our Kinect takes the cake. Not only is it useful for debugging, but also the Visual Gesture Builder tool makes use of the recordings as well. To get started, visit the Record tab of Kinect Studio. Conveniently, it looks very much like the Monitor page. The one difference is that there happens to be a few more streams that you can toggle in the left panel. These are not available for view in Kinect Studio itself; rather, the data is recorded for any applications you plan to replay for.
Tip
Only toggle what you need. The recordings grow larger for each Data Source being tracked. A one-minute recording with all Data Sources active will take up a whopping 10 GBs. Remember to delete your recordings after you have finished with them.
To get started, make sure you are connected to the Kinect service and have the desired Data Sources toggled, and then click the Start Recording File button (red circle). Film whatever interactions you need, such as gestures or plain video footage, then click the Stop button when you are done. There is no Pause button, so you will have to film whatever you need in one go.
Once you have clicked Stop, Kinect Studio will transfer you to the Play page (Figure 2-12). Your recording should have been saved as a .xef file in Documents ➤ Kinect Studio ➤ Repository. If you have to reopen your file, go to File ➤ Open for Edit, then pick the file you want.
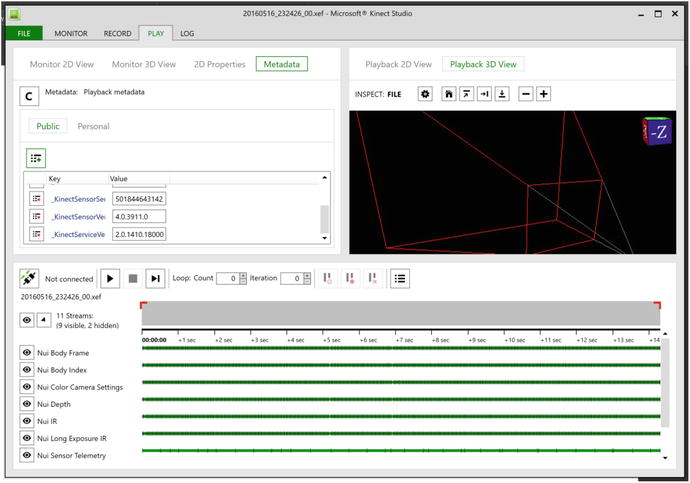
Figure 2-12. The Play page
The Play page has a variety of features to help you analyze your footage. The most straightforward and essential ability is naturally the Play File button. Clicking it replays the saved footage in the Playback 2D View and 3D View windows at the top right. These work the same as on the Monitor page. Unlike the Monitor page, however, you can actually view frame data on the Play page. In the top-left window, click the 2D Properties tab; you will be presented with data such as depth in millimeters, RGB values, and infrared intensity about each pixel in Playback 2D View. To view data about a specific pixel, simply hover your mouse over it in the 2D view in the top-right window.
On the bottom half of the application you have a timeline manipulation panel similar to those found in standard video manipulation suites. To view a specific point in time, click on any of the green bars at the desired timestamp (and not the larger gray bar).
If you work with an IDE like Visual Studio or other developer tools such as the Chrome browser dev tools, you will be familiar with the concept of breakpoints. Basically, they allow you to pause execution at a certain line of code. In Kinect Studio, there are breakpoints, or pause points, that pause your playback whenever they are reached. You can add them by clicking on the gray bar that spans the bottom half of the window; a red circle should appear, as shown in Figure 2-13. Likewise, you can also add markers, which hold metadata about a specific time. This can be used to write notes about a specific time, such as indicating the start of a gesture. Markers are added in the bottom half of the gray bar and appear as blue squares. To create and/or edit metadata, click the Metadata tab at the top left portion of the window.

Figure 2-13. Pause points, markers, and an In point
You should see two little red brackets at either end of the gray bar. These are In and Out points, which allow you to set when the playback starts and finishes in the clip. Simply drag them to where you would like, or right-click the desired location on the bar and press Set In/Out Point. A final nifty feature in the playback window is the Loop tool. Next to the Play button area, you should see two textboxes that say Loop: Count and Iteration. You can set a value in Count, and the playback will be repeated this many times. Iteration lets you know how many times the loop has run. You could use this while debugging your application to avoid having to go back and click Play again and again.
Feeding a Recording into a Kinect Application
Start by unplugging your Kinect from your computer. We do not want to stream the Kinect to our application instead of the recording. On the Play page, ensure that you are still connected to the Kinect service. It should say Connected next to the Play button. Then, make sure all the Data Sources you are interested in are enabled on the bottom half of the Play page. Do not play the video yet.
Since we have not created a full-fledged Kinect application yet, we are going to use one of the sample applications. Search for SDK Browser v2.0 on your computer and run it. Find the Color Basics-WPF sample and install it to a location of your choice. Open the solution file (.sln) in Visual Studio and then compile the project (green arrow or F5). The video window should be black and should say “Kinect not available!” on the bottom. Now, return to Kinect Studio and click the Play button. It should still say “Kinect not available!” on the bottom, but the video feed should work as if you had a real Kinect connected to it. If it is not working, make sure you recorded your Kinect Studio footage with the color Data Source enabled and that it is also enabled on the playback page.
Summary
The Kinect is a device that collects a number of sensory inputs to build a visualization of the world around it. The new Kinect for Windows v2 built on many of the lessons learned from the development of the Kinect for Windows v1, which grants it an unprecedented ability to be used in interactive multimedia applications. Despite all the data it can provide, the programming model for the Kinect is quite simple. Readers acquire data from Data Sources in the form of frames, which we must be sure to handle carefully to avoid bogging down the system. Debugging is also not very difficult, thanks to the time-saving capabilities of Kinect Studio.
Knowing all of this, we are now properly armed to tackle Kinect development. There are many quirks to figure out, and with this knowledge we can now do so.
In the next chapter, we will start working hand in hand with the most basic Data Source: ColorFrameSource.