
CHAPTER 5
![]()
Software Installation
The third little pig met a man with a load of bricks, and said, “Please, man, give me those bricks to build a house with;” so the man gave him the bricks, and he built his house with them. So the wolf came, as he did to the other little pigs, and said,—
“Little pig, little pig, let me come in.”
“No, no, by the hair of my chiny chin chin.”
“Then I’ll huff, and I’ll puff, and I’ll blow your house in.”
Well, he huffed, and he puffed, and he huffed, and he puffed, and he puffed, and he huffed; but he could not get the house down.
—The Nursery Rhymes of England by James Orchard Halliwell (1886)
You’re almost ready to create a database. Chapter 4 covered the planning process. This chapter first goes over a few prerequisites such as obtaining the software, installation guides, and reference manuals. I also discuss the installation of software that precedes the creation of a database. I then demonstrate the process of installing the Oracle software in your VM. I hope you take the opportunity to perform the software installation exercise yourself—the best way to learn is by doing. Besides, software installation is one of the most common tasks of a database administrator.
Once you’ve learned how to install the Oracle software, you’ll be ready to create a database. You create your first database in Chapter 6. To get maximum value out of this book, please repeat all the demonstrations yourself in your VM.
![]() Note To make it possible to repeat the software installation procedure multiple times, make sure you have taken a snapshot of the VM before installing the Oracle software into it. You can then restore the snapshot at will to repeat the procedure if you desire.
Note To make it possible to repeat the software installation procedure multiple times, make sure you have taken a snapshot of the VM before installing the Oracle software into it. You can then restore the snapshot at will to repeat the procedure if you desire.
Oracle Technology Network
One of the reasons Oracle dominates the database market is that it makes its software and its software manuals available for download without any artificial restrictions such as license keys and limited trials. Oracle’s motto is, “free to download, free to learn, unlimited evaluation.” All you need is an Oracle Technology Network (OTN) account, available free of charge.
In addition to software and software manuals, OTN offers forums, articles, sample code, and tutorials. Go to www.oracle.com/technology/index.html and create an account for yourself; there’s no reason not to do so.
The Forgotten Manuals
Beginning with Oracle Database 8, Oracle discontinued the practice of providing free printed copies of reference manuals to customers who purchased database licenses. In the early days of the Internet, when broadband access was not common, Oracle put the manuals on a CD. Today, you can search and read the manuals online; they are available in both HTML and PDF formats. For convenience, you can also download selected manuals—or the entire set of manuals—to your laptop computer for offline reading. You can purchase printed copies of the manuals at http://store.oracle.com, but they are huge. Oracle Database 12c SQL Language Reference alone is almost 1,500 pages, twice the size of the Oracle Database 7 version.
The manuals for Oracle Database 12c are available at docs.oracle.com; the manuals for older database versions are also available, all the way back to Oracle Database 7. For this chapter, you need the installation guides for the Linux operating system—separate guides are available for client installations and server installations.
![]() Note A very short version of the server installation guide, called a Quick Installation Guide, is also available in each case; it covers the most common scenarios.
Note A very short version of the server installation guide, called a Quick Installation Guide, is also available in each case; it covers the most common scenarios.
Prerequisites and Preinstallation Requirements
You need to pay attention to the sections of the installation guides that discuss prerequisites and preinstallation requirements. If you have chosen a complex architecture such as Real Application Clusters (RAC) , these prerequisites are themselves fairly complex, but RAC is outside the scope of this book.
Of course, a common prerequisite for all operating systems is adequate space for database files, archived redo logs, and backups. In a Linux environment, you need to install and run Oracle using a dedicated account, and there are also numerous other prerequisites. There was a time when you had to perform all the prerequisites manually; but when using Oracle Enterprise Linux (OEL) , as is the case for your VM, they are bundled into an RPM package that is installed from the root account by the yum installer as follows:
yum install oracle-rdbms-server-12cR1-preinstall –y
Of course, you don’t need to perform the prerequisites on the VM, because it already contains a full Oracle installation and therefore all the necessary prerequisites have been completed.
Client Installations
A client installation refers to the software that needs to be installed on every machine from which a connection to the database is initiated. This could be a user’s laptop or an application server. This section shows you two types of client installations—Instant Client and SQL Developer—and demonstrates how to install them on a Windows desktop or laptop and connect to a database in your VM.
Instant Client
Prior to Oracle 10g, a typical client installation was a large collection of software including dozens of components. Installation was a time-consuming process that required the use of Oracle Universal Installer (OUI) .
Beginning with Oracle Database 10g, Oracle provides the most essential software in a bundle called Instant Client. OUI is not needed for installation; you can simply copy a few files to a directory of your choice. The entire process takes only a few minutes:
- Use your OTN account to download the necessary zipped files from Oracle Technology Network to your desktop or laptop. Several choices are offered. The most common choices are Basic and SQL*Plus. The Basic package contains the dynamic link libraries required by Oracle applications, and SQL*Plus is the traditional command-line tool favored by database administrators. Download both of them.
- Unzip the two zip files into the same directory. Here’s what I found in the directory after I did that:
$ dir
 Volume in drive C is System
 Volume Serial Number is 1C02-18A4

 Directory of C:UsersiggyDesktopIggyDownloadsinstantclient_12_1

08/03/2014  07:15 PM    <DIR>          .
08/03/2014  07:15 PM    <DIR>          ..
06/28/2013  04:04 AM            40,448 adrci.exe
06/28/2013  04:04 AM            19,672 adrci.sym
06/28/2013  04:04 AM               567 BASIC_README
06/28/2013  04:04 AM            84,992 genezi.exe
06/28/2013  04:04 AM            52,656 genezi.sym
01/13/2006  12:36 AM               342 glogin.sql
06/28/2013  04:02 AM           641,024 oci.dll
06/28/2013  04:02 AM           472,392 oci.sym
06/26/2013  04:38 AM           150,016 ocijdbc12.dll
06/26/2013  04:38 AM            29,912 ocijdbc12.sym
06/28/2013  03:39 AM           505,856 ociw32.dll
06/28/2013  03:39 AM            79,840 ociw32.sym
06/26/2013  04:38 AM         3,389,454 ojdbc6.jar
06/28/2013  03:33 AM            67,072 oramysql12.dll
06/28/2013  03:33 AM            32,472 oramysql12.sym
06/25/2013  12:30 PM         4,736,000 orannzsbb12.dll
06/25/2013  12:30 PM           859,960 orannzsbb12.sym
06/28/2013  03:13 AM         1,095,680 oraocci12.dll
06/28/2013  04:04 AM           842,704 oraocci12.sym
06/28/2013  03:26 AM         1,121,792 oraocci12d.dll
06/28/2013  04:04 AM           944,272 oraocci12d.sym
06/28/2013  04:03 AM       161,174,528 oraociei12.dll
06/28/2013  04:04 AM        10,604,136 oraociei12.sym
06/25/2013  08:25 AM           207,872 oraons.dll
06/28/2013  04:00 AM           310,272 orasql12.dll
06/28/2013  04:00 AM            53,712 orasql12.sym
06/25/2013  04:36 AM         1,559,040 Orasqlplusic12.dll
06/25/2013  04:36 AM           946,176 sqlplus.exe
06/28/2013  04:05 AM           150,856 sqlplus.sym
06/28/2013  04:05 AM               571 SQLPLUS_README
08/03/2014  07:32 PM               187 tnsnames.ora
06/28/2013  04:04 AM            40,448 uidrvci.exe
06/28/2013  04:04 AM            19,672 uidrvci.sym
08/03/2014  07:08 PM    <DIR>          vc10
08/03/2014  07:08 PM    <DIR>          vc11
06/28/2013  03:47 AM            71,231 xstreams.jar
              34 File(s)    190,305,824 bytes
4 Dir(s) 28,239,732,736 bytes free - Use any text editor to create a file called tnsnames.ora containing an entry that describes an existing database. The following sample describes the database that you saw in Chapter 1; the Oracle listener is listening on port 1521. Save the file to the directory that you used in step 2:
$ type tnsnames.ora
orcl12c =
  (description =
    (address = (protocol = tcp)(host = 192.168.56.101)(PORT = 1521))
    (connect_data =
      (server = dedicated)
      (service:name = orcl)
    )
) - Log in to your VM, and switch to the root account using the su - command; the password is oracle. Modify the /etc/sysconfig/iptables file to open port 1521 on the VM. You can either edit the file directly or use the sed command as shown in the following example. The extra line that you need is shown in boldface—it is similar to the line for port 22, the ssh port:
[oracle@localhost ~]$ su -
Password:

[root@localhost ~]# cat /etc/sysconfig/iptables
# Generated by iptables-save v1.4.7 on Sun Aug  3 22:31:09 2014
*filter
:INPUT ACCEPT [0:0]
:FORWARD ACCEPT [0:0]
:OUTPUT ACCEPT [0:0]
-A INPUT -m state --state RELATED,ESTABLISHED -j ACCEPT
-A INPUT -p icmp -j ACCEPT
-A INPUT -i lo -j ACCEPT
-A INPUT -p tcp -m state --state NEW -m tcp --dport 22 -j ACCEPT
-A INPUT -j REJECT --reject-with icmp-host-prohibited
-A FORWARD -j REJECT --reject-with icmp-host-prohibited
COMMIT
# Completed on Sun Aug  3 22:31:09 2014

[root@localhost ~]# sed -i ’/dport 22/a-A INPUT -p tcp -m state --state
NEW -m tcp --dport 1521 -j ACCEPT’ /etc/sysconfig/iptables

[root@localhost ~]# cat /etc/sysconfig/iptables
# Generated by iptables-save v1.4.7 on Sun Aug  3 22:31:09 2014
*filter
:INPUT ACCEPT [0:0]
:FORWARD ACCEPT [0:0]
:OUTPUT ACCEPT [0:0]
-A INPUT -m state --state RELATED,ESTABLISHED -j ACCEPT
-A INPUT -p icmp -j ACCEPT
-A INPUT -i lo -j ACCEPT
-A INPUT -p tcp -m state --state NEW -m tcp --dport 22 -j ACCEPT
-A INPUT -p tcp -m state --state NEW -m tcp --dport 1521 -j ACCEPT
-A INPUT -j REJECT --reject-with icmp-host-prohibited
-A FORWARD -j REJECT --reject-with icmp-host-prohibited
COMMIT
# Completed on Sun Aug  3 22:31:09 2014

[root@localhost ~]# /etc/init.d/iptables restart
iptables: Setting chains to policy ACCEPT: filter          [  OK  ]
iptables: Flushing firewall rules:                         [  OK  ]
iptables: Unloading modules:                               [  OK  ]
iptables: Applying firewall rules: [ OK ] - Switch back to your desktop or laptop, and define a variable called TNS_ADMIN to tell Oracle where you have placed the tnsnames.ora file—typically in the same location as the Instant Client software. You’re ready to connect to the targeted database using the sqlplus program, as shown here:
$ cd "C:UsersiggyDesktopIggyDownloadsinstantclient_12_1"

$ set TNS_ADMIN="C:UsersiggyDesktopIggyDownloadsinstantclient_12_1"

$ type tnsnames.ora

orcl12c =
  (description =
    (address = (protocol = tcp)(host = 192.168.56.101)(PORT = 1521))
    (connect_data =
      (server = dedicated)
      (service:name = pdb1)
    )
  )

$ sqlplus hr/oracle@orcl12c

SQL*Plus: Release 12.1.0.1.0 Production on Sun Aug 3 21:44:34 2014

Copyright (c) 1982, 2013, Oracle.  All rights reserved.

ERROR:
ORA-28002: the password will expire within 7 days

Last Successful login time: Sun Aug 03 2014 21:16:51 -07:00

Connected to:
Oracle Database 12c Enterprise Edition Release 12.1.0.1.0 - 64bit Production
With the Partitioning, OLAP, Advanced Analytics and Real Application Testing options

SQL> select count(*) from employees;

  COUNT(*)
----------
       107

SQL> exit
Disconnected from Oracle Database 12c Enterprise Edition Release 12.1.0.1.0 - 64bit Production
With the Partitioning, OLAP, Advanced Analytics and Real Application Testing options
SQL Developer
Another form of client installation that you have already seen is SQL Developer—a Java-based GUI tool that is useful to application developers as well as database administrators. It is a client installation in its own right and does not depend on other client software such as Instant Client.
Installing SQL Developer is painless:
- Use your OTN account to download the necessary zipped files from Oracle Technology Network, and unzip the contents into a directory of your choice. Note that SQL Developer needs Java to operate, and the first invocation of the tool asks you for the location of Java. You have the option of downloading Java along with SQL Developer, but most people don’t need to do so because they already have a Java installation.
- Click the sqldeveloper.exe program, and provide the details of the target database, as shown in Figure 5-1. Click Connect.
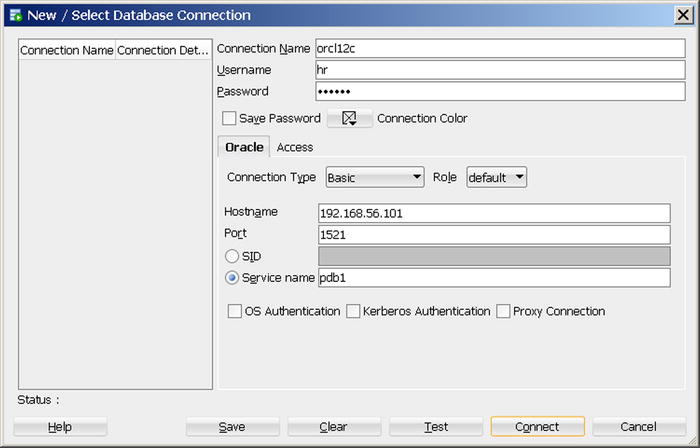
Figure 5-1. Connecting to a database using SQL Developer
- As illustrated in Figure 5-2, you can browse the database by using the navigation panel at left on the SQL Developer screen or submit SQL commands from the SQL worksheet.
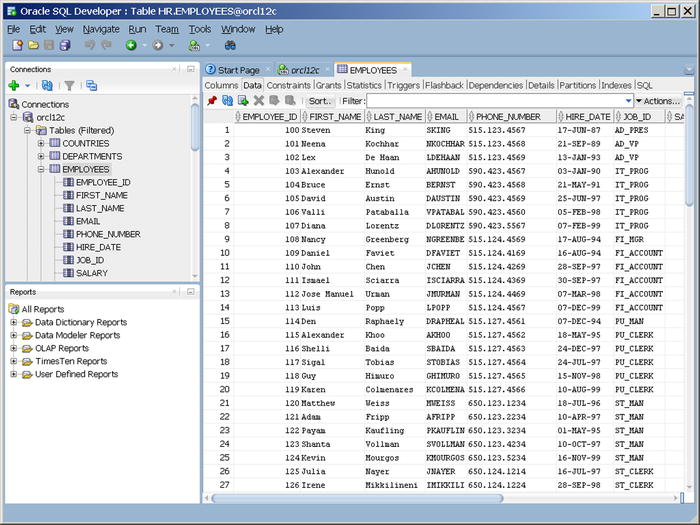
Figure 5-2. Browsing a database and submitting SQL commands using SQL Developer
A GUI tool such as SQL Developer is much easier to use than a command-line tool such as SQL*Plus, but it cannot be used in conjunction with batch programs.
Server Installations
A server installation refers to the software that needs to be installed on the host computer of a database. If you’re not using an advanced Oracle architecture such as RAC or Automatic Storage Management (ASM), creating a server installation is a fairly simple task. Let’s demonstrate using your VM.
First you have to download the zip file containing the software from OTN and unzip it into a staging directory. You’ll use the Firefox browser because it is already installed in the VM. However, you get “Server not found” errors because the network interface has not been started on the VM; you have to fix this first. Switch to the root account using the su - command; the password is oracle. Start the network interface using the ifconfig eth0 up command followed by dhclient eth0. Confirm that interface has been started using the command ping -c 1 www.oracle.com:
[oracle@localhost ~]$ su -
Password:
[root@localhost ~]# ifconfig eth0 up
[root@localhost ~]# dhclient eth0
[root@localhost ~]# ping -c 1 www.oracle.com
PING e7075.x.akamaiedge.net (23.7.198.140) 56(84) bytes of data.
64 bytes from a23-7-198-140.deploy.static.akamaitechnologies.com
(23.7.198.140): icmp_seq=1 ttl=57 time=30.0 ms

--- e7075.x.akamaiedge.net ping statistics ---
1 packets transmitted, 1 received, 0% packet loss, time 104ms
rtt min/avg/max/mdev = 30.093/30.093/30.093/0.000 ms
STARTING THE NETWORK INTERFACE AUTOMATICALLY
If you want the network interface to be started automatically when the VM is powered on, you have to change the value of ONBOOT from no to yes in the file /etc/sysconfig/network-scripts/ifcfg-eth0.
You’re now ready to download and install the Oracle software from the Oracle web site:
- Change the Firefox download location to Always Ask Me Where to Save Files (click Edit and then click Preferences to bring up the Firefox Preferences panel; the Downloads setting is in the General tab).
- Go to www.oracle.com, and find your way to the Oracle Database 12c download page (www.oracle.com/technetwork/database/enterprise-edition/downloads/index.html at the time of writing).
- Click Accept License Agreement, and then download the two zip files containing the software for the Linux x86-64 operating system (File 1 and File 2). You are prompted for your OTN username and password; provide the same username and password that you used in Chapter 1 to download the VM. Save both files to the /tmp directory, because you want to conserve space in the other filesystems. The files are very large (2.3GB at the time of writing), so they may take a long time to download.
- When you are done downloading the files, go to the /tmp directory and unzip them:
unzip linuxamd64_12c_database_1of2.zip
unzip linuxamd64_12c_database_2of2.zip - Unzipping the files creates a directory called database. Switch to that directory using the command cd /tmp/database, and then invoke the runInstaller script using the command ./runInstaller. Doing so starts Oracle Universal Installer (OUI), as shown in Figure 5-3.
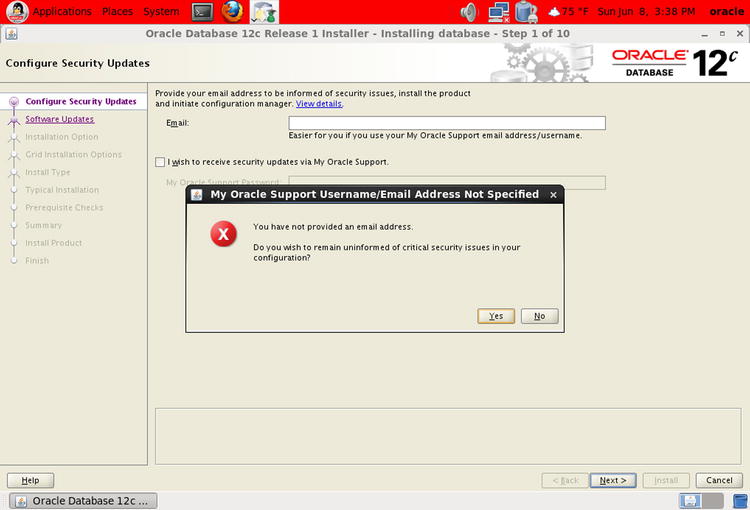
Figure 5-3. OUI: step 1 of 10
- Leave the Email field blank, and uncheck I Wish to Receive Security Updates via My Oracle Support. Click Next.
- A prompt appears with the message “You have not provided an email address. Do you wish to remain uninformed of critical security issues in your configuration?” Click Yes to go to the screen shown in Figure 5-4.
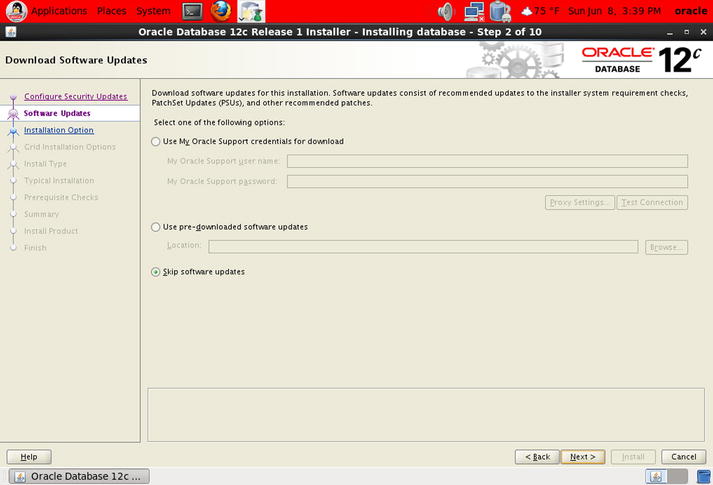
Figure 5-4. OUI: step 2 of 10
- Software updates may be available. However, you need to have purchased an Oracle license in order to download them. Choose Skip Software Updates, and then click Next to go to the screen shown in Figure 5-5.
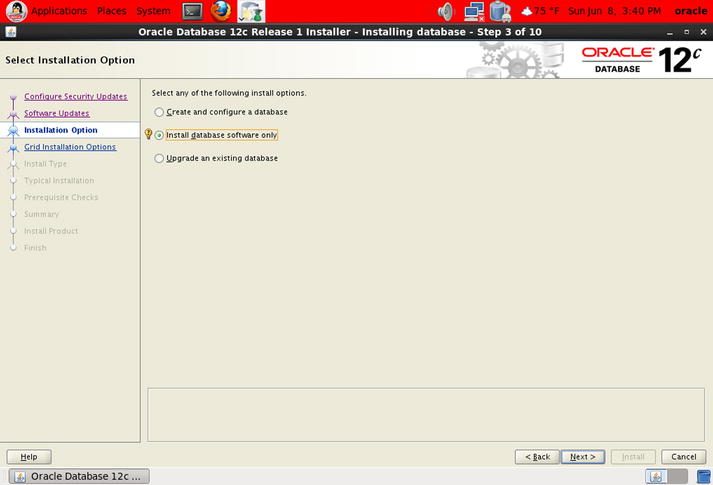
Figure 5-5. OUI: step 3 of 10
- Choose Install Database Software Only, and click Next to go to the screen shown in Figure 5-6.

Figure 5-6. OUI: step 4 of 10
- Choose Single Instance Database Installation, and click Next to go to the screen shown in Figure 5-7.
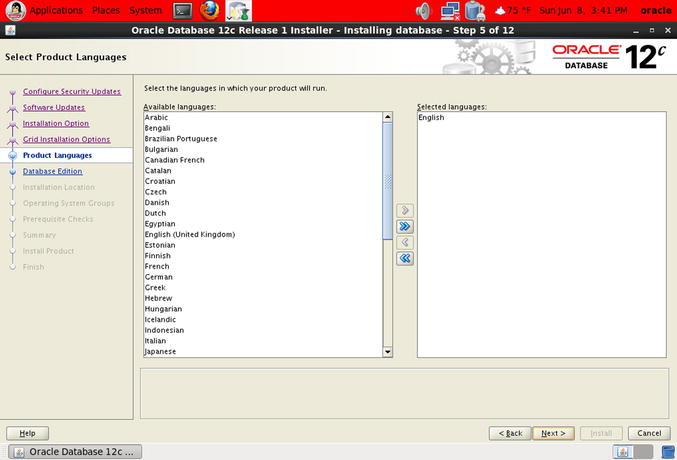
Figure 5-7. OUI: step 5 of 12
- You are presented with a list of languages. Click Next to go to the screen shown in Figure 5-8.
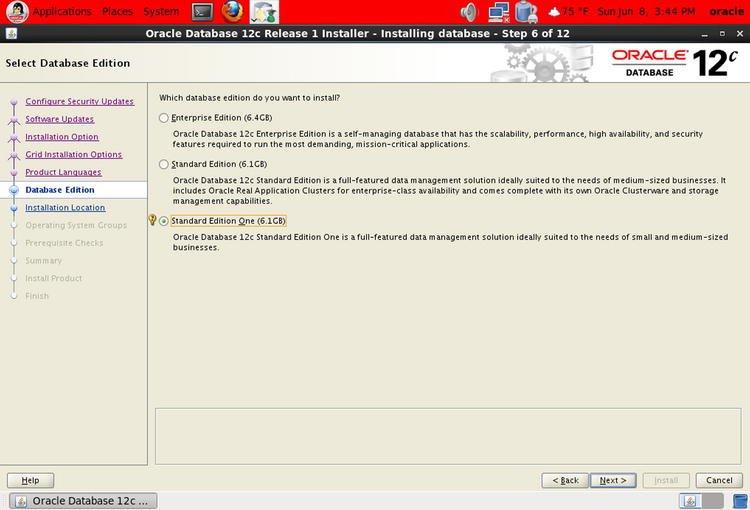
Figure 5-8. OUI: step 6 of 12
- You are presented with a choice of Enterprise Edition, Standard Edition, or Standard Edition One. Choose Standard Edition, and click Next to go to the screen shown in Figure 5-9.
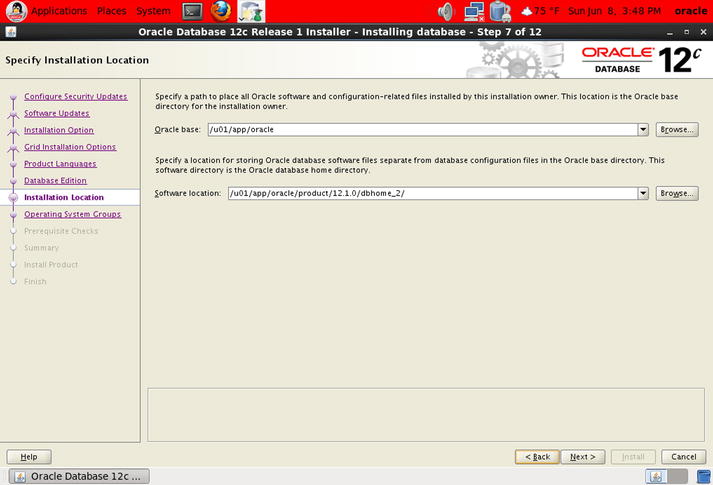
Figure 5-9. OUI: step 7 of 12
- Change the last component of the Software Location path from dbhome_1 to dbhome_2. Click Next to go to the screen shown in Figure 5-10.
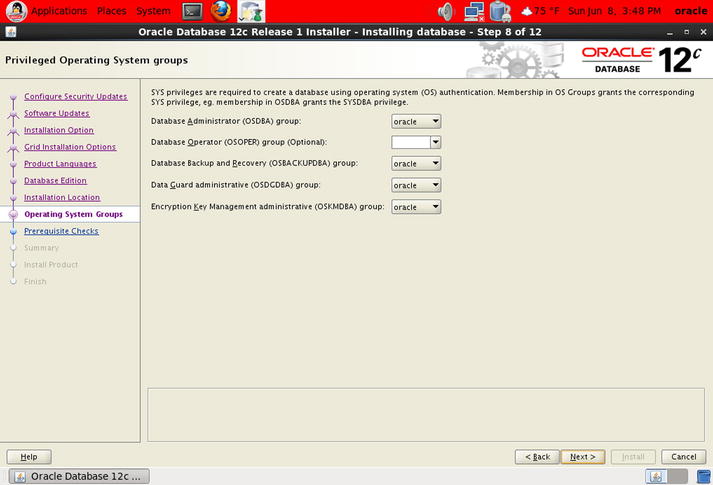
Figure 5-10. OUI: step 8 of 12
- You are asked to designated OS groups for different categories of database administrators. In this case, the defaults will suffice. Click Next to go to the screen shown in Figure 5-11.
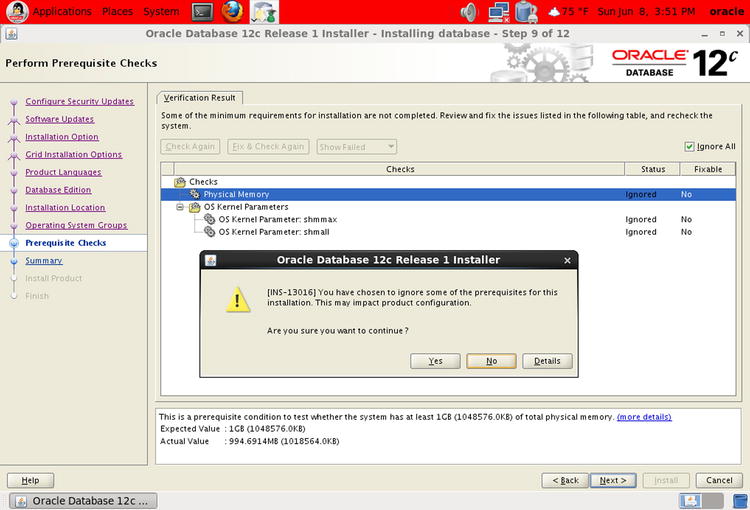
Figure 5-11. OUI: step 9 of 12
- Oracle performs prerequisite checks. You can ignore the warnings: check Ignore All, and then click Next. The installer asks for confirmation that you wish to ignore the warnings. Click Next to go to the screen shown in Figure 5-12.
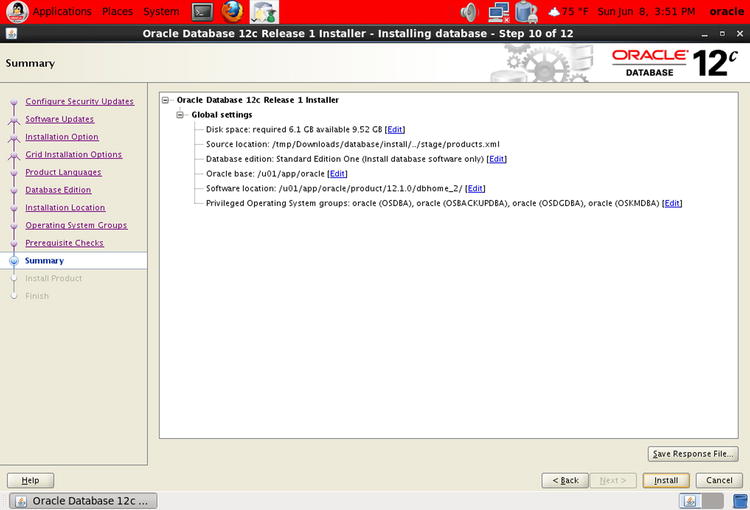
Figure 5-12. OUI: step 10 of 12
- The installer displays a summary of your choices. Click Install, and the installer begins installing the software. A progress bar is displayed; note that the installation may take a long time.
- When the installation is complete, OUI asks you to execute a script called root.sh, as shown in Figure 5-13. Open a terminal window, switch to the root account, and execute the script as follows:
[oracle@localhost ~]$ su -
Password:
[root@localhost ~]# /u01/app/oracle/product/12.1.0/dbhome_2/root.sh
Performing root user operation for Oracle 12c

The following environment variables are set as:
    ORACLE_OWNER= oracle
    ORACLE_HOME=  /u01/app/oracle/product/12.1.0/dbhome_2

Enter the full pathname of the local bin directory: [/usr/local/bin]:
The contents of "dbhome" have not changed. No need to overwrite.
The contents of "oraenv" have not changed. No need to overwrite.
The contents of "coraenv" have not changed. No need to overwrite.

Entries will be added to the /etc/oratab file as needed by
Database Configuration Assistant when a database is created
Finished running generic part of root script.
Now product-specific root actions will be performed.
[root@localhost ~]# exit
logout
[oracle@localhost ~]$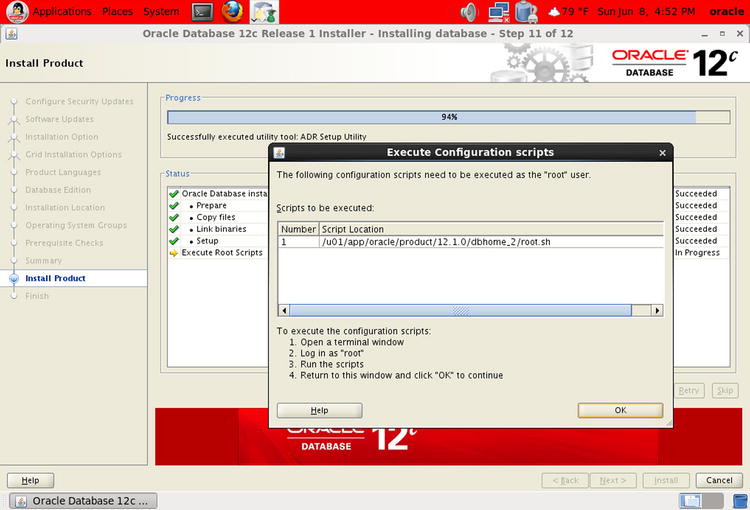
Figure 5-13. OUI: step 11 of 12
- Go back to the installer window, and click OK to go to the screen shown in Figure 5-14.
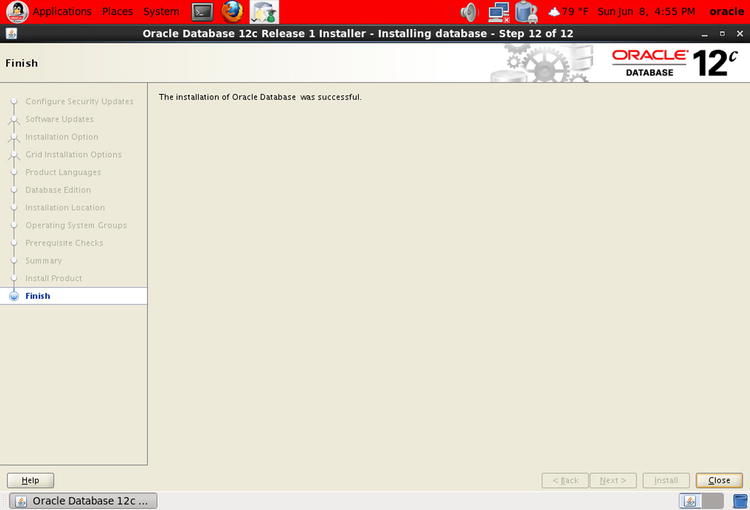
Figure 5-14. OUI: step 12 of 12
- Oracle displays a success message. Click Close to terminate OUI.
Oracle Database Examples
Oracle provides examples and demos that you can install for learning purposes. The steps are as follows:
- Download the zip file containing the examples from OTN, and unzip it into a staging directory.
- Navigate to the staging directory, and click setup.exe to start OUI. The installer displays a welcome screen. Click Next.
- Specify the Oracle Home into which the examples should be installed. Click Next.
- OUI checks that all prerequisites are satisfied. Click Next.
- OUI displays a summary screen. Click Install.
- OUI begins installing the examples and demos. When the installation is complete, OUI displays a success message. Click Exit.
Summary
Here are some of the key points touched on in this chapter:
- Oracle makes its software and its reference manuals available for download without any artificial restrictions such as license keys and limited trials. Oracle’s motto is “free to download, free to learn, unlimited evaluation time.” All you need is an OTN account, available free of charge at www.oracle.com/technology/index.html.
- A client installation refers to the software that needs to be installed on every machine from which a connection to the database is initiated. This could be a user’s laptop or an application server.
- Oracle provides the most essential software in a bundle called an Instant Client; you simply copy a few files to a directory of your choice.
- SQL Developer is a Java-based GUI tool that is useful to application developers and database administrators. It is a client installation in its own right and does not depend on other client software such as the Instant Client.
- A server installation refers to the software that needs to be installed on the host computer of a database.