
CHAPTER 6
![]()
Database Creation
Who verily knows and who can here declare it, whence it was born and whence comes this creation?
The Gods are later than this world’s production. Who knows then whence it first came into being?
He, the first origin of this creation, whether he formed it all or did not form it,
Whose eye controls this world in highest heaven, he verily knows it, or perhaps he knows not.
—The Hymns of the Rigveda by Ralph T. H. Griffith (E. J. Lazarus and Co., Benares, 1897)
Oracle makes the process of creating a database as easy as pie—you can create a database from scratch in a few minutes to an hour. Mogens Norgaard, the ex-CEO of a Danish company called Miracle A/S, recorded one of his employees, Morten Egan, clad in a straitjacket and creating a database in about 30 minutes by typing on his keyboard with his nose!
The reason for this demonstration was that a service provider had quoted 50 hours of labor to create a database. When viewers of the video protested that Egan had only created a very simple database, Norgaard recorded a video of Egan creating a more complex database in less than an hour, once again clad in a straitjacket and typing on the keyboard with his nose. In the same video, a 14-year-old intern named Daniel Christensen demonstrated that he, too, was capable of creating an Oracle database; he did it in 26 minutes.
To find both videos, search the YouTube catalog for the phrase Unconventional Oracle Installation. Here are the opening remarks from the second video:
Norgaard: Mr. Egan, we’ve had some flak from our first “Nosejob” video. People say it’s not a very serious way to show what [the service provider] was actually asked to do. Is that correct?
Egan: No, that is not correct. The thing that [the service provider] was asked to do was to install the database. The job of actually finding out how the database should be installed, what options should be in there, what parameters should be set, was done by me beforehand, and that took a month. So the paper that [the service provider] got to do the job was: install the database, change these two parameters, click Finish.
I had made an entire list of what to do; so it was basically a next-next-next installation type and I think the criticism is based on that. Well, the difficult thing is not to install the database, and that’s correct; it’s not difficult to install the database. The thing that takes time is the precursor thing where you think about how it should be set up and after you install the database where you say: OK, how do I design this thing for the application?
The only thing that [the service provider] was asked to do was the tiny part of installing the database because we did not have access to the machines, the only reason why [the service provider] was asked to do this. And I gave them a piece of paper with basically eight steps and listed the two parameters that need to be changed. And that was it.
In other words, the work of actually creating a database is trivial compared to the planning, approval, and hardware provisioning that precede it. In this chapter, you learn the “Next-Next-Next; click Finish” method of creating a database.
First you have to spend a minute creating a listener. A minute is all it takes!
![]() Tip To make it possible to repeat the database procedure multiple times, make sure you have taken a snapshot of the VM before creating a database. You can then restore the snapshot at will to repeat the procedure if you so desire.
Tip To make it possible to repeat the database procedure multiple times, make sure you have taken a snapshot of the VM before creating a database. You can then restore the snapshot at will to repeat the procedure if you so desire.
The graphical user interfaces demonstrated in this chapter depend on the X Window System. If you are creating a database on a server other than your VM, ask the system administrator for instructions for running graphical user interfaces.
Creating and Configuring a Listener
The Net Configuration Assistant (NetCA) is used to create a listener. To use it to create and configure a listener, follow these steps:
- The NetCA program (netca) is located in the $ORACLE_HOME/bin directory. In your VM, change the value of the ORACLE_HOME environment variable from /u01/app/oracle/product/12.1.0/dbhome_1/ to /u01/app/oracle/product/12.1.0/dbhome_2/, and start NetCA:
[oracle@localhost ~]$ echo $ORACLE_HOME
/u01/app/oracle/product/12.1.0/dbhome_1/
[oracle@localhost ~]$ export ORACLE_HOME=/u01/app/oracle/product/12.1.0/dbhome_2/
[oracle@localhost ~]$ $ORACLE_HOME/bin/netca
The opening screen shown in Figure 6-1 is displayed.

Figure 6-1. NetCA opening screen
- Select Listener Configuration, and click Next. The screen in Figure 6-2 is displayed.
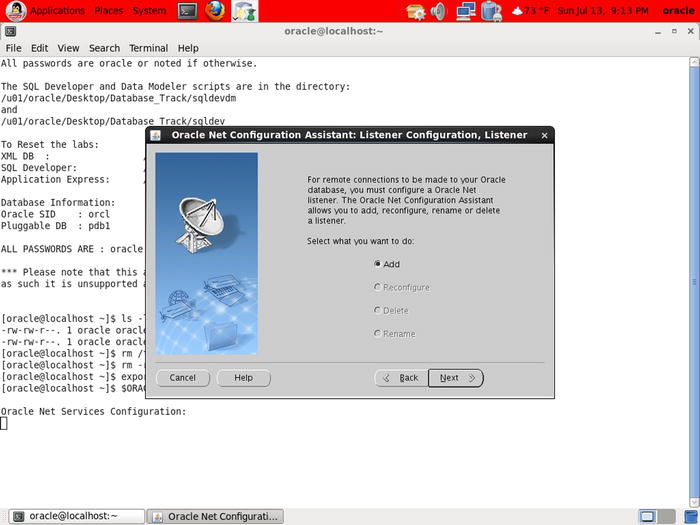
Figure 6-2. NetCA step 2
- Select Add, and click Next. The screen in Figure 6-3 is displayed.
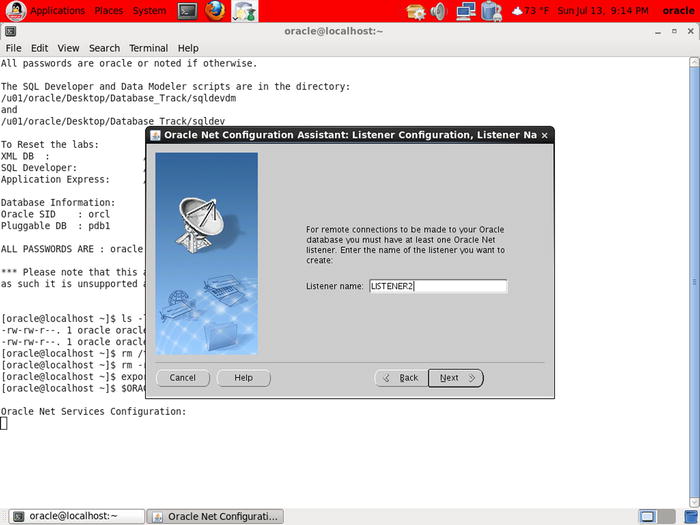
Figure 6-3. NetCA step 3
- Type LISTENER2 in the Listener Name field, and click Next. The screen in Figure 6-4 is displayed.

Figure 6-4. NetCA step 4
- Retain the default selection of protocols, and click Next. The screen in Figure 6-5 is displayed.
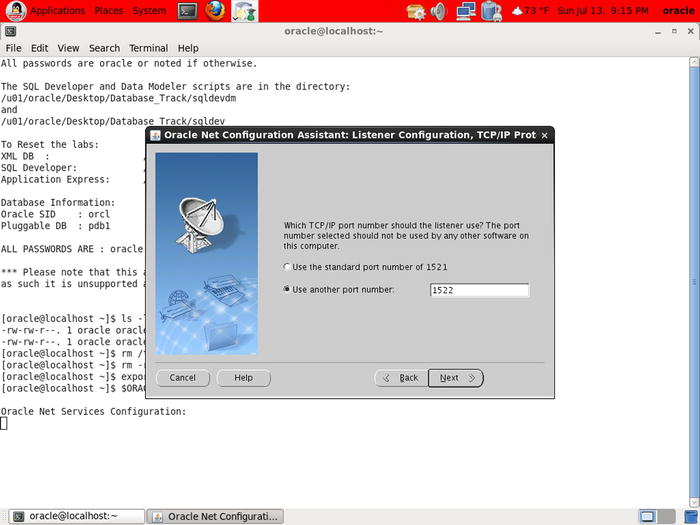
Figure 6-5. NetCA step 5
- You can’t use port 1521 because it is already used by the listener in the first ORACLE_HOME. Type 1522 in the Use Another Port Number field, and click Next. The screen in Figure 6-6 is displayed.
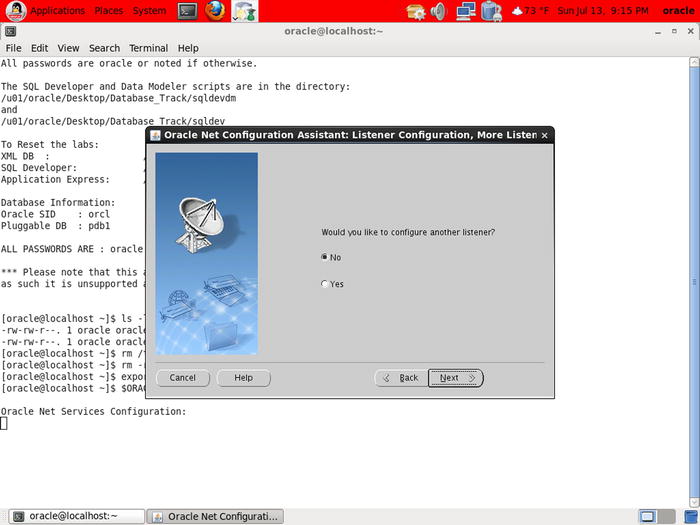
Figure 6-6. NetCA step 6
- You wish to create only a single listener. Keep No selected, and click Next. The screen in Figure 6-7 is displayed.
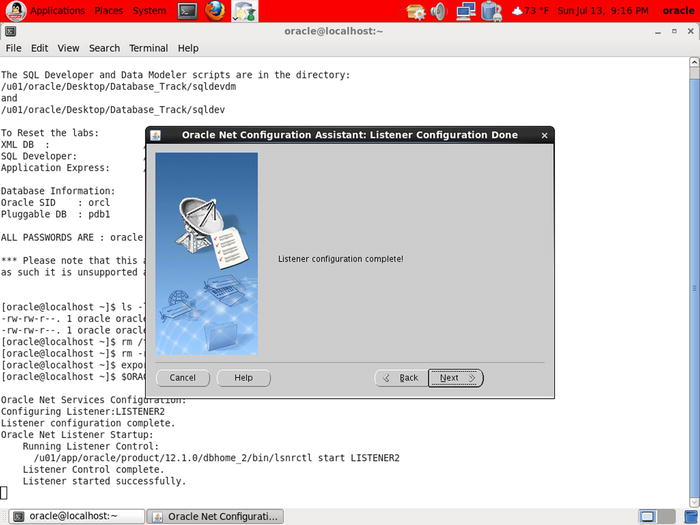
Figure 6-7. NetCA final screen
- Oracle displays a success message. Click Next. This takes you back to the starting screen (Figure 6-1), where you can click Cancel to exit NetCA.
That was easy, wasn’t it?
Creating and Configuring a Database
The Database Configuration Assistant (DBCA) DBCA streamlines the process of creating and configuring a database and ensures that no steps are forgotten. The use of database templates further speeds up and standardizes the database-creation process. The process is described in the following sections.
The DBCA program dbca is located in the $ORACLE_HOME/bin directory. You have already changed the value of the ORACLE_HOME environment variables to /u01/app/oracle/product/12.1.0/dbhome_2/, so go ahead and start the DBCA:
[oracle@localhost ~]$ $ORACLE_HOME/bin/dbca
As the opening screen in Figure 6-8 indicates, DBCA can be used to create a database, reconfigure an existing database, delete a database, or manage database templates. A database template is a copy of all the settings that were used to create a previous database. I recommend that you save the settings of every database you create; this makes it easy to create another database with the same settings. Another good idea is to create an organizational standard and use it for all your databases. For convenience, Oracle provides three database templates, but their configurations are not suitable for production databases—for example, redo logs are not mirrored—so some customization of the Oracle provided templates is usually necessary.
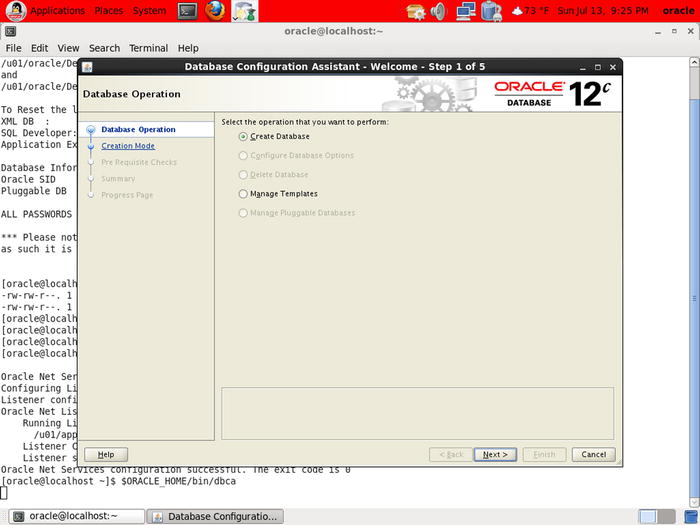
Figure 6-8. DBCA opening screen
To create a database with DBCA, continue with these steps:
- Select Create Database on the DBCA Welcome screen, and click Next to go to the next step, shown in Figure 6-9.
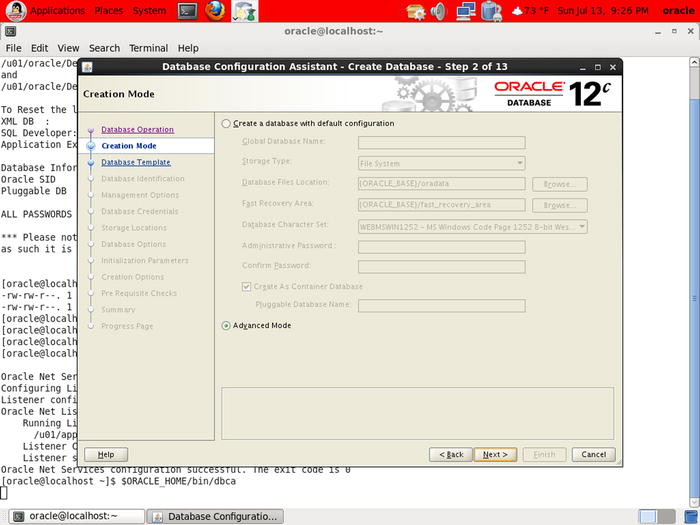
Figure 6-9. DBCA step 2
 Tip Every DBCA screen sports a Help button that you can click to display information on how to use the screen.
 - The screen in Figure 6-9 gives you the option to short-circuit the process by specifying a few options and going directly to the Finish stage. I don’t recommend choosing this option, because the defaults are unsatisfactory; for example, the online redo logs are not mirrored. Select Advanced Mode, and click Next to go to the next step, shown in Figure 6-10.
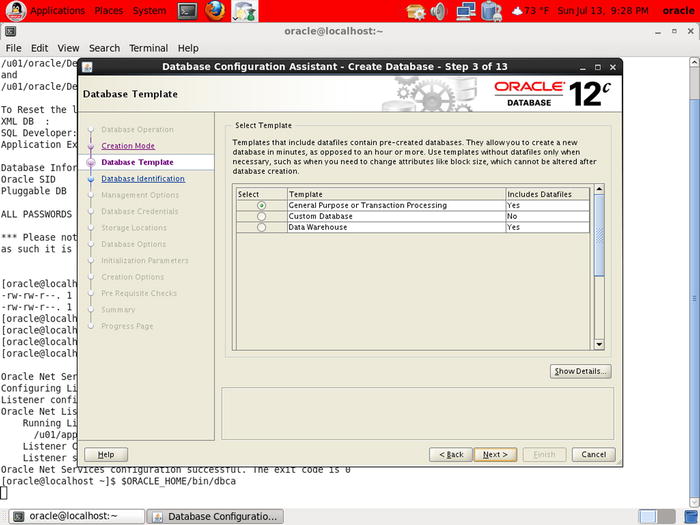
Figure 6-10. DBCA step 3
This screen lists the available templates containing initialization parameters and other choices you need to make when creating a database. Using templates is a good practice because standardization usually improves quality and maintainability.
Oracle provides three default templates: General Purpose or Transaction Processing, Custom Database, and Data Warehouse. It is always tempting to choose the general-purpose template, because it is first in the list and the name indicates that it will suit most purposes. However, note that this template—along with the data warehouse template—is pre-seeded; that is, it includes pre-created data files. Pre-seeded templates are less customizable but allow you to create databases very quickly. But as you’ll see in Table 6-1 later in this chapter, the pre-created data files are loaded with optional software that you may not need. In the Exercises section, you are asked to create your own pre-seeded template with just the software you need and with certain desirable settings.
- Choose the General Purpose or Transaction Processing template. Click the Show Details button, and examine the details of the template; in the screens that follow, you are given the opportunity to modify some of the settings listed in the template. Click Next to go to the next step, shown in Figure 6-11.
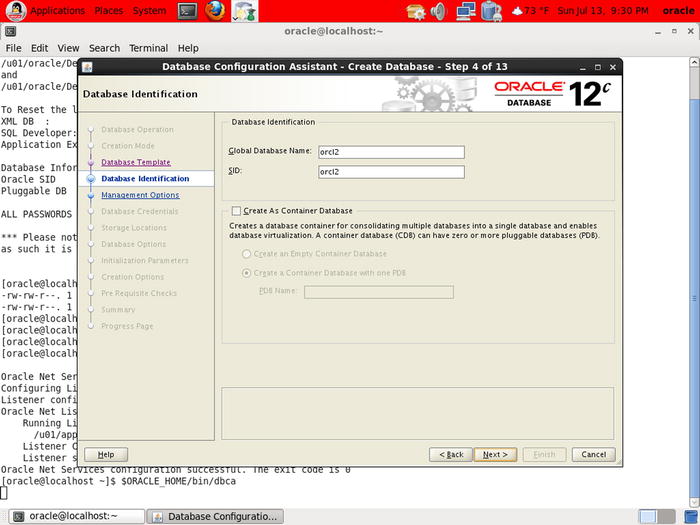
Figure 6-11. DBCA step 4
Here you choose a database name and an instance name (SID) . A database is a group of files on disk, whereas an instance is a group of operating system processes that provide access to a database. Specify orcl2 as the database name as well as the instance name. You next have to decide whether to use the new container architecture, discussed in Chapter 3.
- For the purpose of this exercise, stick with the traditional architecture. Leave the Create As Container Database option unchecked, and click Next to go to the next screen, shown in Figure 6-12.
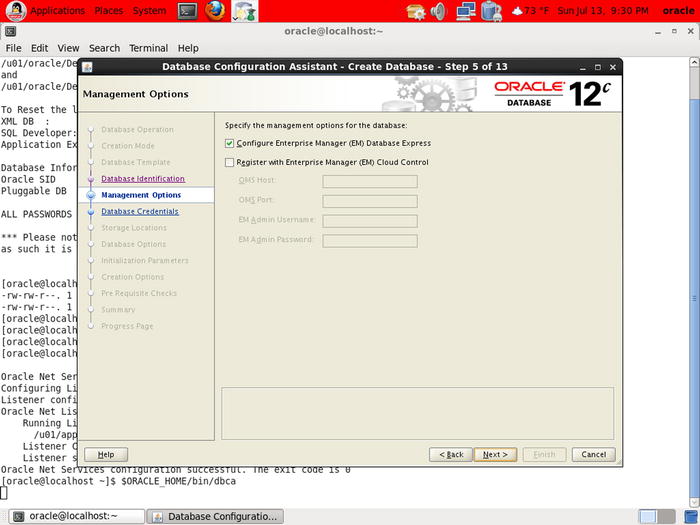
Figure 6-12. DBCA step 5
On this screen, you decide which flavors of Enterprise Manager you would like to use. You can configure a standalone component called Enterprise Manager Database Express (EM Express), and you can also optionally register the new database with an enterprise-wide monitoring framework called Enterprise Manager Cloud Control (EM Cloud Control). EM Express is a very lightweight browser-based tool suitable for common database administration tasks. EM Cloud Control is a sophisticated framework for lights-out database monitoring and backup (among other things).
- Select Configure Enterprise Manager (EM) Database Express, and then click Next to go to the next screen, shown in Figure 6-13.

Figure 6-13. DBCA step 6
You need to choose passwords for the four most important administrative accounts in the database: SYS, SYSTEM, DBSNMP, and SYSMAN. The SYS account owns the core tables in the Oracle data dictionary, whereas the SYSTEM account owns administrative views and other components of Oracle’s management infrastructure. The DBSNMP and SYSMAN views are used by Enterprise Manager. There are a number of other administrative accounts, but they are all locked out when the database is created and should be enabled on an as-needed basis only. You can elect to use the same password for all four accounts. Use a password that meets the complexity requirements of your organization’s security policy but is fairly easy to remember.
- Select Use the Same Administrative Password for All Accounts, and specify a password. Then click Next to go to the next step, shown in Figure 6-14.
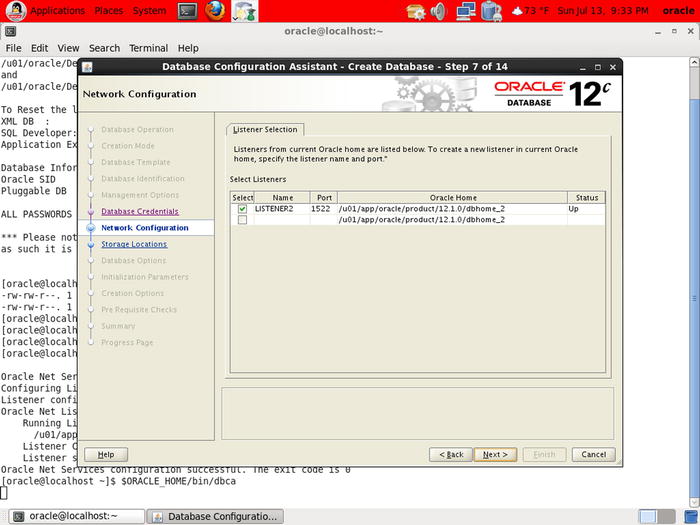
Figure 6-14. DBCA step 7
- Select LISTENER2 to specify which listener the database should register with. Then click Next to go to the next screen, shown in Figure 6-15.
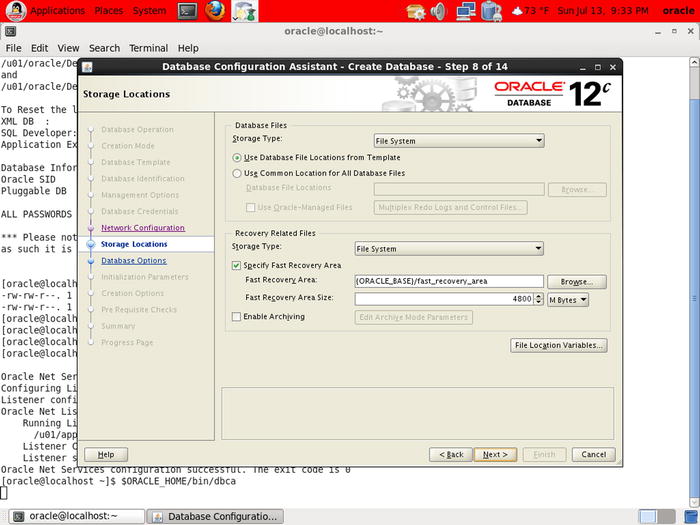
Figure 6-15. DBCA step 8
Next you make decisions about storage. You can use a traditional file system for file storage or use Automatic Storage Management (ASM), an advanced Oracle technology for disk management. A number of data files are automatically created by DBCA; you can let DBCA decide their names and locations, or you can specify a name and location for each data file. If you let Oracle choose, it constructs names and locations from the values of variables such as ORACLE_BASE, ORACLE_HOME, DB_NAME, and SID. Click the File Location Variables button to review these variables’ values; ORACLE_HOME is the location of the Oracle software, ORACLE_BASE is the parent directory of ORACLE_HOME, DB_NAME is the name of the database, and SID is the name of the instance. If you wish, you may alter the names and locations of individual files later. One of the options you can choose on this screen is Oracle-Managed Files; this option gives Oracle control over the naming of data files and their properties.
You must also specify whether to use a common area called the fast recovery area to store backups created with Recovery Manager (RMAN) and archived redo logs; this is the recommended practice. To increase safety, you should specify a location that is on a different file system than the one containing the database. You must also specify the maximum amount of space that Oracle may use for the purpose; this value depends on the size of the database, the backup scheme, and the expected volume of archived redo logs. The default value is not adequate, even for a starter database.
- Change the Fast Recovery Area Size value to 8192 MB (8 GB) for now; you can adjust it at a later date if it does not meet your needs.
On this screen, you also specify whether you would like redo logs to be archived; this too is the recommended practice. Remember that if you do not archive redo logs, you cannot make a backup copy of the database unless you first shut it down; and, if the database ever requires recovery, you cannot recover any changes made to the database after the latest backup.
- For this exercise, select Specify Fast Recovery Area but leave Enable Archiving unselected. Then click the Next button to go to the next screen shown in Figure 6-16.
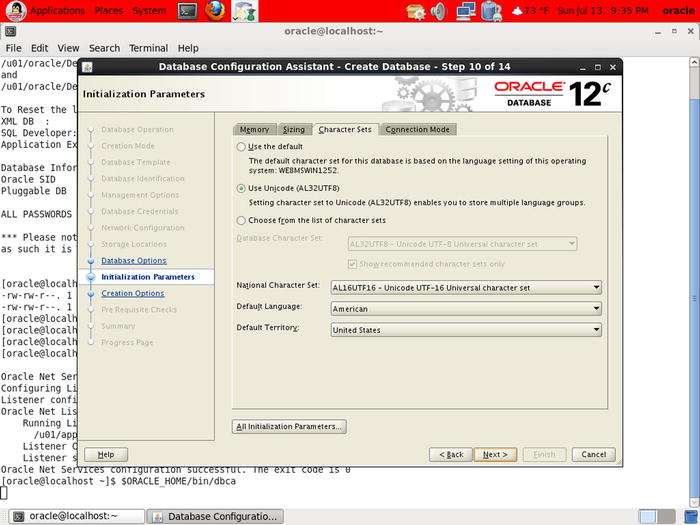
Figure 6-16. DBCA step 10
A lot of options are packed into this screen’s four tabs. In the Memory tab, you specify how much computer memory you are willing to devote to the Oracle database. The simplest option is to choose a single number and leave it to Oracle to manage it appropriately; this is called automatic memory management. Alternatively, you can explicitly specify how much memory Oracle should use for each purpose—for example, the shared pool and the buffer cache.
In the Sizing tab, you specify the maximum number of simultaneous connections to the database that can be expected and the default block size of the database. In this example, the block size is set to 8192 bytes (8KB) and cannot be changed (because the template you are using includes pre-created data files containing blocks of this size).
In the Character Sets tab, you specify character sets that accommodate the languages spoken by your users. It is common to choose Unicode (also called AL32UTF8) in order to support the maximum number of languages.
In the Connection Mode tab, you choose between dedicated server mode and shared server mode; these are discussed in Chapter 4.
You can click the All Initialization Parameters button if you would like to modify initialization parameters that are not presented on this screen.
- For this exercise, the only change you should make is to choose AL32UTF8 as the database character set in the Character Sets tab instead of the default value. Click Next to go to the next screen, shown in Figure 6-17.
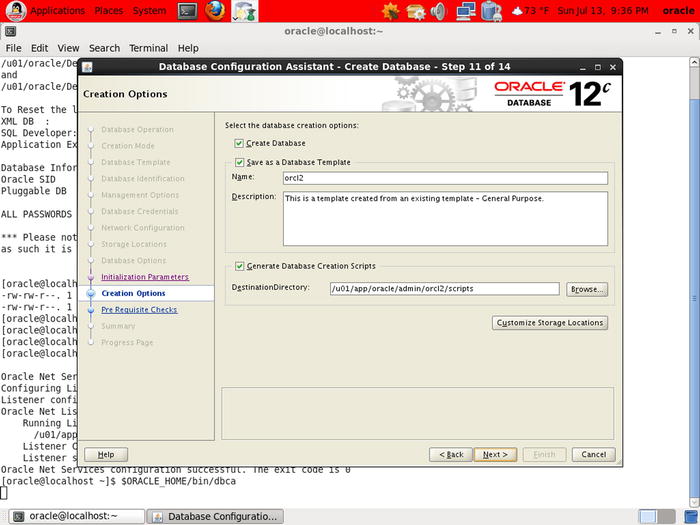
Figure 6-17. DBCA step 11
Here you can choose whether to save your work as a template and whether to generate database-creation scripts. Always save your work as a template, even if you did not make any changes to the default template. Saving your work as a template keeps a record of your work; it also allows you to create other databases using the same settings. In the interest of further documenting your work, you should also select the option that generates database-creation scripts—these are the scripts that DBCA runs behind the scenes to create the database.
- Select Create Database, Save as a Database Template, and Generate Database Creation Scripts; then click Next to go to the next step, shown in Figure 6-18.
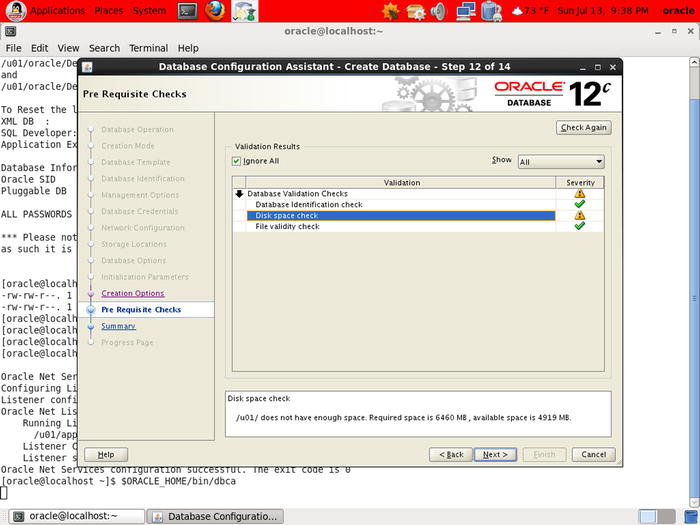
Figure 6-18. DBCA step 12
On this screen, Oracle displays the results of validity checks. One of the checks fails because the DBCA believes there is not enough disk space for the new database. You can ignore this failure because you do in fact have enough disk space.
- Select Ignore All, and then click Next to go to the next step, shown in Figure 6-19.
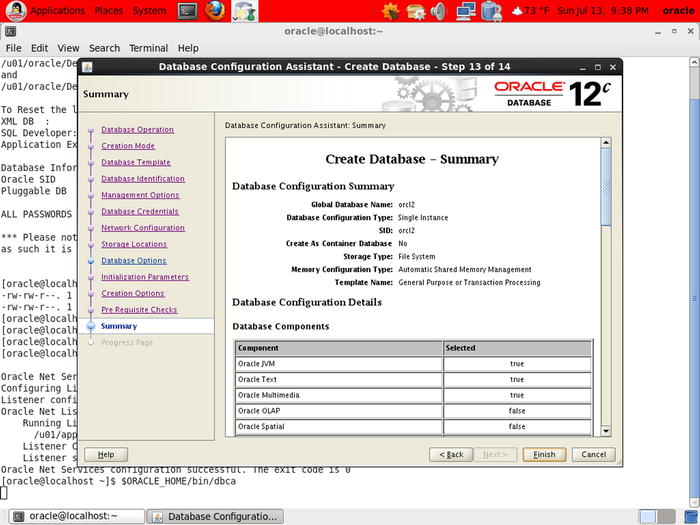
Figure 6-19. DBCA step 13
- DBCA displays a confirmation screen that lists all the options you have selected. Click Finish to begin the process of database creation. This process is particularly speedy if you use a template that includes pre-created data files. Once the database is created, DBCA displays a success message similar to the one shown in Figure 6-20. Make a note of the EM Database Express URL.
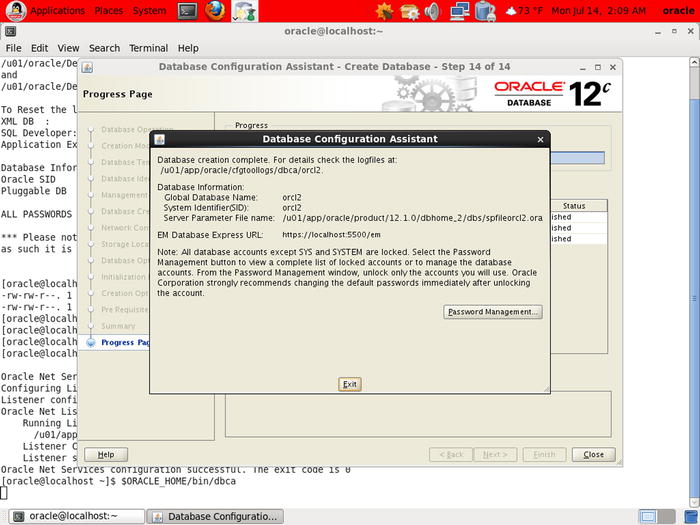
Figure 6-20. DBCA final screen
Common Options
Because you chose a template that included data files, Oracle did not allow you to pick and choose optional components for installation. Table 6-1 shows which options are installed. The option you really need is Sample Schemas, but it is not automatically installed. I leave this as an exercise for you.
Table 6-1. Common Options
Component | Selected |
|---|---|
Oracle JVM | True |
Oracle Text | True |
Oracle Multimedia | True |
Oracle OLAP | False |
Oracle Spatial | False |
Oracle Label Security | False |
Sample Schemas | False |
Oracle Application Express | True |
Oracle Database Vault | False |
Initialization Parameters
Oracle databases have hundreds of initialization parameters, most of which have default values. Table 6-2 lists the few parameters that were set by DBCA.
Table 6-2. Initialization Parameters
Name | Value |
|---|---|
audit_file_dest | {ORACLE_BASE}/admin/{DB_UNIQUE_NAME}/adump |
audit_trail | db |
compatible | 12.1.0.0.0 |
control_files | ("{ORACLE_BASE}/oradata/{DB_UNIQUE_NAME}/control01.ctl", "{ORACLE_BASE}/fast_recovery_area/{DB_UNIQUE_NAME}/control02.ctl") |
db_block_size | 8KB |
db_name | |
db_recovery_file_dest | {ORACLE_BASE}/fast_recovery_area |
db_recovery_file_dest_size | MB |
diagnostic_dest | {ORACLE_BASE} |
dispatchers | (PROTOCOL=TCP) (SERVICE={SID}XDB) |
memory_target | 250MB |
open_cursors | 300 |
processes | 300 |
remote_login_passwordfile | EXCLUSIVE |
undo_tablespace | UNDOTBS1 |
Data Files
All the data files listed in Table 6-3 were included in the template; you could have changed their names and locations if you wished to do so.
Table 6-3. Data Files
Name | Tablespace | Size (MB) |
|---|---|---|
{ORACLE_BASE}/oradata/{DB_UNIQUE_NAME}/system01.dbf | SYSTEM | 770 |
{ORACLE_BASE}/oradata/{DB_UNIQUE_NAME}/sysaux01.dbf | SYSAUX | 650 |
{ORACLE_BASE}/oradata/{DB_UNIQUE_NAME}/undotbs01.dbf | UNDOTBS1 | 25 |
{ORACLE_BASE}/oradata/{DB_UNIQUE_NAME}/users01.dbf | USERS | 5 |
{ORACLE_BASE}/oradata/{DB_UNIQUE_NAME}/temp01.dbf | TEMP | 60 |
Control Files
Table 6-4 shows the control files created by DBCA. It is conventional to triply mirror the control file because it is critical. However, at least one mirror copy should be placed in a different location for extra safety—this is not automatically performed by DBCA.
Table 6-4. Control Files
Name |
|---|
{ORACLE_BASE}/oradata/{DB_UNIQUE_NAME}/control01.ctl |
{ORACLE_BASE}/fast_recovery_area/{DB_UNIQUE_NAME}/control02.ctl |
Redo Log Groups
Table 6-5 shows the redo log groups created by DBCA. It is conventional to create at least three redo log groups; high-volume environments need even more. Mirroring the redo log files is recommended—DBCA does not do this automatically. Also, the sizes chosen by DBCA are fairly low.
Table 6-5. Redo Log Groups
Group | Size (KB) |
|---|---|
1 | 51,200 |
2 | 51,200 |
3 | 51,200 |
Basic Database Administration Tasks
The most basic database administration tasks are stopping and starting the database and the listener. First you must define the environment variables ORACLE_SID and ORACLE_HOME correctly. You do so using the oraenv program, as follows:
[oracle@localhost ~]$ source oraenv
ORACLE_SID = [orcl] ? orcl2
The Oracle base has been set to /u01/app/oracle
Stopping the Database
You typically stop the database before stopping the listener. Let’s stop the database first:
[oracle@localhost ~]$ sqlplus "/ as sysdba"

SQL*Plus: Release 12.1.0.1.0 Production on Mon Aug 4 02:59:55 2014

Copyright (c) 1982, 2013, Oracle.  All rights reserved.

Connected to:
Oracle Database 12c Release 12.1.0.1.0 - 64bit Production

SQL> shutdown immediate;
Database closed.
Database dismounted.
ORACLE instance shut down.
SQL> exit
Disconnected from Oracle Database 12c Release 12.1.0.1.0 - 64bit Production
Stopping the Listener
After stopping the database, you can stop the listener:
[oracle@localhost ~]$ lsnrctl stop listener2

LSNRCTL for Linux: Version 12.1.0.1.0 - Production on 04-AUG-2014 03:00:53

Copyright (c) 1991, 2013, Oracle.  All rights reserved.

Connecting to (DESCRIPTION=(ADDRESS=(PROTOCOL=TCP)(HOST=localhost)(PORT=1522)))
The command completed successfully
Starting the Listener
The listener is typically started before starting the database. Let’s start the listener first:
[oracle@localhost ~]$ lsnrctl start listener2

LSNRCTL for Linux: Version 12.1.0.1.0 - Production on 04-AUG-2014 03:03:44

Copyright (c) 1991, 2013, Oracle.  All rights reserved.

Starting /u01/app/oracle/product/12.1.0/dbhome_2/bin/tnslsnr: please wait...

TNSLSNR for Linux: Version 12.1.0.1.0 - Production
System parameter file is /u01/app/oracle/product/12.1.0/dbhome_2/network/admin/listener.ora
Log messages written to /u01/app/oracle/diag/tnslsnr/localhost/listener2/alert/log.xml
Listening on: (DESCRIPTION=(ADDRESS=(PROTOCOL=tcp)(HOST=localhost)(PORT=1522)))
Listening on: (DESCRIPTION=(ADDRESS=(PROTOCOL=ipc)(KEY=EXTPROC1522)))

Connecting to (DESCRIPTION=(ADDRESS=(PROTOCOL=TCP)(HOST=localhost)(PORT=1522)))
STATUS of the LISTENER
------------------------
Alias                     listener2
Version                   TNSLSNR for Linux: Version 12.1.0.1.0 - Production
Start Date                04-AUG-2014 03:03:44
Uptime                    0 days 0 hr. 0 min. 0 sec
Trace Level               off
Security                  ON: Local OS Authentication
SNMP                      OFF
Listener Parameter File   /u01/app/oracle/product/12.1.0/dbhome_2/network/admin/listener.ora
Listener Log File         /u01/app/oracle/diag/tnslsnr/localhost/listener2/alert/log.xml
Listening Endpoints Summary...
  (DESCRIPTION=(ADDRESS=(PROTOCOL=tcp)(HOST=localhost)(PORT=1522)))
  (DESCRIPTION=(ADDRESS=(PROTOCOL=ipc)(KEY=EXTPROC1522)))
The listener supports no services
The command completed successfully
Starting the Database
After starting the listener, you can start the database:
[oracle@localhost ~]$ sqlplus "/ as sysdba"

SQL*Plus: Release 12.1.0.1.0 Production on Mon Aug 4 03:03:52 2014

Copyright (c) 1982, 2013, Oracle.  All rights reserved.

Connected to an idle instance.

SQL> startup
ORACLE instance started.

Total System Global Area  438423552 bytes
Fixed Size                2289304 bytes
Variable Size              255852904 bytes
Database Buffers        176160768 bytes
Redo Buffers                4120576 bytes
Database mounted.
Database opened.
SQL> exit
Disconnected from Oracle Database 12c Release 12.1.0.1.0 - 64bit Production
Enterprise Manager Database Express
As mentioned earlier, Enterprise Manager Database Express is a lightweight browser-based tool suitable for common database administration tasks (other than stopping and starting the database or listener). You first need to open port 5500 on the VM. Switch to the root account using the su - command; the password is oracle. Modify the /etc/sysconfig/iptables file as shown next. You can either edit the file directly or use the sed command as shown. The extra line you need is shown in boldface; it is similar to the line for port 22, the ssh port:
[oracle@localhost ~]$ su -
Password:

[root@localhost ~]# cat /etc/sysconfig/iptables
# Generated by iptables-save v1.4.7 on Sun Aug  3 22:31:09 2014
*filter
:INPUT ACCEPT [0:0]
:FORWARD ACCEPT [0:0]
:OUTPUT ACCEPT [0:0]
-A INPUT -m state --state RELATED,ESTABLISHED -j ACCEPT
-A INPUT -p icmp -j ACCEPT
-A INPUT -i lo -j ACCEPT
-A INPUT -p tcp -m state --state NEW -m tcp --dport 22 -j ACCEPT
-A INPUT -p tcp -m state --state NEW -m tcp --dport 1521 -j ACCEPT
-A INPUT -j REJECT --reject-with icmp-host-prohibited
-A FORWARD -j REJECT --reject-with icmp-host-prohibited
COMMIT
# Completed on Sun Aug  3 22:31:09 2014

[root@localhost ~]# sed -i ’/dport 22/a-A INPUT -p tcp -m state --state
NEW -m tcp --dport 5500 -j ACCEPT’ /etc/sysconfig/iptables

[root@localhost ~]# cat /etc/sysconfig/iptables
# Generated by iptables-save v1.4.7 on Sun Aug  3 22:31:09 2014
*filter
:INPUT ACCEPT [0:0]
:FORWARD ACCEPT [0:0]
:OUTPUT ACCEPT [0:0]
-A INPUT -m state --state RELATED,ESTABLISHED -j ACCEPT
-A INPUT -p icmp -j ACCEPT
-A INPUT -i lo -j ACCEPT
-A INPUT -p tcp -m state --state NEW -m tcp --dport 22 -j ACCEPT
-A INPUT -p tcp -m state --state NEW -m tcp --dport 5500 -j ACCEPT
-A INPUT -p tcp -m state --state NEW -m tcp --dport 1521 -j ACCEPT
-A INPUT -j REJECT --reject-with icmp-host-prohibited
-A FORWARD -j REJECT --reject-with icmp-host-prohibited
COMMIT
# Completed on Sun Aug  3 22:31:09 2014

[root@localhost ~]# /etc/init.d/iptables restart
iptables: Setting chains to policy ACCEPT: filter          [  OK  ]
iptables: Flushing firewall rules:                         [  OK  ]
iptables: Unloading modules:                               [  OK  ]
iptables: Applying firewall rules:                         [  OK  ]
The URL was displayed by DBCA after it created the database. Replace localhost with the IP address of your VM. The screen shown in Figure 6-21 is displayed.
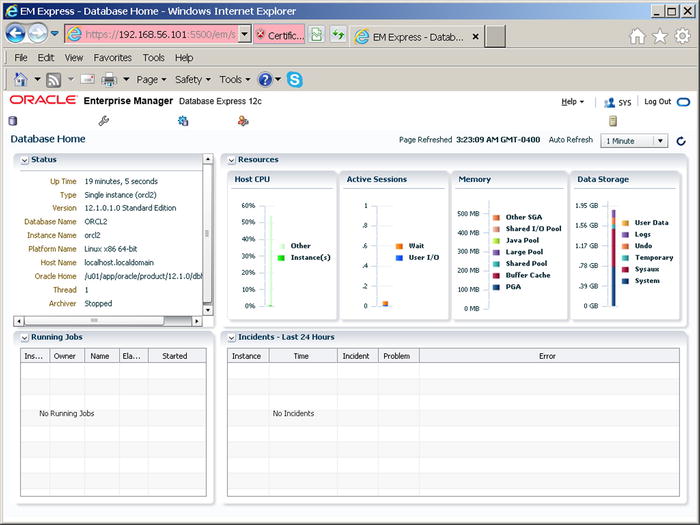
Figure 6-21. Home screen of Enterprise Manager Database Express
Summary
Here is a short summary of the concepts touched on in this chapter.
- You can use NetCA to configure a listener. You can use DBCA to create a database, reconfigure existing databases, delete a database, and manage database templates.
- A database template is a copy of all the settings used to create a previous database.
- Oracle provides three database templates: General Purpose or Transaction Processing, Custom Database, and Data Warehouse.
- Saving your work as a template allows you to review your work later; it also lets you create other databases using the same settings.